brake JEEP CHEROKEE 2015 KL / 5.G Owner's Manual
[x] Cancel search | Manufacturer: JEEP, Model Year: 2015, Model line: CHEROKEE, Model: JEEP CHEROKEE 2015 KL / 5.GPages: 244, PDF Size: 30.6 MB
Page 59 of 244
STOP/START SYSTEM — 3.2L ENGINE
The Stop/Start function is developed to reduce emissions. The system will stop the
engine automatically during a vehicle stop if the required conditions are met.
Releasing the brake pedal or pressing the accelerator pedal will automatically re-start
the engine.
Automatic Mode
The Stop/Start feature is enabled after every normal customer engine start. At that
time, the system will go into STOP/START READY and if all other conditions are met,
can go into a STOP/START AUTOSTOP ACTIVE “Autostop” mode.
To Activate The Autostop Mode, The Following Must Occur:
• The system must be in STOP/START READY state. A STOP/START READY
message will be displayed in the Electronic Vehicle Information Center (EVIC) or
Driver Information Display (DID) within the Stop/Start section. Refer to “Elec-
tronic Vehicle Information Center (EVIC)” or “Driver Information Display (DID)” in
“Understanding Your Instrument Panel” in your owner’s manual on the DVD for
further information.
• The vehicle must be completely stopped.
• The shifter must be in a forward gear and the brake pedal depressed.
The engine will shut down, the tachometer will move to the zero position and the
Stop/Start telltale will illuminate indicating you are in Autostop. Customer settings
will be maintained upon return to an engine running condition.
Refer to the “Stop/Start System” in the “Starting and Operating” section located in
your owners manual on the DVD for further information.
OPERATING YOUR VEHICLE
57
Page 61 of 244
ELECTRIC PARKING BRAKE (EPB)
Your vehicle is equipped with a new Electric Park Brake System (EPB) that offers
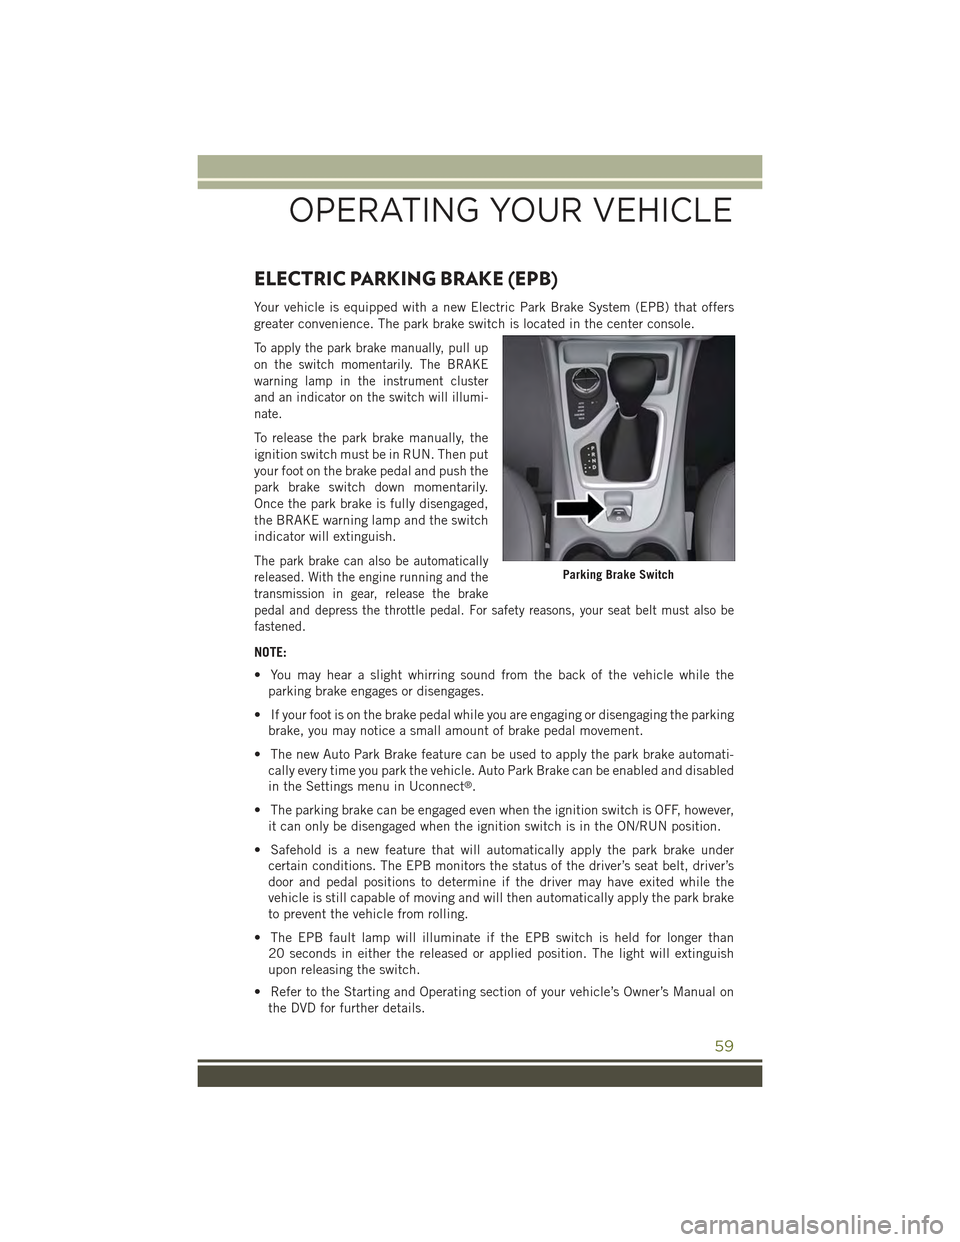
greater convenience. The park brake switch is located in the center console.
To apply the park brake manually, pull up
on the switch momentarily. The BRAKE
warning lamp in the instrument cluster
and an indicator on the switch will illumi-
nate.
To release the park brake manually, the
ignition switch must be in RUN. Then put
your foot on the brake pedal and push the
park brake switch down momentarily.
Once the park brake is fully disengaged,
the BRAKE warning lamp and the switch
indicator will extinguish.
The park brake can also be automatically
released. With the engine running and the
transmission in gear, release the brake
pedal and depress the throttle pedal. For safety reasons, your seat belt must also be
fastened.
NOTE:
• You may hear a slight whirring sound from the back of the vehicle while the
parking brake engages or disengages.
• If your foot is on the brake pedal while you are engaging or disengaging the parking
brake, you may notice a small amount of brake pedal movement.
• The new Auto Park Brake feature can be used to apply the park brake automati-
cally every time you park the vehicle. Auto Park Brake can be enabled and disabled
in the Settings menu in Uconnect®.
• The parking brake can be engaged even when the ignition switch is OFF, however,
it can only be disengaged when the ignition switch is in the ON/RUN position.
• Safehold is a new feature that will automatically apply the park brake under
certain conditions. The EPB monitors the status of the driver’s seat belt, driver’s
door and pedal positions to determine if the driver may have exited while the
vehicle is still capable of moving and will then automatically apply the park brake
to prevent the vehicle from rolling.
• The EPB fault lamp will illuminate if the EPB switch is held for longer than
20 seconds in either the released or applied position. The light will extinguish
upon releasing the switch.
• Refer to the Starting and Operating section of your vehicle’s Owner’s Manual on
the DVD for further details.
Parking Brake Switch
OPERATING YOUR VEHICLE
59
Page 62 of 244
CAUTION!
If the Brake System Warning Light remains on with the parking brake released, a
brake system malfunction is indicated. Have the brake system serviced by an
authorized dealer immediately.
WARNING!
• Never use the PARK position as a substitute for the parking brake. Always apply
the parking brake fully when parked to guard against vehicle movement and
possible injury or damage.
• When leaving the vehicle, always make sure the ignition is in the OFF position,
remove the key fob from the vehicle, and lock your vehicle.
• Never leave children alone in a vehicle, or with access to an unlocked vehicle.
Allowing children to be in a vehicle unattended is dangerous for a number of
reasons. A child or others could be seriously or fatally injured. Children should
be warned not to touch the parking brake, brake pedal or the transmission gear
selector.
• Do not leave the Key Fob in or near the vehicle, (or in a location accessible to
children), and do not leave the ignition in the ACC or ON/RUN position. A child
could operate power windows, other controls, or move the vehicle.
• Be sure the parking brake is fully disengaged before driving; failure to do so can
lead to brake failure and a collision.
• Always fully apply the parking brake when leaving your vehicle, or it may roll
and cause damage or injury. Also be certain to leave the transmission in PARK.
Failure to do so may allow the vehicle to roll and cause damage or injury.
• Driving the vehicle with the parking brake engaged, or repeated use of the
parking brake to slow the vehicle may cause serious damage to the brake
system.
OPERATING YOUR VEHICLE
60
Page 64 of 244
ParkSense® Active Park Assist
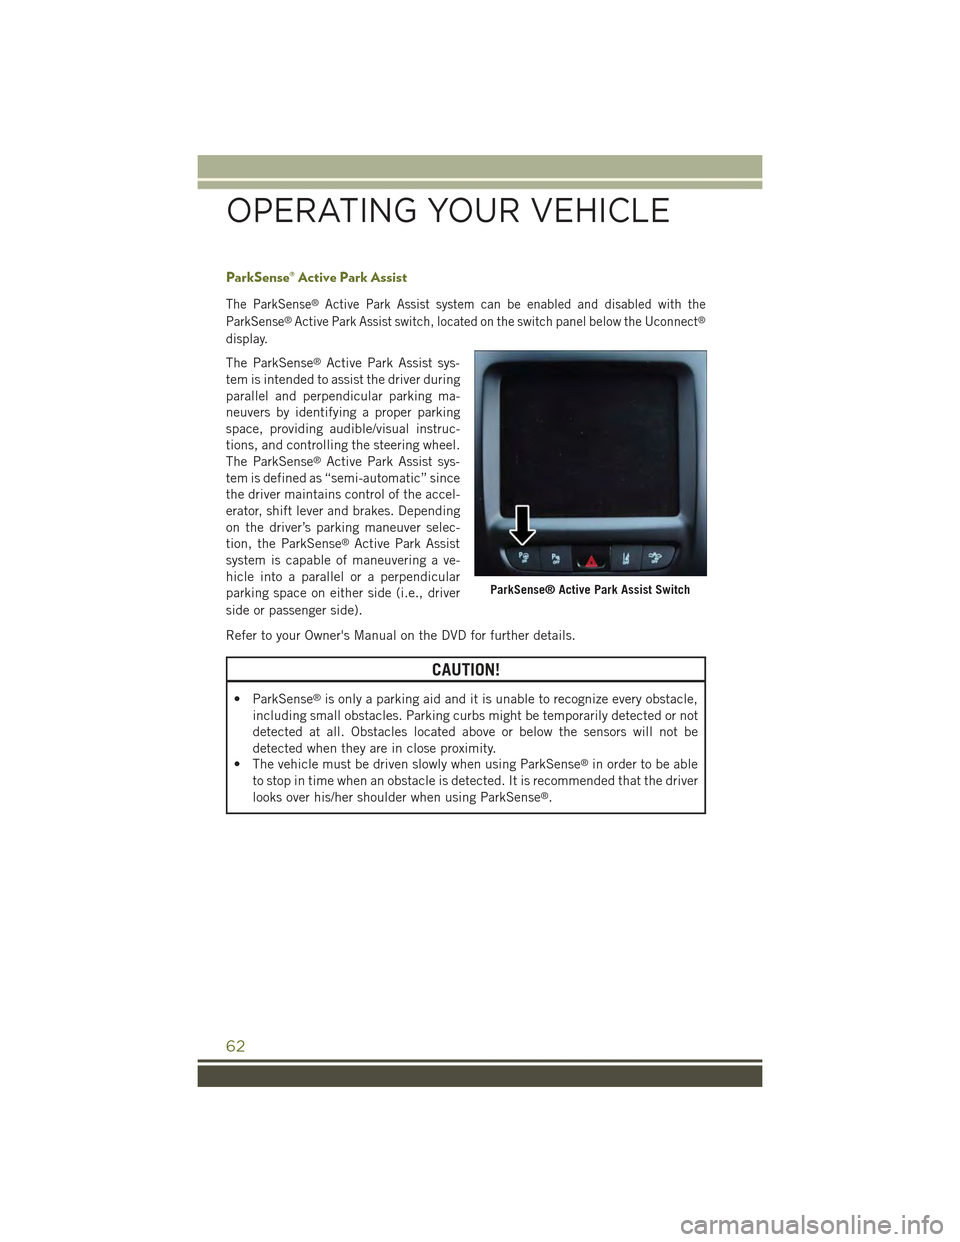
The ParkSense®Active Park Assist system can be enabled and disabled with the
ParkSense®Active Park Assist switch, located on the switch panel below the Uconnect®
display.
The ParkSense®Active Park Assist sys-
tem is intended to assist the driver during
parallel and perpendicular parking ma-
neuvers by identifying a proper parking
space, providing audible/visual instruc-
tions, and controlling the steering wheel.
The ParkSense®Active Park Assist sys-
tem is defined as “semi-automatic” since
the driver maintains control of the accel-
erator, shift lever and brakes. Depending
on the driver’s parking maneuver selec-
tion, the ParkSense®Active Park Assist
system is capable of maneuvering a ve-
hicle into a parallel or a perpendicular
parking space on either side (i.e., driver
side or passenger side).
Refer to your Owner's Manual on the DVD for further details.
CAUTION!
• ParkSense®is only a parking aid and it is unable to recognize every obstacle,
including small obstacles. Parking curbs might be temporarily detected or not
detected at all. Obstacles located above or below the sensors will not be
detected when they are in close proximity.
• The vehicle must be driven slowly when using ParkSense®in order to be able
to stop in time when an obstacle is detected. It is recommended that the driver
looks over his/her shoulder when using ParkSense®.
ParkSense® Active Park Assist Switch
OPERATING YOUR VEHICLE
62
Page 155 of 244
PROGRAMMABLE FEATURES
Uconnect® Customer Programmable Features
The Uconnect®system allows you to access Customer Programmable feature
settings such as Display, Clock, Safety & Driving Assistance, Lights, Doors & Locks,
Auto-On Comfort & Remote Start, Engine Off Operation, Compass Settings, Audio,
Trailer Brake, Phone/Bluetooth®, SiriusXM Setup and System Information through
buttons on the touchscreen.
• Press the SETTINGS button (Uconnect®5.0), or press the “Apps” button
(Uconnect®8.4) located near the bottom of the touchscreen, then press the
“Settings” button on the touchscreen to access the Settings screen. When making
a selection, scroll up or down until the preferred setting is highlighted, then press
and release the preferred setting until a check-mark appears next to the setting,
showing that setting has been selected. The following feature settings are
available:
• Display• Doors & Locks
• Safety & Driving Assistance• Engine Off Options
• Auto-On Comfort & Remote Start • Audio
• Phone/Bluetooth®• SiriusXM Setup
• Lights• Trailer Brake
• Compass (Uconnect®5.0)• System Information
• Units• Voice
• Clock
NOTE:
Depending on the vehicles options, feature settings may vary.
ELECTRONICS
153
Page 165 of 244
Shifting Procedures
4X4 HI To 4X4 LOW
• With the vehicle at speeds of 0 to 3 mph (0 to 5 km/h), the ignition switch in the
ON position or the engine running, shift the transmission into NEUTRAL, and
press the “4WD LOW” button once. The “4WD LOW” indicator light in the
instrument cluster will begin to flash and remain on solid when the shift is
complete.
NOTE:
If shift conditions/interlocks are not met a message will flash from the Electronic
Vehicle Information Center (EVIC)/Driver Information Display (DID) with instructions
on how to complete the requested shift. Refer to “Electronic Vehicle Information
Center (EVIC)/Driver Information Display (DID)” in “Understanding Your Instrument
Panel” on the DVD for further information.
4X4 LOW To 4X4 HI
• With the vehicle at speeds of 0 to 3 mph (0 to 5 km/h), the ignition switch in the
ON position or the engine running, shift the transmission into NEUTRAL, and
press the “4WD LOW” button once. The “4WD LOW” indicator light in the
instrument cluster will flash and go out when the shift is complete.
NOTE:
If shift conditions/interlocks are not met a message will flash from the Electronic
Vehicle Information Center (EVIC)/Driver Information Display (DID) with instructions
on how to complete the requested shift. Refer to “Electronic Vehicle Information
Center (EVIC)/Driver Information Display (DID)” in “Understanding Your Instrument
Panel” on the DVD for further information.
NEUTRAL Shift Procedure
1. Bring the vehicle to a complete stop and shift the transmission to PARK.
2. Turn the engine OFF.
3. Turn the ignition switch to the ON/RUN position, but do not start the engine.
4. Press and hold the brake pedal.
5. Shift the transmission into NEUTRAL.
6. Using a ballpoint pen or similar object, press and hold the recessed Power
Transfer Unit NEUTRAL (N) button (located by the selector switch) for four
seconds. The light behind the NEUTRAL (N) symbol will blink, indicating shift in
progress. The light will stop blinking (stay on solid) when the shift to NEUTRAL
(N) is complete.
7. After the shift is completed and the NEUTRAL light stays on, release the
NEUTRAL (N) button.
8. Start the engine.
9. Shift the transmission into REVERSE.
OFF-ROAD CAPABILITIES
163
Page 166 of 244
10. Release the brake pedal for five seconds and ensure that there is no vehicle
movement.
11. Shift the transmission to NEUTRAL.
12. Apply the parking brake.
NOTE:
Repeat these Steps to shift out of NEUTRAL.
REAR ELECTRONIC LOCKER (E-LOCKER) SYSTEM
• The Rear E-Locker System features a mechanical locking rear differential to
provide better traction in the 4WD LOW position. The “REAR LOCK” button is on
the Selec-Terrain Knob
Activating The Rear E-Locker
To activate the Rear E-Locker System, the following conditions must be met:
• The 4WD system must be in 4WD LOW.
• The ignition switch in the ON position or the engine running.
• Vehicle speed must be below 15 MPH (24 km/h).
• To engage Rear E-Locker, press the REAR LOCK button once.
Deactivating The Rear E-Locker System
To deactivate the Rear E-Locker System, the following conditions must be met:
• Rear E-Locker must be engaged, and the REAR LOCK indicator light on.
• The ignition switch in the ON position or the engine running.
• To disengage Rear E-Locker , press the REAR LOCK button once.
NOTE:
• It may also be necessary to drive slowly steering back and forth to complete
engagement and disengagement of the E- Locker.
• When engaging Rear E-Locker, the indicator lights in the instrument cluster and
on the REAR LOCK button will begin to flash. When the shift is complete the REAR
LOCK indicator lights will remain on.
• When disengaging Rear E-Locker, the indicator lights in the instrument cluster
and on the REAR LOCK button will begin to flash. When the shift is complete the
REAR LOCK indicator lights will remain off.
OFF-ROAD CAPABILITIES
164
Page 167 of 244
• Shifting into or out of Rear E-Locker is possible with the vehicle completely
stopped; however, difficulty may occur due to the mating clutch teeth not being
properly aligned. Several attempts may be required for clutch teeth alignment and
shift completion to occur. The preferred method is for the vehicle to be rolling,
below 15 MPH (24 km/h), while including right and left steering maneuvers to
allow for the clutch teeth to align.
• The Rear E-Locker System must be disengaged prior to taking the vehicle out of
4X4 LOW range. If 4X4 LOW shift conditions/interlocks are not met, a message will
flash from the Electronic Vehicle Information Center (EVIC)/Driver Information
Display with instructions on how to complete the requested shift.
SELEC-TERRAIN™
• Selec-Terrain™ combines the capa-
bilities of the vehicle control systems,
along with driver input, to provide the
best performance for all terrains.
Rotate the mode control knob to select
the following Selec-Terrain™ positions:
•Auto— Fully automatic full time four-
wheel drive operation can be used on
and off road. Balances traction with
seamless steering feel to provide im-
proved handling and acceleration over
two-wheel drive vehicles.
•Snow— Tuning set for additional sta-
bility in inclement weather. Use on and
off road on loose traction surfaces such
as snow. When in SNOW mode (depending on certain operating conditions), the
transmission may use second gear (rather than first gear) during launches, to
minimize wheel slippage.
•Sport— This mode alters the transmission's automatic shift schedule for sportier
driving. Upshift speeds are increased to make full use of available engine power.
•Sand/Mud— Off road calibration for use on low traction surfaces such as mud,
sand, or wet grass. Driveline is maximized for traction. Some binding may be felt
on less forgiving surfaces. The electronic brake controls are set to limit traction
control management of throttle and wheel spin.
•Rock— Off-road calibration only available in 4WD LOW range. Traction based
tuning with improved steer-ability for use on high traction off-road surfaces.
Activate the Hill Descent Control for steep downhill control. Use for low speed
obstacles such as large rocks, deep ruts, etc.
NOTE:
SPORT mode is not available when 4X4 LOW is selected.
Selec-Terrain™ Switch
OFF-ROAD CAPABILITIES
165
Page 170 of 244
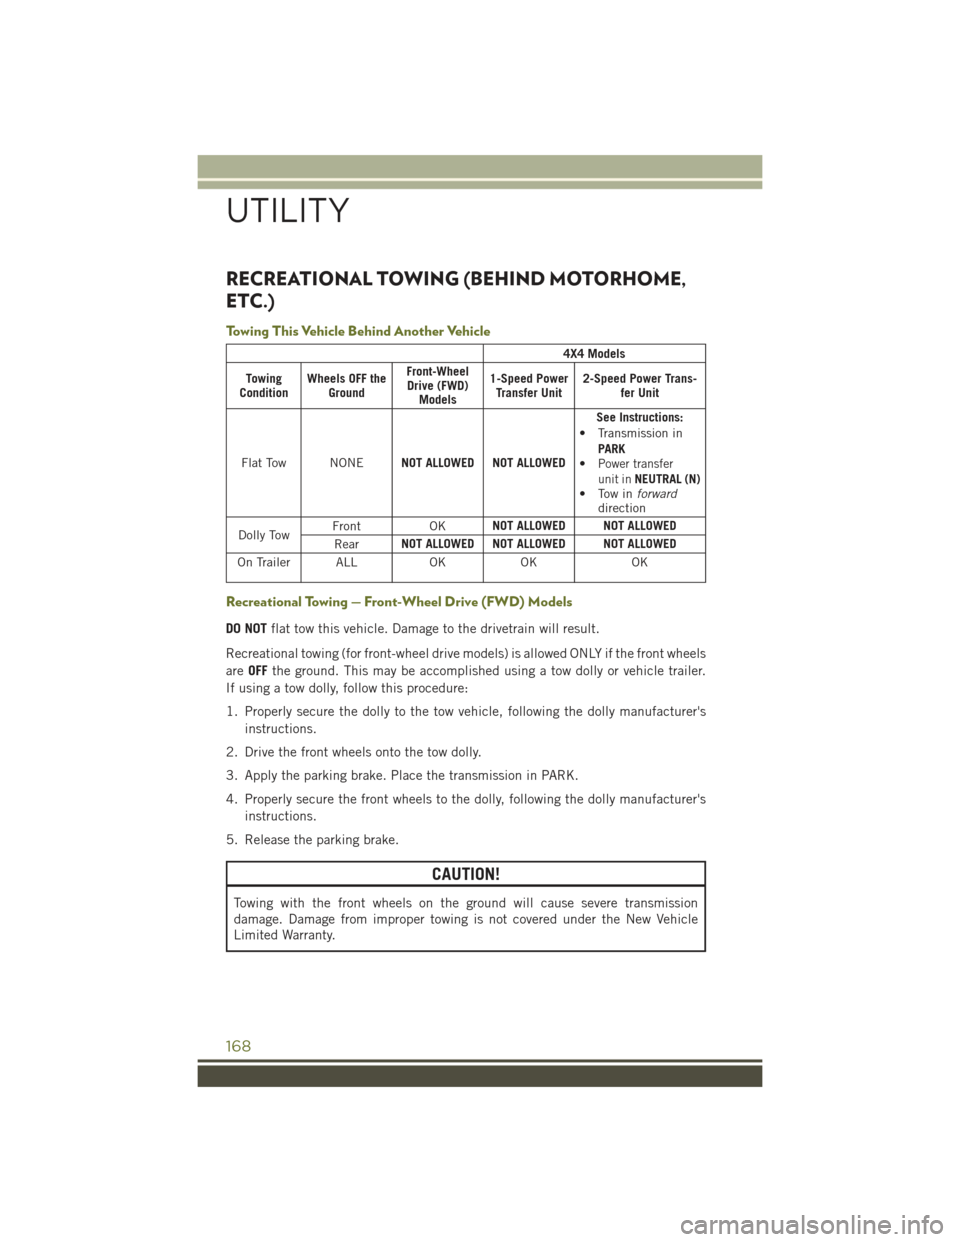
RECREATIONAL TOWING (BEHIND MOTORHOME,
ETC.)
Towing This Vehicle Behind Another Vehicle
4X4 Models
TowingConditionWheels OFF theGround
Front-WheelDrive (FWD)Models
1-Speed PowerTransfer Unit2-Speed Power Trans-fer Unit
Flat Tow NONENOT ALLOWED NOT ALLOWED
See Instructions:• Transmission in
PARK•Power transferunit inNEUTRAL (N)• Tow inforwarddirection
Dolly TowFrontOKNOT ALLOWED NOT ALLOWED
RearNOT ALLOWED NOT ALLOWED NOT ALLOWED
On Trailer ALLOKOKOK
Recreational Towing — Front-Wheel Drive (FWD) Models
DO NOTflat tow this vehicle. Damage to the drivetrain will result.
Recreational towing (for front-wheel drive models) is allowed ONLY if the front wheels
areOFFthe ground. This may be accomplished using a tow dolly or vehicle trailer.
If using a tow dolly, follow this procedure:
1. Properly secure the dolly to the tow vehicle, following the dolly manufacturer's
instructions.
2. Drive the front wheels onto the tow dolly.
3. Apply the parking brake. Place the transmission in PARK.
4. Properly secure the front wheels to the dolly, following the dolly manufacturer's
instructions.
5. Release the parking brake.
CAUTION!
Towing with the front wheels on the ground will cause severe transmission
damage. Damage from improper towing is not covered under the New Vehicle
Limited Warranty.
UTILITY
168
Page 172 of 244
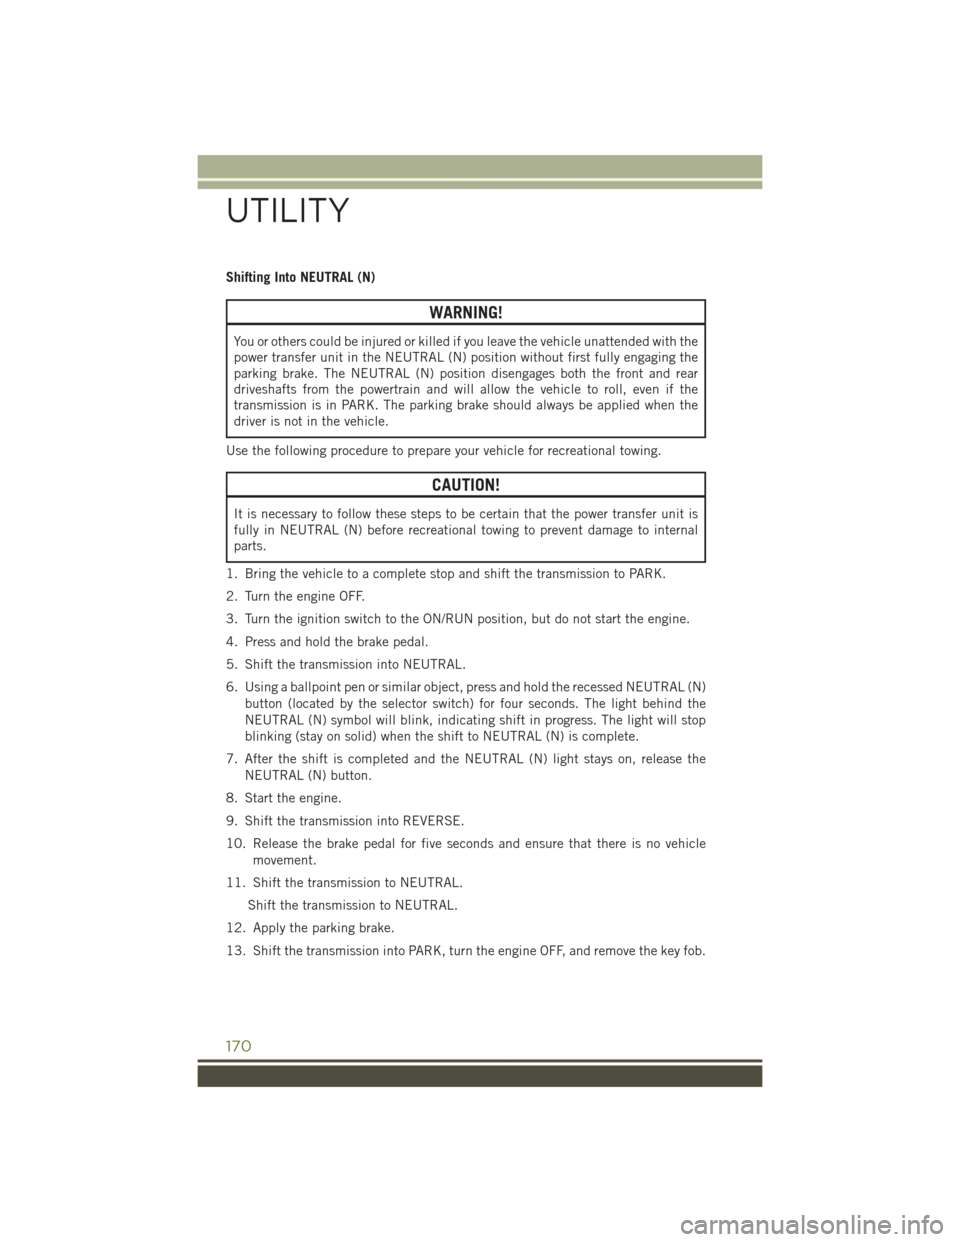
Shifting Into NEUTRAL (N)
WARNING!
You or others could be injured or killed if you leave the vehicle unattended with the
power transfer unit in the NEUTRAL (N) position without first fully engaging the
parking brake. The NEUTRAL (N) position disengages both the front and rear
driveshafts from the powertrain and will allow the vehicle to roll, even if the
transmission is in PARK. The parking brake should always be applied when the
driver is not in the vehicle.
Use the following procedure to prepare your vehicle for recreational towing.
CAUTION!
It is necessary to follow these steps to be certain that the power transfer unit is
fully in NEUTRAL (N) before recreational towing to prevent damage to internal
parts.
1. Bring the vehicle to a complete stop and shift the transmission to PARK.
2. Turn the engine OFF.
3. Turn the ignition switch to the ON/RUN position, but do not start the engine.
4. Press and hold the brake pedal.
5. Shift the transmission into NEUTRAL.
6. Using a ballpoint pen or similar object, press and hold the recessed NEUTRAL (N)
button (located by the selector switch) for four seconds. The light behind the
NEUTRAL (N) symbol will blink, indicating shift in progress. The light will stop
blinking (stay on solid) when the shift to NEUTRAL (N) is complete.
7. After the shift is completed and the NEUTRAL (N) light stays on, release the
NEUTRAL (N) button.
8. Start the engine.
9. Shift the transmission into REVERSE.
10. Release the brake pedal for five seconds and ensure that there is no vehicle
movement.
11. Shift the transmission to NEUTRAL.
Shift the transmission to NEUTRAL.
12. Apply the parking brake.
13. Shift the transmission into PARK, turn the engine OFF, and remove the key fob.
UTILITY
170