lock JEEP CHEROKEE 2015 KL / 5.G Owner's Manual
[x] Cancel search | Manufacturer: JEEP, Model Year: 2015, Model line: CHEROKEE, Model: JEEP CHEROKEE 2015 KL / 5.GPages: 244, PDF Size: 30.6 MB
Page 30 of 244
5. Try to pull the webbing out of the retractor. If it is locked, you should not be able
to pull out any webbing. If the retractor is not locked, repeat the last step.
6. Finally, pull up on any extra webbing to tighten the lap portion around the child
restraint while you push the child restraint rearward and downward into the
vehicle seat.
7. If the child restraint has a top tether strap and the seating position has a top tether
anchorage, connect the tether strap to the anchorage and tighten the tether strap.
See below for directions to attach a tether anchor.
8. Test that the child restraint is installed tightly by pulling back and forth on the
child seat at the belt path. It should not move more than 1 inch (25.4 mm) in any
direction.
Installing The Top Tether Strap (With Either Lower Anchors Or Vehicle Seat Belt):
When installing a forward-facing child restraint, always secure the top tether strap,
up to the tether anchor weight limit, whether the child restraint is installed with the
lower anchors or the vehicle seat belt.
Tether Anchorage Installation
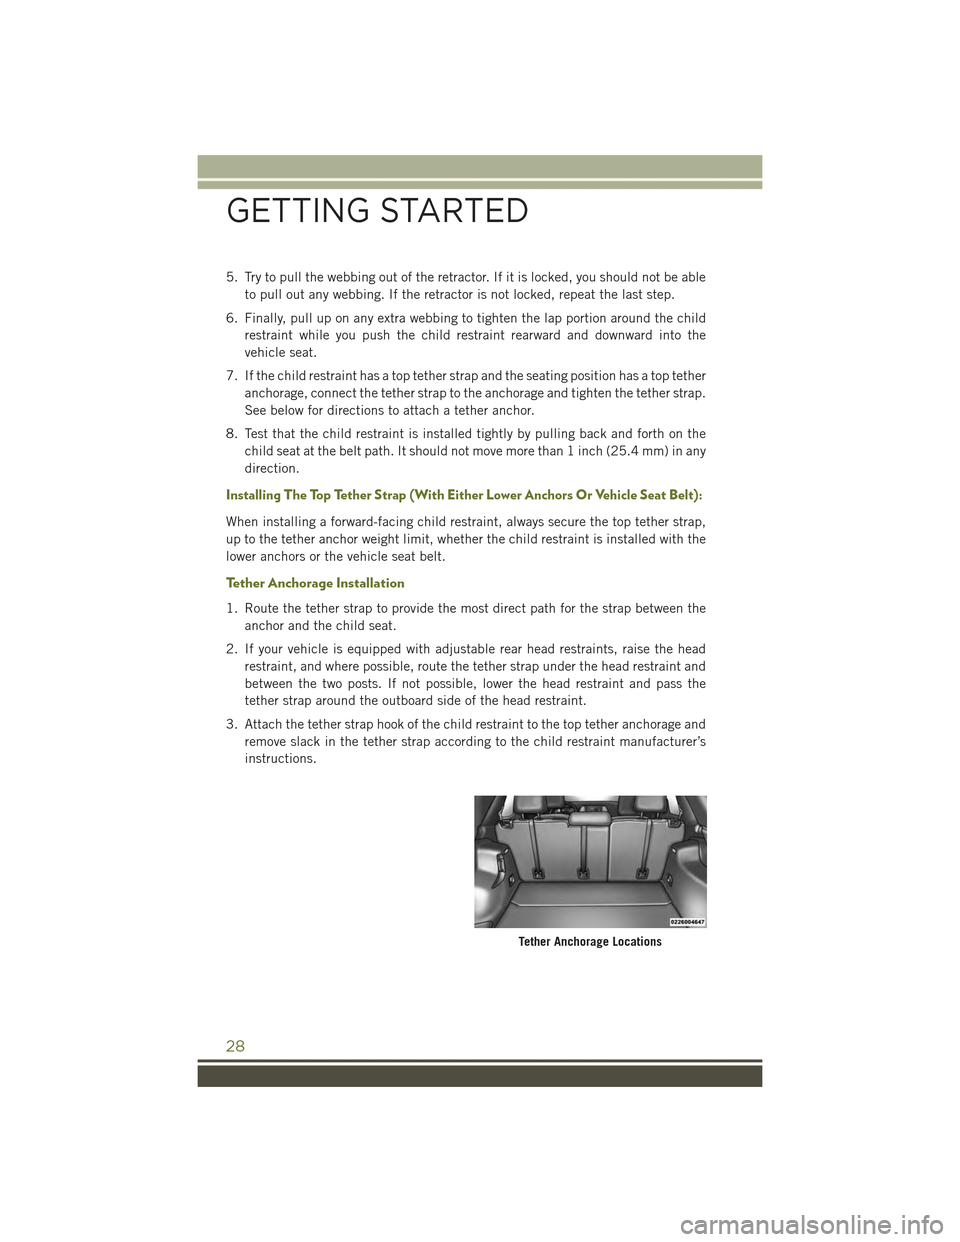
1. Route the tether strap to provide the most direct path for the strap between the
anchor and the child seat.
2. If your vehicle is equipped with adjustable rear head restraints, raise the head
restraint, and where possible, route the tether strap under the head restraint and
between the two posts. If not possible, lower the head restraint and pass the
tether strap around the outboard side of the head restraint.
3. Attach the tether strap hook of the child restraint to the top tether anchorage and
remove slack in the tether strap according to the child restraint manufacturer’s
instructions.
Tether Anchorage Locations
GETTING STARTED
28
Page 34 of 244
To set a memory position:
1. Cycle the vehicles ignition to the ON position.
2. Adjust all memory profile settings.
3. Press and release the S (SET) button.
4. Press and release the 1 or 2 button within five seconds.
NOTE:
Before programming your RKE transmitters you must select the “Memory Linked To
Fob” feature through the Uconnect®system. Refer to “Uconnect®Settings ” in
“Understanding Your Instrument Panel” in the Owner's Manual on the DVD for
further details.
To program a Key Fob to the memory position:
1. Cycle the vehicles ignition to the OFF position.
2. Select the desired memory profile 1 or 2.
3. Press and release the S (SET) button on the memory switch, then within five
seconds press and release the 1 or 2 button accordingly.
4. Press and release the LOCK button on the RKE transmitter within 10 seconds.
• To recall the saved positions, press 1 or 2 on the memory switch or press UNLOCK
on the programmed RKE transmitter.
Easy Entry/Exit Feature
The memory seat has an Easy Entry/Exit feature. This feature provides automatic
driver seat positioning to enhance driver mobility when entering and exiting the
vehicle.
NOTE:
The Easy Entry/Exit feature is not enabled when the vehicle is delivered from the
factory. To enable (or later disable) this feature you must select “Easy Exit Seats” in
“Engine Off Options” through the programmable features in the Uconnect®system.
• Refer to “Uconnect®Customer Programmable Features” in “Electronics” of this
User Guide.
• For further details refer to “Uconnect®Settings” in “Understanding Your Instru-
ment Panel” in the Owner's Manual on the DVD.
GETTING STARTED
32
Page 36 of 244
REAR SEATS
60/40 Split Folding Rear Seat With Fold-Flat Feature
• Each rear seatback can be folded flat
or reclined.
Forward/Rearward
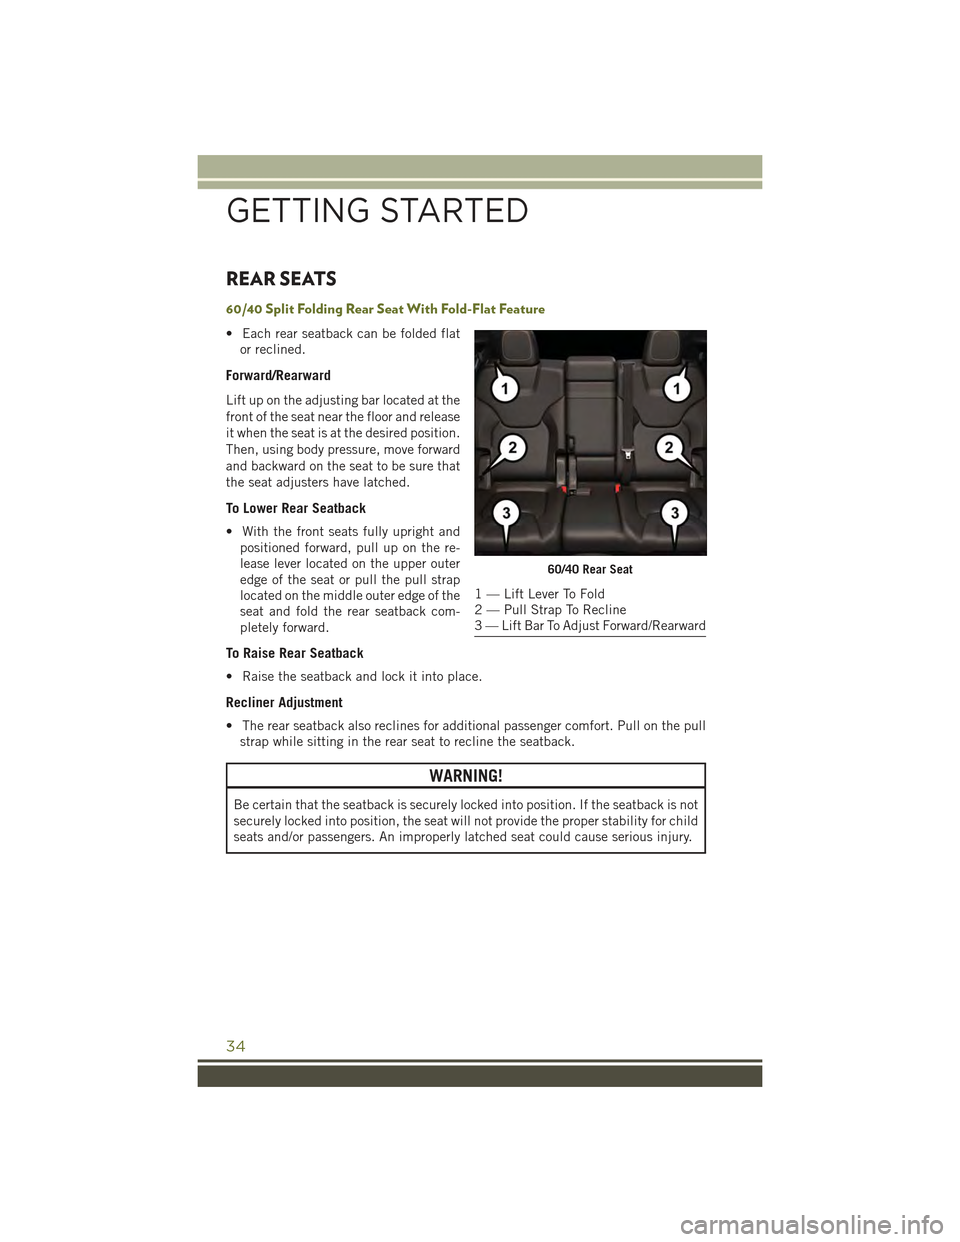
Lift up on the adjusting bar located at the
front of the seat near the floor and release
it when the seat is at the desired position.
Then, using body pressure, move forward
and backward on the seat to be sure that
the seat adjusters have latched.
To Lower Rear Seatback
• With the front seats fully upright and
positioned forward, pull up on the re-
lease lever located on the upper outer
edge of the seat or pull the pull strap
located on the middle outer edge of the
seat and fold the rear seatback com-
pletely forward.
To Raise Rear Seatback
• Raise the seatback and lock it into place.
Recliner Adjustment
• The rear seatback also reclines for additional passenger comfort. Pull on the pull
strap while sitting in the rear seat to recline the seatback.
WARNING!
Be certain that the seatback is securely locked into position. If the seatback is not
securely locked into position, the seat will not provide the proper stability for child
seats and/or passengers. An improperly latched seat could cause serious injury.
60/40 Rear Seat
1 — Lift Lever To Fold2 — Pull Strap To Recline3 — Lift Bar To Adjust Forward/Rearward
GETTING STARTED
34
Page 39 of 244
WARNING!
• Persons who are unable to feel pain to the skin because of advanced age,
chronic illness, diabetes, spinal cord injury, medication, alcohol use, exhaus-
tion, or other physical conditions must exercise care when using the steering
wheel heater. It may cause burns even at low temperatures, especially if used
for long periods.
• Do not place anything on the steering wheel that insulates against heat, such
as a blanket or steering wheel covers of any type and material. This may cause
the steering wheel heater to overheat.
TILT/TELESCOPING STEERING COLUMN
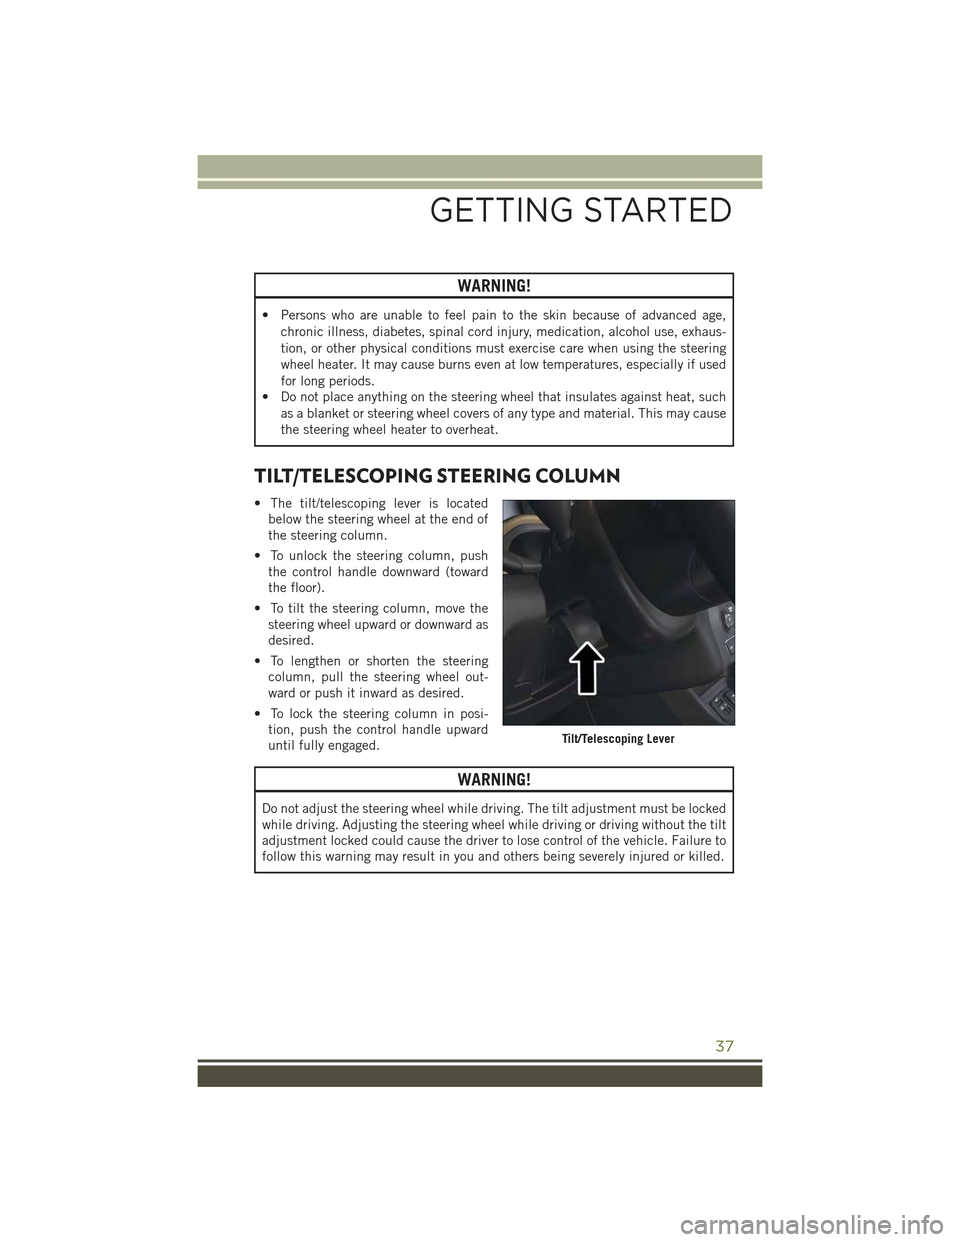
• The tilt/telescoping lever is located
below the steering wheel at the end of
the steering column.
• To unlock the steering column, push
the control handle downward (toward
the floor).
• To tilt the steering column, move the
steering wheel upward or downward as
desired.
• To lengthen or shorten the steering
column, pull the steering wheel out-
ward or push it inward as desired.
• To lock the steering column in posi-
tion, push the control handle upward
until fully engaged.
WARNING!
Do not adjust the steering wheel while driving. The tilt adjustment must be locked
while driving. Adjusting the steering wheel while driving or driving without the tilt
adjustment locked could cause the driver to lose control of the vehicle. Failure to
follow this warning may result in you and others being severely injured or killed.
Tilt/Telescoping Lever
GETTING STARTED
37
Page 62 of 244
CAUTION!
If the Brake System Warning Light remains on with the parking brake released, a
brake system malfunction is indicated. Have the brake system serviced by an
authorized dealer immediately.
WARNING!
• Never use the PARK position as a substitute for the parking brake. Always apply
the parking brake fully when parked to guard against vehicle movement and
possible injury or damage.
• When leaving the vehicle, always make sure the ignition is in the OFF position,
remove the key fob from the vehicle, and lock your vehicle.
• Never leave children alone in a vehicle, or with access to an unlocked vehicle.
Allowing children to be in a vehicle unattended is dangerous for a number of
reasons. A child or others could be seriously or fatally injured. Children should
be warned not to touch the parking brake, brake pedal or the transmission gear
selector.
• Do not leave the Key Fob in or near the vehicle, (or in a location accessible to
children), and do not leave the ignition in the ACC or ON/RUN position. A child
could operate power windows, other controls, or move the vehicle.
• Be sure the parking brake is fully disengaged before driving; failure to do so can
lead to brake failure and a collision.
• Always fully apply the parking brake when leaving your vehicle, or it may roll
and cause damage or injury. Also be certain to leave the transmission in PARK.
Failure to do so may allow the vehicle to roll and cause damage or injury.
• Driving the vehicle with the parking brake engaged, or repeated use of the
parking brake to slow the vehicle may cause serious damage to the brake
system.
OPERATING YOUR VEHICLE
60
Page 68 of 244
Closing Power Shade
Express
• Press the switch forward and release it within one-half second and the shade will
close automatically from any position.
Manual
• To close the shade, press and hold the switch in the forward position.
NOTE:
Any release of the switch will stop the movement and the shade will remain in a
partially closed condition until the switch is pushed and held forward again.
Pinch Protection Feature
This feature will detect an obstruction in the opening of the sunroof during Express
Close operation. If an obstruction in the path of the sunroof is detected, the sunroof
will automatically retract. Remove the obstruction if this occurs. Next, press the
switch forward and release to Express Close.
NOTE:
If three consecutive sunroof close attempts result in Pinch Protect reversals, the
fourth close attempt will be a Manual Close movement with Pinch Protect disabled.
WARNING!
• Do not let children play with the sunroof. Never leave children unattended in a
vehicle, or with access to an unlocked vehicle. Do not leave the Key Fob in or
near the vehicle, and do not leave the ignition of a vehicle equipped with
Keyless Enter-N-Go™ in the ACC or ON/RUN mode. Occupants, particularly
unattended children, can become entrapped by the power sunroof while
operating the power sunroof switch. Such entrapment may result in serious
injury or death.
• In a collision, there is a greater risk of being thrown from a vehicle with an open
sunroof. You could also be severely injured or killed. Always fasten your seat
belt properly and make sure all passengers are properly secured.
• Do not allow small children to operate the sunroof. Never allow your fingers,
other body parts, or any object to project through the sunroof opening. Injury
may result.
OPERATING YOUR VEHICLE
66
Page 73 of 244
Uconnect® ACCESS
Uconnect® Access — If Equipped (U.S. Residents Only Available On Uconnect®
8.4A And Uconnect® 8.4AN)
Uconnect®Access enhances your ownership and driving experience by connecting
your vehicle with a 3G cellular connection. Uconnect®Access provides:
•The ability to remotely lock/unlock your doors and start your vehicle from virtually
anywhere, with the Uconnect®Access App, Owner Connect website and Uconnect®
Care (Vehicle must be within the United States and have network coverage).
• The functionality to turn your vehicle into a WiFi Hotspot on demand.
• Theft Alarm Notification via text or email.
• Voice Texting so you can compose, send and receive text messages with your voice
while keeping your hands on the wheel. Requires a cell phone that supports
Bluetooth Message Access Profile (MAP).
Before you drive, familiarize yourself with the easy-to-use Uconnect®System.
1. The ASSIST and 9-1-1 buttons are located on your rearview mirror. The ASSIST
Button is used for contacting Roadside Assistance, Vehicle Care and Uconnect®
Care. The 9-1-1 Button connects you directly to emergency assistance.
NOTE:
Vehicles sold in Canada and Mexico DO NOT have 9-1-1 Call system capabilities. 9-1-1
or other emergency line operators in Canada and Mexico may not answer or respond to
9-1-1 system calls.
2. The Uconnect®“Apps” button on the touchscreen on the menu bar at the bottom
right corner of the radio touchscreen. This is where you can begin your registration
process, manage your Apps and purchase WiFi on demand.
3. The Uconnect®Voice Command and Uconnect®Phone buttons are located on the
left side of your steering wheel. These buttons let you use your voice to give
commands, make phone calls, send and receive text messages hands-free, enter
navigation destinations, and control your radio and media devices.
Included Trial Period For New Vehicles
Your new vehicle may come with an included trial period for use of the Uconnect®
Access Services starting at the date of vehicle purchase (date based on vehicle sales
notification from your dealer). To activate the trial, you must first register with
Uconnect®Access. Once registered, Uconnect®Access customers can purchase
additional Services and Apps over the lifetime of their vehicle ownership.
ELECTRONICS
71
Page 74 of 244
Features And Packages
• After the trial period, you can subscribe to continue your service by visit-
ing the Uconnect®Store located within the Mopar Owner Connect website
(moparownerconnect.com). If you need assistance, U.S. residents can call
Uconnect®Care at 855-792-4241.
• For the latest information on packages and pricing information: U.S. residents
visit DriveUconnect.com. Canadian residents visit DriveUconnect.ca.
Uconnect® Access Registration (Uconnect® 8.4A And 8.4AN Only,
U.S. 48 Contiguous States, Alaska And Hawaii)
To unlock the full potential of Uconnect®Access in your vehicle, you first need to
register with Uconnect®Access.
1. From the parked vehicle with the radio touchscreen powered on, select the
“Apps” button located near the bottom right-hand corner of the radio touch-
screen.
NOTE:
Should you require assistance anytime during the registration process, simply call
Uconnect®Care at 1-855-792-4241.
2. Press “Start” on the reminder screen or select “Uconnect Registration” under the
“All Apps” or “Favorites Apps” tab on the Apps list.
3. The Uconnect®Access Registration App will open and display step-by-step
instructions to start your registration.
4. Enter your email address into the radio touchscreen.
5. A message will display on the touchscreen indicating your email submission was
accepted. In a few minutes, you will receive an email which will allow you to
register your vehicle for Uconnect®Access. You should open this email and begin
your Uconnect®Access registration within 72 hours.
6. Check for an email from Uconnect®Access that contains your personalized
registration link. If you don't see it, check your spam or junk mail folder. Open the
email and click on the link to continue registering.
NOTE:
For security reasons, this link is valid for 72 hours from the time you’ve submitted
your email address into the radio touchscreen. If the link has expired, simply re-enter
your email address into the Uconnect®Registration App on the radio touchscreen
to receive another link. The secured registration link will take you through the
Uconnect®Access registration process step by step.
ELECTRONICS
72
Page 75 of 244
7. To unlock the full potential of Uconnect®Access in your vehicle, you will need to
create or validate an existing Mopar Owner Connect account previously (Owner
Center). Uconnect®along with Mopar Owner Connect have joined forces to create
one destination to manage all of your vehicle needs, from managing your
Uconnect®Access account, to tracking service history and finding recommended
accessories for your vehicle. If you already have a Mopar Owner Connect account,
log in to the website with your existing username/email and password. For
assistance with this web based registration process, call Uconnect®Care at
1-855-792-4241.
8.Once you are logged in to your Mopar Owner Connect account, you will create a
personal Uconnect®Security PIN. The Uconnect®Security PIN will be required to
authenticate you when accessing your account via Uconnect®Care or performing any
remote services such as Remote Door Lock/Unlock or Remote Horn & Lights.
9.If your vehicle qualifies for a trial package it will be presented. Simply agree to the
Uconnect®Terms of Service (checkbox) and then select the “Start Service” button.
At this point your vehicle is registered with Uconnect®Access. Continue to set up Via
Mobile. Apps will be downloaded the next time you start your vehicle. If the Apps
have not appeared after 24 hours, please contact Uconnect®Care.
Download The Uconnect® Access App
The Uconnect®Access smartphone app allows you to remotely lock or unlock your
doors, start your engine (if equipped) and activate your horn and lights from virtually
anywhere. The smartphone app also features Via Mobile (if equipped) which uses
your smartphone’s data plan to access your personal Pandora®, iHeartRadio, Slacker
Radio and Aha™ by HARMAN accounts and control them using your vehicle
touchscreen.
The Uconnect®Access app is only compatible with select iPhone®and Android
smartphones. Visit UconnectPhone.com or call 1-877-855-8400 to confirm that
your smartphone is compatible with Uconnect®. Once you’ve confirmed your smart-
phone is compatible, Android and iPhone®users should visit their respective app
store and search for “Uconnect Access” to download the app.
Set Up Your Via Mobile Profile — If Equipped
Setting up your Via Mobile profile means entering your login information for each App
so that they can work in your vehicle. Complete your Via Mobile Profile online during
registration of your Uconnect®Access system. Access this page by logging into your
Mopar Owner Connect account (moparownerconnect.com), going to Edit Profile,
then Via Mobile Profile.
If you already have an account with these Apps, scroll down and press the “Link” button
to enter your information. If you do not have an account, you can create a new one.
ELECTRONICS
73
Page 83 of 244
Uconnect® Access Remote Features
If you own a compatible iPhone®or Android®powered device, the Uconnect®Access
App allows you to remotely lock or unlock your doors, start your engine or activate your
horn and lights from virtually anywhere (Vehicle must be within the United States and
have network coverage). You can download the App from Mopar Owner Connect or from
the App Store (iPhone) or Google Play store. VisitUconnectPhone.com to determine if
your device is compatible. For Uconnect®Phone customer support and to determine
if your device is compatible.
U.S. residents - visit UconnectPhone.com or call 1-877-855-8400
Remote Start— This feature provides the ability to start the engine on your vehicle,
without the keys and from virtually any distance. You can send a request to your
vehicle in one of two ways:
1. Using the Uconnect®Access App from a compatible smartphone.
2. From the Mopar Owner Connect website.
• After 15 minutes if you have not entered your vehicle with the key, the engine
will shut off automatically.
• You can also send a command to turn-off an engine that has been remote
started.
•This remote function requires your vehicle to be equipped with a factory-installed
Remote Start system. To utilize this feature after the Uconnect®Access App is
downloaded, login with your user name and password.
NOTE:
Your four digit Uconnect®Security PIN is required to confirm the request.
• You can set-up notifications for your account to receive an email or text (SMS)
message every time a command is sent. Login to Mopar Owner Connect
(moparownerconnect.com) and click on Edit Profile to manage Uconnect®
Notifications.
Remote Door Lock/Unlock— This feature provides the ability to lock or unlock the door
on your vehicle, without the keys and from virtually any distance. You can send a
request to your vehicle in one of three ways:
1. Using the Uconnect®Access App from a compatible smartphone.
2. From the Mopar Owner Connect website.
3. By contacting the Uconnect®Care on the phone.
To use this feature after the Uconnect®Access App is downloaded, login using your
user name and password. You will need your four digit Uconnect®Security PIN to
confirm the request. Press the “closed lock” icon on your Uconnect®Access App to
lock the doors, and press the “open Lock” icon to unlock the driver’s door.
ELECTRONICS
81