steering wheel JEEP CHEROKEE 2015 KL / 5.G Owner's Manual
[x] Cancel search | Manufacturer: JEEP, Model Year: 2015, Model line: CHEROKEE, Model: JEEP CHEROKEE 2015 KL / 5.GPages: 244, PDF Size: 30.6 MB
Page 84 of 244
You can set-up notifications for your account to receive an email or text
(SMS) message every time a command is sent. Login to Mopar Owner Connect
(moparownerconnect.com) and click on Edit Profile to manage Uconnect®Notifica-
tions.
Remote Horn And Lights— It’s easy to locate a vehicle in a dark, crowded or noisy
parking area by activating the horn and lights. It may also help if you need to draw
attention to your vehicle for any reason. You can send a request to your vehicle in one
of three ways:
1. Using the Uconnect®Access App from a compatible smartphone.
2. From the Mopar Owner Connect website.
3. By contacting the Uconnect®Care on the phone.
To use this feature after the Uconnect®Access App is downloaded, login using your
user name and password. You will need your four digit Uconnect®Security PIN to
confirm the request. You can set-up notifications for your account to receive an
email or text (SMS) message every time a command is sent. Login to Mopar Owner
Connect (moparownerconnect.com) and click on Edit Profile to manage Uconnect®
Notifications.
Voice Texting— Want to dictate a personal message? Register with Uconnect®
Access to take advantage of a new, cloudbased Voice Texting service, an enhance-
ment to Voice Text Reply.
Voice Texting allows you to compose a new text or reply to an incoming text message.
Before you attempt to use the Voice Texting feature, check to ensure you have the
following:
1. A paired, Bluetooth®enabled phone with the Message Access Profile (MAP). Not
all Bluetooth®enabled phones support MAP, including all iPhones®(Apple iOS).
Visit UconnectPhone.com for system and device compatibility information.
2.An active Uconnect®Access trial or paid subscription. Press the “Apps” button on
the lower right hand corner of the touchscreen to begin the registration process.
3. Accept the “Allow MAP” profile request on your smart phone. (Please refer to
device manufacturer instructions for details).
To Send A Text Message:
1. Push the Uconnect®Phone Buttonon the steering wheel.
2. Wait for the beep.
3. Say “Text.”
4. Uconnect®will prompt you “Say the phone number, or full name and phone type
of the contact you want to send a message to.”
5. Wait for the beep and say a contact that is in your phonebook, or a mobile phone
number that you would like to send the message to.
ELECTRONICS
82
Page 89 of 244
Via Mobile apps can also be launched through Voice Recognition by pressing the
VR button on the steering wheel and stating “launch” and then the name of the app.
For example, you can say “launch Aha Via Mobile.”
NOTE:
For detailed information on how to use Via Mobile apps visit the Mopar Owner
Connect website (moparownerconnect.com) and login using the username and
password you set up when registering for Uconnect®Access.
A message will be displayed to remind you that Via Mobile apps utilize the data plan
on your connected smartphone to provide content. Many smartphones have a limit to
how much data they can utilize before incurring additional charges. The amount of
data being used varies by smartphone device, cellular service provider and specific
app. Check your mobile phone service plan for more details.* Press “OK” to continue
or the “X” to exit.
(*Additional smartphone data usage charges may apply.)
Via Mobile Apps — If Equipped
•Aha™ by HARMAN— Aha™ by HARMAN makes it easy to instantly access your
favorite Web content on the go. Choose from over 40,000+ stations spanning
internet radio, personalized music, news, entertainment, hotels, weather, audio-
books, Facebook®, Twitter®, and more.
•iHeartRadio— iHeartRadio provides instant access to more than 1,500 live radio
stations from across the country and allows listeners to create custom music
stations inspired by their favorite artists or songs.
•Pandora®— Pandora®gives people the music and comedy they love anytime,
anywhere. Personalized stations launch instantly, with the input of a favorite artist,
track, comedian, or genre.
•Slacker Radio— Enjoy millions of songs and hundreds of handcrafted stations.
NOTE:
For detailed information on how to use Via Mobile apps visit the Mopar Owner
Connect website (moparownerconnect.com) and log in using the username and
password you set up when registering for Uconnect®Access.
ELECTRONICS
87
Page 96 of 244
Get Started
1. VisitUconnectPhone.comto check mobile device and feature compatibility and to
find phone pairing instructions.
2. Reduce background noise. Wind and passenger conversations are examples of
noise that may impact recognition.
3. Speak clearly at a normal pace and volume while facing straight ahead. The
microphone is positioned on the rearview mirror and aimed at the driver.
4. Each time you give a Voice Command, you must first push either the VR or Phone
button, wait untilafterthe beep, then say your Voice Command.
5. You can interrupt the help message or system prompts by pushing the VR or
Phone button and saying a Voice Command from current category.
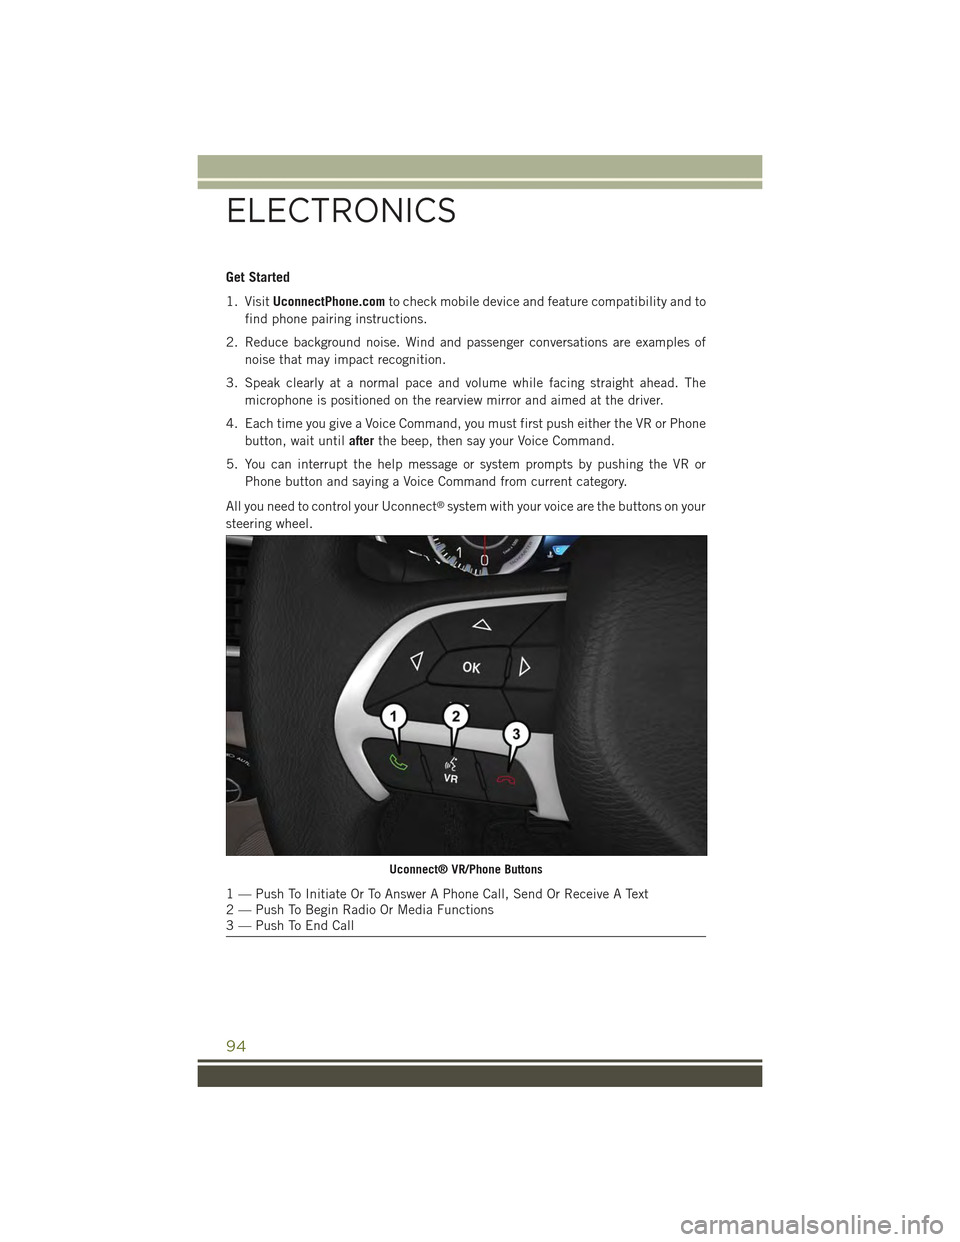
All you need to control your Uconnect®system with your voice are the buttons on your
steering wheel.
Uconnect® VR/Phone Buttons
1 — Push To Initiate Or To Answer A Phone Call, Send Or Receive A Text2 — Push To Begin Radio Or Media Functions3 — Push To End Call
ELECTRONICS
94
Page 109 of 244
MEDIA HUB — PLAYING iPod®/USB/MP3 DEVICES
There are many ways to play music from iPod®/MP3 players or USB devices through
your vehicle's sound system.
• Press your “Media” button on the touchscreen to begin.
USB Port
Connect your iPod®or compatible device using a USB cable into the USB Port. USB
Memory sticks with audio files can also be used. Audio from the device can be played
on the vehicle's sound system while providing metadata (artist, track title, album,
etc.) information on the radio display.
When connected, the iPod®/compatible USB device can be controlled using the
radio or Steering Wheel Audio Controls to play, skip to the next or previous track,
browse, and list the contents.
The iPod®battery charges when plugged into the USB port (if supported by the
specific device).
To route the USB/iPod®cable out of the center console, use the access cut out.
NOTE:
• When connecting your iPod®device for the first time, the system may take several
minutes to read your music, depending on the number of files. For example, the
system will take approximately five minutes for every 1000 songs loaded on the
device. Also during the reading process, the Shuffle and Browse functions will be
disabled. This process is needed to ensure the full use of your iPod®features and
only happens the first time it is connected. After the first time, the reading process
of your iPod®will take considerably less time unless changes are made or new
songs are added to the playlist.
•The USB port supports certain Mini, Classic, Nano, Touch, and iPhone®devices. The
USB port also supports playing music from compatible external USB Mass Storage
Class memory devices. Some iPod®software versions may not fully support the USB
port features. Please visit Apple’s website for iPod®software updates.
ELECTRONICS
107
Page 115 of 244
Taking A Detour
To take a detour you must be navigating a route.
• Press the “Detour” button on the touchscreen.
NOTE:
If the route you are currently taking is the only reasonable option, the device might
not calculate a detour.
For more information, see your Uconnect®Supplement Manual.
Uconnect® Phone (Bluetooth® Hands Free Calling)
• If the Uconnect®Phone buttonexists on your steering wheel, then you have
the Uconnect®Phone features.
• The Uconnect®Phone is a voice-activated, hands-free, in-vehicle communica-
tions system with Voice Command Capability (see Voice Command section).
• The Uconnect®Phone allows you to dial a phone number with your mobile phone
using simple voice commands or using screen button on the touchscreens.
• Refer to the Understand The Features Of Your Vehicle section of your vehicle's
Owner's Manual on the DVD for further details.
NOTE:
The Uconnect®Phone requires a mobile phone equipped with the Bluetooth®
Hands-Free Profile, Version 1.0 or higher. For Uconnect®Customer Support:
• U.S. residents visit UconnectPhone.com or call 1-877-855-8400.
•Canadian Residents visitUconnectPhone.com or call, 1-800-465–2001 (English)
or 1-800-387-9983 (French).
Pairing A Phone
• To use the Uconnect®Phone feature, you must first pair your Bluetooth®phone
with the Uconnect®system.
Start Pairing Procedure On The Radio
• Press the “Phone” button on the touchscreen, then press the “Settings” button on
the touchscreen. Next, press “Add Device.”
• Uconnect®Phone will display an “In progress” screen while the system is
connecting.
Start Pairing Procedure On Mobile Phone
• Search for available devices on your Bluetooth®enabled mobile phone. This is
usually within Settings or Options under “Bluetooth.” See your mobile phone’s
manual for details.
• When your phone finds the system, select “Uconnect” as the paired device. You
may be prompted by your phone to download the phonebook. This is so you can
make calls by saying the name of your contact (PBAP-Phone Book Access Profile).
ELECTRONICS
113
Page 116 of 244
Complete The Pairing Procedure
• When prompted on the phone, verify with radio password shown on the Uconnect®
Screen.
• If your phone asks you to accept a connection request from Uconnect®, select
“Yes.” If available, check the box telling it not to ask again – that way your phone
will automatically connect each time you start the vehicle.
Select The Mobile Phone's Priority Level
• When the pairing process has successfully completed, the system will prompt you
to choose whether or not this is your favorite phone. Selecting “Yes” will make this
phone the highest priority. This phone will take precedence over other paired
phones within range. Only one phone can be paired at a time.
• You are now ready to make hands-free calls. Push the “Uconnect®Phone” button
on your steering wheel to begin.
Making A Phone Call
• Push the Uconnect®Phone button.
• After the BEEP, say “dial” then the number (or “call” then the name as listed in
your phone; see Phonebook).
NOTE:
You can also initiate a call by using the touchscreen on the Phone main screen.
Receiving A Call – Accept (And End)
• When an incoming call rings/is announced on Uconnect®, push the Phone button
.
• To end a call, push the Hang Up or Phone button.
Mute (Or Unmute) Microphone During Call
• During a call, press the “Mute” button on the Phone main screen to mute and
unmute the call.
Transfer Ongoing Call Between Handset And Vehicle
• During an on-going call, press the “Transfer” button on the Phone main screen to
transfer an on-going call between handset and vehicle.
Common Phone Commands (Examples)
• “Call John Smith”
• “Call John Smith mobile”
• “Dial 1 248 555 1212”
• “Redial”
ELECTRONICS
114
Page 117 of 244
Phonebook
The Uconnect®radio will automatically download your phonebook from your paired
phone, if this feature is supported by your phone. Entries are updated each time that
the phone is connected. If your phone book entries do not appear, check the settings
on your phone. Some phones require you to enable this feature manually.
• Your phonebook can be browsed on your radio screen, but editing can only be done
on your phone. To browse, press the “Phone” button on the touchscreen, then the
“Phonebook” button on the touchscreen.
Favorite phonebook entries can be saved as Favorites for quicker access. Favorites
are shown at the top of your main phone screen.
Voice Command Tips
• Speaking complete names (i.e; Call John Doe vs. Call John) will result in greater
system accuracy.
• You can “chain” commands together for faster results. Say “Call John Doe,
mobile,” for example.
• If you are listening to available voice command options, you do not have to listen
to the entire list. When you hear the command that you need, push the
button on the steering wheel, wait for the beep and say your command.
Changing The Volume
• Start a dialogue by pushing the Phone button, then say a command for
example - "Help".
• Use the radio VOLUME/MUTE rotary knob to adjust the volume to a comfortable
level while the Uconnect®system is speaking. Please note the volume setting for
Uconnect®is different than the audio system.
NOTE:
To access help, push the Uconnect®Phonebutton on the steering wheel and
say "help." Press the display or press either the Phoneor VRbutton and
say "cancel" to cancel the help session.
ELECTRONICS
115
Page 120 of 244
Get Started
1. Visit UconnectPhone.com for mobile device and feature compatibility and to find
phone pairing instructions.
2. Reduce background noise. Wind and passenger conversations are examples of
noise that may impact recognition.
3. Speak clearly at a normal pace and volume while facing straight ahead. The
microphone is positioned on the rearview mirror and aimed at the driver.
4. Each time you give a Voice Command, you must first push either the VR or Phone
button, wait untilafterthe beep, then say your Voice Command.
5. You can interrupt the help message or system prompts by pushing the VR or
Phone button and saying a Voice Command from current category.
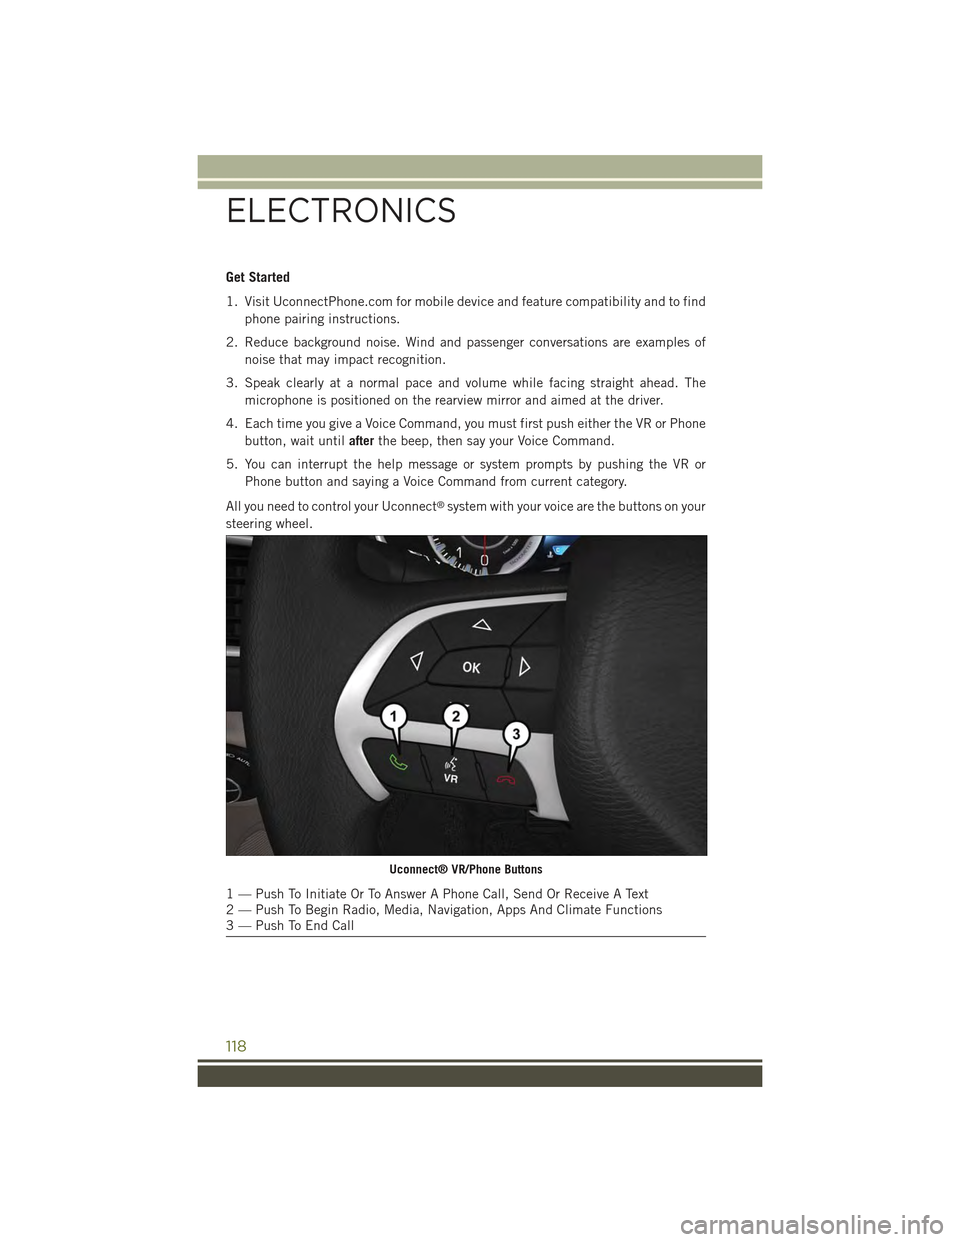
All you need to control your Uconnect®system with your voice are the buttons on your
steering wheel.
Uconnect® VR/Phone Buttons
1 — Push To Initiate Or To Answer A Phone Call, Send Or Receive A Text2 — Push To Begin Radio, Media, Navigation, Apps And Climate Functions3 — Push To End Call
ELECTRONICS
118
Page 126 of 244
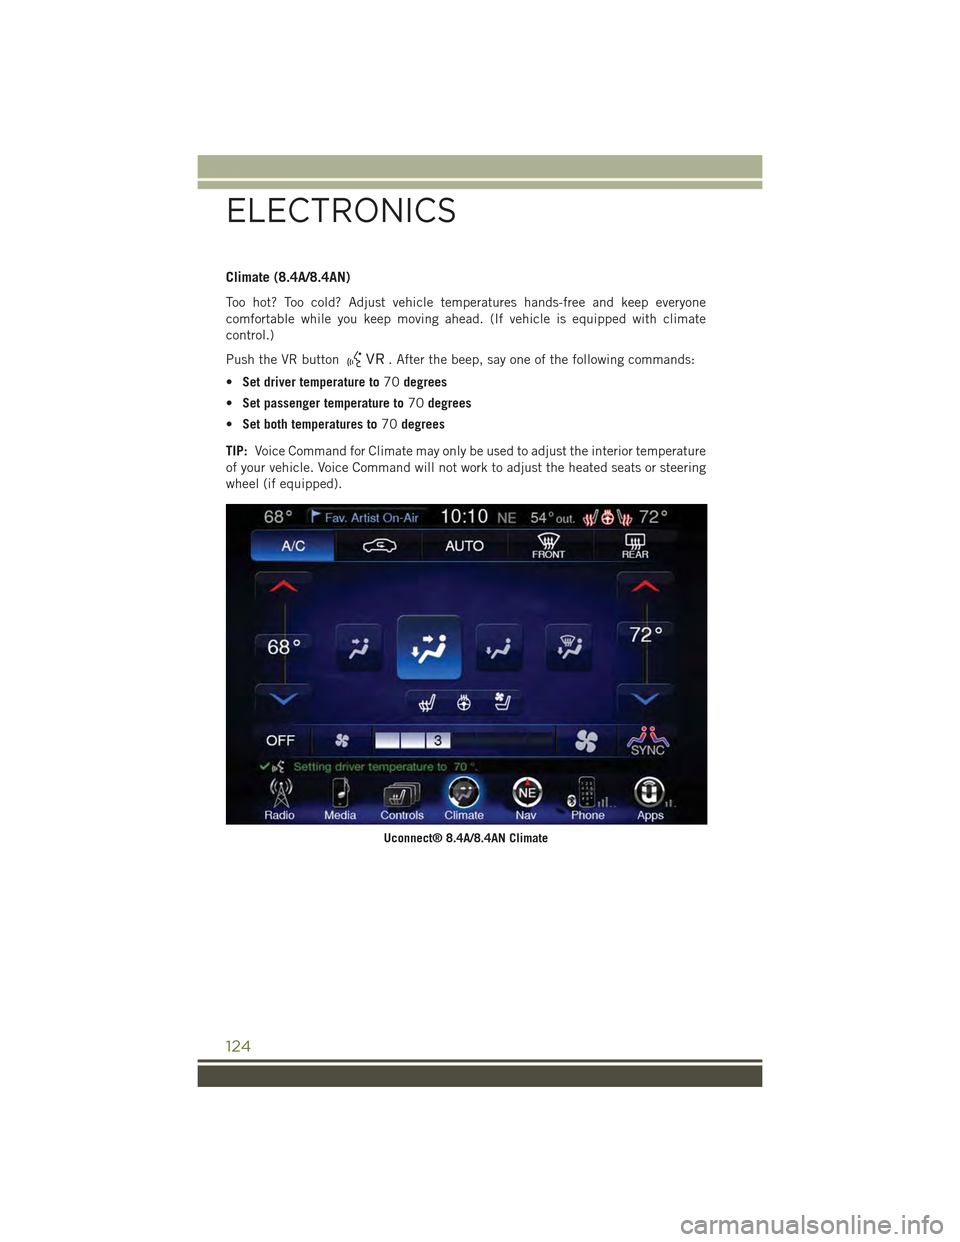
Climate (8.4A/8.4AN)
Too hot? Too cold? Adjust vehicle temperatures hands-free and keep everyone
comfortable while you keep moving ahead. (If vehicle is equipped with climate
control.)
Push the VR button. After the beep, say one of the following commands:
•Set driver temperature to70degrees
•Set passenger temperature to70degrees
•Set both temperatures to70degrees
TIP:Voice Command for Climate may only be used to adjust the interior temperature
of your vehicle. Voice Command will not work to adjust the heated seats or steering
wheel (if equipped).
Uconnect® 8.4A/8.4AN Climate
ELECTRONICS
124
Page 142 of 244
Seek Up/Down Buttons
• Press to seek through Disc tracks.
• Hold either button to bypass tracks without stopping.
Browse
• Press the “Browse” button on the touchscreen to scroll through and select a
desired track on the Disc. Press the “Exit” button on the touchscreen if you wish
to cancel the browse function.
MEDIA HUB — PLAYING iPod®/USB/MP3 DEVICES
There are many ways to play music from iPod®/MP3 players or USB devices through
your vehicle's sound system.
• Press your “Media” button on the touchscreen to begin.
USB Port
Connect your iPod®or compatible device using a USB cable into the USB Port. USB
Memory sticks with audio files can also be used. Audio from the device can be played
on the vehicle's sound system while providing metadata (artist, track title, album,
etc.) information on the radio display.
When connected, the iPod®/compatible USB device can be controlled using the
radio or Steering Wheel Audio Controls to play, skip to the next or previous track,
browse, and list the contents.
The iPod®battery charges when plugged into the USB port (if supported by the
specific device).
To route the USB/iPod®cable out of the center console, use the access cut out.
NOTE:
• When connecting your iPod®device for the first time, the system may take several
minutes to read your music, depending on the number of files. For example, the
system will take approximately five minutes for every 1000 songs loaded on the
device. Also during the reading process, the Shuffle and Browse functions will be
disabled. This process is needed to ensure the full use of your iPod®features and
only happens the first time it is connected. After the first time, the reading process
of your iPod®will take considerably less time unless changes are made or new
songs are added to the playlist.
• The USB port supports certain Mini, Classic, Nano, Touch, and iPhone®devices.
The USB port also supports playing music from compatible external USB Mass
Storage Class memory devices. Some iPod®software versions may not fully
support the USB port features. Please visit Apple’s website for iPod®software
updates.
ELECTRONICS
140