wheel JEEP CHEROKEE 2015 KL / 5.G Owner's Guide
[x] Cancel search | Manufacturer: JEEP, Model Year: 2015, Model line: CHEROKEE, Model: JEEP CHEROKEE 2015 KL / 5.GPages: 244, PDF Size: 30.6 MB
Page 186 of 244
Tire Service Kit Usage Precautions
• Replace the Tire Service Kit Sealant Bottle (1) and Sealant Hose (6) prior to the
expiration date (printed on the bottle label) to assure optimum operation of the
system. Refer to “Sealing A Tire With Tire Service Kit” section (F) “Sealant Bottle
and Hose Replacement.”
• The Sealant Bottle (1) and Sealant Hose (6) are a one tire application use. After
each use, always replace these components immediately at an authorized dealer.
• When the Tire Service Kit sealant is in a liquid form, clean water, and a damp cloth
will remove the material from the vehicle or tire and wheel components. Once the
sealant dries, it can easily be peeled off and properly discarded.
• For optimum performance, make sure the valve stem on the wheel is free of debris
before connecting the Tire Service Kit.
• You can use the Tire Service Kit air pump to inflate bicycle tires. The kit also
comes with two needles, located in the Accessory Storage Compartment (on the
bottom of the air pump) for inflating sport balls, rafts, or similar inflatable items.
However, use only the Air Pump Hose (7) and make sure the Mode Select Knob (5)
is in the Air Mode when inflating such items to avoid injecting sealant into them.
The Tire Service Kit Sealant is only intended to seal punctures less than 1/4”
(6 mm) diameter in the tread of your vehicle.
• Do not lift or carry the Tire Service Kit by the hoses.
Sealing A Tire With Tire Service Kit
(A) Whenever You Stop To Use Tire Service Kit:
1. Pull over to a safe location and turn on the vehicle’s Hazard Warning flashers.
2. Verify that the valve stem (on the wheel with the deflated tire) is in a position that
is near to the ground. This will allow the Tire Service Kit Hoses (6) and (7) to reach
the valve stem and keep the Tire Service Kit flat on the ground. This will provide
the best positioning of the kit when injecting the sealant into the deflated tire and
running the air pump. Move the vehicle as necessary to place the valve stem in
this position before proceeding.
3. Place the transmission in PARK (auto transmission) or in Gear (manual transmis-
sion) and cycle the ignition to the OFF position.
4. Set the parking brake.
(B) Setting Up To Use Tire Service Kit:
1. Turn the Mode Select Knob (5) to the Sealant Mode position.
2. Uncoil the Sealant Hose (6) and then remove the cap from the fitting at the end
of the hose.
3. Place the Tire Service Kit flat on the ground next to the deflated tire.
4. Remove the cap from the valve stem and then screw the fitting at the end of the
Sealant Hose (6) onto the valve stem.
WHAT TO DO IN EMERGENCIES
184
Page 190 of 244
WARNING!
• Do not attempt to seal a tire on the side of the vehicle closest to traffic. Pull far
enough off the road to avoid the danger of being hit when using the Tire Service
Kit.
• Do not use the Tire Service Kit or drive the vehicle under the following
circumstances:
• If the puncture in the tire tread is approximately 1/4”. (6 mm) or larger.
• If the tire has any sidewall damage.
• If the tire has any damage from driving with extremely low tire pressure.
• If the tire has any damage from driving on a flat tire.
• If the wheel has any damage.
• If you are unsure of the condition of the tire or the wheel.
• Keep the Tire Service Kit away from open flames or heat source.
• A loose Tire Service Kit thrown forward in a collision or hard stop could
endanger the occupants of the vehicle. Always stow the Tire Service Kit in the
place provided. Failure to follow these warnings can result in injuries that are
serious or fatal to you, your passengers, and others around you.
•Take care not to allow the contents of the Tire Service Kit to come in contact with
hair, eyes, or clothing. The Tire Service Kit is harmful if inhaled, swallowed, or
absorbed through the skin. It causes skin, eye, and respiratory irritation. Flush
immediately with plenty of water if there is any contact with eyes or skin. Change
clothing as soon as possible, if there is any contact with clothing.
• The Tire Service Kit Sealant solution contains latex. In case of an allergic
reaction or rash, consult a physician immediately. Keep the Tire Service Kit out
of reach of children. If swallowed, rinse mouth immediately with plenty of
water and drink plenty of water. Do not induce vomiting! Consult a physician
immediately.
• The Tire Service Kit is not a permanent flat tire repair. Have the tire inspected
and repaired or replaced after using the Tire Service Kit. Do not exceed 55 mph
(88 km/h) until the tire is repaired or replaced. Failure to follow this warning
can result in injuries that are serious or fatal to you, your passengers, and
others around you.
WHAT TO DO IN EMERGENCIES
188
Page 191 of 244
JACKING AND TIRE CHANGING
Jack Location
• The scissor-type jack and tire changing tools are located in the cargo compartment
behind the rear seat underneath the load floor.
Spare Tire Stowage
• The spare tire is stowed underneath the rear cargo load floor behind the rear seat
along with the jack and wheel chocks.
Preparations For Jacking
1. Park the vehicle on a firm level surface as far from the edge of the roadway as
possible. Avoid icy or slippery areas.
2. Turn on the Hazard Warning flasher.
3. Set the parking brake.
4. Place the shift lever into PARK.
5. Turn the ignition to the OFF position.
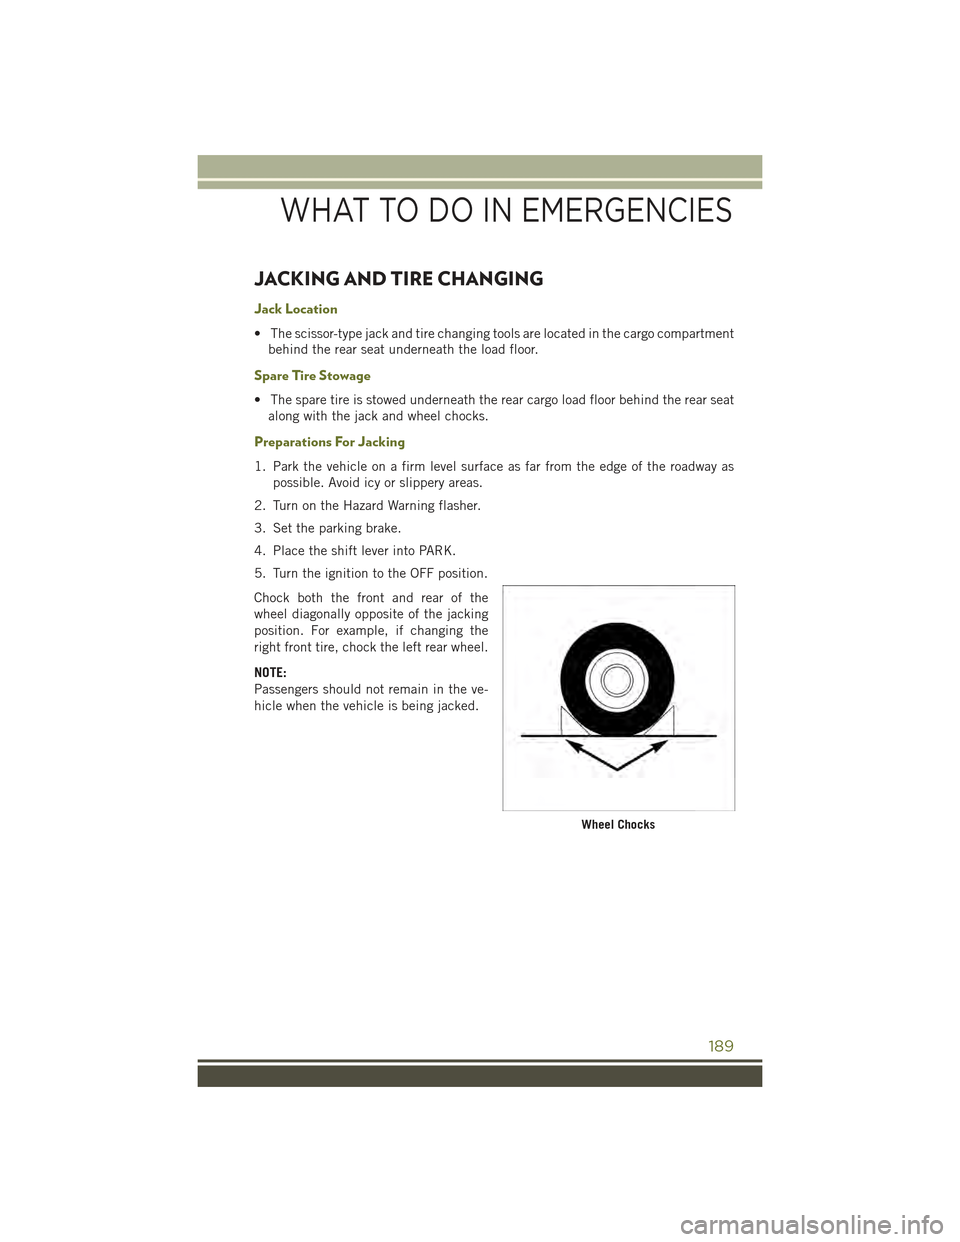
Chock both the front and rear of the
wheel diagonally opposite of the jacking
position. For example, if changing the
right front tire, chock the left rear wheel.
NOTE:
Passengers should not remain in the ve-
hicle when the vehicle is being jacked.
Wheel Chocks
WHAT TO DO IN EMERGENCIES
189
Page 192 of 244
Jacking Instructions
1. Remove spare tire.
2. Remove spare tire, jack and tools from
storage.
3. Loosen (but do not remove) the wheel
lug bolts by turning them to the left
one turn while the wheel is still on the
ground.
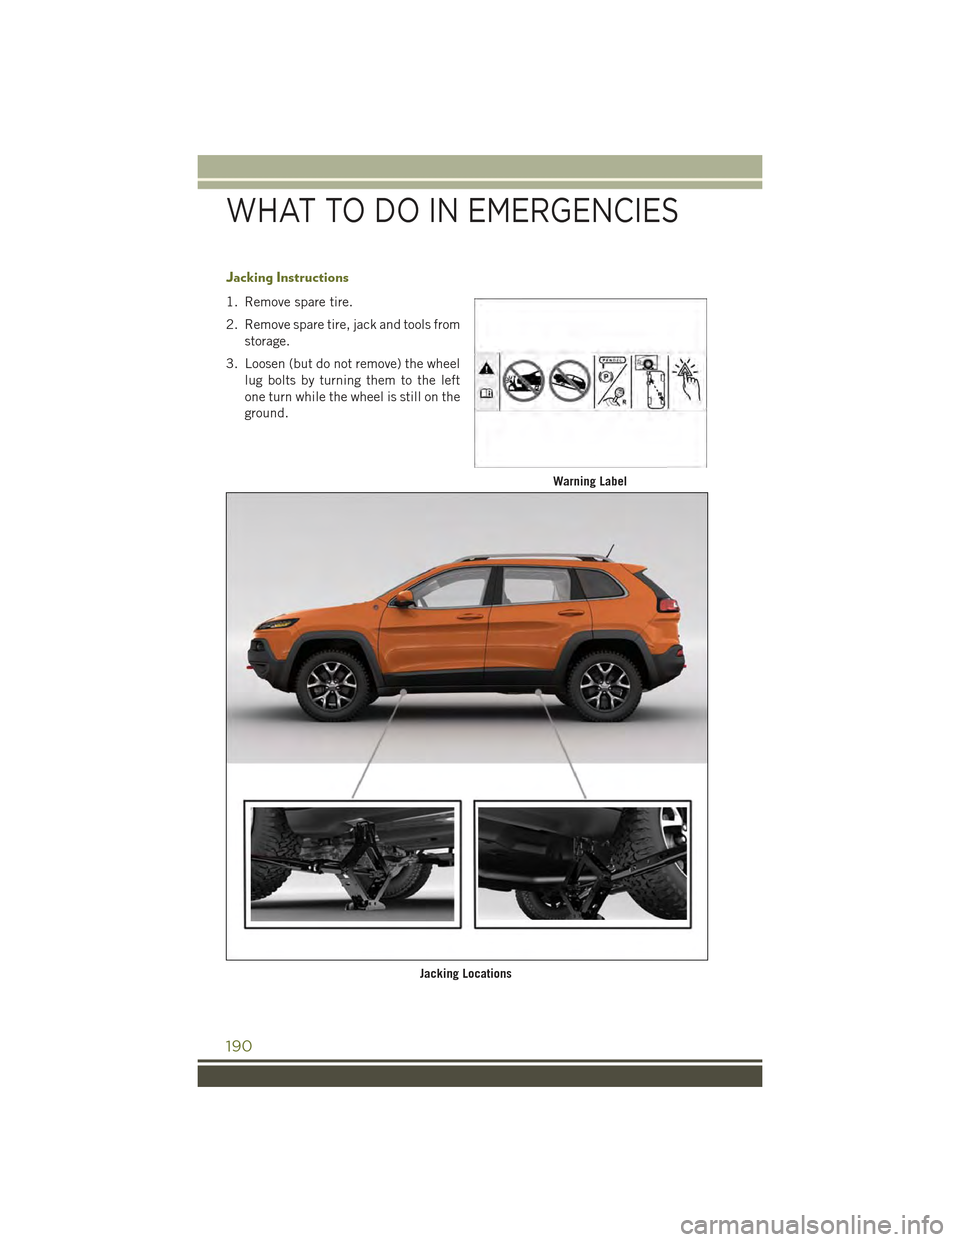
Warning Label
Jacking Locations
WHAT TO DO IN EMERGENCIES
190
Page 193 of 244
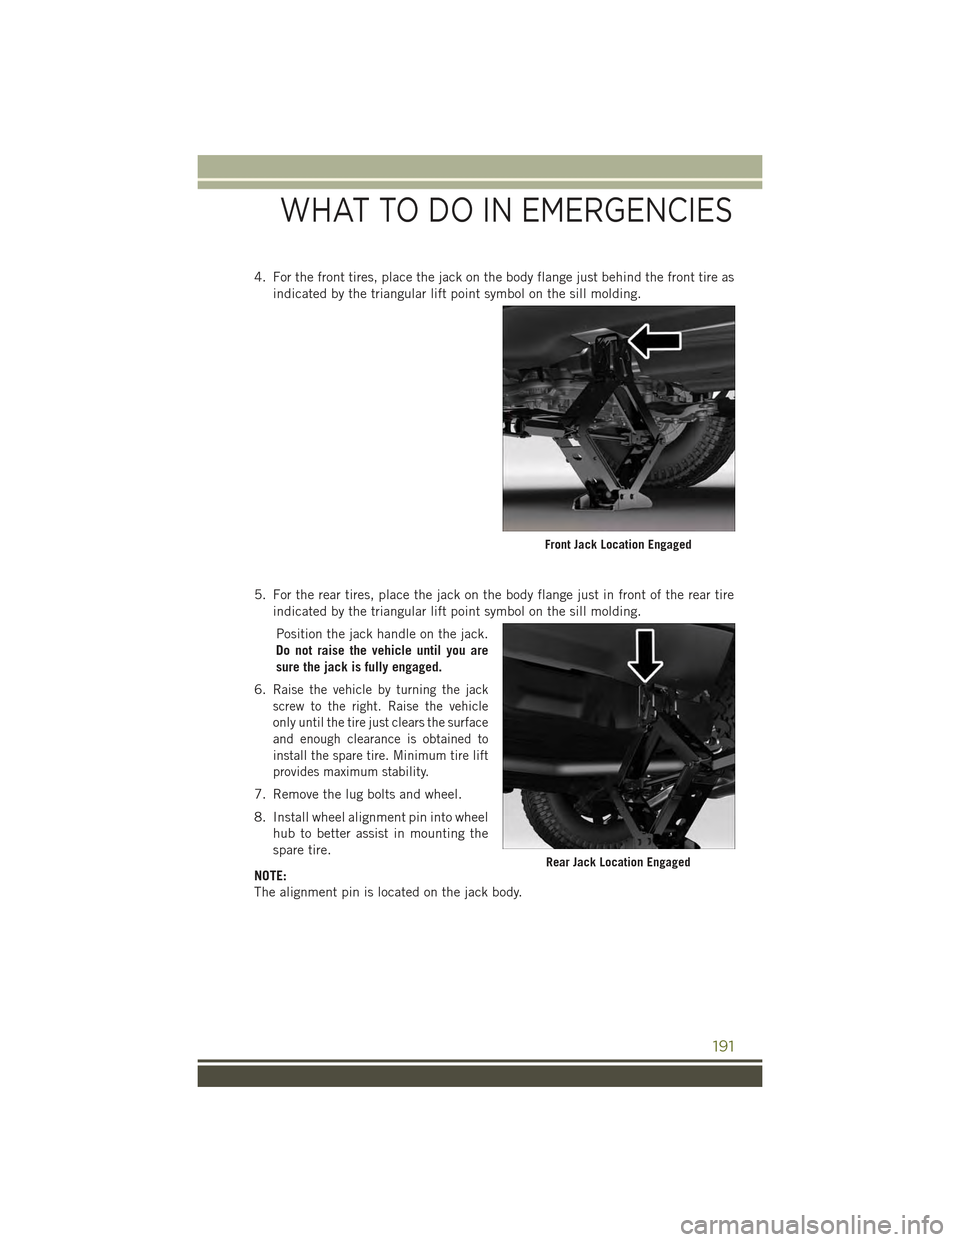
4. For the front tires, place the jack on the body flange just behind the front tire as
indicated by the triangular lift point symbol on the sill molding.
5. For the rear tires, place the jack on the body flange just in front of the rear tire
indicated by the triangular lift point symbol on the sill molding.
Position the jack handle on the jack.
Do not raise the vehicle until you are
sure the jack is fully engaged.
6.Raise the vehicle by turning the jack
screw to the right. Raise the vehicle
only until the tire just clears the surface
and enough clearance is obtained to
install the spare tire. Minimum tire lift
provides maximum stability.
7. Remove the lug bolts and wheel.
8. Install wheel alignment pin into wheel
hub to better assist in mounting the
spare tire.
NOTE:
The alignment pin is located on the jack body.
Front Jack Location Engaged
Rear Jack Location Engaged
WHAT TO DO IN EMERGENCIES
191
Page 194 of 244
9. Position the spare wheel/tire on the vehicle and install lug bolts with the
cone-shaped end toward the wheel. Lightly tighten the bolts.
10. Lower the vehicle by turning the jack screw to the left, and remove the jack.
11. Finish tightening the lug bolts. Push down on the wrench while at the end of the
handle for increased leverage. Tighten the lug bolts in a star pattern until each
nut has been tightened twice. The correct wheel bolt tightness is 100 ft lb
(135 N·m). If in doubt about the correct tightness, have them checked with a
torque wrench by your authorized dealer or at a service station.
12. Lower the jack to it's fully closed position.
13. Secure the tire, jack, and tools in their proper locations.
14. Remove chocks from wheels.
Road Tire Installation
1. Mount the road tire on the axle.
2. Install the remaining lug bolts with the threaded end of the bolt toward the wheel.
Lightly tighten the lug bolts.
3. Lower the vehicle to the ground by turning the jack handle counterclockwise.
4. Finish tightening the lug bolts. Push down on the wrench while at the end of the
handle for increased leverage. Tighten the lug bolts in a star pattern until each
bolt has been tightened twice. The correct tightness of each lug bolt is 100 ft/lbs
(135 N·m). If in doubt about the correct tightness, have them checked with a
torque wrench by your authorized dealer or service station.
5. After 25 miles (40 km) check the lug bolt torque with a torque wrench to ensure
that all lug bolts are properly seated against the wheel.
CAUTION!
Do not attempt to raise the vehicle by jacking on locations other than those
indicated in the Jacking Instructions for this vehicle.
WHAT TO DO IN EMERGENCIES
192
Page 195 of 244
WARNING!
• Being under a jacked-up vehicle is dangerous. The vehicle could slip off the
jack and fall on you. You could be crushed. Never put any part of your body
under a vehicle that is on a jack. If you need to get under a raised vehicle, take
it to a service center where it can be raised on a lift.
• Never start or run the engine while the vehicle is on a jack.
• The jack is designed to be used as a tool for changing tires only. The jack
should not be used to lift the vehicle for service purposes. The vehicle should
be jacked on a firm level surface only. Avoid ice or slippery areas.
• Do not attempt to change a tire on the side of the vehicle close to moving
traffic, pull far enough off the road to avoid the danger of being hit when
operating the jack or changing the wheel.
• Carefully follow these tire changing warnings to help prevent personal injury or
damage to your vehicle:
• Always park on a firm, level surface as far from the edge of the roadway
as possible before raising the vehicle.
• Turn on the Hazard Warning flasher.
• Chock the wheel diagonally opposite the wheel to be raised.
• Set the parking brake firmly and set an automatic transmission in PARK.
• Do not let anyone sit in the vehicle when it is on a jack.
• Do not get under the vehicle when it is on a jack.
• Only use the jack in the positions indicated and for lifting this vehicle during
a tire change.
• If working on or near a roadway, be extremely careful of motor traffic.
• Assure that spare tires, flat or inflated, are securely stowed, spares must be
stowed in the rear cargo area with the wing nut attached.
• Raising the vehicle higher than necessary can make the vehicle less stable. It
could slip off the jack and hurt someone near it. Raise the vehicle only enough
to remove the tire.
• A loose tire or jack thrown forward in a collision or hard stop could injure the
occupants in the vehicle. Have the deflated (flat) tire repaired or replaced
immediately.
• To avoid the risk of forcing the vehicle off the jack, do not tighten the lug bolts
fully until the vehicle is lowered to the ground. Failure to follow this warning
may result in personal injury.
WHAT TO DO IN EMERGENCIES
193
Page 199 of 244
FREEING A STUCK VEHICLE
• If your vehicle becomes stuck in mud, sand or snow, it can often be moved by a
rocking motion. Turn your steering wheel right and left to clear the area around the
front wheels. Then shift back and forth between REVERSE and DRIVE. Using
minimal accelerator pedal pressure to maintain the rocking motion, without
spinning the wheels, is most effective.
NOTE:
If your vehicle is equipped with Traction Control or Electronic Stability Control (ESC),
turn the system OFF before attempting to “rock” the vehicle.
CAUTION!
• Racing the engine or spinning the wheels may lead to transmission overheating
and failure. Allow the engine to idle with the shift lever in NEUTRAL for at least
one minute after every five rocking-motion cycles. This will minimize overheat-
ing and reduce the risk of transmission failure during prolonged efforts to free
a stuck vehicle.
• When “rocking” a stuck vehicle by moving between REVERSE and DRIVE, do
not spin the wheels faster than 15 mph (24 km/h), or drivetrain damage may
result.
• Revving the engine or spinning the wheels too fast may lead to transmission
overheating and failure. It can also damage the tires. Do not spin the wheels
above 30 mph (48 km/h) while in gear (no transmission shifting occurring).
WARNING!
Fast spinning tires can be dangerous. Forces generated by excessive wheel speeds
may cause damage, or even failure, of the axle and tires. A tire could explode and
injure someone. Do not spin your vehicle's wheels faster than 30 mph (48 km/h)
or for longer than 30 seconds continuously without stopping when you are stuck
and do not let anyone near a spinning wheel, no matter what the speed.
WHAT TO DO IN EMERGENCIES
197
Page 201 of 244
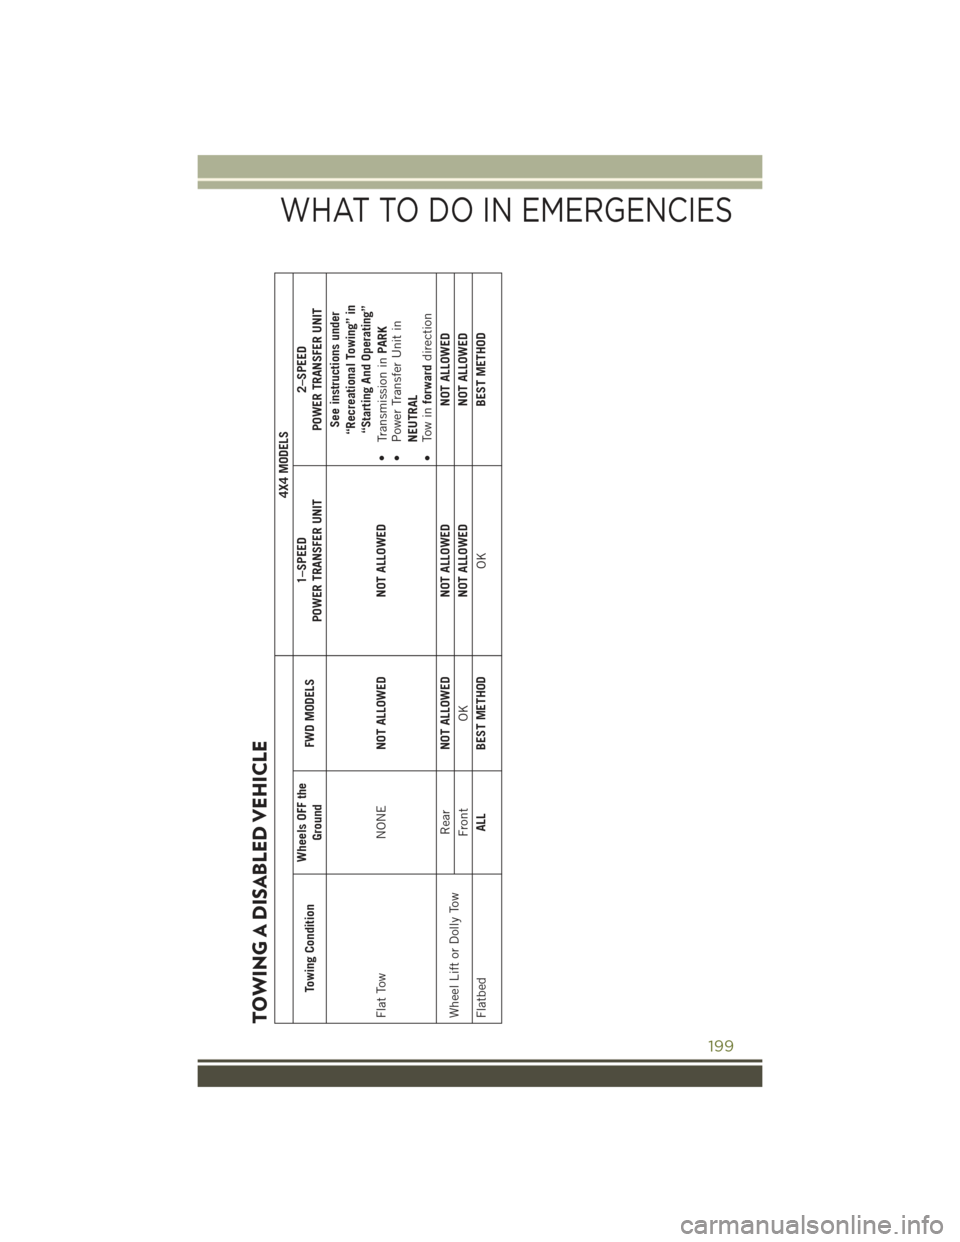
TOWING A DISABLED VEHICLE
4X4 MODELS
Towing Condition
Wheels OFF the
Ground
FWD MODELS
1–SPEED
POWER TRANSFER UNIT
2–SPEED
POWER TRANSFER UNIT
Flat Tow
NONE
NOT ALLOWED
NOT ALLOWED
See instructions under“Recreational Towing” in“Starting And Operating”
•
Transmission in
PARK
• Power Transfer Unit in
NEUTRAL
• Tow in
forward
direction
Wheel Lift or Dolly Tow
Rear
NOT ALLOWED
NOT ALLOWED
NOT ALLOWED
Front
OK
NOT ALLOWED
NOT ALLOWED
Flatbed
ALL
BEST METHOD
OK
BEST METHOD
WHAT TO DO IN EMERGENCIES
199
Page 218 of 244
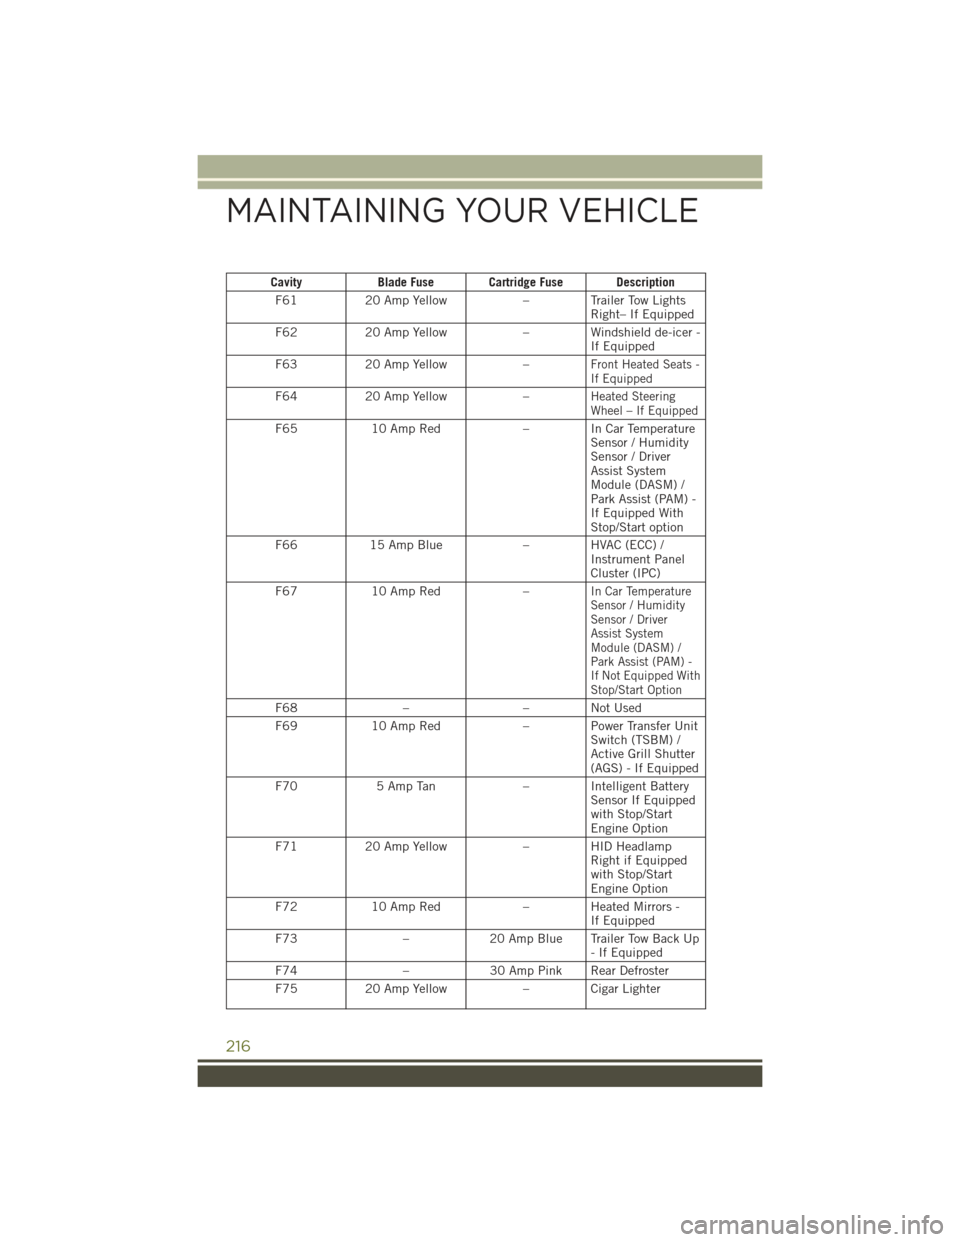
CavityBlade Fuse Cartridge Fuse Description
F6120 Amp Yellow– Trailer Tow LightsRight– If Equipped
F6220 Amp Yellow– Windshield de-icer -If Equipped
F6320 Amp Yellow–Front Heated Seats -If Equipped
F6420 Amp Yellow–Heated SteeringWheel – If Equipped
F6510 Amp Red–InCarTemperatureSensor / HumiditySensor / DriverAssist SystemModule (DASM) /Park Assist (PAM) -If Equipped WithStop/Start option
F6615 Amp Blue–HVAC(ECC)/Instrument PanelCluster (IPC)
F6710 Amp Red–In Car TemperatureSensor / HumiditySensor / DriverAssist SystemModule (DASM) /Park Assist (PAM) -If Not Equipped WithStop/Start Option
F68––NotUsed
F6910 Amp Red–PowerTransferUnitSwitch (TSBM) /Active Grill Shutter(AGS) - If Equipped
F705 Amp Tan– Intelligent BatterySensor If Equippedwith Stop/StartEngine Option
F7120 Amp Yellow–HIDHeadlampRight if Equippedwith Stop/StartEngine Option
F7210 Amp Red– Heated Mirrors -If Equipped
F73–20 Amp Blue Trailer Tow Back Up-IfEquipped
F74–30 Amp Pink Rear Defroster
F7520 Amp Yellow– Cigar Lighter
MAINTAINING YOUR VEHICLE
216