engine JEEP CHEROKEE 2016 KL / 5.G Owner's Manual
[x] Cancel search | Manufacturer: JEEP, Model Year: 2016, Model line: CHEROKEE, Model: JEEP CHEROKEE 2016 KL / 5.GPages: 236, PDF Size: 11.24 MB
Page 156 of 236
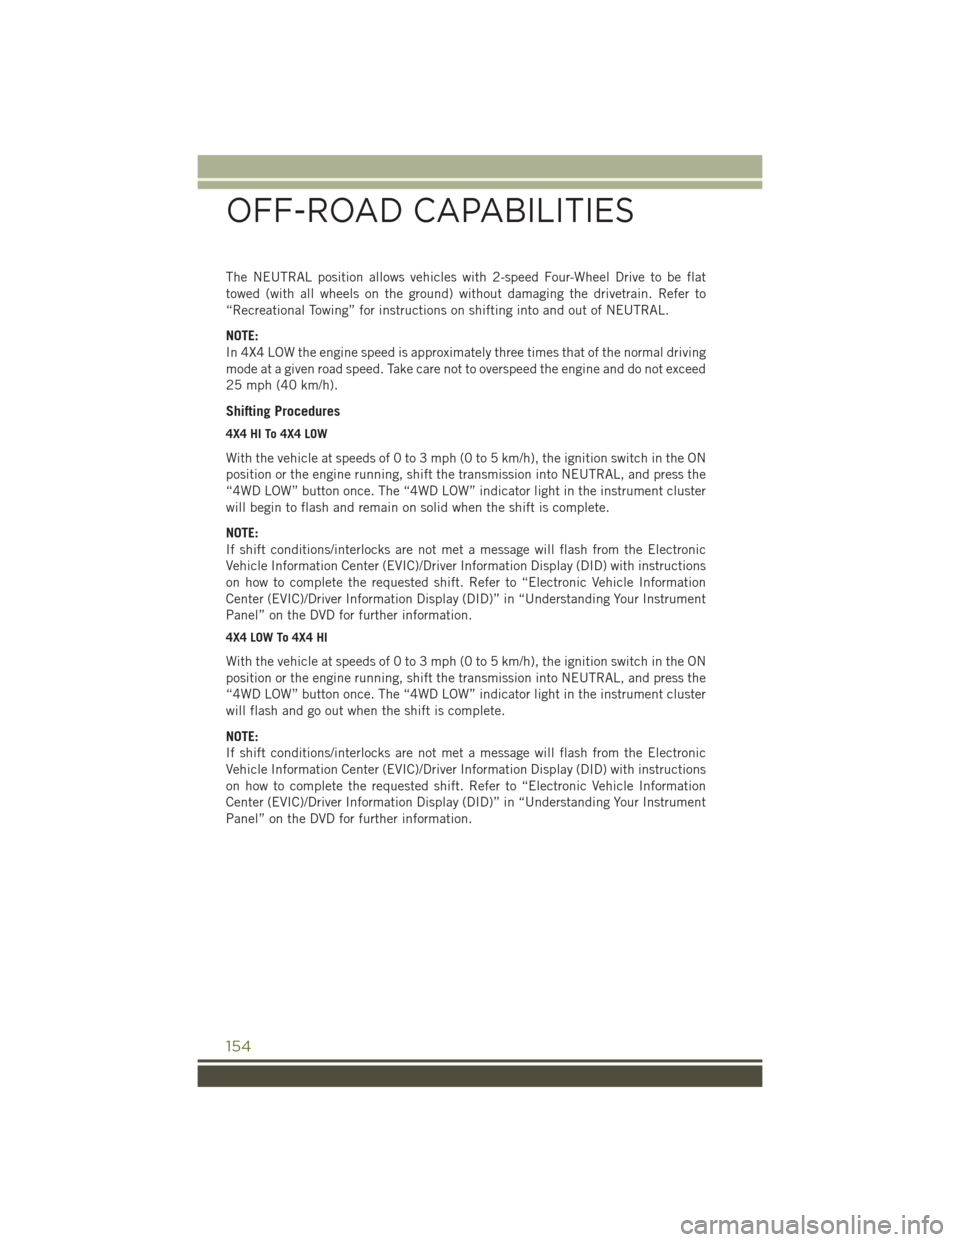
The NEUTRAL position allows vehicles with 2-speed Four-Wheel Drive to be flat
towed (with all wheels on the ground) without damaging the drivetrain. Refer to
“Recreational Towing” for instructions on shifting into and out of NEUTRAL.
NOTE:
In 4X4 LOW the engine speed is approximately three times that of the normal driving
mode at a given road speed. Take care not to overspeed the engine and do not exceed
25 mph (40 km/h).
Shifting Procedures
4X4 HI To 4X4 LOW
With the vehicle at speeds of 0 to 3 mph (0 to 5 km/h), the ignition switch in the ON
position or the engine running, shift the transmission into NEUTRAL, and press the
“4WD LOW” button once. The “4WD LOW” indicator light in the instrument cluster
will begin to flash and remain on solid when the shift is complete.
NOTE:
If shift conditions/interlocks are not met a message will flash from the Electronic
Vehicle Information Center (EVIC)/Driver Information Display (DID) with instructions
on how to complete the requested shift. Refer to “Electronic Vehicle Information
Center (EVIC)/Driver Information Display (DID)” in “Understanding Your Instrument
Panel” on the DVD for further information.
4X4 LOW To 4X4 HI
With the vehicle at speeds of 0 to 3 mph (0 to 5 km/h), the ignition switch in the ON
position or the engine running, shift the transmission into NEUTRAL, and press the
“4WD LOW” button once. The “4WD LOW” indicator light in the instrument cluster
will flash and go out when the shift is complete.
NOTE:
If shift conditions/interlocks are not met a message will flash from the Electronic
Vehicle Information Center (EVIC)/Driver Information Display (DID) with instructions
on how to complete the requested shift. Refer to “Electronic Vehicle Information
Center (EVIC)/Driver Information Display (DID)” in “Understanding Your Instrument
Panel” on the DVD for further information.
OFF-ROAD CAPABILITIES
154
Page 157 of 236
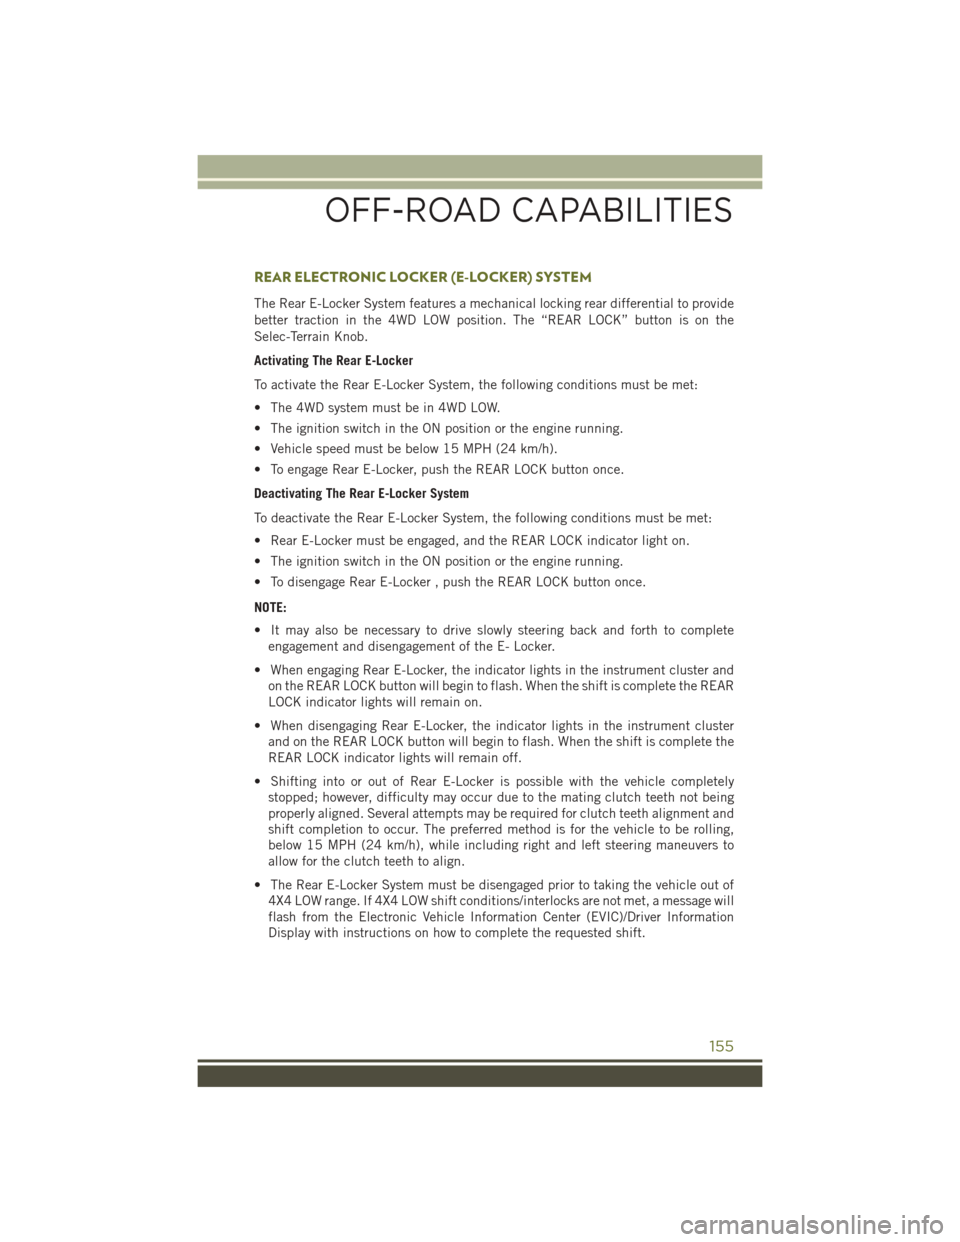
REAR ELECTRONIC LOCKER (E-LOCKER) SYSTEM
The Rear E-Locker System features a mechanical locking rear differential to provide
better traction in the 4WD LOW position. The “REAR LOCK” button is on the
Selec-Terrain Knob.
Activating The Rear E-Locker
To activate the Rear E-Locker System, the following conditions must be met:
• The 4WD system must be in 4WD LOW.
• The ignition switch in the ON position or the engine running.
• Vehicle speed must be below 15 MPH (24 km/h).
• To engage Rear E-Locker, push the REAR LOCK button once.
Deactivating The Rear E-Locker System
To deactivate the Rear E-Locker System, the following conditions must be met:
• Rear E-Locker must be engaged, and the REAR LOCK indicator light on.
• The ignition switch in the ON position or the engine running.
• To disengage Rear E-Locker , push the REAR LOCK button once.
NOTE:
• It may also be necessary to drive slowly steering back and forth to completeengagement and disengagement of the E- Locker.
• When engaging Rear E-Locker, the indicator lights in the instrument cluster and on the REAR LOCK button will begin to flash. When the shift is complete the REAR
LOCK indicator lights will remain on.
• When disengaging Rear E-Locker, the indicator lights in the instrument cluster and on the REAR LOCK button will begin to flash. When the shift is complete the
REAR LOCK indicator lights will remain off.
• Shifting into or out of Rear E-Locker is possible with the vehicle completely stopped; however, difficulty may occur due to the mating clutch teeth not being
properly aligned. Several attempts may be required for clutch teeth alignment and
shift completion to occur. The preferred method is for the vehicle to be rolling,
below 15 MPH (24 km/h), while including right and left steering maneuvers to
allow for the clutch teeth to align.
• The Rear E-Locker System must be disengaged prior to taking the vehicle out of 4X4 LOW range. If 4X4 LOW shift conditions/interlocks are not met, a message will
flash from the Electronic Vehicle Information Center (EVIC)/Driver Information
Display with instructions on how to complete the requested shift.
OFF-ROAD CAPABILITIES
155
Page 158 of 236
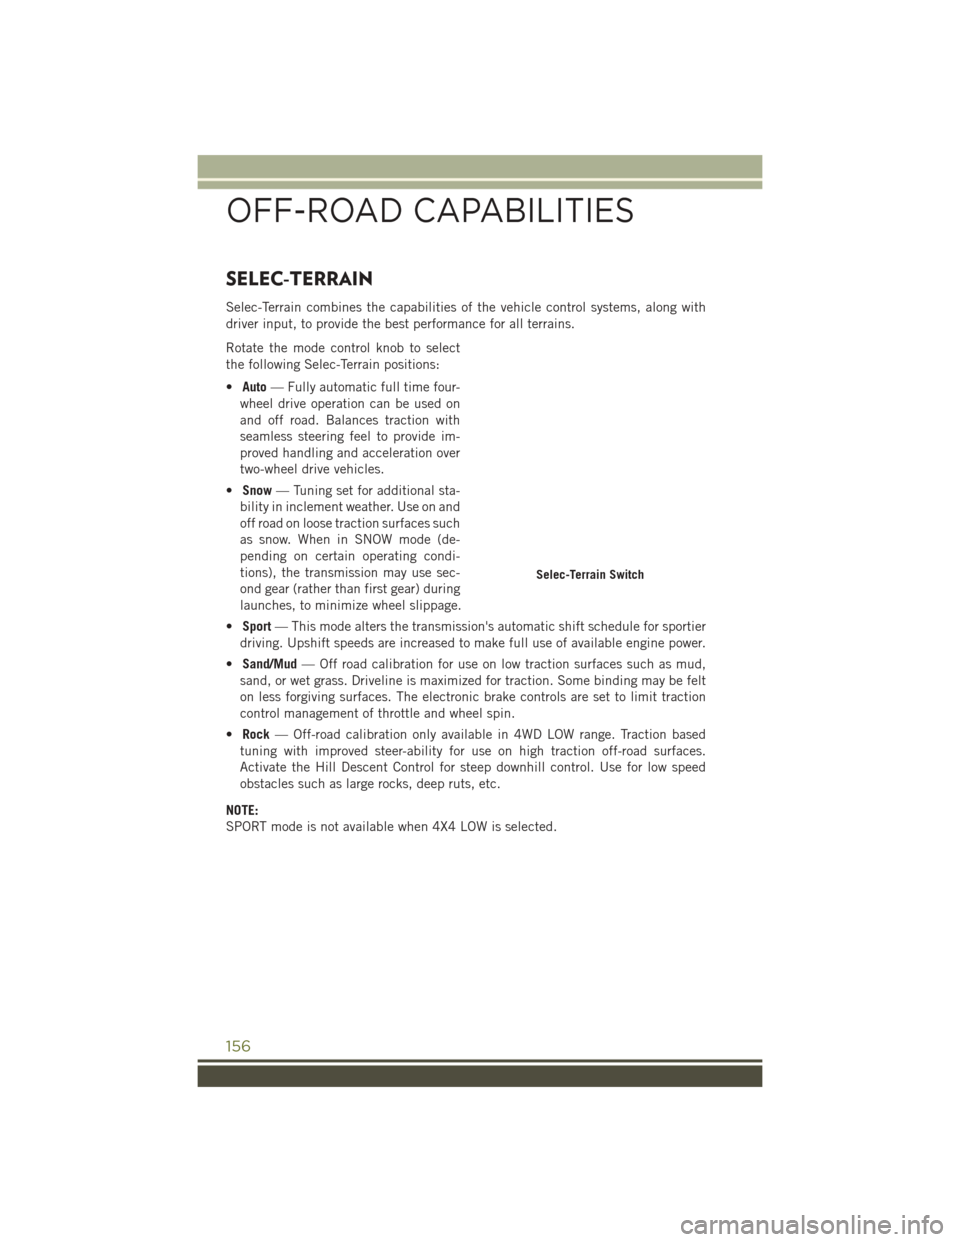
SELEC-TERRAIN
Selec-Terrain combines the capabilities of the vehicle control systems, along with
driver input, to provide the best performance for all terrains.
Rotate the mode control knob to select
the following Selec-Terrain positions:
•Auto — Fully automatic full time four-
wheel drive operation can be used on
and off road. Balances traction with
seamless steering feel to provide im-
proved handling and acceleration over
two-wheel drive vehicles.
• Snow — Tuning set for additional sta-
bility in inclement weather. Use on and
off road on loose traction surfaces such
as snow. When in SNOW mode (de-
pending on certain operating condi-
tions), the transmission may use sec-
ond gear (rather than first gear) during
launches, to minimize wheel slippage.
• Sport — This mode alters the transmission's automatic shift schedule for sportier
driving. Upshift speeds are increased to make full use of available engine power.
• Sand/Mud — Off road calibration for use on low traction surfaces such as mud,
sand, or wet grass. Driveline is maximized for traction. Some binding may be felt
on less forgiving surfaces. The electronic brake controls are set to limit traction
control management of throttle and wheel spin.
• Rock — Off-road calibration only available in 4WD LOW range. Traction based
tuning with improved steer-ability for use on high traction off-road surfaces.
Activate the Hill Descent Control for steep downhill control. Use for low speed
obstacles such as large rocks, deep ruts, etc.
NOTE:
SPORT mode is not available when 4X4 LOW is selected.
Selec-Terrain Switch
OFF-ROAD CAPABILITIES
156
Page 160 of 236
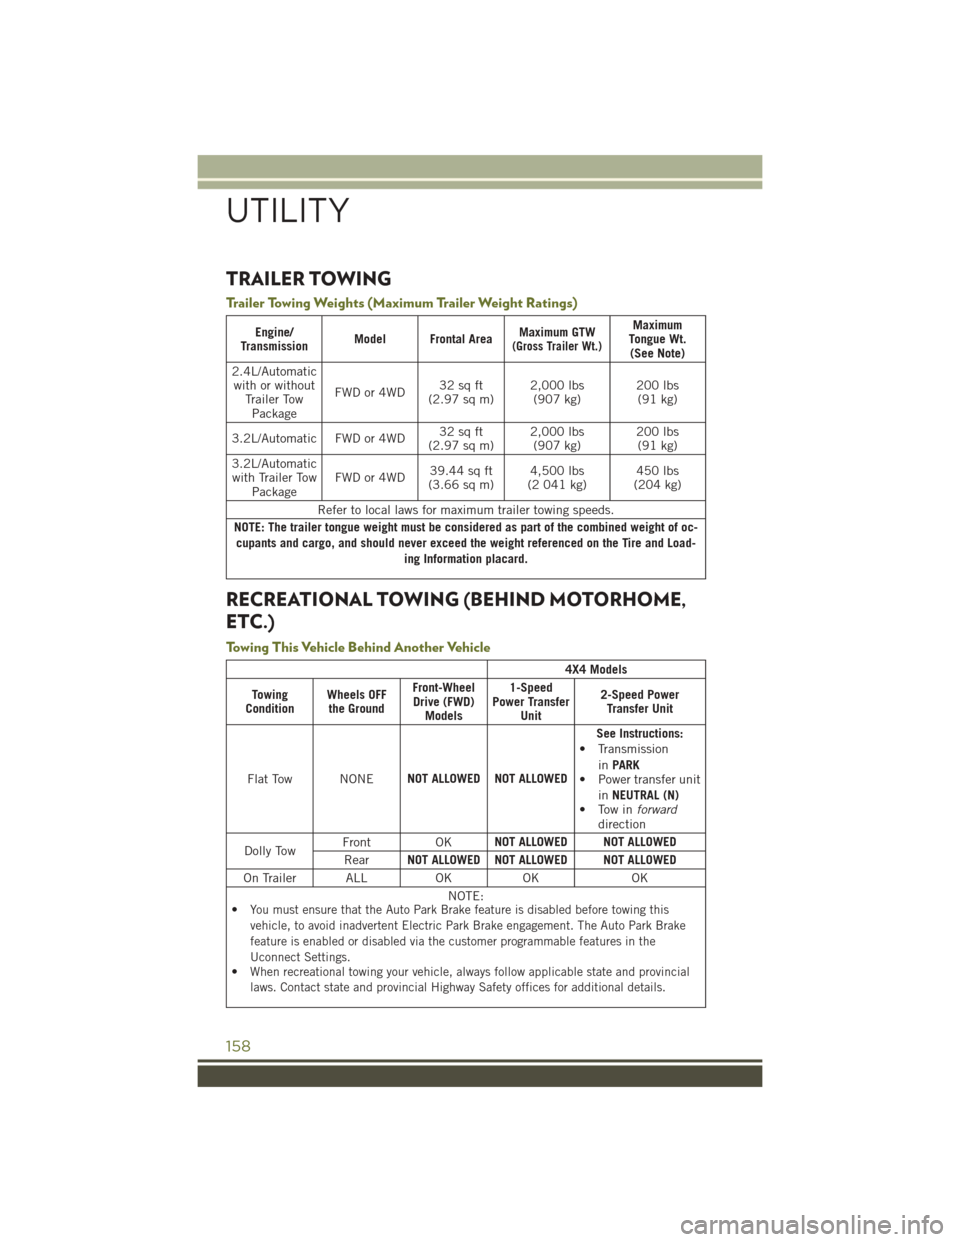
TRAILER TOWING
Trailer Towing Weights (Maximum Trailer Weight Ratings)
Engine/
Transmission Model Frontal Area Maximum GTW(Gross Trailer Wt.)
Maximum
Tongue Wt. (See Note)
2.4L/Automatic with or without Trailer TowPackage FWD or 4WD
32 sq ft
(2.97 sq m) 2,000 lbs
(907 kg) 200 lbs
(91 kg)
3.2L/Automatic FWD or 4WD 32 sq ft
(2.97 sq m) 2,000 lbs
(907 kg) 200 lbs
(91 kg)
3.2L/Automatic with Trailer Tow Package FWD or 4WD
39.44 sq ft
(3.66 sq m) 4,500 lbs
(2 041 kg) 450 lbs
(204 kg)
Refer to local laws for maximum trailer towing speeds.
NOTE: The trailer tongue weight must be considered as part of the combined weight of oc- cupants and cargo, and should never exceed the weight referenced on the Tire and Load- ing Information placard.
RECREATIONAL TOWING (BEHIND MOTORHOME,
ETC.)
Towing This Vehicle Behind Another Vehicle
4X4 Models
Towing
Condition Wheels OFF
the Ground Front-Wheel
Drive (FWD) Models 1-Speed
Power Transfer Unit 2-Speed Power
Transfer Unit
Flat Tow NONE NOT ALLOWED NOT ALLOWED See Instructions:
• Transmission
inPARK
• Power transfer unit
inNEUTRAL (N)
• Tow in forward
direction
Dolly Tow Front OK
NOT ALLOWED NOT ALLOWED
Rear NOT ALLOWED NOT ALLOWED NOT ALLOWED
On Trailer ALL OK OK OK NOTE:
•
You must ensure that the Auto Park Brake feature is disabled before towing this
vehicle, to avoid inadvertent Electric Park Brake engagement. The Auto Park Brake
feature is enabled or disabled via the customer programmable features in the
Uconnect Settings.
•When recreational towing your vehicle, always follow applicable state and provincial
laws. Contact state and provincial Highway Safety offices for additional details.
UTILITY
158
Page 161 of 236
Recreational Towing — Front-Wheel Drive (FWD) Models
DO NOTflat tow this vehicle. Damage to the drivetrain will result.
Recreational towing (for front-wheel drive models) is allowed ONLY if the front wheels
are OFF the ground. This may be accomplished using a tow dolly or vehicle trailer.
If using a tow dolly, follow this procedure:
1. Properly secure the dolly to the tow vehicle, following the dolly manufacturer's instructions.
2. Drive the front wheels onto the tow dolly.
3. Apply the parking brake. Place the transmission in PARK. Turn the engine OFF.
4. Properly secure the front wheels to the dolly, following the dolly manufacturer's instructions.
5. Turn the ignition to the ON/RUN position, but do not start the engine.
6. Press and hold the brake pedal.
7. Release the parking brake.
8. Turn the ignition OFF, remove the Key Fob, and release the brake pedal.
CAUTION!
• Towing with the front wheels on the ground will cause severe transmission damage. Damage from improper towing is not covered under the New Vehicle
Limited Warranty.
• Ensure that the Electric Park Brake is released, and remains released, while
being towed.
Recreational Towing — 4X4 Models With 1-Speed Power Transfer Unit
Recreational towing is not allowed. These models do not have a NEUTRAL (N) position
in the power transfer unit.
NOTE:
This vehicle may be towed on a flatbed or vehicle trailer provided all four wheels are
OFF the ground.
CAUTION!
Towing this vehicle with ANYof its wheels on the ground can cause severe
transmission and/or power transfer unit damage. Damage from improper towing is not
covered under the New Vehicle Limited Warranty.
UTILITY
159
Page 163 of 236
1. Bring the vehicle to a complete stop and shift the transmission to PARK.
2. Turn the engine OFF.
3. Turn the ignition switch to the ON/RUN position, but do not start the engine.
4. Press and hold the brake pedal.
5. Shift the transmission into NEUTRAL.
6. Using a ballpoint pen or similar object, push and hold the recessed NEUTRAL (N)button (located by the selector switch) for four seconds. The light behind the
NEUTRAL (N) symbol will blink, indicating shift in progress. The light will stop
blinking (stay on solid) when the shift to NEUTRAL (N) is complete.
7. After the shift is completed and the NEUTRAL (N) light stays on, release the NEUTRAL (N) button.
8. Start the engine.
9. Release the parking brake.
10. Shift the transmission into REVERSE.
11. Release the brake pedal for five seconds and ensure that there is no vehicle movement.
12. Shift the transmission to NEUTRAL.
13. Apply the parking brake.
14. Shift the transmission into PARK, turn the engine OFF, and remove the key fob.
15. Attach the vehicle to the tow vehicle using a suitable tow bar.
16. Turn the ignition to the ON/RUN position, but do not start the engine.
17. Press and hold the brake pedal.
18. Release the parking brake.
19. Turn the ignition OFF, remove the Key Fob, and release the brake pedal.
NOTE:
• Steps 1 through 5 are requirements that must be met before pushing the NEUTRAL (N) button, and must continue to be met until the shift has been
completed. If any of these requirements are not met before pushing the NEUTRAL
(N) button or are no longer met during the shift, then the NEUTRAL (N) indicator
light will flash continuously until all requirements are met or until the NEUTRAL
(N) button is released.
• The ignition switch must be in the ON/RUN position for a shift to take place and for the position indicator lights to be operable. If the ignition switch is not in the
ON/RUN position, the shift will not take place and no position indicator lights will
be on or flashing.
• A flashing NEUTRAL (N) position indicator light indicates that shift requirements have not been met.
UTILITY
161
Page 164 of 236
Shifting Out Of NEUTRAL (N)
Use the following procedure to prepare your vehicle for normal usage.
1. Bring the vehicle to a complete stop, leaving it connected to the tow vehicle.
2. Apply the parking brake.
3. Turn the ignition switch to the ON/RUN position, but do not start the engine.
4. Press and hold the brake pedal.
5. Shift the transmission into NEUTRAL.
6. Using a ballpoint pen or similar object, push and hold the recessed power transferunit NEUTRAL (N) button (located by the selector switch) for one second.
7.
When the NEUTRAL (N) indicator light turns off, release the NEUTRAL (N) button.
8. After the NEUTRAL (N) button has been released, the power transfer unit will shift to the position indicated by the selector switch.
NOTE:
When shifting the power transfer unit out of NEUTRAL (N), the engine should remain
OFF to avoid gear clash.
9. Shift the transmission into PARK.
10. Release the brake pedal.
11. Disconnect vehicle from the tow vehicle.
12. Start the engine.
13. Press and hold the brake pedal.
14. Release the parking brake.
15. Shift the transmission into DRIVE, release the brake pedal, and check that the vehicle operates normally.
16. Re-enable the Auto Park Brake feature, if desired.
NOTE:
• Steps 1 through 5 are requirements that must be met before pushing the NEUTRAL (N) button, and must continue to be met until the shift has been
completed. If any of these requirements are not met before pushing the NEUTRAL
(N) button or are no longer met during the shift, the NEUTRAL (N) indicator light
will flash continuously until all requirements are met or until the NEUTRAL (N)
button is released.
• The ignition switch must be in the ON/RUN position for a shift to take place and for the position indicator lights to be operable. If the ignition switch is not in the
ON/RUN position, the shift will not take place and no position indicator lights will
be on or flashing.
• A flashing NEUTRAL (N) position indicator light indicates that shift requirements have not been met.
UTILITY
162
Page 165 of 236
ROADSIDE ASSISTANCE
Dial toll-free 1-800-521-2779 for U.S. Residents or 1-800-363-4869 for Canadian
Residents.
• Provide your name, vehicle identification number, license plate number, and yourlocation, including the telephone number from which you are calling.
• Briefly describe the nature of the problem and answer a few simple questions.
• You will be given the name of the service provider and an estimated time of arrival. If you feel you are in an “unsafe situation”, please let us know. With your consent,
we will contact local police or safety authorities.
INSTRUMENT CLUSTER WARNING LIGHTS
– Low Fuel Warning Light
This warning light indicates when the fuel level reaches approximately 2.0 gal (7.8 L).
This light will turn on and a single chime will sound.
- Charging System Light
This light shows the status of the electrical charging system. If the charging system
light remains on, it means that the vehicle is experiencing a problem with the
charging system.
We recommend you do not continue driving if the charging system light is on. Have
the vehicle serviced immediately.
- Oil Pressure Warning Light
This light indicates low engine oil pressure. If the light turns on while driving, stop
the vehicle and shut off the engine as soon as possible. A chime will sound for four
minutes when this light turns on.
We recommend you do not operate the vehicle or engine damage will occur. Have the
vehicle serviced immediately.
- Anti-Lock Brake (ABS) Light
This light monitors the Anti-Lock Brake System (ABS). The light will turn on when the
ignition switch is turned to the ON/RUN position and may stay on for as long as four
seconds.
If the ABS light remains on or turns on while driving, it indicates that the Anti-Lock
portion of the brake system is not functioning and that service is required. However, the
conventional brake system will continue to operate normally if the BRAKE warning light
is not on.
WHAT TO DO IN EMERGENCIES
163
Page 166 of 236
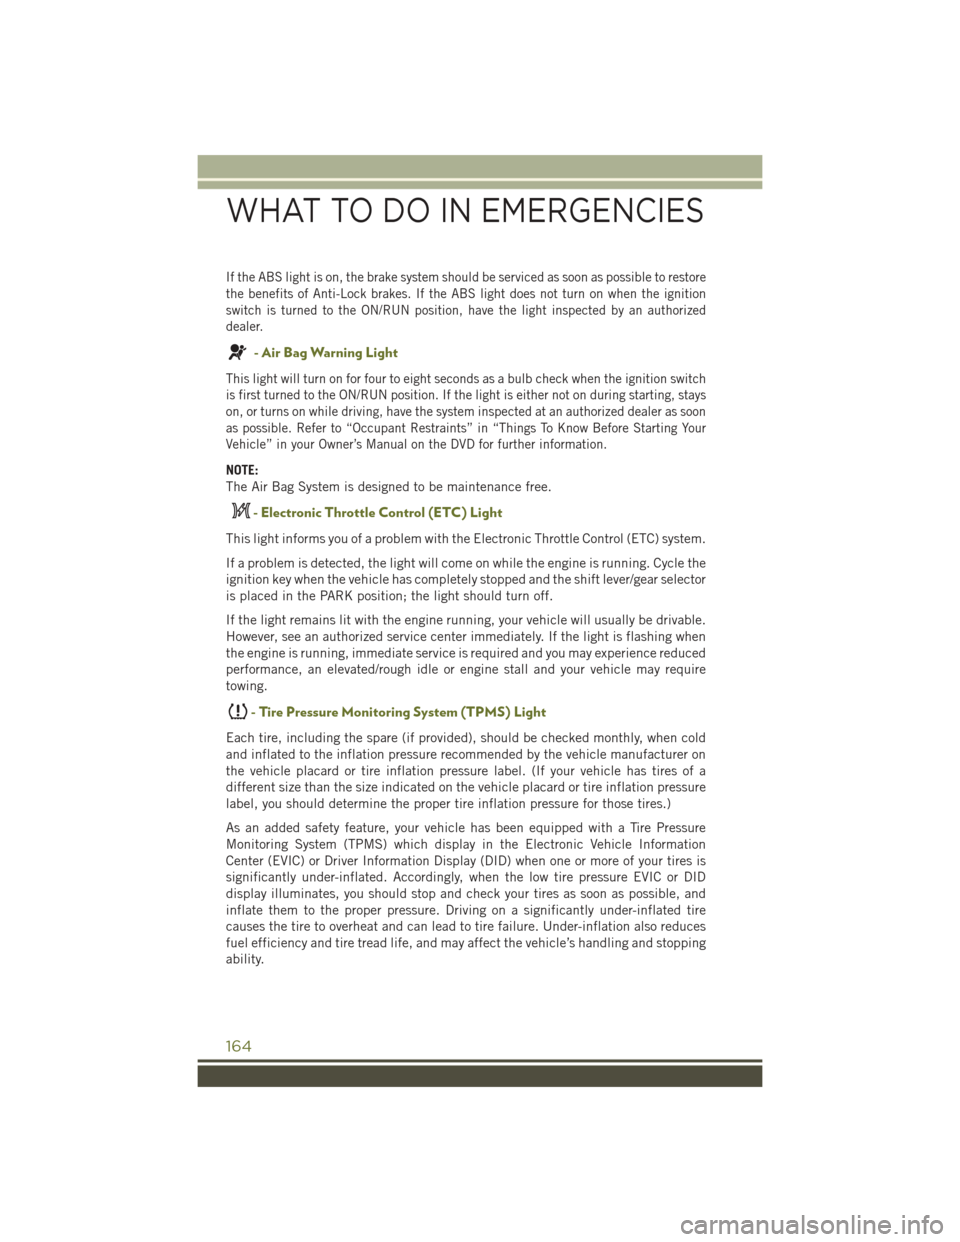
If the ABS light is on, the brake system should be serviced as soon as possible to restore
the benefits of Anti-Lock brakes. If the ABS light does not turn on when the ignition
switch is turned to the ON/RUN position, have the light inspected by an authorized
dealer.
- Air Bag Warning Light
This light will turn on for four to eight seconds as a bulb check when the ignition switch
is first turned to the ON/RUN position. If the light is either not on during starting, stays
on, or turns on while driving, have the system inspected at an authorized dealer as soon
as possible. Refer to “Occupant Restraints” in “Things To Know Before Starting Your
Vehicle” in your Owner’s Manual on the DVD for further information.
NOTE:
The Air Bag System is designed to be maintenance free.
- Electronic Throttle Control (ETC) Light
This light informs you of a problem with the Electronic Throttle Control (ETC) system.
If a problem is detected, the light will come on while the engine is running. Cycle the
ignition key when the vehicle has completely stopped and the shift lever/gear selector
is placed in the PARK position; the light should turn off.
If the light remains lit with the engine running, your vehicle will usually be drivable.
However, see an authorized service center immediately. If the light is flashing when
the engine is running, immediate service is required and you may experience reduced
performance, an elevated/rough idle or engine stall and your vehicle may require
towing.
- Tire Pressure Monitoring System (TPMS) Light
Each tire, including the spare (if provided), should be checked monthly, when cold
and inflated to the inflation pressure recommended by the vehicle manufacturer on
the vehicle placard or tire inflation pressure label. (If your vehicle has tires of a
different size than the size indicated on the vehicle placard or tire inflation pressure
label, you should determine the proper tire inflation pressure for those tires.)
As an added safety feature, your vehicle has been equipped with a Tire Pressure
Monitoring System (TPMS) which display in the Electronic Vehicle Information
Center (EVIC) or Driver Information Display (DID) when one or more of your tires is
significantly under-inflated. Accordingly, when the low tire pressure EVIC or DID
display illuminates, you should stop and check your tires as soon as possible, and
inflate them to the proper pressure. Driving on a significantly under-inflated tire
causes the tire to overheat and can lead to tire failure. Under-inflation also reduces
fuel efficiency and tire tread life, and may affect the vehicle’s handling and stopping
ability.
WHAT TO DO IN EMERGENCIES
164
Page 168 of 236
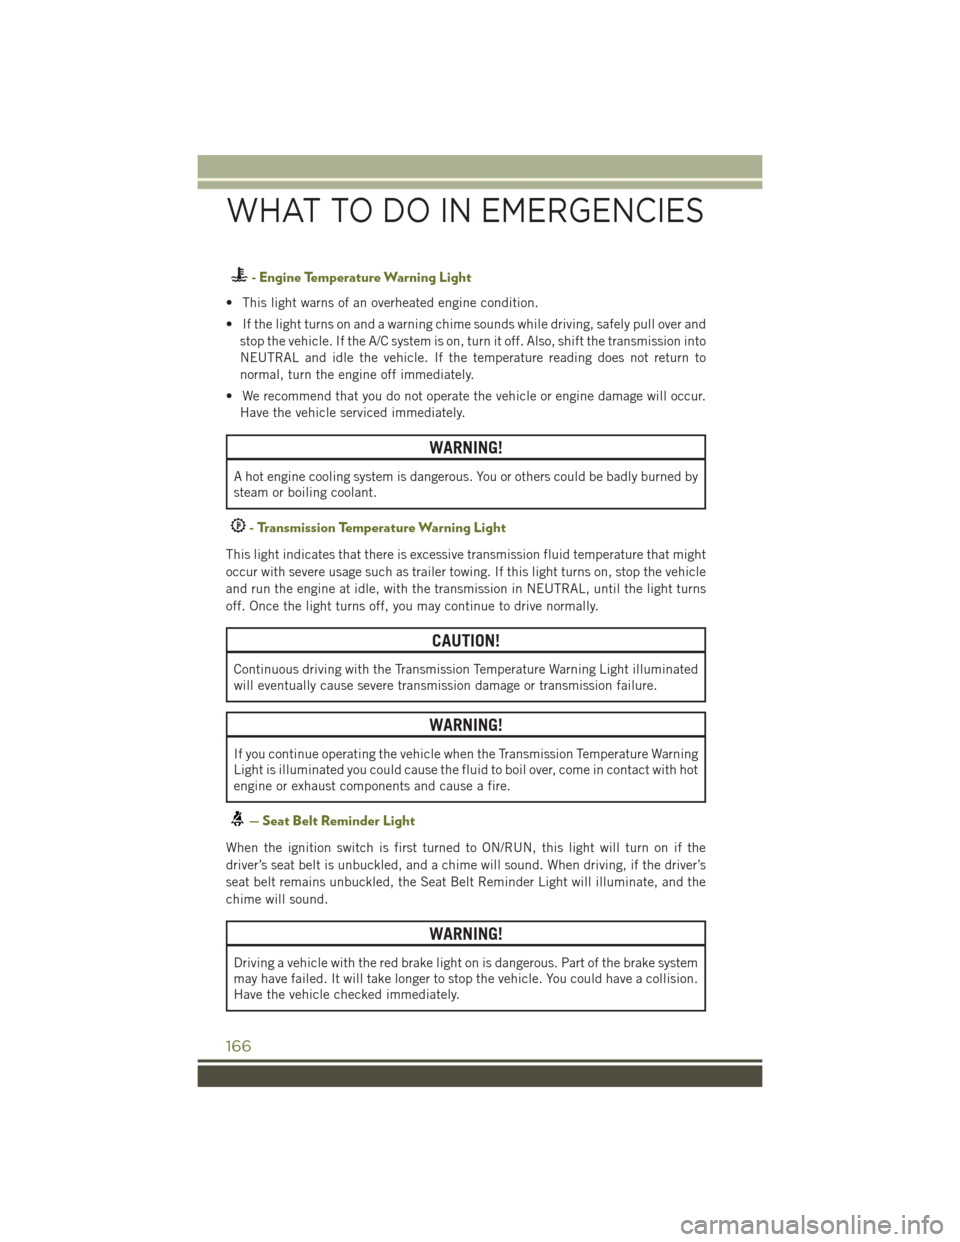
- Engine Temperature Warning Light
• This light warns of an overheated engine condition.
• If the light turns on and a warning chime sounds while driving, safely pull over andstop the vehicle. If the A/C system is on, turn it off. Also, shift the transmission into
NEUTRAL and idle the vehicle. If the temperature reading does not return to
normal, turn the engine off immediately.
• We recommend that you do not operate the vehicle or engine damage will occur. Have the vehicle serviced immediately.
WARNING!
A hot engine cooling system is dangerous. You or others could be badly burned by
steam or boiling coolant.
- Transmission Temperature Warning Light
This light indicates that there is excessive transmission fluid temperature that might
occur with severe usage such as trailer towing. If this light turns on, stop the vehicle
and run the engine at idle, with the transmission in NEUTRAL, until the light turns
off. Once the light turns off, you may continue to drive normally.
CAUTION!
Continuous driving with the Transmission Temperature Warning Light illuminated
will eventually cause severe transmission damage or transmission failure.
WARNING!
If you continue operating the vehicle when the Transmission Temperature Warning
Light is illuminated you could cause the fluid to boil over, come in contact with hot
engine or exhaust components and cause a fire.
— Seat Belt Reminder Light
When the ignition switch is first turned to ON/RUN, this light will turn on if the
driver’s seat belt is unbuckled, and a chime will sound. When driving, if the driver’s
seat belt remains unbuckled, the Seat Belt Reminder Light will illuminate, and the
chime will sound.
WARNING!
Driving a vehicle with the red brake light on is dangerous. Part of the brake system
may have failed. It will take longer to stop the vehicle. You could have a collision.
Have the vehicle checked immediately.
WHAT TO DO IN EMERGENCIES
166