change wheel JEEP CHEROKEE 2016 KL / 5.G User Guide
[x] Cancel search | Manufacturer: JEEP, Model Year: 2016, Model line: CHEROKEE, Model: JEEP CHEROKEE 2016 KL / 5.GPages: 236, PDF Size: 11.24 MB
Page 107 of 236
USB Port
• Connect your compatible device using a USB cable into the USB Port. USBMemory sticks with audio files can also be used. Audio from the device can be
played on the vehicles sound system while providing metadata (artist, track title,
album, etc.) information on the radio display.
• When connected, the compatible USB device can be controlled using the radio or Steering Wheel Audio Controls to play, skip to the next or previous track, browse,
and list the contents.
• The battery charges when plugged into the USB port (if supported by the specific device).
• To route the USB cable out of the center console, use the access cut out.
NOTE:
When connecting your device for the first time, the system may take several minutes
to read your music, depending on the number of files. For example, the system will
take approximately five minutes for every 1,000 songs loaded on the device. Also
during the reading process, the Shuffle and Browse functions will be disabled. This
process is needed to ensure the full use of your features and only happens the first
time it is connected. After the first time, the reading process of your device will take
considerably less time unless changes are made or new songs are added to the
playlist.
SD Card
• Play songs stored on an SD card inserted into the SD card slot.
• Song playback can be controlled using the radio or Steering Wheel Audio Controls to play, skip to the next or previous track, browse, and list the contents.
Bluetooth Streaming Audio
• If equipped with Uconnect Voice Command, your Bluetooth-equipped device may also be able to stream music to your vehicle's sound system. Your connected
device must be Bluetooth-compatible and paired with your system (see Uconnect
Phone for pairing instructions). You can access the music from your connected
Bluetooth device by pressing the Bluetooth
button on the touchscreen while in
Media mode.
ELECTRONICS
105
Page 144 of 236
STEERING WHEEL AUDIO CONTROLS
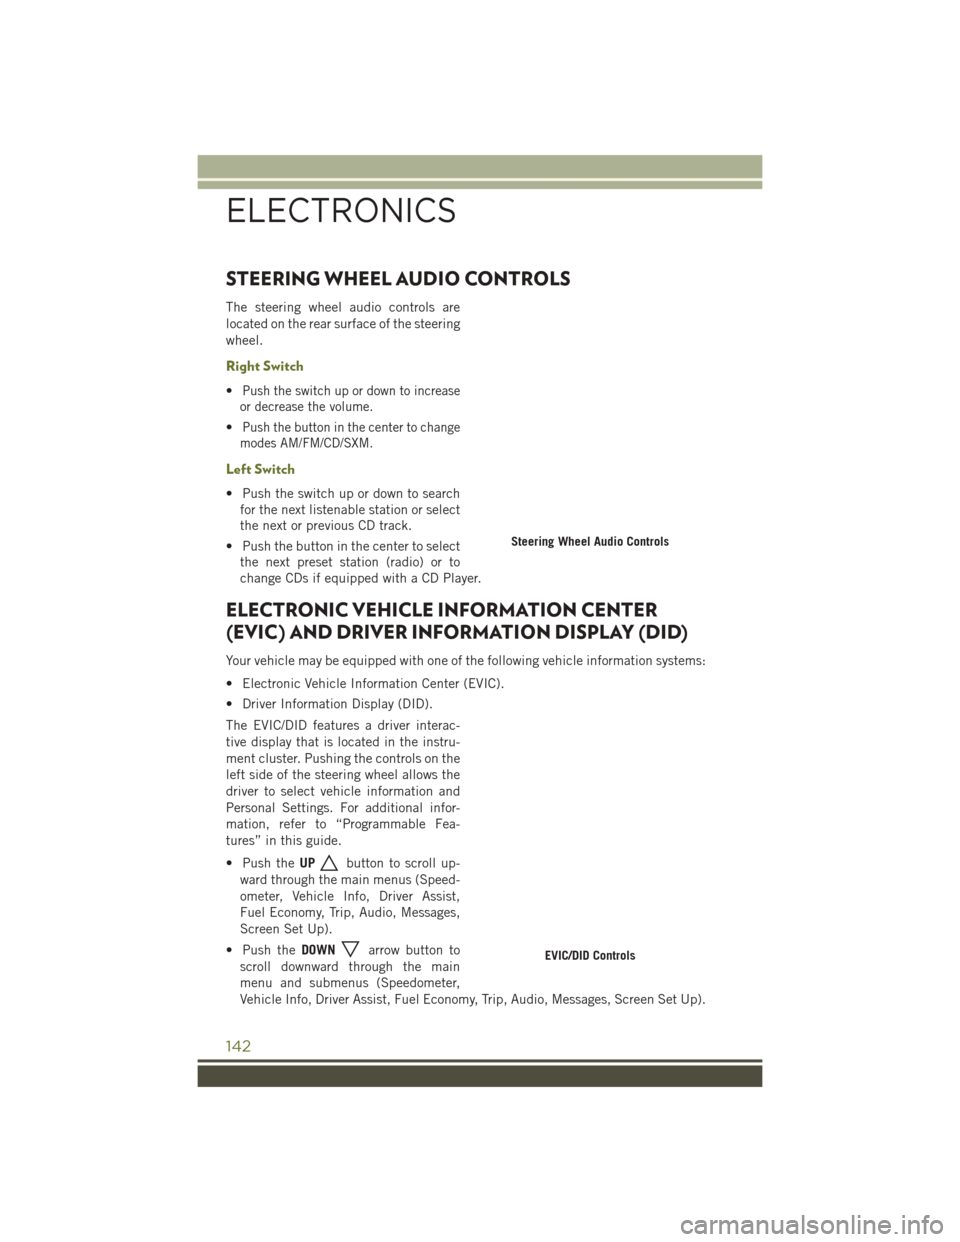
The steering wheel audio controls are
located on the rear surface of the steering
wheel.
Right Switch
•Push the switch up or down to increase
or decrease the volume.
•Push the button in the center to change
modes AM/FM/CD/SXM.
Left Switch
• Push the switch up or down to search for the next listenable station or select
the next or previous CD track.
• Push the button in the center to select the next preset station (radio) or to
change CDs if equipped with a CD Player.
ELECTRONIC VEHICLE INFORMATION CENTER
(EVIC) AND DRIVER INFORMATION DISPLAY (DID)
Your vehicle may be equipped with one of the following vehicle information systems:
• Electronic Vehicle Information Center (EVIC).
• Driver Information Display (DID).
The EVIC/DID features a driver interac-
tive display that is located in the instru-
ment cluster. Pushing the controls on the
left side of the steering wheel allows the
driver to select vehicle information and
Personal Settings. For additional infor-
mation, refer to “Programmable Fea-
tures” in this guide.
• Push the UP
button to scroll up-
ward through the main menus (Speed-
ometer, Vehicle Info, Driver Assist,
Fuel Economy, Trip, Audio, Messages,
Screen Set Up).
• Push the DOWN
arrow button to
scroll downward through the main
menu and submenus (Speedometer,
Vehicle Info, Driver Assist, Fuel Economy, Trip, Audio, Messages, Screen Set Up).
Steering Wheel Audio Controls
EVIC/DID Controls
ELECTRONICS
142
Page 167 of 236
IF THE LIGHT STARTS FLASHING INDICATING A LOW TIRE PRESSURE, ADJUST THE AIR
PRESSURE IN THE LOW TIRE TO THE AIR PRESSURE SHOWN ON THE VEHICLE PLACARD OR
TIRE INFLATION PRESSURE LABEL LOCATED ON THE DRIVER'S DOOR.
NOTE:
After inflation, the vehicle may need to be driven for 20 minutes before the flashing light
will turn off.
Please note that the TPMS is not a substitute for proper tire maintenance, and it is
the driver’s responsibility to maintain correct tire pressure, even if under-inflation
has not reached the level to trigger illumination of the TPMS low EVIC or DID display.
Your vehicle has also been equipped with a TPMS malfunction indicator to indicate
when the system is not operating properly. The TPMS malfunction indicator is
combined with the low tire pressure telltale. When the system detects a malfunction,
the telltale will flash for approximately one minute and then remain continuously
illuminated. This sequence will continue each time the vehicle is restarted as long as
the malfunction exists.
When the malfunction indicator is illuminated, the system may not be able to detect
or signal low tire pressure as intended. TPMS malfunctions may occur for a variety of
reasons, including the installation of replacement or alternate tires or wheels on the
vehicle that prevent the TPMS from functioning properly. Always check the TPMS
malfunction telltale after replacing one or more tires or wheels on your vehicle, to
ensure that the replacement or alternate tires and wheels allow the TPMS to continue
to function properly.
NOTE:
Tire pressures change by approximately 1 psi (7 kPa) per 12° F (7° C) of air
temperature change. Keep this in mind when checking tire pressure inside a garage,
especially in the Winter. Example: If garage temperature is 68°F (20°C) and the
outside temperature is 32°F (0°C), then the cold tire inflation pressure should be
increased by 3 psi (21 kPa), which equals 1 psi (7 kPa) for every 12°F (7°C) for this
outside temperature condition.
CAUTION!
The TPMS has been optimized for the original equipment tires and wheels. TPMS
pressures and warning have been established for the tire size equipped on your
vehicle. Undesirable system operation or sensor damage may result when using
replacement equipment that is not of the same size, type, and/or style. After-
market wheels can cause sensor damage. Do not use tire sealant from a can, or
balance beads if your vehicle is equipped with a TPMS, as damage to the sensors
may result.
WHAT TO DO IN EMERGENCIES
165
Page 181 of 236
NOTE:
• The metal end fitting from Power Plug (8) may get hot after use, so it should behandled carefully.
• Failure to reinstall the cap on the fitting at the end of the Sealant Hose (6) can result in sealant contacting your skin, clothing, and the vehicle’s interior. It can
also result in sealant contacting internal Tire Service Kit components which may
cause permanent damage to the kit.
WARNING!
•Do not attempt to seal a tire on the side of the vehicle closest to traffic. Pull far
enough off the road to avoid the danger of being hit when using the Tire Service
Kit.
• Do not use the Tire Service Kit or drive the vehicle under the following circumstances:
• If the puncture in the tire tread is approximately 1/4”. (6 mm) or larger.
• If the tire has any sidewall damage.
• If the tire has any damage from driving with extremely low tire pressure.
• If the tire has any damage from driving on a flat tire.
• If the wheel has any damage.
• If you are unsure of the condition of the tire or the wheel.
• Keep the Tire Service Kit away from open flames or heat source.
• A loose Tire Service Kit thrown forward in a collision or hard stop could
endanger the occupants of the vehicle. Always stow the Tire Service Kit in the
place provided. Failure to follow these warnings can result in injuries that are
serious or fatal to you, your passengers, and others around you.
•
Take care not to allow the contents of the Tire Service Kit to come in contact with
hair, eyes, or clothing. The Tire Service Kit is harmful if inhaled, swallowed, or
absorbed through the skin. It causes skin, eye, and respiratory irritation. Flush
immediately with plenty of water if there is any contact with eyes or skin. Change
clothing as soon as possible, if there is any contact with clothing.
• The Tire Service Kit Sealant solution contains latex. In case of an allergic
reaction or rash, consult a physician immediately. Keep the Tire Service Kit out
of reach of children. If swallowed, rinse mouth immediately with plenty of
water and drink plenty of water. Do not induce vomiting! Consult a physician
immediately.
• The Tire Service Kit is not a permanent flat tire repair. Have the tire inspected
and repaired or replaced after using the Tire Service Kit. Do not exceed 55 mph
(88 km/h) until the tire is repaired or replaced. Failure to follow this warning
can result in injuries that are serious or fatal to you, your passengers, and
others around you.
WHAT TO DO IN EMERGENCIES
179
Page 182 of 236
JACKING AND TIRE CHANGING
WARNING!
• Do not attempt to change a tire on the side of the vehicle close to movingtraffic. Pull far enough off the road to avoid the danger of being hit when
operating the jack or changing the wheel.
• Being under a jacked-up vehicle is dangerous. The vehicle could slip off the
jack and fall on you. You could be crushed. Never put any part of your body
under a vehicle that is on a jack. If you need to get under a raised vehicle, take
it to a service center where it can be raised on a lift.
• Never start or run the engine while the vehicle is on a jack.
• The jack is designed to be used as a tool for changing tires only. The jack
should not be used to lift the vehicle for service purposes. The vehicle should
be jacked on a firm level surface only. Avoid ice or slippery areas.
Jack Location/Spare Tire Stowage
The jack, wheel chocks and spare tire are stowed under the load floor behind the rear
seat.
1. Open the liftgate.
2. Lift the access cover using the load floor handle.
3. Remove the hook from the stowed position on the back side of the load floor and place the hook over the top body in white flange and weather seal. This will hold
the load floor up while obtaining the jack and spare tire.
4. Remove the fastener securing the jack and spare tire.
5. Remove the chocks.
6. Remove the scissors jack and wheel bolt wrench from the spare wheel as an assembly. Turn the jack screw to the left to loosen the wheel bolt wrench, and
remove the wrench from the jack assembly.
NOTE:
The jack handle attaches to the side of the jack with two attachment points. When
the jack is partially expanded, the tension between the two attachment points holds
the jack handle in place.
7. Remove the spare tire.
WHAT TO DO IN EMERGENCIES
180
Page 183 of 236
WARNING!
A loose tire or jack thrown forward in a collision or hard stop could endanger the
occupants of the vehicle. Always stow the jack parts and the spare tire in the
places provided. Have the deflated (flat) tire repaired or replaced immediately.
Preparations For Jacking
1. Park the vehicle on a firm level surface as far from the edge of the roadway aspossible. Avoid icy or slippery areas.
WARNING!
Do not attempt to change a tire on the side of the vehicle close to moving traffic,
pull far enough off the road to avoid being hit when operating the jack or changing
the wheel.
2. Turn on the Hazard Warning flasher.
3. Set the parking brake.
4. Place the shift lever into PARK.
5. Turn the ignition off to the LOCK position.
6. Chock both the front and rear of the wheel diagonally opposite of the jacking position. For example, if changing the right front tire, chock the left rear wheel.
NOTE:
Passengers should not remain in the ve-
hicle when the vehicle is being jacked.
Wheel Chocks
WHAT TO DO IN EMERGENCIES
181
Page 184 of 236
Jacking Instructions
WARNING!
Carefully follow these tire changing warnings to help prevent personal injury or
damage to your vehicle:
• Always park on a firm, level surface as far from the edge of the roadway aspossible before raising the vehicle.
• Turn on the Hazard Warning flasher.
• Chock the wheel diagonally opposite the wheel to be raised.
• Set the parking brake firmly and set the transmission in PARK.
• Never start or run the engine with the vehicle on a jack.
• Do not let anyone sit in the vehicle when it is on a jack.
• Do not get under the vehicle when it is on a jack. If you need to get under a
raised vehicle, take it to a service center where it can be raised on a lift.
• Only use the jack in the positions indicated and for lifting this vehicle during
a tire change.
• If working on or near a roadway, be extremely careful of motor traffic.
• To assure that spare tires, flat or inflated, are securely stowed, spares must be
stowed with the valve stem facing the ground.
CAUTION!
Do not attempt to raise the vehicle by jacking on locations other than those
indicated in the Jacking Instructions for this vehicle.
Warning Label
WHAT TO DO IN EMERGENCIES
182
Page 221 of 236
FREQUENTLY ASKED QUESTIONS
GETTING STARTED
How do I install my LATCH Equipped Child Seat? pg. 27
How do I program my Front Seat Memory? pg. 33
ELECTRONICS
Which radio is in my vehicle?
• Uconnect 5.0 pg. 85
• Uconnect 8.4A/8.4AN pg. 97
How do I activate the Audio Jack?
• Uconnect 5.0 pg. 89
• Uconnect 8.4A/8.4AN pg. 104
How do I set the clock on my radio?
• Uconnect 5.0 pg. 85
• Uconnect 8.4A/8.4AN pg. 97
How do I use the Navigation feature?
• Uconnect 8.4A/8.4AN pg. 107
How do I configure my Universal Garage Door Opener (HomeLink)? pg. 144
How do I pair my cell phone via Bluetooth with the Uconnect Hands-Free Voice
Activation System? pg. 131
How do I improve the Bluetooth performance of my Uconnect System? pg. 140
OFF-ROAD CAPABILITIES
How do I shift into different four-wheel drive selections? pg. 153
UTILITY
How do I know how much I can tow with my Jeep Cherokee? pg. 158
WHAT TO DO IN EMERGENCIES
What do I do if my TPMS warning light is blinking? pg. 164
How do I change a flat tire? pg. 180
How do I Jump-Start my vehicle? pg. 186
MAINTAINING YOUR VEHICLE
Where is my Fuse Block located? pg. 204
What type of oil do I use? pg. 198
How often should I change my engine’s oil? pg. 200
What should my tire pressure be set at? pg. 212
FAQ’s
219
Page 224 of 236
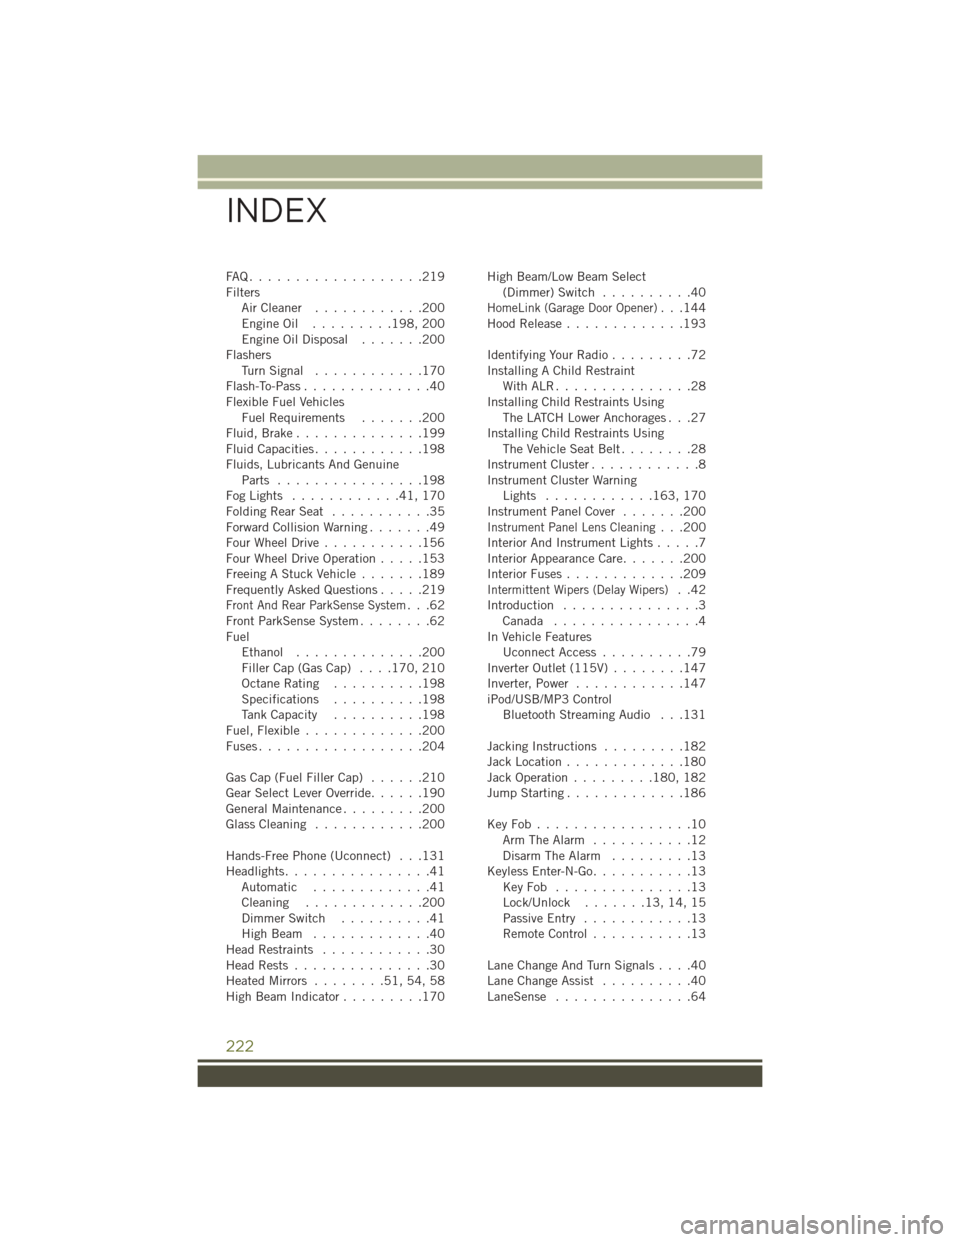
FAQ...................219
FiltersAirCleaner ............200
EngineOil ......... 198, 200
Engine Oil Disposal .......200
Flashers TurnSignal ............170
Flash-To-Pass ..............40
Flexible Fuel Vehicles Fuel Requirements .......200
Fluid,Brake..............199
Fluid Capacities ............198
Fluids, Lubricants And Genuine Parts ................198
FogLights ............41,170
FoldingRearSeat ...........35
Forward Collision Warning .......49
Four Wheel Drive ...........156
Four Wheel Drive Operation .....153
Freeing A Stuck Vehicle .......189
Frequently Asked Questions .....219
Front And Rear ParkSense System...62
Front ParkSense System ........62
Fuel Ethanol ..............200
Filler Cap (Gas Cap) ....170, 210
Octane Rating ..........198
Specifications ..........198
Tank Capacity ..........198
Fuel, Flexible .............200
Fuses..................204
Gas Cap (Fuel Filler Cap) ......210
Gear Select Lever Override ......190
GeneralMaintenance.........200
Glass Cleaning ............200
Hands-Free Phone (Uconnect) . . .131
Headlights ................41
Automatic .............41
Cleaning .............200
Dimmer Switch ..........41
HighBeam .............40
Head Restraints ............30
HeadRests...............30
Heated Mirrors ........51,54,58
High Beam Indicator .........170 High Beam/Low Beam Select
(Dimmer) Switch ..........40
HomeLink (Garage Door Opener)...144
Hood Release .............193
Identifying Your Radio .........72
Installing A Child Restraint WithALR...............28
Installing Child Restraints Using The LATCH Lower Anchorages . . .27
Installing Child Restraints Using The Vehicle Seat Belt ........28
Instrument Cluster ............8
Instrument Cluster Warning Lights ............ 163, 170
Instrument Panel Cover .......200
Instrument Panel Lens Cleaning...200
Interior And Instrument Lights .....7
Interior Appearance Care .......200
Interior Fuses .............209
Intermittent Wipers (Delay Wipers)..42
Introduction ...............3
Canada ................4
In Vehicle Features Uconnect Access ..........79
Inverter Outlet (115V) ........147
Inverter, Power ............147
iPod/USB/MP3 Control Bluetooth Streaming Audio . . .131
Jacking Instructions .........182
Jack Location .............180
Jack Operation .........180, 182
Jump Starting .............186
KeyFob.................10 Arm The Alarm ...........12
Disarm The Alarm .........13
Keyless Enter-N-Go ...........13
KeyFob ...............13
Lock/Unlock .......13,14,15
Passive Entry ............13
Remote Control ...........13
LaneChangeAndTurnSignals....40
Lane Change Assist ..........40
LaneSense ...............64
INDEX
222