instrument cluster JEEP CHEROKEE 2016 KL / 5.G User Guide
[x] Cancel search | Manufacturer: JEEP, Model Year: 2016, Model line: CHEROKEE, Model: JEEP CHEROKEE 2016 KL / 5.GPages: 236, PDF Size: 11.24 MB
Page 3 of 236
INTRODUCTION/WELCOME
WELCOME FROM FCA US LLC...... 3
CONTROLS AT A GLANCE
DRIVER COCKPIT.............. 6
INSTRUMENT CLUSTER .......... 8
GETTING STARTED
KEYFOB ................... 10
REMOTE START............... 12
VEHICLE SECURITY ALARM ....... 12
KEYLESS ENTER-N-GO .......... 13
SEAT BELT SYSTEMS ........... 16
SUPPLEMENTAL RESTRAINT
SYSTEM (SRS) — AIR BAGS ....... 17
CHILD RESTRAINTS ............ 25
HEAD RESTRAINTS ............. 30
FRONT SEATS ................ 32
REAR SEATS ................ 35
HEATED/VENTILATED SEATS ....... 37
HEATED STEERING WHEEL ........ 38
TILT/TELESCOPING STEERING
COLUMN ................... 39
OPERATING YOUR VEHICLE
ENGINE BREAK-IN
RECOMMENDATIONS ........... 40
TURN SIGNAL/HIGH BEAM LEVER . . . 40
HEADLIGHT SWITCH ............ 41
WIPER/WASHER LEVER .......... 42
ELECTRONIC SPEED CONTROL ..... 43
ADAPTIVE CRUISE CONTROL (ACC) . . . 45
FORWARD COLLISION WARNING
(FCW) WITH MITIGATION ......... 49
MANUAL CLIMATE CONTROLS
WITHOUT TOUCHSCREEN ........ 51
MANUAL CLIMATE CONTROLS
WITH TOUCHSCREEN ........... 52
AUTOMATIC TEMPERATURE
CONTROLS (ATC) .............. 55
STOP/START SYSTEM — IF EQUIPPED . . 59ELECTRIC PARK BRAKE (EPB) ...... 60
PARKSENSE ................. 62
LANESENSE ................. 64
PARKVIEW REAR BACK UP CAMERA... 64
POWER SUNROOF ............. 66
WIND BUFFETING ............. 69
ELECTRONICS
YOUR VEHICLE'S SOUND SYSTEM . . . 70
IDENTIFYING YOUR RADIO ........ 72
UCONNECT ACCESS ............ 73
UCONNECT 5.0 ............... 85
UCONNECT 8.4A/8.4AN .......... 97
UCONNECT 8.4A/8.4AN VOICE
RECOGNITION QUICK TIPS ....... 112
UCONNECT PHONE ........... 131
STEERING WHEEL AUDIO
CONTROLS ................. 142
ELECTRONIC VEHICLE INFORMATION
CENTER (EVIC) AND DRIVER
INFORMATION DISPLAY (DID) ..... 142
PROGRAMMABLE FEATURES ...... 143
UNIVERSAL GARAGE DOOR OPENER
(HomeLink) ................. 144
POWER INVERTER ............ 147
POWER OUTLET ............. 148
WIRELESS CHARGING PAD ....... 150
OFF-ROAD CAPABILITIES
FOUR-WHEEL DRIVE OPERATION . . . 153
SELEC-TERRAIN............. 156
UTILITY
CARGO AREA FEATURES ........ 157
TRAILER TOWING ............ 158
RECREATIONAL TOWING
(BEHIND MOTORHOME, ETC.) ..... 158
WHAT TO DO IN EMERGENCIES
ROADSIDE ASSISTANCE......... 163
INSTRUMENT CLUSTER WARNING
LIGHTS ................... 163
INSTRUMENT CLUSTER INDICATOR
LIGHTS ................... 170
IF YOUR ENGINE OVERHEATS ..... 173
TIRESERVICEKIT ............ 174
JACKING AND TIRE CHANGING .... 180
JUMP-STARTING PROCEDURES .... 186
FREEING A STUCK VEHICLE ...... 189
RECOVERY STRAP — IF EQUIPPED . . . 190SHIFT LEVER OVERRIDE........ 190
TOWING A DISABLED VEHICLE .... 191
ENHANCED ACCIDENT RESPONSE
SYSTEM (EARS) .............. 192
EVENT DATA RECORDER (EDR) .... 192
TABLE OF CONTENTS
Page 10 of 236
INSTRUMENT CLUSTER
1. Tachometer
2. Electronic Vehicle Information Center (EVIC) Or Driver Information Display (DID)
3. Speedometer
(See page 163 for Instrument Cluster Warning Lights information.)
CONTROLS AT A GLANCE
8
Page 11 of 236
4. Fuel Gauge
5. Fuel Filler Door Location
6. Temperature Gauge
(See page 170 for Instrument Cluster Indicator Lights information.)
CONTROLS AT A GLANCE
9
Page 14 of 236
REMOTE START
• Push REMOTE START buttonon the Key Fob twice within five seconds.
Pushing the REMOTE START button a third time shuts the engine off.
• To drive the vehicle, push UNLOCK button, insert the key in the ignition and turn to the ON/RUN position.
• With remote start, the engine will only run for 15 minutes (timeout) unless the ignition key is placed in the ON/RUN position.
• The vehicle must be started with the key after two consecutive timeouts.
WARNING!
• Do not start or run an engine in a closed garage or confined area. Exhaust gas contains Carbon Monoxide (CO) which is odorless and colorless. Carbon
Monoxide is poisonous and can cause serious injury or death when inhaled.
• Keep Key Fob transmitters away from children. Operation of the Remote Start
System, windows, door locks or other controls could cause serious injury or
death.
Remote Start Windshield Wiper De–icer Activation — If Equipped
When Remote Start is active and the outside ambient temperature is less than 40° F
(4.4° C), the wiper De-Icer will be enabled. On exiting remote start resume previous
operation except, if the De-Icer is active, the De-Icer timer and operation will continue.
VEHICLE SECURITY ALARM
The Vehicle Security Alarm monitors the vehicle doors for unauthorized entry and the
ignition for unauthorized operation. While the Vehicle Security Alarm is armed,
interior switches for door locks and decklid release are disabled. If something triggers
the alarm, the Vehicle Security Alarm will provide the following audible and visible
signals: the horn will pulse, the park lamps and/or turn signals will flash, and the
Vehicle Security Light in the instrument cluster will flash.
To Arm The System:
Lock the door using either the power door lock switch (one door must be open) or the
LOCK button on the Remote Keyless Entry (RKE) transmitter (doors can be open or
closed), and close all doors.
The Vehicle Security Light in the instrument cluster will flash for 16 seconds. This
shows that the Vehicle Security Alarm is arming. During this period, if a door is
opened, the ignition is cycled to ON/RUN, or the power door locks are unlocked in any
manner, the Vehicle Security Alarm will automatically disarm.
GETTING STARTED
12
Page 62 of 236
To Manually Turn On The Stop/Start System
Push the STOP/START Off switch (located on the switch bank). The light on the
switch will turn off.
For complete details on the Stop/Start System refer to the “Stop/Start System” in the
“Starting And Operating” section located in your owners manual on the DVD for
further information.
ELECTRIC PARK BRAKE (EPB)
Your vehicle is equipped with a new Electric Park Brake System (EPB) that offers
greater convenience. The park brake switch is located in the center console.
To apply the park brake manually, pull up
on the switch momentarily. The BRAKE
warning lamp in the instrument cluster
and an indicator on the switch will illu-
minate.
To release the park brake manually, the
ignition switch must be in RUN. Then put
your foot on the brake pedal and push the
park brake switch down momentarily.
Once the park brake is fully disengaged,
the BRAKE warning lamp and the switch
indicator will extinguish.
The park brake can also be automatically
released. With the engine running and
the transmission in gear, release the
brake pedal and depress the throttle pedal. For safety reasons, your seat belt must
also be fastened.
NOTE:
• You may hear a slight whirring sound from the back of the vehicle while the parkingbrake engages or disengages.
• If your foot is on the brake pedal while you are engaging or disengaging the parking brake, you may notice a small amount of brake pedal movement.
• The new Auto Park Brake feature can be used to apply the park brake automati- cally every time you park the vehicle. Auto Park Brake can be enabled and disabled
in the Settings menu in Uconnect.
• The parking brake can be engaged even when the ignition switch is OFF, however, it can only be disengaged when the ignition switch is in the ON/RUN position.
Parking Brake Switch
OPERATING YOUR VEHICLE
60
Page 156 of 236
The NEUTRAL position allows vehicles with 2-speed Four-Wheel Drive to be flat
towed (with all wheels on the ground) without damaging the drivetrain. Refer to
“Recreational Towing” for instructions on shifting into and out of NEUTRAL.
NOTE:
In 4X4 LOW the engine speed is approximately three times that of the normal driving
mode at a given road speed. Take care not to overspeed the engine and do not exceed
25 mph (40 km/h).
Shifting Procedures
4X4 HI To 4X4 LOW
With the vehicle at speeds of 0 to 3 mph (0 to 5 km/h), the ignition switch in the ON
position or the engine running, shift the transmission into NEUTRAL, and press the
“4WD LOW” button once. The “4WD LOW” indicator light in the instrument cluster
will begin to flash and remain on solid when the shift is complete.
NOTE:
If shift conditions/interlocks are not met a message will flash from the Electronic
Vehicle Information Center (EVIC)/Driver Information Display (DID) with instructions
on how to complete the requested shift. Refer to “Electronic Vehicle Information
Center (EVIC)/Driver Information Display (DID)” in “Understanding Your Instrument
Panel” on the DVD for further information.
4X4 LOW To 4X4 HI
With the vehicle at speeds of 0 to 3 mph (0 to 5 km/h), the ignition switch in the ON
position or the engine running, shift the transmission into NEUTRAL, and press the
“4WD LOW” button once. The “4WD LOW” indicator light in the instrument cluster
will flash and go out when the shift is complete.
NOTE:
If shift conditions/interlocks are not met a message will flash from the Electronic
Vehicle Information Center (EVIC)/Driver Information Display (DID) with instructions
on how to complete the requested shift. Refer to “Electronic Vehicle Information
Center (EVIC)/Driver Information Display (DID)” in “Understanding Your Instrument
Panel” on the DVD for further information.
OFF-ROAD CAPABILITIES
154
Page 157 of 236
REAR ELECTRONIC LOCKER (E-LOCKER) SYSTEM
The Rear E-Locker System features a mechanical locking rear differential to provide
better traction in the 4WD LOW position. The “REAR LOCK” button is on the
Selec-Terrain Knob.
Activating The Rear E-Locker
To activate the Rear E-Locker System, the following conditions must be met:
• The 4WD system must be in 4WD LOW.
• The ignition switch in the ON position or the engine running.
• Vehicle speed must be below 15 MPH (24 km/h).
• To engage Rear E-Locker, push the REAR LOCK button once.
Deactivating The Rear E-Locker System
To deactivate the Rear E-Locker System, the following conditions must be met:
• Rear E-Locker must be engaged, and the REAR LOCK indicator light on.
• The ignition switch in the ON position or the engine running.
• To disengage Rear E-Locker , push the REAR LOCK button once.
NOTE:
• It may also be necessary to drive slowly steering back and forth to completeengagement and disengagement of the E- Locker.
• When engaging Rear E-Locker, the indicator lights in the instrument cluster and on the REAR LOCK button will begin to flash. When the shift is complete the REAR
LOCK indicator lights will remain on.
• When disengaging Rear E-Locker, the indicator lights in the instrument cluster and on the REAR LOCK button will begin to flash. When the shift is complete the
REAR LOCK indicator lights will remain off.
• Shifting into or out of Rear E-Locker is possible with the vehicle completely stopped; however, difficulty may occur due to the mating clutch teeth not being
properly aligned. Several attempts may be required for clutch teeth alignment and
shift completion to occur. The preferred method is for the vehicle to be rolling,
below 15 MPH (24 km/h), while including right and left steering maneuvers to
allow for the clutch teeth to align.
• The Rear E-Locker System must be disengaged prior to taking the vehicle out of 4X4 LOW range. If 4X4 LOW shift conditions/interlocks are not met, a message will
flash from the Electronic Vehicle Information Center (EVIC)/Driver Information
Display with instructions on how to complete the requested shift.
OFF-ROAD CAPABILITIES
155
Page 165 of 236
ROADSIDE ASSISTANCE
Dial toll-free 1-800-521-2779 for U.S. Residents or 1-800-363-4869 for Canadian
Residents.
• Provide your name, vehicle identification number, license plate number, and yourlocation, including the telephone number from which you are calling.
• Briefly describe the nature of the problem and answer a few simple questions.
• You will be given the name of the service provider and an estimated time of arrival. If you feel you are in an “unsafe situation”, please let us know. With your consent,
we will contact local police or safety authorities.
INSTRUMENT CLUSTER WARNING LIGHTS
– Low Fuel Warning Light
This warning light indicates when the fuel level reaches approximately 2.0 gal (7.8 L).
This light will turn on and a single chime will sound.
- Charging System Light
This light shows the status of the electrical charging system. If the charging system
light remains on, it means that the vehicle is experiencing a problem with the
charging system.
We recommend you do not continue driving if the charging system light is on. Have
the vehicle serviced immediately.
- Oil Pressure Warning Light
This light indicates low engine oil pressure. If the light turns on while driving, stop
the vehicle and shut off the engine as soon as possible. A chime will sound for four
minutes when this light turns on.
We recommend you do not operate the vehicle or engine damage will occur. Have the
vehicle serviced immediately.
- Anti-Lock Brake (ABS) Light
This light monitors the Anti-Lock Brake System (ABS). The light will turn on when the
ignition switch is turned to the ON/RUN position and may stay on for as long as four
seconds.
If the ABS light remains on or turns on while driving, it indicates that the Anti-Lock
portion of the brake system is not functioning and that service is required. However, the
conventional brake system will continue to operate normally if the BRAKE warning light
is not on.
WHAT TO DO IN EMERGENCIES
163
Page 172 of 236
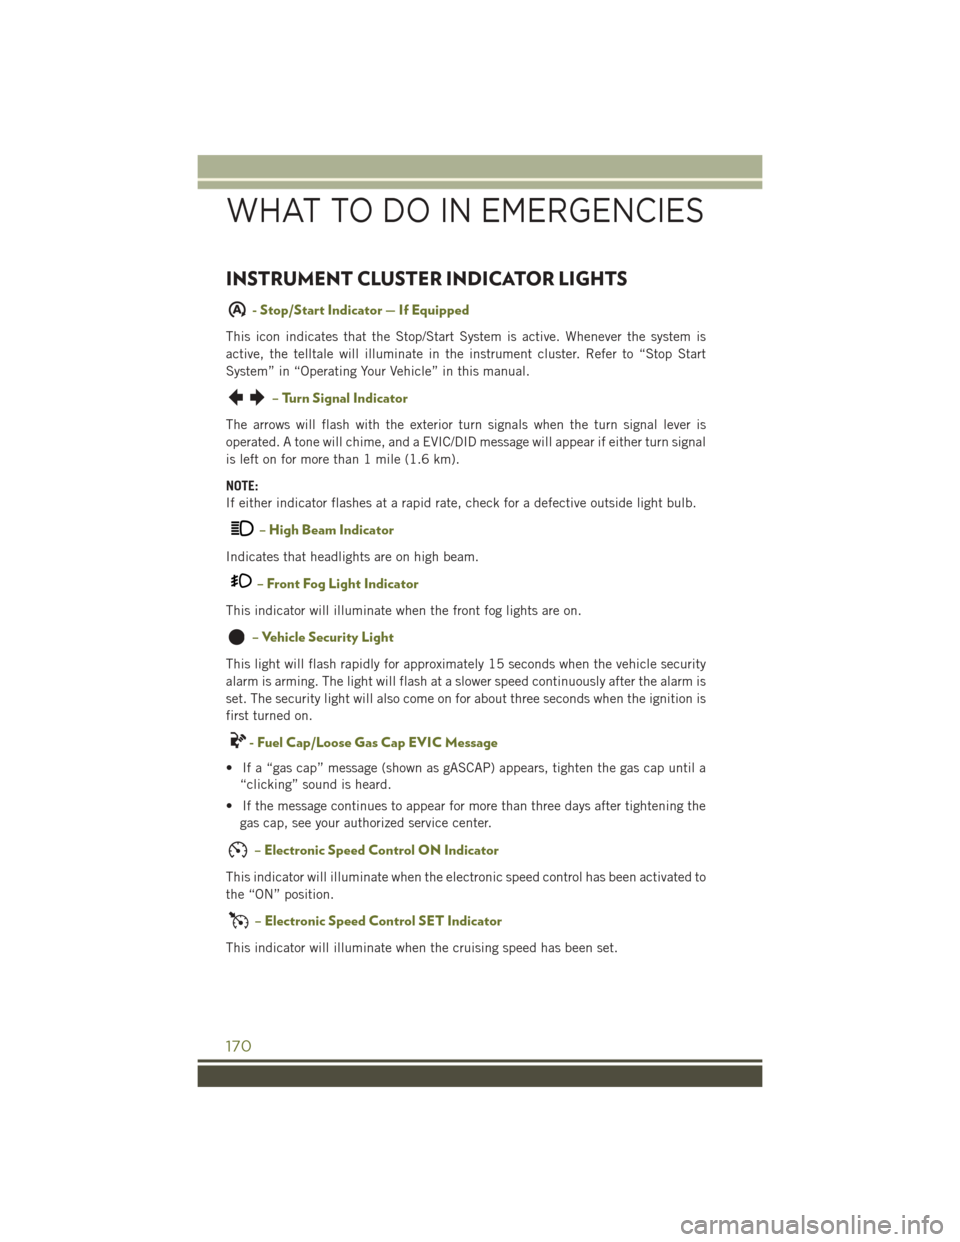
INSTRUMENT CLUSTER INDICATOR LIGHTS
A- Stop/Start Indicator — If Equipped
This icon indicates that the Stop/Start System is active. Whenever the system is
active, the telltale will illuminate in the instrument cluster. Refer to “Stop Start
System” in “Operating Your Vehicle” in this manual.
– Turn Signal Indicator
The arrows will flash with the exterior turn signals when the turn signal lever is
operated. A tone will chime, and a EVIC/DID message will appear if either turn signal
is left on for more than 1 mile (1.6 km).
NOTE:
If either indicator flashes at a rapid rate, check for a defective outside light bulb.
– High Beam Indicator
Indicates that headlights are on high beam.
– Front Fog Light Indicator
This indicator will illuminate when the front fog lights are on.
– Vehicle Security Light
This light will flash rapidly for approximately 15 seconds when the vehicle security
alarm is arming. The light will flash at a slower speed continuously after the alarm is
set. The security light will also come on for about three seconds when the ignition is
first turned on.
- Fuel Cap/Loose Gas Cap EVIC Message
• If a “gas cap” message (shown as gASCAP) appears, tighten the gas cap until a“clicking” sound is heard.
• If the message continues to appear for more than three days after tightening the gas cap, see your authorized service center.
– Electronic Speed Control ON Indicator
This indicator will illuminate when the electronic speed control has been activated to
the “ON” position.
– Electronic Speed Control SET Indicator
This indicator will illuminate when the cruising speed has been set.
WHAT TO DO IN EMERGENCIES
170
Page 202 of 236
FLEXIBLE FUEL (2.4L ENGINE ONLY) — IF EQUIPPED
E-85 General Information
The information in this section is unique for Flexible Fuel vehicles only. These
vehicles can be identified by a unique fuel filler door label that statesEthanol (E-85)
or Unleaded Gasoline Only and a yellow fuel cap. Refer to the Owner’s Manual on the
DVD for further information.
CAUTION!
Only vehicles with the E-85 fuel filler door label or a yellow gas cap can operate on
E-85.
MAINTENANCE PROCEDURES
For information on the maintenance procedures for your vehicle, please refer to
“Maintenance Procedures” in “Maintaining Your Vehicle” in your Owner’s Manual or
applicable supplement on the DVD for further details.
MAINTENANCE SCHEDULE
Your vehicle is equipped with an automatic oil change indicator system. The oil
change indicator system will remind you that it is time to take your vehicle in for
scheduled maintenance.
Based on engine operation conditions, the oil change indicator message will
illuminate. This means that service is required for your vehicle. Operating conditions
such as frequent short-trips, trailer tow, extremely hot or cold ambient temperatures
will influence when the “Oil Change Required” message is displayed. Severe
Operating Conditions can cause the change oil message to illuminate as early as
3,500 miles (5,600 km) since last reset. Have your vehicle serviced as soon as
possible, within the next 500 miles (805 km).
Your authorized dealer will reset the oil change indicator message after completing the
scheduled oil change. If a scheduled oil change is performed by someone other than
your authorized dealer, the message can be reset by referring to the steps described
under “Instrument Cluster Warning Lights” in “What To Do In Emergencies” in this
guide or “Electronic Vehicle Information Center (EVIC)” or “Driver Information Display
(DID)” in “Understanding Your Instrument Panel” in your Owners Manual on the DVD for
further information.
MAINTAINING YOUR VEHICLE
200