manual radio set JEEP CHEROKEE 2016 KL / 5.G User Guide
[x] Cancel search | Manufacturer: JEEP, Model Year: 2016, Model line: CHEROKEE, Model: JEEP CHEROKEE 2016 KL / 5.GPages: 236, PDF Size: 11.24 MB
Page 35 of 236
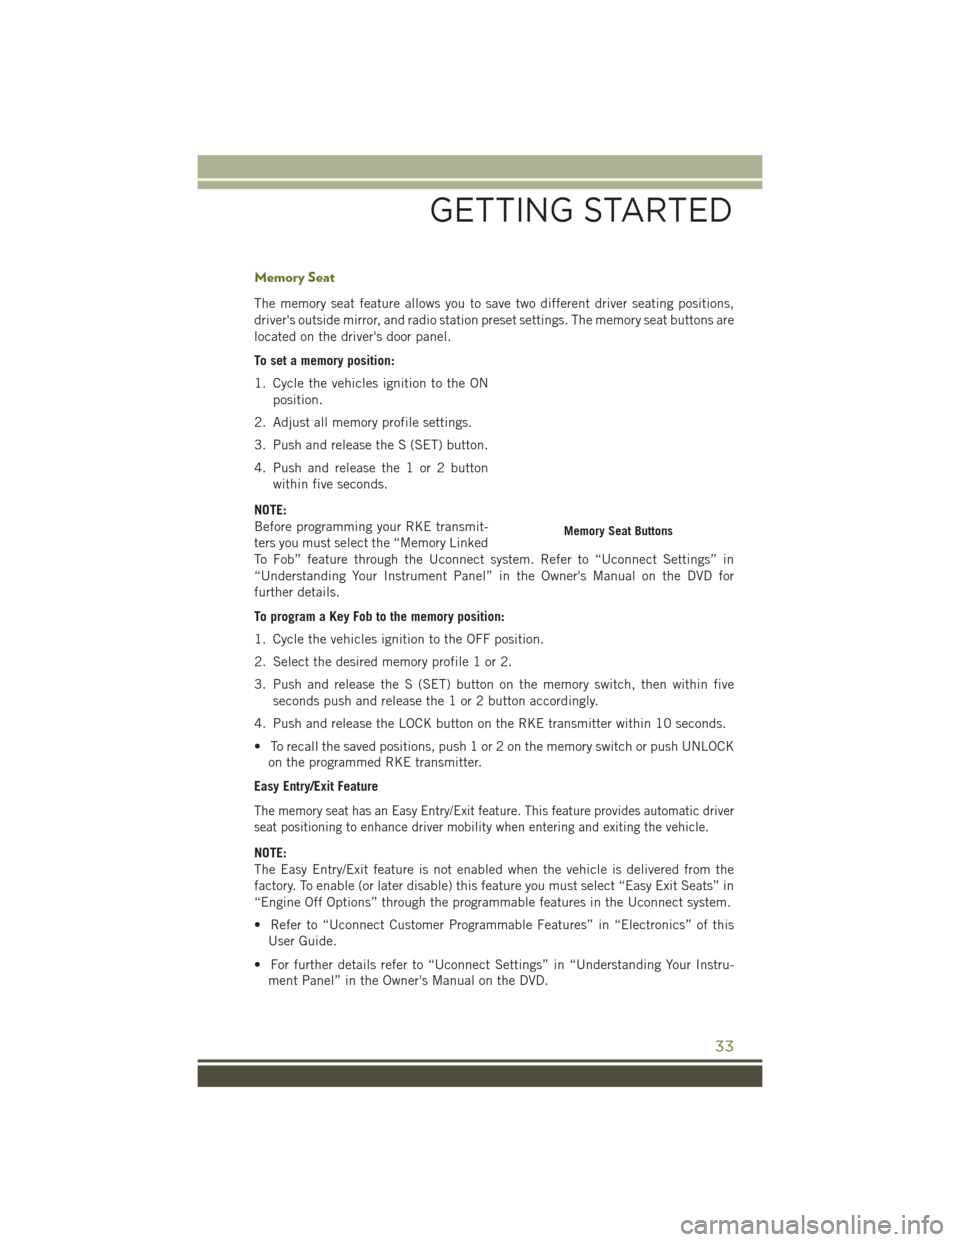
Memory Seat
The memory seat feature allows you to save two different driver seating positions,
driver's outside mirror, and radio station preset settings. The memory seat buttons are
located on the driver's door panel.
To set a memory position:
1. Cycle the vehicles ignition to the ONposition.
2. Adjust all memory profile settings.
3. Push and release the S (SET) button.
4. Push and release the 1 or 2 button within five seconds.
NOTE:
Before programming your RKE transmit-
ters you must select the “Memory Linked
To Fob” feature through the Uconnect system. Refer to “Uconnect Settings” in
“Understanding Your Instrument Panel” in the Owner's Manual on the DVD for
further details.
To program a Key Fob to the memory position:
1. Cycle the vehicles ignition to the OFF position.
2. Select the desired memory profile 1 or 2.
3. Push and release the S (SET) button on the memory switch, then within five seconds push and release the 1 or 2 button accordingly.
4. Push and release the LOCK button on the RKE transmitter within 10 seconds.
• To recall the saved positions, push 1 or 2 on the memory switch or push UNLOCK on the programmed RKE transmitter.
Easy Entry/Exit Feature
The memory seat has an Easy Entry/Exit feature. This feature provides automatic driver
seat positioning to enhance driver mobility when entering and exiting the vehicle.
NOTE:
The Easy Entry/Exit feature is not enabled when the vehicle is delivered from the
factory. To enable (or later disable) this feature you must select “Easy Exit Seats” in
“Engine Off Options” through the programmable features in the Uconnect system.
• Refer to “Uconnect Customer Programmable Features” in “Electronics” of this User Guide.
• For further details refer to “Uconnect Settings” in “Understanding Your Instru- ment Panel” in the Owner's Manual on the DVD.
Memory Seat Buttons
GETTING STARTED
33
Page 43 of 236
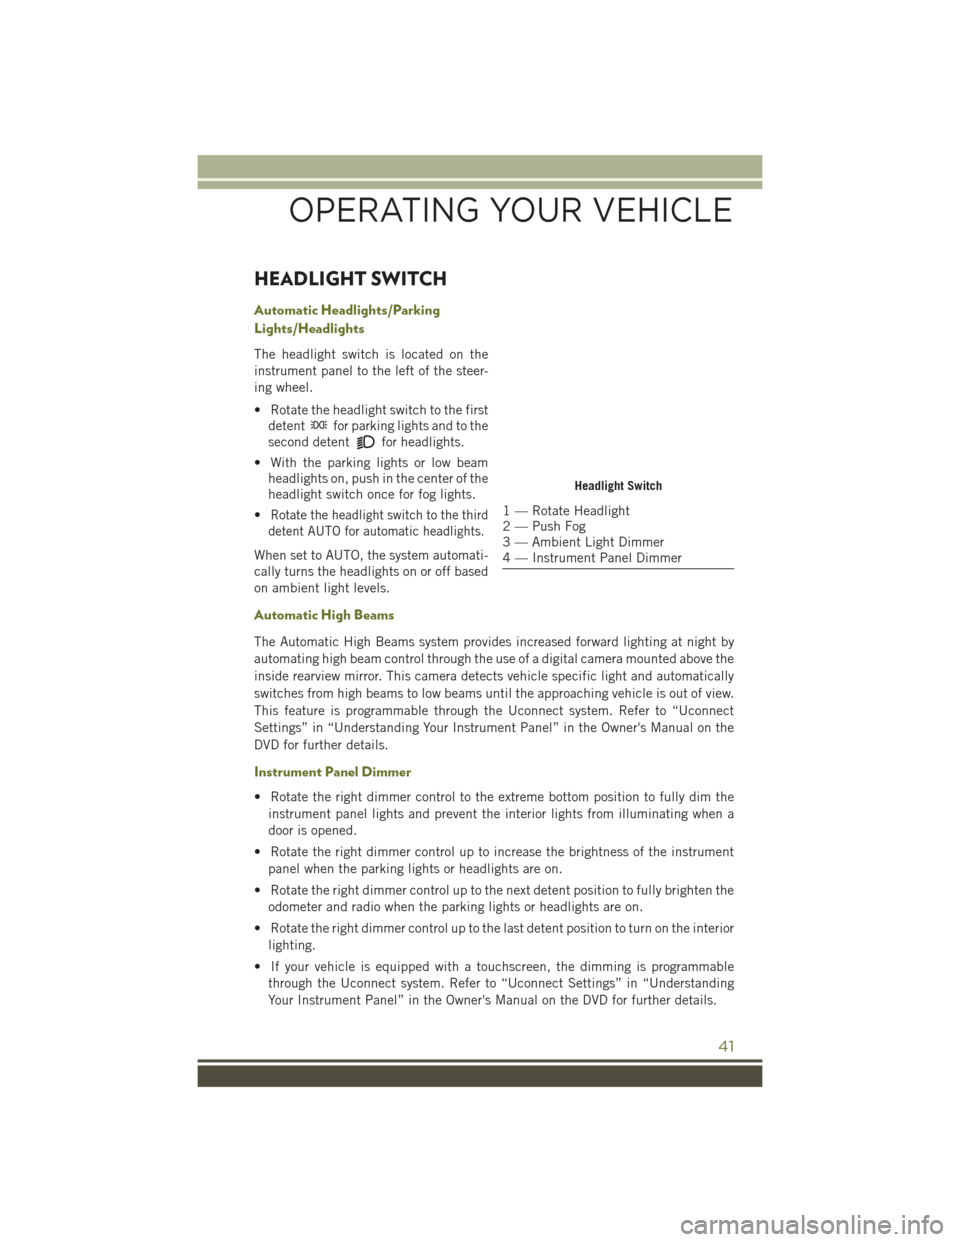
HEADLIGHT SWITCH
Automatic Headlights/Parking
Lights/Headlights
The headlight switch is located on the
instrument panel to the left of the steer-
ing wheel.
• Rotate the headlight switch to the firstdetent
for parking lights and to the
second detent
for headlights.
• With the parking lights or low beam headlights on, push in the center of the
headlight switch once for fog lights.
•
Rotate the headlight switch to the third
detent AUTO for automatic headlights.
When set to AUTO, the system automati-
cally turns the headlights on or off based
on ambient light levels.
Automatic High Beams
The Automatic High Beams system provides increased forward lighting at night by
automating high beam control through the use of a digital camera mounted above the
inside rearview mirror. This camera detects vehicle specific light and automatically
switches from high beams to low beams until the approaching vehicle is out of view.
This feature is programmable through the Uconnect system. Refer to “Uconnect
Settings” in “Understanding Your Instrument Panel” in the Owner's Manual on the
DVD for further details.
Instrument Panel Dimmer
• Rotate the right dimmer control to the extreme bottom position to fully dim the
instrument panel lights and prevent the interior lights from illuminating when a
door is opened.
• Rotate the right dimmer control up to increase the brightness of the instrument panel when the parking lights or headlights are on.
• Rotate the right dimmer control up to the next detent position to fully brighten the odometer and radio when the parking lights or headlights are on.
• Rotate the right dimmer control up to the last detent position to turn on the interior lighting.
• If your vehicle is equipped with a touchscreen, the dimming is programmable through the Uconnect system. Refer to “Uconnect Settings” in “Understanding
Your Instrument Panel” in the Owner's Manual on the DVD for further details.
Headlight Switch
1 — Rotate Headlight
2 — Push Fog
3 — Ambient Light Dimmer
4 — Instrument Panel Dimmer
OPERATING YOUR VEHICLE
41
Page 89 of 236
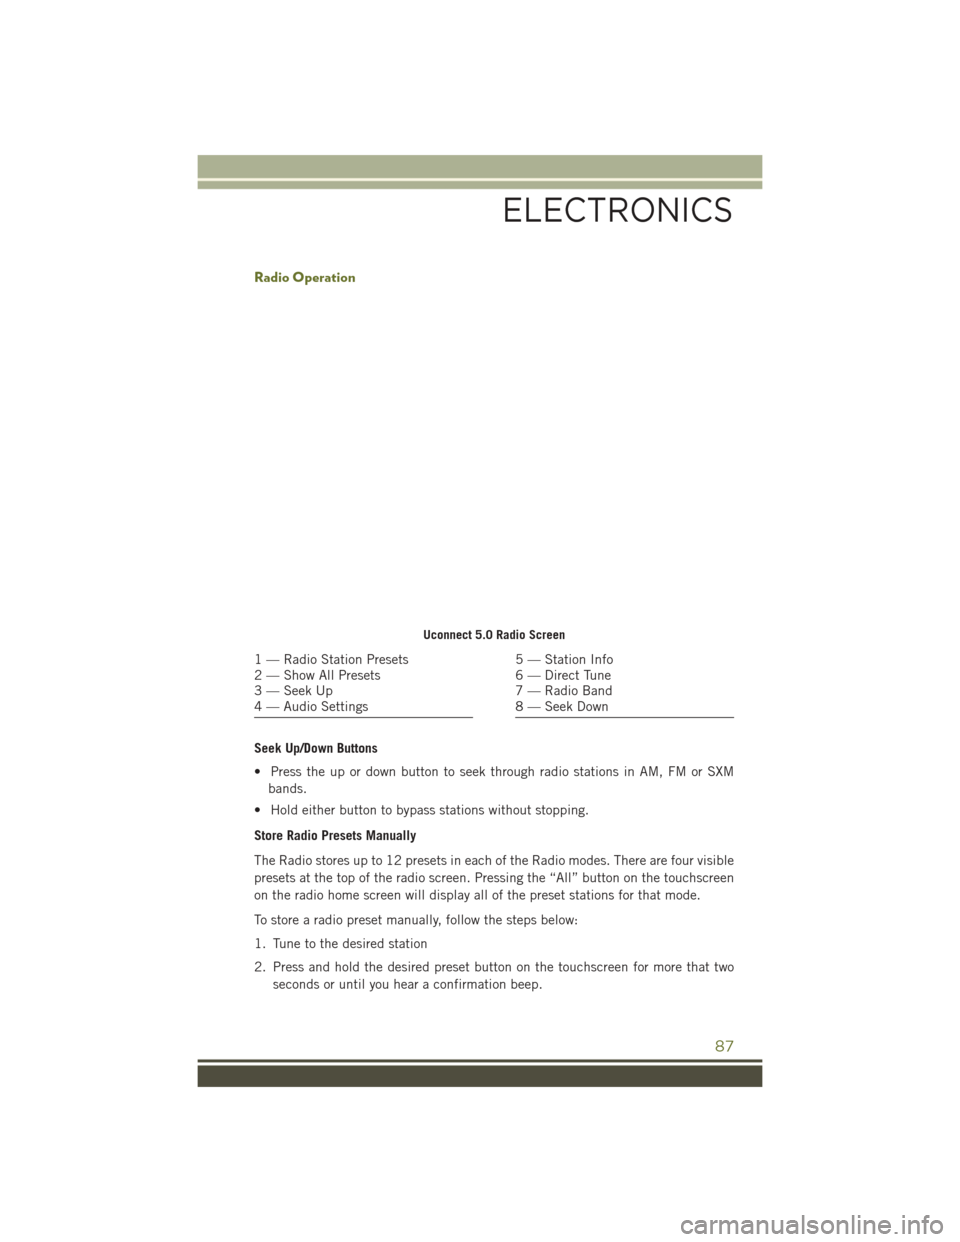
Radio Operation
Seek Up/Down Buttons
• Press the up or down button to seek through radio stations in AM, FM or SXMbands.
• Hold either button to bypass stations without stopping.
Store Radio Presets Manually
The Radio stores up to 12 presets in each of the Radio modes. There are four visible
presets at the top of the radio screen. Pressing the “All” button on the touchscreen
on the radio home screen will display all of the preset stations for that mode.
To store a radio preset manually, follow the steps below:
1. Tune to the desired station
2. Press and hold the desired preset button on the touchscreen for more that two seconds or until you hear a confirmation beep.
Uconnect 5.0 Radio Screen
1 — Radio Station Presets
2 — Show All Presets
3 — Seek Up
4 — Audio Settings5 — Station Info
6 — Direct Tune
7 — Radio Band
8 — Seek Down
ELECTRONICS
87
Page 99 of 236
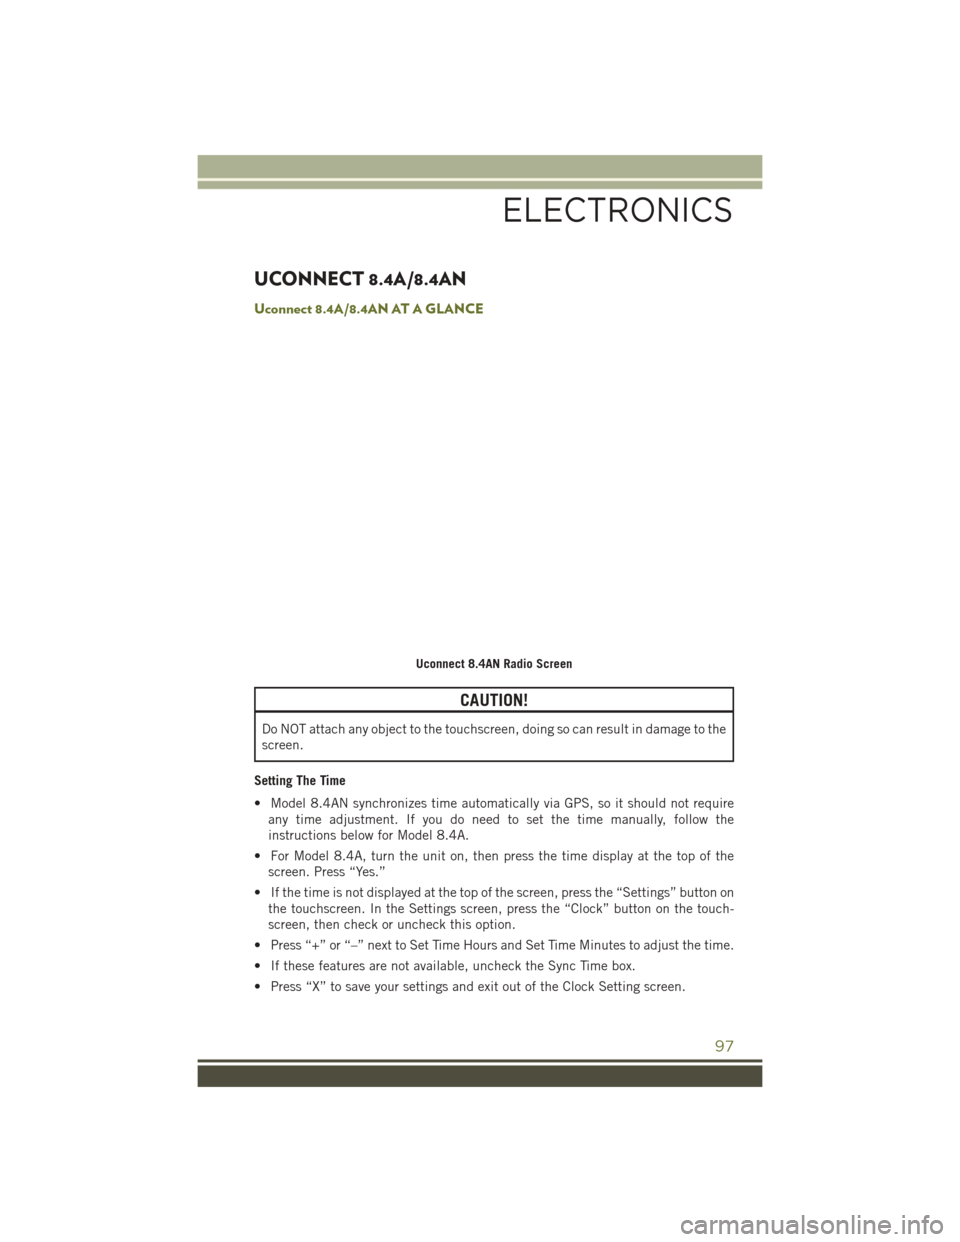
UCONNECT 8.4A/8.4AN
Uconnect 8.4A/8.4AN AT A GLANCE
CAUTION!
Do NOT attach any object to the touchscreen, doing so can result in damage to the
screen.
Setting The Time
• Model 8.4AN synchronizes time automatically via GPS, so it should not require any time adjustment. If you do need to set the time manually, follow the
instructions below for Model 8.4A.
• For Model 8.4A, turn the unit on, then press the time display at the top of the screen. Press “Yes.”
• If the time is not displayed at the top of the screen, press the “Settings” button on the touchscreen. In the Settings screen, press the “Clock” button on the touch-
screen, then check or uncheck this option.
• Press “+” or “–” next to Set Time Hours and Set Time Minutes to adjust the time.
• If these features are not available, uncheck the Sync Time box.
• Press “X” to save your settings and exit out of the Clock Setting screen.
Uconnect 8.4AN Radio Screen
ELECTRONICS
97
Page 103 of 236
Direct Tune
• Tune directly to a radio station by pressing the “Tune” button on the screen, andentering the desired station number.
Store Radio Presets Manually
Your radio can store 36 total preset stations, 12 presets per band (AM, FM and SXM).
They are shown at the top of your radio screen. To see the 12 preset stations per band,
press the arrow button on the touchscreen at the top right of the screen to toggle
between the two sets of six presets.
To store a radio preset manually, follow the steps below:
1. Tune to the desired station.
2. Press and hold the desired numbered button on the touchscreen for more than two seconds or until you hear a confirmation beep.
HD Radio — If Equipped
• HD Radio (available on Uconnect 8.4AN) operates similar to conventional radio except it allows broadcasters to transmit a high-quality digital signal.
• With an HD radio receiver, the listener is provided with a clear sound that enhances the listening experience. HD radio can also transmit data such as song
title or artist.
SiriusXM PREMIER OVER 160 CHANNELS
Get every channel available on your satellite radio, and enjoy all you want, all in one
place. Hear commercial-free music plus sports, news, talk and entertainment. Get all
the premium programming, including Howard Stern, every NFL game, Oprah Radio,
every MLB and NHL game, every NASCAR race, Martha Stewart and more. And get
20+ extra channels, including SiriusXM Latino, offering 20 channels of commercial
free music, news, talk, comedy, sports and more dedicated to Spanish language
programming.
• To access SiriusXM Satellite Radio, press the “SXM” button on the touchscreen onthe main Radio screen.
The following describes features that are available when in SiriusXM Satellite Radio
mode:
Seek Up/Seek Down
• Press the Seek arrow buttons on the touchscreen for less than two seconds to seek through channels in SXM mode.
• Press and hold either arrow button on the touchscreen for more than two seconds to bypass channels without stopping. The radio will stop at the next listenable
channel once the arrow button on the touchscreen is released.
ELECTRONICS
101
Page 135 of 236
If the Uconnect Phone Buttonexists on your steering wheel, you then have the
Uconnect Phone features.
Refer to the Understand The Features Of Your Vehicle section of your vehicle's Owner's
Manual on the DVD for further details.
NOTE:
• The Uconnect Phone requires a mobile phone equipped with the Bluetooth Hands-Free Profile, Version 1.0 or higher.
• Most mobile phones/devices are compatible with the Uconnect system, however some mobile phones/devices may not be equipped with all of the required features
to utilize all of the Uconnect system features.
• For Uconnect Customer Care: • U.S. residents visit UconnectPhone.com or call 1-877-855-8400.
• Canadian Residents visit UconnectPhone.com or call, 1-800-465-2001(English) or 1-800-387-9983 (French).
Pairing (Wirelessly Connecting) Your Mobile Phone To The Uconnect System
Mobile phone pairing is the process of establishing a wireless connection between a
cellular phone and the Uconnect system.
NOTE:
• To use the Uconnect Phone feature, you first must determine if your mobilephone and software are compatible with the Uconnect system. Please visit
UconnectPhone.com for complete mobile phone compatibility information.
• Mobile phone pairing is not available while the vehicle is in motion.
• A maximum of 10 mobile phones can be paired to the Uconnect system.
Start Pairing Procedure On The Radio
Uconnect 5.0:
1. Place the ignition in the ACC or ON position.
2. Press the “Phone” button.
3. Select “Settings.”
4. Select “Paired Phones.”
5. Select “Add device.” • Uconnect Phone will display an “Inprogress” screen while the system
is connecting.
Uconnect 5.0
ELECTRONICS
133