sensor JEEP CHEROKEE 2016 KL / 5.G User Guide
[x] Cancel search | Manufacturer: JEEP, Model Year: 2016, Model line: CHEROKEE, Model: JEEP CHEROKEE 2016 KL / 5.GPages: 236, PDF Size: 11.24 MB
Page 19 of 236
Seat Belt Pretensioner
• The front seat belt system is equipped with pretensioning devices that aredesigned to remove slack from the seat belt in the event of a collision.
• A deployed pretensioner or a deployed air bag must be replaced immediately.
WARNING!
• In a collision, you and your passengers can suffer much greater injuries if you are not properly buckled up. You can strike the interior of your vehicle or other
passengers, or you can be thrown out of the vehicle. Always be sure you and
others in your vehicle are buckled up properly.
• A shoulder belt placed behind you will not protect you from injury during a
collision. You are more likely to hit your head in a collision if you do not wear
your shoulder belt. The lap and shoulder belt are meant to be used together.
•
A seat belt that is too loose will not protect you properly. In a sudden stop, you
could move too far forward, increasing the possibility of injury. Wear your seat belt
snugly.
•A frayed or torn seat belt could rip apart in a collision and leave you with no
protection. Inspect the seat belt system periodically, checking for cuts, frays, or
loose parts. Damaged parts must be replaced immediately. Do not disassemble or
modify the system. Seat belt assemblies must be replaced after a collision.
SUPPLEMENTAL RESTRAINT SYSTEM (SRS) —
AIR BAGS
Air Bag System Components
Your vehicle may be equipped with the following air bag system components:
• Occupant Restraint Controller (ORC)
• Air Bag Warning Light
• Steering Wheel and Column
• Instrument Panel
• Knee Impact Bolsters
• Advanced Front Air Bags
• Supplemental Side Air Bags
• Supplemental Knee Air Bags
• Front and Side Impact Sensors
• Seat Belt Pretenioners
• Seat Belt Buckle Switch
• Seat Track Position Sensors
• Occupant Classification System
GETTING STARTED
17
Page 20 of 236
Advanced Front Air Bags
• This vehicle has Advanced Front Air Bags for both the driver and front passengeras a supplement to the seat belt restraint systems. The Advanced Front Air Bags
will not deploy in every type of collision.
• Advanced Front Air Bags are designed to provide additional protection by supplementing the seat belts. Advanced Front Air Bags are not expected to reduce
the risk of injury in rear, side, or rollover collisions.
• The Advanced Front Air Bags will not deploy in all frontal collisions, including some that may produce substantial vehicle damage — for example, some pole
collisions, truck underrides, and angle offset collisions.
• On the other hand, depending on the type and location of impact, Advanced Front Air Bags may deploy in crashes with little vehicle front-end damage but that
produce a severe initial deceleration.
• Because air bag sensors measure vehicle deceleration over time, vehicle speed and damage by themselves are not good indicators of whether or not an air bag
should have deployed.
• Seat belts are necessary for your protection in all collisions, and also are needed to help keep you in position, away from an inflating air bag.
• After any collision, the vehicle should be taken to an authorized dealer immedi- ately.
• Do not drive your vehicle after the air bags have deployed. If you are involved in another collision, the air bags will not be in place to protect you.
• If it is necessary to modify the air bag system for persons with disabilities, contact your authorized dealer.
• Refer to the Owner's Manual on the DVD for further details regarding the Supplemental Restraint System (SRS).
Occupant Classification System
This vehicle is equipped with a right front passenger Occupant Classification System
(“OCS”) that is designed to provide Passenger Advanced Front Air Bag output
appropriate to the occupant’s seated weight input, as determined by the OCS.
The Occupant Classification System (OCS) consists of the following:
• Occupant Restraint Controller (ORC)
• Occupant Classification Module (OCM) and Sensor located in the front passengerseat
• Air Bag Warning Light
GETTING STARTED
18
Page 47 of 236
ADAPTIVE CRUISE CONTROL (ACC)
If your vehicle is equipped with Adaptive
Cruise Control the controls operate ex-
actly the same as the electronic speed
control with only a couple of differences.
With this option you can set a specified
distance you would like to maintain be-
tween you and the vehicle in front of you.
If the ACC sensor detects a vehicle
ahead, ACC will apply limited braking or
acceleration automatically to maintain a
preset following distance, while match-
ing the speed of the vehicle ahead.
If the sensor does not detect a vehicle
ahead of you, ACC will maintain a fixed set
speed.
ACC ON/OFF
• Push and release the Adaptive CruiseControl (ACC) ON/OFF button.
ACC READY will appear in the Electronic
Vehicle Information Center (EVIC) or
Driver Information Display (DID) to indicate the ACC is on.
• Push and release the Adaptive Cruise Control (ACC) ON/OFF button a second time to turn the system off.
Adaptive Cruise Control (ACC) Off will appear in the Electronic Vehicle Information
Center (EVIC) or Driver Information Display (DID) to indicate the ACC is off.
To Vary The Speed Setting
To Increase Speed
While ACC is set, you can increase the set speed by pushing the SET +button.
The drivers preferred units can be selected through the instrument panel settings if
equipped. Refer to “Understanding Your Instrument Panel” in the Owner’s Manual
on the DVD for more information. The speed increment shown is dependant on the
speed of U.S. (mph) or Metric (km/h) units:
U.S. Speed (mph)
• Pushing the SET +button once will result in a 1 mph increase in set speed. Each
subsequent tap of the button results in an increase of 1 mph.
• If the button is continually pushed, the set speed will continue to increase in 5 mph increments until the button is released. The increase in set speed is
reflected in the EVIC/DID.
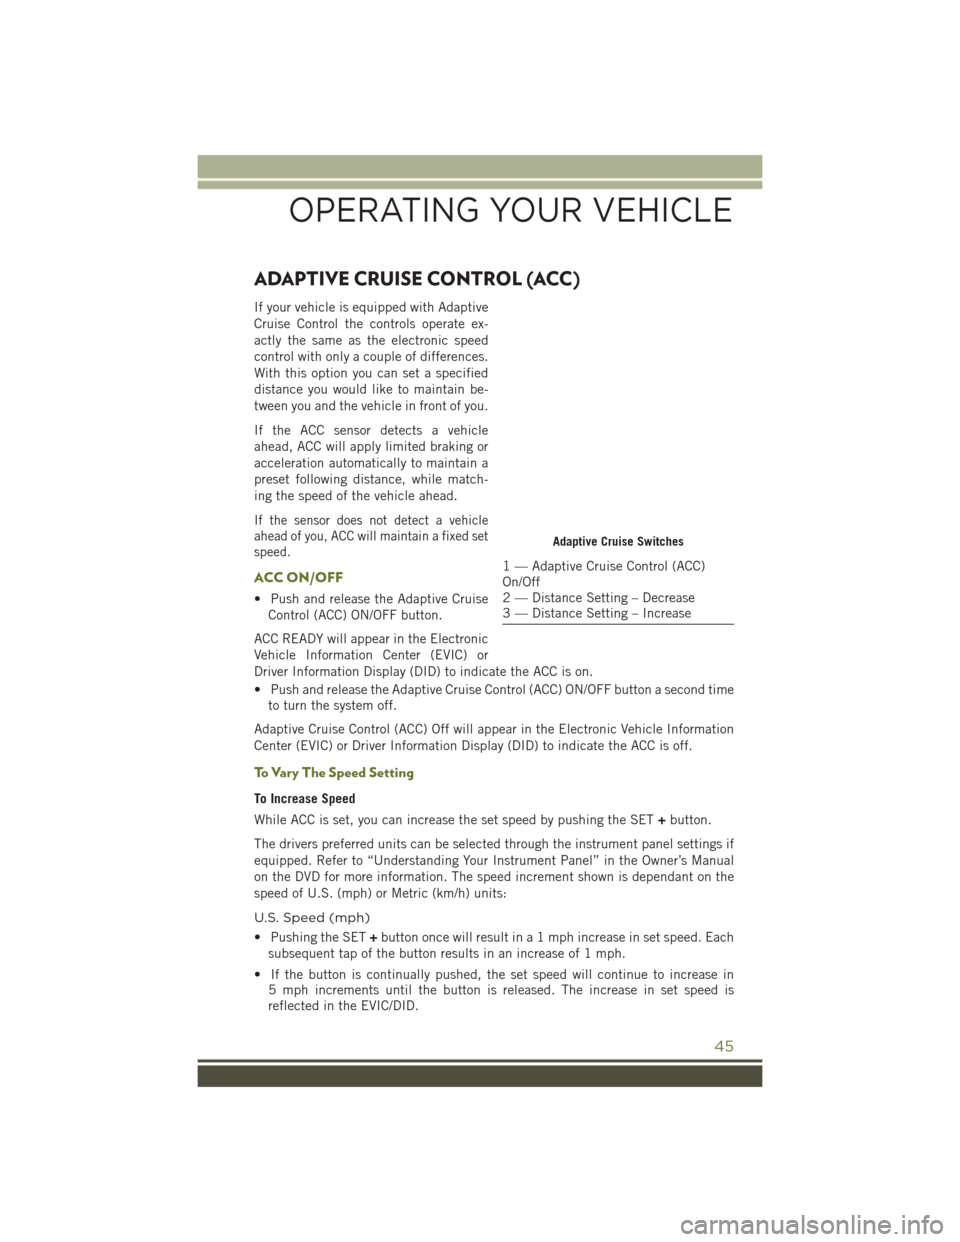
Adaptive Cruise Switches
1 — Adaptive Cruise Control (ACC)
On/Off
2 — Distance Setting – Decrease
3 — Distance Setting – Increase
OPERATING YOUR VEHICLE
45
Page 51 of 236
FORWARD COLLISION WARNING (FCW) WITH
MITIGATION
The Forward Collision Warning (FCW) system with mitigation provides the driver with
audible warnings, visual warnings (within the EVIC/DID), and may apply a brake jerk
to warn the driver when it detects a potential frontal collision. The warnings and
limited braking are intended to provide the driver with enough time to react, avoid or
mitigate the potential collision.
• FCW monitors the information from the forward looking sensors as well as theElectronic Brake Controller (EBC), to calculate the probability of a forward
collision. When the system determines that a forward collision is probable, the
driver will be provided with audible and visual warnings and may provide a brake
jerk warning.
• If the driver does not take action based upon these progressive warnings, then the system will provide a limited level of active braking to help slow the vehicle and
mitigate the potential forward collision. If the driver reacts to the warnings by
braking and the system determines that the driver intends to avoid the collision by
braking but has not applied sufficient brake force, the system will compensate and
provide additional brake force as required.
Turning FCW ON Or OFF
NOTE:
The default status of FCW is “On,” this allows the system to warn you of a possible
collision with the vehicle in front of you when you are farther away and it applies
limited braking. This gives you the most reaction time to avoid a possible collision.
The forward collision button is on the switch panel that is located in the center of the
instrument panel.
• To turn the FCW system OFF, push the forward collision button once (LED turns on).
• To turn the FCW system back ON, push the forward collision button again (LED turns off).
Changing FCW Status
The FCW feature has two settings and can be changed within the Uconnect System
Screen:
• Far
• Near
NOTE:
The FCW and active braking settings can only be changed when the vehicle is in
PARK.
OPERATING YOUR VEHICLE
49
Page 64 of 236
PARKSENSE
ParkSense Front And Rear Park Assist
ParkSense can be enabled and disabled by pushing the ParkSense switch located on
the switch panel below the Uconnect display.
The six ParkSense sensors, located in
the rear fascia/bumper, monitor the area
behind the vehicle that is within the sen-
sors’ field of view. The sensors can de-
tect obstacles from approximately 12 in
(30 cm) up to 79 in (200 cm) from the
rear fascia/bumper in the horizontal di-
rection, depending on the location, type
and orientation of the obstacle.
The six ParkSense sensors, located in the
front fascia/bumper, monitor the area in
front of the vehicle that is within the
sensors’ field of view. The sensors can
detect obstacles from approximately
12 in (30 cm) up to 47 in (120 cm) from
the front fascia/bumper in the horizontal
direction, depending on the location, type and orientation of the obstacle.
When an object is detected within 2 meters behind the rear bumper while the vehicle
is in REVERSE, a warning will display in the Electronic Vehicle Information Center
(EVIC) or Driver Information Display (DID). In addition a chime will sound (when
Sound and Display is selected from the Customer Programmable Features screen of
the Uconnect System). As the vehicle moves closer to the object, the chime rate will
change from single 1/2 second tone (for rear only), to slow (for rear only), to fast,
to continuous.
Refer to your Owner's Manual on the DVD for further details.
ParkSense Switch
OPERATING YOUR VEHICLE
62
Page 65 of 236
ParkSense Active Park Assist
The ParkSense Active Park Assist system can be enabled and disabled with the ParkSense
Active Park Assist switch, located on the switch panel below the Uconnect display.
The ParkSense Active Park Assist system
is intended to assist the driver during
parallel and perpendicular parking ma-
neuvers by identifying a proper parking
space, providing audible/visual instruc-
tions, and controlling the steering wheel.
The ParkSense Active Park Assist system
is defined as “semi-automatic” since the
driver maintains control of the accelerator,
shift lever and brakes. Depending on the
driver’s parking maneuver selection, the
ParkSense Active Park Assist system is
capable of maneuvering a vehicle into a
parallel or a perpendicular parking space
on either side (i.e., driver side or passen-
ger side).
Refer to your Owner's Manual on the DVD for further details.
CAUTION!
• ParkSense is only a parking aid and it is unable to recognize every obstacle,including small obstacles. Parking curbs might be temporarily detected or not
detected at all. Obstacles located above or below the sensors will not be
detected when they are in close proximity.
• The vehicle must be driven slowly when using ParkSense in order to be able to stop in time when an obstacle is detected. It is recommended that the driver
looks over his/her shoulder when using ParkSense.
WARNING!
• Drivers must be careful when backing up even when using ParkSense. Always
check carefully behind your vehicle, look behind you, and be sure to check for
pedestrians, animals, other vehicles, obstructions, and blind spots before
backing up. You are responsible for safety and must continue to pay attention
to your surroundings. Failure to do so can result in serious injury or death.
• Before using ParkSense, it is strongly recommended that the ball mount and
hitch ball assembly is disconnected from the vehicle when the vehicle is not
used for towing. Failure to do so can result in injury or damage to vehicles or
obstacles because the hitch ball will be much closer to the obstacle than the
rear fascia when the loudspeaker sounds the continuous tone. Also, the sensors
could detect the ball mount and hitch ball assembly, depending on its size and
shape, giving a false indication that an obstacle is behind the vehicle.
ParkSense Active Park Assist Switch
OPERATING YOUR VEHICLE
63
Page 112 of 236
Adding A Stop
• To add a stop you must be navigating a route.
• Press the “Menu” button on the touchscreen to return to the Main Navigationmenu.
• Press the “Where To?” button on the touchscreen, then search for the extra stop. When another location has been selected, you can choose to cancel your previous
route, add as the first destination or add as the last destination.
• Press the desired selection and press the “Yes” button on the touchscreen.
Taking A Detour
• To take a detour you must be navigating a route.
• Press the “Detour” button on the touchscreen.
NOTE:
If the route you are currently taking is the only reasonable option, the device may not
calculate a detour. For more information, see your Uconnect User's Manual.
SiriusXM TRAFFIC (8.4AN & US Market Only)
Don't Drive Through Traffic. Drive Around It.
Avoid congestion before you reach it. By enhancing your vehicle's navigation system
with the ability to see detailed traffic information, you can pinpoint traffic incidents,
determine average traffic speed and estimate travel time along your route. Since the
service is integrated with a vehicle's navigation system, SiriusXM Traffic can help
drivers pick the fastest route based on traffic conditions.
• Detailed information on traffic speed, accidents, construction, and road closings.
• Traffic information from multiple sources, including police and emergency ser- vices, cameras and road sensors.
• Coast-to-coast delivery of traffic information.
• View conditions for points along your route and beyond. Available in over 130 markets.
ELECTRONICS
110
Page 167 of 236
IF THE LIGHT STARTS FLASHING INDICATING A LOW TIRE PRESSURE, ADJUST THE AIR
PRESSURE IN THE LOW TIRE TO THE AIR PRESSURE SHOWN ON THE VEHICLE PLACARD OR
TIRE INFLATION PRESSURE LABEL LOCATED ON THE DRIVER'S DOOR.
NOTE:
After inflation, the vehicle may need to be driven for 20 minutes before the flashing light
will turn off.
Please note that the TPMS is not a substitute for proper tire maintenance, and it is
the driver’s responsibility to maintain correct tire pressure, even if under-inflation
has not reached the level to trigger illumination of the TPMS low EVIC or DID display.
Your vehicle has also been equipped with a TPMS malfunction indicator to indicate
when the system is not operating properly. The TPMS malfunction indicator is
combined with the low tire pressure telltale. When the system detects a malfunction,
the telltale will flash for approximately one minute and then remain continuously
illuminated. This sequence will continue each time the vehicle is restarted as long as
the malfunction exists.
When the malfunction indicator is illuminated, the system may not be able to detect
or signal low tire pressure as intended. TPMS malfunctions may occur for a variety of
reasons, including the installation of replacement or alternate tires or wheels on the
vehicle that prevent the TPMS from functioning properly. Always check the TPMS
malfunction telltale after replacing one or more tires or wheels on your vehicle, to
ensure that the replacement or alternate tires and wheels allow the TPMS to continue
to function properly.
NOTE:
Tire pressures change by approximately 1 psi (7 kPa) per 12° F (7° C) of air
temperature change. Keep this in mind when checking tire pressure inside a garage,
especially in the Winter. Example: If garage temperature is 68°F (20°C) and the
outside temperature is 32°F (0°C), then the cold tire inflation pressure should be
increased by 3 psi (21 kPa), which equals 1 psi (7 kPa) for every 12°F (7°C) for this
outside temperature condition.
CAUTION!
The TPMS has been optimized for the original equipment tires and wheels. TPMS
pressures and warning have been established for the tire size equipped on your
vehicle. Undesirable system operation or sensor damage may result when using
replacement equipment that is not of the same size, type, and/or style. After-
market wheels can cause sensor damage. Do not use tire sealant from a can, or
balance beads if your vehicle is equipped with a TPMS, as damage to the sensors
may result.
WHAT TO DO IN EMERGENCIES
165
Page 173 of 236
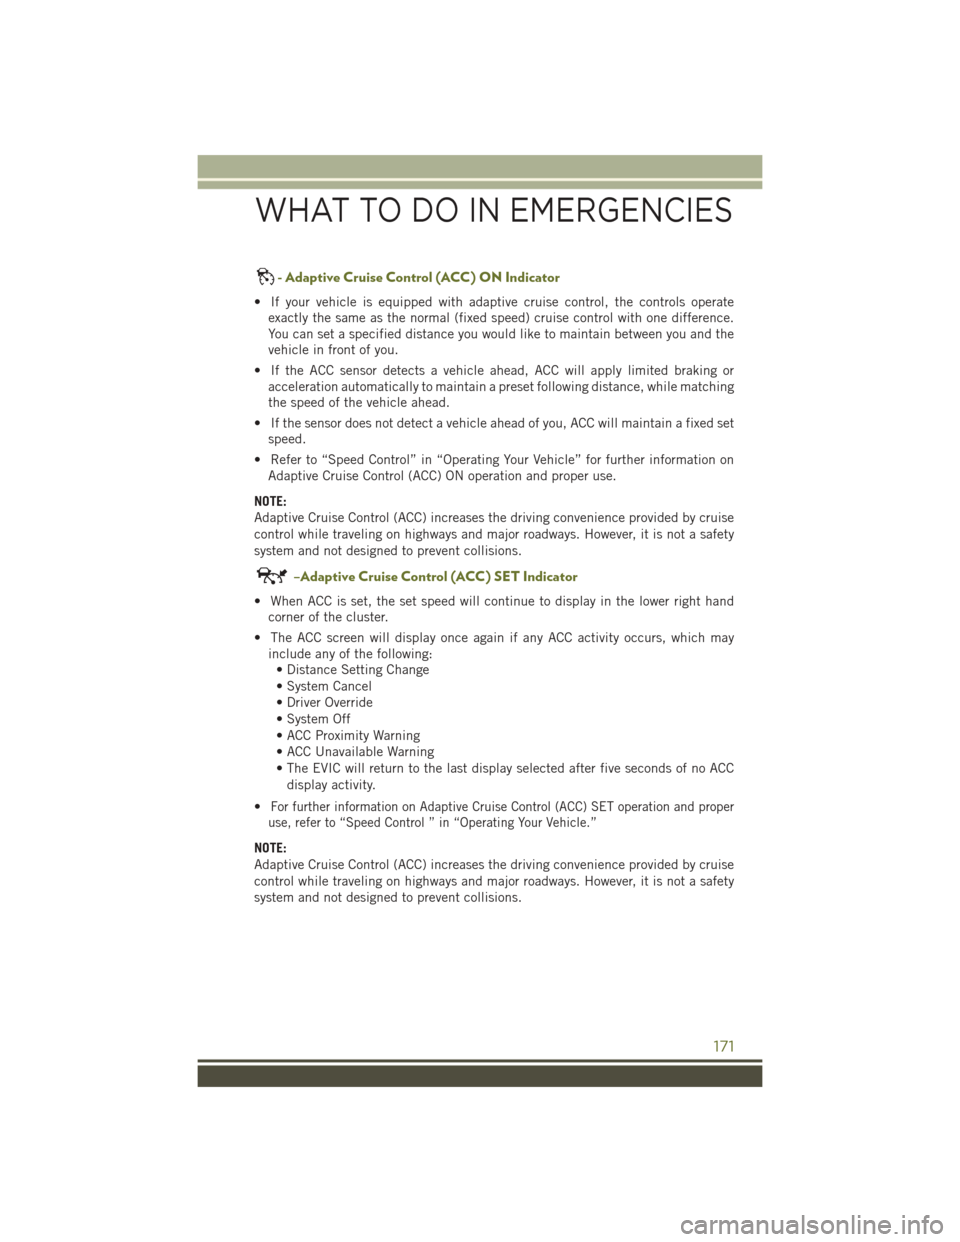
- Adaptive Cruise Control (ACC) ON Indicator
• If your vehicle is equipped with adaptive cruise control, the controls operateexactly the same as the normal (fixed speed) cruise control with one difference.
You can set a specified distance you would like to maintain between you and the
vehicle in front of you.
• If the ACC sensor detects a vehicle ahead, ACC will apply limited braking or acceleration automatically to maintain a preset following distance, while matching
the speed of the vehicle ahead.
• If the sensor does not detect a vehicle ahead of you, ACC will maintain a fixed set speed.
• Refer to “Speed Control” in “Operating Your Vehicle” for further information on Adaptive Cruise Control (ACC) ON operation and proper use.
NOTE:
Adaptive Cruise Control (ACC) increases the driving convenience provided by cruise
control while traveling on highways and major roadways. However, it is not a safety
system and not designed to prevent collisions.
–Adaptive Cruise Control (ACC) SET Indicator
• When ACC is set, the set speed will continue to display in the lower right hand corner of the cluster.
• The ACC screen will display once again if any ACC activity occurs, which may include any of the following:• Distance Setting Change
• System Cancel
• Driver Override
• System Off
• ACC Proximity Warning
• ACC Unavailable Warning
• The EVIC will return to the last display selected after five seconds of no ACC
display activity.
•
For further information on Adaptive Cruise Control (ACC) SET operation and proper
use, refer to “Speed Control ” in “Operating Your Vehicle.”
NOTE:
Adaptive Cruise Control (ACC) increases the driving convenience provided by cruise
control while traveling on highways and major roadways. However, it is not a safety
system and not designed to prevent collisions.
WHAT TO DO IN EMERGENCIES
171
Page 206 of 236
FUSES
WARNING!
• When replacing a blown fuse, always use an appropriate replacement fuse withthe same amp rating as the original fuse. Never replace a fuse with another
fuse of higher amp rating. Never replace a blown fuse with metal wires or any
other material. Failure to use proper fuses may result in serious personal injury,
fire and/or property damage.
• Before replacing a fuse, make sure that the ignition is off and that all the other
services are switched off and/or disengaged.
• If the replaced fuse blows again, contact an authorized dealer.
• If a general protection fuse for safety systems (air bag system, braking system),
power unit systems (engine system, gearbox system) or steering system blows,
contact an authorized dealer.
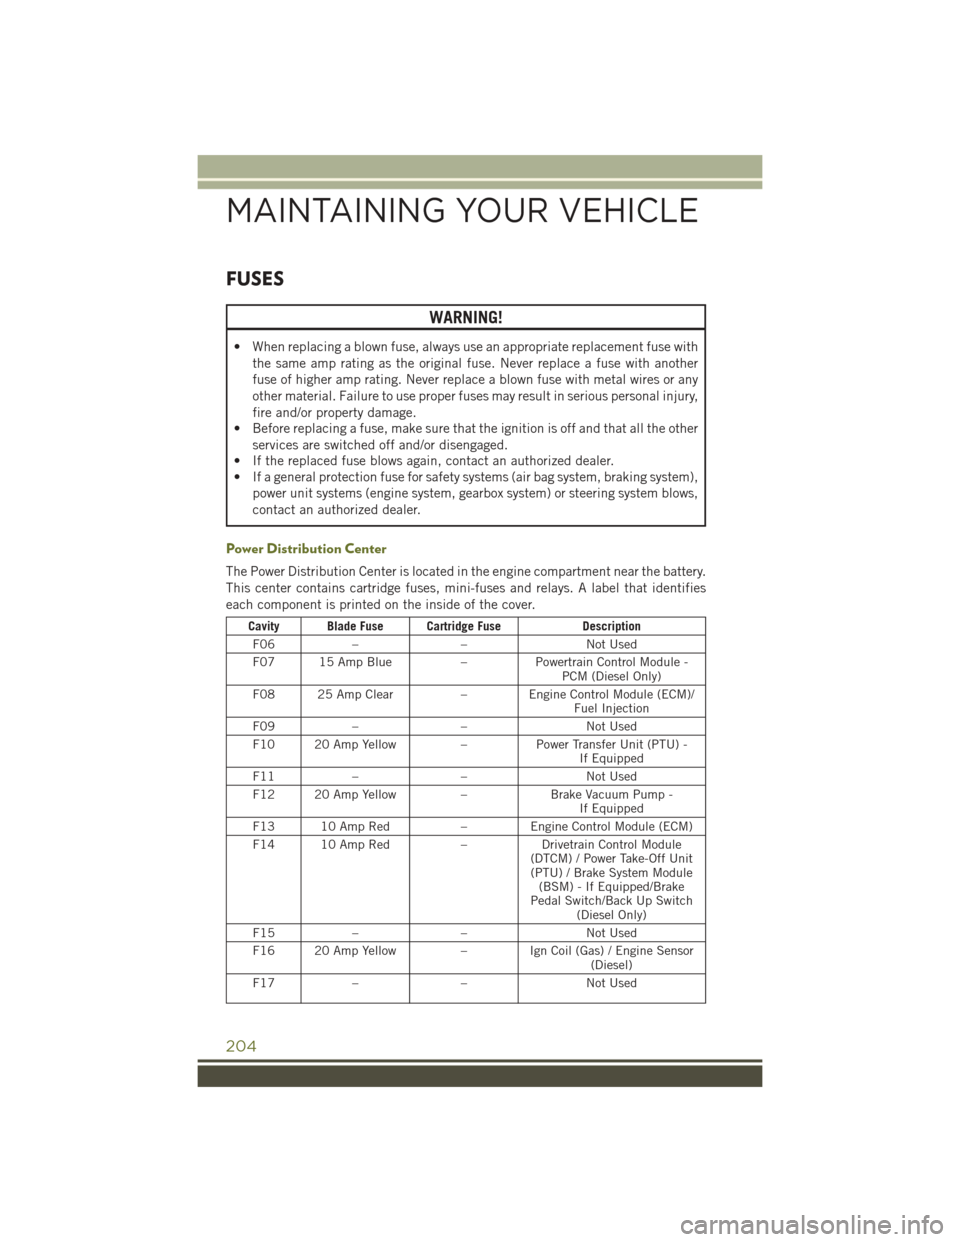
Power Distribution Center
The Power Distribution Center is located in the engine compartment near the battery.
This center contains cartridge fuses, mini-fuses and relays. A label that identifies
each component is printed on the inside of the cover.
Cavity Blade Fuse Cartridge Fuse Description
F06 – – Not Used
F07 15 Amp Blue –Powertrain Control Module -
PCM (Diesel Only)
F08 25 Amp Clear – Engine Control Module (ECM)/
Fuel Injection
F09 – – Not Used
F10 20 Amp Yellow –Power Transfer Unit (PTU) -
If Equipped
F11 – – Not Used
F12 20 Amp Yellow –Brake Vacuum Pump -
If Equipped
F13 10 Amp Red –Engine Control Module (ECM)
F14 10 Amp Red –Drivetrain Control Module
(DTCM) / Power Take-Off Unit (PTU) / Brake System Module (BSM) - If Equipped/Brake
Pedal Switch/Back Up Switch (Diesel Only)
F15 – – Not Used
F16 20 Amp Yellow –Ign Coil (Gas) / Engine Sensor
(Diesel)
F17 – – Not Used
MAINTAINING YOUR VEHICLE
204