light JEEP CHEROKEE 2018 Owner handbook (in English)
[x] Cancel search | Manufacturer: JEEP, Model Year: 2018, Model line: CHEROKEE, Model: JEEP CHEROKEE 2018Pages: 312, PDF Size: 4.91 MB
Page 146 of 312
Remove your foot from the accelerator pedal.
If you do not, the vehicle may continue to
accelerate beyond the set speed. If this oc-
curs:
• The message “DRIVER OVERRIDE” willappear in the instrument cluster display.
• The system will not be controlling the dis- tance between your vehicle and the vehicle
ahead. The vehicle speed will only be de-
termined by the position of the accelerator
pedal.
Varying The Speed
Once the ACC has been activated, the speed
can be increased or decreased.
NOTE:
• When you override and push the SET (+)
button or SET (-)buttons, the new set
speed will be the current speed of the
vehicle.
• When you use the SET (-)button to decel-
erate, if the engine’s braking power does
not slow the vehicle sufficiently to reach
the set speed, the brake system will auto-
matically slow the vehicle. • The ACC system applies the brake down to
a full stop when following a target vehicle.
If an ACC host vehicle follows a target
vehicle to a standstill, the host vehicle will
release the vehicle brakes two seconds af-
ter coming to a full stop.
• The ACC system maintains set speed when driving up hill and down hill. However, a
slight speed change on moderate hills is
normal. In addition, downshifting may oc-
cur while climbing uphill or descending
downhill. This is normal operation and nec-
essary to maintain set speed. When driving
up hill and down hill, the ACC system will
cancel if the braking temperature exceeds
normal range (overheated).
To Increase Speed
While ACC is set, you can increase the set
speed by pushing the SET (+)button.
The driver's preferred units can be selected
through the instrument panel settings if
equipped. Refer to “Getting To Know Your
Instrument Panel” in the Owner’s Manual for
further information. The speed increment
shown is dependant on the chosen speed unit
of U.S. (mph) or Metric (km/h): U.S. Speed (mph)
• Pushing the SET
(+)button once will result
in a 1 mph increase in set speed. Each
subsequent tap of the button results in an
increase of 1 mph.
• If the button is continually pushed, the set speed will continue to increase in 5 mph
increments until the button is released.
The increase in set speed is reflected in the
instrument cluster display.
Metric Speed (km/h)
• Pushing the SET (+)button once will result
in a 1 km/h increase in set speed. Each
subsequent tap of the button results in an
increase of 1 km/h.
• If the button is continually pushed, the set speed will continue to increase in 10 km/h
increments until the button is released.
The increase in set speed is reflected in the
instrument cluster display.
To Decrease Speed
While ACC is set, the set speed can be de-
creased by pushing the SET (-)button.
STARTING AND OPERATING
144
Page 152 of 312
and the system is disabled, the instrument
cluster display will show the “PARKSENSE
OFF” message for as long as the vehicle is in
REVERSE.
The ParkSense switch LED will be on when
ParkSense is disabled or requires service.
The ParkSense switch LED will be off when
the system is enabled. If the ParkSense
switch is pushed, and requires service, the
ParkSense switch LED will blink momen-
tarily, and then the LED will be on.
Engagement/Disengagement
To disengage the system, push the ParkSense
switch, located on the switch panel below the
Uconnect display.
When the system passes from engaged to
disengaged and vice versa, it is always ac-
companied by a dedicated message in the
instrument cluster display.
System engaged:ParkSense switch LED off.
System disengaged: ParkSense switch LED on
constantly. The ParkSense switch LED lights up also in
the case of a ParkSense system failure. If the
button is pushed with a system failure, the
ParkSense switch LED flashes for about
5 seconds, then it stays on constantly.
After the ParkSense has been disengaged, it
will stay in this condition until the following
engagement, even if the ignition device
passes from ON/RUN to OFF and then again
to ON/RUN.
Operation With A Trailer
The operation of the sensors is automatically
deactivated when the trailer's electric plug is
inserted in the vehicle's tow hook socket. The
sensors are automatically reactivated when
the trailer's cable plug is removed.
General Warnings
If “PARKSENSE UNAVAILABLE WIPE REAR
SENSORS" or "PARKSENSE UNAVAILABLE
WIPE FRONT SENSORS” appears in the in-
strument cluster display, clean the
ParkSense sensors with water, car wash soap
and a soft cloth. Do not use rough or hard
cloths. Do not scratch or poke the sensors.
Otherwise, you could damage the sensors.
PARKSENSE ACTIVE PARK
ASSIST
Enabling And Disabling ParkSense Active
Park Assist
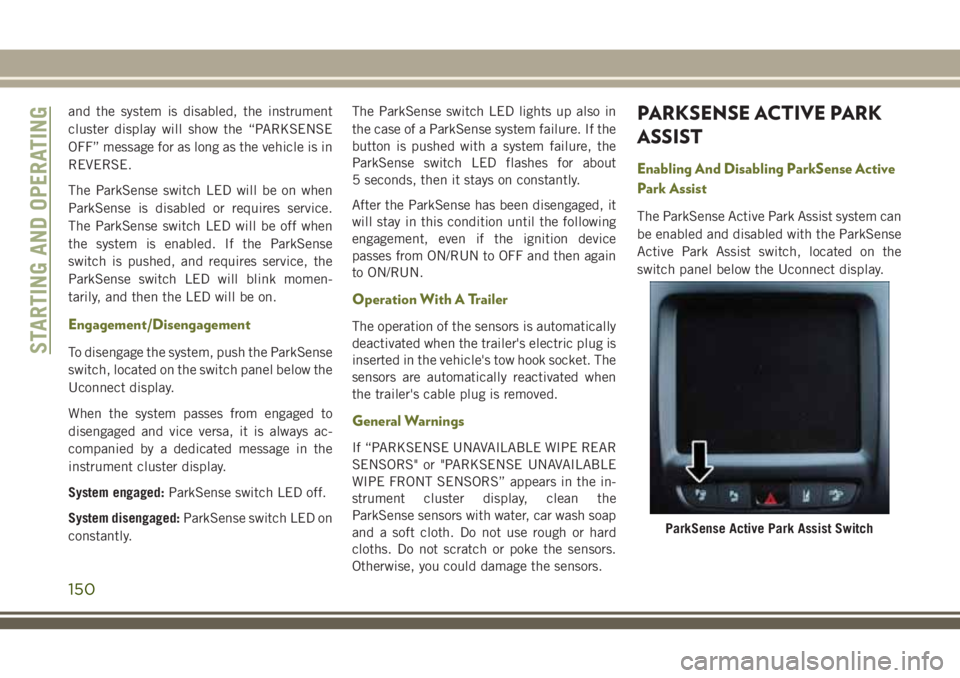
The ParkSense Active Park Assist system can
be enabled and disabled with the ParkSense
Active Park Assist switch, located on the
switch panel below the Uconnect display.
ParkSense Active Park Assist Switch
STARTING AND OPERATING
150
Page 157 of 312
WARNING!
up. You must continue to pay attention
while backing up. Failure to do so can
result in serious injury or death.
CAUTION!
• To avoid vehicle damage, ParkViewshould only be used as a parking aid.
The ParkView camera is unable to view
every obstacle or object in your drive
path.
• To avoid vehicle damage, the vehicle
must be driven slowly when using
ParkView to be able to stop in time when
an obstacle is seen. It is recommended
that the driver look frequently over his/
her shoulder when using ParkView.
REFUELING THE VEHICLE
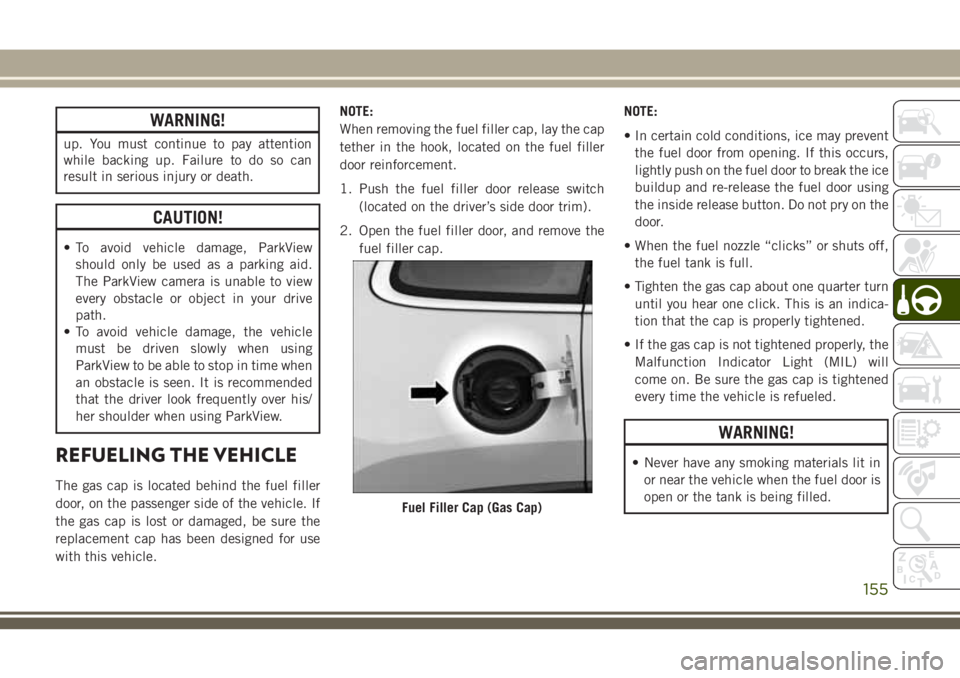
The gas cap is located behind the fuel filler
door, on the passenger side of the vehicle. If
the gas cap is lost or damaged, be sure the
replacement cap has been designed for use
with this vehicle. NOTE:
When removing the fuel filler cap, lay the cap
tether in the hook, located on the fuel filler
door reinforcement.
1. Push the fuel filler door release switch
(located on the driver’s side door trim).
2. Open the fuel filler door, and remove the fuel filler cap. NOTE:
• In certain cold conditions, ice may prevent
the fuel door from opening. If this occurs,
lightly push on the fuel door to break the ice
buildup and re-release the fuel door using
the inside release button. Do not pry on the
door.
• When the fuel nozzle “clicks” or shuts off, the fuel tank is full.
• Tighten the gas cap about one quarter turn until you hear one click. This is an indica-
tion that the cap is properly tightened.
• If the gas cap is not tightened properly, the Malfunction Indicator Light (MIL) will
come on. Be sure the gas cap is tightened
every time the vehicle is refueled.
WARNING!
• Never have any smoking materials lit in or near the vehicle when the fuel door is
open or the tank is being filled.
Fuel Filler Cap (Gas Cap)
155
Page 158 of 312
WARNING!
• Never add fuel when the engine is run-ning. This is in violation of most coun-
tries regulations and may cause the
“Malfunction Indicator Light” to turn
on.
• A fire may result if fuel is pumped into a
portable container that is inside of a
vehicle. You could be burned. Always
place fuel containers on the ground
while filling.
CAUTION!
• Damage to the fuel system or emissioncontrol system could result from using
an improper fuel filler cap. A poorly
fitting cap could let impurities into the
fuel system. Also, a poorly fitting after-
market cap can cause the “Malfunction
Indicator Light (MIL)” to illuminate, due
to fuel vapors escaping from the system.
• A poorly fitting fuel filler cap may cause
the MIL to turn on.
CAUTION!
• To avoid fuel spillage and overfilling, donot “top off” the fuel tank after filling.
• If fuel is spilled on surface on the paint,
clear it immediately to avoid damage the
paint.
TRAILER TOWING
Trailer Towing Weights (Maximum Trailer Weight Ratings)
Engine/Transmission ModelFrontal Area Maximum GTW
(Gross Trailer Wt.) Maximum Tongue Wt.
(See Note)
2.4L/Automatic with or
without Trailer Tow Package FWD
40 sq ft (3.72 sq m) 4,409 lbs (2,000 kg) 220 lbs (100 kg)
2.4L/Automatic with or
without Trailer Tow Package 4WD
40 sq ft (3.72 sq m) 4,850 lbs (2,200 kg) 243 lbs (110 kg)
3.2L/Automatic with or
without Trailer Tow Package FWD or 4WD
40 sq ft (3.72 sq m) 4,850 lbs (2,200 kg) 243 lbs (110 kg)
2.0L Diesel/Manual FWD40 sq ft (3.72 sq m) 3,968 lbs (1,800 kg) 198 lbs (90 kg)
2.0L Diesel/Manual 4WD40 sq ft (3.72 sq m) 3,527 lbs (1,600 kg) 176 lbs (80 kg)
STARTING AND OPERATING
156
Page 163 of 312
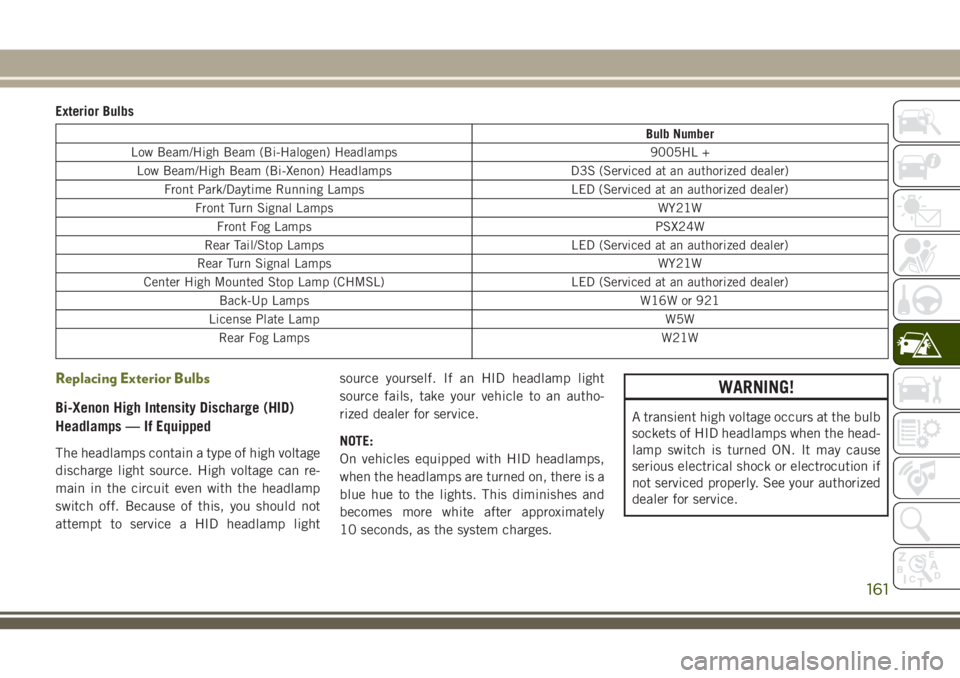
Exterior Bulbs
Bulb Number
Low Beam/High Beam (Bi-Halogen) Headlamps 9005HL + Low Beam/High Beam (Bi-Xenon) Headlamps D3S (Serviced at an authorized dealer) Front Park/Daytime Running Lamps LED (Serviced at an authorized dealer)
Front Turn Signal Lamps WY21WFront Fog Lamps PSX24W
Rear Tail/Stop Lamps LED (Serviced at an authorized dealer)
Rear Turn Signal Lamps WY21W
Center High Mounted Stop Lamp (CHMSL) LED (Serviced at an authorized dealer) Back-Up Lamps W16W or 921
License Plate Lamp W5W Rear Fog Lamps W21W
Replacing Exterior Bulbs
Bi-Xenon High Intensity Discharge (HID)
Headlamps — If Equipped
The headlamps contain a type of high voltage
discharge light source. High voltage can re-
main in the circuit even with the headlamp
switch off. Because of this, you should not
attempt to service a HID headlamp light source yourself. If an HID headlamp light
source fails, take your vehicle to an autho-
rized dealer for service.
NOTE:
On vehicles equipped with HID headlamps,
when the headlamps are turned on, there is a
blue hue to the lights. This diminishes and
becomes more white after approximately
10 seconds, as the system charges.
WARNING!
A transient high voltage occurs at the bulb
sockets of HID headlamps when the head-
lamp switch is turned ON. It may cause
serious electrical shock or electrocution if
not serviced properly. See your authorized
dealer for service.
161
Page 169 of 312
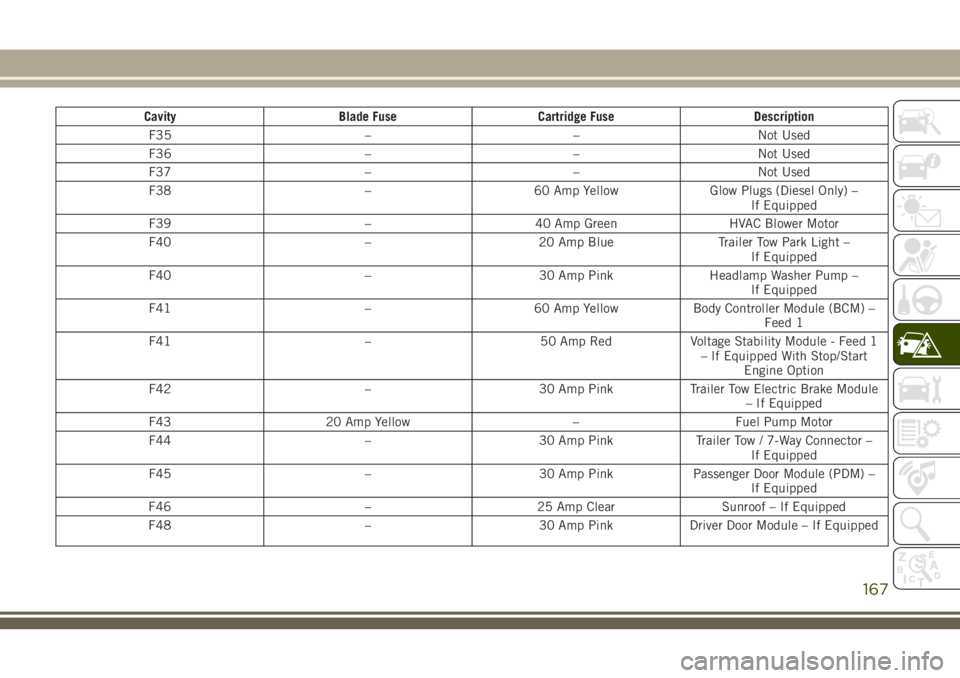
CavityBlade Fuse Cartridge Fuse Description
F35 ––Not Used
F36 ––Not Used
F37 ––Not Used
F38 –60 Amp Yellow Glow Plugs (Diesel Only) –
If Equipped
F39 –40 Amp Green HVAC Blower Motor
F40 –20 Amp Blue Trailer Tow Park Light –
If Equipped
F40 –30 Amp PinkHeadlamp Washer Pump –
If Equipped
F41 –60 Amp YellowBody Controller Module (BCM) –
Feed 1
F41 –50 Amp RedVoltage Stability Module - Feed 1
– If Equipped With Stop/Start Engine Option
F42 –30 Amp PinkTrailer Tow Electric Brake Module
– If Equipped
F43 20 Amp Yellow –Fuel Pump Motor
F44 –30 Amp PinkTrailer Tow / 7-Way Connector –
If Equipped
F45 –30 Amp PinkPassenger Door Module (PDM) –
If Equipped
F46 –25 Amp Clear Sunroof – If Equipped
F48 –30 Amp PinkDriver Door Module – If Equipped
167
Page 170 of 312
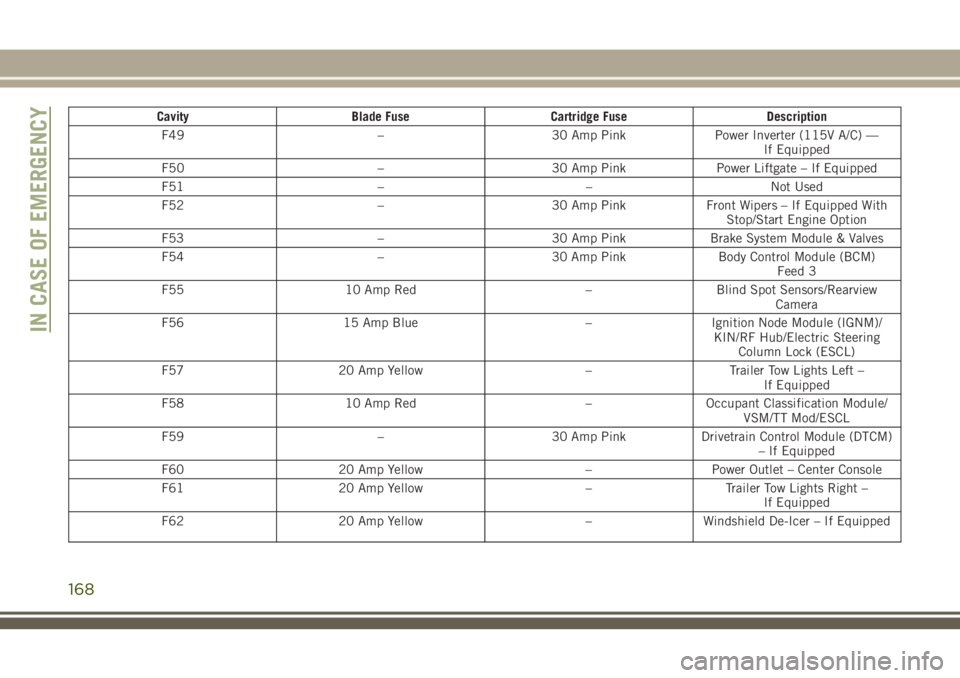
CavityBlade Fuse Cartridge Fuse Description
F49 –30 Amp PinkPower Inverter (115V A/C) —
If Equipped
F50 –30 Amp PinkPower Liftgate – If Equipped
F51 ––Not Used
F52 –30 Amp PinkFront Wipers – If Equipped With
Stop/Start Engine Option
F53 –30 Amp PinkBrake System Module & Valves
F54 –30 Amp PinkBody Control Module (BCM)
Feed 3
F55 10 Amp Red –Blind Spot Sensors/Rearview
Camera
F56 15 Amp Blue –Ignition Node Module (IGNM)/
KIN/RF Hub/Electric Steering Column Lock (ESCL)
F57 20 Amp Yellow –Trailer Tow Lights Left –
If Equipped
F58 10 Amp Red –Occupant Classification Module/
VSM/TT Mod/ESCL
F59 –30 Amp PinkDrivetrain Control Module (DTCM)
– If Equipped
F60 20 Amp Yellow –Power Outlet – Center Console
F61 20 Amp Yellow –Trailer Tow Lights Right –
If Equipped
F62 20 Amp Yellow –Windshield De-Icer – If Equipped
IN CASE OF EMERGENCY
168
Page 172 of 312
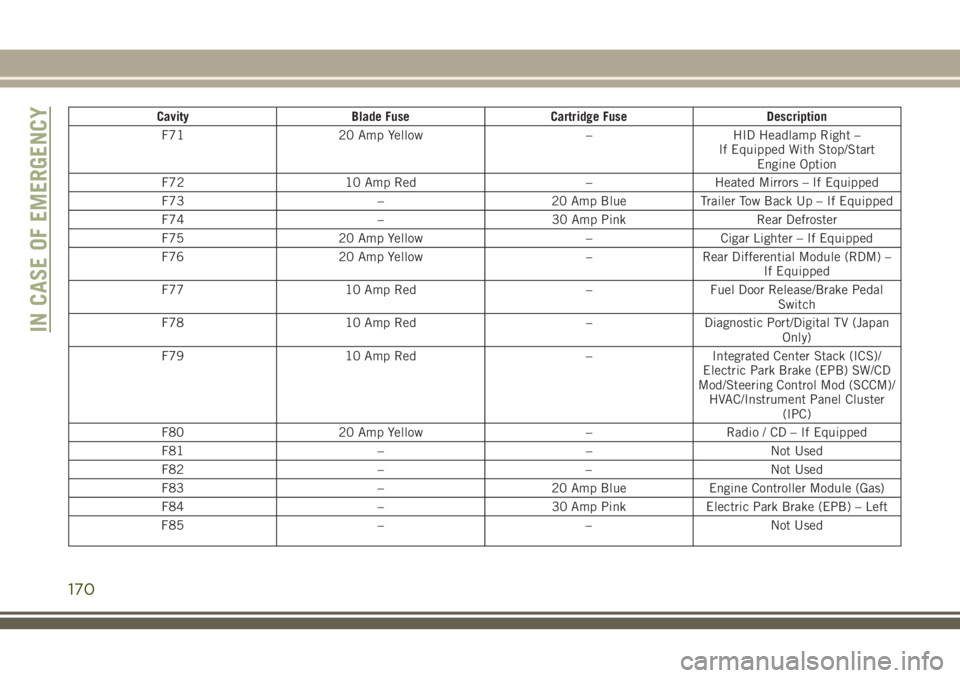
CavityBlade Fuse Cartridge Fuse Description
F71 20 Amp Yellow –HID Headlamp Right –
If Equipped With Stop/Start Engine Option
F72 10 Amp Red –Heated Mirrors – If Equipped
F73 –20 Amp BlueTrailer Tow Back Up – If Equipped
F74 –30 Amp Pink Rear Defroster
F75 20 Amp Yellow –Cigar Lighter – If Equipped
F76 20 Amp Yellow –Rear Differential Module (RDM) –
If Equipped
F77 10 Amp Red –Fuel Door Release/Brake Pedal
Switch
F78 10 Amp Red –Diagnostic Port/Digital TV (Japan
Only)
F79 10 Amp Red –Integrated Center Stack (ICS)/
Electric Park Brake (EPB) SW/CD
Mod/Steering Control Mod (SCCM)/ HVAC/Instrument Panel Cluster (IPC)
F80 20 Amp Yellow –Radio / CD – If Equipped
F81 ––Not Used
F82 ––Not Used
F83 –20 Amp BlueEngine Controller Module (Gas)
F84 –30 Amp PinkElectric Park Brake (EPB) – Left
F85 ––Not Used
IN CASE OF EMERGENCY
170
Page 174 of 312
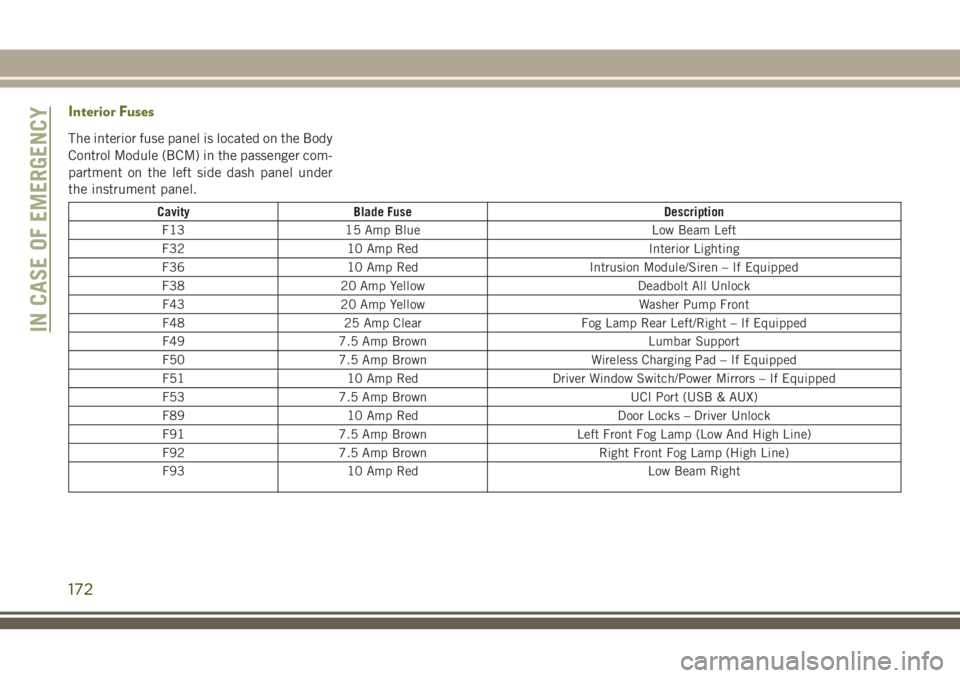
Interior Fuses
The interior fuse panel is located on the Body
Control Module (BCM) in the passenger com-
partment on the left side dash panel under
the instrument panel.
CavityBlade Fuse Description
F13 15 Amp Blue Low Beam Left
F32 10 Amp Red Interior Lighting
F36 10 Amp Red Intrusion Module/Siren – If Equipped
F38 20 Amp Yellow Deadbolt All Unlock
F43 20 Amp Yellow Washer Pump Front
F48 25 Amp Clear Fog Lamp Rear Left/Right – If Equipped
F49 7.5 Amp Brown Lumbar Support
F50 7.5 Amp Brown Wireless Charging Pad – If Equipped
F51 10 Amp Red Driver Window Switch/Power Mirrors – If Equipped
F53 7.5 Amp Brown UCI Port (USB & AUX)
F89 10 Amp Red Door Locks – Driver Unlock
F91 7.5 Amp Brown Left Front Fog Lamp (Low And High Line)
F92 7.5 Amp Brown Right Front Fog Lamp (High Line)
F93 10 Amp Red Low Beam Right
IN CASE OF EMERGENCY
172
Page 178 of 312
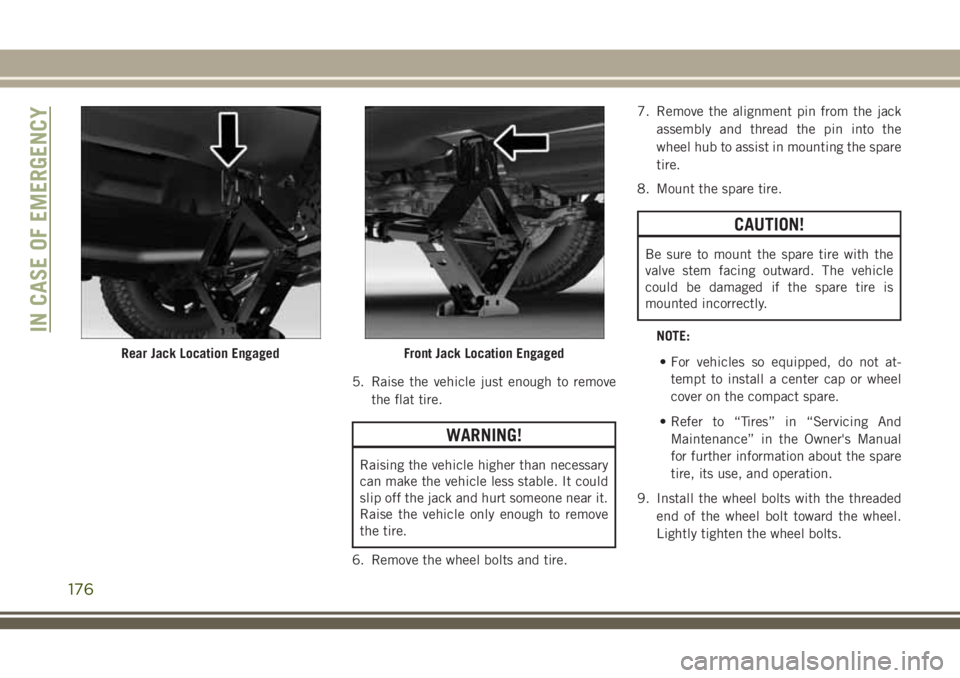
5. Raise the vehicle just enough to removethe flat tire.
WARNING!
Raising the vehicle higher than necessary
can make the vehicle less stable. It could
slip off the jack and hurt someone near it.
Raise the vehicle only enough to remove
the tire.
6. Remove the wheel bolts and tire. 7. Remove the alignment pin from the jack
assembly and thread the pin into the
wheel hub to assist in mounting the spare
tire.
8. Mount the spare tire.
CAUTION!
Be sure to mount the spare tire with the
valve stem facing outward. The vehicle
could be damaged if the spare tire is
mounted incorrectly.
NOTE:• For vehicles so equipped, do not at- tempt to install a center cap or wheel
cover on the compact spare.
• Refer to “Tires” in “Servicing And Maintenance” in the Owner's Manual
for further information about the spare
tire, its use, and operation.
9. Install the wheel bolts with the threaded end of the wheel bolt toward the wheel.
Lightly tighten the wheel bolts.
Rear Jack Location EngagedFront Jack Location Engaged
IN CASE OF EMERGENCY
176