start stop button JEEP CHEROKEE 2019 Owner handbook (in English)
[x] Cancel search | Manufacturer: JEEP, Model Year: 2019, Model line: CHEROKEE, Model: JEEP CHEROKEE 2019Pages: 344, PDF Size: 6.35 MB
Page 163 of 344

3. At the next vehicle stop (after turning off
the STOP/START system) the engine will
not be stopped.
4. If the STOP/START system is manually
turned off, the engine can only be started
and stopped by cycling the ignition
switch.
5. The STOP/START system will reset itself
back to an ON condition every time the
key is turned off and back on.
To Manually Turn On The Stop/Start
System
Push the STOP/START Off switch (located on
the switch bank). The light on the switch will
turn off.
SPEED CONTROL
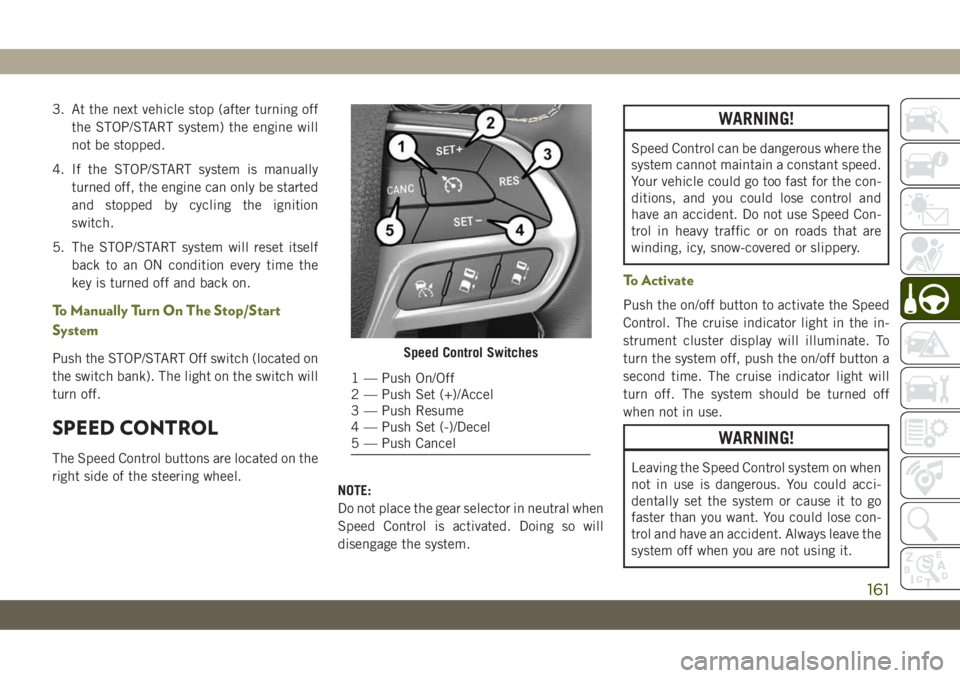
The Speed Control buttons are located on the
right side of the steering wheel.
NOTE:
Do not place the gear selector in neutral when
Speed Control is activated. Doing so will
disengage the system.
WARNING!
Speed Control can be dangerous where the
system cannot maintain a constant speed.
Your vehicle could go too fast for the con-
ditions, and you could lose control and
have an accident. Do not use Speed Con-
trol in heavy traffic or on roads that are
winding, icy, snow-covered or slippery.
To Activate
Push the on/off button to activate the Speed
Control. The cruise indicator light in the in-
strument cluster display will illuminate. To
turn the system off, push the on/off button a
second time. The cruise indicator light will
turn off. The system should be turned off
when not in use.
WARNING!
Leaving the Speed Control system on when
not in use is dangerous. You could acci-
dentally set the system or cause it to go
faster than you want. You could lose con-
trol and have an accident. Always leave the
system off when you are not using it.
Speed Control Switches
1 — Push On/Off
2 — Push Set (+)/Accel
3 — Push Resume
4 — Push Set (-)/Decel
5 — Push Cancel
161
Page 165 of 344

• If the ACC sensor detects a vehicle ahead,
ACC will apply limited braking or accelera-
tion (not to exceed the original set speed)
automatically to maintain a preset follow-
ing distance, while matching the speed of
the vehicle ahead.
WARNING!
• Adaptive Cruise Control (ACC) is a con-
venience system. It is not a substitute
for active driving involvement. It is al-
ways the driver’s responsibility to be at-
tentive of road, traffic, and weather con-
ditions, vehicle speed, distance to the
vehicle ahead; and, most importantly,
brake operation to ensure safe operation
of the vehicle under all road conditions.
Your complete attention is always re-
quired while driving to maintain safe
control of your vehicle. Failure to follow
these warnings can result in a collision
and death or serious personal injury.
• The ACC system:
• Does not react to pedestrians, on-
coming vehicles, and stationary ob-
WARNING!
jects (e.g., a stopped vehicle in a
traffic jam or a disabled vehicle).
• Cannot take street, traffic, and
weather conditions into account,
and may be limited upon adverse
sight distance conditions.
• Does not always fully recognize
complex driving conditions, which
can result in wrong or missing dis-
tance warnings.
• Will bring the vehicle to a complete
stop while following a target vehicle
and hold the vehicle for approxi-
mately 3 minutes in the stop posi-
tion. If the target vehicle does not
start moving within 3 minutes the
parking brake will be activated, and
the ACC system will be cancelled.
You should switch off the ACC system:
• When driving in fog, heavy rain, heavy
snow, sleet, heavy traffic, and complex
driving situations (i.e., in highway con-
struction zones).
WARNING!
• When entering a turn lane or highway off
ramp; when driving on roads that are
winding, icy, snow-covered, slippery, or
have steep uphill or downhill slopes.
• When towing a trailer up or down steep
slopes.
• When circumstances do not allow safe
driving at a constant speed.
Activating Adaptive Cruise Control (ACC )
Push and release the Adaptive Cruise Control
(ACC) on/off button.
The minimum set speed for the ACC system is
19 mph (30 km/h).
When the system is turned on and in the
ready state, the instrument cluster display
will read “ACC Ready.”
When the system is off, the instrument clus-
ter display will read “Adaptive Cruise Control
(ACC) Off.”
163
Page 208 of 344

WARNING!
• Take care not to allow the contents of
Tire Service Kit to come in contact with
hair, eyes, or clothing. Tire Service Kit
sealant is harmful if inhaled, swallowed,
or absorbed through the skin. It causes
skin, eye, and respiratory irritation.
Flush immediately with plenty of water if
there is any contact with eyes or skin.
Change clothing as soon as possible, if
there is any contact with clothing.
• Tire Service Kit Sealant solution con-
tains latex. In case of an allergic reaction
or rash, consult a physician immedi-
ately. Keep Tire Service Kit out of reach
of children. If swallowed, rinse mouth
immediately with plenty of water and
drink plenty of water. Do not induce
vomiting! Consult a physician immedi-
ately.
Sealing A Tire With Tire Service Kit
(A) Whenever You Stop To Use Tire Service
Kit:
1. Pull over to a safe location and turn on the
vehicle’s Hazard Warning flashers.2. Verify that the valve stem (on the wheel
with the deflated tire) is in a position that
is near to the ground. This will allow the
Tire Service Kit Hoses (6) and (7) to reach
the valve stem and keep the Tire Service
Kit flat on the ground. This will provide
the best positioning of the kit when inject-
ing the sealant into the deflated tire and
running the air pump. Move the vehicle as
necessary to place the valve stem in this
position before proceeding.
3. Place the transmission in PARK (auto
transmission) or in Gear (manual trans-
mission) and place the ignition in the OFF
position.
4. Apply the parking brake.
(B) Setting Up To Use Tire Service Kit:
1. Push in the Mode Select Knob (5) and
turn to the Sealant Mode position.
2. Uncoil the Sealant Hose (6) and then
remove the cap from the fitting at the end
of the hose.
3. Place the Tire Service Kit flat on the
ground next to the deflated tire.4. Remove the cap from the valve stem and
then screw the fitting at the end of the
Sealant Hose (6) onto the valve stem.
5. Uncoil the Power Plug (8) and insert the
plug into the vehicle’s 12 Volt power
outlet.
NOTE:
Do not remove foreign objects (e.g., screws or
nails) from the tire.
(C) Injecting Tire Service Kit Sealant Into
The Deflated Tire:
• Always start the engine before turning ON
the Tire Service Kit.
NOTE:
Manual transmission vehicles must have
the parking brake engaged and the gear se-
lector in NEUTRAL.
• After pushing the Power Button (4), the
sealant (white fluid) will flow from the Seal-
ant Bottle (1) through the Sealant Hose (6)
and into the tire.
NOTE:
Sealant may leak out through the puncture in
the tire.IN CASE OF EMERGENCY
206
Page 340 of 344

Adjustable Upper Shoulder Belt
Anchorage................104
Automatic Locking Retractor (ALR) .108
Child Restraints.............119
Energy Management Feature.....107
Front Seat.........100, 101, 103
Inspection................136
Lap/Shoulder Belt Operation.....103
Lap/Shoulder Belts...........101
Lap/Shoulder Belt Untwisting.....104
Operating Instructions.........103
Pregnant Women............107
Pretensioners..............107
Rear Seat.................101
Reminder.................100
Seat Belt Pretensioner.........107
Seat Belt Reminder...........100
Untwisting Procedure.........104
Seat Belts Maintenance..........251
Seats......................23
Adjustment................23
Easy Entry.................26
Head Restraints..............28
Heated...................26
Memory...................25
Rear Folding................23
Tilting....................23Ventilated.................28
Security Alarm..............19, 68
Arm The System.............19
Disarm The System............19
Selec-Terrain.................155
Selection Of Coolant (Antifreeze).....262
Sentry Key Replacement..........15
Service Assistance.............315
Shifting
Automatic Transmission........148
Manual Transmission..........144
Shift Lever Override.............213
Shoulder Belts................101
Signals, Turn..............73, 138
Siri.......................311
Snow Chains (Tire Chains).........247
Snow Tires..................244
Spare Tires...............244, 245
Spark Plugs.................262
Specifications
Fuel (Gasoline).............262
Oil .....................262
Speed Control
Accel/Decel...............161
Cancel...............161, 162
Resume..............161, 162
Set.....................161Speed Control (Cruise Control) . . .161, 162
Starting....................139
Button...................15
Cold Weather...............140
Remote...................17
Starting Procedures.............139
Steering
Tilt Column.................31
Wheel, Heated...............31
Steering Wheel Audio Controls......288
Steering Wheel Mounted Sound System
Controls..................288
Stop/Start...................73
Storage, Vehicle................48
Stuck, Freeing................213
Sun Roof....................51
Closing...................51
Opening..................51
Sunshade Operation.............51
Sway Control, Trailer.............84
System, Remote Starting..........17
Temperature Control, Automatic (ATC) . .48
Text Messages.............270, 303
Time Delay
Headlight..................35
Tips ......................288
INDEX
338