stop start JEEP CHEROKEE 2019 Owner handbook (in English)
[x] Cancel search | Manufacturer: JEEP, Model Year: 2019, Model line: CHEROKEE, Model: JEEP CHEROKEE 2019Pages: 344, PDF Size: 6.35 MB
Page 95 of 344
Changing the FCW status to the “Near” set-
ting, allows the system to warn the driver of a
possible collision with the vehicle in front
when the distance between the vehicle in the
front is much closer. This setting provides
less reaction time than the “Far” and “Me-
dium” settings, which allows for a more dy-
namic driving experience.
NOTE:
• Changing the FCW status to “Only Warn-
ing” prevents the system from providing
limited active braking, or additional brake
support if the driver is not braking ad-
equately in the event of a potential frontal
collision, but maintains the audible and
visual warnings.
• Changing the FCW status to “Off” prevents
the system from providing autonomous
braking, or additional brake support if the
driver is not braking adequately in the event
of a potential frontal collision.
• The system will NOT retain the last setting
selected by the driver after ignition shut
down. The system will reset to the default
setting when the vehicle is restarted.• FCW may not react to irrelevant objects
such as overhead objects, ground reflec-
tions, objects not in the path of the vehicle,
stationary objects that are far away, oncom-
ing traffic, or leading vehicles with the
same or higher rate of speed.
• FCW will be disabled like ACC, with the
unavailable screens.
FCW Limited Warning
If the instrument cluster display reads “ACC/
FCW Limited Functionality” or “ACC/FCW
Limited Functionality Clean Front Wind-
shield” momentarily, there may be a condi-
tion that limits FCW functionality. Although
the vehicle is still drivable under normal
conditions, the active braking may not be
fully available. Once the condition that lim-
ited the system performance is no longer
present, the system will return to its full
performance state. If the problem persists,
see an authorized dealer.
Service FCW Warning
If the system turns off, and the instrument
cluster display reads:
• ACC/FCW Unavailable Service Required• Cruise/FCW Unavailable Service Required
This indicates there is an internal system
fault. Although the vehicle is still drivable
under normal conditions, have the system
checked by an authorized dealer.
Pedestrian Emergency Braking (PEB) — If
Equipped
The Pedestrian Emergency Braking (PEB) is a
sub-system of the FCW system which pro-
vides the driver with audible and visual warn-
ings in the instrument cluster display, and
may apply automatic braking when it detects
a potential frontal collision with a pedestrian.
If a PEB event begins at a speed below
37 mph (60 km/h), the system may provide
braking to mitigate the potential collision
with a pedestrian. If the PEB event stops the
vehicle completely, the system will hold the
vehicle at a standstill for two seconds and
then release the brakes. When the system
determines a collision with the pedestrian in
front of you is no longer probable, the warning
message will be deactivated.
The minimum speed for PEB activation is
3 mph (5 km/h).
93
Page 103 of 344
traveling, the BeltAlert warning sequence will
begin until the seat belts are buckled again.
The outboard front passenger seat BeltAlert
is not active when the outboard front passen-
ger seat is unoccupied. BeltAlert may be
triggered when an animal or other items are
placed on the outboard front passenger seat
or when the seat is folded flat (if equipped). It
is recommended that pets be restrained in
the rear seat (if equipped) in pet harnesses or
pet carriers that are secured by seat belts,
and cargo is properly stowed.
Rear Seat BeltAlert
Rear Seat BeltAlert shows the driver whether
the seat belts in the rear seat are buckled or
unbuckled. When the ignition switch is in the
START or ON/RUN position, a Seat Belt Re-
minder Light turns on for each rear seat
position. If a seat belt is buckled, the Seat
Belt Reminder Light for that position will
illuminate solid green. If a seat belt is un-
buckled, the Seat Belt Reminder Light will
illuminate red. If a rear passenger unbuckles
a seat belt that was buckled at the start of the
trip, a single chime will sound and the Seat
Belt Reminder Light for that position willchange from solid green to blinking red. This
will alert the driver to stop the vehicle until
the rear passenger buckles the seat belt
again. After the driver and outboard front seat
passenger have buckled their seat belts all
Seat Belt Reminder Lights will turn off.
BeltAlert can be activated or deactivated by
an authorized dealer. FCA US LLC does not
recommend deactivating BeltAlert.
NOTE:
If BeltAlert has been deactivated, the Seat
Belt Reminder Light will turn on and remain
on until the driver and outboard front seat
passenger seat belts are buckled.
Lap/Shoulder Belts
All seating positions in your vehicle are
equipped with lap/shoulder belts.
The seat belt webbing retractor will lock only
during very sudden stops or collisions. This
feature allows the shoulder part of the seat
belt to move freely with you under normal
conditions. However, in a collision the seat
belt will lock and reduce your risk of striking
the inside of the vehicle or being thrown out
of the vehicle.
WARNING!
• Relying on the air bags alone could lead
to more severe injuries in a collision. The
air bags work with your seat belt to
restrain you properly. In some collisions,
the air bags won’t deploy at all. Always
wear your seat belt even though you have
air bags.
• In a collision, you and your passengers
can suffer much greater injuries if you
are not properly buckled up. You can
strike the interior of your vehicle or other
passengers, or you can be thrown out of
the vehicle. Always be sure you and
others in your vehicle are buckled up
properly.
• It is dangerous to ride in a cargo area,
inside or outside of a vehicle. In a colli-
sion, people riding in these areas are
more likely to be seriously injured or
killed.
• Do not allow people to ride in any area of
your vehicle that is not equipped with
seats and seat belts.
101
Page 142 of 344
Extreme Cold Weather (Below –22°F Or
−30°C)
To ensure reliable starting at these tempera-
tures, use of an externally powered electric
engine block heater (available from an autho-
rized dealer) is recommended.
Normal Starting — Diesel Engine
Before starting your vehicle, adjust your seat,
both inside and outside mirrors, and fasten
your seat belts.
The starter is allowed to crank for up to
30-second intervals. Waiting a few minutes
between such intervals will protect the starter
from overheating.
WARNING!
• Before exiting a vehicle, always come to
a complete stop, then shift the auto-
matic transmission into PARK and apply
the parking brake.
• Always make sure the keyless ignition
node is in the OFF mode, key fob is
WARNING!
removed from the vehicle and vehicle is
locked.
• Never leave children alone in a vehicle,
or with access to an unlocked vehicle.
Leaving children in a vehicle unattended
is dangerous for a number of reasons. A
child or others could be seriously or
fatally injured. Children should be
warned not to touch the parking brake,
brake pedal or the gear selector.
• Do not leave the key fob in or near the
vehicle, or in a location accessible to
children, and do not leave the ignition of
a vehicle equipped with Keyless Enter-
N-Go in the ACC or ON/RUN mode. A
child could operate power windows,
other controls, or move the vehicle.
• Do not leave children or animals inside
parked vehicles in hot weather. Interior
heat build-up may cause serious injury
or death.NOTE:
Engine start up in very low ambient tempera-
ture could result in evident white smoke. This
condition will disappear as the engine warms
up.
CAUTION!
The engine is allowed to crank as long as
30 seconds. If the engine fails to start
during this period, please wait at least two
minutes for the starter to cool before re-
peating start procedure.
Battery Blanket Usage
A battery loses 60% of its cranking power as
the battery temperature decreases to 0°F
(-18°C). For the same decrease in tempera-
ture, the engine requires twice as much
power to crank at the same RPM. The use of
battery blankets will greatly increase starting
capability at low temperatures. Suitable bat-
tery blankets are available from your autho-
rized Mopar dealer.
STARTING AND OPERATING
140
Page 143 of 344
Normal Starting Procedure — Keyless
Enter-N-Go
Observe the instrument panel cluster lights
when starting the engine.
NOTE:
Normal starting of either a cold or a warm
engine is obtained without pumping or press-
ing the accelerator pedal.
1. Always apply the parking brake.
2. Press and hold the brake pedal while
pushing the ENGINE START/STOP button
once.
NOTE:
A delay of the start of up to five seconds is
possible under very cold conditions. The
“Wait to Start” telltale will be illuminated
during the pre-heat process, When the
engine Wait To Start light goes off the
engine will automatically crank.
CAUTION!
If the “Water in Fuel Indicator Light” re-
mains on, DO NOT START the engine be-
CAUTION!
fore the water is drained from the fuel
filters to avoid engine damage.
3. The system will automatically engage the
starter to crank the engine. If the vehicle
fails to start, the starter will disengage
automatically after 30 seconds.
4. If you wish to stop the cranking of the
engine prior to the engine starting, push
the button again.
5. Check that the oil pressure warning light
has turned off.
6. Release the parking brake.
Engine Warm Up
Avoid full throttle operation when the engine
is cold. When starting a cold engine, bring the
engine up to operating speed slowly to allow
the oil pressure to stabilize as the engine
warms up.NOTE:
High-speed, no-load running of a cold engine
can result in excessive white smoke and poor
engine performance. No-load engine speeds
should be kept under 1,200 RPM during the
warm-up period, especially in cold ambient
temperature conditions.
ENGINE BREAK-IN
RECOMMENDATIONS
A long break-in period is not required for the
engine and drivetrain (transmission and axle)
in your vehicle.
Drive moderately during the first 300 miles
(500 km). After the initial 60 miles
(100 km), speeds up to 50 or 55 mph (80 or
90 km/h) are desirable.
While cruising, brief full-throttle acceleration
within the limits of local traffic laws contrib-
utes to a good break-in. Wide-open throttle
acceleration in low gear can be detrimental
and should be avoided.
141
Page 148 of 344
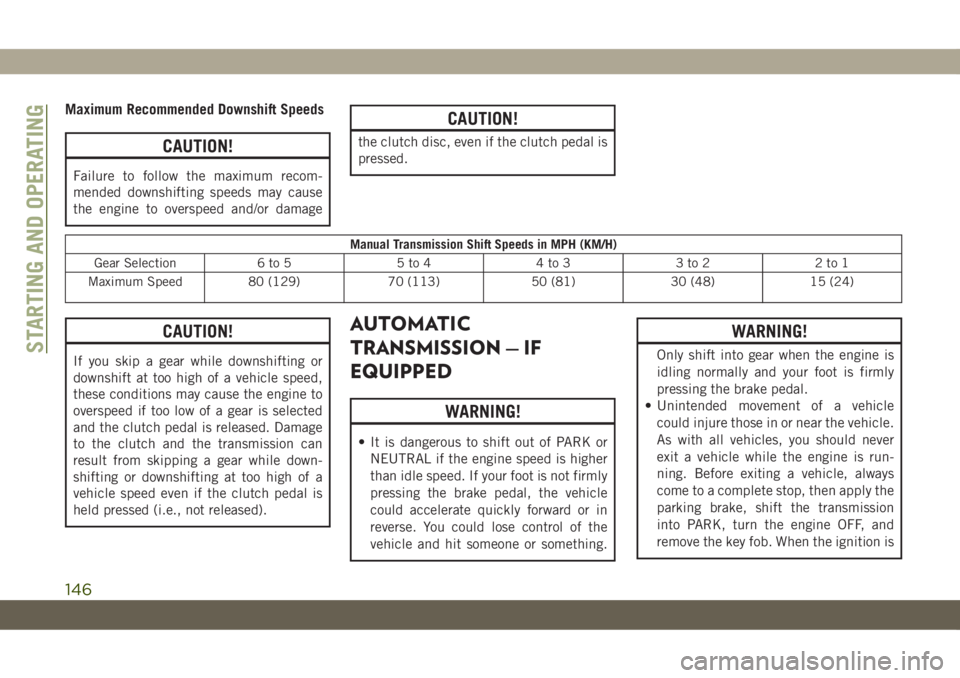
Maximum Recommended Downshift Speeds
CAUTION!
Failure to follow the maximum recom-
mended downshifting speeds may cause
the engine to overspeed and/or damage
CAUTION!
the clutch disc, even if the clutch pedal is
pressed.
Manual Transmission Shift Speeds in MPH (KM/H)
Gear Selection 6 to 5 5 to 4 4 to 3 3 to 2 2 to 1
Maximum Speed 80 (129) 70 (113) 50 (81) 30 (48) 15 (24)
CAUTION!
If you skip a gear while downshifting or
downshift at too high of a vehicle speed,
these conditions may cause the engine to
overspeed if too low of a gear is selected
and the clutch pedal is released. Damage
to the clutch and the transmission can
result from skipping a gear while down-
shifting or downshifting at too high of a
vehicle speed even if the clutch pedal is
held pressed (i.e., not released).
AUTOMATIC
TRANSMISSION — IF
EQUIPPED
WARNING!
• It is dangerous to shift out of PARK or
NEUTRAL if the engine speed is higher
than idle speed. If your foot is not firmly
pressing the brake pedal, the vehicle
could accelerate quickly forward or in
reverse. You could lose control of the
vehicle and hit someone or something.
WARNING!
Only shift into gear when the engine is
idling normally and your foot is firmly
pressing the brake pedal.
• Unintended movement of a vehicle
could injure those in or near the vehicle.
As with all vehicles, you should never
exit a vehicle while the engine is run-
ning. Before exiting a vehicle, always
come to a complete stop, then apply the
parking brake, shift the transmission
into PARK, turn the engine OFF, and
remove the key fob. When the ignition isSTARTING AND OPERATING
146
Page 150 of 344
Brake/Transmission Shift Interlock
System
This vehicle is equipped with a Brake Trans-
mission Shift Interlock system (BTSI) that
holds the transmission gear selector in PARK
unless the brakes are applied. To shift the
transmission out of PARK, the ignition must
be in the ON/RUN mode (engine running or
not) and the brake pedal must be pressed.
The brake pedal must also be pressed to shift
from NEUTRAL into DRIVE or REVERSE
when the vehicle is stopped or moving at low
speeds.
Nine-Speed Automatic Transmission
The transmission gear range (PRND) is dis-
played both beside the gear selector and in
the instrument cluster. To select a gear range,
press the lock button on the gear selector and
move the selector rearward or forward. You
must also press the brake pedal to shift the
transmission out of PARK (or NEUTRAL,
when the vehicle is stopped or moving at low
speeds). Select the DRIVE range for normal
driving.NOTE:
In the event of a mismatch between the gear
selector position and the actual transmission
gear (for example, driver selects REVERSE
while driving forward), the position indicator
will blink continuously until the selector is
returned to the proper position, or the re-
quested shift can be completed.
The electronically-controlled transmission
adapts its shift schedule based on driver
inputs, along with environmental and road
conditions. The transmission electronics are
self-calibrating; therefore, the first few shifts
on a new vehicle may be somewhat abrupt.
This is a normal condition, and precision
shifts will develop within a few hundred miles
(kilometers).
The nine-speed transmission has been devel-
oped to meet the needs of current and future
FWD/AWD vehicles. Software and calibration
is refined to optimize the customer’s driving
experience and fuel economy. By design,
some vehicle and driveline combinations uti-
lize 9th gear only in very specific driving
situations and conditions.Only shift from DRIVE to PARK or REVERSE
when the accelerator pedal is released and
the vehicle is stopped. Be sure to keep your
foot on the brake pedal when shifting be-
tween these gears.
The transmission gear selector provides
PARK, REVERSE, NEUTRAL, DRIVE, and
MANUAL (AutoStick) shift positions. Manual
shifts can be made using the AutoStick shift
control. Moving the gear selector into the
MANUAL (-/+) position (beside the DRIVE
position) activates AutoStick mode, provid-
ing manual shift control and displaying the
current gear in the instrument cluster (as 1,
2, 3, etc.). Toggling the gear selector forward
(-) or rearward (+) while in the MANUAL
position will manually select the transmis-
sion gear.
Refer to “AutoStick” in the Owner’s Manual.
STARTING AND OPERATING
148
Page 152 of 344
• You can start out (from a stop) in first or
second gear. Starting out in second gear
can be helpful in snow or icy conditions.
Tap the gear selector forward or rearward to
select the desired gear after the vehicle is
brought to a stop.
• If a requested downshift would cause the
engine to overspeed, that shift will not
occur.
• The system will ignore attempts to upshift
at too low of a vehicle speed.
• Avoid using speed control when AutoStick
is engaged because the transmission will
not shift automatically.
• Transmission shifting will be more notice-
able when AutoStick is enabled.
• The system may revert to automatic shift
mode if a fault or overheat condition is
detected.
To disengage AutoStick mode, return the gear
selector to the DRIVE position. You can shift
in or out of the AutoStick position at any time
without taking your foot off the accelerator
pedal.WARNING!
Do not downshift for additional engine
braking on a slippery surface. The drive
wheels could lose their grip and the ve-
hicle could skid, causing a collision or
personal injury.
FOUR-WHEEL DRIVE
OPERATION
1-Speed Four-Wheel Drive (4X4) — If
Equipped
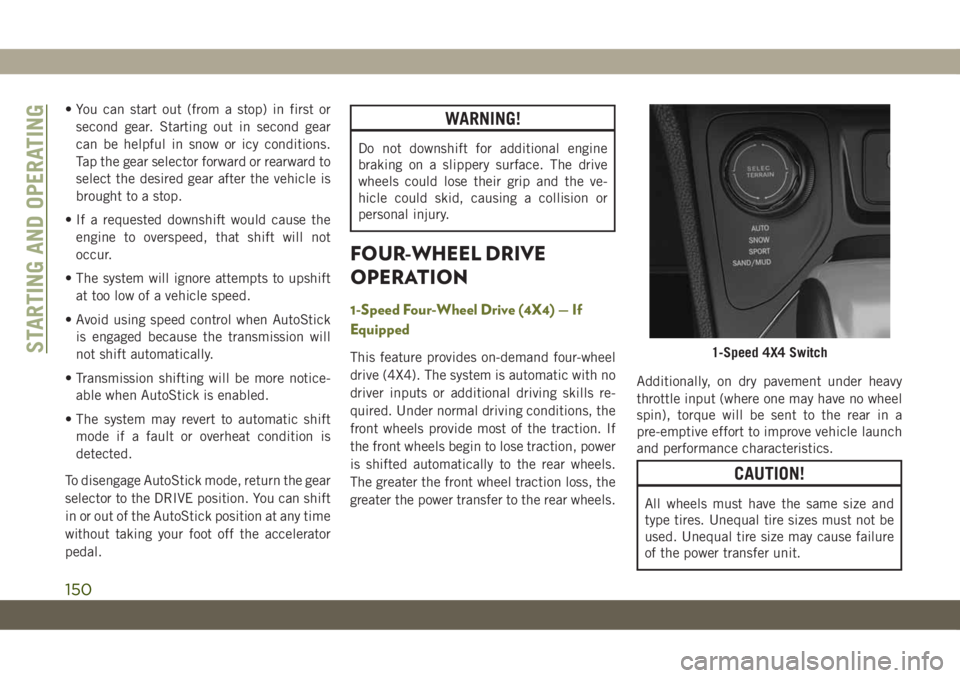
This feature provides on-demand four-wheel
drive (4X4). The system is automatic with no
driver inputs or additional driving skills re-
quired. Under normal driving conditions, the
front wheels provide most of the traction. If
the front wheels begin to lose traction, power
is shifted automatically to the rear wheels.
The greater the front wheel traction loss, the
greater the power transfer to the rear wheels.Additionally, on dry pavement under heavy
throttle input (where one may have no wheel
spin), torque will be sent to the rear in a
pre-emptive effort to improve vehicle launch
and performance characteristics.
CAUTION!
All wheels must have the same size and
type tires. Unequal tire sizes must not be
used. Unequal tire size may cause failure
of the power transfer unit.
1-Speed 4X4 SwitchSTARTING AND OPERATING
150
Page 155 of 344
Shifting Out Of 4X4 LOW
With the vehicle at speeds of 0 to 3 mph (0 to
5 km/h), the ignition in the ON mode and the
engine running, shift the transmission into
NEUTRAL, and push the “4WD LOW” button
once. The “4WD LOW” indicator light in the
instrument cluster will flash and go out when
the shift is complete.
NOTE:
• If shift conditions/interlocks are not met, a
message will flash from the instrument
cluster display with instructions on how to
complete the requested shift. Refer to “In-
strument Cluster Display” in “Getting To
Know Your Instrument Panel” for further
information.
• Shifting into or out of 4WD LOW is possible
with the vehicle completely stopped; how-
ever, difficulty may occur due to the mating
clutch teeth not being properly aligned.
Several attempts may be required for
clutch teeth alignment and shift comple-
tion to occur. The preferred method is with
the vehicle rolling 0 to 3 mph (0 to 5 km/h).If the vehicle is moving faster than 3 mph
(5 km/h), the 4WD system will not allow the
shift.
NEUTRAL Shift Procedure
WARNING!
You or others could be injured or killed if
you leave the vehicle unattended with the
power transfer unit in the NEUTRAL (N)
position without first fully engaging the
parking brake. The NEUTRAL (N) position
disengages both the front and rear drive-
shafts from the powertrain and will allow
the vehicle to roll, even if the automatic
transmission is in PARK (or manual trans-
mission is in gear). The parking brake
should always be applied when the driver
is not in the vehicle.
1. Bring the vehicle to a complete stop on
level ground and shift the automatic
transmission to PARK
2. Turn the engine OFF.
3. Turn the ignition to the ON/RUN mode,
but do not start the engine.
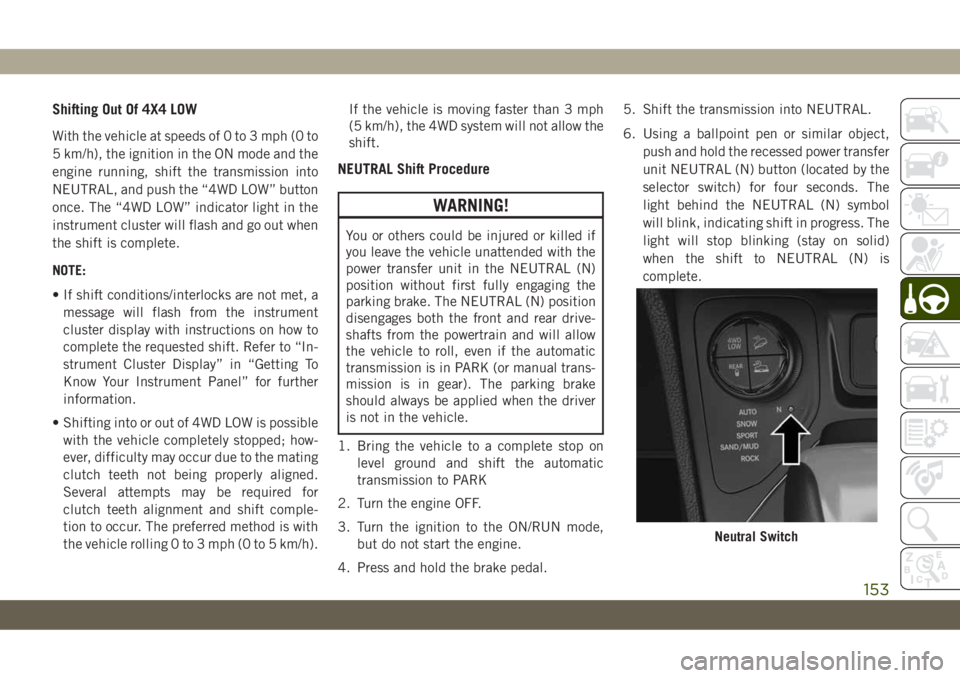
4. Press and hold the brake pedal.5. Shift the transmission into NEUTRAL.
6. Using a ballpoint pen or similar object,
push and hold the recessed power transfer
unit NEUTRAL (N) button (located by the
selector switch) for four seconds. The
light behind the NEUTRAL (N) symbol
will blink, indicating shift in progress. The
light will stop blinking (stay on solid)
when the shift to NEUTRAL (N) is
complete.
Neutral Switch
153
Page 158 of 344
tain operating conditions), the transmis-
sion may use second gear (rather than first
gear) during launches, to minimize wheel
slippage.
•Sport— This mode alters the transmis-
sion's automatic shift schedule for sportier
driving. Upshift speeds are increased to
make full use of available engine power.
NOTE:
SPORT mode is not available when 4WD LOW
is selected.
•Sand/Mud— Off-road calibration for use on
low traction surfaces such as mud, sand, or
wet grass. Driveline is maximized for trac-
tion. Some binding may be felt on less
forgiving surfaces. The electronic brake
controls are set to limit traction control
management of throttle and wheel spin.
•Rock— Off-road calibration only available
in 4WD LOW range. Traction based tuning
with improved steer-ability for use on high
traction off-road surfaces. Use for low
speed obstacles such as large rocks, deep
ruts, etc.NOTE:
• Rock mode is only available on the vehicles
equipped with the Off-Road package.
• Activate the Hill Descent Control or Selec
Speed Control for steep downhill control.
See “Electronic Brake Control System” in
“Safety” for further information.
STOP/START SYSTEM
The Stop/Start function was developed to
reduce fuel consumption. The system will
stop the engine automatically during a ve-
hicle stop if the required conditions are met.
Releasing the brake pedal or pressing the
accelerator pedal will automatically restart
the engine.
This vehicle has been upgraded with a Heavy
Duty Battery, Starter, as well as other engine
parts, to handle the Additional engine starts.
Automatic Mode
The Stop/Start feature is enabled after every
normal customer engine start. At that time,
the system will go into STOP/START READY
and if all other conditions are met, can go
into a STOP/START AUTOSTOP ACTIVE “Au-
tostop” mode.
To Activate The Autostop Mode, The Following
Must Occur:
• The system must be in STOP/START
READY state. A STOP/START READY mes-
sage will be displayed in the instrument
cluster display within the Stop/Start sec-
tion. Refer to “Warning Lights And Mes-
sages” in “Getting To Know Your Instru-
ment Panel” in your Owner’s Manual.
• The vehicle must be completely stopped.
• The gear selector must be in a forward gear
and the brake pedal depressed.
The engine will shut down, the tachometer
will move to the zero position and the Stop/
Start telltale will illuminate indicating you
are in Autostop. Customer settings will be
maintained upon return to an engine running
condition.
STARTING AND OPERATING
156
Page 159 of 344
Refer to the “Stop/Start System” in the
“Starting And Operating” in your Owner’s
Manual.
Possible Reasons The Engine Does Not
Autostop
Prior to engine shut down, the system will
check many safety and comfort conditions to
see if they are fulfilled. Detailed information
about the operation of the Stop/Start system
may be viewed in the instrument cluster dis-
play Stop/Start Screen. In the following situ-
ations the engine will not stop:
• Driver’s seat belt is not buckled.
• Driver’s door is not closed.
• Battery temperature is too warm or cold.
• Battery charge is low.
• The vehicle is on a steep grade.
• Cabin heating or cooling is in process and
an acceptable cabin temperature has not
been achieved.
• HVAC is set to full defrost mode at a high
blower speed.
• HVAC set to MAX A/C.• Engine has not reached normal operating
temperature.
• The transmission is not in a forward or
reverse gear.
• Hood is open.
• Vehicle is in 4LO transfer case mode (if
equipped with 4WD).
• Brake pedal is not pressed with sufficient
pressure with vehicle in DRIVE position.
Other Factors Which Can Inhibit Autostop In-
clude:
• Accelerator pedal input.
• Engine temp too high.
• 5 mph threshold not achieved from previ-
ous AUTOSTOP.
• Steering angle beyond threshold.
• ACC is on and speed is set.
It may be possible for the vehicle to be driven
several times without the STOP/START sys-
tem going into a STOP/START READY state
under more extreme conditions of the items
listed above.
To Start The Engine While In Autostop
Mode
While in a forward gear, the engine will start
when the brake pedal is released or the
throttle pedal is depressed. The transmission
will automatically re-engage upon engine re-
start.
Conditions That Will Cause The Engine To Start
Automatically While In Autostop Mode:
• The transmission gear selector is moved out
of DRIVE except in the PARK position.
• To maintain cabin temperature comfort.
• HVAC is set to full defrost mode.
• HVAC system temperature or fan speed is
manually adjusted.
• Battery voltage drops too low.
• Low brake vacuum (e.g. after several brake
pedal applications).
• STOP/START OFF switch is pushed.
• A STOP/START system error occurs.
• 4WD system is put into 4LO mode (if
equipped with 4WD).
157