stop start JEEP CHEROKEE 2019 Owner handbook (in English)
[x] Cancel search | Manufacturer: JEEP, Model Year: 2019, Model line: CHEROKEE, Model: JEEP CHEROKEE 2019Pages: 344, PDF Size: 6.35 MB
Page 160 of 344
Conditions That Force An Application Of The
Electric Park Brake While In Autostop Mode:
• The driver’s door is open and brake pedal
released.
• The driver’s door is open and the driver’s
seat belt is unbuckled.
• The engine hood has been opened.
• A STOP/START system error occurs.
If the Electric Park Brake is applied with the
engine off, the engine may require a manual
restart and the electric park brake may re-
quire a manual release (depress brake pedal
and push Electric Park Brake switch). Refer
to “Instrument Cluster Display” in “Getting
To Know Your Instrument Panel” in your Own-
er’s Manual.
To Manually Turn Off The Stop/Start
System
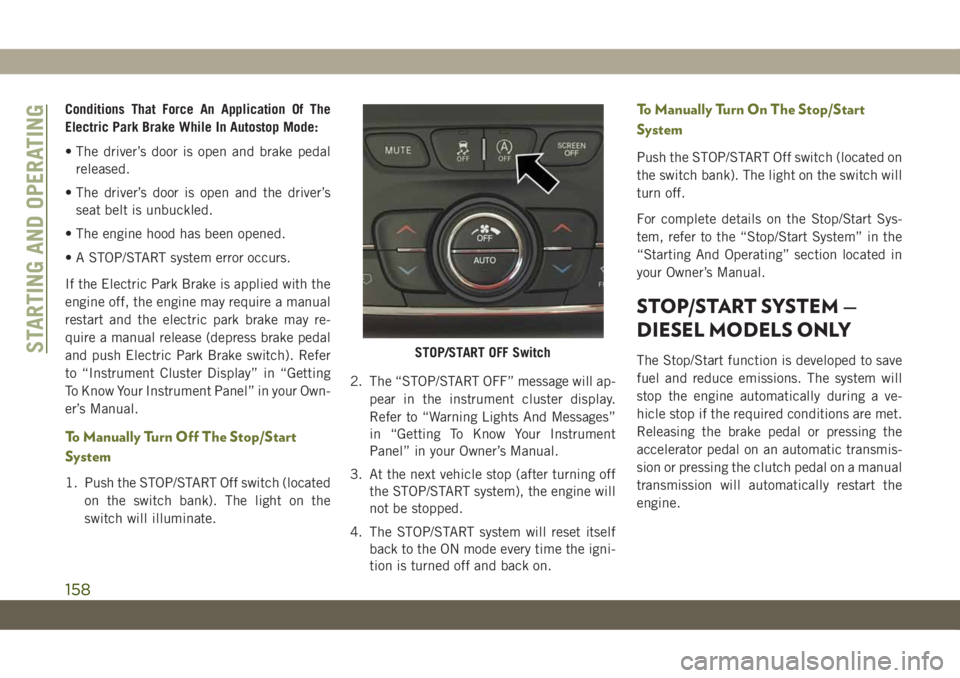
1. Push the STOP/START Off switch (located
on the switch bank). The light on the
switch will illuminate.2. The “STOP/START OFF” message will ap-
pear in the instrument cluster display.
Refer to “Warning Lights And Messages”
in “Getting To Know Your Instrument
Panel” in your Owner’s Manual.
3. At the next vehicle stop (after turning off
the STOP/START system), the engine will
not be stopped.
4. The STOP/START system will reset itself
back to the ON mode every time the igni-
tion is turned off and back on.
To Manually Turn On The Stop/Start
System
Push the STOP/START Off switch (located on
the switch bank). The light on the switch will
turn off.
For complete details on the Stop/Start Sys-
tem, refer to the “Stop/Start System” in the
“Starting And Operating” section located in
your Owner’s Manual.
STOP/START SYSTEM —
DIESEL MODELS ONLY
The Stop/Start function is developed to save
fuel and reduce emissions. The system will
stop the engine automatically during a ve-
hicle stop if the required conditions are met.
Releasing the brake pedal or pressing the
accelerator pedal on an automatic transmis-
sion or pressing the clutch pedal on a manual
transmission will automatically restart the
engine.STOP/START OFF SwitchSTARTING AND OPERATING
158
Page 161 of 344
Automatic Mode
The Stop/Start feature is enabled after every
normal customer engine start. It will remain
in STOP/START NOT READY until you drive
forward with a vehicle speed greater than
4 mph (7 km/h). At that time, the system will
go into STOP/START READY and if all other
conditions are met, can go into a STOP/
START AUTOSTOP ACTIVE “Autostop”
mode.
To Activate The Autostop Mode, The Following
Must Occur:
• The system must be in STOP/START
READY state. A STOP/START READY mes-
sage will be displayed in the instrument
cluster display within the Stop/Start sec-
tion. Refer to “Instrument Cluster Display”
in “Getting To Know Your Instrument
Panel” in your Owner’s information for fur-
ther details.
• The vehicle must be completely stopped.
• The gear selector must be in DRIVE and the
brake pedal depressed (automatic trans-
mission) or the gear selector must be in
NEUTRAL and the clutch pedal must be
fully released (manual transmission).The engine will shut down, the tachometer
will move to the zero position and the Stop/
Start telltale will illuminate indicating you
are in Autostop. While in Autostop, the Cli-
mate Controls system may automatically ad-
just airflow to maintain cabin comfort. Cus-
tomer settings will be maintained upon return
to an engine running condition.
Possible Reasons The Engine Does Not
Autostop
Prior to engine shut down, the system will
check many safety and comfort conditions to
see if they are fulfilled. Detailed information
about the operation of the Stop/Start system
may be viewed in the instrument cluster
Stop/Start Screen. In the following situations
the engine will not stop:
• Driver’s seat belt is not buckled.
• Driver’s door is not closed.
• Battery temperature is too warm or cold.
• The vehicle is on a steep grade.
• Cabin heating or cooling is in process and
an acceptable cabin temperature has not
been achieved.• HVAC is set to full defrost mode at a high
blower speed.
• Engine has not reached normal operating
temperature.
• Battery charge is low.
• The transmission is not in DRIVE (auto-
matic transmission) or NEUTRAL (manual
transmission).
• Hood is open.
• Vehicle is in 4LO transfer case mode.
• Exhaust system regeneration in process.
Other Factors Which Can Inhibit Autostop In-
clude:
• Fuel level.
• Accelerator pedal input (automatic trans-
mission only).
• Engine temperature too high.
It may be possible for the vehicle to be driven
several times without the STOP/START sys-
tem going into a STOP/START READY state
under more extreme conditions of the items
listed above.
159
Page 162 of 344
To Start The Engine While In Autostop
Mode
Automatic Transmission:
While in DRIVE, the engine will start when
the brake pedal is released or the throttle
pedal is depressed. The transmission will
automatically re-engage upon engine restart.
During this transition, the brakes will hold
the vehicle to avoid undesired vehicle move-
ment.
Manual Transmission:
When the gear selector is in NEUTRAL, the
engine will start when the clutch pedal is
pressed. The vehicle will go into STOP/
START SYSTEM NOT READY mode until the
vehicle speed is greater than 4 mph (7 km/h).
Conditions That Will Cause The Engine To Start
Automatically While In Autostop Mode:
• The transmission gear selector is moved
from DRIVE to REVERSE or NEUTRAL.
• To maintain cabin temperature comfort.
• HVAC is set to full defrost mode.
• Battery voltage drops too low.• Low brake vacuum (e.g. after several brake
pedal applications).
• STOP/START OFF switch is pushed.
• 4WD system is put into 4LO mode.
• The emissions system requires it.
• A STOP/START system error occurs.
• HVAC system temperature or fan speed is
manually adjusted.
Conditions That Force An Application Of The
Electric Park Brake While In Autostop Mode:
• The driver door is open and brake pedal
released.
• The driver door is open and the driver seat
belt is unbuckled.
• The engine hood has been opened.
• A STOP/START system error occurs.
If the Electric Park Brake is applied with the
engine off, the engine may require a manual
restart and the electric park brake may re-
quire a manual release (depress brake pedal
and push Electric Park Brake switch). Referto “Instrument Cluster Display” in “Getting
To Know Your Instrument Panel” in your Own-
er’s Manual for further information.To Manually Turn Off The Stop/Start
System
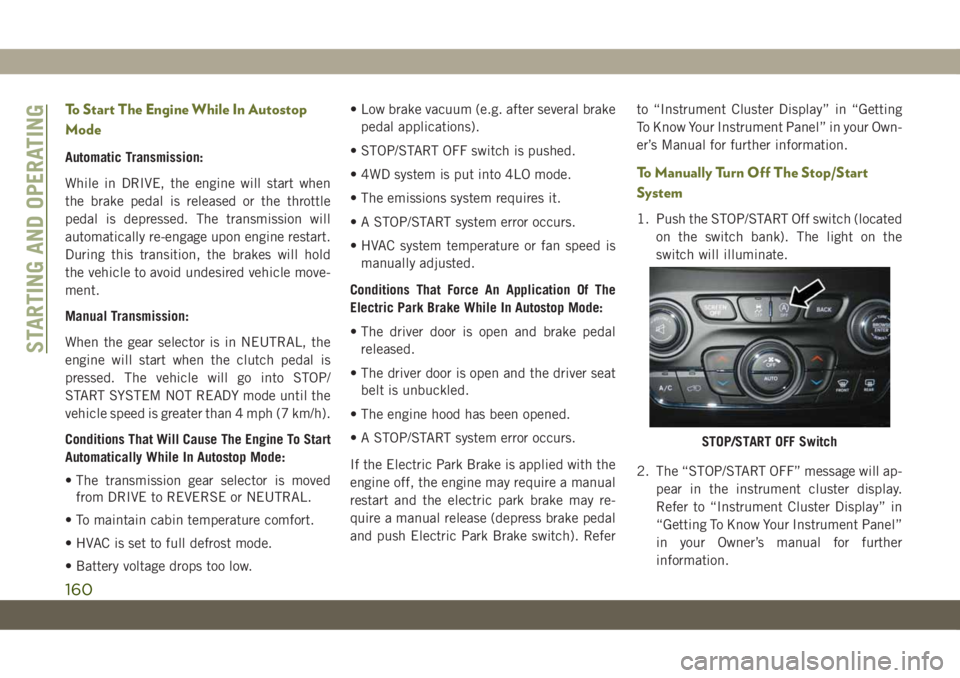
1. Push the STOP/START Off switch (located
on the switch bank). The light on the
switch will illuminate.
2. The “STOP/START OFF” message will ap-
pear in the instrument cluster display.
Refer to “Instrument Cluster Display” in
“Getting To Know Your Instrument Panel”
in your Owner’s manual for further
information.
STOP/START OFF Switch
STARTING AND OPERATING
160
Page 163 of 344
3. At the next vehicle stop (after turning off
the STOP/START system) the engine will
not be stopped.
4. If the STOP/START system is manually
turned off, the engine can only be started
and stopped by cycling the ignition
switch.
5. The STOP/START system will reset itself
back to an ON condition every time the
key is turned off and back on.
To Manually Turn On The Stop/Start
System
Push the STOP/START Off switch (located on
the switch bank). The light on the switch will
turn off.
SPEED CONTROL
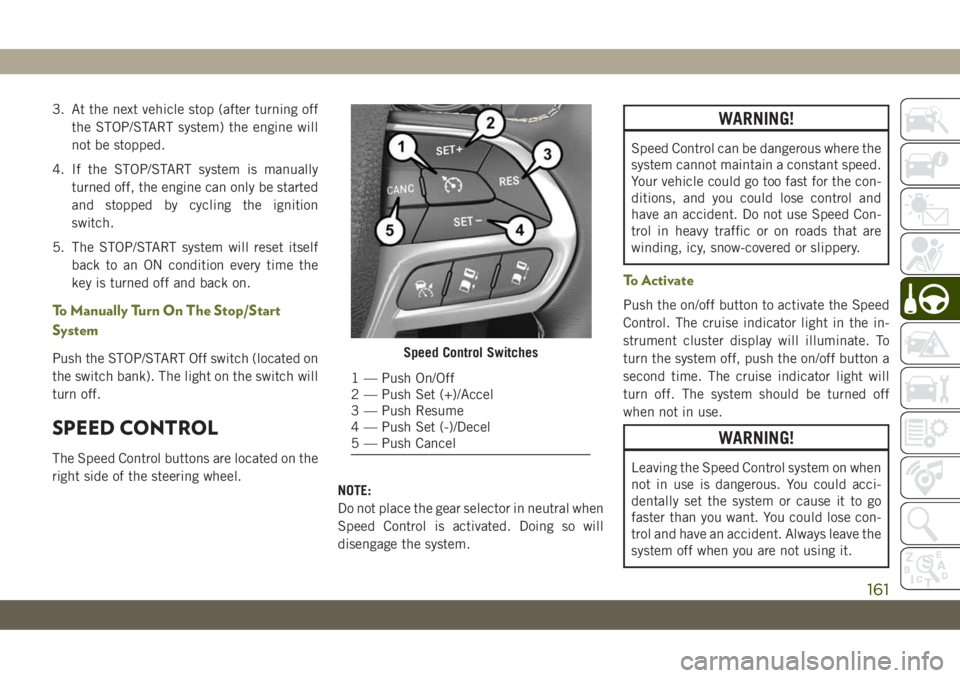
The Speed Control buttons are located on the
right side of the steering wheel.
NOTE:
Do not place the gear selector in neutral when
Speed Control is activated. Doing so will
disengage the system.
WARNING!
Speed Control can be dangerous where the
system cannot maintain a constant speed.
Your vehicle could go too fast for the con-
ditions, and you could lose control and
have an accident. Do not use Speed Con-
trol in heavy traffic or on roads that are
winding, icy, snow-covered or slippery.
To Activate
Push the on/off button to activate the Speed
Control. The cruise indicator light in the in-
strument cluster display will illuminate. To
turn the system off, push the on/off button a
second time. The cruise indicator light will
turn off. The system should be turned off
when not in use.
WARNING!
Leaving the Speed Control system on when
not in use is dangerous. You could acci-
dentally set the system or cause it to go
faster than you want. You could lose con-
trol and have an accident. Always leave the
system off when you are not using it.
Speed Control Switches
1 — Push On/Off
2 — Push Set (+)/Accel
3 — Push Resume
4 — Push Set (-)/Decel
5 — Push Cancel
161
Page 165 of 344
• If the ACC sensor detects a vehicle ahead,
ACC will apply limited braking or accelera-
tion (not to exceed the original set speed)
automatically to maintain a preset follow-
ing distance, while matching the speed of
the vehicle ahead.
WARNING!
• Adaptive Cruise Control (ACC) is a con-
venience system. It is not a substitute
for active driving involvement. It is al-
ways the driver’s responsibility to be at-
tentive of road, traffic, and weather con-
ditions, vehicle speed, distance to the
vehicle ahead; and, most importantly,
brake operation to ensure safe operation
of the vehicle under all road conditions.
Your complete attention is always re-
quired while driving to maintain safe
control of your vehicle. Failure to follow
these warnings can result in a collision
and death or serious personal injury.
• The ACC system:
• Does not react to pedestrians, on-
coming vehicles, and stationary ob-
WARNING!
jects (e.g., a stopped vehicle in a
traffic jam or a disabled vehicle).
• Cannot take street, traffic, and
weather conditions into account,
and may be limited upon adverse
sight distance conditions.
• Does not always fully recognize
complex driving conditions, which
can result in wrong or missing dis-
tance warnings.
• Will bring the vehicle to a complete
stop while following a target vehicle
and hold the vehicle for approxi-
mately 3 minutes in the stop posi-
tion. If the target vehicle does not
start moving within 3 minutes the
parking brake will be activated, and
the ACC system will be cancelled.
You should switch off the ACC system:
• When driving in fog, heavy rain, heavy
snow, sleet, heavy traffic, and complex
driving situations (i.e., in highway con-
struction zones).
WARNING!
• When entering a turn lane or highway off
ramp; when driving on roads that are
winding, icy, snow-covered, slippery, or
have steep uphill or downhill slopes.
• When towing a trailer up or down steep
slopes.
• When circumstances do not allow safe
driving at a constant speed.
Activating Adaptive Cruise Control (ACC )
Push and release the Adaptive Cruise Control
(ACC) on/off button.
The minimum set speed for the ACC system is
19 mph (30 km/h).
When the system is turned on and in the
ready state, the instrument cluster display
will read “ACC Ready.”
When the system is off, the instrument clus-
ter display will read “Adaptive Cruise Control
(ACC) Off.”
163
Page 170 of 344
WARNING!
result in injury or damage to vehicles or
obstacles because the hitch ball will be
much closer to the obstacle than the rear
fascia when the loudspeaker sounds the
continuous tone. Also, the sensors could
detect the ball mount and hitch ball
assembly, depending on its size and
shape, giving a false indication that an
obstacle is behind the vehicle.
CAUTION!
• ParkSense is only a parking aid and it is
unable to recognize every obstacle, in-
cluding small obstacles. Parking curbs
might be temporarily detected or not
detected at all. Obstacles located above
or below the sensors will not be detected
when they are in close proximity.
• The vehicle must be driven slowly when
using ParkSense in order to be able to
stop in time when an obstacle is de-
tected. It is recommended that the
driver looks over his/her shoulder when
using ParkSense.
PARKSENSE FRONT AND
REAR PARK ASSIST — IF
EQUIPPED
The ParkSense Park Assist system provides
visual and audible indications of the distance
between the rear and/or front fascia and a
detected obstacle when backing up or mov-
ing forward, e.g. during a parking maneuver.
If your vehicle is equipped with an automatic
transmission, the vehicle brakes may be au-
tomatically applied and released when per-
forming a reverse parking maneuver if the
system detects a possible collision with an
obstacle.
Refer to “ParkSense System Usage Precau-
tions” in “Starting And Operating” in your
Owner’s Manual for limitations of this system
and recommendations.
ParkSense will retain the last system state
(enabled or disabled) from the last ignition
cycle when the ignition is changed to the
ON/RUN position.
ParkSense Sensors
The four ParkSense sensors, located in the
rear fascia/bumper, monitor the area behind
the vehicle that is within the sensors’ field of
view. The sensors can detect obstacles from
approximately 12 inches (30 cm) up to
79 inches (200 cm) from the rear fascia/
bumper in the horizontal direction, depend-
ing on the location, type and orientation of
the obstacle.
The six ParkSense sensors, located in the
front fascia/bumper, monitor the area in front
of the vehicle that is within the sensors’ field
of view. The sensors can detect obstacles
from approximately 12 inches (30 cm) up to
47 inches (120 cm) from the front fascia/
bumper in the horizontal direction, depend-
ing on the location, type and orientation of
the obstacle.
When an object is detected within 79 inches
(200 cm) behind the rear bumper while the
vehicle is in REVERSE, a warning will appear
in the instrument cluster display. In addition
a chime will sound (when Sound and Display
is selected from the Customer Programmable
Features section of the Uconnect System
STARTING AND OPERATING
168
Page 181 of 344
CAUTION!
• Never add anything other than AdBlue
(UREA) to the tank – especially any form
of hydrocarbon such as diesel fuel, fuel
system additives, gasoline, or any other
petroleum-based product. Even a very
small amount of these, less than
100 parts per million or less than 1 oz.
(30 ml) per 78 gallons (295 liters) will
contaminate the entire AdBlue (UREA)
system and will require replacement. If
owners use a container, funnel or nozzle
when refilling the tank, it should either
be new or one that is has only been used
for adding AdBlue (UREA). Mopar pro-
vides an attachable nozzle with its Ad-
Blue (UREA) for this purpose.3. Stop filling the AdBlue (UREA) tank im-
mediately when any of the following hap-
pen: AdBlue (UREA) splashes out the fill
inlet, or a AdBlue (UREA) pump nozzle
automatically shuts off.
4. After removing the nozzle, refit the cap on
the AdBlue (UREA) filler by turning it
clockwise until it is fully tightened. Cycle
the ignition to the ACC position (no need
to start the engine).
5. Wait for the warning on the instrument
panel to switch off before moving the
vehicle, the warning light may stay on for
a few seconds to half a minute. In case of
engine start-up and movement of the ve-
hicle, the warning light will remain on for
a longer period of time, but there are no
problems on the engine functionality. If
topping up is done with the AdBlue
(UREA) tank empty, you have to wait two
minutes before starting the vehicle.When Refueling The Additive For Diesel Emis-
sions AdBlue (UREA) With Bottle:
• Park the vehicle on level ground.
• Turn off the engine by cycling the ignition to
the OFF position.
• Open the fuel filler and then unscrew and
remove the cap from the AdBlue (UREA)
filler.
• Press the bottom of the bottle towards the
filler to release the bottle's safety valve and
start topping up; if the level of AdBlue
(UREA) in the bottle.
• Stop filling the AdBlue (UREA) tank imme-
diately when any of the following happen:
AdBlue (UREA) stops flowing from the fill
bottle into the AdBlue (UREA) fill inlet,
AdBlue (UREA) splashes out the fill inlet.
• If the level of AdBlue (UREA) in the bottle
does not drop while topping up, it means
that you have filled the reservoir, so pull the
bottle towards you to re-close the bottle's
safety valve and unscrew the bottle from
the filler.
179
Page 199 of 344
7. Remove the spare tire.
WARNING!
A loose tire or jack thrown forward in a
collision or hard stop could endanger the
occupants of the vehicle. Always stow the
jack parts and the spare tire in the places
provided. Have the deflated (flat) tire re-
paired or replaced immediately.
Preparations For Jacking
1. Park the vehicle on a firm level surface as
far from the edge of the roadway as pos-
sible. Avoid icy or slippery areas.
WARNING!
Do not attempt to change a tire on the side
of the vehicle close to moving traffic. Pull
far enough off the road to avoid being hit
when operating the jack or changing the
wheel.
2. Turn on the Hazard Warning flasher.
3. Apply the parking brake.4. Place the gear selector into PARK (auto-
matic transmission) or REVERSE (manual
transmission).
5. Turn the ignition OFF.
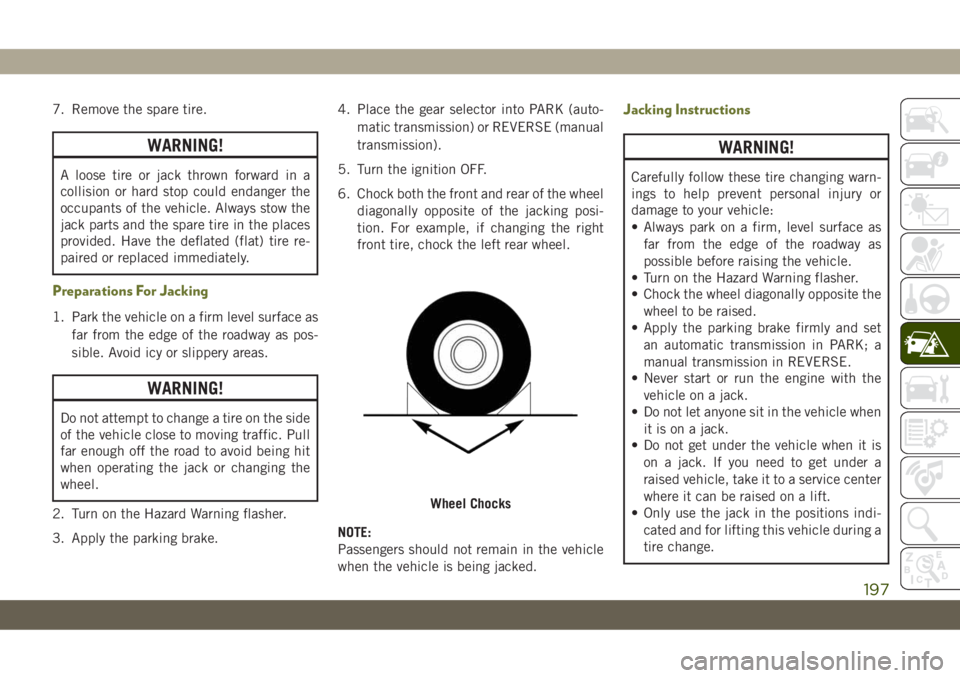
6. Chock both the front and rear of the wheel
diagonally opposite of the jacking posi-
tion. For example, if changing the right
front tire, chock the left rear wheel.
NOTE:
Passengers should not remain in the vehicle
when the vehicle is being jacked.
Jacking Instructions
WARNING!
Carefully follow these tire changing warn-
ings to help prevent personal injury or
damage to your vehicle:
• Always park on a firm, level surface as
far from the edge of the roadway as
possible before raising the vehicle.
• Turn on the Hazard Warning flasher.
• Chock the wheel diagonally opposite the
wheel to be raised.
• Apply the parking brake firmly and set
an automatic transmission in PARK; a
manual transmission in REVERSE.
• Never start or run the engine with the
vehicle on a jack.
• Do not let anyone sit in the vehicle when
it is on a jack.
• Do not get under the vehicle when it is
on a jack. If you need to get under a
raised vehicle, take it to a service center
where it can be raised on a lift.
• Only use the jack in the positions indi-
cated and for lifting this vehicle during a
tire change.
Wheel Chocks
197
Page 208 of 344
WARNING!
• Take care not to allow the contents of
Tire Service Kit to come in contact with
hair, eyes, or clothing. Tire Service Kit
sealant is harmful if inhaled, swallowed,
or absorbed through the skin. It causes
skin, eye, and respiratory irritation.
Flush immediately with plenty of water if
there is any contact with eyes or skin.
Change clothing as soon as possible, if
there is any contact with clothing.
• Tire Service Kit Sealant solution con-
tains latex. In case of an allergic reaction
or rash, consult a physician immedi-
ately. Keep Tire Service Kit out of reach
of children. If swallowed, rinse mouth
immediately with plenty of water and
drink plenty of water. Do not induce
vomiting! Consult a physician immedi-
ately.
Sealing A Tire With Tire Service Kit
(A) Whenever You Stop To Use Tire Service
Kit:
1. Pull over to a safe location and turn on the
vehicle’s Hazard Warning flashers.2. Verify that the valve stem (on the wheel
with the deflated tire) is in a position that
is near to the ground. This will allow the
Tire Service Kit Hoses (6) and (7) to reach
the valve stem and keep the Tire Service
Kit flat on the ground. This will provide
the best positioning of the kit when inject-
ing the sealant into the deflated tire and
running the air pump. Move the vehicle as
necessary to place the valve stem in this
position before proceeding.
3. Place the transmission in PARK (auto
transmission) or in Gear (manual trans-
mission) and place the ignition in the OFF
position.
4. Apply the parking brake.
(B) Setting Up To Use Tire Service Kit:
1. Push in the Mode Select Knob (5) and
turn to the Sealant Mode position.
2. Uncoil the Sealant Hose (6) and then
remove the cap from the fitting at the end
of the hose.
3. Place the Tire Service Kit flat on the
ground next to the deflated tire.4. Remove the cap from the valve stem and
then screw the fitting at the end of the
Sealant Hose (6) onto the valve stem.
5. Uncoil the Power Plug (8) and insert the
plug into the vehicle’s 12 Volt power
outlet.
NOTE:
Do not remove foreign objects (e.g., screws or
nails) from the tire.
(C) Injecting Tire Service Kit Sealant Into
The Deflated Tire:
• Always start the engine before turning ON
the Tire Service Kit.
NOTE:
Manual transmission vehicles must have
the parking brake engaged and the gear se-
lector in NEUTRAL.
• After pushing the Power Button (4), the
sealant (white fluid) will flow from the Seal-
ant Bottle (1) through the Sealant Hose (6)
and into the tire.
NOTE:
Sealant may leak out through the puncture in
the tire.IN CASE OF EMERGENCY
206
Page 214 of 344
CAUTION!
Accessories plugged into the vehicle
power outlets draw power from the vehi-
cle’s battery, even when not in use (i.e.,
cellular devices, etc.). Eventually, if
plugged in long enough without engine
operation, the vehicle’s battery will dis-
charge sufficiently to degrade battery life
and/or prevent the engine from starting.
REFUELING IN EMERGENCY
Emergency Fuel Filler Door Release
If you are unable to open the fuel filler door,
use the fuel filler door emergency release.
1. Open the liftgate.
2. Remove access door located on right inte-
rior trim panel for release cable with the
tip of your key.
3. Grab the release cable tether and pull up
to release the fuel filler door.
IF YOUR ENGINE
OVERHEATS
In any of the following situations, you can
reduce the potential for overheating your en-
gine by taking the appropriate action.
• On the highways — slow down.
• In city traffic — while stopped, place the
transmission in NEUTRAL, but do not in-
crease engine idle speed.
CAUTION!
Driving with a hot cooling system could
damage your vehicle. If the temperature
gauge reads “H,” pull over and stop the
vehicle. Idle the vehicle with the air con-
ditioner turned off until the pointer drops
back into the normal range. If the pointer
remains on the “H” and you hear continu-
ous chimes, turn the engine off immedi-
ately and call for service.NOTE:
There are steps that you can take to slow
down an impending overheat condition:
• If your Air Conditioner (A/C) is on, turn it
off. The A/C system adds heat to the engine
cooling system and turning the A/C off can
help remove this heat.
• You can also turn the temperature control
to maximum heat, the mode control to floor
and the blower control to high. This allows
the heater core to act as a supplement to
the radiator and aids in removing heat from
the engine cooling system.WARNING!
You or others can be badly burned by hot
engine coolant (antifreeze) or steam from
your radiator. If you see or hear steam
coming from under the hood, do not open
the hood until the radiator has had time to
cool. Never try to open a cooling system
pressure cap when the radiator or coolant
bottle is hot.
IN CASE OF EMERGENCY
212