ECO mode JEEP CHEROKEE 2019 Owner handbook (in English)
[x] Cancel search | Manufacturer: JEEP, Model Year: 2019, Model line: CHEROKEE, Model: JEEP CHEROKEE 2019Pages: 344, PDF Size: 6.35 MB
Page 234 of 344
WARNING!
matically and may start at any time,
whether the engine is running or not.
• When working near the radiator cooling
fan, turn the ignition to the OFF mode.
The fan is temperature controlled and
can start at any time the ignition is in the
ON mode.
Engine Coolant Checks
Check the engine coolant (antifreeze) protec-
tion every 12 months (before the onset of
freezing weather, where applicable). If the
engine coolant (antifreeze) is dirty, the sys-
tem should be drained, flushed, and refilled
with fresh OAT coolant (conforming to
MS.90032) by an authorized dealer. Check
the front of the A/C condenser for any accu-
mulation of bugs, leaves, etc. If dirty, clean
by gently spraying water from a garden hose
vertically down the face of the condenser.
Check the engine cooling system hoses for
brittle rubber, cracking, tears, cuts, and
tightness of the connection at the coolant
recovery bottle and radiator. Inspect the en-tire system for leaks. DO NOT REMOVE THE
COOLANT PRESSURE CAP WHEN THE
COOLING SYSTEM IS HOT.
Adding Washer Fluid
The windshield and rear window washers
share the same fluid reservoir. The fluid res-
ervoir is located in the front of the engine
compartment. Be sure to check the fluid level
in the reservoir at regular intervals. Fill the
reservoir with windshield washer solvent (not
radiator antifreeze) and operate the system
for a few seconds to flush out the residual
water.
When refilling the washer fluid reservoir, take
some washer fluid and apply it to a cloth or
towel and wipe clean the wiper blades, this
will help blade performance.
To prevent freeze-up of your windshield
washer system in cold weather, select a solu-
tion or mixture that meets or exceeds the
temperature range of your climate. This rat-
ing information can be found on most washer
fluid containers.
WARNING!
Commercially available windshield washer
solvents are flammable. They could ignite
and burn you. Care must be exercised
when filling or working around the washer
solution.
CAUTION!
Do not travel with the windshield washer
fluid reservoir empty: the windshield
washer is essential for improving visibility.
Repeated operation of the system without
fluid could damage or cause rapid deterio-
ration of some system components.
Brake System
In order to assure brake system performance,
all brake system components should be in-
spected periodically. Refer to the “Mainte-
nance Plan” in this section for the proper
maintenance intervals.
SERVICING AND MAINTENANCE
232
Page 243 of 344
Example: If garage temperature = 68°F
(20°C) and the outside temperature = 32°F
(0°C) then the cold tire inflation pressure
should be increased by 3 psi (21 kPa), which
equals 1 psi (7 kPa) for every 12°F (7°C) for
this outside temperature condition.
Tire pressure may increase from 2 to 6 psi
(13 to 40 kPa) during operation. DO NOT
reduce this normal pressure build up or your
tire pressure will be too low.
Tire Pressures For High Speed Operation
The manufacturer advocates driving at safe
speeds and within posted speed limits.
Where speed limits or conditions are such
that the vehicle can be driven at high speeds,
maintaining correct tire inflation pressure is
very important. Increased tire pressure and
reduced vehicle loading may be required for
high-speed vehicle operation. Refer to an
authorized tire dealer or original equipment
vehicle dealer for recommended safe operat-
ing speeds, loading and cold tire inflation
pressures.
WARNING!
High speed driving with your vehicle under
maximum load is dangerous. The added
strain on your tires could cause them to
fail. You could have a serious collision. Do
not drive a vehicle loaded to the maximum
capacity at continuous speeds above
75 mph (120 km/h).
Radial Ply Tires
WARNING!
Combining radial ply tires with other types
of tires on your vehicle will cause your
vehicle to handle poorly. The instability
could cause a collision. Always use radial
ply tires in sets of four. Never combine
them with other types of tires.
Tire Repair
If your tire becomes damaged, it may be
repaired if it meets the following criteria:
• The tire has not been driven on when flat.
•
The damage is only on the tread section of
your tire (sidewall damage is not repairable).
• The puncture is no greater thana¼ofan
inch (6 mm).
Consult an authorized tire dealer for tire re-
pairs and additional information.
Damaged Run Flat tires, or Run Flat tires that
have experienced a loss of pressure should be
replaced immediately with another Run Flat
tire of identical size and service description
(Load Index and Speed Symbol). Replace the
tire pressure sensor as well as it is not de-
signed to be reused.
Run Flat Tires — If Equipped
Run Flat tires allow you the capability to drive
50 miles (80 km) at 50 mph (80 km/h) after
a rapid loss of inflation pressure. This rapid
loss of inflation is referred to as the Run Flat
mode. A Run Flat mode occurs when the tire
inflation pressure is of/or below 14 psi
(96 kPa). Once a Run Flat tire reaches the
run flat mode it has limited driving capabili-
ties and needs to be replaced immediately. A
Run Flat tire is not repairable. When a run flat
tire is changed after driving with underin-
241
Page 244 of 344
flated tire condition, please replace the TPM
sensor as it is not designed to be reused when
driven under run flat mode (14 psi (96 kPa))
condition.
NOTE:
TPM Sensor must be replaced after driving
the vehicle on a flat tire condition.
It is not recommended driving a vehicle
loaded at full capacity or to tow a trailer while
a tire is in the run flat mode.
See the tire pressure monitoring section for
more information.
Tire Spinning
When stuck in mud, sand, snow, or ice con-
ditions, do not spin your vehicle's wheels
above 30 mph (48 km/h) or for longer than
30 seconds continuously without stopping.
Refer to “Freeing A Stuck Vehicle” in “In
Case Of Emergency” for further information.
WARNING!
Fast spinning tires can be dangerous.
Forces generated by excessive wheel
WARNING!
speeds may cause tire damage or failure. A
tire could explode and injure someone. Do
not spin your vehicle's wheels faster than
30 mph (48 km/h) for more than 30 sec-
onds continuously when you are stuck,
and do not let anyone near a spinning
wheel, no matter what the speed.
Tread Wear Indicators
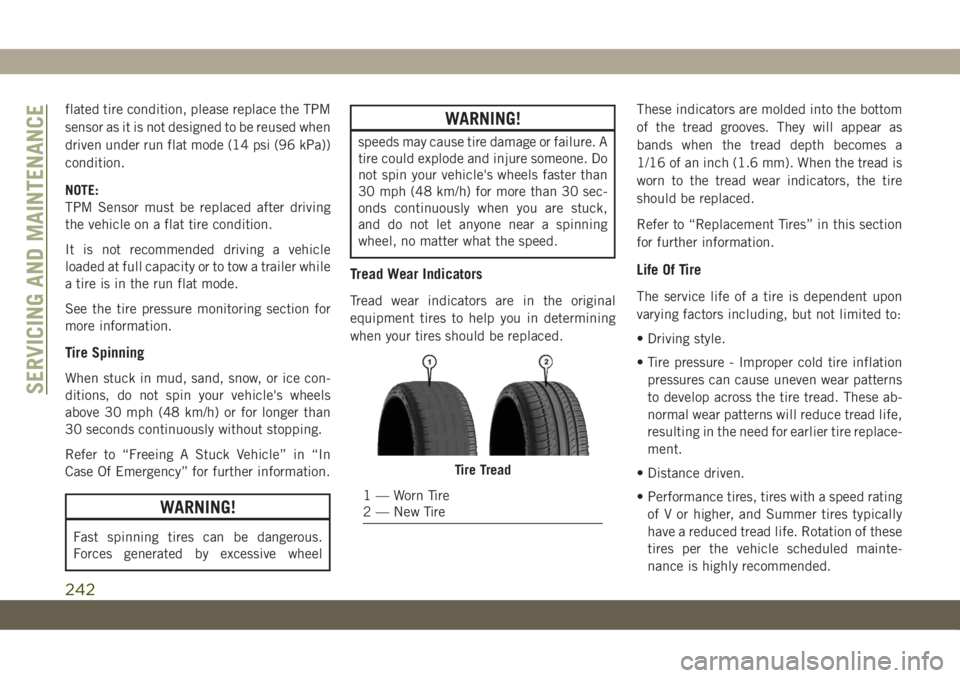
Tread wear indicators are in the original
equipment tires to help you in determining
when your tires should be replaced.These indicators are molded into the bottom
of the tread grooves. They will appear as
bands when the tread depth becomes a
1/16 of an inch (1.6 mm). When the tread is
worn to the tread wear indicators, the tire
should be replaced.
Refer to “Replacement Tires” in this section
for further information.
Life Of Tire
The service life of a tire is dependent upon
varying factors including, but not limited to:
• Driving style.
• Tire pressure - Improper cold tire inflation
pressures can cause uneven wear patterns
to develop across the tire tread. These ab-
normal wear patterns will reduce tread life,
resulting in the need for earlier tire replace-
ment.
• Distance driven.
• Performance tires, tires with a speed rating
of V or higher, and Summer tires typically
have a reduced tread life. Rotation of these
tires per the vehicle scheduled mainte-
nance is highly recommended.
Tire Tread
1 — Worn Tire
2 — New Tire
SERVICING AND MAINTENANCE
242
Page 249 of 344
NOTE:
If you intend parking or storing your vehicle
for an extended period after cleaning the
wheels with wheel cleaner, drive your vehicle
and apply the brakes to remove the water
droplets from the brake components. This
activity will remove the red rust on the brake
rotors and prevent vehicle vibration when
braking.
Dark Vapor Chrome, Black Satin Chrome, or Low
Gloss Clear Coat Wheels
CAUTION!
If your vehicle is equipped with these
specialty wheels, DO NOT USE wheel
cleaners, abrasives, or polishing com-
pounds. They will permanently damage
this finish and such damage is not covered
by the New Vehicle Limited Warranty.
HAND WASH ONLY USING MILD SOAP
AND WATER WITH A SOFT CLOTH. Used
on a regular basis; this is all that is re-
quired to maintain this finish.
Tire Chains (Traction Devices)
Use of traction devices require sufficient tire-
to-body clearance. Follow these recommen-
dations to guard against damage.
• Traction device must be of proper size for
the tire, as recommended by the traction
device manufacturer
• Use on Front Tires Only
• Due to limited clearance, the following
traction devices are recommended:
Front Wheel Drive (FWD) Models
• Original equipment 225/60R17 and 225/
55R18 tire sizes are not chainable.
• The use of 7mm snow chains is permitted
with the use of 215/60R17 tires on size
17 x 7.0 ET41 wheels.
Four Wheel Drive (4WD) Non-Trailhawk Models
Without A Two-Speed Power Takeoff Unit
• Original equipment 225/60R17 and 225/
55R18 tire sizes are not chainable.
• The use of 9mm snow chains is permitted
with the use of 215/60R17 tires on size
17 x 7.0 ET41 wheels.Four Wheel Drive (4WD) Non-Trailhawk Models
With A Two-Speed Power Takeoff Unit
• The use of 7mm snow chains is permitted
with 225/60R17 and 225/55R18 tires.
Four Wheel Drive (4WD) Trailhawk Models
• The use of 9mm snow chains is permitted
with the use of 225/65R17 tires on size
17 x 7.5 ET31 wheels.
CAUTION!
• Use on Front Tires Only
• Damage to Front Wheel Drive (FWD)
Models may result if tire chains or trac-
tion devices are used with original
equipment size tires.
• Damage to Four Wheel Drive (4WD)
Models without a Two-Speed Power
Takeoff Unit may result if tire chains or
traction devices are used with original
equipment size tires.
• Damage to Four Wheel Drive (4WD)
Trailhawk Models may result if tire
chains or traction devices are used with
original equipment size tires.
247
Page 272 of 344
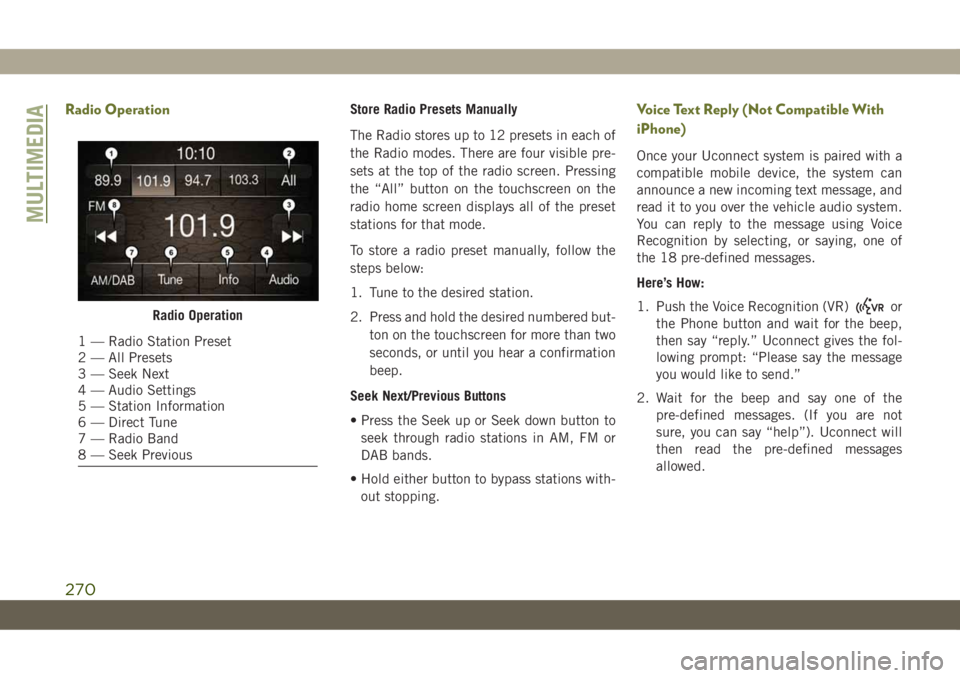
Radio OperationStore Radio Presets Manually
The Radio stores up to 12 presets in each of
the Radio modes. There are four visible pre-
sets at the top of the radio screen. Pressing
the “All” button on the touchscreen on the
radio home screen displays all of the preset
stations for that mode.
To store a radio preset manually, follow the
steps below:
1. Tune to the desired station.
2. Press and hold the desired numbered but-
ton on the touchscreen for more than two
seconds, or until you hear a confirmation
beep.
Seek Next/Previous Buttons
• Press the Seek up or Seek down button to
seek through radio stations in AM, FM or
DAB bands.
• Hold either button to bypass stations with-
out stopping.Voice Text Reply (Not Compatible With
iPhone)
Once your Uconnect system is paired with a
compatible mobile device, the system can
announce a new incoming text message, and
read it to you over the vehicle audio system.
You can reply to the message using Voice
Recognition by selecting, or saying, one of
the 18 pre-defined messages.
Here’s How:
1. Push the Voice Recognition (VR)
or
the Phone button and wait for the beep,
then say “reply.” Uconnect gives the fol-
lowing prompt: “Please say the message
you would like to send.”
2. Wait for the beep and say one of the
pre-defined messages. (If you are not
sure, you can say “help”). Uconnect will
then read the pre-defined messages
allowed.Radio Operation
1 — Radio Station Preset
2 — All Presets
3 — Seek Next
4 — Audio Settings
5 — Station Information
6 — Direct Tune
7 — Radio Band
8 — Seek Previous
MULTIMEDIA
270
Page 277 of 344
WARNING!
ALWAYS drive safely with your hands on
the wheel. You have full responsibility and
assume all risks related to the use of the
Uconnect features and applications in this
vehicle. Only use Uconnect when it is safe
to do so. Failure to do so may result in an
accident involving serious injury or death.
• To access the Radio mode, press the “Ra-
dio” button on the touchscreen.
Selecting Radio Stations
• Press the desired radio band (AM, FM or
DAB) button on the touchscreen.
Seek Up/Seek Down
• Press the Seek up or down arrow buttons on
the touchscreen for less than two seconds
to seek through radio stations.
• Press and hold either arrow button on the
touchscreen for more than two seconds to
bypass stations without stopping. The radio
will stop at the next listenable station once
the arrow button on the touchscreen is
released.Direct Tune
• Tune directly to a radio station by pressing
the “Tune” button on the screen, and en-
tering the desired station number.
Store Radio Presets Manually
Your radio can store 36 total preset stations,
12 presets per band (AM, FM and DAB). They
are shown at the top of your radio screen. To
see the 12 preset stations per band, press the
arrow button on the touchscreen at the top
right of the screen to toggle between the two
sets of six presets.
To store a radio preset manually, follow the
steps below:
1. Tune to the desired station.
2. Press and hold the desired numbered but-
ton on the touchscreen for more than two
seconds or until you hear a confirmation
beep.
Android Auto — If Equipped
NOTE:
Feature availability depends on your carrier
and mobile phone manufacturer. Some
Android Auto features may or may not be
available in every region and/or language.
Android Auto is a feature of your Uconnect
system, and your Android 5.0 Lollipop, or
higher, powered smartphone with a data plan,
that allows you to project your smartphone
and a number of its apps onto the touch-
screen radio display. Android Auto automati-
cally brings you useful information, and orga-
nizes it into simple cards that appear just
when they are needed. Android Auto can be
used with Google's best-in-class speech tech-
nology, the steering wheel controls, the knobs
and buttons on your radio faceplate, and the
radio display’s touchscreen to control many
of your apps. To use Android Auto follow the
following steps:
1. Download the Android Auto app from the
Google Play store on your Android-
powered smartphone.
275
Page 283 of 344
WARNING!
ALWAYS drive safely with your hands on
the wheel. You have full responsibility and
assume all risks related to the use of the
Uconnect features and applications in this
vehicle. Only use Uconnect when it is safe
to do so. Failure to do so may result in an
accident involving serious injury or death.
• To access the Radio mode, press the “Ra-
dio” button on the touchscreen.
Selecting Radio Stations
• Press the desired radio band (AM, FM or
DAB) button on the touchscreen.
Seek Up/Seek Down
• Press the Seek up or down arrow buttons on
the touchscreen for less than two seconds
to seek through radio stations.
• Press and hold either arrow button on the
touchscreen for more than two seconds to
bypass stations without stopping. The radio
will stop at the next listenable station once
the arrow button on the touchscreen is
released.Direct Tune
• Tune directly to a radio station by pressing
the “Tune” button on the screen, and en-
tering the desired station number.
Store Radio Presets Manually
Your radio can store 36 total preset stations,
12 presets per band (AM, FM and DAB). They
are shown at the top of your radio screen. To
see the 12 preset stations per band, press the
arrow button on the touchscreen at the top
right of the screen to toggle between the two
sets of six presets.
To store a radio preset manually, follow the
steps below:
1. Tune to the desired station.
2. Press and hold the desired numbered but-
ton on the touchscreen for more than two
seconds or until you hear a confirmation
beep.
Android Auto — If Equipped
NOTE:
Feature availability depends on your carrier
and mobile phone manufacturer. Some
Android Auto features may or may not be
available in every region and/or language.
Android Auto is a feature of your Uconnect
system, and your Android 5.0 Lollipop, or
higher, powered smartphone with a data plan,
that allows you to project your smartphone
and a number of its apps onto the touch-
screen radio display. Android Auto automati-
cally brings you useful information, and orga-
nizes it into simple cards that appear just
when they are needed. Android Auto can be
used with Google's best-in-class speech tech-
nology, the steering wheel controls, the knobs
and buttons on your radio faceplate, and the
radio display’s touchscreen to control many
of your apps. To use Android Auto follow
these steps:
1. Download the Android Auto app from the
Google Play store on your Android-
powered smartphone.
281