washer fluid JEEP CHEROKEE 2019 Owner handbook (in English)
[x] Cancel search | Manufacturer: JEEP, Model Year: 2019, Model line: CHEROKEE, Model: JEEP CHEROKEE 2019Pages: 344, PDF Size: 6.35 MB
Page 10 of 344
ADAPTIVE CRUISE CONTROL (ACC) — IF
EQUIPPED....................... 162
Activating Adaptive Cruise Control (ACC) . . 163
To Set A Desired ACC Speed.......... 164
Resume...................... 164
To Vary The Speed Setting........... 164
Setting The Following Distance In ACC.... 166
PARKSENSE REAR PARK ASSIST — IF EQUIPPED . . 166ParkSense Sensors................ 166
ParkSense Warning Display........... 166
Enabling And Disabling ParkSense...... 166
ParkSense System Usage Precautions.... 167
PARKSENSE FRONT AND REAR PARK ASSIST — IF
EQUIPPED....................... 168
ParkSense Sensors................ 168
Enabling And Disabling ParkSense...... 169
Operation With A Trailer............. 169
PARKSENSE ACTIVE PARK ASSIST SYSTEM — IF
EQUIPPED....................... 169
LANESENSE...................... 170
LaneSense Operation.............. 170
Turning LaneSense On Or Off......... 170
LaneSense Warning Message.......... 171
Changing LaneSense Status.......... 172
PARKVIEW REAR BACK UP CAMERA — IF
EQUIPPED....................... 173
REFUELING THE VEHICLE............... 173
REFUELING THE VEHICLE — DIESEL ENGINE.... 175
AdBlue (UREA) — If Equipped........ 176
TRAILER TOWING................... 181Trailer Towing Weights (Maximum Trailer Weight
Ratings)...................... 181
RECREATIONAL TOWING (BEHIND MOTORHOME,
ETC.).......................... 182
Towing This Vehicle Behind Another
Vehicle....................... 182
Recreational Towing — Front-Wheel Drive (FWD)
Models...................... 183
Recreational Towing — 4x4 Models...... 183
IN CASE OF EMERGENCY
HAZARD WARNING FLASHERS............ 184
BULB REPLACEMENT................. 184
Replacement Bulbs............... 184
Replacing Exterior Bulbs............ 185
FUSES......................... 185General Information............... 186
Underhood Fuses................ 186
Interior Fuses................... 195
JACKING AND TIRE CHANGING............ 196Jack Location/Spare Tire Stowage....... 196
Preparations For Jacking............ 197
Jacking Instructions............... 197
Road Tire Installation.............. 200
Declaration Of Conformance.......... 200
Jack Usage Precautions............ 203
TIRE SERVICE KIT — IF EQUIPPED.......... 204Tire Service Kit Storage............. 204
Tire Service Kit Components And Operation . 204
Tire Service Kit Usage Precautions...... 205
Sealing A Tire With Tire Service Kit...... 206
JUMP STARTING.................... 209Preparations For Jump Start.......... 210
Jump Starting Procedure............ 211
REFUELING IN EMERGENCY.............. 212Emergency Fuel Filler Door Release..... 212
IF YOUR ENGINE OVERHEATS............. 212
GEAR SELECTOR OVERRIDE.............. 213
FREEING A STUCK VEHICLE.............. 213
TOWING A DISABLED VEHICLE............ 214
Without The Key Fob.............. 215
Front-Wheel Drive (FWD) Models....... 215
4x4 Models.................... 216
Recovery Strap — If Equipped......... 216
ENHANCED ACCIDENT RESPONSE SYSTEM (EARS) . 217
EVENT DATA RECORDER (EDR)............ 217
SERVICING AND MAINTENANCE
SCHEDULED SERVICING................ 218Scheduled Servicing — Gasoline Engine . . . 218
Scheduled Servicing — Diesel Engine.... 222
ENGINE COMPARTMENT............... 2272.0L Engine.................... 227
2.4L Engine.................... 228
3.2L Engine.................... 229
2.2L Diesel Engine............... 230
Checking Oil Level................ 231
Cooling System.................. 231
Adding Washer Fluid.............. 232
Brake System.................. 232
Manual Transmission — If Equipped..... 233
Automatic Transmission............ 234
Maintenance-Free Battery........... 234
DEALER SERVICE................... 235Windshield Wiper Blades............ 235
TABLE OF CONTENTS
8
Page 40 of 344
Mist
Use the Mist feature when weather condi-
tions make occasional usage of the wipers
necessary. Push the lever upward to the MIST
position and release for a single wiping cycle.
NOTE:
The mist feature does not activate the washer
pump; therefore, no washer fluid will be
sprayed on the windshield. The wash func-
tion must be used in order to spray the
windshield with washer fluid.
Rain Sensing Wipers — If Equipped
This feature senses rain or snowfall on the
windshield and automatically activates the
wipers for the driver. The feature is especially
useful for road splash or overspray from the
windshield washers of the vehicle ahead.
Rotate the end of the multifunction lever to
one of four settings to activate this feature.
The sensitivity of the system can be adjusted
with the multifunction lever. Wiper delay po-
sition one is the least sensitive, and wiper
delay position four is the most sensitive.NOTE:
Setting three should be used for normal rain
conditions.
Settings one and two can be used if the driver
desires less wiper sensitivity. Setting four can
be used if the driver desires more sensitivity.
Place the wiper switch in the OFF position
when not using the system.
NOTE:
• The Rain Sensing feature will not operate
when the wiper switch is in the low or
high-speed position.
• The Rain Sensing feature may not function
properly when ice or dried salt water is
present on the windshield.
• Use of products containing wax or silicone
may reduce Rain Sensing performance.
• The Rain Sensing feature can be turned on
and off using the Uconnect System, refer to
“Uconnect Settings” in “Multimedia” in
your Owner’s Manual for further
information.The Rain Sensing system has protection fea-
tures for the wiper blades and arms, and will
not operate under the following conditions:
•Low Ambient Temperature— When the igni-
tion is first turned ON, the Rain Sensing
system will not operate until the wiper
switch is moved, vehicle speed is greater
than 3 mph (5 km/h) or the outside tem-
perature is greater than 32°F (0°C).
•Transmission In NEUTRAL Position— When
the ignition is ON, and the automatic trans-
mission is in the NEUTRAL position, the
Rain Sensing system will not operate until
the wiper switch is moved, vehicle speed is
greater than 3 mph (5 km/h) or the gear
selector is moved out of the NEUTRAL
position.
Remote Start Mode Inhibit— On vehicles
equipped with Remote Starting system, Rain
Sensing wipers are not operational when the
vehicle is in the remote start mode. Once the
operator is in the vehicle and has placed the
ignition switch in the RUN position, rain
sensing wiper operation can resume, if it has
been selected, and no other inhibit condi-
tions (mentioned previously) exist.
GETTING TO KNOW YOUR VEHICLE
38
Page 71 of 344
— Electronic Stability Control (ESC) Off
Warning Light — If Equipped
This warning light indicates the Electronic
Stability Control (ESC) is off.
Each time the ignition is turned to ON/RUN
or ACC/ON/RUN, the ESC system will be on,
even if it was turned off previously.
— Low Fuel Warning Light
When the fuel level reaches approximately
2 gal (7.5 L) this light will turn on, and
remain on until fuel is added.
A single warning chime will sound with Low
Fuel Warning.
— Low Washer Fluid Warning Light —
If Equipped
This warning light will illuminate when the
windshield washer fluid is low.
— Service LaneSense Warning Light
— If Equipped
This warning light will illuminate when the
LaneSense system is not operating and re-
quires service. Please see an authorized
dealer.
— LaneSense Warning Light — If
Equipped
The LaneSense Warning Light will be solid
yellow when the vehicle is approaching a lane
marker. The warning light will flash when the
vehicle is crossing the lane marker.
Refer to “LaneSense — If Equipped" in
“Starting And Operating” for further informa-
tion.
— Engine Check/Malfunction Indica-
tor Warning Light (MIL)
The Engine Check/Malfunction Indicator
Light (MIL) is a part of an Onboard Diagnostic
System called OBD II that monitors engine
and automatic transmission control systems.
This warning light will illuminate when the
ignition is in the ON/RUN position before
engine start. If the bulb does not come on
when turning the ignition switch from OFF to
ON/RUN, have the condition checked
promptly.
Certain conditions, such as a loose or missing
gas cap, poor quality fuel, etc., may illumi-
nate the light after engine start. The vehicle
should be serviced if the light stays onthrough several typical driving styles. In most
situations, the vehicle will drive normally and
will not require towing.
When the engine is running, the MIL may
flash to alert serious conditions that could
lead to immediate loss of power or severe
catalytic converter damage. The vehicle
should be serviced by an authorized dealer as
soon as possible if this occurs.
WARNING!
A malfunctioning catalytic converter, as
referenced above, can reach higher tem-
peratures than in normal operating condi-
tions. This can cause a fire if you drive
slowly or park over flammable substances
such as dry plants, wood, cardboard, etc.
This could result in death or serious injury
to the driver, occupants or others.
CAUTION!
Prolonged driving with the Malfunction
Indicator Light (MIL) on could cause dam-
age to the vehicle control system. It also
69
Page 221 of 344
Once A Month Or Before A Long Trip
• Check engine oil level.
• Check windshield washer fluid level.
• Check tire pressure and look for unusual
wear or damage. Rotate tires at the first
sign of irregular wear, even if it occurs
before the oil indicator system turns on.
• Check the fluid levels of the coolant reser-
voir and brake master cylinder, fill as
needed.
• Check function of all interior and exterior
lights.
At Each Oil Change
• Change oil and filter.
• Rotate the tires.Rotate at the first sign of
irregular wear, even if it occurs before the oil
indicator system turns on.
• Inspect battery and clean and tighten ter-
minals as required.• Inspect brake pads, shoes, rotors, drums,
hoses and park brake.
• Inspect engine cooling system protection
and hoses.
• Inspect exhaust system.
• Inspect engine air cleaner if using in dusty
or off-road conditions.
CAUTION!
Failure to perform the required mainte-
nance items may result in damage to the
vehicle.Maintenance Plan — Gasoline Engine
NOTE:
Once you have carried out the last interven-
tion in the table, continue with the scheduled
servicing, maintaining the frequency indi-
cated in the plan by marking each operation
with a dot or dedicated note. Simply restart-
ing the maintenance from the start of the
plan may cause the allowed interval to be
exceeded for some operations.
219
Page 225 of 344
The manufacturer recommends that these
maintenance intervals be performed at your
selling dealer. The technicians at your deal-
ership know your vehicle best, and have ac-
cess to factory trained information, genuine
Mopar parts, and specially designed elec-
tronic and mechanical tools that can help
prevent future costly repairs.
NOTE:
•The actual interval for changing engine oil
and replacing the engine oil filter depends on
the vehicle usage conditions, and is signaled
by the warning light or message in the instru-
ment cluster. In any case, it must never ex-
ceed two years. If the vehicle is used mainly
for city driving, change the engine oil and
filter every year.
•Flush and replace the engine coolant at
120 months or 150,000 miles (240,000 km)
whichever comes first.
•The timing and accessory belts must be
changed every 37,500 miles (60,000 km) or
3 years for particularly demanding use (dusty
areas, severe weather conditions, very low orvery high temperatures for extended periods,
city driving, long periods of idling). Under no
circumstances should these intervals be
exceeded.
Once A Month Or Before A Long Trip
• Check engine oil level.
• Check windshield washer fluid level.
• Check tire pressure and look for unusual
wear or damage. Rotate tires at the first
sign of irregular wear, even if it occurs
before the oil indicator system turns on.
• Check the fluid levels of the coolant reser-
voir and brake master cylinder, fill as
needed.
• Check function of all interior and exterior
lights.
• Control and recovery of additive level for
AdBlue Diesel emissions (UREA) (if
equipped)
At Each Oil Change
• Change the engine oil filter.
• Inspect the brake hoses and lines.• Inspect for the presence of water in the fuel
filter/water separator unit.
Demanding Vehicle Use
• Restore additive level for AdBlue Diesel
emissions (UREA) (if equipped), when the
lamp is illuminated or the message on the
instrument panel.
CAUTION!
Failure to perform the required mainte-
nance items may result in damage to the
vehicle.
Maintenance Plan — Diesel Engine
NOTE:
Once you have carried out the last interven-
tion in the table, continue with the scheduled
servicing, maintaining the frequency indi-
cated in the plan by marking each operation
with a dot or dedicated note. Simply restart-
ing the maintenance from the start of the
plan may cause the allowed interval to be
exceeded for some operations.
223
Page 229 of 344
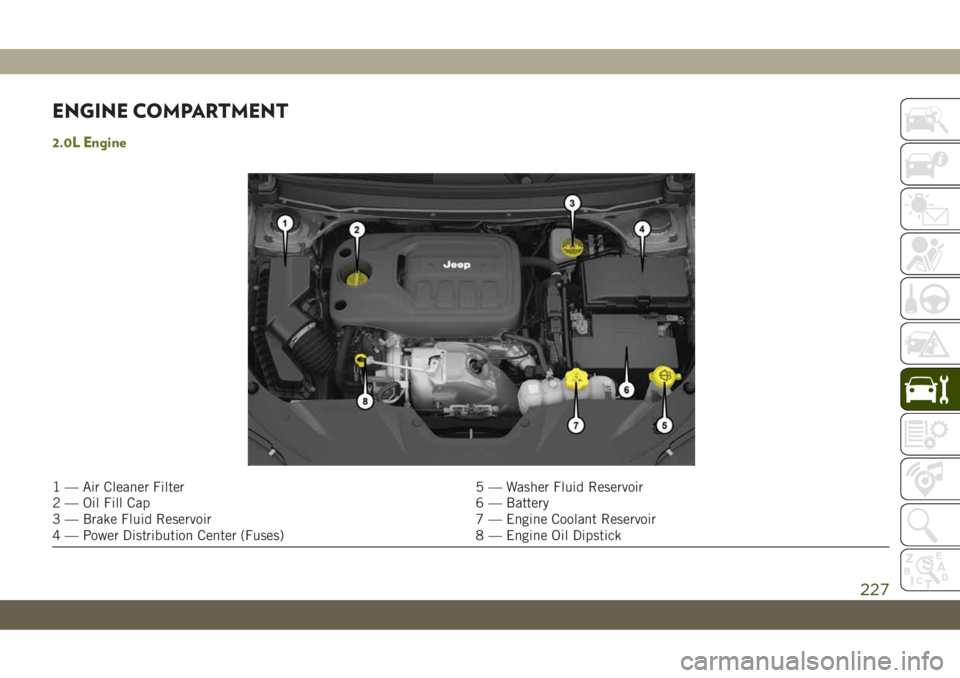
ENGINE COMPARTMENT
2.0L Engine
1 — Air Cleaner Filter 5 — Washer Fluid Reservoir
2 — Oil Fill Cap 6 — Battery
3 — Brake Fluid Reservoir 7 — Engine Coolant Reservoir
4 — Power Distribution Center (Fuses) 8 — Engine Oil Dipstick
227
Page 230 of 344
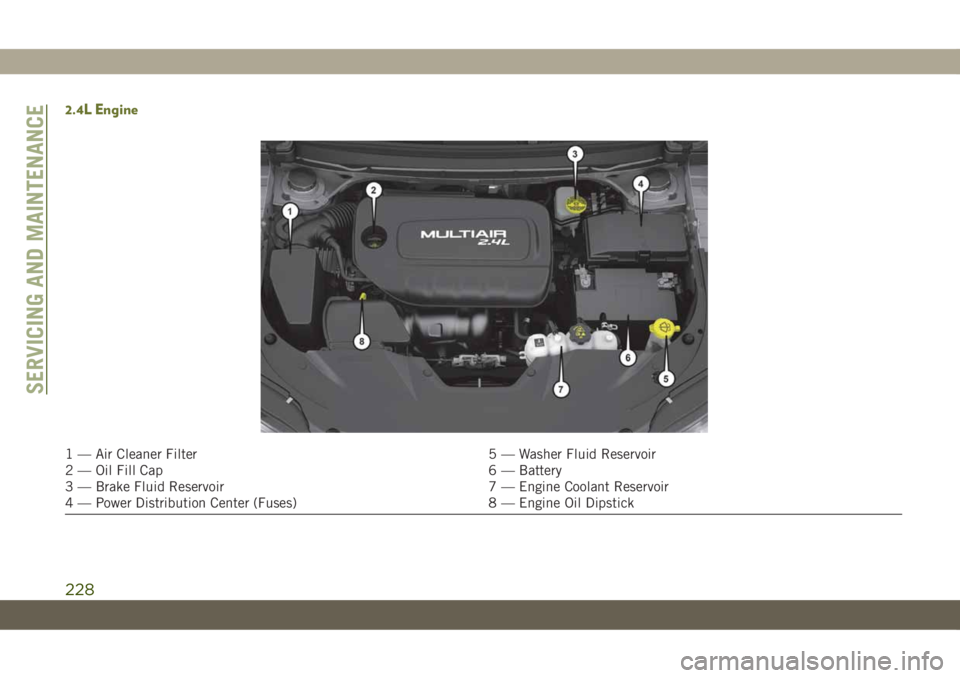
2.4L Engine
1 — Air Cleaner Filter 5 — Washer Fluid Reservoir
2 — Oil Fill Cap 6 — Battery
3 — Brake Fluid Reservoir 7 — Engine Coolant Reservoir
4 — Power Distribution Center (Fuses) 8 — Engine Oil Dipstick
SERVICING AND MAINTENANCE
228
Page 231 of 344
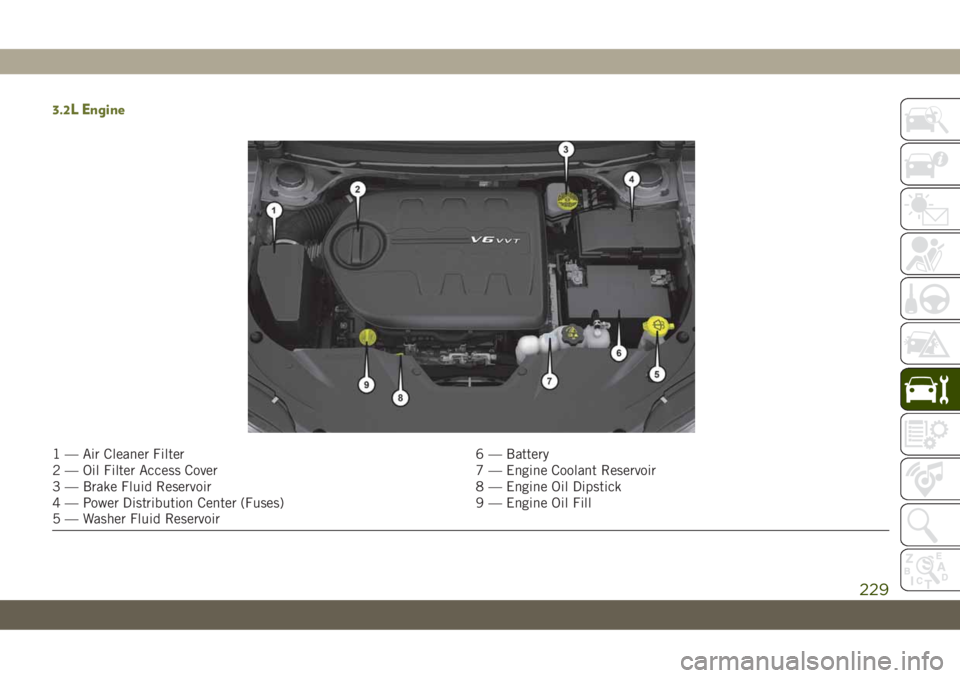
3.2L Engine
1 — Air Cleaner Filter 6 — Battery
2 — Oil Filter Access Cover 7 — Engine Coolant Reservoir
3 — Brake Fluid Reservoir 8 — Engine Oil Dipstick
4 — Power Distribution Center (Fuses) 9 — Engine Oil Fill
5 — Washer Fluid Reservoir
229
Page 232 of 344
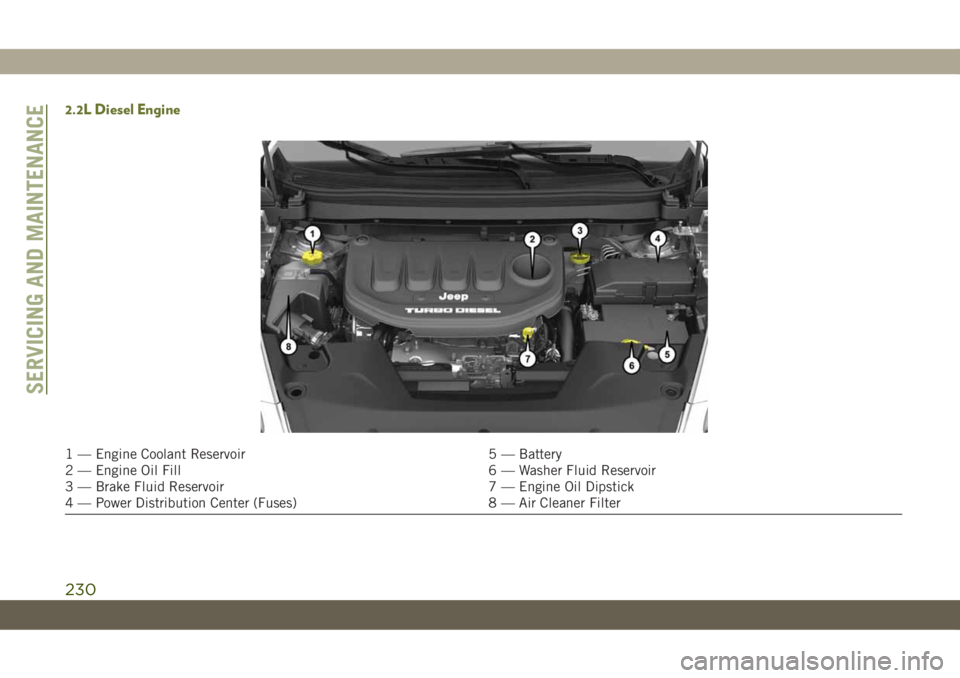
2.2L Diesel Engine
1 — Engine Coolant Reservoir 5 — Battery
2 — Engine Oil Fill 6 — Washer Fluid Reservoir
3 — Brake Fluid Reservoir 7 — Engine Oil Dipstick
4 — Power Distribution Center (Fuses) 8 — Air Cleaner Filter
SERVICING AND MAINTENANCE
230
Page 234 of 344
WARNING!
matically and may start at any time,
whether the engine is running or not.
• When working near the radiator cooling
fan, turn the ignition to the OFF mode.
The fan is temperature controlled and
can start at any time the ignition is in the
ON mode.
Engine Coolant Checks
Check the engine coolant (antifreeze) protec-
tion every 12 months (before the onset of
freezing weather, where applicable). If the
engine coolant (antifreeze) is dirty, the sys-
tem should be drained, flushed, and refilled
with fresh OAT coolant (conforming to
MS.90032) by an authorized dealer. Check
the front of the A/C condenser for any accu-
mulation of bugs, leaves, etc. If dirty, clean
by gently spraying water from a garden hose
vertically down the face of the condenser.
Check the engine cooling system hoses for
brittle rubber, cracking, tears, cuts, and
tightness of the connection at the coolant
recovery bottle and radiator. Inspect the en-tire system for leaks. DO NOT REMOVE THE
COOLANT PRESSURE CAP WHEN THE
COOLING SYSTEM IS HOT.
Adding Washer Fluid
The windshield and rear window washers
share the same fluid reservoir. The fluid res-
ervoir is located in the front of the engine
compartment. Be sure to check the fluid level
in the reservoir at regular intervals. Fill the
reservoir with windshield washer solvent (not
radiator antifreeze) and operate the system
for a few seconds to flush out the residual
water.
When refilling the washer fluid reservoir, take
some washer fluid and apply it to a cloth or
towel and wipe clean the wiper blades, this
will help blade performance.
To prevent freeze-up of your windshield
washer system in cold weather, select a solu-
tion or mixture that meets or exceeds the
temperature range of your climate. This rat-
ing information can be found on most washer
fluid containers.
WARNING!
Commercially available windshield washer
solvents are flammable. They could ignite
and burn you. Care must be exercised
when filling or working around the washer
solution.
CAUTION!
Do not travel with the windshield washer
fluid reservoir empty: the windshield
washer is essential for improving visibility.
Repeated operation of the system without
fluid could damage or cause rapid deterio-
ration of some system components.
Brake System
In order to assure brake system performance,
all brake system components should be in-
spected periodically. Refer to the “Mainte-
nance Plan” in this section for the proper
maintenance intervals.
SERVICING AND MAINTENANCE
232