USB port JEEP CHEROKEE 2019 Owner handbook (in English)
[x] Cancel search | Manufacturer: JEEP, Model Year: 2019, Model line: CHEROKEE, Model: JEEP CHEROKEE 2019Pages: 344, PDF Size: 6.35 MB
Page 192 of 344
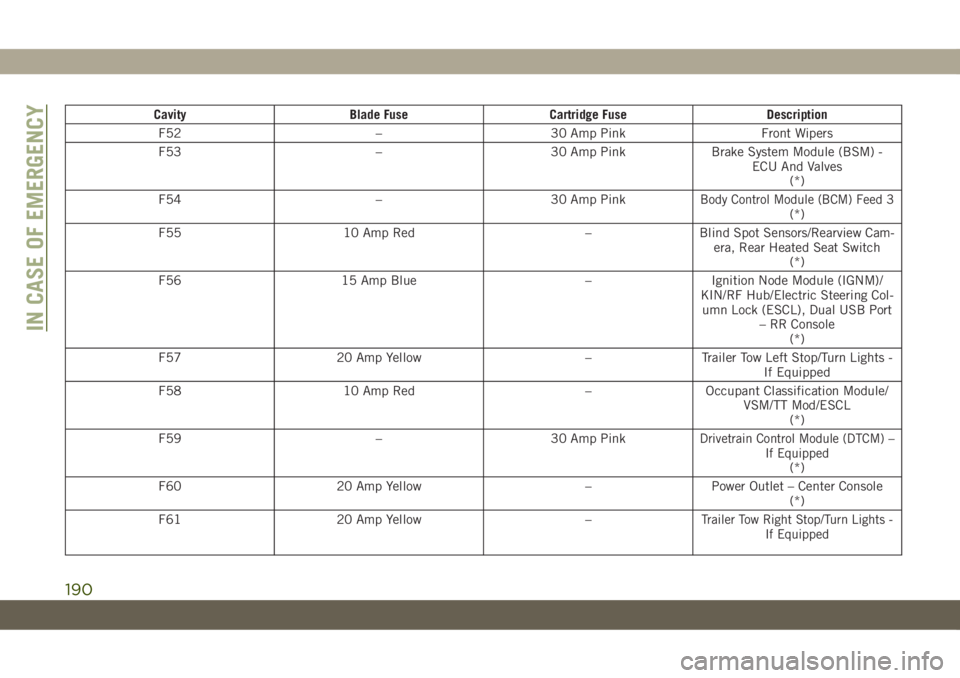
Cavity Blade Fuse Cartridge Fuse Description
F52 – 30 Amp Pink Front Wipers
F53 – 30 Amp Pink Brake System Module (BSM) -
ECU And Valves
(*)
F54 – 30 Amp Pink
Body Control Module (BCM) Feed 3(*)
F55 10 Amp Red – Blind Spot Sensors/Rearview Cam-
era, Rear Heated Seat Switch
(*)
F56 15 Amp Blue – Ignition Node Module (IGNM)/
KIN/RF Hub/Electric Steering Col-
umn Lock (ESCL), Dual USB Port
– RR Console
(*)
F57 20 Amp Yellow – Trailer Tow Left Stop/Turn Lights -
If Equipped
F58 10 Amp Red – Occupant Classification Module/
VSM/TT Mod/ESCL
(*)
F59 – 30 Amp Pink
Drivetrain Control Module (DTCM) –
If Equipped
(*)
F60 20 Amp Yellow – Power Outlet – Center Console
(*)
F61 20 Amp Yellow –
Trailer Tow Right Stop/Turn Lights -
If Equipped
IN CASE OF EMERGENCY
190
Page 195 of 344
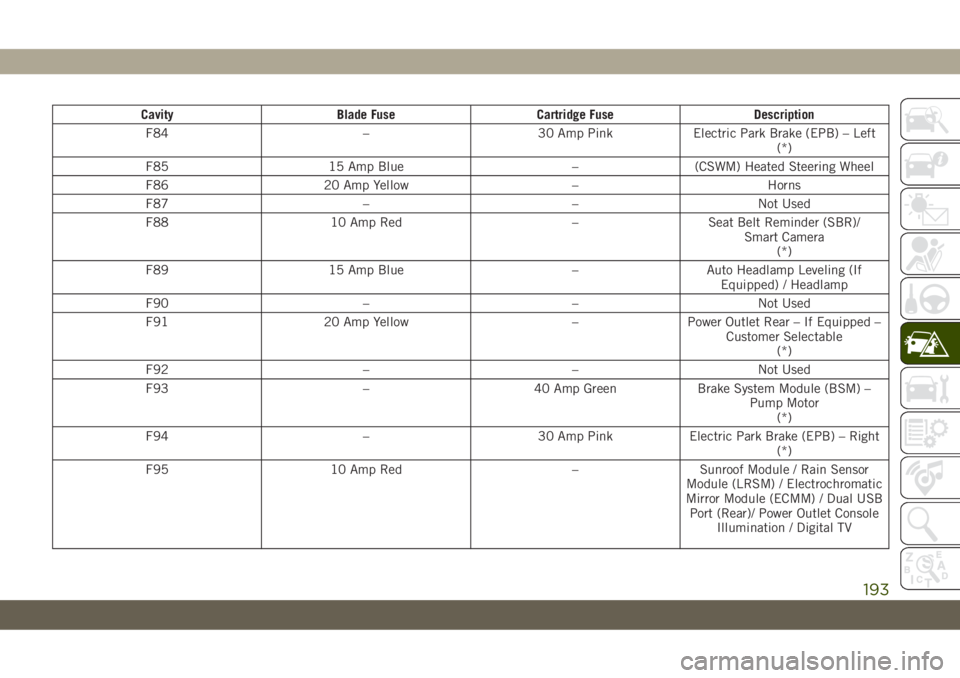
Cavity Blade Fuse Cartridge Fuse Description
F84 – 30 Amp Pink Electric Park Brake (EPB) – Left
(*)
F85 15 Amp Blue – (CSWM) Heated Steering Wheel
F86 20 Amp Yellow – Horns
F87 – – Not Used
F88 10 Amp Red – Seat Belt Reminder (SBR)/
Smart Camera
(*)
F89 15 Amp Blue – Auto Headlamp Leveling (If
Equipped) / Headlamp
F90 – – Not Used
F91 20 Amp Yellow – Power Outlet Rear – If Equipped –
Customer Selectable
(*)
F92 – – Not Used
F93 – 40 Amp Green Brake System Module (BSM) –
Pump Motor
(*)
F94 – 30 Amp Pink Electric Park Brake (EPB) – Right
(*)
F95 10 Amp Red – Sunroof Module / Rain Sensor
Module (LRSM) / Electrochromatic
Mirror Module (ECMM) / Dual USB
Port (Rear)/ Power Outlet Console
Illumination / Digital TV
193
Page 197 of 344

Interior Fuses
The interior fuse panel is located on the Body
Control Module (BCM) in the passenger com-
partment on the left side dash panel under
the instrument panel.
Cavity Blade Fuse Description
F32 10 Amp Red Interior Lighting
F36 10 Amp Red Intrusion Module/Siren – If Equipped
F38 20 Amp YellowDeadbolt All Unlock
(*)
F43 20 Amp Yellow Washer Pump Front
F48 25 Amp Clear Fog Lamp Rear Left/Right – If Equipped
F49 7.5 Amp Brown Lumbar Support
F50 7.5 Amp Brown Wireless Charging Pad – If Equipped
F51 7.5 Amp Brown Driver Window Switch/Power Mirrors – If Equipped
F53 7.5 Amp Brown UCI Port (USB & AUX)
F89 15 Amp Blue Door Locks – Driver Unlock
F91 7.5 Amp Brown Left Front Fog Lamp (Low And High Line)
F92 7.5 Amp Brown Right Front Fog Lamp (High Line)
F93 10 Amp Red Low Beam Right
195
Page 278 of 344
2. Connect your Android powered smart-
phone to one of the media USB ports in
your vehicle. If you have not downloaded
the Android Auto app to your smartphone
before plugging in the device for the first
time, the app begins to download.
NOTE:
Be sure to use the factory-provided USB
cable that came with your phone, as af-
termarket cables may not work.
Your phone may ask you to approve the
use of the Android Auto app before use.3. Once the device is connected and recog-
nized, Android Auto should automatically
launch, but you can also launch it by
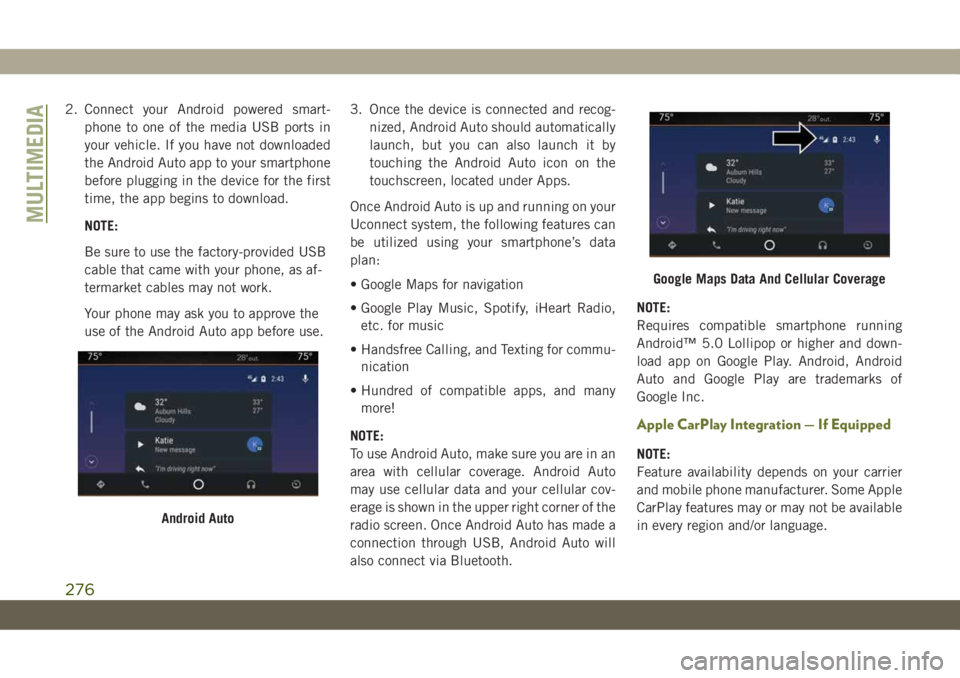
touching the Android Auto icon on the
touchscreen, located under Apps.
Once Android Auto is up and running on your
Uconnect system, the following features can
be utilized using your smartphone’s data
plan:
• Google Maps for navigation
• Google Play Music, Spotify, iHeart Radio,
etc. for music
• Handsfree Calling, and Texting for commu-
nication
• Hundred of compatible apps, and many
more!
NOTE:
To use Android Auto, make sure you are in an
area with cellular coverage. Android Auto
may use cellular data and your cellular cov-
erage is shown in the upper right corner of the
radio screen. Once Android Auto has made a
connection through USB, Android Auto will
also connect via Bluetooth.NOTE:
Requires compatible smartphone running
Android™ 5.0 Lollipop or higher and down-
load app on Google Play. Android, Android
Auto and Google Play are trademarks of
Google Inc.
Apple CarPlay Integration — If Equipped
NOTE:
Feature availability depends on your carrier
and mobile phone manufacturer. Some Apple
CarPlay features may or may not be available
in every region and/or language.
Android Auto
Google Maps Data And Cellular Coverage
MULTIMEDIA
276
Page 279 of 344
Uconnect works seamlessly with Apple Car-
Play, the smarter, more secure way to use
your iPhone in the car, and stay focused on
the road. Use your Uconnect Touchscreen
display, the vehicle's knobs and controls, and
your voice with Siri to get access to Apple
Music, Maps, Messages, and more.
To use CarPlay, make sure you are using
iPhone 5 or later, have Siri enabled in Set-
tings, that your iPhone is unlocked for the
very first connection only, and then use the
following procedure:
1. Connect your iPhone to one of the media
USB ports in your vehicle.
NOTE:
Be sure to use the factory-provided Light-
ning cable that came with your phone, as
aftermarket cables may not work.
2. Once the device is connected and recog-
nized, CarPlay should automatically
launch, but you can also launch it by
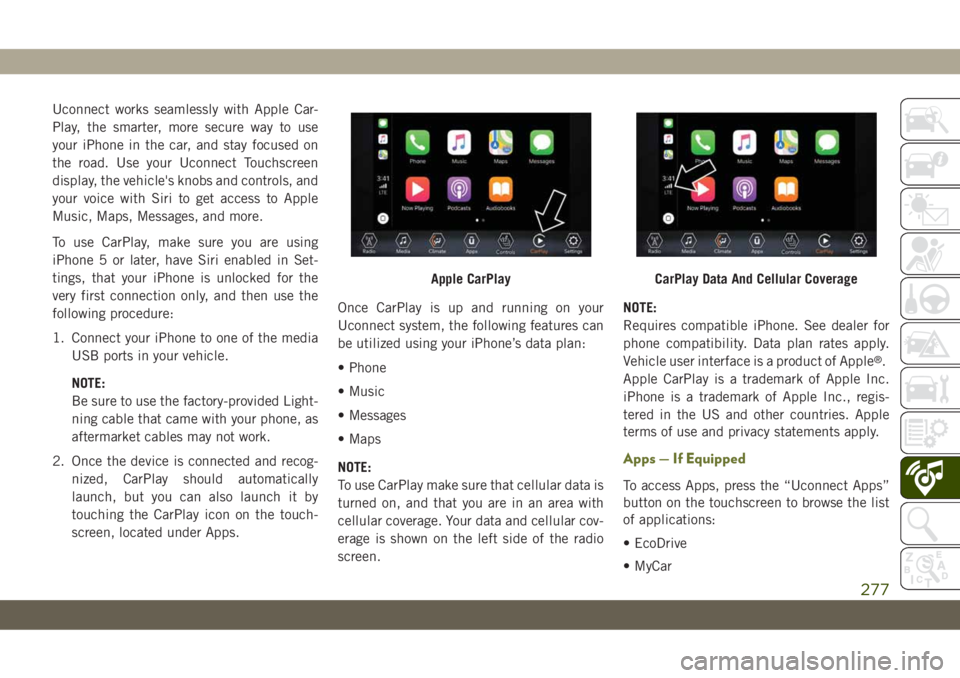
touching the CarPlay icon on the touch-
screen, located under Apps.Once CarPlay is up and running on your
Uconnect system, the following features can
be utilized using your iPhone’s data plan:
• Phone
• Music
• Messages
• Maps
NOTE:
To use CarPlay make sure that cellular data is
turned on, and that you are in an area with
cellular coverage. Your data and cellular cov-
erage is shown on the left side of the radio
screen.NOTE:
Requires compatible iPhone. See dealer for
phone compatibility. Data plan rates apply.
Vehicle user interface is a product of Apple
®.
Apple CarPlay is a trademark of Apple Inc.
iPhone is a trademark of Apple Inc., regis-
tered in the US and other countries. Apple
terms of use and privacy statements apply.
Apps — If Equipped
To access Apps, press the “Uconnect Apps”
button on the touchscreen to browse the list
of applications:
• EcoDrive
• MyCar
Apple CarPlayCarPlay Data And Cellular Coverage
277
Page 284 of 344
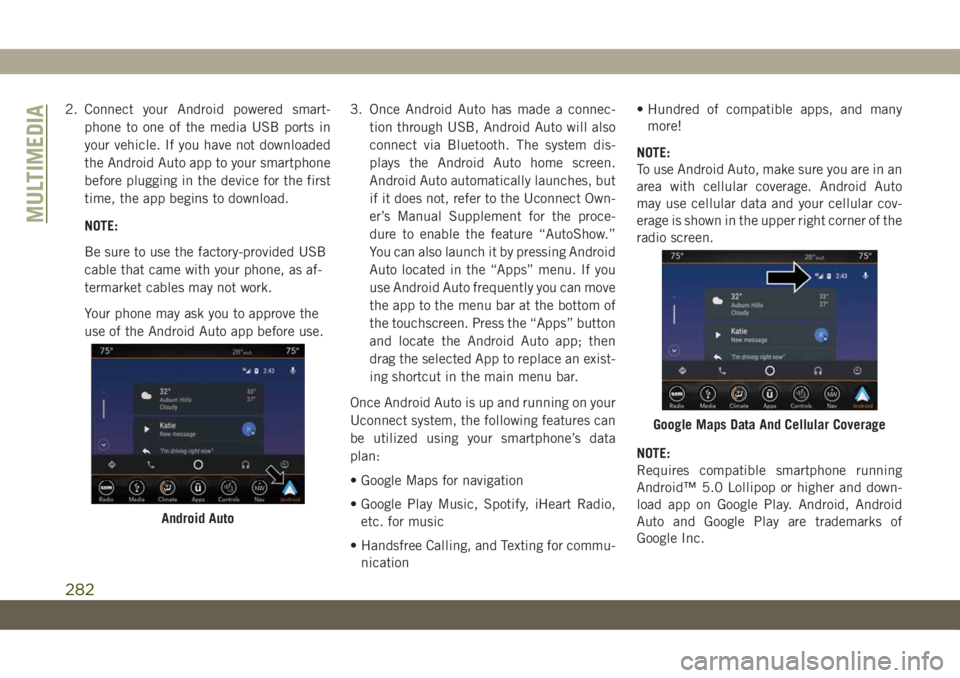
2. Connect your Android powered smart-
phone to one of the media USB ports in
your vehicle. If you have not downloaded
the Android Auto app to your smartphone
before plugging in the device for the first
time, the app begins to download.
NOTE:
Be sure to use the factory-provided USB
cable that came with your phone, as af-
termarket cables may not work.
Your phone may ask you to approve the
use of the Android Auto app before use.3. Once Android Auto has made a connec-
tion through USB, Android Auto will also
connect via Bluetooth. The system dis-
plays the Android Auto home screen.
Android Auto automatically launches, but
if it does not, refer to the Uconnect Own-
er’s Manual Supplement for the proce-
dure to enable the feature “AutoShow.”
You can also launch it by pressing Android
Auto located in the “Apps” menu. If you
use Android Auto frequently you can move
the app to the menu bar at the bottom of
the touchscreen. Press the “Apps” button
and locate the Android Auto app; then
drag the selected App to replace an exist-
ing shortcut in the main menu bar.
Once Android Auto is up and running on your
Uconnect system, the following features can
be utilized using your smartphone’s data
plan:
• Google Maps for navigation
• Google Play Music, Spotify, iHeart Radio,
etc. for music
• Handsfree Calling, and Texting for commu-
nication• Hundred of compatible apps, and many
more!
NOTE:
To use Android Auto, make sure you are in an
area with cellular coverage. Android Auto
may use cellular data and your cellular cov-
erage is shown in the upper right corner of the
radio screen.
NOTE:
Requires compatible smartphone running
Android™ 5.0 Lollipop or higher and down-
load app on Google Play. Android, Android
Auto and Google Play are trademarks of
Google Inc.
Android Auto
Google Maps Data And Cellular Coverage
MULTIMEDIA
282
Page 287 of 344
Apple CarPlay Integration — If Equipped
NOTE:
Feature availability depends on your carrier
and mobile phone manufacturer. Some Apple
CarPlay features may or may not be available
in every region and/or language.
Uconnect works seamlessly with Apple Car-
Play, the smarter, more secure way to use
your iPhone in the car, and stay focused on
the road. Use your Uconnect Touchscreen
display, the vehicle's knobs and controls, and
your voice with Siri to get access to Apple
Music, Maps, Messages, and more.
To use CarPlay, make sure you are using
iPhone 5 or later, have Siri enabled in Set-
tings, that your iPhone is unlocked for the
very first connection only, and then use the
following procedure:
1. Connect your iPhone to one of the media
USB ports in your vehicle.
NOTE:
Be sure to use the factory-provided Light-
ning cable that came with your phone, as
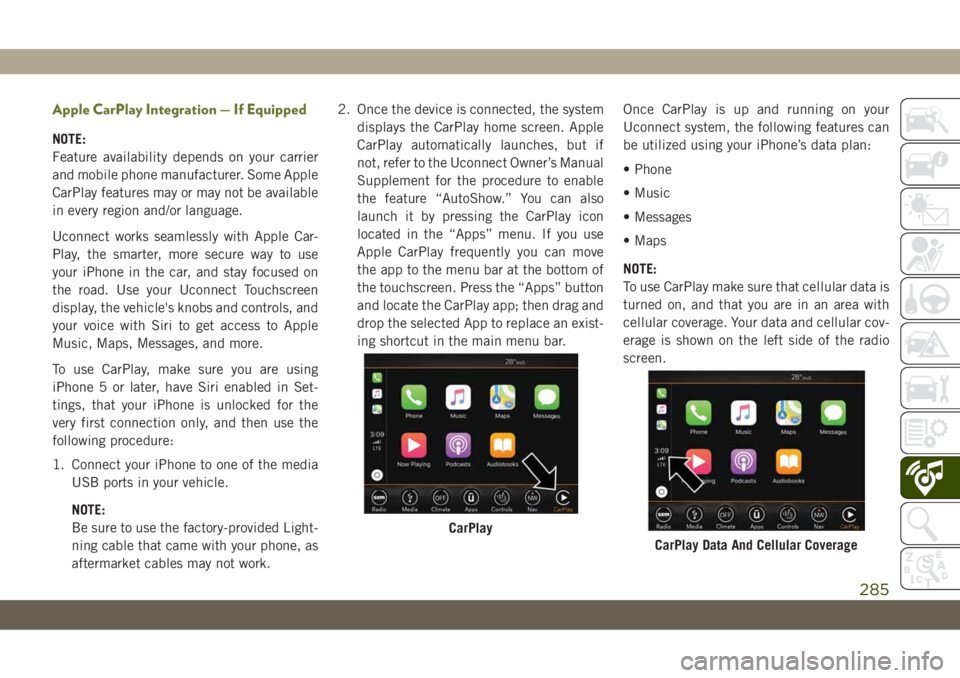
aftermarket cables may not work.2. Once the device is connected, the system
displays the CarPlay home screen. Apple
CarPlay automatically launches, but if
not, refer to the Uconnect Owner’s Manual
Supplement for the procedure to enable
the feature “AutoShow.” You can also
launch it by pressing the CarPlay icon
located in the “Apps” menu. If you use
Apple CarPlay frequently you can move
the app to the menu bar at the bottom of
the touchscreen. Press the “Apps” button
and locate the CarPlay app; then drag and
drop the selected App to replace an exist-
ing shortcut in the main menu bar.Once CarPlay is up and running on your
Uconnect system, the following features can
be utilized using your iPhone’s data plan:
• Phone
• Music
• Messages
• Maps
NOTE:
To use CarPlay make sure that cellular data is
turned on, and that you are in an area with
cellular coverage. Your data and cellular cov-
erage is shown on the left side of the radio
screen.
CarPlay
CarPlay Data And Cellular Coverage
285
Page 291 of 344
Right Switch
• Push the switch up or down to increase or
decrease the volume.
• Push the button in the center to mute the
radio.
Reception Conditions
Reception conditions change constantly
while driving. Reception may be interfered
with by the presence of mountains, buildings
or bridges, especially when you are far away
from the broadcaster.
The volume may be increased when receiving
traffic alerts and news.
Care And Maintenance
Observe the following precautions to ensure
the system is fully operational:
• The display lens should not come into con-
tact with pointed or rigid objects which
could damage its surface; use a soft, dry
anti-static cloth to clean and do not press.• Never use alcohol, gas and derivatives to
clean the display lens.
• Prevent any liquid from entering the sys-
tem: this could damage it beyond repair.
Anti-Theft Protection
The system is equipped with an anti-theft
protection system based on the exchange of
information with the electronic control unit
(Body Computer) on the vehicle. This guaran-
tees maximum safety.
If the check has a positive outcome, the
system will start to operate. See an autho-
rized dealer for further information.
AUX/USB/MP3 CONTROL —
IF EQUIPPED
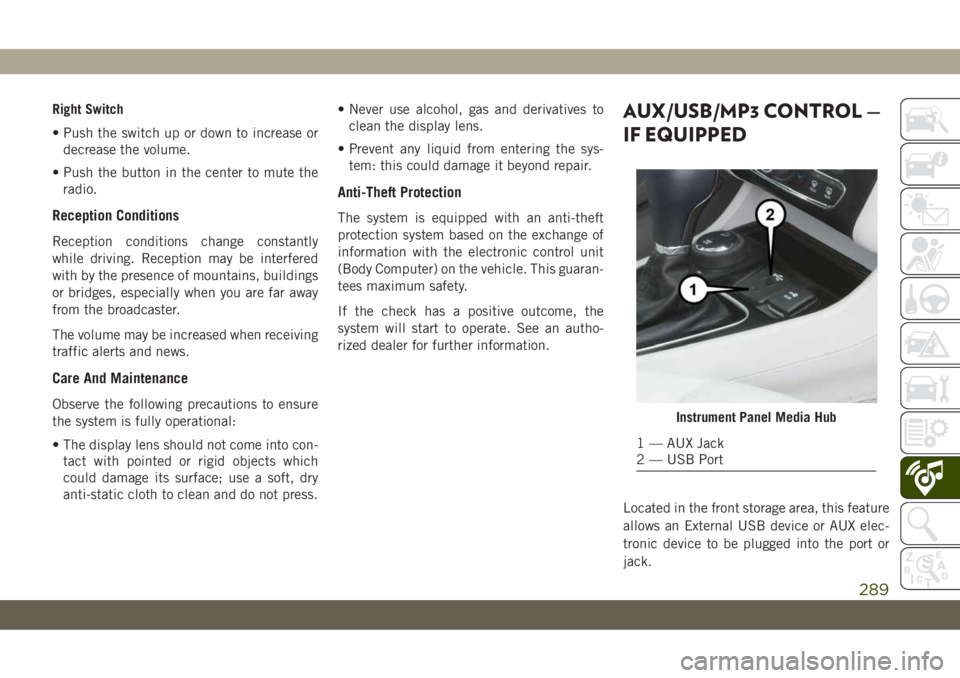
Located in the front storage area, this feature
allows an External USB device or AUX elec-
tronic device to be plugged into the port or
jack.
Instrument Panel Media Hub
1 — AUX Jack
2 — USB Port
289
Page 292 of 344
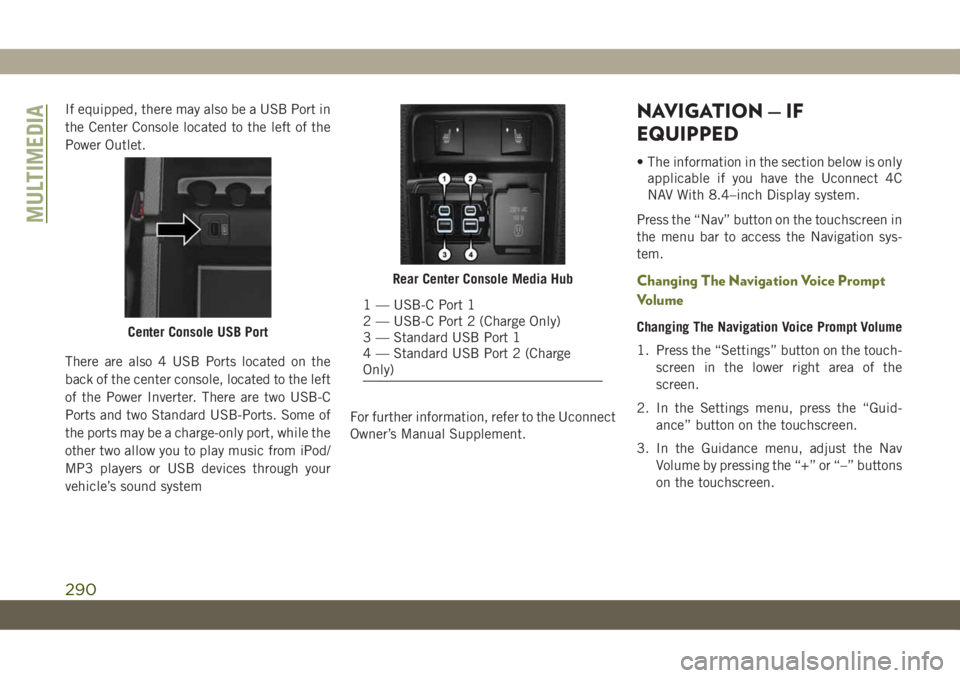
If equipped, there may also be a USB Port in
the Center Console located to the left of the
Power Outlet.
There are also 4 USB Ports located on the
back of the center console, located to the left
of the Power Inverter. There are two USB-C
Ports and two Standard USB-Ports. Some of
the ports may be a charge-only port, while the
other two allow you to play music from iPod/
MP3 players or USB devices through your
vehicle’s sound systemFor further information, refer to the Uconnect
Owner’s Manual Supplement.NAVIGATION — IF
EQUIPPED
• The information in the section below is only
applicable if you have the Uconnect 4C
NAV With 8.4–inch Display system.
Press the “Nav” button on the touchscreen in
the menu bar to access the Navigation sys-
tem.
Changing The Navigation Voice Prompt
Volume
Changing The Navigation Voice Prompt Volume
1. Press the “Settings” button on the touch-
screen in the lower right area of the
screen.
2. In the Settings menu, press the “Guid-
ance” button on the touchscreen.
3. In the Guidance menu, adjust the Nav
Volume by pressing the “+” or “–” buttons
on the touchscreen.Center Console USB Port
Rear Center Console Media Hub
1 — USB-C Port 1
2 — USB-C Port 2 (Charge Only)
3 — Standard USB Port 1
4 — Standard USB Port 2 (Charge
Only)
MULTIMEDIA
290
Page 309 of 344
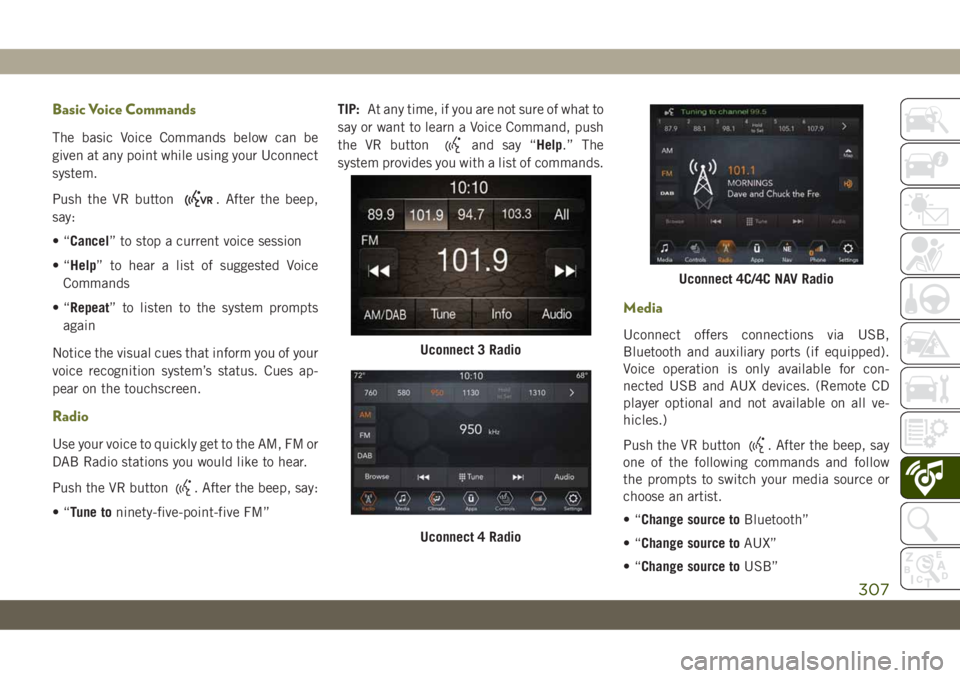
Basic Voice Commands
The basic Voice Commands below can be
given at any point while using your Uconnect
system.
Push the VR button
. After the beep,
say:
•“Cancel” to stop a current voice session
•“Help” to hear a list of suggested Voice
Commands
•“Repeat” to listen to the system prompts
again
Notice the visual cues that inform you of your
voice recognition system’s status. Cues ap-
pear on the touchscreen.
Radio
Use your voice to quickly get to the AM, FM or
DAB Radio stations you would like to hear.
Push the VR button
. After the beep, say:
•“Tune toninety-five-point-five FM”TIP:At any time, if you are not sure of what to
say or want to learn a Voice Command, push
the VR button
and say “Help.” The
system provides you with a list of commands.
Media
Uconnect offers connections via USB,
Bluetooth and auxiliary ports (if equipped).
Voice operation is only available for con-
nected USB and AUX devices. (Remote CD
player optional and not available on all ve-
hicles.)
Push the VR button
. After the beep, say
one of the following commands and follow
the prompts to switch your media source or
choose an artist.
•“Change source toBluetooth”
•“Change source toAUX”
•“Change source toUSB”
Uconnect 3 Radio
Uconnect 4 Radio
Uconnect 4C/4C NAV Radio
307