warning JEEP CHEROKEE 2019 Owner handbook (in English)
[x] Cancel search | Manufacturer: JEEP, Model Year: 2019, Model line: CHEROKEE, Model: JEEP CHEROKEE 2019Pages: 344, PDF Size: 6.35 MB
Page 4 of 344
HOW TO USE THIS MANUAL
Essential Information
Consult the Table of Contents to determine
which section contains the information you
desire.
Since the specification of your vehicle de-
pends on the items of equipment ordered,
certain descriptions and illustrations may dif-
fer from your vehicle's equipment.
The detailed index at the back of this Owner's
Manual contains a complete listing of all
subjects.
Symbols
Some vehicle components have colored la-
bels whose symbols indicate precautions to
be observed when using this component.
Refer to “Warning Lights and Messages” in
“Getting To Know Your Instrument Panel” for
further information on the symbols used in
your vehicle.
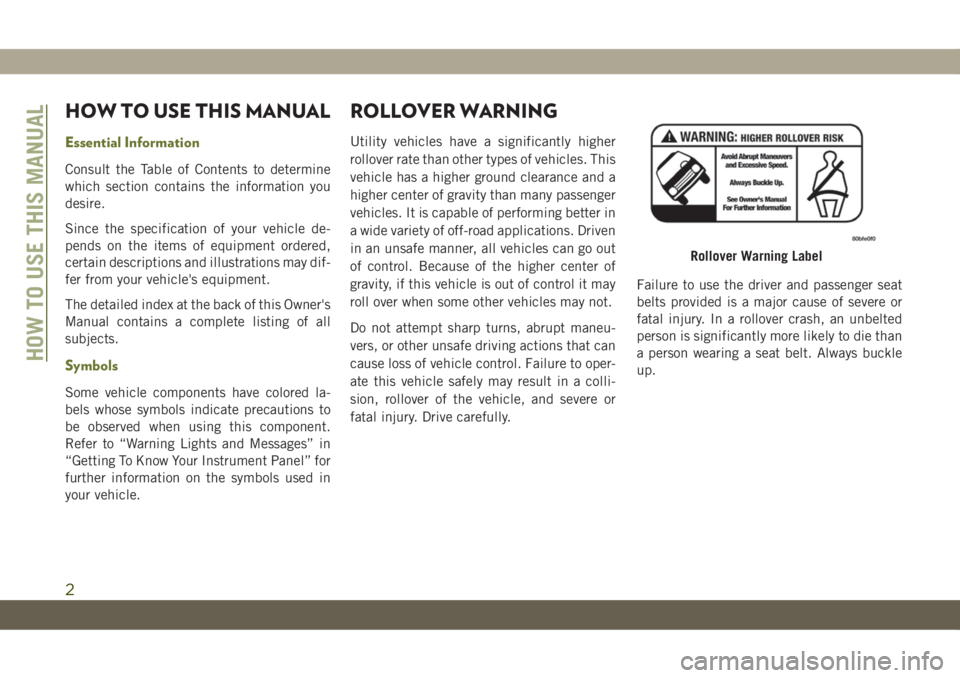
ROLLOVER WARNING
Utility vehicles have a significantly higher
rollover rate than other types of vehicles. This
vehicle has a higher ground clearance and a
higher center of gravity than many passenger
vehicles. It is capable of performing better in
a wide variety of off-road applications. Driven
in an unsafe manner, all vehicles can go out
of control. Because of the higher center of
gravity, if this vehicle is out of control it may
roll over when some other vehicles may not.
Do not attempt sharp turns, abrupt maneu-
vers, or other unsafe driving actions that can
cause loss of vehicle control. Failure to oper-
ate this vehicle safely may result in a colli-
sion, rollover of the vehicle, and severe or
fatal injury. Drive carefully.Failure to use the driver and passenger seat
belts provided is a major cause of severe or
fatal injury. In a rollover crash, an unbelted
person is significantly more likely to die than
a person wearing a seat belt. Always buckle
up.
Rollover Warning Label
HOW TO USE THIS MANUAL
2
Page 6 of 344
WARNINGS AND
CAUTIONS
This User Guide containsWARNINGSagainst
operating procedures that could result in a
collision, bodily injury and/or death. It also
containsCAUTIONSagainst procedures that
could result in damage to your vehicle. If you
do not read this entire guide, you may miss
important information. Observe all Warnings
and Cautions.
VEHICLE MODIFICATIONS/
ALTERATIONS
WARNING!
Any modifications or alterations to this
vehicle could seriously affect its roadwor-
thiness and safety and may lead to a col-
lision resulting in serious injury or death.
HOW TO USE THIS MANUAL
4
Page 8 of 344
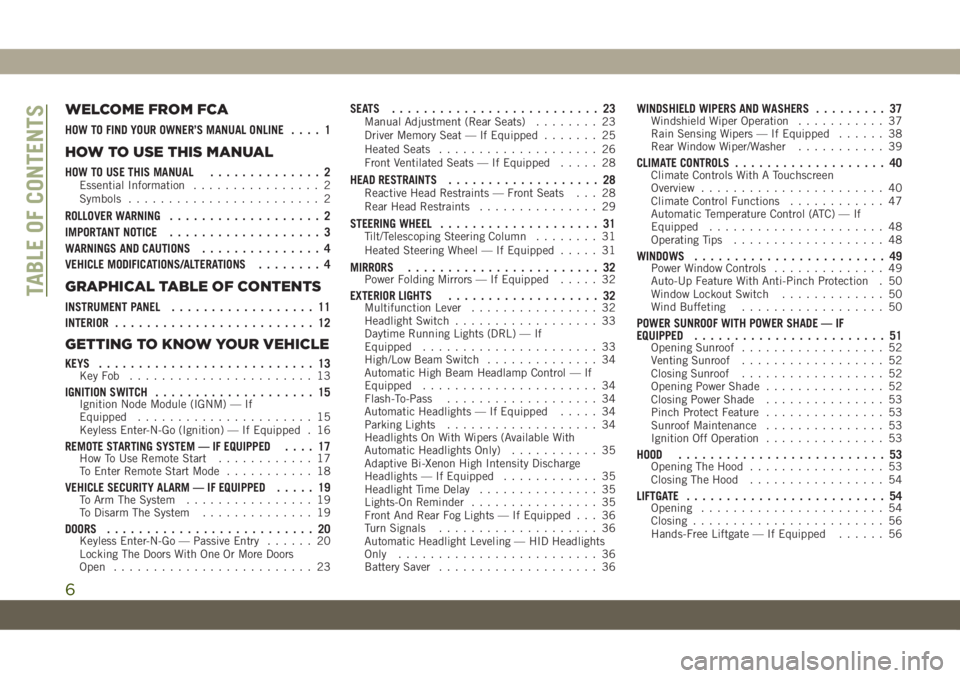
WELCOME FROM FCA
HOW TO FIND YOUR OWNER’S MANUAL ONLINE.... 1
HOW TO USE THIS MANUAL
HOW TO USE THIS MANUAL.............. 2Essential Information................ 2
Symbols........................ 2
ROLLOVER WARNING................... 2
IMPORTANT NOTICE................... 3
WARNINGS AND CAUTIONS............... 4
VEHICLE MODIFICATIONS/ALTERATIONS........ 4
GRAPHICAL TABLE OF CONTENTS
INSTRUMENT PANEL.................. 11
INTERIOR......................... 12
GETTING TO KNOW YOUR VEHICLE
KEYS........................... 13KeyFob ....................... 13
IGNITION SWITCH.................... 15Ignition Node Module (IGNM) — If
Equipped...................... 15
Keyless Enter-N-Go (Ignition) — If Equipped . 16
REMOTE STARTING SYSTEM — IF EQUIPPED.... 17How To Use Remote Start............ 17
To Enter Remote Start Mode........... 18
VEHICLE SECURITY ALARM — IF EQUIPPED..... 19To Arm The System................ 19
To Disarm The System.............. 19
DOORS.......................... 20Keyless Enter-N-Go — Passive Entry...... 20
Locking The Doors With One Or More Doors
Open......................... 23
SEATS .......................... 23Manual Adjustment (Rear Seats)........ 23
Driver Memory Seat — If Equipped....... 25
Heated Seats.................... 26
Front Ventilated Seats — If Equipped..... 28
HEAD RESTRAINTS................... 28Reactive Head Restraints — Front Seats . . . 28
Rear Head Restraints............... 29
STEERING WHEEL.................... 31Tilt/Telescoping Steering Column........ 31
Heated Steering Wheel — If Equipped..... 31
MIRRORS........................ 32Power Folding Mirrors — If Equipped..... 32
EXTERIOR LIGHTS................... 32Multifunction Lever................ 32
Headlight Switch.................. 33
Daytime Running Lights (DRL) — If
Equipped...................... 33
High/Low Beam Switch.............. 34
Automatic High Beam Headlamp Control — If
Equipped...................... 34
Flash-To-Pass................... 34
Automatic Headlights — If Equipped..... 34
Parking Lights................... 34
Headlights On With Wipers (Available With
Automatic Headlights Only)........... 35
Adaptive Bi-Xenon High Intensity Discharge
Headlights — If Equipped............ 35
Headlight Time Delay............... 35
Lights-On Reminder................ 35
Front And Rear Fog Lights — If Equipped . . . 36
Turn Signals.................... 36
Automatic Headlight Leveling — HID Headlights
Only......................... 36
Battery Saver.................... 36
WINDSHIELD WIPERS AND WASHERS......... 37Windshield Wiper Operation........... 37
Rain Sensing Wipers — If Equipped...... 38
Rear Window Wiper/Washer........... 39
CLIMATE CONTROLS................... 40Climate Controls With A Touchscreen
Overview....................... 40
Climate Control Functions............ 47
Automatic Temperature Control (ATC) — If
Equipped...................... 48
Operating Tips................... 48
WINDOWS........................ 49Power Window Controls.............. 49
Auto-Up Feature With Anti-Pinch Protection . 50
Window Lockout Switch............. 50
Wind Buffeting.................. 50
POWER SUNROOF WITH POWER SHADE — IF
EQUIPPED........................ 51
Opening Sunroof.................. 52
Venting Sunroof.................. 52
Closing Sunroof.................. 52
Opening Power Shade............... 52
Closing Power Shade............... 53
Pinch Protect Feature............... 53
Sunroof Maintenance............... 53
Ignition Off Operation............... 53
HOOD.......................... 53Opening The Hood................. 53
Closing The Hood................. 54
LIFTGATE......................... 54Opening....................... 54
Closing........................ 56
Hands-Free Liftgate — If Equipped...... 56
TABLE OF CONTENTS
6
Page 9 of 344
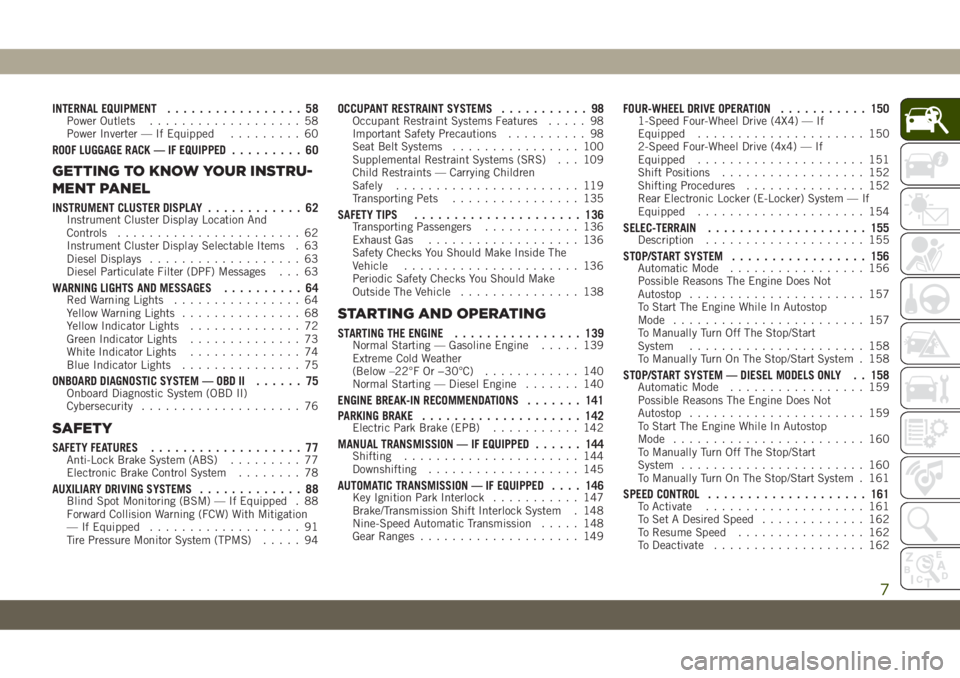
INTERNAL EQUIPMENT................. 58Power Outlets................... 58
Power Inverter — If Equipped......... 60
ROOF LUGGAGE RACK — IF EQUIPPED......... 60
GETTING TO KNOW YOUR INSTRU-
MENT PANEL
INSTRUMENT CLUSTER DISPLAY............ 62Instrument Cluster Display Location And
Controls....................... 62
Instrument Cluster Display Selectable Items . 63
Diesel Displays................... 63
Diesel Particulate Filter (DPF) Messages . . . 63
WARNING LIGHTS AND MESSAGES.......... 64Red Warning Lights................ 64
Yellow Warning Lights............... 68
Yellow Indicator Lights.............. 72
Green Indicator Lights.............. 73
White Indicator Lights.............. 74
Blue Indicator Lights............... 75
ONBOARD DIAGNOSTIC SYSTEM — OBD II...... 75Onboard Diagnostic System (OBD II)
Cybersecurity.................... 76
SAFETY
SAFETY FEATURES................... 77Anti-Lock Brake System (ABS)......... 77
Electronic Brake Control System........ 78
AUXILIARY DRIVING SYSTEMS............. 88Blind Spot Monitoring (BSM) — If Equipped . 88
Forward Collision Warning (FCW) With Mitigation
— If Equipped................... 91
Tire Pressure Monitor System (TPMS)..... 94
OCCUPANT RESTRAINT SYSTEMS........... 98Occupant Restraint Systems Features..... 98
Important Safety Precautions.......... 98
Seat Belt Systems................ 100
Supplemental Restraint Systems (SRS) . . . 109
Child Restraints — Carrying Children
Safely....................... 119
Transporting Pets................ 135
SAFETY TIPS..................... 136Transporting Passengers............ 136
Exhaust Gas................... 136
Safety Checks You Should Make Inside The
Vehicle...................... 136
Periodic Safety Checks You Should Make
Outside The Vehicle............... 138
STARTING AND OPERATING
STARTING THE ENGINE................ 139Normal Starting — Gasoline Engine..... 139
Extreme Cold Weather
(Below –22°F Or −30°C)............ 140
Normal Starting — Diesel Engine....... 140
ENGINE BREAK-IN RECOMMENDATIONS....... 141
PARKING BRAKE.................... 142
Electric Park Brake (EPB)........... 142
MANUAL TRANSMISSION — IF EQUIPPED...... 144Shifting...................... 144
Downshifting................... 145
AUTOMATIC TRANSMISSION — IF EQUIPPED.... 146Key Ignition Park Interlock........... 147
Brake/Transmission Shift Interlock System . 148
Nine-Speed Automatic Transmission..... 148
Gear Ranges.................... 149
FOUR-WHEEL DRIVE OPERATION........... 1501-Speed Four-Wheel Drive (4X4) — If
Equipped..................... 150
2-Speed Four-Wheel Drive (4x4) — If
Equipped..................... 151
Shift Positions.................. 152
Shifting Procedures............... 152
Rear Electronic Locker (E-Locker) System — If
Equipped..................... 154
SELEC-TERRAIN.................... 155Description.................... 155
STOP/START SYSTEM................. 156Automatic Mode................. 156
Possible Reasons The Engine Does Not
Autostop...................... 157
To Start The Engine While In Autostop
Mode........................ 157
To Manually Turn Off The Stop/Start
System...................... 158
To Manually Turn On The Stop/Start System . 158
STOP/START SYSTEM — DIESEL MODELS ONLY . . 158Automatic Mode................. 159
Possible Reasons The Engine Does Not
Autostop...................... 159
To Start The Engine While In Autostop
Mode........................ 160
To Manually Turn Off The Stop/Start
System....................... 160
To Manually Turn On The Stop/Start System . 161
SPEED CONTROL.................... 161To Activate.................... 161
To Set A Desired Speed............. 162
To Resume Speed................ 162
To Deactivate................... 162
7
Page 10 of 344
ADAPTIVE CRUISE CONTROL (ACC) — IF
EQUIPPED....................... 162
Activating Adaptive Cruise Control (ACC) . . 163
To Set A Desired ACC Speed.......... 164
Resume...................... 164
To Vary The Speed Setting........... 164
Setting The Following Distance In ACC.... 166
PARKSENSE REAR PARK ASSIST — IF EQUIPPED . . 166ParkSense Sensors................ 166
ParkSense Warning Display........... 166
Enabling And Disabling ParkSense...... 166
ParkSense System Usage Precautions.... 167
PARKSENSE FRONT AND REAR PARK ASSIST — IF
EQUIPPED....................... 168
ParkSense Sensors................ 168
Enabling And Disabling ParkSense...... 169
Operation With A Trailer............. 169
PARKSENSE ACTIVE PARK ASSIST SYSTEM — IF
EQUIPPED....................... 169
LANESENSE...................... 170
LaneSense Operation.............. 170
Turning LaneSense On Or Off......... 170
LaneSense Warning Message.......... 171
Changing LaneSense Status.......... 172
PARKVIEW REAR BACK UP CAMERA — IF
EQUIPPED....................... 173
REFUELING THE VEHICLE............... 173
REFUELING THE VEHICLE — DIESEL ENGINE.... 175
AdBlue (UREA) — If Equipped........ 176
TRAILER TOWING................... 181Trailer Towing Weights (Maximum Trailer Weight
Ratings)...................... 181
RECREATIONAL TOWING (BEHIND MOTORHOME,
ETC.).......................... 182
Towing This Vehicle Behind Another
Vehicle....................... 182
Recreational Towing — Front-Wheel Drive (FWD)
Models...................... 183
Recreational Towing — 4x4 Models...... 183
IN CASE OF EMERGENCY
HAZARD WARNING FLASHERS............ 184
BULB REPLACEMENT................. 184
Replacement Bulbs............... 184
Replacing Exterior Bulbs............ 185
FUSES......................... 185General Information............... 186
Underhood Fuses................ 186
Interior Fuses................... 195
JACKING AND TIRE CHANGING............ 196Jack Location/Spare Tire Stowage....... 196
Preparations For Jacking............ 197
Jacking Instructions............... 197
Road Tire Installation.............. 200
Declaration Of Conformance.......... 200
Jack Usage Precautions............ 203
TIRE SERVICE KIT — IF EQUIPPED.......... 204Tire Service Kit Storage............. 204
Tire Service Kit Components And Operation . 204
Tire Service Kit Usage Precautions...... 205
Sealing A Tire With Tire Service Kit...... 206
JUMP STARTING.................... 209Preparations For Jump Start.......... 210
Jump Starting Procedure............ 211
REFUELING IN EMERGENCY.............. 212Emergency Fuel Filler Door Release..... 212
IF YOUR ENGINE OVERHEATS............. 212
GEAR SELECTOR OVERRIDE.............. 213
FREEING A STUCK VEHICLE.............. 213
TOWING A DISABLED VEHICLE............ 214
Without The Key Fob.............. 215
Front-Wheel Drive (FWD) Models....... 215
4x4 Models.................... 216
Recovery Strap — If Equipped......... 216
ENHANCED ACCIDENT RESPONSE SYSTEM (EARS) . 217
EVENT DATA RECORDER (EDR)............ 217
SERVICING AND MAINTENANCE
SCHEDULED SERVICING................ 218Scheduled Servicing — Gasoline Engine . . . 218
Scheduled Servicing — Diesel Engine.... 222
ENGINE COMPARTMENT............... 2272.0L Engine.................... 227
2.4L Engine.................... 228
3.2L Engine.................... 229
2.2L Diesel Engine............... 230
Checking Oil Level................ 231
Cooling System.................. 231
Adding Washer Fluid.............. 232
Brake System.................. 232
Manual Transmission — If Equipped..... 233
Automatic Transmission............ 234
Maintenance-Free Battery........... 234
DEALER SERVICE................... 235Windshield Wiper Blades............ 235
TABLE OF CONTENTS
8
Page 17 of 344
rity alarm will arm. To change the current
setting, refer to "Uconnect Settings" in "Mul-
timedia" in the Owner’s Manual for further
information.
To Lock The Doors And Liftgate
Push and release the lock button on the key
fob to lock all doors and liftgate.
Vehicles Equipped With Keyless Enter-N-Go —
Passive Entry
If one or more doors are open, or the liftgate is
open, the doors will lock. The doors will
unlock again automatically if the key is left
inside the passenger compartment, otherwise
the doors will stay locked.
Request For Additional Key Fobs
NOTE:
Only key fobs that are programmed to the
vehicle electronics can be used to start and
operate the vehicle. Once a key fob is pro-
grammed to a vehicle, it cannot be pro-
grammed to any other vehicle.
WARNING!
• Always remove the key fobs from the
vehicle and lock all doors when leaving
the vehicle unattended.
• For vehicles equipped with Keyless
Enter-N-Go — Ignition, always remem-
ber to place the ignition in the OFF
mode.
NOTE:
Used batteries may be harmful to the envi-
ronment if not disposed of correctly. Always
dispose of used batteries by specialized bat-
tery disposal container, or by taking used
batteries to an authorized dealer.
Duplication of key fobs may be performed at
an authorized dealer. This procedure consists
of programming a blank key fob to the vehicle
electronics. A blank key fob is one that has
never been programmed.
NOTE:
When having the Sentry Key Immobilizer Sys-
tem serviced, bring all vehicle keys with you
to an authorized dealer.
IGNITION SWITCH
Ignition Node Module (IGNM) — If
Equipped
The Ignition Node Module (IGNM) operates
similar to an ignition switch. It has four
operating positions, three with detents and
one that is spring-loaded. The detent posi-
tions are OFF, ACC, and ON/RUN. The START
position is a spring-loaded momentary con-
tact position. When released from the START
position, the switch automatically returns to
the ON/RUN position.
15
Page 18 of 344
WARNING!
Never remove the mechanical key while
the vehicle is moving, as the steering
wheel will automatically lock as soon as
WARNING!
the key is turned. This also applies to
vehicles that are being towed.
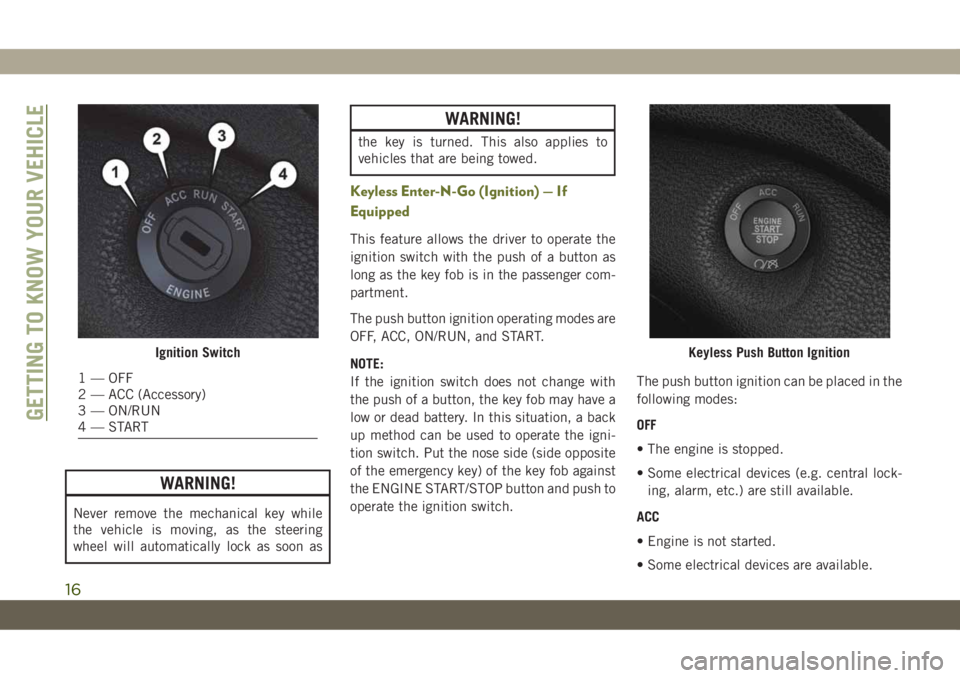
Keyless Enter-N-Go (Ignition) — If
Equipped
This feature allows the driver to operate the
ignition switch with the push of a button as
long as the key fob is in the passenger com-
partment.
The push button ignition operating modes are
OFF, ACC, ON/RUN, and START.
NOTE:
If the ignition switch does not change with
the push of a button, the key fob may have a
low or dead battery. In this situation, a back
up method can be used to operate the igni-
tion switch. Put the nose side (side opposite
of the emergency key) of the key fob against
the ENGINE START/STOP button and push to
operate the ignition switch.The push button ignition can be placed in the
following modes:
OFF
• The engine is stopped.
• Some electrical devices (e.g. central lock-
ing, alarm, etc.) are still available.
ACC
• Engine is not started.
• Some electrical devices are available.
Ignition Switch
1 — OFF
2 — ACC (Accessory)
3 — ON/RUN
4—START
Keyless Push Button Ignition
GETTING TO KNOW YOUR VEHICLE
16
Page 19 of 344
ON/RUN
• Driving position.
• All the electrical devices are available.
START
• Start the engine.
NOTE:
The vehicle will not start if the key fob is
located inside the cargo area and the liftgate
is opened.
WARNING!
• When exiting the vehicle, always remove
the key fob from the vehicle and lock
your vehicle.
• Never leave children alone in a vehicle,
or with access to an unlocked vehicle.
• Allowing children to be in a vehicle un-
attended is dangerous for a number of
reasons. A child or others could be seri-
ously or fatally injured. Children should
be warned not to touch the parking
brake, brake pedal or the gear selector.
• Do not leave the key fob in or near the
vehicle, or in a location accessible to
WARNING!
children, and do not leave the ignition of
a vehicle equipped with Keyless Enter-
N-Go in the ON/RUN mode. A child
could operate power windows, other con-
trols, or move the vehicle.
• Do not leave children or animals inside
parked vehicles in hot weather. Interior
heat build-up may cause serious injury
or death.
CAUTION!
An unlocked vehicle is an invitation for
thieves. Always remove key fob from the
vehicle and lock all doors when leaving the
vehicle unattended.
NOTE:
For further information, refer to "Starting The
Engine" in "Starting And Operating."
REMOTE STARTING
SYSTEM — IF EQUIPPED
Push the remote start button on the key fob
twice within five seconds. Pushing the re-
mote start button a third time shuts the
engine off.
To drive the vehicle, push the START/STOP
button to turn the ignition to the ON/RUN
mode.
NOTE:
• With remote start, the engine will only run
for 15 minutes (timeout) unless the igni-
tion is placed in the ON/RUN mode.
• The vehicle must be started with the key
after two consecutive timeouts.
How To Use Remote Start
Push the remote start button on the key fob
twice within five seconds. Pushing the re-
mote start button a third time shuts the
engine off.
17
Page 20 of 344
To drive the vehicle, push the unlock button,
insert the key in the ignition and turn to the
ON/RUN position.
NOTE:
• With remote start, the engine will only run
for 15 minutes (timeout) unless the igni-
tion key is placed in the ON/RUN position.
• The vehicle must be started with the key
after two consecutive timeouts.
All of the following conditions must be met
before the engine will remote start:
• Gear selector in PARK
• Doors closed
• Hood closed
• Liftgate closed
• Hazard switch off
• Brake switch inactive (brake pedal not
pushed)
• Battery at an acceptable charge level
• Check engine light shall not be present• System not disabled from previous remote
start event
• Vehicle alarm system indicator flashing
• Ignition in STOP/OFF position
• Fuel level meets minimum requirement
• Vehicle security alarm is not signaling an
intrusion
WARNING!
• Do not start or run an engine in a closed
garage or confined area. Exhaust gas
contains Carbon Monoxide (CO) which is
odorless and colorless. Carbon Monox-
ide is poisonous and can cause serious
injury or death when inhaled.
• Keep key fobs away from children. Op-
eration of the Remote Start System, win-
dows, door locks or other controls could
cause serious injury or death.
To Enter Remote Start Mode
Push and release the remote start button on
the key fob twice within five seconds. The
vehicle doors will lock, the parking lights will
flash, and the horn will chirp twice (if pro-
grammed). Then, the engine will start, and
the vehicle will remain in the Remote Start
mode for a 15-minute cycle.
NOTE:
• If an engine fault is present or fuel level is
low, the vehicle will start and then shut
down in 10 seconds.
• The park lamps will turn on and remain on
during Remote Start mode.
• For security, power window and power sun-
roof operation (if equipped) are disabled
when the vehicle is in the Remote Start
mode.
• The engine can be started two consecutive
times with the key fob. However, the igni-
tion must be cycled by pushing the START/
STOP button twice (or the ignition switch
must be cycled to the ON/RUN position)
before you can repeat the start sequence
for a third cycle.
GETTING TO KNOW YOUR VEHICLE
18
Page 25 of 344
• If Passive Entry is disabled using the
Uconnect System, the key protection de-
scribed in "Preventing Inadvertent Locking
of Passive Entry key fob in Vehicle" remains
active/functional.
• The Passive Entry system will not operate if
the key fob battery is dead.
The vehicle doors can also be locked by using
the lock button located on the vehicle’s inte-
rior door panel.
Locking The Doors With One Or More
Doors Open
If the door lock switch is pushed while the
ignition is in ACC or ON/RUN and the driver's
door is open, the doors will not lock.
SEATS
Seats are a part of the Occupant Restraint
System of the vehicle.
WARNING!
• It is dangerous to ride in a cargo area,
inside or outside of a vehicle. In a colli-
WARNING!
sion, people riding in these areas are
more likely to be seriously injured or
killed.
• Do not allow people to ride in any area of
your vehicle that is not equipped with
seats and seat belts. In a collision,
people riding in these areas are more
likely to be seriously injured or killed.
• Be sure everyone in your vehicle is in a
seat and using a seat belt properly.
Manual Adjustment (Rear Seats)
WARNING!
Do not pile luggage or cargo higher than
the top of the seatback. This could impair
visibility or become a dangerous projectile
in a sudden stop or collision.
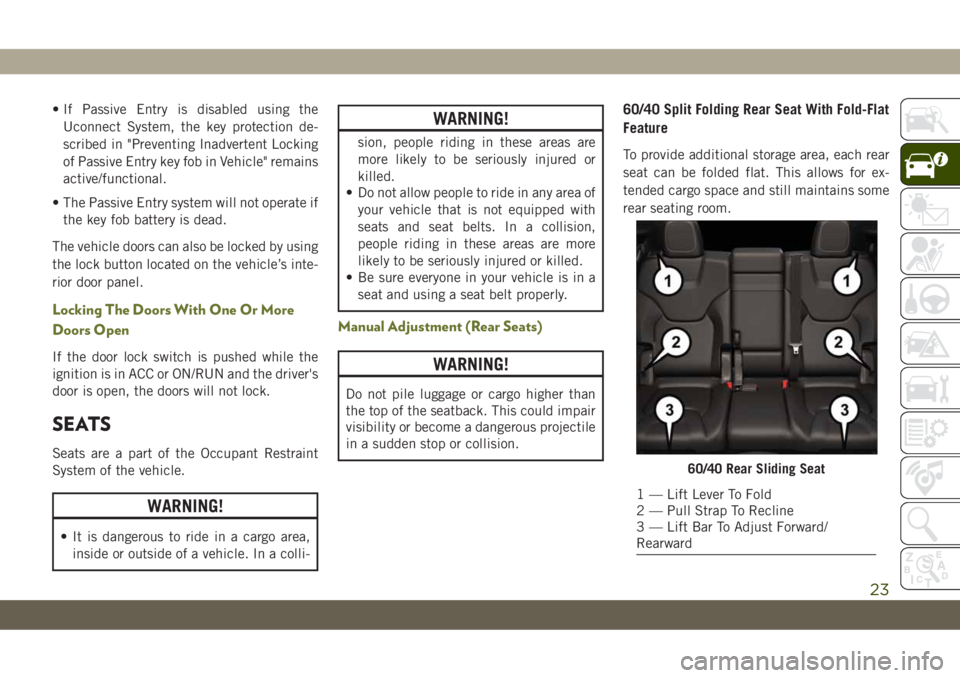
60/40 Split Folding Rear Seat With Fold-Flat
Feature
To provide additional storage area, each rear
seat can be folded flat. This allows for ex-
tended cargo space and still maintains some
rear seating room.
60/40 Rear Sliding Seat
1 — Lift Lever To Fold
2 — Pull Strap To Recline
3 — Lift Bar To Adjust Forward/
Rearward
23