manual radio set JEEP CHEROKEE 2019 Owner handbook (in English)
[x] Cancel search | Manufacturer: JEEP, Model Year: 2019, Model line: CHEROKEE, Model: JEEP CHEROKEE 2019Pages: 344, PDF Size: 6.35 MB
Page 27 of 344
Driver Memory Seat — If Equipped
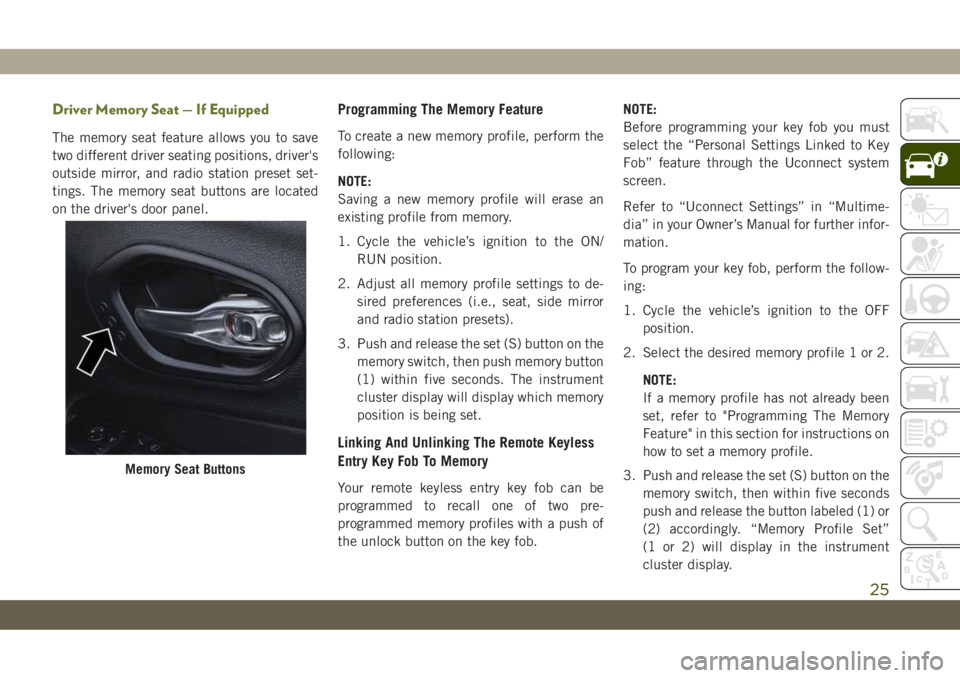
The memory seat feature allows you to save
two different driver seating positions, driver's
outside mirror, and radio station preset set-
tings. The memory seat buttons are located
on the driver's door panel.
Programming The Memory Feature
To create a new memory profile, perform the
following:
NOTE:
Saving a new memory profile will erase an
existing profile from memory.
1. Cycle the vehicle’s ignition to the ON/
RUN position.
2. Adjust all memory profile settings to de-
sired preferences (i.e., seat, side mirror
and radio station presets).
3. Push and release the set (S) button on the
memory switch, then push memory button
(1) within five seconds. The instrument
cluster display will display which memory
position is being set.
Linking And Unlinking The Remote Keyless
Entry Key Fob To Memory
Your remote keyless entry key fob can be
programmed to recall one of two pre-
programmed memory profiles with a push of
the unlock button on the key fob.NOTE:
Before programming your key fob you must
select the “Personal Settings Linked to Key
Fob” feature through the Uconnect system
screen.
Refer to “Uconnect Settings” in “Multime-
dia” in your Owner’s Manual for further infor-
mation.
To program your key fob, perform the follow-
ing:
1. Cycle the vehicle’s ignition to the OFF
position.
2. Select the desired memory profile 1 or 2.
NOTE:
If a memory profile has not already been
set, refer to "Programming The Memory
Feature" in this section for instructions on
how to set a memory profile.
3. Push and release the set (S) button on the
memory switch, then within five seconds
push and release the button labeled (1) or
(2) accordingly. “Memory Profile Set”
(1 or 2) will display in the instrument
cluster display.
Memory Seat Buttons
25
Page 59 of 344
NOTE:
Activation zone is the same for vehicles
equipped with and without trailer tow package.
When a valid kicking motion is completed,
the liftgate will chime, the hazard lights will
flash and the liftgate will open after approxi-
mately one second, or close after approxi-
mately three seconds. This assumes all op-
tions are enabled in the radio.
NOTE:
• Opening or closing the Hands-Free Liftgate
requires a valid Passive Entry key fob within
5 ft (1.5 m) of the door handle. If a valid
Passive Entry key fob is not within 5 ft
(1.5 m), the liftgate will not respond to any
kicks.
• The Hands-Free Liftgate feature may be
turned on or off in Uconnect Settings. Refer
to “Uconnect Settings” in “Multimedia” in
the Owner’s Manual for further information.
The Hands-Free Liftgate feature should be
turned off during Jacking, Tire Changing,
Manual Car Wash, and Vehicle Service.NOTE:
The Hands-free liftgate feature can be acti-
vated by any metallic object making a similar
in-and-out motion under the rear bumper,
such as cleaning using a metal broom.
NOTE:
• The Hands-Free Liftgate will only operate
when the transmission is in PARK.
• If anything obstructs the Hands-Free lift-
gate while it is opening or closing, the
liftgate will automatically reverse to the
closed/open position, provided it meets
sufficient resistance.
• There are pinch sensors attached to the
side of the liftgate opening. Light pressure
anywhere along these strips will cause the
liftgate to return to the open position.
• If the power liftgate encounters multiple
obstructions within the same cycle, the
system will automatically stop. If this oc-
curs, the liftgate must be operated manu-
ally.• The power liftgate will release, but not
power open, in temperatures below −12° F
(−24° C). Be sure to remove any buildup of
snow or ice from the liftgate before opening
the liftgate.
• If the liftgate is left open for an extended
period of time, the liftgate may need to be
closed manually to reset power liftgate
functionality.
WARNING!
• Driving with the liftgate open can allow
poisonous exhaust gases into your ve-
hicle. You and your passengers could be
injured by these fumes. Keep the liftgate
closed when you are operating the ve-
hicle.
• If you are required to drive with the
liftgate open, make sure that all win-
dows are closed, and the climate control
blower switch is set at high speed. Do
not use the recirculation mode.
57
Page 93 of 344
WARNING!
other vehicles, obstructions, and blind
spots before backing up. Failure to do so
can result in serious injury or death.
Modes Of Operation
Three selectable modes of operation are
available in the Uconnect System. Refer to
“Uconnect Settings” in “Multimedia” in the
Owner’s Manual for further information.
Blind Spot Alert Lights Only
When operating in Blind Spot Alert mode, the
BSM system will provide a visual alert in the
appropriate side view mirror based on a de-
tected object. However, when the system is
operating in Rear Cross Path (RCP) mode, the
system will respond with both visual and
audible alerts when a detected object is pres-
ent. Whenever an audible alert is requested,
the radio is muted.
Blind Spot Alert Lights/Chime
When operating in Blind Spot Alert Lights/
Chime mode, the BSM system will provide a
visual alert in the appropriate side view mirrorbased on a detected object. If the turn signal
is then activated, and it corresponds to an
alert present on that side of the vehicle, an
audible chime will also be sounded. When-
ever a turn signal and detected object are
present on the same side at the same time,
both the visual and audible alerts will be
issued. In addition to the audible alert the
radio (if on) will also be muted.
NOTE:
Whenever an audible alert is requested by the
BSM system, the radio is also muted.
When the system is in RCP, the system shall
respond with both visual and audible alerts
when a detected object is present. Whenever
an audible alert is requested, the radio is also
muted. Turn/hazard signal status is ignored;
the RCP state always requests the chime.
Blind Spot Alert Off
When the BSM system is turned off there will
be no visual or audible alerts from either the
BSM or RCP systems.NOTE:
The BSM system will store the current oper-
ating mode when the vehicle is shut off. Each
time the vehicle is started the previously
stored mode will be recalled and used.
Forward Collision Warning (FCW) With
Mitigation — If Equipped
Forward Collision Warning (FCW) With Miti-
gation Operation
The Forward Collision Warning (FCW) system
with mitigation provides the driver with au-
dible warnings, visual warnings (within the
instrument cluster display), and may apply a
brake jerk to warn the driver when it detects a
potential frontal collision. The warnings and
limited braking are intended to provide the
driver with enough time to react, avoid or
mitigate the potential collision.
NOTE:
FCW monitors the information from the for-
ward looking sensors as well as the Electronic
Brake Controller (EBC), to calculate the prob-
ability of a forward collision. When the sys-
91
Page 272 of 344
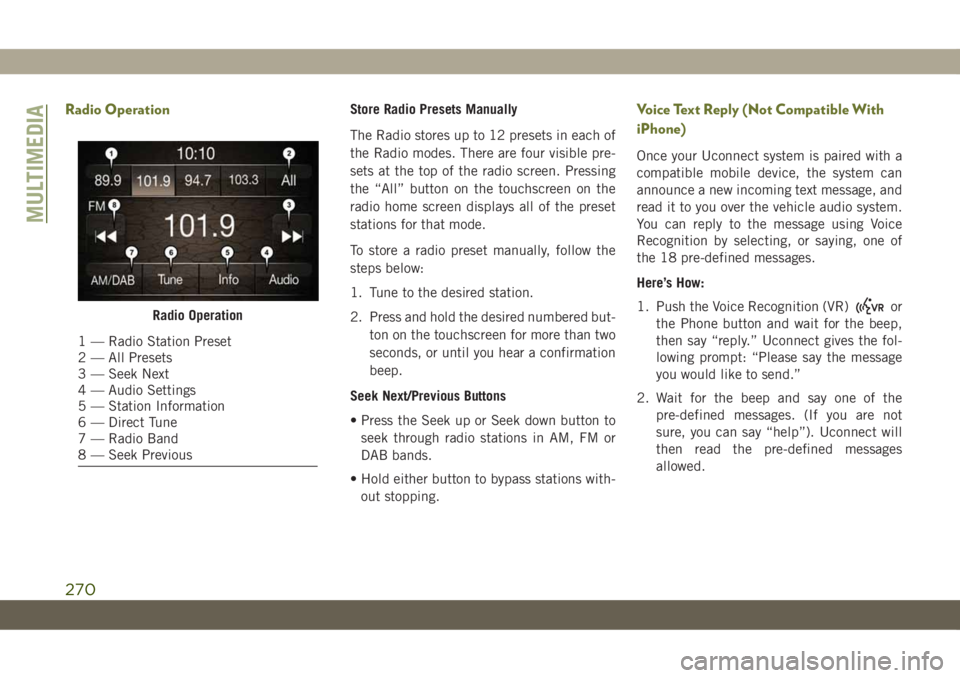
Radio OperationStore Radio Presets Manually
The Radio stores up to 12 presets in each of
the Radio modes. There are four visible pre-
sets at the top of the radio screen. Pressing
the “All” button on the touchscreen on the
radio home screen displays all of the preset
stations for that mode.
To store a radio preset manually, follow the
steps below:
1. Tune to the desired station.
2. Press and hold the desired numbered but-
ton on the touchscreen for more than two
seconds, or until you hear a confirmation
beep.
Seek Next/Previous Buttons
• Press the Seek up or Seek down button to
seek through radio stations in AM, FM or
DAB bands.
• Hold either button to bypass stations with-
out stopping.Voice Text Reply (Not Compatible With
iPhone)
Once your Uconnect system is paired with a
compatible mobile device, the system can
announce a new incoming text message, and
read it to you over the vehicle audio system.
You can reply to the message using Voice
Recognition by selecting, or saying, one of
the 18 pre-defined messages.
Here’s How:
1. Push the Voice Recognition (VR)
or
the Phone button and wait for the beep,
then say “reply.” Uconnect gives the fol-
lowing prompt: “Please say the message
you would like to send.”
2. Wait for the beep and say one of the
pre-defined messages. (If you are not
sure, you can say “help”). Uconnect will
then read the pre-defined messages
allowed.Radio Operation
1 — Radio Station Preset
2 — All Presets
3 — Seek Next
4 — Audio Settings
5 — Station Information
6 — Direct Tune
7 — Radio Band
8 — Seek Previous
MULTIMEDIA
270
Page 277 of 344
WARNING!
ALWAYS drive safely with your hands on
the wheel. You have full responsibility and
assume all risks related to the use of the
Uconnect features and applications in this
vehicle. Only use Uconnect when it is safe
to do so. Failure to do so may result in an
accident involving serious injury or death.
• To access the Radio mode, press the “Ra-
dio” button on the touchscreen.
Selecting Radio Stations
• Press the desired radio band (AM, FM or
DAB) button on the touchscreen.
Seek Up/Seek Down
• Press the Seek up or down arrow buttons on
the touchscreen for less than two seconds
to seek through radio stations.
• Press and hold either arrow button on the
touchscreen for more than two seconds to
bypass stations without stopping. The radio
will stop at the next listenable station once
the arrow button on the touchscreen is
released.Direct Tune
• Tune directly to a radio station by pressing
the “Tune” button on the screen, and en-
tering the desired station number.
Store Radio Presets Manually
Your radio can store 36 total preset stations,
12 presets per band (AM, FM and DAB). They
are shown at the top of your radio screen. To
see the 12 preset stations per band, press the
arrow button on the touchscreen at the top
right of the screen to toggle between the two
sets of six presets.
To store a radio preset manually, follow the
steps below:
1. Tune to the desired station.
2. Press and hold the desired numbered but-
ton on the touchscreen for more than two
seconds or until you hear a confirmation
beep.
Android Auto — If Equipped
NOTE:
Feature availability depends on your carrier
and mobile phone manufacturer. Some
Android Auto features may or may not be
available in every region and/or language.
Android Auto is a feature of your Uconnect
system, and your Android 5.0 Lollipop, or
higher, powered smartphone with a data plan,
that allows you to project your smartphone
and a number of its apps onto the touch-
screen radio display. Android Auto automati-
cally brings you useful information, and orga-
nizes it into simple cards that appear just
when they are needed. Android Auto can be
used with Google's best-in-class speech tech-
nology, the steering wheel controls, the knobs
and buttons on your radio faceplate, and the
radio display’s touchscreen to control many
of your apps. To use Android Auto follow the
following steps:
1. Download the Android Auto app from the
Google Play store on your Android-
powered smartphone.
275
Page 280 of 344
• TuneIn
• Deezer
• Reuters
• Twitter
• Facebook Check-In
• Apple CarPlay
• Android Auto, and many more.
UCONNECT 4C/4C NAV
WITH 8.4-INCH DISPLAY
Uconnect 4C/4C NAV At A Glance
WARNING!
ALWAYS drive safely with your hands on
the wheel. You have full responsibility and
assume all risks related to the use of the
Uconnect features including DAB, and ap-
plications in this vehicle. Only use
Uconnect features and services when it is
safe to do so. Failure to do so may result in
an accident involving serious injury or
death.
CAUTION!
Do NOT attach any object to the touch-
screen, doing so can result in damage to
the screen.
NOTE:
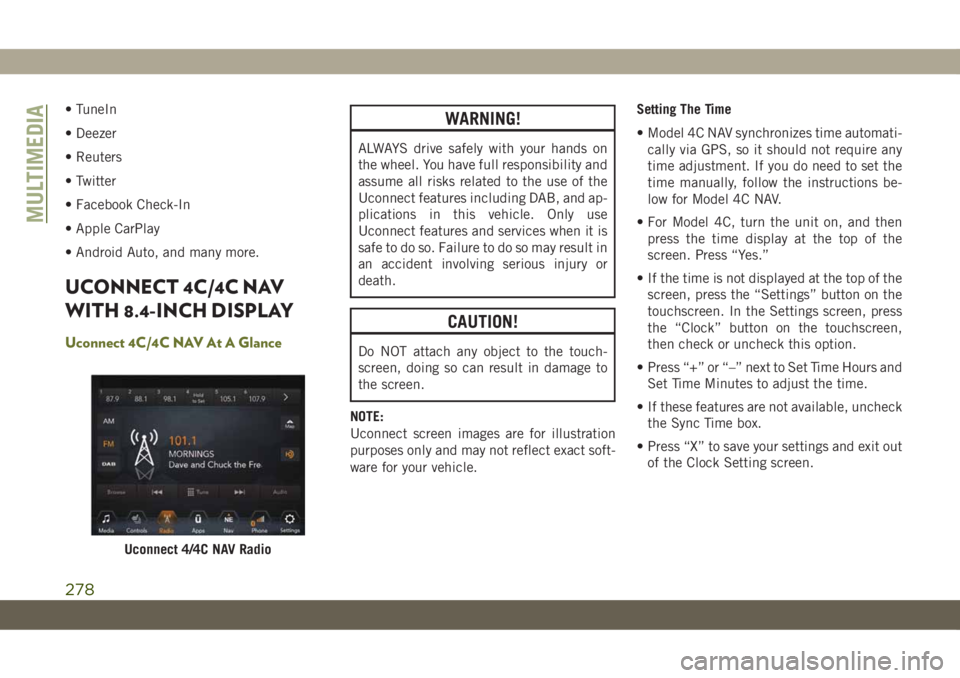
Uconnect screen images are for illustration
purposes only and may not reflect exact soft-
ware for your vehicle.Setting The Time
• Model 4C NAV synchronizes time automati-
cally via GPS, so it should not require any
time adjustment. If you do need to set the
time manually, follow the instructions be-
low for Model 4C NAV.
• For Model 4C, turn the unit on, and then
press the time display at the top of the
screen. Press “Yes.”
• If the time is not displayed at the top of the
screen, press the “Settings” button on the
touchscreen. In the Settings screen, press
the “Clock” button on the touchscreen,
then check or uncheck this option.
• Press “+” or “–” next to Set Time Hours and
Set Time Minutes to adjust the time.
• If these features are not available, uncheck
the Sync Time box.
• Press “X” to save your settings and exit out
of the Clock Setting screen.
Uconnect 4/4C NAV Radio
MULTIMEDIA
278
Page 283 of 344
WARNING!
ALWAYS drive safely with your hands on
the wheel. You have full responsibility and
assume all risks related to the use of the
Uconnect features and applications in this
vehicle. Only use Uconnect when it is safe
to do so. Failure to do so may result in an
accident involving serious injury or death.
• To access the Radio mode, press the “Ra-
dio” button on the touchscreen.
Selecting Radio Stations
• Press the desired radio band (AM, FM or
DAB) button on the touchscreen.
Seek Up/Seek Down
• Press the Seek up or down arrow buttons on
the touchscreen for less than two seconds
to seek through radio stations.
• Press and hold either arrow button on the
touchscreen for more than two seconds to
bypass stations without stopping. The radio
will stop at the next listenable station once
the arrow button on the touchscreen is
released.Direct Tune
• Tune directly to a radio station by pressing
the “Tune” button on the screen, and en-
tering the desired station number.
Store Radio Presets Manually
Your radio can store 36 total preset stations,
12 presets per band (AM, FM and DAB). They
are shown at the top of your radio screen. To
see the 12 preset stations per band, press the
arrow button on the touchscreen at the top
right of the screen to toggle between the two
sets of six presets.
To store a radio preset manually, follow the
steps below:
1. Tune to the desired station.
2. Press and hold the desired numbered but-
ton on the touchscreen for more than two
seconds or until you hear a confirmation
beep.
Android Auto — If Equipped
NOTE:
Feature availability depends on your carrier
and mobile phone manufacturer. Some
Android Auto features may or may not be
available in every region and/or language.
Android Auto is a feature of your Uconnect
system, and your Android 5.0 Lollipop, or
higher, powered smartphone with a data plan,
that allows you to project your smartphone
and a number of its apps onto the touch-
screen radio display. Android Auto automati-
cally brings you useful information, and orga-
nizes it into simple cards that appear just
when they are needed. Android Auto can be
used with Google's best-in-class speech tech-
nology, the steering wheel controls, the knobs
and buttons on your radio faceplate, and the
radio display’s touchscreen to control many
of your apps. To use Android Auto follow
these steps:
1. Download the Android Auto app from the
Google Play store on your Android-
powered smartphone.
281
Page 287 of 344
Apple CarPlay Integration — If Equipped
NOTE:
Feature availability depends on your carrier
and mobile phone manufacturer. Some Apple
CarPlay features may or may not be available
in every region and/or language.
Uconnect works seamlessly with Apple Car-
Play, the smarter, more secure way to use
your iPhone in the car, and stay focused on
the road. Use your Uconnect Touchscreen
display, the vehicle's knobs and controls, and
your voice with Siri to get access to Apple
Music, Maps, Messages, and more.
To use CarPlay, make sure you are using
iPhone 5 or later, have Siri enabled in Set-
tings, that your iPhone is unlocked for the
very first connection only, and then use the
following procedure:
1. Connect your iPhone to one of the media
USB ports in your vehicle.
NOTE:
Be sure to use the factory-provided Light-
ning cable that came with your phone, as
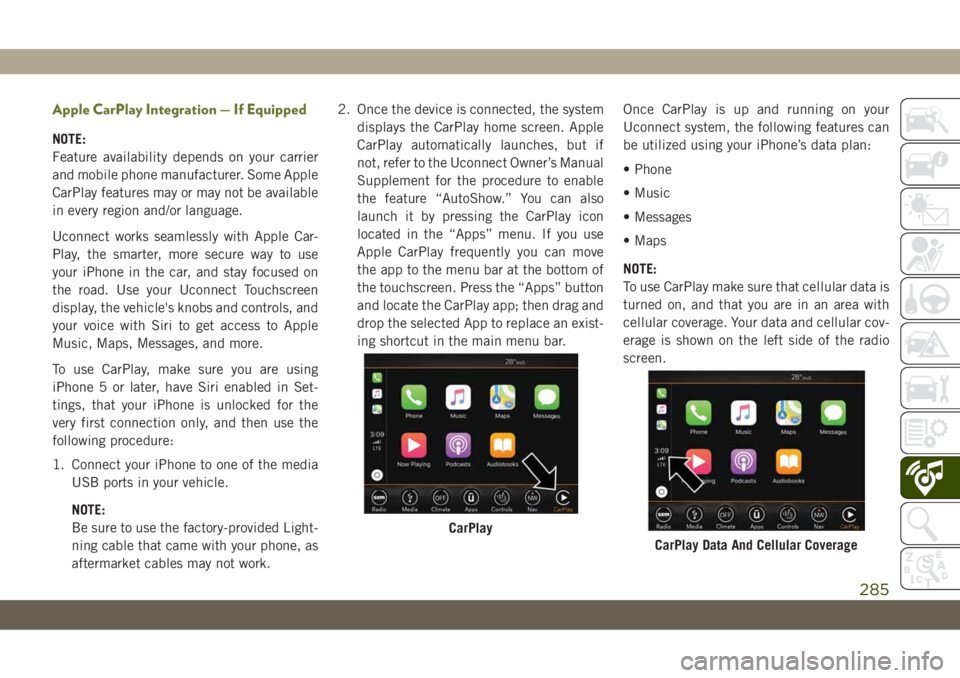
aftermarket cables may not work.2. Once the device is connected, the system
displays the CarPlay home screen. Apple
CarPlay automatically launches, but if
not, refer to the Uconnect Owner’s Manual
Supplement for the procedure to enable
the feature “AutoShow.” You can also
launch it by pressing the CarPlay icon
located in the “Apps” menu. If you use
Apple CarPlay frequently you can move
the app to the menu bar at the bottom of
the touchscreen. Press the “Apps” button
and locate the CarPlay app; then drag and
drop the selected App to replace an exist-
ing shortcut in the main menu bar.Once CarPlay is up and running on your
Uconnect system, the following features can
be utilized using your iPhone’s data plan:
• Phone
• Music
• Messages
• Maps
NOTE:
To use CarPlay make sure that cellular data is
turned on, and that you are in an area with
cellular coverage. Your data and cellular cov-
erage is shown on the left side of the radio
screen.
CarPlay
CarPlay Data And Cellular Coverage
285
Page 290 of 344
UCONNECT SETTINGS
The Uconnect system allows you to access
Customer Programmable feature settings
such as Display, Voice, Clock, Safety & Driv-
ing Assistance, Lights, Doors & Locks,
Auto-On Comfort, Engine Off Options, Sus-
pension, Compass Settings, Audio, Phone/
Bluetooth, Radio Setup, Restore Settings,
Clear Personal Data, and System Information
through buttons on the touchscreen.
Push the SETTINGS button (Uconnect 3), or
press the “Apps” button (Uconnect 4 or
4C/4C NAV) located near the bottom of the
touchscreen, then press the “Settings” but-
ton on the touchscreen to access the Settings
screen. When making a selection, scroll up or
down until the preferred setting is high-
lighted, then press the preferred setting until
a check-mark appears next to the setting,
showing that setting has been selected. The
following feature settings are available:
• Language • Engine Off Options
• Display • Compass — If
Equipped
• Units • Audio• Voice • Phone/Bluetooth
• Clock • Suspension — If
Equipped
• Camera — If
Equipped• AUX Switches
• Safety & Driving
Assistance• Restore Settings
• Brakes • Clear Personal Data
• Mirrors & Wipers —
If Equipped• System Information
• Lights • Radio Setup
• Doors & Locks
• Auto-On Comfort
NOTE:
Depending on the vehicles options, feature
settings may vary.
Refer to “Uconnect Settings” in “Multime-
dia” in your Owner’s Manual for further infor-
mation.
TIPS CONTROLS AND
GENERAL INFORMATION
Steering Wheel Audio Controls
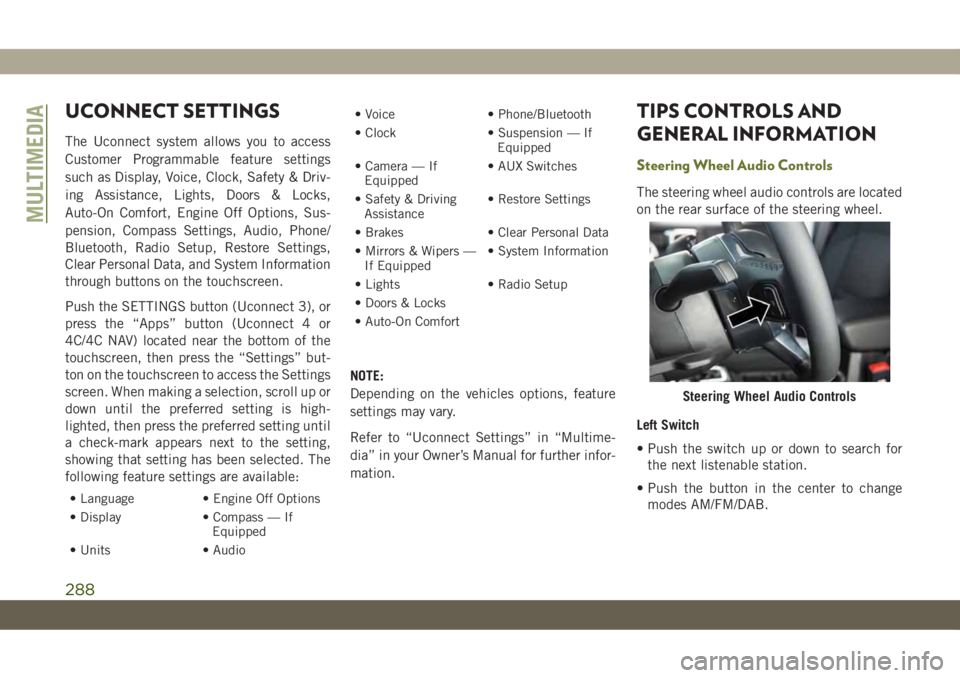
The steering wheel audio controls are located
on the rear surface of the steering wheel.
Left Switch
• Push the switch up or down to search for
the next listenable station.
• Push the button in the center to change
modes AM/FM/DAB.
Steering Wheel Audio Controls
MULTIMEDIA
288
Page 304 of 344
Mute (Or Unmute) Microphone During
Call
• During a call, press the “Mute” button on
the Phone main screen, that appears only
when a call is in progress, to mute and
unmute the call.
Transfer Ongoing Call Between Handset
And Vehicle
• During an on-going call, press the “Trans-
fer” button on the Phone main screen to
transfer an on-going call between handset
and vehicle.
Phonebook
The Uconnect system will automatically sync
your phonebook from your paired phone, if
this feature is supported by your phone.
Phonebook contacts are updated each time
that the phone is connected. Phonebook en-
tries are displayed in the Contacts menu. If
your phone book entries do not appear, check
the settings on your phone. Some phones
require you to enable this feature manually.• Your phonebook can be browsed on the
Uconnect system touchscreen, but editing
can only be done on your phone. To browse,
press the “Phone” button on the touch-
screen, then the “Phonebook” button on
the touchscreen.
Favorite phonebook entries can be saved as
Favorites for quicker access. Favorites are
shown in the Favorites menu.
Voice Command Tips
• Speaking complete names (i.e; Call John
Doe vs. Call John) will result in greater
system accuracy.
• You can “link” commands together for
faster results. Say “Call John Doe, mobile,”
for example.
• If you are listening to available voice com-
mand options, you do not have to listen to
the entire list. When you hear the command
that you need, push the
button on the
steering wheel, wait for the beep and say
your command.
Changing The Volume
• Start a dialogue by pushing the VR button
, then say a command. For example,
"Help".
• Use the radio VOLUME/MUTE rotary knob
to adjust the volume to a comfortable level
while the Uconnect system is speaking.
NOTE:
The volume setting for Uconnect is different
than the audio system.
NOTE:
To access help, push the VR button
on the
steering wheel and say "help." Push the VR
button
and say "cancel" to cancel the
help session.
Using Do Not Disturb
With Do Not Disturb, you can disable notifi-
cations from incoming calls and texts, allow-
ing you to keep your eyes on the road and
hands on the wheel. For your convenience,
there is a counter display to keep track of
your missed calls and text messages while
you were using Do Not Disturb.
MULTIMEDIA
302