steering JEEP CHEROKEE 2019 Owner handbook (in English)
[x] Cancel search | Manufacturer: JEEP, Model Year: 2019, Model line: CHEROKEE, Model: JEEP CHEROKEE 2019Pages: 344, PDF Size: 6.35 MB
Page 3 of 344
Congratulations on selecting your new FCA
vehicle. Be assured that it represents preci-
sion workmanship, distinctive styling, and
high quality.
ALWAYS drive safely and pay attention to the
road. ALWAYS drive safely with your hands on
the steering wheel. You have full responsibil-
ity and assume all risks related to the use of
the features and applications in this vehicle.
Only use the features and applications when
it is safe to do so. Failure to do so may result
in an accident involving serious injury or
death.
This guide illustrates and describes the op-
eration of features and equipment that are
either standard or optional on this vehicle.
This guide may also include a description of
features and equipment that are no longer
available or were not ordered on this vehicle.
Please disregard any features and equipment
described in this guide that are not available
on this vehicle. FCA reserves the right to
make changes in design and specifications
and/or make additions to or improvements to
its products without imposing any obligation
upon itself to install them on products previ-
ously manufactured.This User Guide has been prepared to help
you quickly become acquainted with the im-
portant features of your vehicle. It contains
most things you will need to operate and
maintain the vehicle, including emergency
information.
When it comes to service, remember that your
authorized dealer knows your Jeep
®vehicle
best, has factory-trained technicians and
genuine MOPAR
®parts, and cares about your
satisfaction.
HOW TO FIND YOUR
OWNER’S MANUAL ONLINE
This publication has been prepared as a ref-
erence item to help you quickly become ac-
quainted with the most important features
and processes of your vehicle. It contains
most things you will need to operate and
maintain the vehicle, including emergency
information and procedures.
This User Guide is not a replacement for the full
Owner’s Manual, and does not fully cover every
operation and procedure possible with your ve-
hicle.For more detailed descriptions of the topics
discussed in this User Guide, as well as
information covering features and processes
not covered in this User Guide, the full ve-
hicle Owner’s Manual can be accessed for
free online in a printer-friendly PDF format.
To get the full Owner’s Manual or applicable
supplement for your vehicle, follow the appro-
priate web address below:
www.mopar.eu/owneror alternatively, to ac-
cess this information, go to the Internet web-
site athttp://aftersales.fiat.com/elum/.
FCA is committed to protecting our environ-
ment and natural resources. By converting
from paper to electronic delivery for the ma-
jority of the user information for your vehicle,
together we greatly reduce the demand for
tree-based products and lessen the stress on
our environment.
1
Page 8 of 344
WELCOME FROM FCA
HOW TO FIND YOUR OWNER’S MANUAL ONLINE.... 1
HOW TO USE THIS MANUAL
HOW TO USE THIS MANUAL.............. 2Essential Information................ 2
Symbols........................ 2
ROLLOVER WARNING................... 2
IMPORTANT NOTICE................... 3
WARNINGS AND CAUTIONS............... 4
VEHICLE MODIFICATIONS/ALTERATIONS........ 4
GRAPHICAL TABLE OF CONTENTS
INSTRUMENT PANEL.................. 11
INTERIOR......................... 12
GETTING TO KNOW YOUR VEHICLE
KEYS........................... 13KeyFob ....................... 13
IGNITION SWITCH.................... 15Ignition Node Module (IGNM) — If
Equipped...................... 15
Keyless Enter-N-Go (Ignition) — If Equipped . 16
REMOTE STARTING SYSTEM — IF EQUIPPED.... 17How To Use Remote Start............ 17
To Enter Remote Start Mode........... 18
VEHICLE SECURITY ALARM — IF EQUIPPED..... 19To Arm The System................ 19
To Disarm The System.............. 19
DOORS.......................... 20Keyless Enter-N-Go — Passive Entry...... 20
Locking The Doors With One Or More Doors
Open......................... 23
SEATS .......................... 23Manual Adjustment (Rear Seats)........ 23
Driver Memory Seat — If Equipped....... 25
Heated Seats.................... 26
Front Ventilated Seats — If Equipped..... 28
HEAD RESTRAINTS................... 28Reactive Head Restraints — Front Seats . . . 28
Rear Head Restraints............... 29
STEERING WHEEL.................... 31Tilt/Telescoping Steering Column........ 31
Heated Steering Wheel — If Equipped..... 31
MIRRORS........................ 32Power Folding Mirrors — If Equipped..... 32
EXTERIOR LIGHTS................... 32Multifunction Lever................ 32
Headlight Switch.................. 33
Daytime Running Lights (DRL) — If
Equipped...................... 33
High/Low Beam Switch.............. 34
Automatic High Beam Headlamp Control — If
Equipped...................... 34
Flash-To-Pass................... 34
Automatic Headlights — If Equipped..... 34
Parking Lights................... 34
Headlights On With Wipers (Available With
Automatic Headlights Only)........... 35
Adaptive Bi-Xenon High Intensity Discharge
Headlights — If Equipped............ 35
Headlight Time Delay............... 35
Lights-On Reminder................ 35
Front And Rear Fog Lights — If Equipped . . . 36
Turn Signals.................... 36
Automatic Headlight Leveling — HID Headlights
Only......................... 36
Battery Saver.................... 36
WINDSHIELD WIPERS AND WASHERS......... 37Windshield Wiper Operation........... 37
Rain Sensing Wipers — If Equipped...... 38
Rear Window Wiper/Washer........... 39
CLIMATE CONTROLS................... 40Climate Controls With A Touchscreen
Overview....................... 40
Climate Control Functions............ 47
Automatic Temperature Control (ATC) — If
Equipped...................... 48
Operating Tips................... 48
WINDOWS........................ 49Power Window Controls.............. 49
Auto-Up Feature With Anti-Pinch Protection . 50
Window Lockout Switch............. 50
Wind Buffeting.................. 50
POWER SUNROOF WITH POWER SHADE — IF
EQUIPPED........................ 51
Opening Sunroof.................. 52
Venting Sunroof.................. 52
Closing Sunroof.................. 52
Opening Power Shade............... 52
Closing Power Shade............... 53
Pinch Protect Feature............... 53
Sunroof Maintenance............... 53
Ignition Off Operation............... 53
HOOD.......................... 53Opening The Hood................. 53
Closing The Hood................. 54
LIFTGATE......................... 54Opening....................... 54
Closing........................ 56
Hands-Free Liftgate — If Equipped...... 56
TABLE OF CONTENTS
6
Page 11 of 344
RAISING THE VEHICLE................. 239
TIRES.......................... 239
Tires — General Information......... 239
Tire Types..................... 244
Spare Tires — If Equipped........... 244
Wheel And Wheel Trim Care.......... 246
Tire Chains (Traction Devices)......... 247
Tire Rotation Recommendations........ 248
STORING THE VEHICLE................ 249
BODYWORK....................... 250
Preserving The Bodywork............ 250
INTERIORS....................... 251Seats And Fabric Parts............. 251
Plastic And Coated Parts............ 251
Leather Parts................... 252
Glass Surfaces.................. 252
TECHNICAL SPECIFICATIONS
VEHICLE IDENTIFICATION NUMBER.......... 253
WHEEL AND TIRE TORQUE SPECIFICATIONS.... 253
Torque Specifications.............. 254
FUEL REQUIREMENTS — GASOLINE ENGINE.... 254Methanol..................... 255
Ethanol....................... 255
Clean Air Gasoline................ 255
CNG And LP Fuel System Modifications . . . 255
MMT In Gasoline................. 256
Materials Added To Fuel............ 256
Fuel Icon Identification Compliant To
EN16942..................... 256
FUEL REQUIREMENTS — DIESEL ENGINE...... 258Fuel Icon Identification Compliant To
EN16942..................... 259
FLUID CAPACITIES................... 260
FLUIDS AND LUBRICANTS............... 262
Engine....................... 262
Chassis....................... 265
FUEL CONSUMPTION AND CO2EMISSIONS..... 265
MOPAR ACCESSORIES................. 265
Authentic Accessories By Mopar........ 265
MULTIMEDIA
CYBERSECURITY................... 267
UCONNECT 3 WITH 5–INCH DISPLAY — IF
EQUIPPED....................... 268
Uconnect 3 With 5–inch Display At A
Glance....................... 268
Clock Setting................... 269
Audio Setting................... 269
Radio Operation................. 270
Voice Text Reply
(Not Compatible With iPhone)........ 270
Apps — If Equipped............... 271
UCONNECT 4 WITH 7-INCH DISPLAY......... 272Uconnect 4 At A Glance............ 272
Drag & Drop Menu Bar............. 273
Radio....................... 274
Android Auto — If Equipped.......... 275
Apple CarPlay Integration — If Equipped . . 276
Apps — If Equipped............... 277
UCONNECT 4C/4C NAV WITH 8.4-INCH DISPLAY . . 278Uconnect 4C/4C NAV At A Glance...... 278
Drag & Drop Menu Bar............. 279
Radio....................... 280
Android Auto — If Equipped.......... 281
Apple CarPlay Integration — If Equipped . . 285
Apps — If Equipped............... 287
UCONNECT SETTINGS................ 288
TIPS CONTROLS AND GENERAL INFORMATION . . . 288
Steering Wheel Audio Controls........ 288
AUX/USB/MP3 CONTROL — IF EQUIPPED...... 289
NAVIGATION — IF EQUIPPED............. 290
Changing The Navigation Voice Prompt
Volume....................... 290
Finding Points Of Interest........... 292
Finding A Place By Spelling The Name . . . 292
One-Step Voice Destination Entry....... 292
Setting Your Home Location.......... 292
Home........................ 292
Adding A Stop.................. 294
Taking A Detour.................. 294
Map Update.................... 294
UCONNECT PHONE.................. 295Uconnect Phone (Bluetooth Hands Free
Calling)...................... 295
Pairing (Wirelessly Connecting) Your Mobile
Phone To The Uconnect System....... 298
Common Phone Commands (Examples) . . . 301
Mute (Or Unmute) Microphone During Call . 302
Transfer Ongoing Call Between Handset And
Vehicle...................... 302
Phonebook.................... 302
Voice Command Tips.............. 302
Changing The Volume.............. 302
Using Do Not Disturb.............. 302
Incoming Text Messages............ 303
Helpful Tips And Common Questions To Improve
Bluetooth Performance With Your Uconnect
System...................... 304
9
Page 13 of 344
INSTRUMENT PANEL
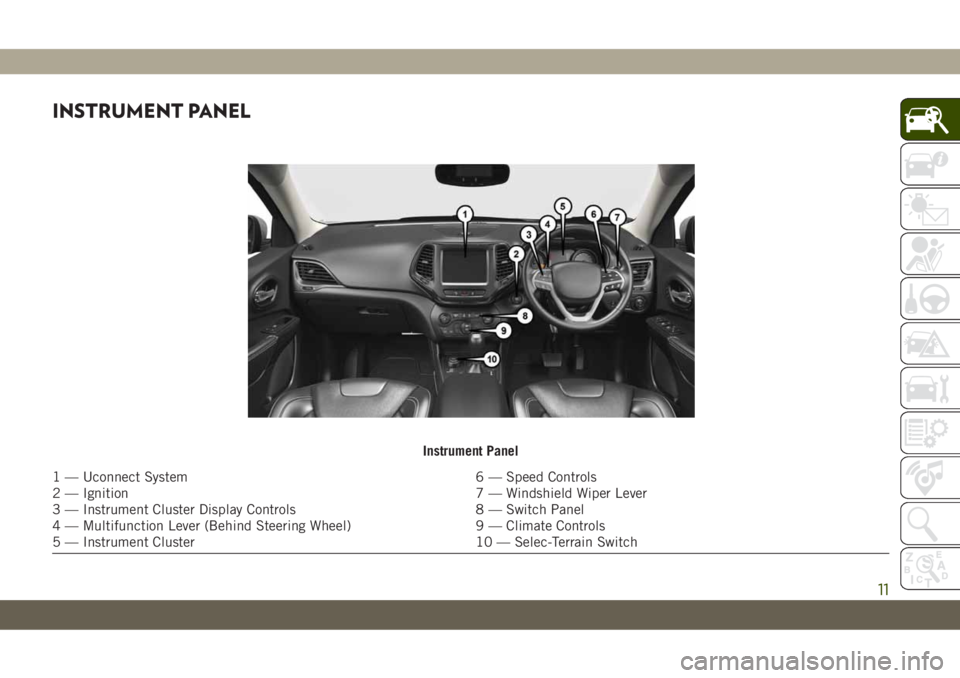
Instrument Panel
1 — Uconnect System 6 — Speed Controls
2 — Ignition 7 — Windshield Wiper Lever
3 — Instrument Cluster Display Controls 8 — Switch Panel
4 — Multifunction Lever (Behind Steering Wheel) 9 — Climate Controls
5 — Instrument Cluster 10 — Selec-Terrain Switch
11
Page 18 of 344
WARNING!
Never remove the mechanical key while
the vehicle is moving, as the steering
wheel will automatically lock as soon as
WARNING!
the key is turned. This also applies to
vehicles that are being towed.
Keyless Enter-N-Go (Ignition) — If
Equipped
This feature allows the driver to operate the
ignition switch with the push of a button as
long as the key fob is in the passenger com-
partment.
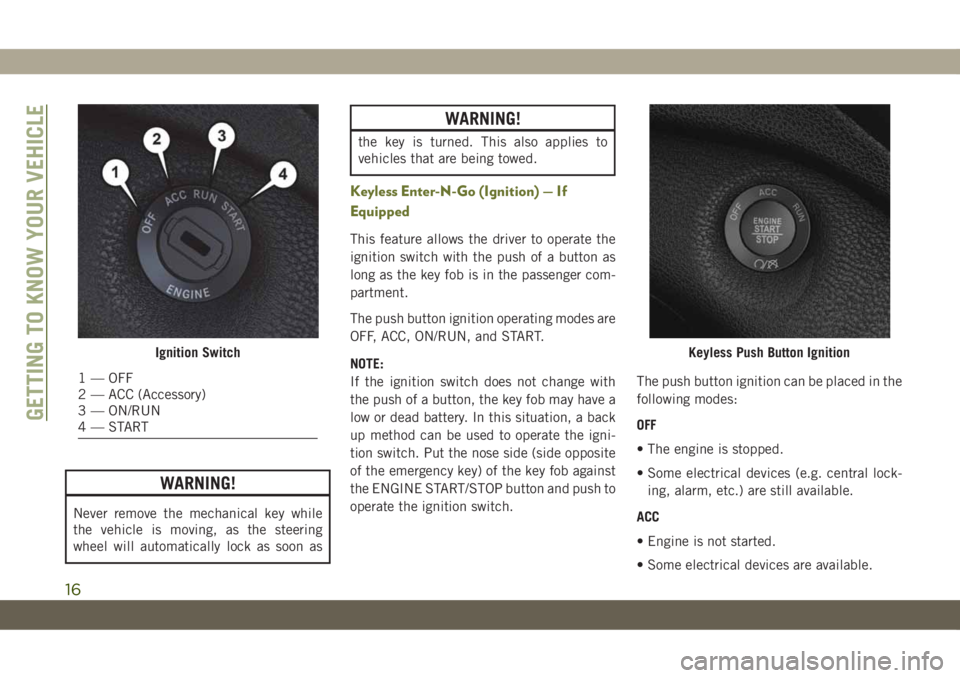
The push button ignition operating modes are
OFF, ACC, ON/RUN, and START.
NOTE:
If the ignition switch does not change with
the push of a button, the key fob may have a
low or dead battery. In this situation, a back
up method can be used to operate the igni-
tion switch. Put the nose side (side opposite
of the emergency key) of the key fob against
the ENGINE START/STOP button and push to
operate the ignition switch.The push button ignition can be placed in the
following modes:
OFF
• The engine is stopped.
• Some electrical devices (e.g. central lock-
ing, alarm, etc.) are still available.
ACC
• Engine is not started.
• Some electrical devices are available.
Ignition Switch
1 — OFF
2 — ACC (Accessory)
3 — ON/RUN
4—START
Keyless Push Button Ignition
GETTING TO KNOW YOUR VEHICLE
16
Page 33 of 344
STEERING WHEEL
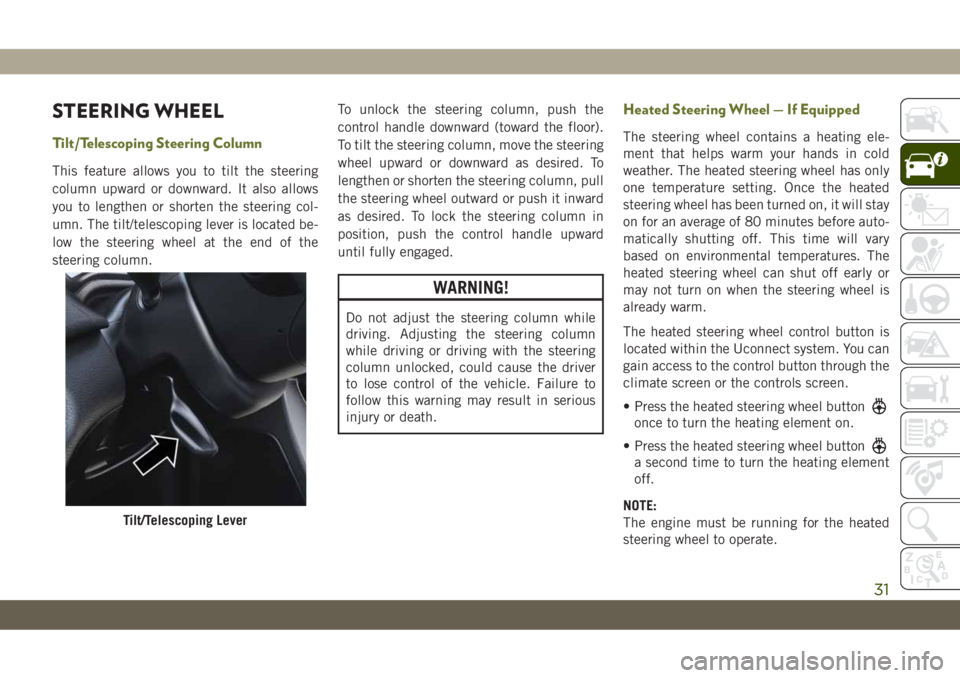
Tilt/Telescoping Steering Column
This feature allows you to tilt the steering
column upward or downward. It also allows
you to lengthen or shorten the steering col-
umn. The tilt/telescoping lever is located be-
low the steering wheel at the end of the
steering column.To unlock the steering column, push the
control handle downward (toward the floor).
To tilt the steering column, move the steering
wheel upward or downward as desired. To
lengthen or shorten the steering column, pull
the steering wheel outward or push it inward
as desired. To lock the steering column in
position, push the control handle upward
until fully engaged.
WARNING!
Do not adjust the steering column while
driving. Adjusting the steering column
while driving or driving with the steering
column unlocked, could cause the driver
to lose control of the vehicle. Failure to
follow this warning may result in serious
injury or death.
Heated Steering Wheel — If Equipped
The steering wheel contains a heating ele-
ment that helps warm your hands in cold
weather. The heated steering wheel has only
one temperature setting. Once the heated
steering wheel has been turned on, it will stay
on for an average of 80 minutes before auto-
matically shutting off. This time will vary
based on environmental temperatures. The
heated steering wheel can shut off early or
may not turn on when the steering wheel is
already warm.
The heated steering wheel control button is
located within the Uconnect system. You can
gain access to the control button through the
climate screen or the controls screen.
• Press the heated steering wheel button
once to turn the heating element on.
• Press the heated steering wheel button
a second time to turn the heating element
off.
NOTE:
The engine must be running for the heated
steering wheel to operate.
Tilt/Telescoping Lever
31
Page 34 of 344
Vehicles Equipped With Remote Start
On models that are equipped with remote
start, the heated steering wheel can be pro-
grammed to come on during a remote start
through the Uconnect system. Refer to
“Uconnect Settings” in “Multimedia” in the
Owner’s Manual for further information.
WARNING!
• Persons who are unable to feel pain to
the skin because of advanced age,
chronic illness, diabetes, spinal cord in-
jury, medication, alcohol use, exhaus-
tion, or other physical conditions must
exercise care when using the steering
wheel heater. It may cause burns even at
low temperatures, especially if used for
long periods.
• Do not place anything on the steering
wheel that insulates against heat, such
as a blanket or steering wheel covers of
any type and material. This may cause
the steering wheel heater to overheat.
MIRRORS
Power Folding Mirrors — If Equipped
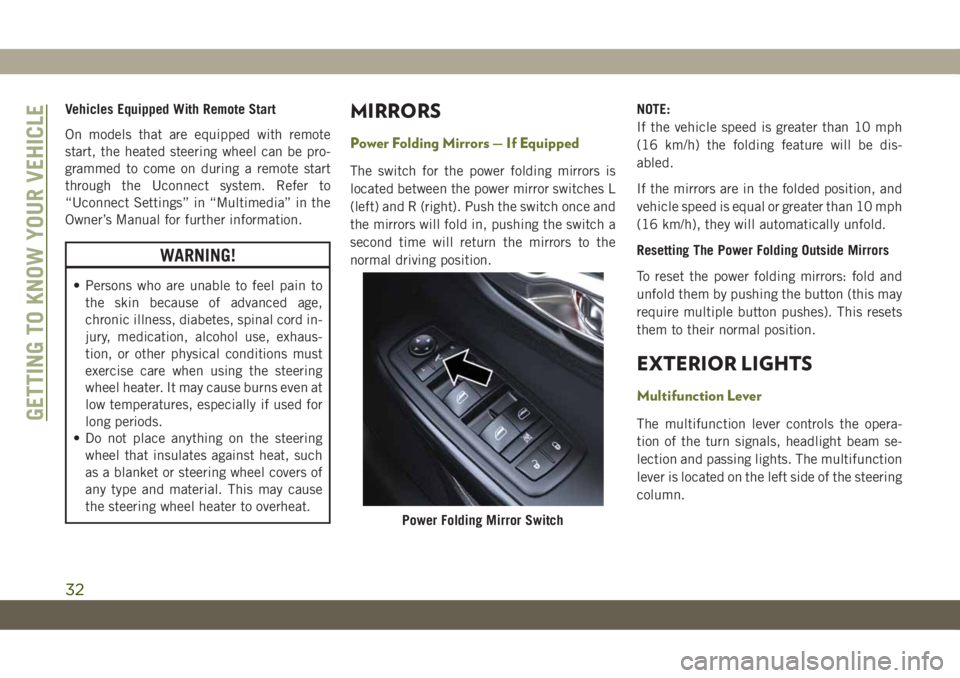
The switch for the power folding mirrors is
located between the power mirror switches L
(left) and R (right). Push the switch once and
the mirrors will fold in, pushing the switch a
second time will return the mirrors to the
normal driving position.NOTE:
If the vehicle speed is greater than 10 mph
(16 km/h) the folding feature will be dis-
abled.
If the mirrors are in the folded position, and
vehicle speed is equal or greater than 10 mph
(16 km/h), they will automatically unfold.
Resetting The Power Folding Outside Mirrors
To reset the power folding mirrors: fold and
unfold them by pushing the button (this may
require multiple button pushes). This resets
them to their normal position.
EXTERIOR LIGHTS
Multifunction Lever
The multifunction lever controls the opera-
tion of the turn signals, headlight beam se-
lection and passing lights. The multifunction
lever is located on the left side of the steering
column.
Power Folding Mirror Switch
GETTING TO KNOW YOUR VEHICLE
32
Page 36 of 344
High/Low Beam Switch
Push the multifunction lever, located on the
left side of the steering wheel, away from you
to switch the headlights to high beam. Pull
the multifunction lever toward you to switch
the headlights back to low beam.
Automatic High Beam Headlamp Control
— If Equipped
The Automatic High Beam Headlamp Control
system provides increased forward lighting at
night by automating high beam control
through the use of a digital camera mounted
on the inside rearview mirror. This camera
detects vehicle specific light and automati-
cally switches from high beams to low beams
until the approaching vehicle is out of view.NOTE:
• The multifunction lever must be in the high
beam position in order to activate the Au-
tomatic High Beams.
• The Automatic High Beam Headlamp Con-
trol can be turned on or off using the
Uconnect System. Refer to “Uconnect Set-
tings” in “Multimedia” in your Owner’s
Manual for further information.
When set to AUTO, the system automatically
turns the headlights on or off based on am-
bient light levels.
Flash-To-Pass
You can signal another vehicle with your
headlights by lightly pulling the multifunc-
tion lever toward you. This will cause the high
beam headlights to turn on, and remain on,
until the lever is released.
Automatic Headlights — If Equipped
This system automatically turns the head-
lights on or off according to ambient light
levels. To turn the system on, rotate the
headlight switch clockwise to the last detent
(AUTO position) for automatic headlight op-
eration. When the system is on, the headlight
time delay feature is also on. This means the
headlights will stay on for up to 90 seconds
after you place the ignition into the OFF
position. To turn the automatic system off,
move the headlight switch out of the AUTO
position.
NOTE:
The engine must be running before the head-
lights will come on in the automatic mode.
Parking Lights
To operate the parking lights, the ignition
must be in the OFF position. Turn the head-
light switch to the “P” position. Then move
the multifunction lever up or down to turn on
the left or right side parking lights.
GETTING TO KNOW YOUR VEHICLE
34
Page 37 of 344
Headlights On With Wipers (Available
With Automatic Headlights Only)
When this feature is active, the headlights
will turn on after the wipers are turned on if
the headlight switch is placed in the AUTO
position and programmable feature is set to
ON. In addition, the headlights will turn off
when the wipers are turned off if they were
turned on by this feature.
NOTE:
The Headlights On with Wipers feature can
be turned on or off using the Uconnect Sys-
tem.
Refer to “Uconnect Settings/Customer Pro-
grammable Features” in “Multimedia” in the
Owner’s Manual for further information.
Adaptive Bi-Xenon High Intensity
Discharge Headlights — If Equipped
This system automatically swivels the head-
light beam pattern horizontally to provide
increased illumination in the direction the
vehicle is steering.NOTE:
• Each time the Adaptive Headlight System
is turned on, the headlights will initialize by
performing a brief sequence of rotations.
• The Adaptive Headlight System is active
only when the vehicle is moving forward.
The Adaptive Headlight System can be
turned on or off using the Uconnect System,
refer to “Uconnect Settings” in “Multime-
dia” in the Owner’s Manual for further infor-
mation.
Headlight Time Delay
This feature provides the safety of headlight
illumination for up to 90 seconds (program-
mable) when leaving your vehicle in an unlit
area.
To activate the delay feature, place the igni-
tion in the OFF position while the headlights
are still on. Then, turn off the headlights
within 45 seconds. The delay interval begins
when the headlight switch is turned off.NOTE:
The headlight delay feature is automatically
activated if the customer leaves the headlight
switch in the AUTO position while the igni-
tion is placed in the OFF position.
If you turn the headlights or parking lights on,
or place the ignition in ACC or RUN, the
system will cancel the delay.
If you turn the headlights off before the
ignition, they will turn off in the normal
manner.
NOTE:
• The lights must be turned off within 45 sec-
onds of placing the ignition in the OFF
position to activate this feature.
• The headlight delay time is programmable
using the Uconnect System, refer to
“Uconnect Settings” in “Multimedia” in
the Owner’s Manual for further information.
Lights-On Reminder
If the headlights or parking lights are on after
the ignition is in the OFF position, a chime
will sound to alert the driver when the driver's
door is opened.
35
Page 39 of 344
headlights are turned on and left on for eight
minutes while the ignition is OFF, the exterior
lights will automatically turn off.
NOTE:
The battery saver mode is canceled if the
ignition is OFF and the headlamp switch is in
the park lamp position. The parking lamps
will remain on and drain the vehicle's battery.
WINDSHIELD WIPERS AND
WASHERS
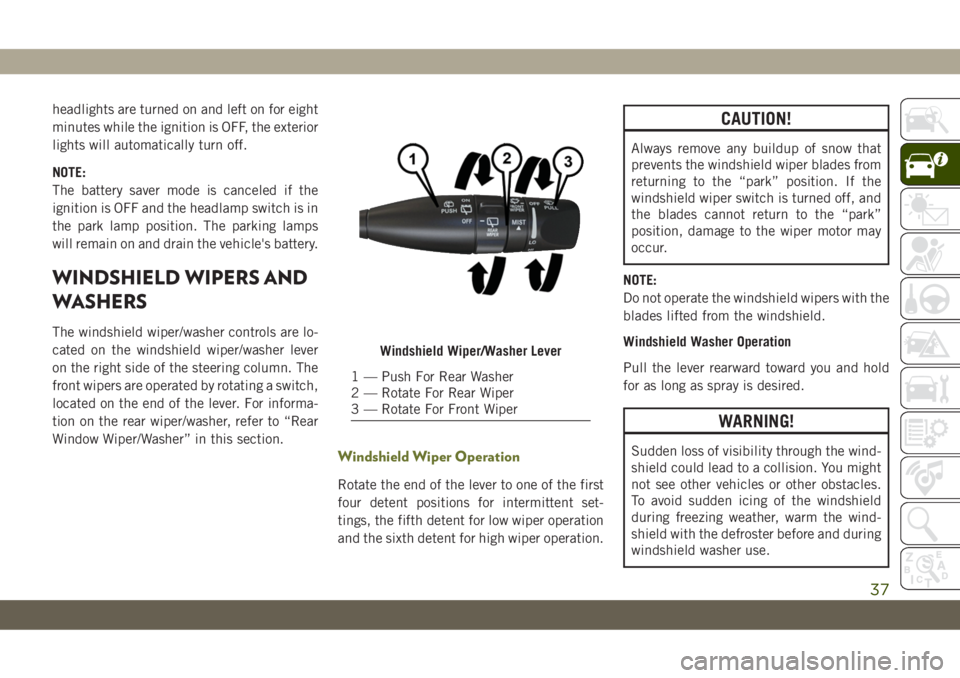
The windshield wiper/washer controls are lo-
cated on the windshield wiper/washer lever
on the right side of the steering column. The
front wipers are operated by rotating a switch,
located on the end of the lever. For informa-
tion on the rear wiper/washer, refer to “Rear
Window Wiper/Washer” in this section.
Windshield Wiper Operation
Rotate the end of the lever to one of the first
four detent positions for intermittent set-
tings, the fifth detent for low wiper operation
and the sixth detent for high wiper operation.
CAUTION!
Always remove any buildup of snow that
prevents the windshield wiper blades from
returning to the “park” position. If the
windshield wiper switch is turned off, and
the blades cannot return to the “park”
position, damage to the wiper motor may
occur.
NOTE:
Do not operate the windshield wipers with the
blades lifted from the windshield.
Windshield Washer Operation
Pull the lever rearward toward you and hold
for as long as spray is desired.
WARNING!
Sudden loss of visibility through the wind-
shield could lead to a collision. You might
not see other vehicles or other obstacles.
To avoid sudden icing of the windshield
during freezing weather, warm the wind-
shield with the defroster before and during
windshield washer use.
Windshield Wiper/Washer Lever
1 — Push For Rear Washer
2 — Rotate For Rear Wiper
3 — Rotate For Front Wiper
37