transmission fluid JEEP CHEROKEE 2019 Owner handbook (in English)
[x] Cancel search | Manufacturer: JEEP, Model Year: 2019, Model line: CHEROKEE, Model: JEEP CHEROKEE 2019Pages: 344, PDF Size: 6.35 MB
Page 10 of 344
ADAPTIVE CRUISE CONTROL (ACC) — IF
EQUIPPED....................... 162
Activating Adaptive Cruise Control (ACC) . . 163
To Set A Desired ACC Speed.......... 164
Resume...................... 164
To Vary The Speed Setting........... 164
Setting The Following Distance In ACC.... 166
PARKSENSE REAR PARK ASSIST — IF EQUIPPED . . 166ParkSense Sensors................ 166
ParkSense Warning Display........... 166
Enabling And Disabling ParkSense...... 166
ParkSense System Usage Precautions.... 167
PARKSENSE FRONT AND REAR PARK ASSIST — IF
EQUIPPED....................... 168
ParkSense Sensors................ 168
Enabling And Disabling ParkSense...... 169
Operation With A Trailer............. 169
PARKSENSE ACTIVE PARK ASSIST SYSTEM — IF
EQUIPPED....................... 169
LANESENSE...................... 170
LaneSense Operation.............. 170
Turning LaneSense On Or Off......... 170
LaneSense Warning Message.......... 171
Changing LaneSense Status.......... 172
PARKVIEW REAR BACK UP CAMERA — IF
EQUIPPED....................... 173
REFUELING THE VEHICLE............... 173
REFUELING THE VEHICLE — DIESEL ENGINE.... 175
AdBlue (UREA) — If Equipped........ 176
TRAILER TOWING................... 181Trailer Towing Weights (Maximum Trailer Weight
Ratings)...................... 181
RECREATIONAL TOWING (BEHIND MOTORHOME,
ETC.).......................... 182
Towing This Vehicle Behind Another
Vehicle....................... 182
Recreational Towing — Front-Wheel Drive (FWD)
Models...................... 183
Recreational Towing — 4x4 Models...... 183
IN CASE OF EMERGENCY
HAZARD WARNING FLASHERS............ 184
BULB REPLACEMENT................. 184
Replacement Bulbs............... 184
Replacing Exterior Bulbs............ 185
FUSES......................... 185General Information............... 186
Underhood Fuses................ 186
Interior Fuses................... 195
JACKING AND TIRE CHANGING............ 196Jack Location/Spare Tire Stowage....... 196
Preparations For Jacking............ 197
Jacking Instructions............... 197
Road Tire Installation.............. 200
Declaration Of Conformance.......... 200
Jack Usage Precautions............ 203
TIRE SERVICE KIT — IF EQUIPPED.......... 204Tire Service Kit Storage............. 204
Tire Service Kit Components And Operation . 204
Tire Service Kit Usage Precautions...... 205
Sealing A Tire With Tire Service Kit...... 206
JUMP STARTING.................... 209Preparations For Jump Start.......... 210
Jump Starting Procedure............ 211
REFUELING IN EMERGENCY.............. 212Emergency Fuel Filler Door Release..... 212
IF YOUR ENGINE OVERHEATS............. 212
GEAR SELECTOR OVERRIDE.............. 213
FREEING A STUCK VEHICLE.............. 213
TOWING A DISABLED VEHICLE............ 214
Without The Key Fob.............. 215
Front-Wheel Drive (FWD) Models....... 215
4x4 Models.................... 216
Recovery Strap — If Equipped......... 216
ENHANCED ACCIDENT RESPONSE SYSTEM (EARS) . 217
EVENT DATA RECORDER (EDR)............ 217
SERVICING AND MAINTENANCE
SCHEDULED SERVICING................ 218Scheduled Servicing — Gasoline Engine . . . 218
Scheduled Servicing — Diesel Engine.... 222
ENGINE COMPARTMENT............... 2272.0L Engine.................... 227
2.4L Engine.................... 228
3.2L Engine.................... 229
2.2L Diesel Engine............... 230
Checking Oil Level................ 231
Cooling System.................. 231
Adding Washer Fluid.............. 232
Brake System.................. 232
Manual Transmission — If Equipped..... 233
Automatic Transmission............ 234
Maintenance-Free Battery........... 234
DEALER SERVICE................... 235Windshield Wiper Blades............ 235
TABLE OF CONTENTS
8
Page 40 of 344
Mist
Use the Mist feature when weather condi-
tions make occasional usage of the wipers
necessary. Push the lever upward to the MIST
position and release for a single wiping cycle.
NOTE:
The mist feature does not activate the washer
pump; therefore, no washer fluid will be
sprayed on the windshield. The wash func-
tion must be used in order to spray the
windshield with washer fluid.
Rain Sensing Wipers — If Equipped
This feature senses rain or snowfall on the
windshield and automatically activates the
wipers for the driver. The feature is especially
useful for road splash or overspray from the
windshield washers of the vehicle ahead.
Rotate the end of the multifunction lever to
one of four settings to activate this feature.
The sensitivity of the system can be adjusted
with the multifunction lever. Wiper delay po-
sition one is the least sensitive, and wiper
delay position four is the most sensitive.NOTE:
Setting three should be used for normal rain
conditions.
Settings one and two can be used if the driver
desires less wiper sensitivity. Setting four can
be used if the driver desires more sensitivity.
Place the wiper switch in the OFF position
when not using the system.
NOTE:
• The Rain Sensing feature will not operate
when the wiper switch is in the low or
high-speed position.
• The Rain Sensing feature may not function
properly when ice or dried salt water is
present on the windshield.
• Use of products containing wax or silicone
may reduce Rain Sensing performance.
• The Rain Sensing feature can be turned on
and off using the Uconnect System, refer to
“Uconnect Settings” in “Multimedia” in
your Owner’s Manual for further
information.The Rain Sensing system has protection fea-
tures for the wiper blades and arms, and will
not operate under the following conditions:
•Low Ambient Temperature— When the igni-
tion is first turned ON, the Rain Sensing
system will not operate until the wiper
switch is moved, vehicle speed is greater
than 3 mph (5 km/h) or the outside tem-
perature is greater than 32°F (0°C).
•Transmission In NEUTRAL Position— When
the ignition is ON, and the automatic trans-
mission is in the NEUTRAL position, the
Rain Sensing system will not operate until
the wiper switch is moved, vehicle speed is
greater than 3 mph (5 km/h) or the gear
selector is moved out of the NEUTRAL
position.
Remote Start Mode Inhibit— On vehicles
equipped with Remote Starting system, Rain
Sensing wipers are not operational when the
vehicle is in the remote start mode. Once the
operator is in the vehicle and has placed the
ignition switch in the RUN position, rain
sensing wiper operation can resume, if it has
been selected, and no other inhibit condi-
tions (mentioned previously) exist.
GETTING TO KNOW YOUR VEHICLE
38
Page 69 of 344
If the light turns on while driving, safely pull
over and stop the vehicle. If the A/C system is
on, turn it off. Also, shift the transmission
into NEUTRAL and idle the vehicle. If the
temperature reading does not return to nor-
mal, turn the engine off immediately and call
for service. Refer to “If Your Engine Over-
heats” in “In Case Of Emergency” for further
information.
— Hood Open Warning Light
This warning light will illuminate when the
hood is left open and not fully closed.
NOTE:
If the vehicle is moving, there will also be a
single chime.
— Liftgate Open Warning Light
This warning light will illuminate when the
liftgate is open.
NOTE:
If the vehicle is moving, there will also be a
single chime.
— Oil Pressure Warning Light
This warning light will illuminate to indicate
low engine oil pressure. If the light turns on
while driving, stop the vehicle, shut off the
engine as soon as possible, and contact an
authorized dealer. A chime will sound when
this light turns on.
Do not operate the vehicle until the cause is
corrected. This light does not indicate how
much oil is in the engine. The engine oil level
must be checked under the hood.
— Oil Temperature Warning Light
This warning light will illuminate to indicate
the engine oil temperature is high. If the light
turns on while driving, stop the vehicle and
shut off the engine as soon as possible. Wait
for oil temperature to return to normal levels.
— Transmission Temperature Warning
Light — If Equipped
This warning light will illuminate to warn of a
high transmission fluid temperature. This
may occur with strenuous usage such as
trailer towing. If this light turns on, stop thevehicle and run the engine at idle or slightly
faster, with the transmission in PARK or
NEUTRAL, until the light turns off. Once the
light turns off, you may continue to drive
normally.
WARNING!
If you continue operating the vehicle when
the Transmission Temperature Warning
Light is illuminated you could cause the
fluid to boil over, come in contact with hot
engine or exhaust components and cause a
fire.
CAUTION!
Continuous driving with the Transmission
Temperature Warning Light illuminated
will eventually cause severe transmission
damage or transmission failure.
67
Page 71 of 344
— Electronic Stability Control (ESC) Off
Warning Light — If Equipped
This warning light indicates the Electronic
Stability Control (ESC) is off.
Each time the ignition is turned to ON/RUN
or ACC/ON/RUN, the ESC system will be on,
even if it was turned off previously.
— Low Fuel Warning Light
When the fuel level reaches approximately
2 gal (7.5 L) this light will turn on, and
remain on until fuel is added.
A single warning chime will sound with Low
Fuel Warning.
— Low Washer Fluid Warning Light —
If Equipped
This warning light will illuminate when the
windshield washer fluid is low.
— Service LaneSense Warning Light
— If Equipped
This warning light will illuminate when the
LaneSense system is not operating and re-
quires service. Please see an authorized
dealer.
— LaneSense Warning Light — If
Equipped
The LaneSense Warning Light will be solid
yellow when the vehicle is approaching a lane
marker. The warning light will flash when the
vehicle is crossing the lane marker.
Refer to “LaneSense — If Equipped" in
“Starting And Operating” for further informa-
tion.
— Engine Check/Malfunction Indica-
tor Warning Light (MIL)
The Engine Check/Malfunction Indicator
Light (MIL) is a part of an Onboard Diagnostic
System called OBD II that monitors engine
and automatic transmission control systems.
This warning light will illuminate when the
ignition is in the ON/RUN position before
engine start. If the bulb does not come on
when turning the ignition switch from OFF to
ON/RUN, have the condition checked
promptly.
Certain conditions, such as a loose or missing
gas cap, poor quality fuel, etc., may illumi-
nate the light after engine start. The vehicle
should be serviced if the light stays onthrough several typical driving styles. In most
situations, the vehicle will drive normally and
will not require towing.
When the engine is running, the MIL may
flash to alert serious conditions that could
lead to immediate loss of power or severe
catalytic converter damage. The vehicle
should be serviced by an authorized dealer as
soon as possible if this occurs.
WARNING!
A malfunctioning catalytic converter, as
referenced above, can reach higher tem-
peratures than in normal operating condi-
tions. This can cause a fire if you drive
slowly or park over flammable substances
such as dry plants, wood, cardboard, etc.
This could result in death or serious injury
to the driver, occupants or others.
CAUTION!
Prolonged driving with the Malfunction
Indicator Light (MIL) on could cause dam-
age to the vehicle control system. It also
69
Page 144 of 344
The engine oil installed in the engine at the
factory is a high-quality energy conserving
type lubricant. Oil changes should be consis-
tent with anticipated climate conditions un-
der which vehicle operations will occur.
For the recommended viscosity and quality
grades, refer to “Fluids And Lubricants” in
“Technical Specifications”.
CAUTION!
Never use Non-Detergent Oil or Straight
Mineral Oil in the engine or damage may
result.
NOTE:
A new engine may consume some oil during
its first few thousand miles (kilometers) of
operation. This should be considered a nor-
mal part of the break-in and not interpreted
as a problem.
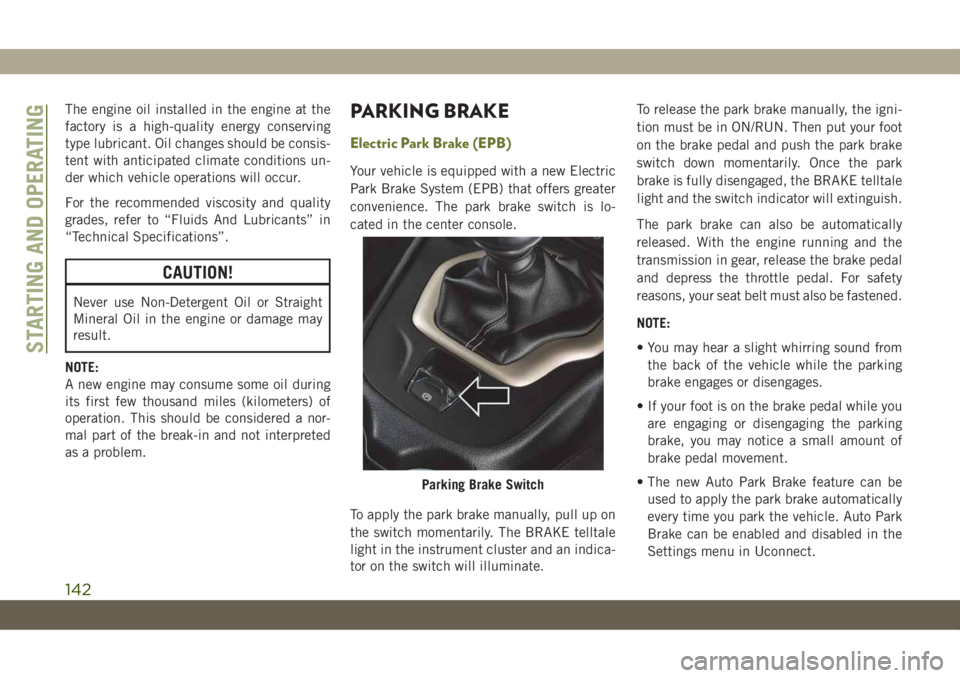
PARKING BRAKE
Electric Park Brake (EPB)
Your vehicle is equipped with a new Electric
Park Brake System (EPB) that offers greater
convenience. The park brake switch is lo-
cated in the center console.
To apply the park brake manually, pull up on
the switch momentarily. The BRAKE telltale
light in the instrument cluster and an indica-
tor on the switch will illuminate.To release the park brake manually, the igni-
tion must be in ON/RUN. Then put your foot
on the brake pedal and push the park brake
switch down momentarily. Once the park
brake is fully disengaged, the BRAKE telltale
light and the switch indicator will extinguish.
The park brake can also be automatically
released. With the engine running and the
transmission in gear, release the brake pedal
and depress the throttle pedal. For safety
reasons, your seat belt must also be fastened.
NOTE:
• You may hear a slight whirring sound from
the back of the vehicle while the parking
brake engages or disengages.
• If your foot is on the brake pedal while you
are engaging or disengaging the parking
brake, you may notice a small amount of
brake pedal movement.
• The new Auto Park Brake feature can be
used to apply the park brake automatically
every time you park the vehicle. Auto Park
Brake can be enabled and disabled in the
Settings menu in Uconnect.
Parking Brake Switch
STARTING AND OPERATING
142
Page 146 of 344
transmission is placed in PARK, or with a
manual transmission, whenever the ignition
is turned “OFF”. Auto Park Brake is enabled
and disabled by customer selection through
the customer programmable features section
of the Uconnect Settings.
Any single auto park brake application can be
bypassed by pushing the EPB switch to the
release position while the transmission is
placed in PARK.
SafeHold
SafeHold is a safety feature of the Electric
Park Brake System that will engage the park
brake automatically if the vehicle is left un-
secured while the ignition is in ON/RUN.
For automatic transmissions, the park brake
will automatically engage if all of the follow-
ing conditions are met:
• The vehicle is at a standstill.
• There is no attempt to depress the brake
pedal or accelerator pedal.
• The seat belt is unbuckled.
• The driver door is open.For manual transmissions, the park brake will
automatically engage if all of the following
conditions are met:
• The vehicle is at a standstill.
• There is no attempt to depress the brake
pedal or accelerator pedal.
• The clutch pedal is not pressed.
• The seat belt is unbuckled.
• The driver door is open.MANUAL TRANSMISSION —
IF EQUIPPED
WARNING!
You or others could be injured if you leave
the vehicle unattended without having the
parking brake fully applied. The parking
brake should always be applied when the
driver is not in the vehicle, especially on
an incline.
CAUTION!
• Never drive with your foot resting on the
clutch pedal, or attempt to hold the
vehicle on a hill with the clutch pedal
partially engaged, as this will cause ab-
normal wear on the clutch.
• Do not drive with your hand resting on
the gear selector as the force exerted,
even if slight, could lead over time to
premature wear of the gearbox internal
components.
NOTE:
During cold weather, you may experience
increased effort in shifting until the transmis-
sion fluid warms up. This is normal.
Shifting
Fully press the clutch pedal before shifting
gears. As you release the clutch pedal, lightly
press the accelerator pedal.
You should always use first gear when starting
from a standing position.
STARTING AND OPERATING
144
Page 208 of 344
WARNING!
• Take care not to allow the contents of
Tire Service Kit to come in contact with
hair, eyes, or clothing. Tire Service Kit
sealant is harmful if inhaled, swallowed,
or absorbed through the skin. It causes
skin, eye, and respiratory irritation.
Flush immediately with plenty of water if
there is any contact with eyes or skin.
Change clothing as soon as possible, if
there is any contact with clothing.
• Tire Service Kit Sealant solution con-
tains latex. In case of an allergic reaction
or rash, consult a physician immedi-
ately. Keep Tire Service Kit out of reach
of children. If swallowed, rinse mouth
immediately with plenty of water and
drink plenty of water. Do not induce
vomiting! Consult a physician immedi-
ately.
Sealing A Tire With Tire Service Kit
(A) Whenever You Stop To Use Tire Service
Kit:
1. Pull over to a safe location and turn on the
vehicle’s Hazard Warning flashers.2. Verify that the valve stem (on the wheel
with the deflated tire) is in a position that
is near to the ground. This will allow the
Tire Service Kit Hoses (6) and (7) to reach
the valve stem and keep the Tire Service
Kit flat on the ground. This will provide
the best positioning of the kit when inject-
ing the sealant into the deflated tire and
running the air pump. Move the vehicle as
necessary to place the valve stem in this
position before proceeding.
3. Place the transmission in PARK (auto
transmission) or in Gear (manual trans-
mission) and place the ignition in the OFF
position.
4. Apply the parking brake.
(B) Setting Up To Use Tire Service Kit:
1. Push in the Mode Select Knob (5) and
turn to the Sealant Mode position.
2. Uncoil the Sealant Hose (6) and then
remove the cap from the fitting at the end
of the hose.
3. Place the Tire Service Kit flat on the
ground next to the deflated tire.4. Remove the cap from the valve stem and
then screw the fitting at the end of the
Sealant Hose (6) onto the valve stem.
5. Uncoil the Power Plug (8) and insert the
plug into the vehicle’s 12 Volt power
outlet.
NOTE:
Do not remove foreign objects (e.g., screws or
nails) from the tire.
(C) Injecting Tire Service Kit Sealant Into
The Deflated Tire:
• Always start the engine before turning ON
the Tire Service Kit.
NOTE:
Manual transmission vehicles must have
the parking brake engaged and the gear se-
lector in NEUTRAL.
• After pushing the Power Button (4), the
sealant (white fluid) will flow from the Seal-
ant Bottle (1) through the Sealant Hose (6)
and into the tire.
NOTE:
Sealant may leak out through the puncture in
the tire.IN CASE OF EMERGENCY
206
Page 227 of 344
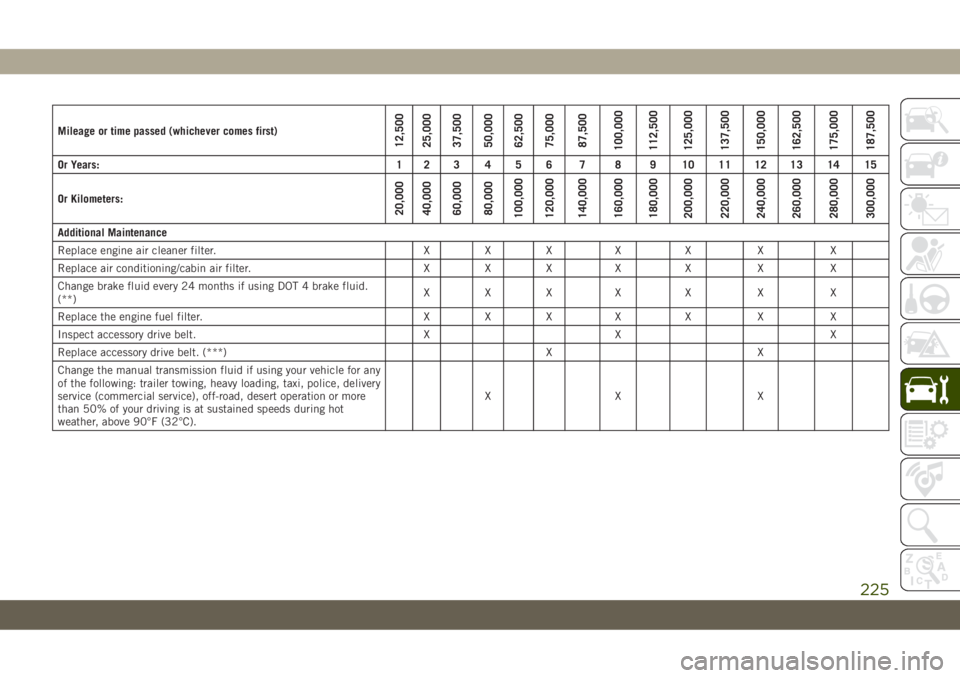
Mileage or time passed (whichever comes first)12,500
25,000
37,500
50,000
62,500
75,000
87,500
100,000
112,500
125,000
137,500
150,000
162,500
175,000
187,500
Or Years: 1 2 3 4 5 6 7 8 9 10 11 12 13 14 15
Or Kilometers:
20,000
40,000
60,000
80,000
100,000
120,000
140,000
160,000
180,000
200,000
220,000
240,000
260,000
280,000
300,000
Additional Maintenance
Replace engine air cleaner filter. X X X X X X X
Replace air conditioning/cabin air filter. X X X X X X X
Change brake fluid every 24 months if using DOT 4 brake fluid.
(**)XXX X X X X
Replace the engine fuel filter. X X X X X X X
Inspect accessory drive belt. X X X
Replace accessory drive belt. (***) X X
Change the manual transmission fluid if using your vehicle for any
of the following: trailer towing, heavy loading, taxi, police, delivery
service (commercial service), off-road, desert operation or more
than 50% of your driving is at sustained speeds during hot
weather, above 90°F (32°C).XX X
225
Page 235 of 344
WARNING!
Riding the brakes can lead to brake failure
and possibly a collision. Driving with your
foot resting or riding on the brake pedal
can result in abnormally high brake tem-
peratures, excessive lining wear, and pos-
sible brake damage. You would not have
your full braking capacity in an emergency.
Fluid Level Check — Brake Master Cylinder
The fluid level of the master cylinder should
be checked whenever the vehicle is serviced,
or immediately if the brake system warning
light is on. If necessary, add fluid to bring
level within the designated marks on the side
of the reservoir of the brake master cylinder.
Be sure to clean the top of the master cylin-
der area before removing cap. With disc
brakes, fluid level can be expected to fall as
the brake pads wear. Brake fluid level should
be checked when pads are replaced. If the
brake fluid is abnormally low, check the sys-
tem for leaks.
Refer to “Fluids And Lubricants” in “Techni-
cal Specifications” for further information.
WARNING!
• Brake fluid is poisonous and highly cor-
rosive. In the event of accidental con-
tact, immediately wash the affected
parts with water and neutral soap. Then
rinse thoroughly. Call a doctor immedi-
ately if swallowed.
• Use only manufacturer's recommended
brake fluid. Refer to “Fluids And Lubri-
cants” in “Technical Specifications” for
further information. Using the wrong
type of brake fluid can severely damage
your brake system and/or impair its per-
formance. The proper type of brake fluid
for your vehicle is also identified on the
original factory installed hydraulic mas-
ter cylinder reservoir.
• To avoid contamination from foreign
matter or moisture, use only new brake
fluid or fluid that has been in a tightly
closed container. Keep the master cylin-
der reservoir cap secured at all times.
Brake fluid in a open container absorbs
moisture from the air resulting in a lower
boiling point. This may cause it to boil
WARNING!
unexpectedly during hard or prolonged
braking, resulting in sudden brake fail-
ure. This could result in a collision.
• Overfilling the brake fluid reservoir can
result in spilling brake fluid on hot en-
gine parts, causing the brake fluid to
catch fire. Brake fluid can also damage
painted and vinyl surfaces, care should
be taken to avoid its contact with these
surfaces.
• Do not allow petroleum based fluid to
contaminate the brake fluid. Brake seal
components could be damaged, causing
partial or complete brake failure. This
could result in a collision.
Manual Transmission — If Equipped
Fluid Level Check
Check the fluid level by removing the fill
plug. The fluid level should be between the
bottom of the fill hole and a point not more
than 3/16 inch (4.7 mm) below the bottom of
the hole.
233
Page 236 of 344
Add fluid, if necessary, to maintain the
proper level.
Please see your authorized dealer for service.
Automatic Transmission
Fluid Level Check
The fluid level is preset at the factory and
does not require adjustment under normal
operating conditions. Routine fluid level
checks are not required; therefore the trans-
mission has no dipstick. An authorized dealer
can check your transmission fluid level using
special service tools. If you notice fluid leak-
age or transmission malfunction, visit an au-
thorized dealer immediately to have the
transmission fluid level checked. Operating
the vehicle with an improper fluid level can
cause severe transmission damage.
CAUTION!
If a transmission fluid leak occurs, visit an
authorized dealer immediately. Severe
transmission damage may occur. An au-
thorized dealer has the proper tools to
adjust the fluid level accurately.
Maintenance-Free Battery
Your vehicle is equipped with a maintenance-
free battery. You will never have to add water,
nor is periodic maintenance required.
WARNING!
• Using the battery with low fluid will
irreparably damage the battery and may
cause an explosion.
• When performing any operation on the
battery or near it, always protect your
eyes with special goggles.
• Batteries contain substances which are
very dangerous for the environment. For
battery replacement, contact an autho-
rized dealership.
• Battery fluid is a corrosive acid solution
and can burn or even blind you. Do not
allow battery fluid to contact your eyes,
skin, or clothing. Do not lean over a
battery when attaching clamps. If acid
splashes in eyes or on skin, flush the
area immediately with large amounts of
water. Refer to “Jump Starting Proce-
WARNING!
dure” in “In Case Of Emergency” for
further information.
• Battery gas is flammable and explosive.
Keep flame or sparks away from the
battery. Do not use a booster battery or
any other booster source with an output
greater than 12 Volts. Do not allow cable
clamps to touch each other.
• Battery posts, terminals, and related ac-
cessories contain lead and lead com-
pounds. Wash hands after handling.
CAUTION!
• It is essential when replacing the cables
on the battery that the positive cable is
attached to the positive post and the
negative cable is attached to the nega-
tive post. Battery posts are marked posi-
tive (+) and negative (-) and are identi-
fied on the battery case. Cable clamps
should be tight on the terminal posts
and free of corrosion.
•
If a “fast charger” is used while the bat-
tery is in the vehicle, disconnect both
SERVICING AND MAINTENANCE
234