belt JEEP CHEROKEE 2020 Owner handbook (in English)
[x] Cancel search | Manufacturer: JEEP, Model Year: 2020, Model line: CHEROKEE, Model: JEEP CHEROKEE 2020Pages: 332, PDF Size: 8.87 MB
Page 127 of 332
125
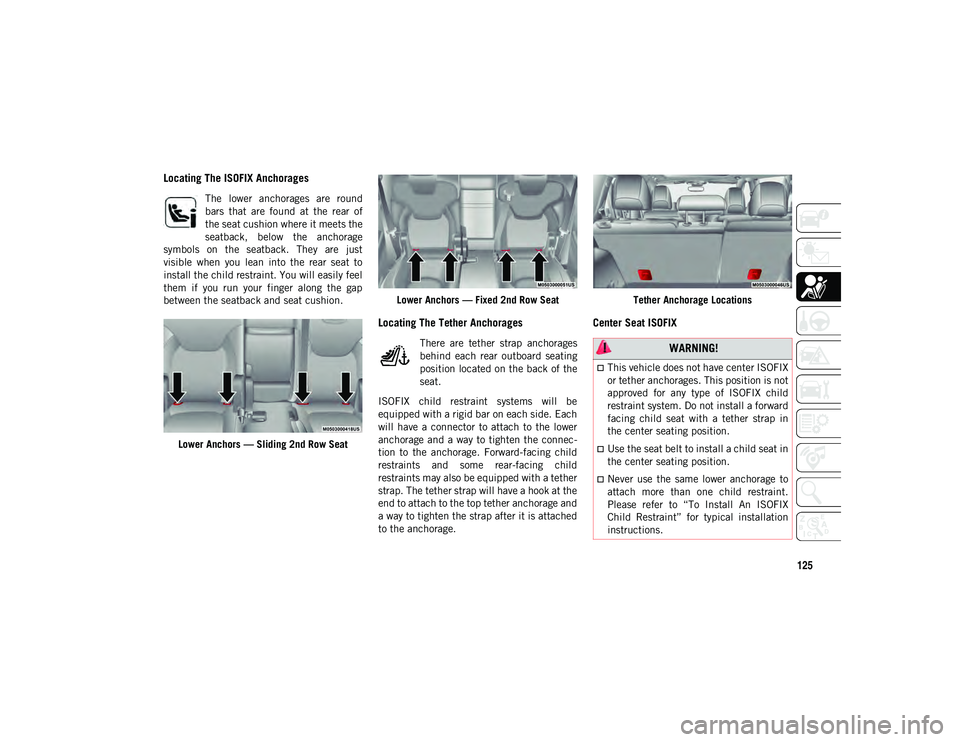
Locating The ISOFIX Anchorages
The lower anchorages are round
bars that are found at the rear of
the seat cushion where it meets the
seatback, below the anchorage
symbols on the seatback. They are just
visible when you lean into the rear seat to
install the child restraint. You will easily feel
them if you run your finger along the gap
between the seatback and seat cushion.
Lower Anchors — Sliding 2nd Row Seat Lower Anchors — Fixed 2nd Row Seat
Locating The Tether Anchorages
There are tether strap anchorages
behind each rear outboard seating
position located on the back of the
seat.
ISOFIX child restraint systems will be
equipped with a rigid bar on each side. Each
will have a connector to attach to the lower
anchorage and a way to tighten the connec -
tion to the anchorage. Forward-facing child
restraints and some rear-facing child
restraints may also be equipped with a tether
strap. The tether strap will have a hook at the
end to attach to the top tether anchorage and
a way to tighten the strap after it is attached
to the anchorage. Tether Anchorage Locations
Center Seat ISOFIX
WARNING!
This vehicle does not have center ISOFIX
or tether anchorages. This position is not
approved for any type of ISOFIX child
restraint system. Do not install a forward
facing child seat with a tether strap in
the center seating position.
Use the seat belt to install a child seat in
the center seating position.
Never use the same lower anchorage to
attach more than one child restraint.
Please refer to “To Install An ISOFIX
Child Restraint” for typical installation
instructions.
2020_JEEP_CHEROKEE_UG_RHD_UK.book Page 125
Page 130 of 332
SAFETY
128
(Continued)
To Install An ISOFIX Child Restraint
If the selected seating position has a Switch-
able Automatic Locking Retractor (ALR) seat
belt, stow the seat belt, following the instruc -
tions below. See the section “Installing Child
Restraints Using the Vehicle Seat Belt” to
check what type of seat belt each seating
position has.
1. Loosen the adjusters on the lower connectors and on the tether strap of the
child seat so that you can more easily
attach the connectors to the vehicle
anchorages.
2. Place the child seat between the lower anchorages for that seating position. For
some second row seats, you may need to
recline the seat and / or raise the head
restraint to get a better fit. If the rear seat
can be moved forward and rearward in
the vehicle, you may wish to move it to its
rear-most position to make room for the
child seat. You may also move the front
seat forward to allow more room for the
child seat.
3. Attach the connectors of the child restraint to the lower anchorages in the
selected seating position. 4. If the child restraint has a tether strap,
connect it to the top tether anchorage.
See the section “Installing Child
Restraints Using the Top Tether
Anchorage” for directions to attach a
tether anchor.
5. Tighten all of the straps as you push the child restraint rearward and downward
into the seat. Remove slack in the straps
according to the child restraint manufac -
turer’s instructions.
6. Test that the child restraint is installed tightly by pulling back and forth on the
child seat at the belt path. It should not
move more than 25 mm in any direction.
Installing Child Restraints Using The Top
Tether Anchorage
1. Look behind the seating position whereyou plan to install the child restraint to
find the tether anchorage. You may need
to move the seat forward to provide better
access to the tether anchorage. If there is
no top tether anchorage for that seating
position, move the child restraint to
another position in the vehicle if one is
available. WARNING!
Improper installation of a child restraint
to the ISOFIX anchorages can lead to
failure of the restraint. The child could
be badly injured or killed. Follow the
child restraint manufacturer’s directions
exactly when installing an infant or child
restraint.
Child restraint anchorages are designed
to withstand only those loads imposed by
correctly-fitted child restraints. Under
no circumstances are they to be used for
adult seat belts, harnesses, or for
attaching other items or equipment to
the vehicle.
Install the child restraint system when
the vehicle is stationary. The ISOFIX
child restraint system is correctly fixed to
the brackets when you hear the click.
WARNING! (Continued)
2020_JEEP_CHEROKEE_UG_RHD_UK.book Page 128
Page 131 of 332
129
2. Route the tether strap to provide themost direct path for the strap between
the anchor and the child seat. If your
vehicle is equipped with adjustable rear
head restraints, raise the head restraint,
and where possible, route the tether
strap under the head restraint and
between the two posts. If not possible,
lower the head restraint and pass the
tether strap around the outboard side of
the head restraint.
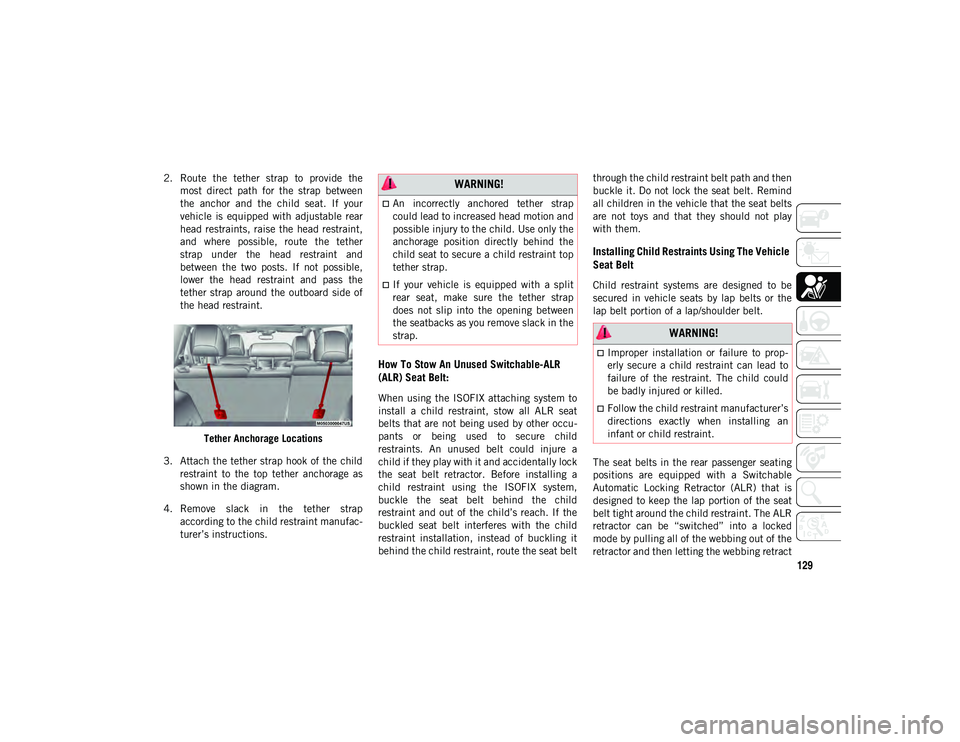
Tether Anchorage Locations
3. Attach the tether strap hook of the child restraint to the top tether anchorage as
shown in the diagram.
4. Remove slack in the tether strap according to the child restraint manufac -
turer’s instructions.
How To Stow An Unused Switchable-ALR
(ALR) Seat Belt:
When using the ISOFIX attaching system to
install a child restraint, stow all ALR seat
belts that are not being used by other occu -
pants or being used to secure child
restraints. An unused belt could injure a
child if they play with it and accidentally lock
the seat belt retractor. Before installing a
child restraint using the ISOFIX system,
buckle the seat belt behind the child
restraint and out of the child’s reach. If the
buckled seat belt interferes with the child
restraint installation, instead of buckling it
behind the child restraint, route the seat belt through the child restraint belt path and then
buckle it. Do not lock the seat belt. Remind
all children in the vehicle that the seat belts
are not toys and that they should not play
with them.
Installing Child Restraints Using The Vehicle
Seat Belt
Child restraint systems are designed to be
secured in vehicle seats by lap belts or the
lap belt portion of a lap/shoulder belt.
The seat belts in the rear passenger seating
positions are equipped with a Switchable
Automatic Locking Retractor (ALR) that is
designed to keep the lap portion of the seat
belt tight around the child restraint. The ALR
retractor can be “switched” into a locked
mode by pulling all of the webbing out of the
retractor and then letting the webbing retract
WARNING!
An incorrectly anchored tether strap
could lead to increased head motion and
possible injury to the child. Use only the
anchorage position directly behind the
child seat to secure a child restraint top
tether strap.
If your vehicle is equipped with a split
rear seat, make sure the tether strap
does not slip into the opening between
the seatbacks as you remove slack in the
strap.
WARNING!
Improper installation or failure to prop
-
erly secure a child restraint can lead to
failure of the restraint. The child could
be badly injured or killed.
Follow the child restraint manufacturer’s
directions exactly when installing an
infant or child restraint.
2020_JEEP_CHEROKEE_UG_RHD_UK.book Page 129
Page 132 of 332
SAFETY
130
back into the retractor. If it is locked, the
ALR will make a clicking noise while the
webbing is pulled back into the retractor.
Refer to the “Automatic Locking Mode”
description in “Switchable Automatic
Locking Retractors (ALR)” under “Occupant
Restraint Systems” for additional informa-
tion on ALR.
Installing A Child Restraint With A
Switchable Automatic Locking Retractor
(ALR)
Child restraint systems are designed to be
secured in vehicle seats by lap belts or the
lap belt portion of a lap/shoulder belt. 1. Place the child seat in the center of the
seating position. For some second row
seats, you may need to recline the seat
and/or raise the head restraint to get a
better fit. If the rear seat can be moved
forward and rearward in the vehicle, you
may wish to move it to its rear-most posi -
tion to make room for the child seat. You
may also move the front seat forward to
allow more room for the child seat.
2. Pull enough of the seat belt webbing from the retractor to pass it through the
belt path of the child restraint. Do not
twist the belt webbing in the belt path.
3. Slide the latch plate into the buckle until you hear a “click.”
4. Pull on the webbing to make the lap portion tight against the child seat. 5. To lock the seat belt, pull down on the
shoulder part of the belt until you have
pulled all the seat belt webbing out of the
retractor. Then, allow the webbing to
retract back into the retractor. As the
webbing retracts, you will hear a clicking
sound. This means the seat belt is now in
the Automatic Locking mode.
6. Try to pull the webbing out of the retractor. If it is locked, you should not
be able to pull out any webbing. If the
retractor is not locked, repeat step 5.
7. Finally, pull up on any excess webbing to tighten the lap portion around the child
restraint while you push the child
restraint rearward and downward into the
vehicle seat.
8. Test that the child restraint is installed tightly by pulling back and forth on the
child seat at the belt path. It should not
move more than 25 mm in any direction.
Any seat belt system will loosen with time, so
check the belt occasionally, and pull it tight
if necessary.
WARNING!
Improper installation or failure to prop -
erly secure a child restraint can lead to
failure of the restraint. The child could
be badly injured or killed.
Follow the child restraint manufacturer’s
directions exactly when installing an
infant or child restraint.
2020_JEEP_CHEROKEE_UG_RHD_UK.book Page 130
Page 134 of 332
SAFETY
132
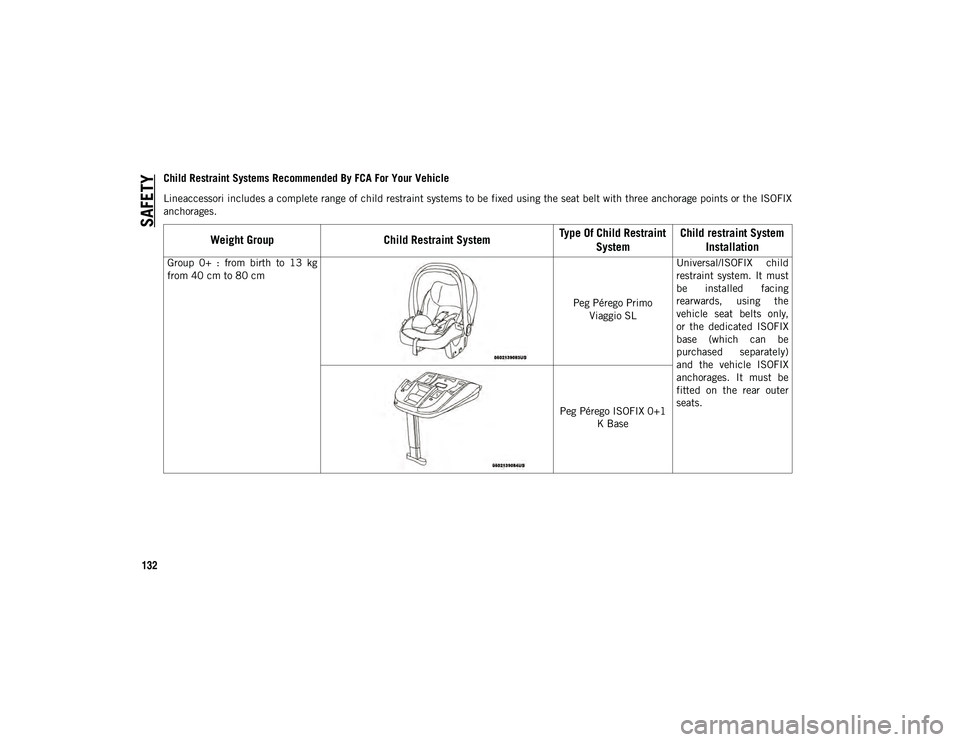
Child Restraint Systems Recommended By FCA For Your Vehicle
Lineaccessori includes a complete range of child restraint systems to be fixed using the seat belt with three anchorage points or the ISOFIX
anchorages.
Weight GroupChild Restraint System Type Of Child Restraint
System Child restraint System
Installation
Group 0+ : from birth to 13 kg
from 40 cm to 80 cm
Peg Pérego Primo
Viaggio SL Universal/ISOFIX child
restraint system. It must
be installed facing
rearwards, using the
vehicle seat belts only,
or the dedicated ISOFIX
base (which can be
purchased separately)
and the vehicle ISOFIX
anchorages. It must be
fitted on the rear outer
seats.
Peg Pérego ISOFIX 0+1
K Base
2020_JEEP_CHEROKEE_UG_RHD_UK.book Page 132
Page 135 of 332
133
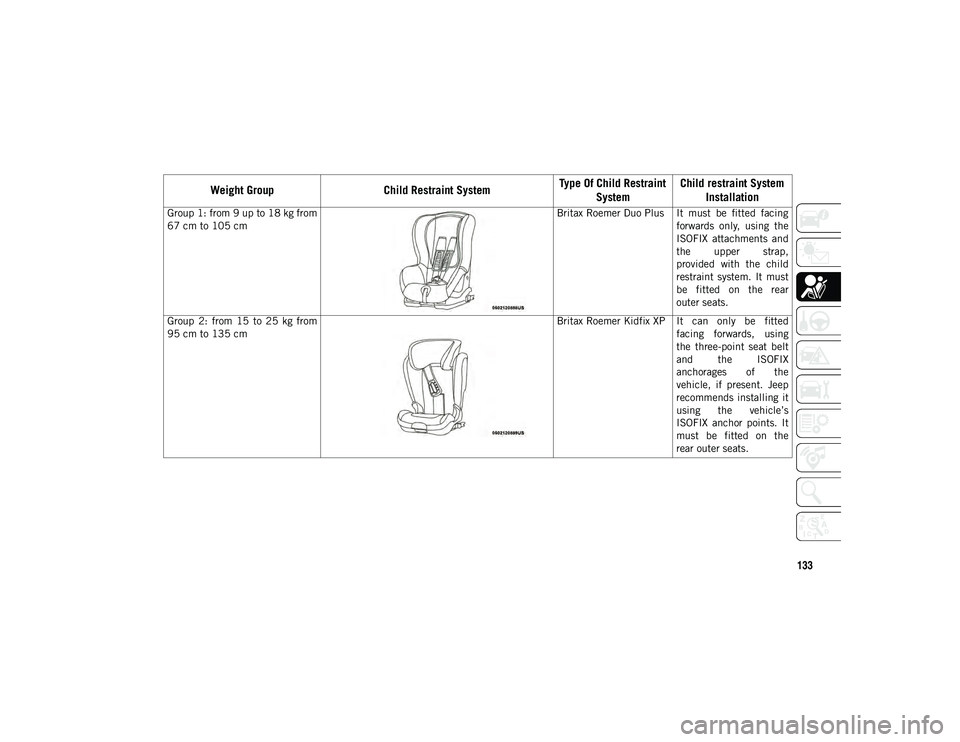
Group 1: from 9 up to 18 kg from
67 cm to 105 cmBritax Roemer Duo Plus It must be fitted facing
forwards only, using the
ISOFIX attachments and
the upper strap,
provided with the child
restraint system. It must
be fitted on the rear
outer seats.
Group 2: from 15 to 25 kg from
95 cm to 135 cm Britax Roemer Kidfix XP It can only be fitted
facing forwards, using
the three-point seat belt
and the ISOFIX
anchorages of the
vehicle, if present. Jeep
recommends installing it
using the vehicle’s
ISOFIX anchor points. It
must be fitted on the
rear outer seats.
Weight Group Child Restraint System Type Of Child Restraint
System Child restraint System
Installation
2020_JEEP_CHEROKEE_UG_RHD_UK.book Page 133
Page 136 of 332
SAFETY
134
(Continued)
IMPORTANT: Jeep recommends fitting the
child restraint system according to the
instructions, which must be included.
Transporting Pets
Air Bags deploying in the front seat could
harm your pet. An unrestrained pet will be
thrown about and possibly injured, or injure
a passenger during panic braking or in a
collision.
Pets should be restrained in the rear seat in
pet harnesses or pet carriers that are secured
by seat belts.
SAFETY TIPS
Transporting Passengers
NEVER TRANSPORT PASSENGERS IN THE
CARGO AREA.
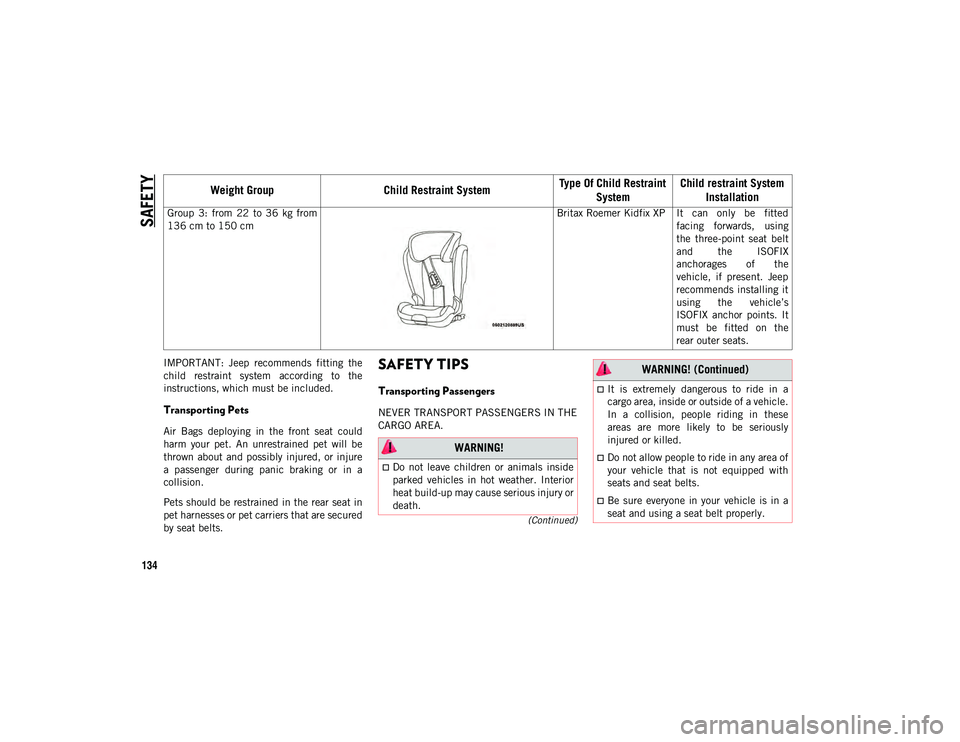
Group 3: from 22 to 36 kg from
136 cm to 150 cm
Britax Roemer Kidfix XP It can only be fitted
facing forwards, using
the three-point seat belt
and the ISOFIX
anchorages of the
vehicle, if present. Jeep
recommends installing it
using the vehicle’s
ISOFIX anchor points. It
must be fitted on the
rear outer seats.
Weight Group Child Restraint System Type Of Child Restraint
System Child restraint System
Installation
WARNING!
Do not leave children or animals inside
parked vehicles in hot weather. Interior
heat build-up may cause serious injury or
death.
It is extremely dangerous to ride in a
cargo area, inside or outside of a vehicle.
In a collision, people riding in these
areas are more likely to be seriously
injured or killed.
Do not allow people to ride in any area of
your vehicle that is not equipped with
seats and seat belts.
Be sure everyone in your vehicle is in a
seat and using a seat belt properly.
WARNING! (Continued)
2020_JEEP_CHEROKEE_UG_RHD_UK.book Page 134
Page 137 of 332
135
Exhaust GasThe best protection against carbon monoxide
entry into the vehicle body is a properly
maintained engine exhaust system.
Whenever a change is noticed in the sound of
the exhaust system, when exhaust fumes can
be detected inside the vehicle, or when the
underside or rear of the vehicle is damaged,
have a competent mechanic inspect the
complete exhaust system and adjacent body
areas for broken, damaged, deteriorated, or
mispositioned parts. Open seams or loose
connections could permit exhaust fumes to
seep into the passenger compartment. In
addition, inspect the exhaust system each
time the vehicle is raised for lubrication or oil
change. Replace as required.
Safety Checks You Should Make Inside
The Vehicle
Seat Belts
Inspect the seat belt system periodically,
checking for cuts, frays, and loose parts.
Damaged parts must be replaced immediately.
Do not disassemble or modify the system.
Front seat belt assemblies must be replaced
after a collision. Rear seat belt assemblies
must be replaced after a collision if they
have been damaged (i.e., bent retractor, torn
webbing, etc.). If there is any question
regarding seat belt or retractor condition,
replace the seat belt.
Air Bag Warning Light
The Air Bag warning light will turn on for
four to eight seconds as a bulb check when
the ignition switch is first turned to ON/RUN.
If the light is either not on during starting,
stays on, or turns on while driving, have the
system inspected at an authorized dealer as
soon as possible. After the bulb check, this
light will illuminate with a single chime when
a fault with the Air Bag System has been
detected. It will stay on until the fault is
removed. If the light comes on intermittently
or remains on while driving, have an autho
-
rized dealer service the vehicle immediately.
Refer to “Occupant Restraint Systems” in
“Safety” for further information.
WARNING!
Exhaust gases can injure or kill. They
contain carbon monoxide (CO), which is
colorless and odorless. Breathing it can
make you unconscious and can eventually
poison you. To avoid breathing (CO), follow
these safety tips:
Do not run the engine in a closed garage
or in confined areas any longer than
needed to move your vehicle in or out of
the area.
If you are required to drive with the
trunk/liftgate/rear doors open, make sure
that all windows are closed and the
climate control BLOWER switch is set at
high speed. DO NOT use the recircula-
tion mode.
If it is necessary to sit in a parked vehicle
with the engine running, adjust your
heating or cooling controls to force
outside air into the vehicle. Set the
blower at high speed.
2020_JEEP_CHEROKEE_UG_RHD_UK.book Page 135
Page 140 of 332
138
(Continued)
STARTING AND OPERATING
STARTING THE ENGINE
Before starting your vehicle, adjust your seat,
adjust both inside and outside mirrors, and
fasten your seat belts.Start the engine with the gear selector in the
NEUTRAL or PARK position. Apply the brake
before shifting to any driving range.
Normal Starting — Gasoline Engine
NOTE:
Normal starting of either a cold or a warm
engine is obtained without pumping or
pushing the accelerator pedal.
Place your foot on the brake and place the
ignition to the START mode and release
when the engine starts. If the engine fails to
start within 10 seconds:
1. Place the ignition in the OFF mode.
2. Wait 10 to 15 seconds.
3. Repeat the “Normal Starting” procedure.NOTE:
Only press one pedal at a time while driving
the vehicle. Torque performance of the
vehicle could be reduced if both pedals are
pressed at the same time. If pressure is
detected on both pedals simultaneously, a
warning message will display in the instru
-
ment cluster. For further information, refer to
“Instrument Cluster Display” in “Getting To
Know Your Instrument Panel”.
Tip Start Feature
Place the ignition in the START mode and
release it as the starter engages. The starter
motor will automatically disengage itself
once the engine is running. If the engine fails
to start, the starter will disengage automati -
cally in 10 seconds. If this occurs:
1. Place the ignition in the OFF mode.
2. Wait 10 to 15 seconds.
3. Repeat the “Normal Starting” procedure.
WARNING!
When leaving the vehicle, always remove
the key fob from the ignition and lock
your vehicle. If equipped with Keyless
Enter-N-Go, always make sure the
keyless ignition node is in “OFF” mode,
remove the key fob from the vehicle and
lock the vehicle.
Never leave children alone in a vehicle,
or with access to an unlocked vehicle.
Allowing children to be in a vehicle unat -
tended is dangerous for a number of
reasons. A child or others could be seri -
ously or fatally injured. Children should
be warned not to touch the parking
brake, brake pedal or the gear selector.
Do not leave the key fob in or near the
vehicle, or in a location accessible to
children, and do not leave the ignition of
a vehicle equipped with Keyless
Enter-N-Go in the ACC or ON/RUN
mode. A child could operate power
windows, other controls, or move the
vehicle.
WARNING! (Continued)
2020_JEEP_CHEROKEE_UG_RHD_UK.book Page 138
Page 141 of 332
139
(Continued)
Normal Starting — Diesel Engine
Before starting your vehicle, adjust your seat,
both inside and outside mirrors, and fasten
your seat belts.
The starter is allowed to crank for up to
30-second intervals. Waiting a few minutes
between such intervals will protect the
starter from overheating.NOTE:
Engine start up in very low ambient tempera-
ture could result in evident white smoke.
This condition will disappear as the engine
warms up.
Battery Blanket Usage
A battery loses 60% of its cranking power as
the battery temperature decreases to 0°F
(-18°C). For the same decrease in tempera -
ture, the engine requires twice as much
power to crank at the same RPM. The use of
battery blankets will greatly increase starting
capability at low temperatures. Suitable
battery blankets are available from your
authorized Mopar dealer.
Normal Starting Procedure — Keyless
Enter-N-Go
Observe the instrument panel telltales when
starting the engine.
NOTE:
Normal starting of either a cold or a warm
engine is obtained without pumping or
pressing the accelerator pedal.
1. Always apply the parking brake.
2. Press and hold the brake pedal while pushing the ENGINE START/STOP
button once.
NOTE:
A delay of the start of up to five seconds is
possible under very cold conditions. The
“Wait to Start” telltale will be illuminated
WARNING!
Before exiting a vehicle, always come to
a complete stop, then shift the auto-
matic transmission into PARK and apply
the parking brake.
Always make sure the keyless ignition
node is in the OFF mode, key fob is
removed from the vehicle and vehicle is
locked.
Never leave children alone in a vehicle,
or with access to an unlocked vehicle.
Leaving children in a vehicle unattended
is dangerous for a number of reasons. A
child or others could be seriously or
fatally injured. Children should be
warned not to touch the parking brake,
brake pedal or the gear selector.
Do not leave the key fob in or near the
vehicle, or in a location accessible to
children, and do not leave the ignition of
a vehicle equipped with Keyless
Enter-N-Go in the ACC or ON/RUN
mode. A child could operate power
windows, other controls, or move the
vehicle.
Do not leave children or animals inside
parked vehicles in hot weather. Interior
heat build-up may cause serious injury or
death.
CAUTION!
The engine is allowed to crank as long as
30 seconds. If the engine fails to start
during this period, please wait at least two
minutes for the starter to cool before
repeating start procedure.
WARNING! (Continued)
2020_JEEP_CHEROKEE_UG_RHD_UK.book Page 139