lock JEEP CHEROKEE 2020 Owner handbook (in English)
[x] Cancel search | Manufacturer: JEEP, Model Year: 2020, Model line: CHEROKEE, Model: JEEP CHEROKEE 2020Pages: 332, PDF Size: 8.87 MB
Page 191 of 332
189
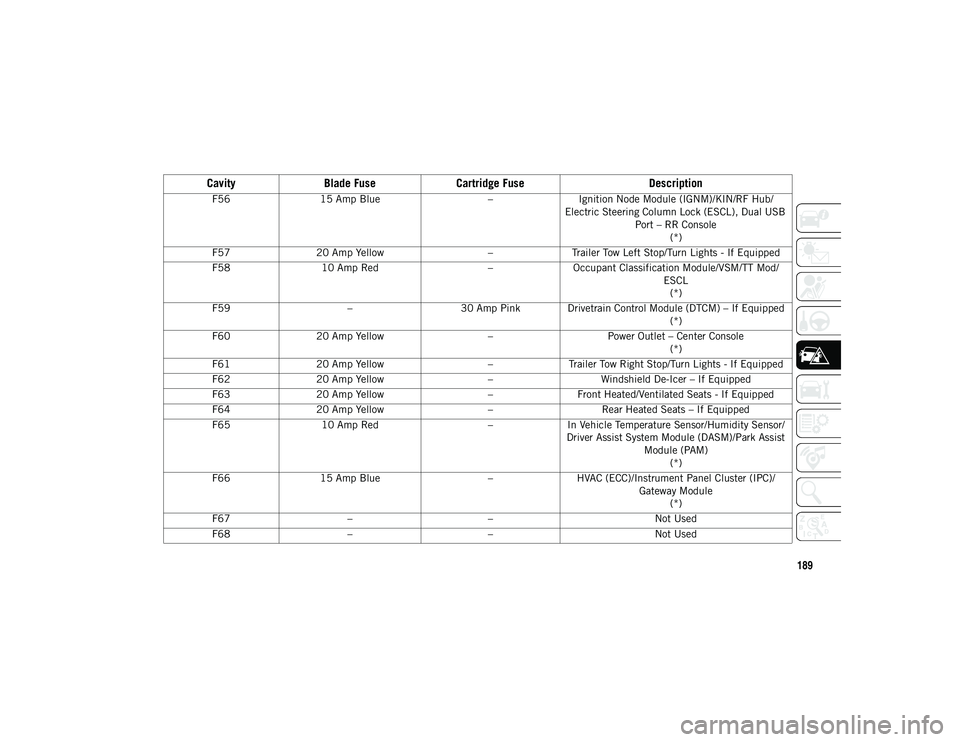
F5615 Amp Blue –Ignition Node Module (IGNM)/KIN/RF Hub/
Electric Steering Column Lock (ESCL), Dual USB Port – RR Console(*)
F57 20 Amp Yellow –Trailer Tow Left Stop/Turn Lights - If Equipped
F58 10 Amp Red –Occupant Classification Module/VSM/TT Mod/
ESCL(*)
F59 –30 Amp Pink Drivetrain Control Module (DTCM) – If Equipped
(*)
F60 20 Amp Yellow –Power Outlet – Center Console
(*)
F61 20 Amp Yellow –Trailer Tow Right Stop/Turn Lights - If Equipped
F62 20 Amp Yellow –Windshield De-Icer – If Equipped
F63 20 Amp Yellow –Front Heated/Ventilated Seats - If Equipped
F64 20 Amp Yellow –Rear Heated Seats – If Equipped
F65 10 Amp Red –In Vehicle Temperature Sensor/Humidity Sensor/
Driver Assist System Module (DASM)/Park Assist Module (PAM)(*)
F66 15 Amp Blue –HVAC (ECC)/Instrument Panel Cluster (IPC)/
Gateway Module(*)
F67 – – Not Used
F68 – – Not Used
CavityBlade Fuse Cartridge Fuse Description
2020_JEEP_CHEROKEE_UG_RHD_UK.book Page 189
Page 195 of 332
193
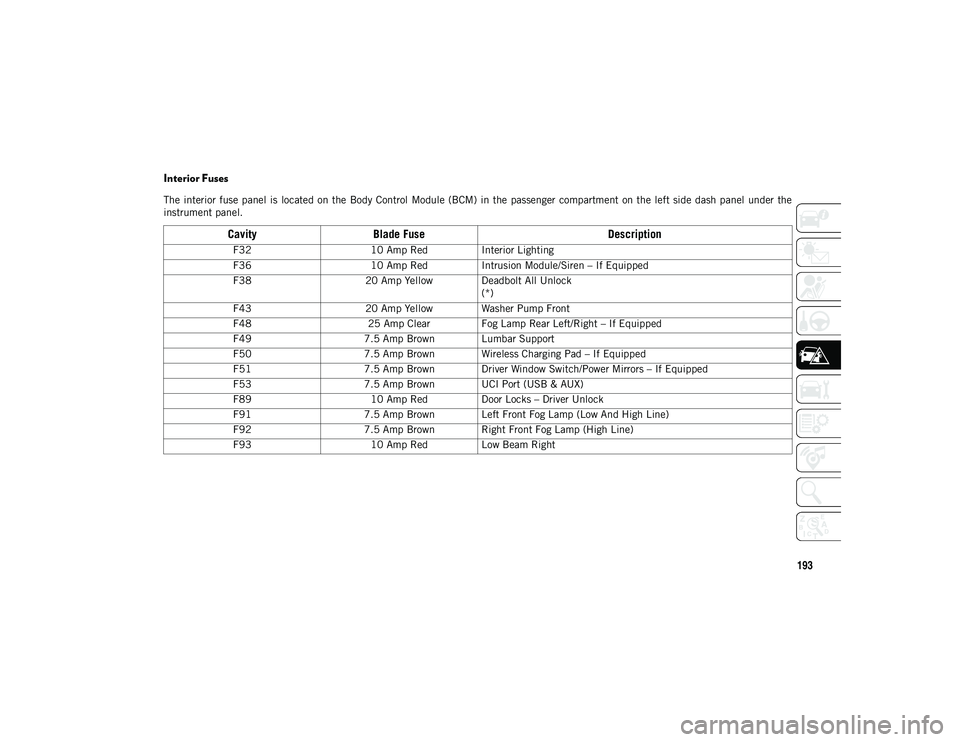
Interior Fuses
The interior fuse panel is located on the Body Control Module (BCM) in the passenger compartment on the left side dash panel under the
instrument panel.
CavityBlade Fuse Description
F3210 Amp RedInterior Lighting
F36 10 Amp RedIntrusion Module/Siren – If Equipped
F38 20 Amp Yellow Deadbolt All Unlock
(*)
F43 20 Amp Yellow Washer Pump Front
F48 25 Amp Clear Fog Lamp Rear Left/Right – If Equipped
F49 7.5 Amp Brown Lumbar Support
F50 7.5 Amp Brown Wireless Charging Pad – If Equipped
F51 7.5 Amp Brown Driver Window Switch/Power Mirrors – If Equipped
F53 7.5 Amp Brown UCI Port (USB & AUX)
F89 10 Amp RedDoor Locks – Driver Unlock
F91 7.5 Amp Brown Left Front Fog Lamp (Low And High Line)
F92 7.5 Amp Brown Right Front Fog Lamp (High Line)
F93 10 Amp RedLow Beam Right
2020_JEEP_CHEROKEE_UG_RHD_UK.book Page 193
Page 198 of 332
IN CASE OF EMERGENCY
196
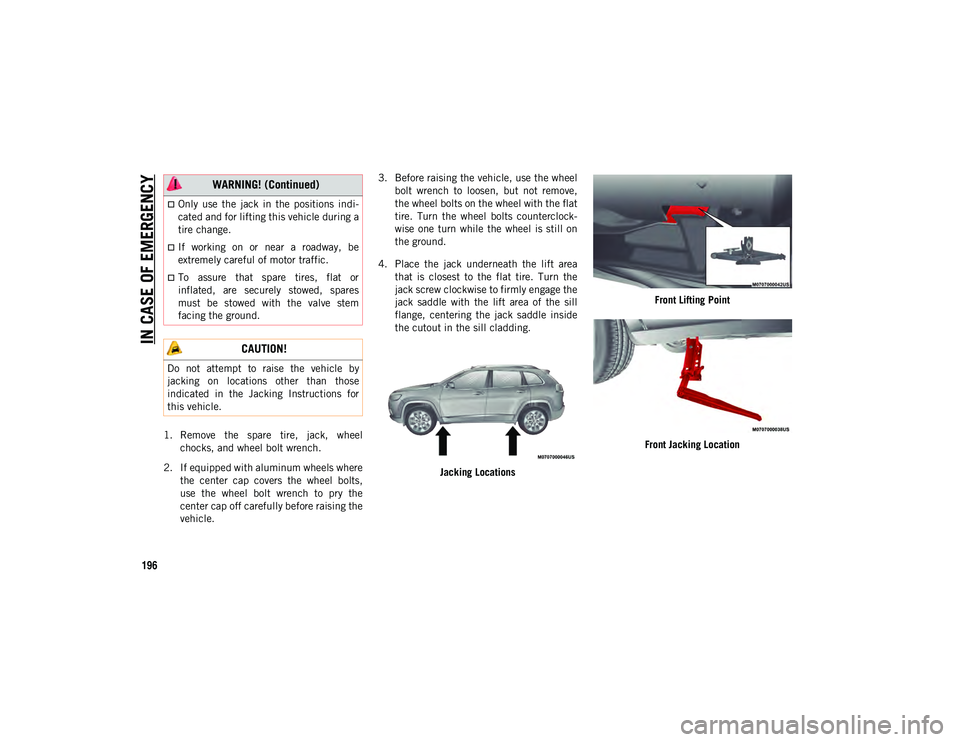
1. Remove the spare tire, jack, wheelchocks, and wheel bolt wrench.
2. If equipped with aluminum wheels where the center cap covers the wheel bolts,
use the wheel bolt wrench to pry the
center cap off carefully before raising the
vehicle. 3. Before raising the vehicle, use the wheel
bolt wrench to loosen, but not remove,
the wheel bolts on the wheel with the flat
tire. Turn the wheel bolts counterclock -
wise one turn while the wheel is still on
the ground.
4. Place the jack underneath the lift area that is closest to the flat tire. Turn the
jack screw clockwise to firmly engage the
jack saddle with the lift area of the sill
flange, centering the jack saddle inside
the cutout in the sill cladding.
Jacking Locations Front Lifting Point
Front Jacking Location
Only use the jack in the positions indi -
cated and for lifting this vehicle during a
tire change.
If working on or near a roadway, be
extremely careful of motor traffic.
To assure that spare tires, flat or
inflated, are securely stowed, spares
must be stowed with the valve stem
facing the ground.
CAUTION!
Do not attempt to raise the vehicle by
jacking on locations other than those
indicated in the Jacking Instructions for
this vehicle.
WARNING! (Continued)
2020_JEEP_CHEROKEE_UG_RHD_UK.book Page 196
Page 200 of 332
IN CASE OF EMERGENCY
198
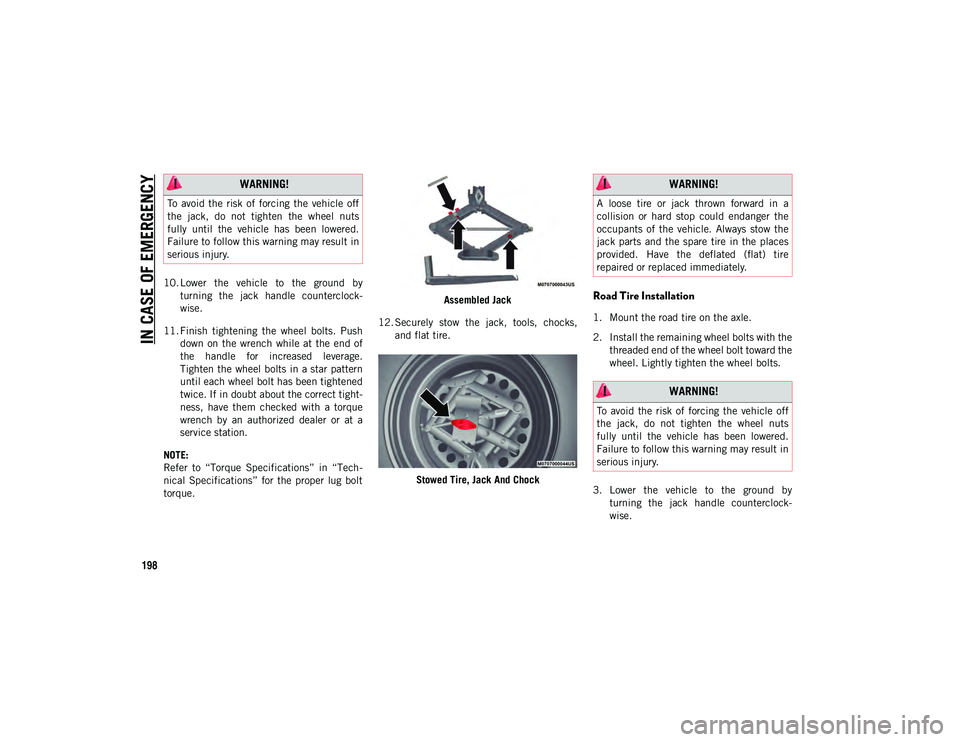
10. Lower the vehicle to the ground byturning the jack handle counterclock -
wise.
11. Finish tightening the wheel bolts. Push down on the wrench while at the end of
the handle for increased leverage.
Tighten the wheel bolts in a star pattern
until each wheel bolt has been tightened
twice. If in doubt about the correct tight -
ness, have them checked with a torque
wrench by an authorized dealer or at a
service station.
NOTE:
Refer to “Torque Specifications” in “Tech -
nical Specifications” for the proper lug bolt
torque. Assembled Jack
12. Securely stow the jack, tools, chocks, and flat tire.
Stowed Tire, Jack And Chock
Road Tire Installation
1. Mount the road tire on the axle.
2. Install the remaining wheel bolts with thethreaded end of the wheel bolt toward the
wheel. Lightly tighten the wheel bolts.
3. Lower the vehicle to the ground by turning the jack handle counterclock -
wise.
WARNING!
To avoid the risk of forcing the vehicle off
the jack, do not tighten the wheel nuts
fully until the vehicle has been lowered.
Failure to follow this warning may result in
serious injury.
WARNING!
A loose tire or jack thrown forward in a
collision or hard stop could endanger the
occupants of the vehicle. Always stow the
jack parts and the spare tire in the places
provided. Have the deflated (flat) tire
repaired or replaced immediately.
WARNING!
To avoid the risk of forcing the vehicle off
the jack, do not tighten the wheel nuts
fully until the vehicle has been lowered.
Failure to follow this warning may result in
serious injury.
2020_JEEP_CHEROKEE_UG_RHD_UK.book Page 198
Page 211 of 332
209
(F) Sealant Bottle And Hose Replacement:
1. Uncoil the Sealant Hose (clear in color).
2. Locate the red colored round SealantBottle release button at the lower right
hand corner of the kit.
3. Push and hold the Sealant Bottle release button, then pull out the bottle holding
the button.
4. Clean any remaining sealant from the Tire Service Kit housing.
5. Position the new Sealant Bottle in the housing so that the Sealant Hose aligns
with the hose slot in the front of the
housing. Push and hold the Sealant
Bottle release button, then push the
bottle into the housing by holding the
button. An audible click will be heard
indicating the bottle is locked into place.
Release the button.
6. Verify that the cap is installed on the fitting at the end of the Sealant Hose and
return the hose to its storage area
(located on top of the housing).
7. Return the Tire Service Kit to its storage location in the vehicle.
JUMP STARTING
If your vehicle has a discharged battery, it
can be jump started using a set of jumper
cables and a battery in another vehicle or by
using a portable battery booster pack. Jump
starting can be dangerous if done improp -
erly, so please follow the procedures in this
section carefully.
NOTE:
When using a portable battery booster pack,
follow the manufacturer’s operating instruc -
tions and precautions.
WARNING!
As required by current regulations, the
information on chemical substances for
the protection of human health and the
environment and on the safe use of the
sealing fluid are on the packaging label.
Compliance with the indications on the
label is an essential condition to ensure
the safety and effectiveness of the
product. Remember to carefully read the
label before use. The user of the product is
responsible for any damages caused by
improper use. The sealing fluid has an
expiration date. Replace the bottle if the
sealant has expired.
CAUTION!
Dispose of the bottle and the sealant
liquid properly. Have them disposed of in
compliance with national and local
regulations.
WARNING!
Do not attempt jump starting if the battery
is frozen. It could rupture or explode and
cause personal injury.
CAUTION!
Do not use a portable battery booster pack
or any other booster source with a system
voltage greater than 12 Volts or damage to
the battery, starter motor, alternator or
electrical system may occur.
2020_JEEP_CHEROKEE_UG_RHD_UK.book Page 209
Page 216 of 332
IN CASE OF EMERGENCY
214
FREEING A STUCK VEHICLE
If your vehicle becomes stuck in mud, sand
or snow, it can often be moved using a
rocking motion. Turn the steering wheel right
and left to clear the area around the front
wheels. For vehicles with automatic trans-
mission, push and hold the lock button on
the gear selector. Then shift back and forth
between DRIVE and REVERSE (with auto -
matic transmission) or SECOND GEAR and
REVERSE (with manual transmission), while
gently pressing the accelerator.
NOTE:
For vehicles with automatic transmission:
Shifts between DRIVE and REVERSE can
only be achieved at wheel speeds of 5 mph
(8 km/h) or less. Whenever the transmission
remains in NEUTRAL for more than two
seconds, you must press the brake pedal to
engage DRIVE or REVERSE.
Use the least amount of accelerator pedal
pressure that will maintain the rocking
motion without spinning the wheels or racing
the engine. NOTE:
Push the “ESC OFF” switch (if necessary), to
place the Electronic Stability Control (ESC)
system in “Partial Off” mode, before rocking
the vehicle. Refer to “Electronic Brake
Control System” in “Safety” for further infor
-
mation. Once the vehicle has been freed,
push the "ESC OFF" switch again to restore
“ESC On” mode.
CAUTION!
Racing the engine or spinning the wheels
may lead to transmission overheating
and failure. Allow the engine to idle with
the transmission in NEUTRAL for at
least one minute after every five
rocking-motion cycles. This will mini -
mize overheating and reduce the risk of
clutch or transmission failure during
prolonged efforts to free a stuck vehicle.
When “rocking” a stuck vehicle by
shifting between DRIVE/SECOND GEAR
and REVERSE, do not spin the wheels
faster than 15 mph (24 km/h), or drive -
train damage may result.
Revving the engine or spinning the
wheels too fast may lead to transmission
overheating and failure. It can also
damage the tires. Do not spin the wheels
above 30 mph (48 km/h) while in gear
(no transmission shifting occurring).
WARNING!
Fast spinning tires can be dangerous.
Forces generated by excessive wheel
speeds may cause damage, or even failure,
of the axle and tires. A tire could explode
and injure someone. Do not spin your
vehicle's wheels faster than 30 mph
(48 km/h) or for longer than 30 seconds
continuously without stopping when you
are stuck and do not let anyone near a
spinning wheel, no matter what the speed.
2020_JEEP_CHEROKEE_UG_RHD_UK.book Page 214
Page 218 of 332
IN CASE OF EMERGENCY
216
Without The Key Fob
Special care must be taken when the vehicle
is towed with the ignition in the LOCK/OFF
mode. The only approved method of towing
without the key fob is with a flatbed truck.
Proper towing equipment is necessary to
prevent damage to the vehicle.
Front-Wheel Drive (FWD) Models
The manufacturer recommends towing your
vehicle with all four wheels OFF the ground
using a flatbed.
If flatbed equipment is not available, this
vehicle must be towed with the front wheels
OFF the ground (using a towing dolly, or
wheel lift equipment with the front wheels
raised).
Ensure that the Electric Park Brake is
released, and remains released, while being
towed. The Electric Park Brake does not
need to be released, if all four wheels are off
the ground.
4x4 Models
The manufacturer requires towing with all
four wheels OFF the ground.
Acceptable methods are to tow the vehicle
on a flatbed, or with one end of vehicle raised
and the opposite end on a towing dolly.
CAUTION!
Do not use sling-type equipment when
towing. Vehicle damage may occur.
When securing the vehicle to a flatbed
truck, do not attach to front or rear
suspension components. Damage to your
vehicle may result from improper towing.
Ensure that the Electric Park Brake is
released, and remains released, while
being towed.
CAUTION!
Towing this vehicle in violation of the
above requirements can cause severe
engine and/or transmission damage.
Damage from improper towing is not
covered under the New Vehicle Limited
Warranty.
CAUTION!
Front or rear wheel lifts must not be used
(if the remaining wheels are on the
ground). Internal damage to the trans-
mission or power transfer unit will occur
if a front or rear wheel lift is used when
towing.
Towing this vehicle in violation of the
above requirements can cause severe
transmission and/or power transfer unit
damage. Damage from improper towing
is not covered under the New Vehicle
Limited Warranty.
2020_JEEP_CHEROKEE_UG_RHD_UK.book Page 216
Page 240 of 332
SERVICING AND MAINTENAN
CE
238
The wiper blades and wiper arms should be
inspected periodically, not just when wiper
performance problems are experienced. This
inspection should include the following
points:
Wear or uneven edges
Foreign material
Hardening or cracking
Deformation or fatigue
If a wiper blade or wiper arm is damaged,
replace the affected wiper arm or blade with
a new unit. Do not attempt to repair a wiper
arm or blade that is damaged.
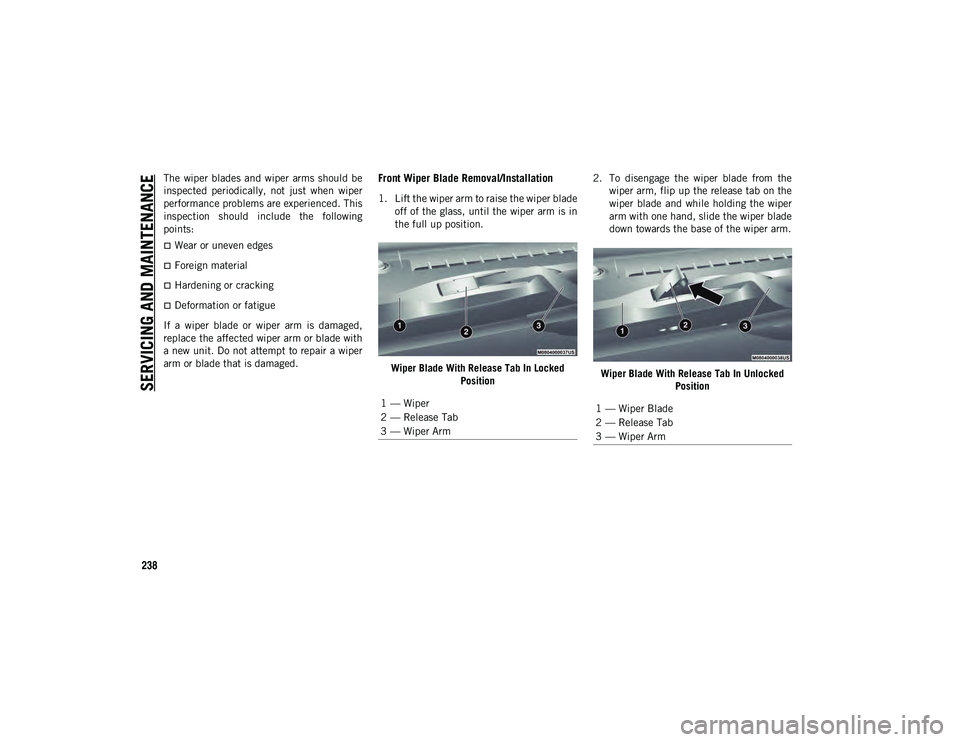
Front Wiper Blade Removal/Installation
1. Lift the wiper arm to raise the wiper blade off of the glass, until the wiper arm is in
the full up position.
Wiper Blade With Release Tab In Locked Position 2. To disengage the wiper blade from the
wiper arm, flip up the release tab on the
wiper blade and while holding the wiper
arm with one hand, slide the wiper blade
down towards the base of the wiper arm.
Wiper Blade With Release Tab In Unlocked Position
1 — Wiper
2 — Release Tab
3 — Wiper Arm
1 — Wiper Blade
2 — Release Tab
3 — Wiper Arm
2020_JEEP_CHEROKEE_UG_RHD_UK.book Page 238
Page 241 of 332
239
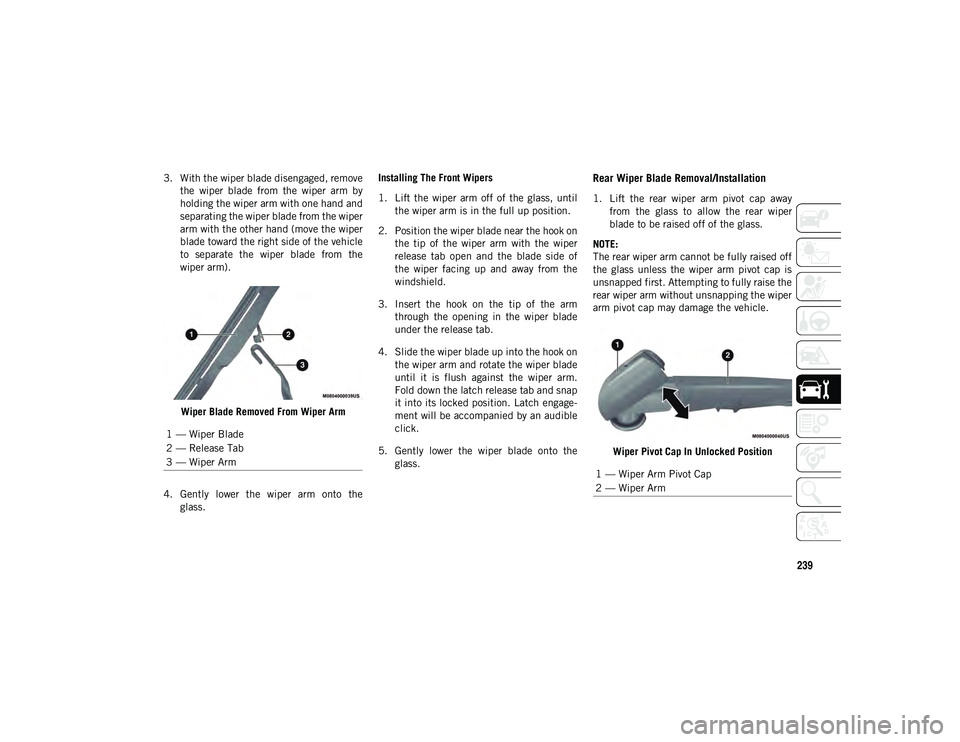
3. With the wiper blade disengaged, removethe wiper blade from the wiper arm by
holding the wiper arm with one hand and
separating the wiper blade from the wiper
arm with the other hand (move the wiper
blade toward the right side of the vehicle
to separate the wiper blade from the
wiper arm).
Wiper Blade Removed From Wiper Arm
4. Gently lower the wiper arm onto the glass. Installing The Front Wipers
1. Lift the wiper arm off of the glass, until
the wiper arm is in the full up position.
2. Position the wiper blade near the hook on the tip of the wiper arm with the wiper
release tab open and the blade side of
the wiper facing up and away from the
windshield.
3. Insert the hook on the tip of the arm through the opening in the wiper blade
under the release tab.
4. Slide the wiper blade up into the hook on the wiper arm and rotate the wiper blade
until it is flush against the wiper arm.
Fold down the latch release tab and snap
it into its locked position. Latch engage -
ment will be accompanied by an audible
click.
5. Gently lower the wiper blade onto the glass.Rear Wiper Blade Removal/Installation
1. Lift the rear wiper arm pivot cap awayfrom the glass to allow the rear wiper
blade to be raised off of the glass.
NOTE:
The rear wiper arm cannot be fully raised off
the glass unless the wiper arm pivot cap is
unsnapped first. Attempting to fully raise the
rear wiper arm without unsnapping the wiper
arm pivot cap may damage the vehicle.
Wiper Pivot Cap In Unlocked Position
1 — Wiper Blade
2 — Release Tab
3 — Wiper Arm
1 — Wiper Arm Pivot Cap
2 — Wiper Arm
2020_JEEP_CHEROKEE_UG_RHD_UK.book Page 239
Page 257 of 332
255
TECHNICAL SPECIFICATIONS
VEHICLE IDENTIFICATION
NUMBER
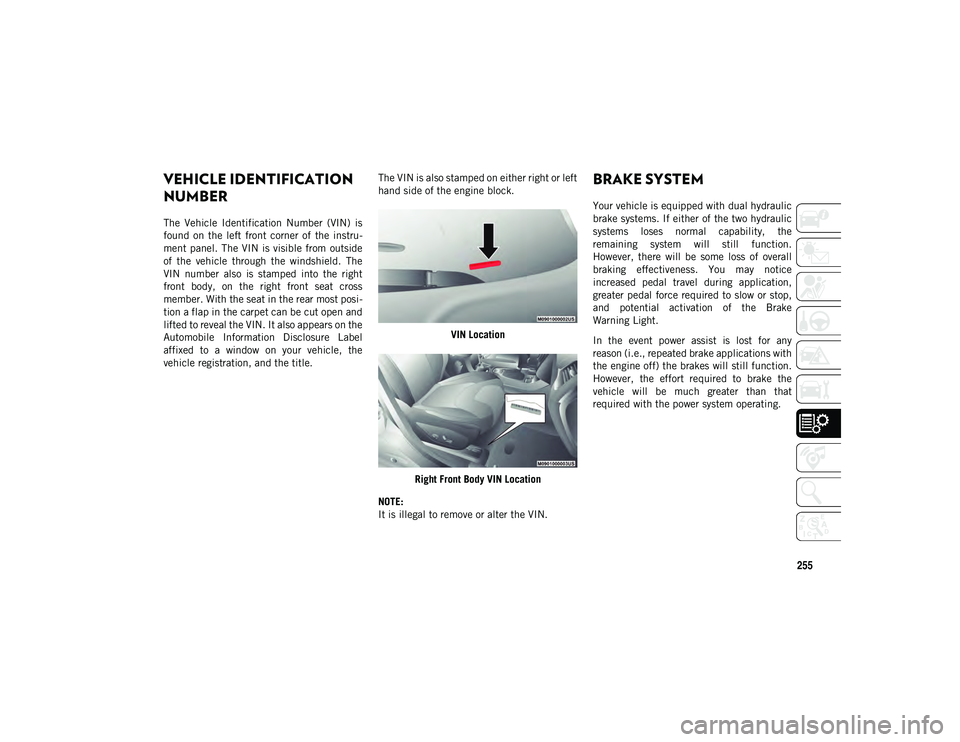
The Vehicle Identification Number (VIN) is
found on the left front corner of the instru-
ment panel. The VIN is visible from outside
of the vehicle through the windshield. The
VIN number also is stamped into the right
front body, on the right front seat cross
member. With the seat in the rear most posi -
tion a flap in the carpet can be cut open and
lifted to reveal the VIN. It also appears on the
Automobile Information Disclosure Label
affixed to a window on your vehicle, the
vehicle registration, and the title. The VIN is also stamped on either right or left
hand side of the engine block.
VIN Location
Right Front Body VIN Location
NOTE:
It is illegal to remove or alter the VIN.
BRAKE SYSTEM
Your vehicle is equipped with dual hydraulic
brake systems. If either of the two hydraulic
systems loses normal capability, the
remaining system will still function.
However, there will be some loss of overall
braking effectiveness. You may notice
increased pedal travel during application,
greater pedal force required to slow or stop,
and potential activation of the Brake
Warning Light.
In the event power assist is lost for any
reason (i.e., repeated brake applications with
the engine off) the brakes will still function.
However, the effort required to brake the
vehicle will be much greater than that
required with the power system operating.
2020_JEEP_CHEROKEE_UG_RHD_UK.book Page 255