tow JEEP CHEROKEE 2020 Owner handbook (in English)
[x] Cancel search | Manufacturer: JEEP, Model Year: 2020, Model line: CHEROKEE, Model: JEEP CHEROKEE 2020Pages: 332, PDF Size: 8.87 MB
Page 11 of 332
9
SPEED CONTROL ................................. 160
To Activate .................................. 160
To Set A Desired Speed................. 160
To Resume Speed ........................ 160
To Deactivate .............................. 161
ADAPTIVE CRUISE CONTROL (ACC) —
IF EQUIPPED ....................................... 161
Activating Adaptive Cruise
Control (ACC) ............................... 162 To Set A Desired ACC Speed.......... 162
Resume ....................................... 162
To Vary The Speed Setting............. 163
Setting The Following Distance
In ACC ........................................ 164
PARKSENSE REAR PARK ASSIST —
IF EQUIPPED ....................................... 164
ParkSense Sensors ....................... 164
ParkSense Warning Display ........... 164
Enabling And Disabling ParkSense .... 165
ParkSense System Usage
Precautions .................................. 165
PARKSENSE FRONT AND REAR PARK
ASSIST — IF EQUIPPED ....................... 166
ParkSense Sensors ....................... 167
Enabling And Disabling
ParkSense ................................... 167
PARKSENSE ACTIVE PARK ASSIST
SYSTEM — IF EQUIPPED ...................... 168 LANESENSE — IF EQUIPPED ................168
LaneSense Operation .................... 168
Turning LaneSense On Or Off ........ 169
LaneSense Warning Message ......... 169
Changing LaneSense Status .......... 171
PARKVIEW REAR BACK UP CAMERA —
IF EQUIPPED ........................................171
REFUELING THE VEHICLE .....................172
REFUELING THE VEHICLE —
DIESEL ENGINE ....................................173
Adblue® (UREA) — If Equipped.... 175
VEHICLE LOADING ...............................177
Weights Label .............................. 177
TRAILER TOWING .................................179
Trailer Towing Weights
(Maximum Trailer Weight Ratings)..... 179
RECREATIONAL TOWING (BEHIND
MOTORHOME, ETC.) ............................180
Towing This Vehicle Behind Another
Vehicle ........................................ 180 Recreational Towing —
Front-Wheel Drive (FWD) Models ... 181 Recreational Towing —
4x4 Models ................................. 181
IN CASE OF EMERGENCY
HAZARD WARNING FLASHERS...............182 BULB REPLACEMENT ............................183
Replacement Bulbs .......................183
Replacing Exterior Bulbs ...............184
FUSES .................................................184
General Information ......................184
Underhood Fuses ..........................185
Interior Fuses ...............................193
JACKING AND TIRE CHANGING...............194
Jack Location/Spare Tire Stowage ...194
Preparations For Jacking................195
Jacking Instructions ......................195
Road Tire Installation ....................198
Declaration Of Conformance ..........199
Jack Usage Precautions .................202
TIRE SERVICE KIT — IF EQUIPPED ........203
Tire Service Kit Storage .................203
Tire Service Kit Components And
Operation .....................................203 Tire Service Kit Usage
Precautions ..................................204 Sealing A Tire With Tire Service
Kit...............................................205
JUMP STARTING ..................................209
Preparations For Jump Start...........210
Jump Starting Procedure ...............210
REFUELING IN EMERGENCY —
IF EQUIPPED .......................................212
2020_JEEP_CHEROKEE_UG_RHD_UK.book Page 9
Page 12 of 332
10
IF YOUR ENGINE OVERHEATS ............... 212
GEAR SELECTOR OVERRIDE .................. 213FREEING A STUCK VEHICLE .................. 214TOWING A DISABLED VEHICLE ............. 215
Without The Key Fob .................... 216
Front-Wheel Drive (FWD) Models .... 216
4x4 Models .................................. 216
Recovery Strap — If Equipped ....... 217
ENHANCED ACCIDENT RESPONSE
SYSTEM (EARS) .................................. 217
EVENT DATA RECORDER (EDR) .............. 217
SERVICING AND MAINTENANCE
SCHEDULED SERVICING ....................... 218
Scheduled Servicing —
Gasoline Engine .......................... 218 Scheduled Servicing —
Diesel Engine ............................... 224
ENGINE COMPARTMENT ....................... 229
2.0L Engine ................................ 229
2.4L Engine ................................ 230
3.2L Engine ................................ 231
2.2L Diesel Engine ...................... 232
Checking Oil Level ........................ 233
Cooling System ............................ 234
Adding Washer Fluid .................... 234
Brake System .............................. 234 Manual Transmission —
If Equipped ................................. 236 Automatic Transmission —
If Equipped ................................. 236 Maintenance-Free Battery ............ 236
Pressure Washing ......................... 237
DEALER SERVICE ................................237
Windshield Wiper Blades ............. 237
RAISING THE VEHICLE ..........................241
TIRES .................................................241
Tires — General Information ........ 241
Tire Types ................................... 246
Spare Tires — If Equipped ........... 246
Wheel And Wheel Trim Care ......... 248
Tire Chains And Traction
Devices ...................................... 249 Tire Rotation Recommendations .... 250
STORING THE VEHICLE .........................251BODYWORK .........................................252
Preserving The Bodywork .............. 252
INTERIORS .........................................253
Seats And Fabric Parts ................. 253
Plastic And Coated Parts............... 254
Leather Parts ............................... 254
Glass Surfaces ............................ 254
TECHNICAL SPECIFICATIONS
VEHICLE IDENTIFICATION NUMBER........255BRAKE SYSTEM ...................................255
WHEEL AND TIRE TORQUE
SPECIFICATIONS ..................................256
Torque Specifications ....................256
WHEELS ..............................................256
WEIGHTS.............................................256
FUEL REQUIREMENTS —
GASOLINE ENGINES ..............................257
2.0L Engine .................................257
2.4L And 3.2L Engines .................257
Materials Added To Fuel ................257
Fuel Icon Identification Compliant
To EN16942 ................................257
FUEL REQUIREMENTS —
DIESEL ENGINE ....................................259
Fuel Icon Identification Compliant
To EN16942 ................................259
FLUID CAPACITIES ..............................261
FLUIDS AND LUBRICANTS .....................262
Engine .........................................262
Chassis ........................................265
FUEL CONSUMPTION AND
CO
2 EMISSIONS ..................................266
MOPAR ACCESSORIES .........................266
Authentic Accessories By Mopar .....266
2020_JEEP_CHEROKEE_UG_RHD_UK.book Page 10
Page 17 of 332
15
NOTE:
Used batteries may be harmful to the envi-
ronment if not disposed of correctly. Always
dispose of used batteries by specialized
battery disposal container, or by taking used
batteries to an authorized dealer.
Duplication of key fobs may be performed at
an authorized dealer. This procedure
consists of programming a blank key fob to
the vehicle electronics. A blank key fob is
one that has never been programmed.
NOTE:
When having the Sentry Key Immobilizer
System serviced, bring all vehicle keys with
you to an authorized dealer.
IGNITION SWITCH
Ignition Node Module (IGNM) — If
Equipped
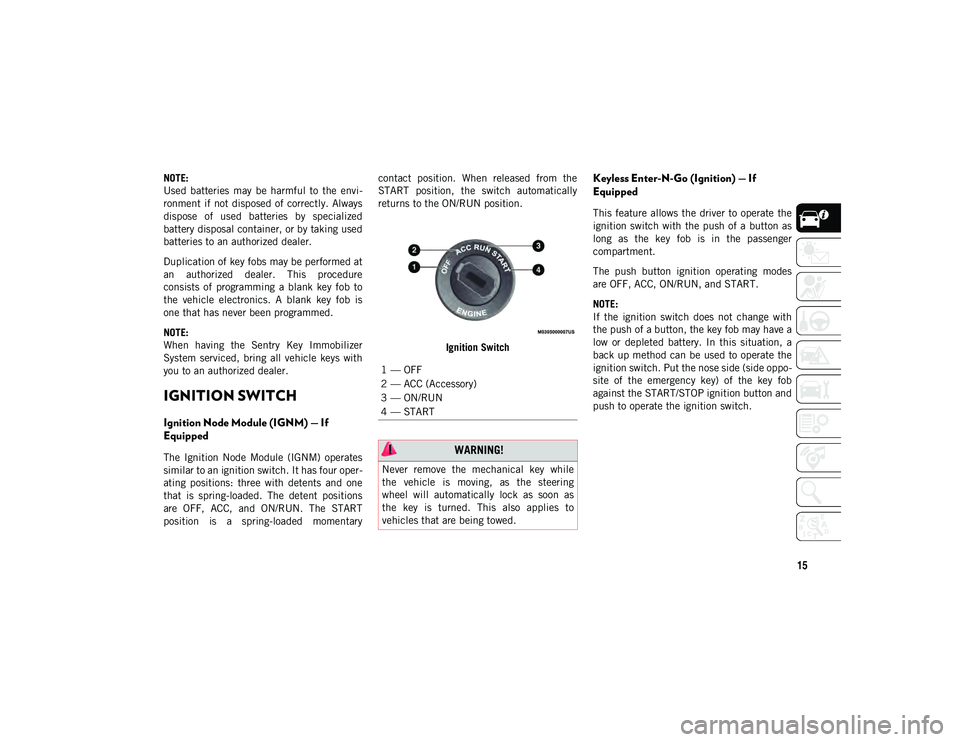
The Ignition Node Module (IGNM) operates
similar to an ignition switch. It has four oper -
ating positions: three with detents and one
that is spring-loaded. The detent positions
are OFF, ACC, and ON/RUN. The START
position is a spring-loaded momentary contact position. When released from the
START position, the switch automatically
returns to the ON/RUN position.
Ignition Switch
Keyless Enter-N-Go (Ignition) — If
Equipped
This feature allows the driver to operate the
ignition switch with the push of a button as
long as the key fob is in the passenger
compartment.
The push button ignition operating modes
are OFF, ACC, ON/RUN, and START.
NOTE:
If the ignition switch does not change with
the push of a button, the key fob may have a
low or depleted battery. In this situation, a
back up method can be used to operate the
ignition switch. Put the nose side (side oppo -
site of the emergency key) of the key fob
against the START/STOP ignition button and
push to operate the ignition switch.
1 — OFF
2 — ACC (Accessory)
3 — ON/RUN
4 — START
WARNING!
Never remove the mechanical key while
the vehicle is moving, as the steering
wheel will automatically lock as soon as
the key is turned. This also applies to
vehicles that are being towed.
2020_JEEP_CHEROKEE_UG_RHD_UK.book Page 15
Page 29 of 332
27
(Continued)
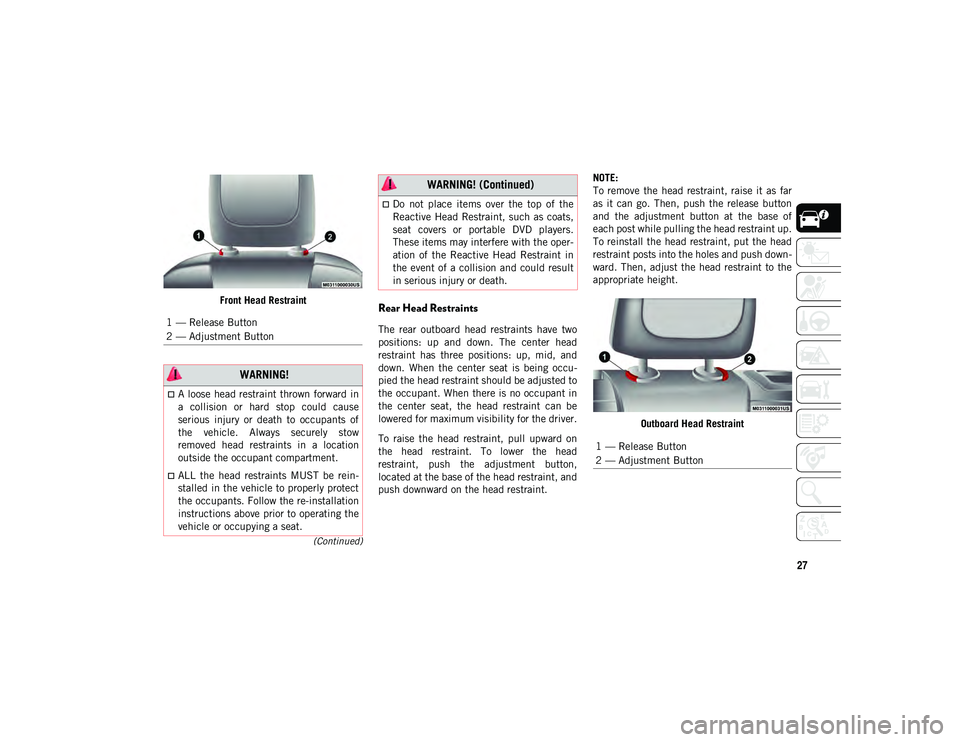
Front Head RestraintRear Head Restraints
The rear outboard head restraints have two
positions: up and down. The center head
restraint has three positions: up, mid, and
down. When the center seat is being occu-
pied the head restraint should be adjusted to
the occupant. When there is no occupant in
the center seat, the head restraint can be
lowered for maximum visibility for the driver.
To raise the head restraint, pull upward on
the head restraint. To lower the head
restraint, push the adjustment button,
located at the base of the head restraint, and
push downward on the head restraint. NOTE:
To remove the head restraint, raise it as far
as it can go. Then, push the release button
and the adjustment button at the base of
each post while pulling the head restraint up.
To reinstall the head restraint, put the head
restraint posts into the holes and push down
-
ward. Then, adjust the head restraint to the
appropriate height.
Outboard Head Restraint
1 — Release Button
2 — Adjustment Button
WARNING!
A loose head restraint thrown forward in
a collision or hard stop could cause
serious injury or death to occupants of
the vehicle. Always securely stow
removed head restraints in a location
outside the occupant compartment.
ALL the head restraints MUST be rein
-
stalled in the vehicle to properly protect
the occupants. Follow the re-installation
instructions above prior to operating the
vehicle or occupying a seat.
Do not place items over the top of the
Reactive Head Restraint, such as coats,
seat covers or portable DVD players.
These items may interfere with the oper -
ation of the Reactive Head Restraint in
the event of a collision and could result
in serious injury or death.
WARNING! (Continued)
1 — Release Button
2 — Adjustment Button
2020_JEEP_CHEROKEE_UG_RHD_UK.book Page 27
Page 30 of 332
GETTING TO KNOW YOUR VEHICLE
28
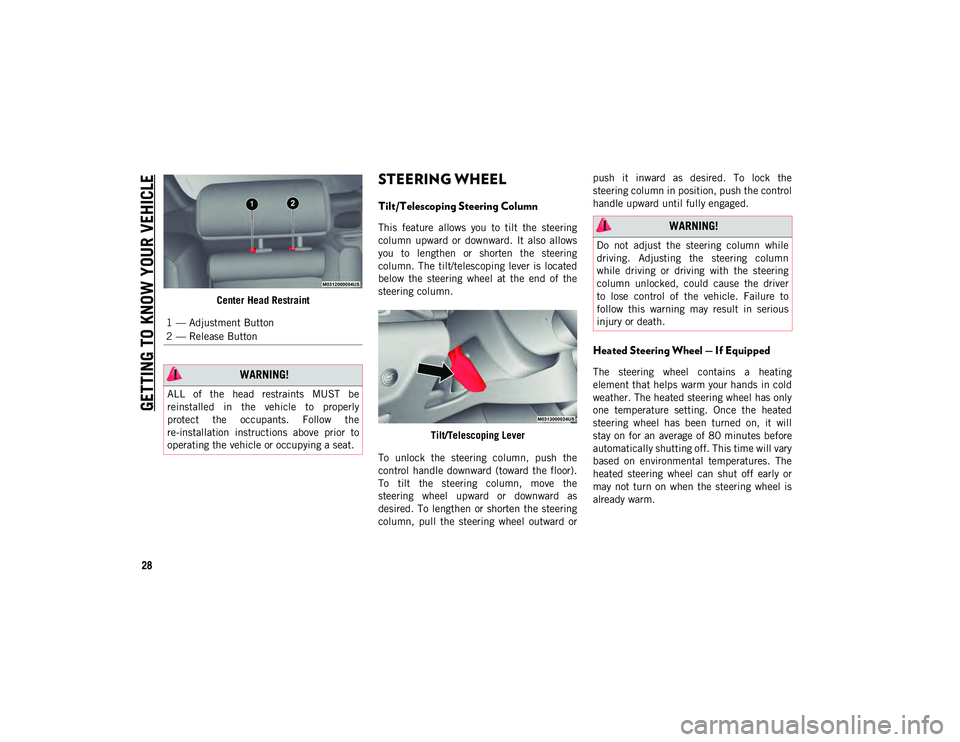
Center Head Restraint
STEERING WHEEL
Tilt/Telescoping Steering Column
This feature allows you to tilt the steering
column upward or downward. It also allows
you to lengthen or shorten the steering
column. The tilt/telescoping lever is located
below the steering wheel at the end of the
steering column.Tilt/Telescoping Lever
To unlock the steering column, push the
control handle downward (toward the floor).
To tilt the steering column, move the
steering wheel upward or downward as
desired. To lengthen or shorten the steering
column, pull the steering wheel outward or push it inward as desired. To lock the
steering column in position, push the control
handle upward until fully engaged.
Heated Steering Wheel — If Equipped
The steering wheel contains a heating
element that helps warm your hands in cold
weather. The heated steering wheel has only
one temperature setting. Once the heated
steering wheel has been turned on, it will
stay on for an average of 80 minutes before
automatically shutting off. This time will vary
based on environmental temperatures. The
heated steering wheel can shut off early or
may not turn on when the steering wheel is
already warm.
1 — Adjustment Button
2 — Release Button WARNING!
ALL of the head restraints MUST be
reinstalled in the vehicle to properly
protect the occupants. Follow the
re-installation instructions above prior to
operating the vehicle or occupying a seat.
WARNING!
Do not adjust the steering column while
driving. Adjusting the steering column
while driving or driving with the steering
column unlocked, could cause the driver
to lose control of the vehicle. Failure to
follow this warning may result in serious
injury or death.
2020_JEEP_CHEROKEE_UG_RHD_UK.book Page 28
Page 33 of 332
31
High/Low Beam Switch
Push the multifunction lever, located on the
left side of the steering wheel, away from you
to switch the headlights to high beam. Pull
the multifunction lever toward you to switch
the headlights back to low beam.
Automatic High Beam Headlamp Control —
If Equipped
The Automatic High Beam Headlamp Control
system provides increased forward lighting at
night by automating high beam control
through the use of a digital camera mounted
on the windshield. This camera detects
vehicle specific light and automatically
switches from high beams to low beams until
the approaching vehicle is out of view.
NOTE:
The multifunction lever must be in the
high beam position in order to activate the
Automatic High Beams.
The Automatic High Beam Headlamp
Control can be turned on or off using the
Uconnect System. Refer to “Uconnect
Settings” in “Multimedia” in your Owner’s
Manual for further information.When set to AUTO, the system automatically
turns the headlights on or off based on
ambient light levels.
Flash-To-Pass
You can signal another vehicle with your
headlights by lightly pulling the multifunc
-
tion lever toward you. This will cause the
high beam headlights to turn on, and remain
on, until the lever is released.
Automatic Headlights — If Equipped
This system automatically turns the head -
lights on or off according to ambient light
levels. To turn the system on, rotate the
headlight switch clockwise to the last detent
(AUTO position) for automatic headlight
operation. When the system is on, the head -
light time delay feature is also on. This
means the headlights will stay on for up to
90 seconds after the ignition is placed in the
OFF position. To turn the automatic system
off, move the headlight switch out of the
AUTO position.
NOTE:
The engine must be running before the head -
lights will come on in the automatic mode.
Parking Lights
To operate the parking lights, the ignition
must be in the OFF position. Turn the head -
light switch to the “P” position. Then move
the multifunction lever up or down to turn on
the left or right side parking lights.
Headlights On With Wipers (Available
With Automatic Headlights Only)
When this feature is active, the headlights
will turn on after the wipers are turned on if
the headlight switch is placed in the AUTO
position and programmable feature is set to
ON. In addition, the headlights will turn off
when the wipers are turned off if they were
turned on by this feature.
NOTE:
The Headlights On with Wipers feature can
be turned on or off using the Uconnect
System.
Refer to “Uconnect Settings” in “Multi -
media” in the Owner’s Manual for further
information.
2020_JEEP_CHEROKEE_UG_RHD_UK.book Page 31
Page 36 of 332
GETTING TO KNOW YOUR VEHICLE
34
WINDSHIELD WIPERS AND
WASHERS
The windshield wiper/washer controls are
located on the windshield wiper/washer lever
on the right side of the steering column. The
front wipers are operated by rotating a
switch, located on the end of the lever. For
information on the rear wiper/washer, refer to
“Rear Window Wiper/Washer” in this
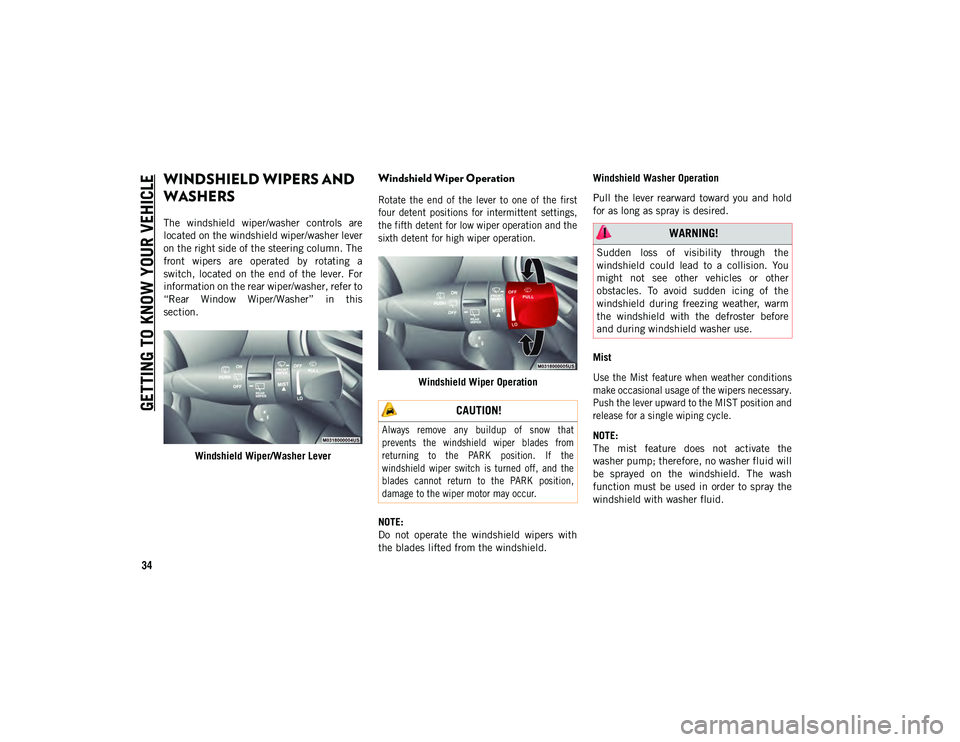
section.Windshield Wiper/Washer Lever
Windshield Wiper Operation
Rotate the end of the lever to one of the first
four detent positions for intermittent settings,
the fifth detent for low wiper operation and the
sixth detent for high wiper operation.
Windshield Wiper Operation
NOTE:
Do not operate the windshield wipers with
the blades lifted from the windshield. Windshield Washer Operation
Pull the lever rearward toward you and hold
for as long as spray is desired.
Mist
Use the Mist feature when weather conditions
make occasional usage of the wipers necessary.
Push the lever upward to the MIST position and
release for a single wiping cycle.
NOTE:
The mist feature does not activate the
washer pump; therefore, no washer fluid will
be sprayed on the windshield. The wash
function must be used in order to spray the
windshield with washer fluid.
CAUTION!
Always remove any buildup of snow that
prevents the windshield wiper blades from
returning to the PARK position. If the
windshield wiper switch is turned off, and the
blades cannot return to the PARK position,
damage to the wiper motor may occur.
WARNING!
Sudden loss of visibility through the
windshield could lead to a collision. You
might not see other vehicles or other
obstacles. To avoid sudden icing of the
windshield during freezing weather, warm
the windshield with the defroster before
and during windshield washer use.
2020_JEEP_CHEROKEE_UG_RHD_UK.book Page 34
Page 44 of 332
GETTING TO KNOW YOUR VEHICLE
42
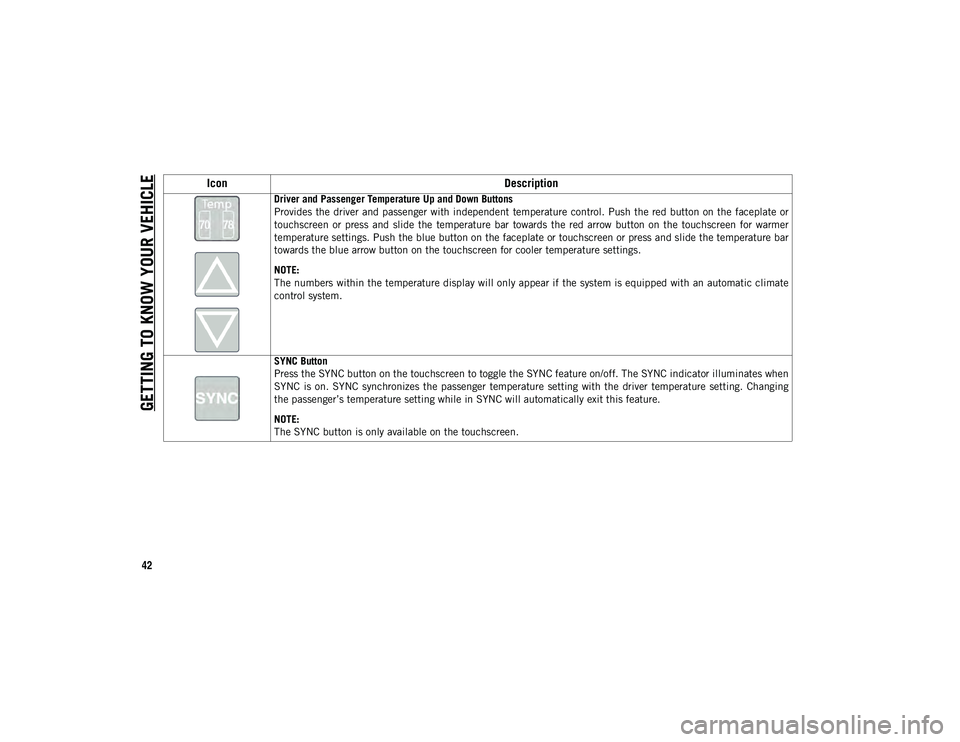
Driver and Passenger Temperature Up and Down Buttons
Provides the driver and passenger with independent temperature control. Push the red button on the faceplate or
touchscreen or press and slide the temperature bar towards the red arrow button on the touchscreen for warmer
temperature settings. Push the blue button on the faceplate or touchscreen or press and slide the temperature bar
towards the blue arrow button on the touchscreen for cooler temperature settings.
NOTE:
The numbers within the temperature display will only appear if the system is equipped with an automatic climate
control system.
SYNC Button
Press the SYNC button on the touchscreen to toggle the SYNC feature on/off. The SYNC indicator illuminates when
SYNC is on. SYNC synchronizes the passenger temperature setting with the driver temperature setting. Changing
the passenger’s temperature setting while in SYNC will automatically exit this feature.
NOTE:
The SYNC button is only available on the touchscreen.
IconDescription
2020_JEEP_CHEROKEE_UG_RHD_UK.book Page 42
Page 54 of 332
GETTING TO KNOW YOUR VEHICLE
52
HOOD
Opening The Hood
Two latches must be released to open the
hood.
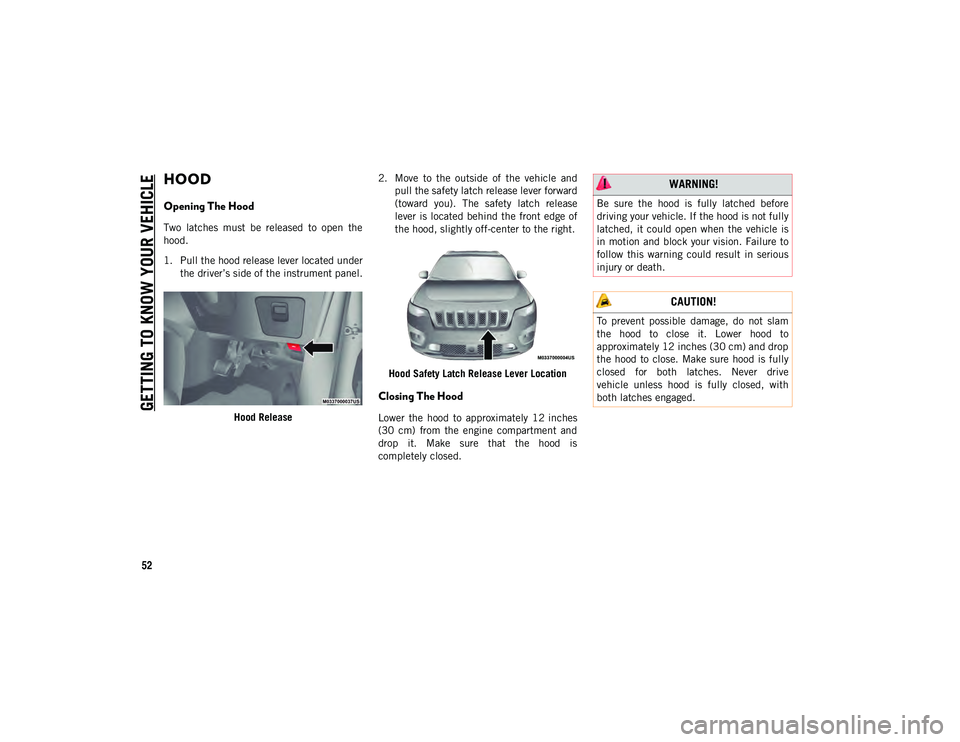
1. Pull the hood release lever located underthe driver’s side of the instrument panel.
Hood Release 2. Move to the outside of the vehicle and
pull the safety latch release lever forward
(toward you). The safety latch release
lever is located behind the front edge of
the hood, slightly off-center to the right.
Hood Safety Latch Release Lever Location
Closing The Hood
Lower the hood to approximately 12 inches
(30 cm) from the engine compartment and
drop it. Make sure that the hood is
completely closed.
WARNING!
Be sure the hood is fully latched before
driving your vehicle. If the hood is not fully
latched, it could open when the vehicle is
in motion and block your vision. Failure to
follow this warning could result in serious
injury or death.
CAUTION!
To prevent possible damage, do not slam
the hood to close it. Lower hood to
approximately 12 inches (30 cm) and drop
the hood to close. Make sure hood is fully
closed for both latches. Never drive
vehicle unless hood is fully closed, with
both latches engaged.
2020_JEEP_CHEROKEE_UG_RHD_UK.book Page 52
Page 56 of 332
GETTING TO KNOW YOUR VEHICLE
54
To Lock The Liftgate
With a valid Passive Entry key fob within 5 ft
(1.5 m) of the liftgate, pushing the Keyless
Enter-N-Go — Passive Entry lock/push
button located to the left of the back-up
camera will lock the vehicle only.
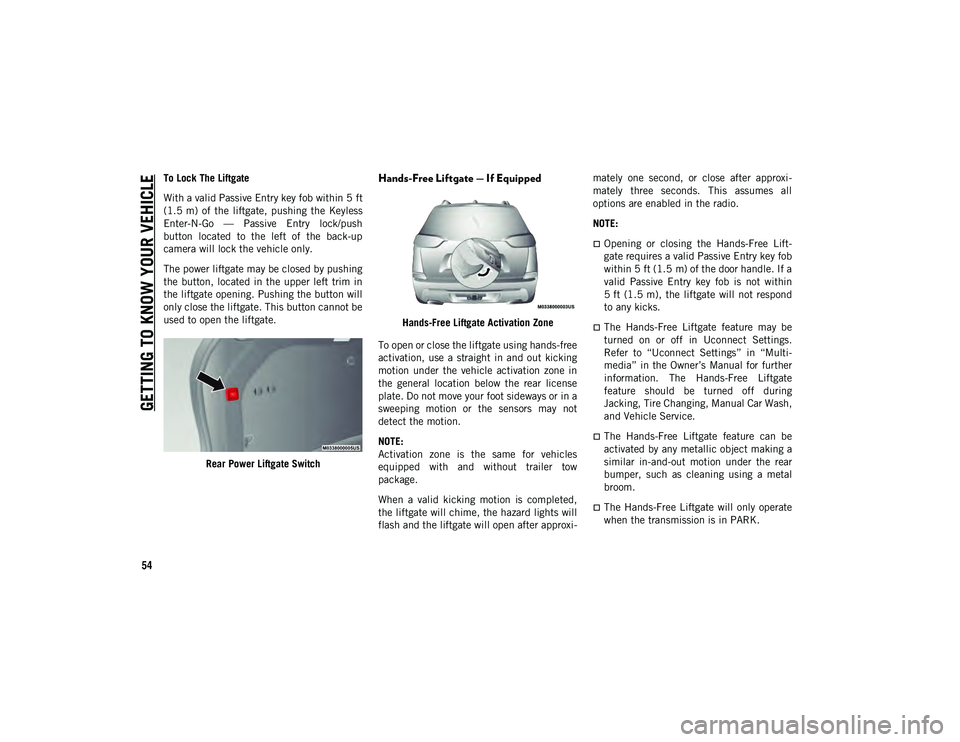
The power liftgate may be closed by pushing
the button, located in the upper left trim in
the liftgate opening. Pushing the button will
only close the liftgate. This button cannot be
used to open the liftgate.Rear Power Liftgate SwitchHands-Free Liftgate — If Equipped
Hands-Free Liftgate Activation Zone
To open or close the liftgate using hands-free
activation, use a straight in and out kicking
motion under the vehicle activation zone in
the general location below the rear license
plate. Do not move your foot sideways or in a
sweeping motion or the sensors may not
detect the motion.
NOTE:
Activation zone is the same for vehicles
equipped with and without trailer tow
package.
When a valid kicking motion is completed,
the liftgate will chime, the hazard lights will
flash and the liftgate will open after approxi -mately one second, or close after approxi
-
mately three seconds. This assumes all
options are enabled in the radio.
NOTE:
Opening or closing the Hands-Free Lift -
gate requires a valid Passive Entry key fob
within 5 ft (1.5 m) of the door handle. If a
valid Passive Entry key fob is not within
5 ft (1.5 m), the liftgate will not respond
to any kicks.
The Hands-Free Liftgate feature may be
turned on or off in Uconnect Settings.
Refer to “Uconnect Settings” in “Multi -
media” in the Owner’s Manual for further
information. The Hands-Free Liftgate
feature should be turned off during
Jacking, Tire Changing, Manual Car Wash,
and Vehicle Service.
The Hands-Free Liftgate feature can be
activated by any metallic object making a
similar in-and-out motion under the rear
bumper, such as cleaning using a metal
broom.
The Hands-Free Liftgate will only operate
when the transmission is in PARK.
2020_JEEP_CHEROKEE_UG_RHD_UK.book Page 54