ESP JEEP CHEROKEE 2023 Owner's Manual
[x] Cancel search | Manufacturer: JEEP, Model Year: 2023, Model line: CHEROKEE, Model: JEEP CHEROKEE 2023Pages: 276, PDF Size: 12.55 MB
Page 108 of 276

106STARTING AND OPERATING
PARKSENSE ACTIVE PARK ASSIST
SYSTEM — IF EQUIPPED
The ParkSense Active Park Assist system is intended to
assist the driver during parallel, perpendicular, and
parallel park exit maneuvers by identifying a proper
parking space, providing audible/visual instructions, and
controlling the steering wheel. The ParkSense Active Park
Assist system is defined as “semi-automatic” since the
driver maintains control of the accelerator, gear selector
and brakes. Depending on the driver's parking maneuver
selection, the ParkSense Active Park Assist system is
capable of maneuvering a vehicle into a parallel or a
perpendicular parking space on either side (i.e., driver
side or passenger side), as well as exiting a parallel
parking space.
NOTE:
The driver is always responsible for controlling the
vehicle, responsible for any surrounding objects, and
must intervene as required during a parking maneuver.
The system is designed to assist the driver and not to
substitute the driver.
During a semi-automatic maneuver, if the driver
touches the steering wheel after being instructed to
remove their hands from the steering wheel, the
system will cancel, and the driver will be required to
manually complete the parking maneuver.
The system may not work in all conditions (e.g. environ -
mental conditions such as heavy rain, snow, etc., or if
searching for a parking space that has surfaces that
will absorb the ultrasonic sensor waves).
New vehicles from the dealer must have at least
30 miles (48 km) accumulated before the ParkSense
Active Park Assist system is fully calibrated and
performs accurately. This is due to the system’s
dynamic vehicle calibration to improve the perfor -
mance of the feature. The system will also continuously
perform the dynamic vehicle calibration to account for
differences such as over or under inflated tires and
new tires.
ENABLING AND DISABLING THE
P
ARKSENSE ACTIVE PARK ASSIST
S
YSTEM
The ParkSense Active Park Assist system can
be enabled and disabled with the ParkSense
Active Park Assist switch, located on the switch
panel below the Uconnect display.
To enable or disable the ParkSense Active Park Assist
system, push the ParkSense Active Park Assist switch
once (LED turns on). Pushing the switch a second time will
disable the system (LED turns off). The ParkSense Active Park Assist system will turn off
automatically for any of the following conditions:
Parking maneuver is completed
Vehicle speed is greater than 18 mph (30 km/h) when
searching for a parking space
Vehicle speed is greater than 5 mph (7 km/h) during
active steering guidance into the parking space
Steering wheel is touched during active steering guid -
ance into the parking space
ParkSense switch is pushed
Driver's door is opened
Rear liftgate is opened
Electronic Stability Control/Anti-Lock Braking System
intervention
NOTE:The ParkSense Active Park Assist system allows a
maximum number of shifts between DRIVE and REVERSE.
If the maneuver cannot be completed within the maximum
amount of shifts, the system will cancel and the
instrument cluster display will instruct the driver to
complete the maneuver manually.
The ParkSense Active Park Assist system will only operate
and search for a parking space when the following
conditions are present:
Gear selector is in DRIVE.
Ignition is in the RUN position.
ParkSense Active Park Assist switch is activated.
Driver's door is closed.
Rear liftgate is closed.
The vehicle must be driven slowly when using Park -
Sense in order to be able to stop in time when an
obstacle is detected. It is recommended that the
driver looks over his/her shoulder when using Park -
Sense.
CAUTION!
23_KL_OM_EN_USC_t.book Page 106
Page 109 of 276
STARTING AND OPERATING107
Vehicle speed is less than 15 mph (25 km/h).
Vehicle is not in 4WD Low (if equipped).
The outer surface and the underside of the front and
rear fascias/bumpers are clean and clear of snow, ice,
mud, dirt or other obstruction.
When pushed, the LED on the ParkSense Active Park
Assist switch will blink momentarily, and then the LED will
turn off if any of the previously described conditions are
not present.
NOTE:If the vehicle is driven above approximately 15 mph
(25 km/h) while searching for a parking space, the
instrument cluster display will instruct the driver to slow
down. If the vehicle is driven above approximately 18 mph
(30 km/h), the system will cancel. The driver must then
reactivate the system by pushing the ParkSense Active
Park Assist switch.
PARALLEL/PERPENDICULAR PARKING
S
PACE ASSISTANCE OPERATION
When the ParkSense Active Park Assist system is enabled
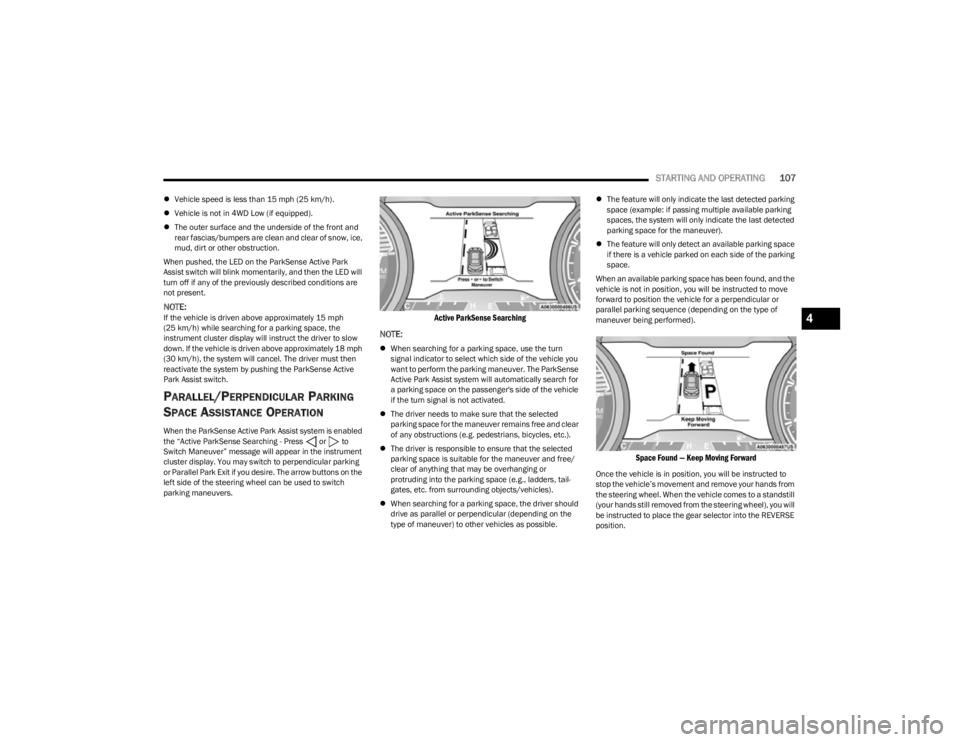
the “Active ParkSense Searching - Press or to
Switch Maneuver” message will appear in the instrument
cluster display. You may switch to perpendicular parking
or Parallel Park Exit if you desire. The arrow buttons on the
left side of the steering wheel can be used to switch
parking maneuvers.
Active ParkSense Searching
NOTE:
When searching for a parking space, use the turn
signal indicator to select which side of the vehicle you
want to perform the parking maneuver. The ParkSense
Active Park Assist system will automatically search for
a parking space on the passenger's side of the vehicle
if the turn signal is not activated.
The driver needs to make sure that the selected
parking space for the maneuver remains free and clear
of any obstructions (e.g. pedestrians, bicycles, etc.).
The driver is responsible to ensure that the selected
parking space is suitable for the maneuver and free/
clear of anything that may be overhanging or
protruding into the parking space (e.g., ladders, tail-
gates, etc. from surrounding objects/vehicles).
When searching for a parking space, the driver should
drive as parallel or perpendicular (depending on the
type of maneuver) to other vehicles as possible.
The feature will only indicate the last detected parking
space (example: if passing multiple available parking
spaces, the system will only indicate the last detected
parking space for the maneuver).
The feature will only detect an available parking space
if there is a vehicle parked on each side of the parking
space.
When an available parking space has been found, and the
vehicle is not in position, you will be instructed to move
forward to position the vehicle for a perpendicular or
parallel parking sequence (depending on the type of
maneuver being performed).
Space Found — Keep Moving Forward
Once the vehicle is in position, you will be instructed to
stop the vehicle’s movement and remove your hands from
the steering wheel. When the vehicle comes to a standstill
(your hands still removed from the steering wheel), you will
be instructed to place the gear selector into the REVERSE
position.
4
23_KL_OM_EN_USC_t.book Page 107
Page 110 of 276
108STARTING AND OPERATING
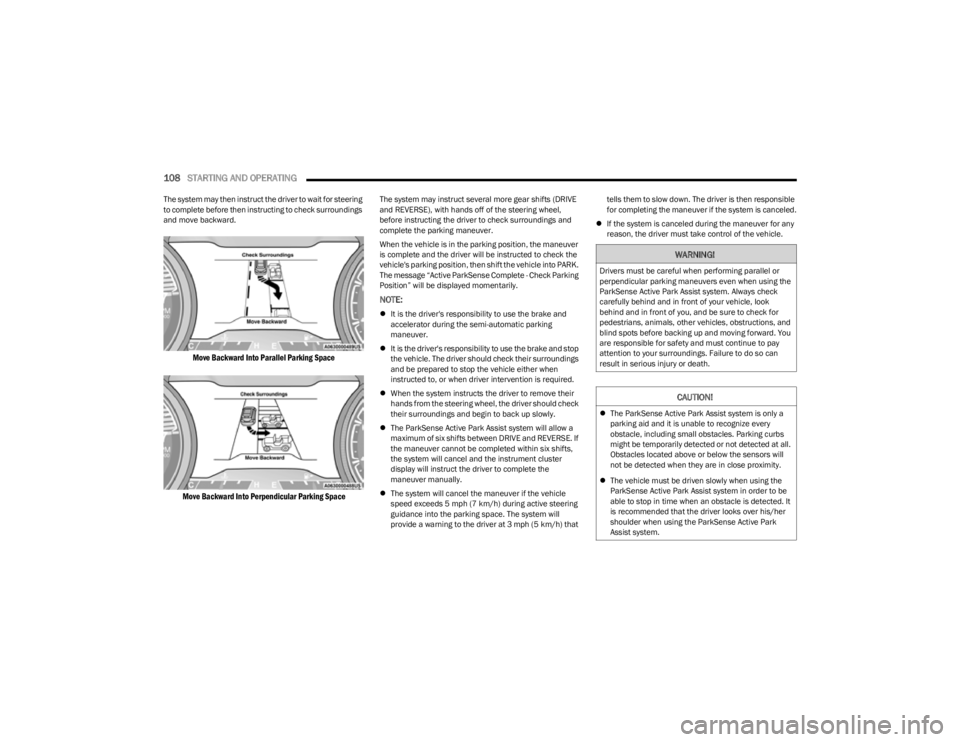
The system may then instruct the driver to wait for steering
to complete before then instructing to check surroundings
and move backward.
Move Backward Into Parallel Parking Space
Move Backward Into Perpendicular Parking Space
The system may instruct several more gear shifts (DRIVE
and REVERSE), with hands off of the steering wheel,
before instructing the driver to check surroundings and
complete the parking maneuver.
When the vehicle is in the parking position, the maneuver
is complete and the driver will be instructed to check the
vehicle's parking position, then shift the vehicle into PARK.
The message “Active ParkSense Complete - Check Parking
Position” will be displayed momentarily.
NOTE:
It is the driver's responsibility to use the brake and
accelerator during the semi-automatic parking
maneuver.
It is the driver's responsibility to use the brake and stop
the vehicle. The driver should check their surroundings
and be prepared to stop the vehicle either when
instructed to, or when driver intervention is required.
When the system instructs the driver to remove their
hands from the steering wheel, the driver should check
their surroundings and begin to back up slowly.
The ParkSense Active Park Assist system will allow a
maximum of six shifts between DRIVE and REVERSE. If
the maneuver cannot be completed within six shifts,
the system will cancel and the instrument cluster
display will instruct the driver to complete the
maneuver manually.
The system will cancel the maneuver if the vehicle
speed exceeds 5 mph (7 km/h) during active steering
guidance into the parking space. The system will
provide a warning to the driver at 3 mph (5 km/h) that tells them to slow down. The driver is then responsible
for completing the maneuver if the system is canceled.
If the system is canceled during the maneuver for any
reason, the driver must take control of the vehicle.
WARNING!
Drivers must be careful when performing parallel or
perpendicular parking maneuvers even when using the
ParkSense Active Park Assist system. Always check
carefully behind and in front of your vehicle, look
behind and in front of you, and be sure to check for
pedestrians, animals, other vehicles, obstructions, and
blind spots before backing up and moving forward. You
are responsible for safety and must continue to pay
attention to your surroundings. Failure to do so can
result in serious injury or death.
CAUTION!
The ParkSense Active Park Assist system is only a
parking aid and it is unable to recognize every
obstacle, including small obstacles. Parking curbs
might be temporarily detected or not detected at all.
Obstacles located above or below the sensors will
not be detected when they are in close proximity.
The vehicle must be driven slowly when using the
ParkSense Active Park Assist system in order to be
able to stop in time when an obstacle is detected. It
is recommended that the driver looks over his/her
shoulder when using the ParkSense Active Park
Assist system.
23_KL_OM_EN_USC_t.book Page 108
Page 114 of 276
112STARTING AND OPERATING
(Continued)
CHANGING LANESENSE SETTINGS
The LaneSense system has settings to adjust the intensity
of the torque warning and the warning zone sensitivity
(early/late) that you can configure through the Uconnect
system
Úpage 126.
NOTE:
When enabled the system operates above 37 mph
(60 km/h) and below 112 mph (180 km/h).
The warnings are disabled with use of the turn signal.
The system will not apply torque to the steering wheel
whenever a safety system engages (Anti-Lock Brakes,
Traction Control System, Electronic Stability Control,
Forward Collision Warning, etc.).
PARKVIEW REAR BACK UP CAMERA
Your vehicle is equipped with the ParkView Rear Back Up
Camera that allows you to see an on-screen image of the
rear surroundings of your vehicle whenever the gear
selector is put into REVERSE. The image will be displayed
in the touchscreen display along with a caution note to
“Check Entire Surroundings” across the top of the screen.
After five seconds this note will disappear. The ParkView
camera is located on the rear of the vehicle above the rear
license plate.
NOTE:The ParkView Rear Back Up Camera has programmable
modes of operation that may be selected through the
Uconnect system
Úpage 126.
When the vehicle is shifted out of REVERSE with camera
delay turned off, the rear camera mode is exited and the
previous screen appears. When the vehicle is shifted out of REVERSE with camera delay turned on, the camera
image will continue to be displayed for up to 10 seconds
unless the following conditions occur: the vehicle speed
exceeds 8 mph (13 km/h), the vehicle is shifted into
PARK, the vehicle’s ignition is placed in the OFF position,
or the touchscreen X button to disable the display of the
Rear View Camera is pressed.
Manual Activation Of The Rear View Camera
1. Press the Controls button located on the bottom of the Uconnect display.
2. Press the Back Up Camera button to turn the Rear View Camera system on.
NOTE:If the Rear View Camera was manually activated, the timer
will start again only after the vehicle speed exceeds 8 mph
(13 km/h).
NOTE:
If the vehicle speed remains below 8 mph (13 km/h),
the Rear View Camera image will be displayed continu -
ously until deactivated via the touchscreen X button,
the vehicle is shifted into PARK, or the ignition is placed
in the OFF position.
The touchscreen X button to disable display of the
camera image is made available ONLY when the
vehicle is not in REVERSE.
When enabled, active guidelines are overlaid on the image
to illustrate the width of the vehicle and its projected back
up path based on the steering wheel position. A dashed
center line overlay indicates the center of the vehicle to
assist with parking or aligning to a hitch/receiver. Different colored zones indicate the distance to the rear of
the vehicle.
The following table shows the approximate distances for
each zone:
Zone Distance To The Rear Of The
Vehicle
Red 0 - 1 ft (0 - 30 cm)
Yellow 1 ft - 6.5 ft (30 cm - 2 m)
Green 6.5 ft or greater (2 m or
greater)
WARNING!
Drivers must be careful when backing up even when
using the ParkView Rear Back Up Camera. Always
check carefully behind your vehicle, and be sure to
check for pedestrians, animals, other vehicles,
obstructions, or blind spots before backing up. You are
responsible for the safety of your surroundings and
must continue to pay attention while backing up.
Failure to do so can result in serious injury or death.
CAUTION!
To avoid vehicle damage, ParkView should only be
used as a parking aid. The ParkView camera is
unable to view every obstacle or object in your drive
path.
23_KL_OM_EN_USC_t.book Page 112
Page 129 of 276
MULTIMEDIA127
CUSTOMER PROGRAMMABLE FEATURES
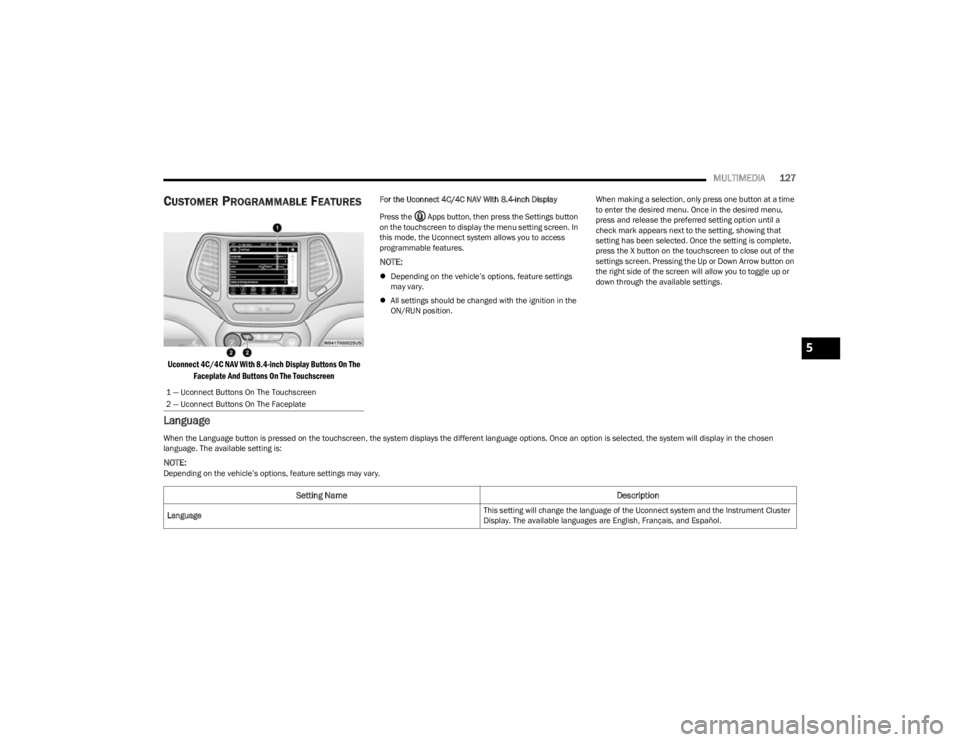
Uconnect 4C/4C NAV With 8.4-inch Display Buttons On The
Faceplate And Buttons On The Touchscreen
For the Uconnect 4C/4C NAV With 8.4-inch Display
Press the Apps button, then press the Settings button
on the touchscreen to display the menu setting screen. In
this mode, the Uconnect system allows you to access
programmable features.
NOTE:
Depending on the vehicle’s options, feature settings
may vary.
All settings should be changed with the ignition in the
ON/RUN position. When making a selection, only press one button at a time
to enter the desired menu. Once in the desired menu,
press and release the preferred setting option until a
check mark appears next to the setting, showing that
setting has been selected. Once the setting is complete,
press the X button on the touchscreen to close out of the
settings screen. Pressing the Up or Down Arrow button on
the right side of the screen will allow you to toggle up or
down through the available settings.
Language
1 — Uconnect Buttons On The Touchscreen
2 — Uconnect Buttons On The Faceplate
When the Language button is pressed on the touchscreen, the system displays the different language options. Once an option is selected, the system will display in the chosen
language. The available setting is:
NOTE:Depending on the vehicle’s options, feature settings may vary.
Setting Name
Description
Language This setting will change the language of the Uconnect system and the Instrument Cluster
Display. The available languages are English, Français, and Español.
5
23_KL_OM_EN_USC_t.book Page 127
Page 131 of 276

MULTIMEDIA129
Units
Voice
When the Units button is pressed on the touchscreen, the system displays the different measurement options. The selected unit of measurement will display in the instrument cluster
display and Navigation system (if equipped). The available settings are:
NOTE:Depending on the vehicle’s options, feature settings may vary.
Setting Name Description
US This setting will change the unit of measurement on the display to US.
Metric This setting will change the unit of measurement on the display to Metric.
Custom This setting changes the “Speed” (MPH or km/h), “Distance” (mi or km), “Fuel
Consumption” (MPG [US], MPG [UK], L/100 km, or km/L), “Pressure” (psi, kPa, or bar), or
“Temperature” (°C or °F) units of measurement independently.
When the Voice button is pressed on the touchscreen, the system displays the options related to the vehicle’s Voice Recognition feature.
NOTE:Depending on the vehicle’s options, feature settings may vary.
Setting Name
Description
Voice Response Length This setting will change the response length for the Voice Recognition system. The “Brief”
setting provides a shortened audio description from the system. The “Detailed” setting
provides the full audio description from the system.
Show Command List This setting will allow you to turn the Command List on or off. The “Always” setting will
always show the Command List. The “With Help” setting will show the Command List and
provide a brief description of what the command does. The “Never” setting will turn the
Command List off.
5
23_KL_OM_EN_USC_t.book Page 129
Page 146 of 276
144SAFETY
Your vehicle may also be equipped with Dynamic Steering
Torque (DST), Hill Descent Control (HDC), Rain Brake
Support (RBS), Ready Alert Braking (RAB), Selec-Speed
Control (SSC), and Trailer Sway Control (TSC).
Brake Assist System (BAS)
The BAS is designed to optimize the vehicle’s braking
capability during emergency braking maneuvers. The
system detects an emergency braking situation by sensing
the rate and amount of brake application and then applies
optimum pressure to the brakes. This can help reduce
braking distances. The BAS complements the Anti-Lock
Brake System (ABS). Applying the brakes very quickly
results in the best BAS assistance. To receive the benefit
of the system, you must apply continuous braking
pressure during the stopping sequence (do not “pump”
the brakes). Do not reduce brake pedal pressure unless
braking is no longer desired. Once the brake pedal is
released, the BAS is deactivated.
Brake System Warning Light
The red Brake System Warning Light will turn on when the
ignition is placed in the ON/RUN mode and may stay on for
as long as four seconds.
If the Brake System Warning Light remains on or comes on
while driving, it indicates that the brake system is not
functioning properly and that immediate service is
required. If the Brake System Warning Light does not
come on when the ignition is placed in the ON/RUN mode,
have the light repaired as soon as possible.
Dynamic Steering Torque (DST)
DST is a feature of the Electronic Stability Control (ESC)
and the Electric Power Steering (EPS) modules, that
provides torque at the steering wheel for certain driving
conditions, in which the ESC module is detecting vehicle
instability. The torque that the steering wheel receives is
only meant to help the driver realize optimal steering
behavior in order to reach/maintain vehicle stability. The
only notification the driver receives that the feature is
active is the torque applied to the steering wheel.
NOTE:The DST feature is only meant to help the driver realize the
correct course of action through small torques on the
steering wheel, which means the effectiveness of the DST
feature is highly dependent on the driver’s sensitivity and
overall reaction to the applied torque. It is very important
to realize that this feature will not steer the vehicle,
meaning the driver is still responsible for steering the
vehicle.
Electronic Brake Force Distribution (EBD)
EBD function manages the distribution of the braking
torque between the front and rear axles by limiting braking
pressure to the rear axle. This is done to prevent overslip of
the rear wheels to avoid vehicle instability, and to prevent
the rear axle from entering ABS before the front axle.
Electronic Roll Mitigation (ERM)
ERM anticipates the potential for wheel lift by monitoring
the driver’s steering wheel input and the speed of the
vehicle. When ERM determines that the rate of change of
the steering wheel angle and vehicle’s speed are
sufficient to potentially cause wheel lift, it then applies the
appropriate brake and may also reduce engine power to
lessen the chance that wheel lift will occur. ERM can only
reduce the chance of wheel lift occurring during severe or
evasive driving maneuvers; it cannot prevent wheel lift
due to other factors, such as road conditions, leaving the
roadway, or striking objects or other vehicles.
NOTE:ERM is disabled any time the ESC is in “Full Off” mode (if
equipped) Úpage 145.
WARNING!
The Brake Assist System (BAS) cannot prevent the natu -
ral laws of physics from acting on the vehicle, nor can it
increase the traction afforded by prevailing road condi -
tions. BAS cannot prevent collisions, including those
resulting from excessive speed in turns, driving on very
slippery surfaces, or hydroplaning. The capabilities of a
BAS-equipped vehicle must never be exploited in a
reckless or dangerous manner, which could jeopardize
the user's safety or the safety of others.
WARNING!
Many factors, such as vehicle loading, road conditions
and driving conditions, influence the chance that wheel
lift or rollover may occur. ERM cannot prevent all wheel
lift or rollovers, especially those that involve leaving the
roadway or striking objects or other vehicles. The capa -
bilities of an ERM-equipped vehicle must never be
exploited in a reckless or dangerous manner which could
jeopardize the user's safety or the safety of others.
23_KL_OM_EN_USC_t.book Page 144
Page 149 of 276
SAFETY147
Enabling HDC
HDC is enabled by pushing the HDC button, but the
following conditions must also be met to enable HDC:
The driveline is in 4WD Low
The vehicle speed is below 5 mph (8 km/h)
The parking brake is released
The driver door is closed
Activating HDC
Once HDC is enabled it will activate automatically if driven
down a grade of sufficient magnitude. The set speed for
HDC is selectable by the driver, and can be adjusted by
using the gear shift +/-. The following summarizes the
HDC set speeds:
HDC Target Set Speeds
P = No set speed. HDC may be enabled but will not acti -
vate.
R = 0.6 mph (1 km/h)
N = 1.2 mph (2 km/h)
D = 0.6 mph (1 km/h)
1st = 0.6 mph (1 km/h)
2nd = 1.2 mph (2 km/h)
3rd = 1.8 mph (3 km/h)
4th = 2.5 mph (4 km/h)
5th = 3.1 mph (5 km/h)
6th = 3.7 mph (6 km/h)
7th = 4.3 mph (7 km/h)
8th = 5.0 mph (8 km/h)
9th = 5.6 mph (9 km/h) – If EquippedNOTE:During HDC the +/- shifter input is used for HDC target
speed selection, but will not affect the gear chosen by the
transmission. When actively controlling HDC the trans -
mission will shift appropriately for the driver-selected set
speed and corresponding driving conditions.
Driver Override
The driver may override HDC activation with throttle or
brake application at any time.
Deactivating HDC
HDC will be deactivated but remain available if any of the
following conditions occur:
Driver overrides HDC set speed with throttle or brake
application.
Vehicle speed exceeds 20 mph (32 km/h) but remains
below 40 mph (64 km/h).
Vehicle is on a downhill grade of insufficient magni-
tude, is on level ground, or is on an uphill grade.
Vehicle is shifted to PARK.
Disabling HDC
HDC will be deactivated and disabled if any of the
following conditions occur:
The driver pushes the HDC button.
The driveline is shifted out of 4WD Low.
The parking brake is applied.
The driver door opens.
The vehicle is driven greater than 20 mph (32 km/h)
for greater than 70 seconds.
The vehicle is driven greater than 40 mph (64 km/h)
(HDC exits immediately).
HDC detects excessive brake temperature.
Feedback To The Driver
The instrument cluster has an HDC icon and the HDC
button has an LED icon, which offers feedback to the
driver about the state HDC is in.
The cluster icon and button light will illuminate and
remain on solid when HDC is enabled or activated. This
is the normal operating condition for HDC.
The cluster icon and button light will flash for several
seconds then extinguish when the driver pushes the
HDC button but enable conditions are not met.
The cluster icon and button light will flash for several
seconds then extinguish when HDC disables due to
excess speed.
The cluster icon and button light will flash when HDC
deactivates due to overheated brakes. The flashing will
stop and HDC will activate again once the brakes have
cooled sufficiently.
WARNING!
HDC is only intended to assist the driver in controlling
vehicle speed when descending hills. The driver must
remain attentive to the driving conditions and is
responsible for maintaining a safe vehicle speed.
6
23_KL_OM_EN_USC_t.book Page 147
Page 150 of 276
148SAFETY
Hill Start Assist (HSA)
HSA is designed to mitigate roll back from a complete stop
while on an incline. If the driver releases the brake while
stopped on an incline, HSA will continue to hold the brake
pressure for a short period. If the driver does not apply the
throttle before this time expires, the system will release
brake pressure and the vehicle will roll down the hill as
normal.
The following conditions must be met in order for HSA to
activate:
The feature must be enabled.
The vehicle must be stopped.
The parking brake must be off.
The driver door must be closed.
The vehicle must be on a sufficient grade.
The gear selection must match vehicle uphill direction
(i.e., vehicle facing uphill is in forward gear; vehicle
backing uphill is in REVERSE gear).
HSA will work in REVERSE gear and all forward gears.
The system will not activate if the transmission is in
PARK or NEUTRAL.
Disabling And Enabling HSA
This feature can be turned on or turned off. To change the
current setting, proceed as follows:
If disabling HSA using your instrument cluster display
Úpage 63
If disabling HSA using Uconnect Settings
Úpage 126
Towing With HSA
HSA will also provide assistance to mitigate roll back while
towing a trailer.
Rain Brake Support (RBS)
RBS may improve braking performance in wet conditions.
It will periodically apply a small amount of brake pressure
to remove any water buildup on the front brake rotors. It
functions when the windshield wipers are in LO or HI
speed. When RBS is active, there is no notification to the
driver and no driver interaction is required.
WARNING!
There may be situations where the Hill Start Assist
(HSA) will not activate and slight rolling may occur, such
as on minor hills or with a loaded vehicle, or while pull -
ing a trailer. HSA is not a substitute for active driving
involvement. It is always the driver’s responsibility to be
attentive to distance to other vehicles, people, and
objects, and most importantly brake operation to
ensure safe operation of the vehicle under all road con -
ditions. Your complete attention is always required
while driving to maintain safe control of your vehicle.
Failure to follow these warnings can result in a collision
or serious personal injury.
WARNING!
If you use a trailer brake controller with your trailer,
the trailer brakes may be activated and deactivated
with the brake switch. If so, there may not be enough
brake pressure to hold both the vehicle and the
trailer on a hill when the brake pedal is released. In
order to avoid rolling down an incline while resuming
acceleration, manually activate the trailer brake or
apply more vehicle brake pressure prior to releasing
the brake pedal.
HSA is not a parking brake. Always apply the parking
brake fully when exiting your vehicle. Also, be certain
to place the transmission in PARK (P).
Failure to follow these warnings can result in a colli -
sion or serious personal injury.
23_KL_OM_EN_USC_t.book Page 148
Page 151 of 276

SAFETY149
Ready Alert Braking (RAB)
RAB may reduce the time required to reach full braking
during emergency braking situations. It anticipates when
an emergency braking situation may occur by monitoring
how fast the throttle is released by the driver. The
Electronic Brake Controller (EBC) will prepare the brake
system for a panic stop.
Selec-Speed Control (SSC) — If Equipped
SSC is intended for off-road driving in 4WD Low only. SSC
maintains vehicle speed by actively controlling engine
torque and brakes.
SSC has three states:
1. Off (feature is not enabled and will not activate).
2. Enabled (feature is enabled and ready but activation
conditions are not met, or driver is actively overriding
with brake or throttle application).
3. Active (feature is enabled and actively controlling vehicle speed).
Enabling SSC
SSC is enabled by pushing the SSC button, but the
following conditions must also be met to enable SSC:
The driveline is in 4WD Low
The vehicle speed is below 5 mph (8 km/h)
The parking brake is released
The driver door is closed
The driver is not applying throttle Activating SSC
Once SSC is enabled it will activate automatically once the
following conditions are met:
Driver releases throttle
Driver releases brake
Transmission is in any selection other than PARK (P)
Vehicle speed is below 20 mph (32 km/h)
The set speed for SSC is selectable by the driver, and can
be adjusted by using the gear shift +/-. Additionally, the
SSC set speed may be reduced when climbing a grade and
the level of set speed reduction depends on the
magnitude of grade. The following summarizes the SSC
set speeds:
SSC Target Set Speeds
1st = .6 mph (1 km/h)
2nd = 1.2 mph (2 km/h)
3rd = 1.8 mph (3 km/h)
4th = 2.5 mph (4 km/h)
5th = 3.1 mph (5 km/h)
6th = 3.7 mph (6 km/h)
7th = 4.3 mph (7 km/h)
8th = 5 mph (8 km/h)
9th = 5.6 mph (9 km/h) – If Equipped
REVERSE = .6 mph (1 km/h)
NEUTRAL = 1.2 mph (2 km/h)
PARK = SSC remains enabled but not active
NOTE:
During SSC the +/- shifter input is used for SSC target
speed selection but will not affect the gear chosen by
the transmission. While actively controlling SSC the
transmission will shift appropriately for the
driver-selected set speed and corresponding driving
conditions.
SSC performance is influenced by the Selec-Terrain
mode. This difference may be notable to the driver and
may be perceived as a varying level of aggressiveness.
Driver Override:
The driver may override SSC activation with throttle or
brake application at any time.
Deactivating SSC
SSC will be deactivated but remain available if any of the
following conditions occur:
Driver overrides SSC set speed with throttle or brake
application.
Vehicle speed exceeds 20 mph (32 km/h) but remains
below 40 mph (64 km/h).
Vehicle is shifted to PARK.
6
23_KL_OM_EN_USC_t.book Page 149