ESP JEEP CHEROKEE 2023 Service Manual
[x] Cancel search | Manufacturer: JEEP, Model Year: 2023, Model line: CHEROKEE, Model: JEEP CHEROKEE 2023Pages: 276, PDF Size: 12.55 MB
Page 200 of 276

198IN CASE OF EMERGENCY
SEALING A TIRE WITH TIRE SERVICE KIT
(A) Whenever You Stop To Use Tire Service
Kit:
1. Pull over to a safe location and turn on the vehicle’s
Hazard Warning Flashers.
2. Verify that the valve stem (on the wheel with the deflated tire) is in a position that is near to the
ground. This will allow the Tire Service Kit Hoses and to reach the valve stem and keep the Tire Service Kit
flat on the ground. This will provide the best
positioning of the kit when injecting the sealant into
the deflated tire and running the air pump. Move the
vehicle as necessary to place the valve stem in this
position before proceeding.
3. Place the transmission in PARK (P) (auto transmission) or in Gear (manual transmission) and
place the ignition in the OFF position.
4. Apply the parking brake.
(B) Setting Up To Use Tire Service Kit:
1. Push in the Mode Select Knob and turn to the Sealant Mode position.
2. Uncoil the Sealant Hose and then remove the cap from the fitting at the end of the hose.
3. Place the Tire Service Kit flat on the ground next to the deflated tire.
4. Remove the cap from the valve stem and then screw the fitting at the end of the Sealant Hose onto the
valve stem.
5. Uncoil the Power Plug and insert the plug into the vehicle’s 12 Volt power outlet.
NOTE:Do not remove foreign objects (e.g., screws or nails) from
the tire.
(C) Injecting Tire Service Kit Sealant Into
The Deflated Tire:
Always start the engine before turning ON the Tire
Service Kit.
NOTE:Manual transmission vehicles must have the parking
brake engaged and the gear selector in NEUTRAL.
After pushing the Power Button, the sealant (white
fluid) will flow from the Sealant Bottle through the
Sealant Hose and into the tire.
NOTE:Sealant may leak out through the puncture in the tire.
If the sealant (white fluid) does not flow within
0 – 10 seconds through the Sealant Hose:
1. Push the Power Button to turn Off the Tire Service
Kit. Disconnect the Sealant Hose from the valve
stem. Make sure the valve stem is free of debris.
Reconnect the Sealant Hose to the valve stem.
Check that the Mode Select Knob is in the Sealant
Mode position and not Air Mode. Push the Power
Button to turn On the Tire Service Kit.
2. Connect the Power Plug to a different 12 Volt power outlet in your vehicle or another vehicle, if available.
Make sure the engine is running before turning ON
the Tire Service Kit.
3. The Sealant Bottle may be empty due to previous use. Call for assistance.
NOTE:If the Mode Select Knob is on Air Mode and the pump is
operating, air will dispense from the Air Pump Hose only,
not the Sealant Hose.
A loose Tire Service Kit thrown forward in a collision
or hard stop could endanger the occupants of the
vehicle. Always stow the Tire Service Kit in the place
provided. Failure to follow these warnings can result
in injuries that are serious or fatal to you, your
passengers, and others around you.
Take care not to allow the contents of Tire Service Kit
to come in contact with hair, eyes, or clothing. Tire
Service Kit sealant is harmful if inhaled, swallowed,
or absorbed through the skin. It causes skin, eye, and
respiratory irritation. Flush immediately with plenty of
water if there is any contact with eyes or skin. Change
clothing as soon as possible, if there is any contact
with clothing.
Tire Service Kit Sealant solution contains latex. In
case of an allergic reaction or rash, consult a physi -
cian immediately. Keep Tire Service Kit out of reach
of children. If swallowed, rinse mouth immediately
with plenty of water and drink plenty of water. Do not
induce vomiting! Consult a physician immediately.
WARNING!
23_KL_OM_EN_USC_t.book Page 198
Page 209 of 276
IN CASE OF EMERGENCY207
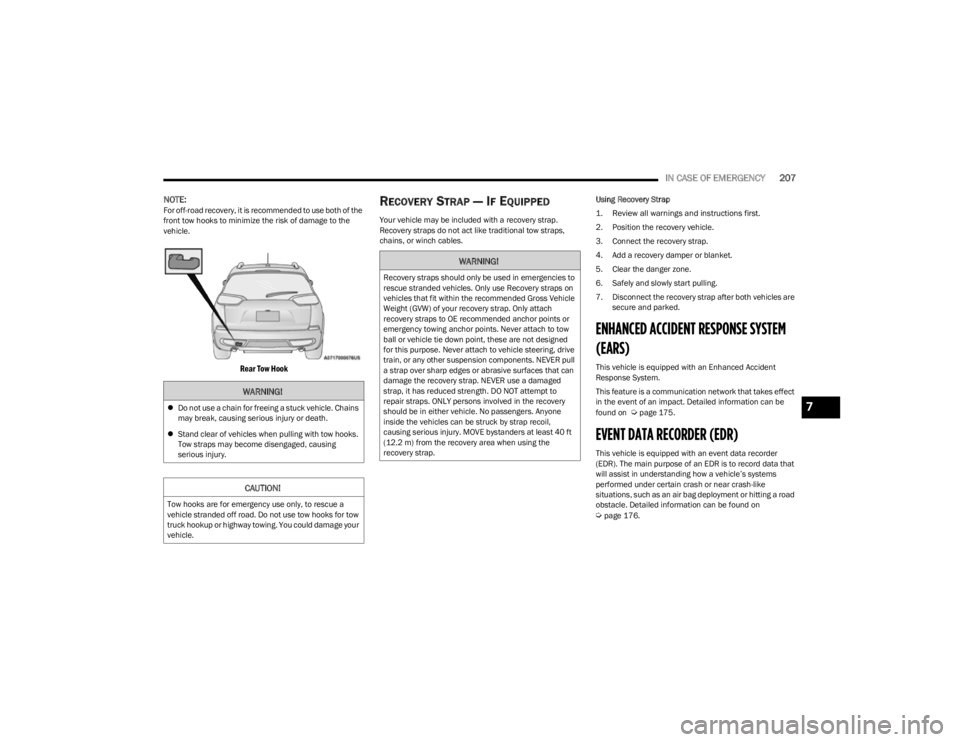
NOTE:For off-road recovery, it is recommended to use both of the
front tow hooks to minimize the risk of damage to the
vehicle.
Rear Tow Hook
RECOVERY STRAP — IF EQUIPPED
Your vehicle may be included with a recovery strap.
Recovery straps do not act like traditional tow straps,
chains, or winch cables. Using Recovery Strap
1. Review all warnings and instructions first.
2. Position the recovery vehicle.
3. Connect the recovery strap.
4. Add a recovery damper or blanket.
5. Clear the danger zone.
6. Safely and slowly start pulling.
7. Disconnect the recovery strap after both vehicles are
secure and parked.
ENHANCED ACCIDENT RESPONSE SYSTEM
(EARS)
This vehicle is equipped with an Enhanced Accident
Response System.
This feature is a communication network that takes effect
in the event of an impact. Detailed information can be
found on
Úpage 175.
EVENT DATA RECORDER (EDR)
This vehicle is equipped with an event data recorder
(EDR). The main purpose of an EDR is to record data that
will assist in understanding how a vehicle’s systems
performed under certain crash or near crash-like
situations, such as an air bag deployment or hitting a road
obstacle. Detailed information can be found on
Úpage 176.
WARNING!
Do not use a chain for freeing a stuck vehicle. Chains
may break, causing serious injury or death.
Stand clear of vehicles when pulling with tow hooks.
Tow straps may become disengaged, causing
serious injury.
CAUTION!
Tow hooks are for emergency use only, to rescue a
vehicle stranded off road. Do not use tow hooks for tow
truck hookup or highway towing. You could damage your
vehicle.
WARNING!
Recovery straps should only be used in emergencies to
rescue stranded vehicles. Only use Recovery straps on
vehicles that fit within the recommended Gross Vehicle
Weight (GVW) of your recovery strap. Only attach
recovery straps to OE recommended anchor points or
emergency towing anchor points. Never attach to tow
ball or vehicle tie down point, these are not designed
for this purpose. Never attach to vehicle steering, drive
train, or any other suspension components. NEVER pull
a strap over sharp edges or abrasive surfaces that can
damage the recovery strap. NEVER use a damaged
strap, it has reduced strength. DO NOT attempt to
repair straps. ONLY persons involved in the recovery
should be in either vehicle. No passengers. Anyone
inside the vehicles can be struck by strap recoil,
causing serious injury. MOVE bystanders at least 40 ft
(12.2 m) from the recovery area when using the
recovery strap.
7
23_KL_OM_EN_USC_t.book Page 207
Page 226 of 276
224SERVICING AND MAINTENANCE
NOTE:
It is the owner's responsibility to maintain the proper
level of protection against freezing according to the
temperatures occurring in the area where the vehicle is
operated.
Use care when filling under hood fluids such as Engine
Oil, Windshield Washer Solvent, Antifreeze etc. to mini -
mize spillage onto top of engine. Any excess fluid that
is spilled onto the top of the engine should be removed
using compressed air or absorbent cloth.
Some vehicles require special tools to add coolant
properly. Failure to fill these systems properly could
lead to severe internal engine damage. If any coolant is
needed to be added to the system, please contact a
local authorized dealer.
Mixing engine coolant types is not recommended and
can result in cooling system damage. If HOAT and OAT
coolant are mixed in an emergency, have an authorized
dealer drain, flush, and refill with OAT coolant
(conforming to MS.90032) as soon as possible.
Cooling System Pressure Cap
The cap must be fully tightened to prevent loss of engine
coolant (antifreeze), and to ensure that engine coolant will
return to the radiator from the coolant expansion bottle/
recovery tank (if equipped).
The cap should be inspected and cleaned if there is any
accumulation of foreign material on the sealing surfaces.
Disposal Of Used Coolant
Used ethylene glycol-based coolant (antifreeze) is a
regulated substance requiring proper disposal. Check with
your local authorities to determine the disposal rules for
your community. To prevent ingestion by animals or
children, do not store ethylene glycol-based coolant in
open containers or allow it to remain in puddles on the
ground, clean up any ground spills immediately. If
ingested, seek emergency assistance immediately.
Coolant Level
The coolant bottle provides a quick visual method for
determining that the coolant level is adequate. With the
engine off and cold, the level of the engine coolant
(antifreeze) in the bottle should be between the ranges
indicated on the bottle.
The radiator normally remains completely full, so there is
no need to remove the radiator/coolant pressure cap
unless checking for engine coolant freeze point or replacing coolant. Advise your service attendant of this. As
long as the engine operating temperature is satisfactory,
the coolant only needs to be checked once a month.
When additional engine coolant is needed to maintain the
proper level, only OAT coolant that meets the
requirements of the manufacturer Material Standard
MS.90032 should be added to the coolant bottle. Do not
overfill.
Cooling System Notes
NOTE:When the vehicle is stopped after a few miles/kilometers
of operation, you may observe vapor coming from the front
of the engine compartment. This is normally a result of
moisture from rain, snow, or high humidity accumulating
on the radiator and being vaporized when the thermostat
opens, allowing hot engine coolant (antifreeze) to enter
the radiator.
If an examination of your engine compartment shows no
evidence of radiator or hose leaks, the vehicle may be
safely driven. The vapor will soon dissipate.
Do not overfill the coolant expansion bottle.
Check the coolant freeze point in the radiator and in
the coolant expansion bottle. If engine coolant needs
to be added, the contents of the coolant expansion
bottle must also be protected against freezing.
If frequent engine coolant additions are required, the
cooling system should be pressure tested for leaks.
Maintain engine coolant concentration at a minimum
of 50% OAT coolant (conforming to MS.90032) and
distilled water for proper corrosion protection of your
engine which contains aluminum components.
WARNING!
Do not open hot engine cooling system. Never add
engine coolant (antifreeze) when the engine is over -
heated. Do not loosen or remove the cap to cool an
overheated engine. Heat causes pressure to build up
in the cooling system. To prevent scalding or injury,
do not remove the pressure cap while the system is
hot or under pressure.
Do not use a pressure cap other than the one speci -
fied for your vehicle. Personal injury or engine
damage may result.
23_KL_OM_EN_USC_t.book Page 224
Page 238 of 276
236SERVICING AND MAINTENANCE
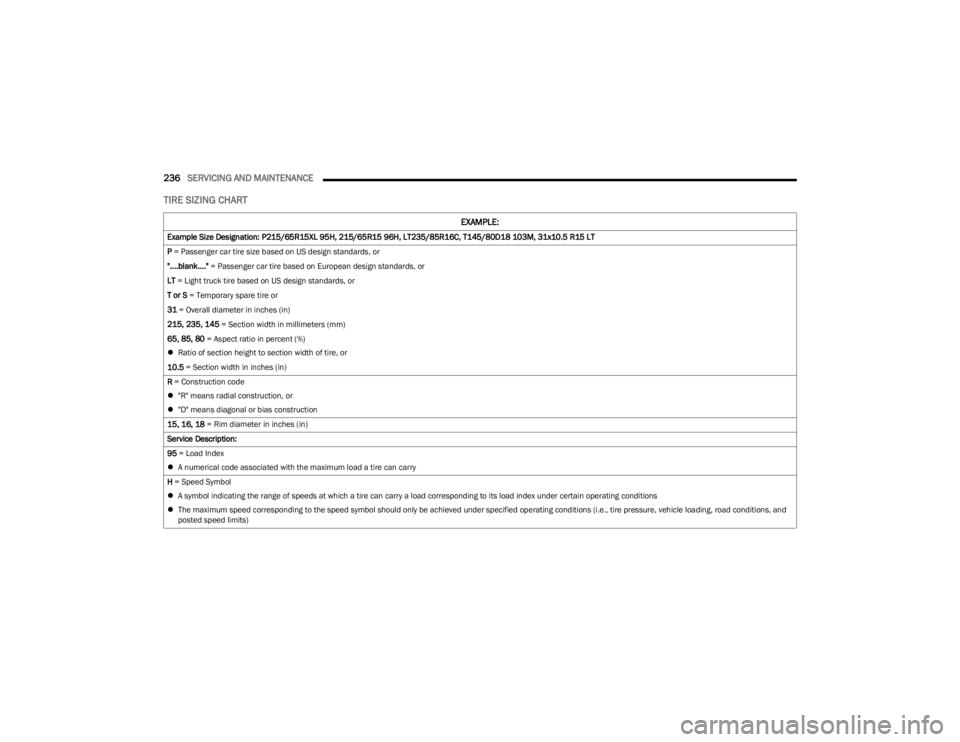
TIRE SIZING CHART
EXAMPLE:
Example Size Designation: P215/65R15XL 95H, 215/65R15 96H, LT235/85R16C, T145/80D18 103M, 31x10.5 R15 LT
P = Passenger car tire size based on US design standards, or
"....blank...." = Passenger car tire based on European design standards, or
LT = Light truck tire based on US design standards, or
T or S = Temporary spare tire or
31 = Overall diameter in inches (in)
215, 235, 145 = Section width in millimeters (mm)
65, 85, 80 = Aspect ratio in percent (%)
Ratio of section height to section width of tire, or
10.5 = Section width in inches (in)
R = Construction code
"R" means radial construction, or
"D" means diagonal or bias construction
15, 16, 18 = Rim diameter in inches (in)
Service Description:
95 = Load Index
A numerical code associated with the maximum load a tire can carry
H = Speed Symbol
A symbol indicating the range of speeds at which a tire can carry a load corresponding to its load index under certain operating conditions
The maximum speed corresponding to the speed symbol should only be achieved under specified operating conditions (i.e., tire pressure, vehicle loading, road conditions, and
posted speed limits)
23_KL_OM_EN_USC_t.book Page 236
Page 243 of 276
SERVICING AND MAINTENANCE241
(Continued)
TIRES — GENERAL INFORMATION
Tire Pressure
Proper tire inflation pressure is essential to the safe and
satisfactory operation of your vehicle. Four primary areas
are affected by improper tire pressure:
Safety
Fuel Economy
Tread Wear
Ride Comfort and Vehicle Stability
Safety Both underinflation and overinflation affect the stability of
the vehicle and can produce a feeling of sluggish response
or over responsiveness in the steering.
NOTE:
Unequal tire pressures from side to side may cause
erratic and unpredictable steering response.
Unequal tire pressure from side to side may cause the
vehicle to drift left or right.
Fuel Economy
Underinflated tires will increase tire rolling resistance
resulting in higher fuel consumption.
Tread Wear
Improper cold tire inflation pressures can cause abnormal
wear patterns and reduced tread life, resulting in the need
for earlier tire replacement.
Ride Comfort And Vehicle Stability
Proper tire inflation contributes to a comfortable ride.
Overinflation produces a jarring and uncomfortable ride.
Tire Inflation Pressures
The proper cold tire inflation pressure is listed on the
driver's side B-pillar or rear edge of the driver's side door. At least once a month:
Check and adjust tire pressure with a good quality
pocket-type pressure gauge. Do not make a visual judg -
ment when determining proper inflation. Tires may look
properly inflated even when they are underinflated.
Inspect tires for signs of tire wear or visible damage.
Inflation pressures specified on the placard are always
“cold tire inflation pressure”. Cold tire inflation pressure is
defined as the tire pressure after the vehicle has not been
driven for at least three hours, or driven less than 1 mile
(1.6 km) after sitting for a minimum of three hours. The
cold tire inflation pressure must not exceed the maximum
inflation pressure molded into the tire sidewall.
Check tire pressures more often if subject to a wide range
of outdoor temperatures, as tire pressures vary with
temperature changes.
Tire pressures change by approximately 1 psi (7 kPa) per
12°F (7°C) of air temperature change. Keep this in mind
when checking tire pressure inside a garage, especially in
the Winter.
WARNING!
Improperly inflated tires are dangerous and can
cause collisions.
Underinflation increases tire flexing and can result in
overheating and tire failure.
Overinflation reduces a tire's ability to cushion shock.
Objects on the road and chuckholes can cause
damage that result in tire failure.
Overinflated or underinflated tires can affect vehicle
handling and can fail suddenly, resulting in loss of
vehicle control.
Unequal tire pressures can cause steering problems.
You could lose control of your vehicle.
Unequal tire pressures from one side of the vehicle
to the other can cause the vehicle to drift to the right
or left.
Always drive with each tire inflated to the recom -
mended cold tire inflation pressure.
WARNING!
CAUTION!
After inspecting or adjusting the tire pressure, always
reinstall the valve stem cap. This will prevent moisture
and dirt from entering the valve stem, which could
damage the valve stem.
8
23_KL_OM_EN_USC_t.book Page 241
Page 247 of 276
SERVICING AND MAINTENANCE245
Compact Spare Tire — If Equipped
The compact spare is for temporary emergency use only.
You can identify if your vehicle is equipped with a compact
spare by looking at the spare tire description on the Tire
And Loading Information Placard located on the driver’s
side door opening or on the sidewall of the tire. Compact
spare tire descriptions begin with the letter “T” or “S”
preceding the size designation. Example: T145/80D18
103M.
T, S = Temporary Spare Tire.
Since this tire has limited tread life, the original equipment
tire should be repaired (or replaced) and reinstalled on
your vehicle at the first opportunity.
Do not install a wheel cover or attempt to mount a
conventional tire on the compact spare wheel, since the
wheel is designed specifically for the compact spare tire.
Do not install more than one compact spare tire and wheel
on the vehicle at any given time.
Full Size Spare — If Equipped
The Full Size spare is for temporary emergency use only.
This tire may look like the originally equipped tire on the
front or rear axle of your vehicle, but it is not. This spare
tire may have limited tread life. When the tread is worn to
the tread wear indicators, the temporary use Full Size
spare tire needs to be replaced. Since it is not the same as
your original equipment tire, replace (or repair) the original
equipment tire and reinstall on the vehicle at the first
opportunity.
Limited Use Spare — If Equipped
The limited use spare tire is for temporary emergency use
only. This tire is identified by a label located on the limited
use spare wheel. This label contains the driving limitations
for this spare. This tire may look like the original equipped
tire on the front or rear axle of your vehicle, but it is not.
Installation of this limited use spare tire affects vehicle
handling. Since it is not the same as your original
equipment tire, replace (or repair) the original equipment
tire and reinstall on the vehicle at the first opportunity.
WHEEL AND WHEEL TRIM CARE
All wheels and wheel trim, especially aluminum and
chrome plated wheels, should be cleaned regularly using
mild (neutral Ph) soap and water to maintain their luster
and to prevent corrosion. Wash wheels with the same
soap solution recommended for the body of the vehicle
and remember to always wash when the surfaces are not
hot to the touch.
Your wheels are susceptible to deterioration caused by salt,
sodium chloride, magnesium chloride, calcium chloride, etc.,
and other road chemicals used to melt ice or control dust on
dirt roads. Use a soft cloth or sponge and mild soap to wipe
away promptly. Do not use harsh chemicals or a stiff brush.
They can damage the wheel’s protective coating that helps
keep them from corroding and tarnishing.
When cleaning extremely dirty wheels including excessive
brake dust, care must be taken in the selection of tire and
wheel cleaning chemicals and equipment to prevent
damage to the wheels. Mopar® Wheel Treatment or
Mopar® Chrome Cleaner or their equivalent is
recommended, or select a non-abrasive, non-acidic
cleaner for aluminum or chrome wheels.
WARNING!
Compact and collapsible spares are for temporary
emergency use only. With these spares, do not drive
more than 50 mph (80 km/h). Temporary use spares
have limited tread life. When the tread is worn to the
tread wear indicators, the temporary use spare tire
needs to be replaced. Be sure to follow the warnings,
which apply to your spare. Failure to do so could result
in spare tire failure and loss of vehicle control.WARNING!
Limited use spares are for emergency use only.
Installation of this limited use spare tire affects vehicle
handling. With this tire, do not drive more than the
speed listed on the limited use spare wheel. Keep
inflated to the cold tire inflation pressures listed on your
Tire And Loading Information Placard located on the
driver’s side B-pillar or the rear edge of the driver’s side
door. Replace (or repair) the original equipment tire at
the first opportunity and reinstall it on your vehicle.
Failure to do so could result in loss of vehicle control.
CAUTION!
Avoid products or automatic car washes that use acidic
solutions or strong alkaline additives or harsh brushes.
Many aftermarket wheel cleaners and automatic car
washes may damage the wheel's protective finish. Such
damage is not covered by the New Vehicle Limited War -
ranty. Only car wash soap, Mopar® Wheel Cleaner or
equivalent is recommended.
8
23_KL_OM_EN_USC_t.book Page 245
Page 250 of 276
248SERVICING AND MAINTENANCE
(Continued)
TIRE ROTATION RECOMMENDATIONS
The tires on the front and rear of your vehicle operate at
different loads and perform different steering, handling,
and braking functions. For these reasons, they wear at
unequal rates.
These effects can be reduced by timely rotation of tires.
The benefits of rotation are especially worthwhile with
aggressive tread designs such as those on On/Off Road
type tires. Rotation will increase tread life, help to
maintain mud, snow, and wet traction levels, and
contribute to a smooth, quiet ride. Refer to the Maintenance Plan for the proper
maintenance intervals
Úpage 209. The reasons for any
rapid or unusual wear should be corrected prior to rotation
being performed.
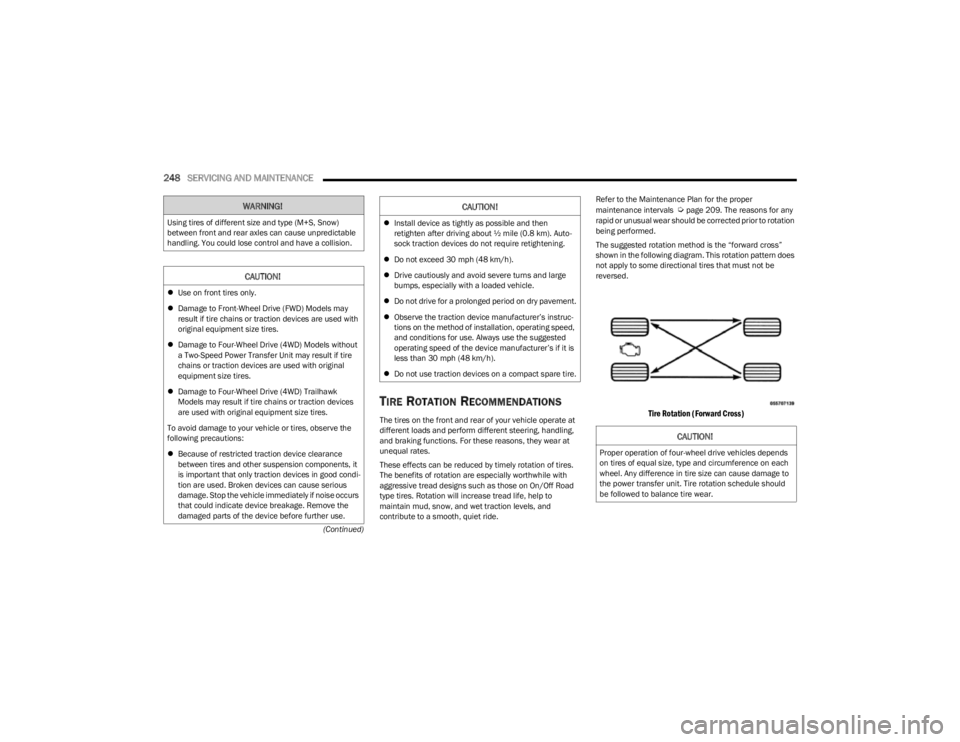
The suggested rotation method is the “forward cross”
shown in the following diagram. This rotation pattern does
not apply to some directional tires that must not be
reversed.
Tire Rotation (Forward Cross)
WARNING!
Using tires of different size and type (M+S, Snow)
between front and rear axles can cause unpredictable
handling. You could lose control and have a collision.
CAUTION!
Use on front tires only.
Damage to Front-Wheel Drive (FWD) Models may
result if tire chains or traction devices are used with
original equipment size tires.
Damage to Four-Wheel Drive (4WD) Models without
a Two-Speed Power Transfer Unit may result if tire
chains or traction devices are used with original
equipment size tires.
Damage to Four-Wheel Drive (4WD) Trailhawk
Models may result if tire chains or traction devices
are used with original equipment size tires.
To avoid damage to your vehicle or tires, observe the
following precautions:
Because of restricted traction device clearance
between tires and other suspension components, it
is important that only traction devices in good condi -
tion are used. Broken devices can cause serious
damage. Stop the vehicle immediately if noise occurs
that could indicate device breakage. Remove the
damaged parts of the device before further use.
Install device as tightly as possible and then
retighten after driving about ½ mile (0.8 km). Auto -
sock traction devices do not require retightening.
Do not exceed 30 mph (48 km/h).
Drive cautiously and avoid severe turns and large
bumps, especially with a loaded vehicle.
Do not drive for a prolonged period on dry pavement.
Observe the traction device manufacturer’s instruc -
tions on the method of installation, operating speed,
and conditions for use. Always use the suggested
operating speed of the device manufacturer’s if it is
less than 30 mph (48 km/h).
Do not use traction devices on a compact spare tire.
CAUTION!
CAUTION!
Proper operation of four-wheel drive vehicles depends
on tires of equal size, type and circumference on each
wheel. Any difference in tire size can cause damage to
the power transfer unit. Tire rotation schedule should
be followed to balance tire wear.
23_KL_OM_EN_USC_t.book Page 248
Page 251 of 276
SERVICING AND MAINTENANCE249
DEPARTMENT OF TRANSPORTATION
UNIFORM TIRE QUALITY GRADES
The following tire grading categories
were established by the National
Highway Traffic Safety Administration.
The specific grade rating assigned by the
tire's manufacturer in each category is
shown on the sidewall of the tires on
your vehicle.
All passenger vehicle tires must conform
to Federal safety requirements in
addition to these grades.
TREADWEAR
The Treadwear grade is a comparative
rating, based on the wear rate of the tire
when tested under controlled conditions
on a specified government test course.
For example, a tire graded 150 would
wear one and one-half times as well on
the government course as a tire graded
100. The relative performance of tires
depends upon the actual conditions of
their use, however, and may depart significantly from the norm due to
variations in driving habits, service
practices, and differences in road
characteristics and climate.
TRACTION GRADES
The Traction grades, from highest to
lowest, are AA, A, B, and C. These grades
represent the tire's ability to stop on wet
pavement, as measured under
controlled conditions on specified
government test surfaces of asphalt and
concrete. A tire marked C may have poor
traction performance.
TEMPERATURE GRADES
The Temperature grades are A (the
highest), B, and C, representing the tire's
resistance to the generation of heat and
its ability to dissipate heat, when tested under controlled conditions on a
specified indoor laboratory test wheel.
Sustained high temperature can cause
the material of the tire to degenerate
and reduce tire life, and excessive
temperature can lead to sudden tire
failure. The grade C corresponds to a
level of performance, which all
passenger vehicle tires must meet
under the Federal Motor Vehicle Safety
Standard No. 109. Grades B and A
represent higher levels of performance
on the laboratory test wheel, than the
minimum required by law.
WARNING!
The traction grade assigned to this tire is based on
straight-ahead braking traction tests, and does not
include acceleration, cornering, hydroplaning, or peak
traction characteristics.WARNING!
The temperature grade for this tire is established for a
tire that is properly inflated and not overloaded.
Excessive speed, underinflation, or excessive loading,
either separately or in combination, can cause heat
buildup and possible tire failure.8
23_KL_OM_EN_USC_t.book Page 249
Page 253 of 276

SERVICING AND MAINTENANCE251
Special Care
If you drive on salted or dusty roads or if you drive near
the ocean, hose off the undercarriage at least once a
month.
It is important that the drain holes in the lower edges of
the doors, rocker panels, and trunk be kept clear and
open.
If you detect any stone chips or scratches in the paint,
touch them up immediately.
If your vehicle is damaged due to a collision or similar
cause that destroys the paint and protective coating,
have your vehicle repaired as soon as possible.
If you carry special cargo such as chemicals, fertilizers,
de-icer salt, etc., be sure that such materials are well
packaged and sealed.
If a lot of driving is done on gravel roads, consider mud
or stone shields behind each wheel.
Use Mopar® Touch Up Paint on scratches as soon as
possible. An authorized dealer has touch up paint to
match the color of your vehicle.
INTERIORS
SEATS AND FABRIC PARTS
Use Mopar® Total Clean to clean fabric upholstery and
carpeting.
Seat Belt Maintenance
Do not bleach, dye or clean the belts with chemical
solvents or abrasive cleaners. This will weaken the fabric.
If the belts need cleaning, use a mild soap solution or
lukewarm water. Do not remove the belts from the vehicle
to wash them. Dry with a soft cloth.
Sun damage can also weaken the fabric. Replace the belts
if they appear frayed or worn or if the buckles do not work
properly.
PLASTIC AND COATED PARTS
Use Mopar® Total Clean to clean vinyl upholstery.
Cleaning Plastic Instrument Cluster
Lenses
The lenses in front of the instruments in this vehicle are
molded in clear plastic. When cleaning the lenses, care
must be taken to avoid scratching the plastic.
Clean with a wet soft cloth. A mild soap solution may be
used, but do not use high alcohol content or abrasive
cleaners. If soap is used, wipe clean with a clean damp
cloth. Dry with a soft cloth.
WARNING!
Do not use volatile solvents for cleaning purposes.
Many are potentially flammable, and if used in closed
areas they may cause respiratory harm.
WARNING!
A frayed or torn seat belt could rip apart in a collision
and leave you with no protection. Inspect the seat belt
system periodically, checking for cuts, frays, or loose
parts. Damaged parts must be replaced immediately.
Do not disassemble or modify the seat belt system. If
your vehicle is involved in a collision, or if you have
questions regarding seat belt or retractor conditions,
take your vehicle to an authorized FCA dealer or
authorized FCA Certified Collision Care Program facility
for inspection.
CAUTION!
Direct contact of air fresheners, insect repellents,
suntan lotions, or hand sanitizers to the plastic,
painted, or decorated surfaces of the interior may
cause permanent damage. Wipe away immediately.
Damage caused by these type of products may not
be covered by your New Vehicle Limited Warranty.
8
23_KL_OM_EN_USC_t.book Page 251
Page 256 of 276
254TECHNICAL SPECIFICATIONS
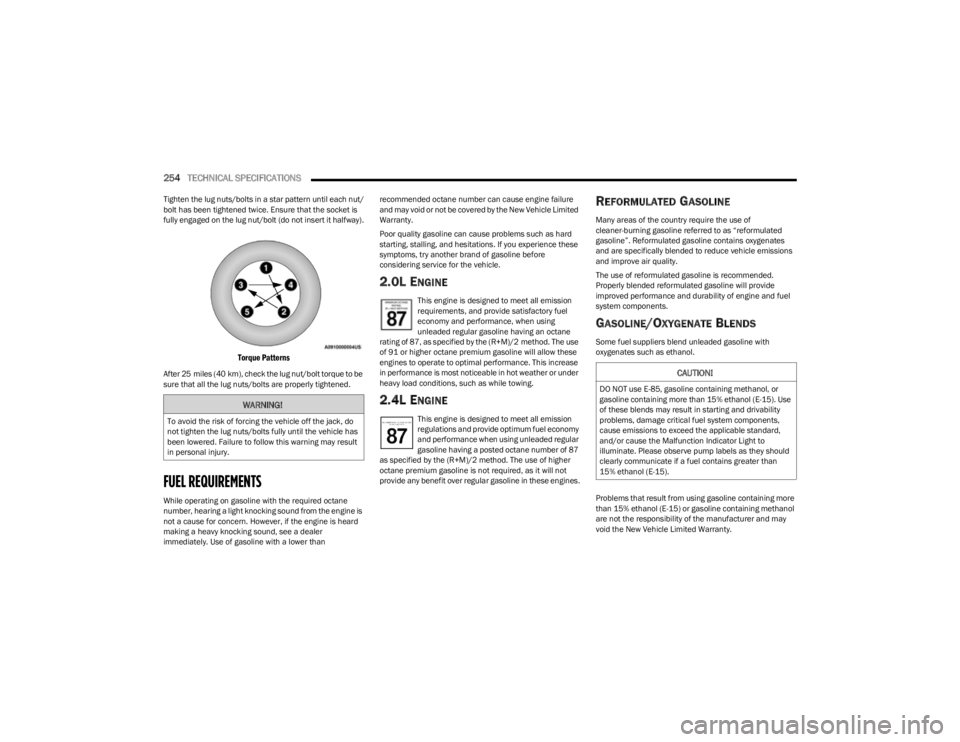
Tighten the lug nuts/bolts in a star pattern until each nut/
bolt has been tightened twice. Ensure that the socket is
fully engaged on the lug nut/bolt (do not insert it halfway).
Torque Patterns
After 25 miles (40 km), check the lug nut/bolt torque to be
sure that all the lug nuts/bolts are properly tightened.
FUEL REQUIREMENTS
While operating on gasoline with the required octane
number, hearing a light knocking sound from the engine is
not a cause for concern. However, if the engine is heard
making a heavy knocking sound, see a dealer
immediately. Use of gasoline with a lower than recommended octane number can cause engine failure
and may void or not be covered by the New Vehicle Limited
Warranty.
Poor quality gasoline can cause problems such as hard
starting, stalling, and hesitations. If you experience these
symptoms, try another brand of gasoline before
considering service for the vehicle.
2.0L ENGINE
This engine is designed to meet all emission
requirements, and provide satisfactory fuel
economy and performance, when using
unleaded regular gasoline having an octane
rating of 87, as specified by the (R+M)/2 method. The use
of 91 or higher octane premium gasoline will allow these
engines to operate to optimal performance. This increase
in performance is most noticeable in hot weather or under
heavy load conditions, such as while towing.
2.4L ENGINE
This engine is designed to meet all emission
regulations and provide optimum fuel economy
and performance when using unleaded regular
gasoline having a posted octane number of 87
as specified by the (R+M)/2 method. The use of higher
octane premium gasoline is not required, as it will not
provide any benefit over regular gasoline in these engines.
REFORMULATED GASOLINE
Many areas of the country require the use of
cleaner-burning gasoline referred to as “reformulated
gasoline”. Reformulated gasoline contains oxygenates
and are specifically blended to reduce vehicle emissions
and improve air quality.
The use of reformulated gasoline is recommended.
Properly blended reformulated gasoline will provide
improved performance and durability of engine and fuel
system components.
GASOLINE/OXYGENATE BLENDS
Some fuel suppliers blend unleaded gasoline with
oxygenates such as ethanol.
Problems that result from using gasoline containing more
than 15% ethanol (E-15) or gasoline containing methanol
are not the responsibility of the manufacturer and may
void the New Vehicle Limited Warranty.
WARNING!
To avoid the risk of forcing the vehicle off the jack, do
not tighten the lug nuts/bolts fully until the vehicle has
been lowered. Failure to follow this warning may result
in personal injury.
CAUTION!
DO NOT use E-85, gasoline containing methanol, or
gasoline containing more than 15% ethanol (E-15). Use
of these blends may result in starting and drivability
problems, damage critical fuel system components,
cause emissions to exceed the applicable standard,
and/or cause the Malfunction Indicator Light to
illuminate. Please observe pump labels as they should
clearly communicate if a fuel contains greater than
15% ethanol (E-15).
23_KL_OM_EN_USC_t.book Page 254