change time JEEP CHEROKEE 2023 Owner's Manual
[x] Cancel search | Manufacturer: JEEP, Model Year: 2023, Model line: CHEROKEE, Model: JEEP CHEROKEE 2023Pages: 276, PDF Size: 12.55 MB
Page 116 of 276
114STARTING AND OPERATING
Payload
The payload of a vehicle is defined as the allowable load
weight a truck can carry, including the weight of the driver,
all passengers, options and cargo.
Gross Axle Weight Rating (GAWR)
The GAWR is the maximum permissible load on the front
and rear axles. The load must be distributed in the cargo
area so that the GAWR of each axle is not exceeded.
Each axle GAWR is determined by the components in the
system with the lowest load carrying capacity (axle,
springs, tires or wheels). Heavier axles, or suspension
components sometimes specified by purchasers for
increased durability, do not necessarily increase the
vehicle's GVWR.
Tire Size
The tire size on the Vehicle Certification Label represents
the actual tire size on your vehicle. Replacement tires
must be equal to the load capacity of this tire size.
Rim Size
This is the rim size that is appropriate for the tire size
listed.
Inflation Pressure
This is the cold tire inflation pressure for your vehicle for
all loading conditions up to full GAWR.
Curb Weight
The curb weight of a vehicle is defined as the total weight
of the vehicle with all fluids, including vehicle fuel, at full
capacity conditions, and with no occupants or cargo
loaded into the vehicle. The front and rear curb weight
values are determined by weighing your vehicle on a
commercial scale before any occupants or cargo are
added.
Loading
The actual total weight and the weight of the front and rear
of your vehicle at the ground can best be determined by
weighing it when it is loaded and ready for operation.
The entire vehicle should first be weighed on a commercial
scale to ensure that the GVWR has not been exceeded.
The weight on the front and rear of the vehicle should then
be determined separately to be sure that the load is
properly distributed over the front and rear axle. Weighing
the vehicle may show that the GAWR of either the front or
rear axles has been exceeded but the total load is within
the specified GVWR. If so, weight must be shifted from
front to rear or rear to front as appropriate until the
specified weight limitations are met. Store the heavier
items down low and be sure that the weight is distributed
equally. Stow all loose items securely before driving.
Improper weight distributions can have an adverse effect
on the way your vehicle steers and handles and the way
the brakes operate.TRAILER TOWING
In this section you will find safety tips and information on
limits to the type of towing you can reasonably do with your
vehicle. Before towing a trailer, carefully review this
information to tow your load as efficiently and safely as
possible.
To maintain the New Vehicle Limited Warranty coverage,
follow the requirements and recommendations in this
manual concerning vehicles used for trailer towing.
COMMON TOWING DEFINITIONS
The following trailer towing related definitions will assist
you in understanding the following information:
Gross Vehicle Weight Rating (GVWR)
The GVWR is the total allowable weight of your vehicle.
This includes driver, passengers, cargo, and tongue
weight. The total load must be limited so that you do not
exceed the GVWR
Úpage 113.
WARNING!
Do not load your vehicle any heavier than the GVWR or
the maximum front and rear GAWR. If you do, parts on
your vehicle can break, or it can change the way your
vehicle handles. This could cause you to lose control.
Overloading can shorten the life of your vehicle.
23_KL_OM_EN_USC_t.book Page 114
Page 126 of 276
124STARTING AND OPERATING
Driving Through Water
Although your vehicle is capable of driving through water,
there are a number of precautions that must be
considered before entering the water:
Driving through water more than a few inches/
centimeters deep will require extra caution to ensure
safety and prevent damage to your vehicle. If you must
drive through water, try to determine the depth and the
bottom condition (and location of any obstacles) prior to
entering. Proceed with caution and maintain a steady
controlled speed less than 5 mph (8 km/h) in deep water
to minimize wave effects.
Flowing Water
If the water is swift flowing and rising (as in storm run-off)
avoid crossing until the water level recedes and/or the
flow rate is reduced. If you must cross flowing-water, avoid
depths in excess of 9 inches (22 cm). The flowing water
can erode the streambed causing your vehicle to sink into
deeper water. Determine exit point(s) that are
downstream of your entry point to allow for drifting. Standing Water
Avoid driving in standing water deeper than 16 inches
(40.5 cm), and reduce speed appropriately to minimize
wave effects. Maximum speed in 16 inches (40.5 cm) of
water is less than 5 mph (8 km/h).
(Trailhawk only): Avoid driving in standing water deeper
than 19 inches (48 cm), and reduce speed appropriately
to minimize wave effects. Maximum speed in 19 inches
(48 cm) of water is less than 5 mph (8 km/h).
Maintenance
After driving through deep water, inspect your vehicle
fluids and lubricants (engine, transmission, Power
Transfer Unit, and Rear Drive Module) to ensure they have
not been contaminated. Contaminated fluids and
lubricants (milky, foamy in appearance) should be
flushed/changed as soon as possible to prevent
component damage.
Driving In Snow, Mud And Sand
In heavy snow, when pulling a load, or for additional
control at slower speeds, shift the transmission to a low
gear and shift the 4WD system to the appropriate terrain
mode, using 4WD LOW if necessary
Úpage 85. Only shift
into a lower gear to maintain forward motion. Over-revving
the engine can spin the wheels and traction will be lost.
Avoid abrupt downshifts on icy or slippery roads because
engine braking may cause skidding and loss of control.
Hill Climbing
NOTE:Before attempting to climb a hill, determine the conditions
at the crest and/or on the other side.
Before climbing a steep hill, shift the transmission to a
lower gear and shift the 4WD system to 4WD LOW. Use
FIRST gear and 4WD LOW for very steep hills.
NOTE:Brakes should be applied at increased slippage, but
before coming to a stop to avoid digging into the loose
surface and rendering the operator of the vehicle stuck/
immobile.
If you stall or begin to lose headway while climbing a steep
hill, allow your vehicle to come to a stop and immediately
apply the brakes. Once stopped, shift to REVERSE. Back
slowly down the hill allowing the compression braking of
the engine to help regulate your speed. If the brakes are
required to control vehicle speed, apply them lightly and
avoid locking or skidding the tires.
CAUTION!
When driving through water, do not exceed 5 mph
(8 km/h). Always check water depth before entering as
a precaution, and check all fluids afterward. Driving
through water may cause damage that may not be
covered by the New Vehicle Limited Warranty.
WARNING!
If the engine stalls or you lose headway or cannot make
it to the top of a steep hill or grade, never attempt to
turn around. To do so may result in tipping and rolling
the vehicle. Always back straight down a hill in
REVERSE gear carefully. Never back down a hill in
NEUTRAL using only the brake.
23_KL_OM_EN_USC_t.book Page 124
Page 128 of 276
126
MULTIMEDIA
UCONNECT SYSTEMS
For detailed information about your Uconnect 4C/4C NAV
With 8.4-inch Display system, refer to your Uconnect Radio
Instruction Manual.
NOTE:Uconnect screen images are for illustration purposes only
and may not reflect exact software for your vehicle.
CYBERSECURITY
Depending on applicability, your vehicle may be able to
send or receive information from a wired or wireless
network. This information allows systems and features in
your vehicle to function properly.
Your vehicle may be equipped with certain security
features to reduce the risk of unauthorized and unlawful
access to vehicle systems and wireless communications.
Vehicle software technology continues to evolve over time
and FCA US LLC, working with its suppliers, evaluates and
takes appropriate steps as needed. As always, if you
experience unusual behavior, contact an authorized
dealer immediately,
Úpage 258, or refer to your
Uconnect Radio Instruction Manual for additional contact
information. The risk of unauthorized and unlawful access to your
vehicle systems may still exist, even if the most recent
version of vehicle software (such as Uconnect software) is
installed.
NOTE:To help further improve user experience, features,
stability, etc., and minimize the potential risk of a security
breach, vehicle owners should routinely check
www.driveuconnect.com (US Residents) or www.driveuco
-
nnect.ca (Canadian Residents) to learn about available
Uconnect software updates.
UCONNECT SETTINGS
The Uconnect system uses a combination of buttons on
the touchscreen and buttons on the faceplate located on
the center of the instrument panel. These buttons allow
you to access and change the Customer Programmable
Features. Many features can vary by vehicle.
Buttons on the faceplate are located below and/or beside
the Uconnect system in the center of the instrument
panel. In addition, there is a SCROLL/ENTER control knob
located on the right side. Turn the control knob to scroll
through menus and change settings. Push the center of
the control knob one or more times to select or change a
setting.
Your Uconnect system may also have SCREEN OFF and
MUTE buttons on the faceplate.
Push the SCREEN OFF button on the faceplate to turn off
the Uconnect screen. Push the button again or tap the
screen to turn the screen on.
Press the Back Arrow button to exit out of a Menu or
certain option on the Uconnect system.
WARNING!
ONLY insert trusted devices/components into your
vehicle. Media of unknown origin could possibly
contain malicious software, and if installed in your
vehicle, it may increase the possibility for vehicle
systems to be breached.
As always, if you experience unusual vehicle
behavior, take your vehicle to an authorized dealer
immediately.
23_KL_OM_EN_USC_t.book Page 126
Page 129 of 276
MULTIMEDIA127
CUSTOMER PROGRAMMABLE FEATURES
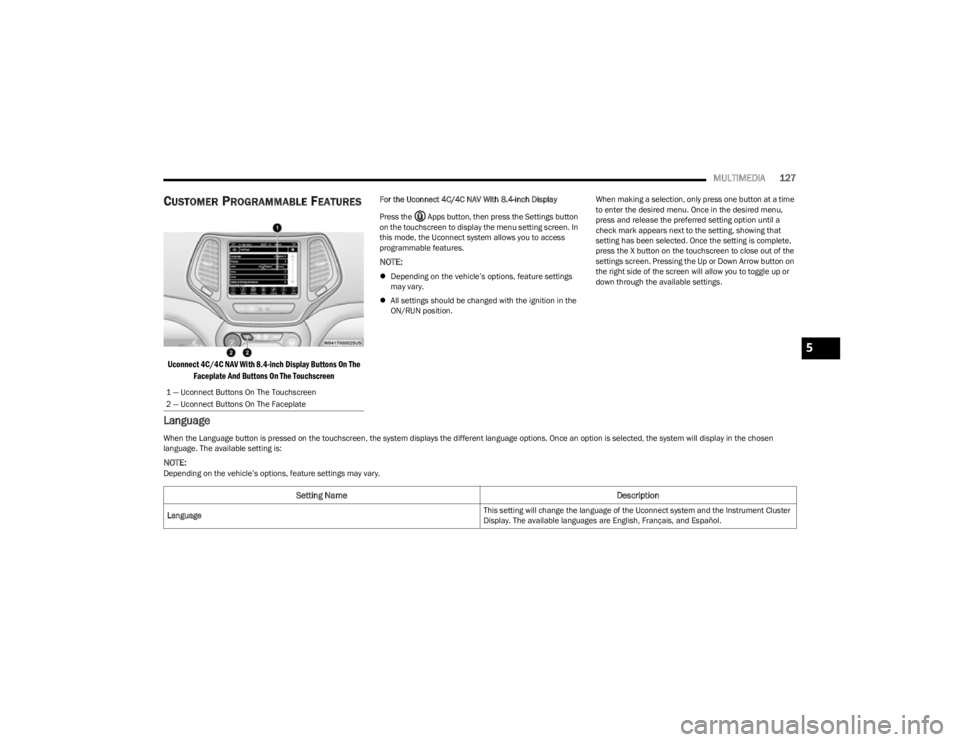
Uconnect 4C/4C NAV With 8.4-inch Display Buttons On The
Faceplate And Buttons On The Touchscreen
For the Uconnect 4C/4C NAV With 8.4-inch Display
Press the Apps button, then press the Settings button
on the touchscreen to display the menu setting screen. In
this mode, the Uconnect system allows you to access
programmable features.
NOTE:
Depending on the vehicle’s options, feature settings
may vary.
All settings should be changed with the ignition in the
ON/RUN position. When making a selection, only press one button at a time
to enter the desired menu. Once in the desired menu,
press and release the preferred setting option until a
check mark appears next to the setting, showing that
setting has been selected. Once the setting is complete,
press the X button on the touchscreen to close out of the
settings screen. Pressing the Up or Down Arrow button on
the right side of the screen will allow you to toggle up or
down through the available settings.
Language
1 — Uconnect Buttons On The Touchscreen
2 — Uconnect Buttons On The Faceplate
When the Language button is pressed on the touchscreen, the system displays the different language options. Once an option is selected, the system will display in the chosen
language. The available setting is:
NOTE:Depending on the vehicle’s options, feature settings may vary.
Setting Name
Description
Language This setting will change the language of the Uconnect system and the Instrument Cluster
Display. The available languages are English, Français, and Español.
5
23_KL_OM_EN_USC_t.book Page 127
Page 130 of 276

128MULTIMEDIA
Display
When the Display button is pressed on the touchscreen, the system will display the options related to the theme (if equipped), brightness, and color of the touchscreen. The available
settings are:
NOTE:Depending on the vehicle’s options, feature settings may vary.
Setting Name Description
Display Mode This setting will allow you to set the brightness manually or have the system set it
automatically. The “Auto” setting has the system automatically adjust the display
brightness. The “Manual” setting will allow the user to adjust the brightness of the
display.
Display Brightness With Headlights ON This setting will allow you to set the brightness when the headlights are on. To access this
setting, Display Mode must be set to Manual. The “+” setting will increase the brightness;
the “-” will decrease the brightness.
Display Brightness With Headlights OFF This setting will allow you to set the brightness when the headlights are off. To access this
setting, Display Mode must be set to Manual. The “+” setting will increase the brightness;
the “-” will decrease the brightness.
Set Theme This setting will allow you to change the display theme.
Keyboard This setting will change the keyboard type on the display. The selectable keyboards are
“ABCDEF Keyboard”, “QWERTY Keyboard”, and “AZERTY Keyboard”.
Touchscreen Beep This setting will allow you to turn the touchscreen beep on or off.
Control Screen Timeout This setting allows you to set the Control Screen to turn off automatically after five
seconds or stay open until manually closed.
Navigation Next Turn Pop-ups Displayed in Cluster This setting will display Navigation prompts in the Instrument Cluster Display.
Phone Pop-ups Displayed In Cluster This setting will display smartphone notifications and messages in the Instrument Cluster
Display.
23_KL_OM_EN_USC_t.book Page 128
Page 131 of 276
MULTIMEDIA129
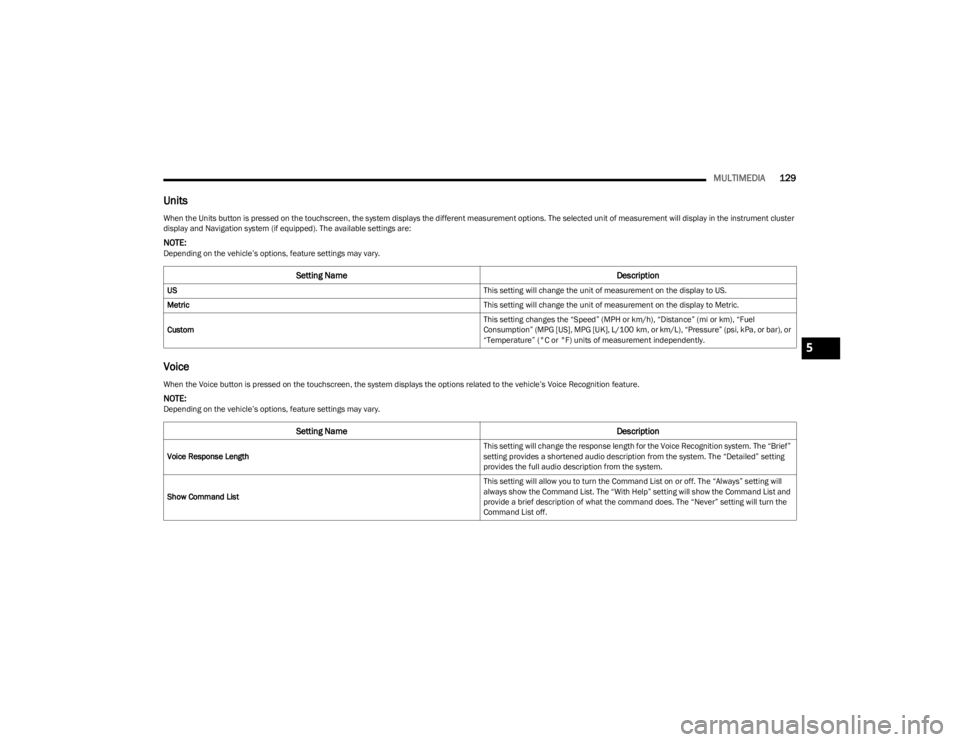
Units
Voice
When the Units button is pressed on the touchscreen, the system displays the different measurement options. The selected unit of measurement will display in the instrument cluster
display and Navigation system (if equipped). The available settings are:
NOTE:Depending on the vehicle’s options, feature settings may vary.
Setting Name Description
US This setting will change the unit of measurement on the display to US.
Metric This setting will change the unit of measurement on the display to Metric.
Custom This setting changes the “Speed” (MPH or km/h), “Distance” (mi or km), “Fuel
Consumption” (MPG [US], MPG [UK], L/100 km, or km/L), “Pressure” (psi, kPa, or bar), or
“Temperature” (°C or °F) units of measurement independently.
When the Voice button is pressed on the touchscreen, the system displays the options related to the vehicle’s Voice Recognition feature.
NOTE:Depending on the vehicle’s options, feature settings may vary.
Setting Name
Description
Voice Response Length This setting will change the response length for the Voice Recognition system. The “Brief”
setting provides a shortened audio description from the system. The “Detailed” setting
provides the full audio description from the system.
Show Command List This setting will allow you to turn the Command List on or off. The “Always” setting will
always show the Command List. The “With Help” setting will show the Command List and
provide a brief description of what the command does. The “Never” setting will turn the
Command List off.
5
23_KL_OM_EN_USC_t.book Page 129
Page 133 of 276
MULTIMEDIA131
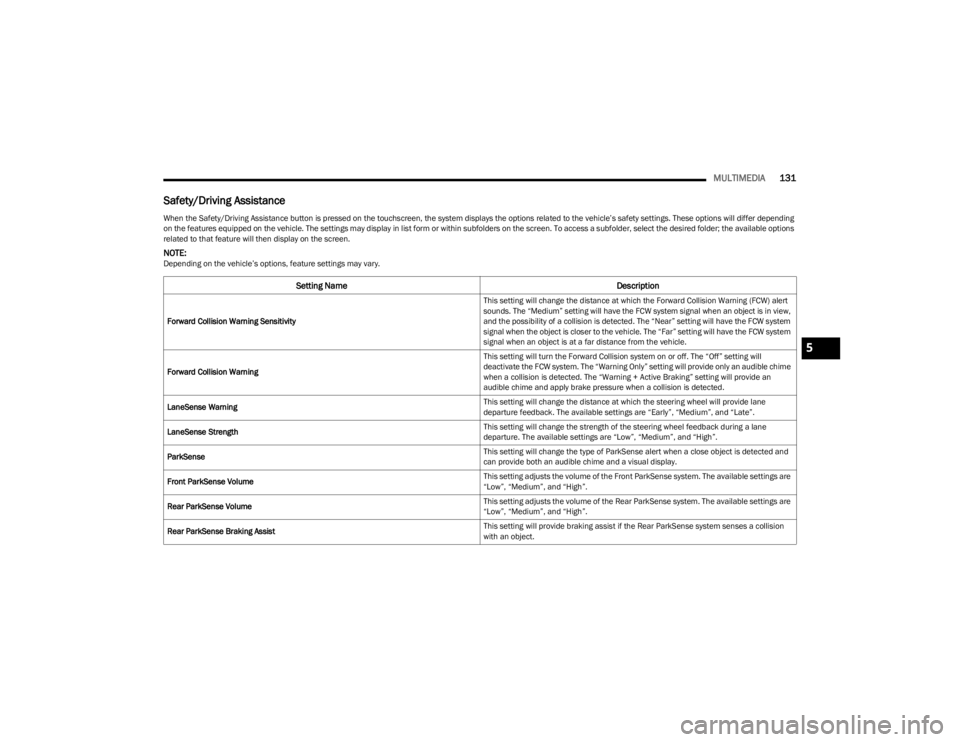
Safety/Driving Assistance
When the Safety/Driving Assistance button is pressed on the touchscreen, the system displays the options related to the vehicle’s safety settings. These options will differ depending
on the features equipped on the vehicle. The settings may display in list form or within subfolders on the screen. To access a subfolder, select the desired folder; the available options
related to that feature will then display on the screen.
NOTE:Depending on the vehicle’s options, feature settings may vary.
Setting Name Description
Forward Collision Warning Sensitivity This setting will change the distance at which the Forward Collision Warning (FCW) alert
sounds. The “Medium” setting will have the FCW system signal when an object is in view,
and the possibility of a collision is detected. The “Near” setting will have the FCW system
signal when the object is closer to the vehicle. The “Far” setting will have the FCW system
signal when an object is at a far distance from the vehicle.
Forward Collision Warning This setting will turn the Forward Collision system on or off. The “Off” setting will
deactivate the FCW system. The “Warning Only” setting will provide only an audible chime
when a collision is detected. The “Warning + Active Braking” setting will provide an
audible chime and apply brake pressure when a collision is detected.
LaneSense Warning This setting will change the distance at which the steering wheel will provide lane
departure feedback. The available settings are “Early”, “Medium”, and “Late”.
LaneSense Strength This setting will change the strength of the steering wheel feedback during a lane
departure. The available settings are “Low”, “Medium”, and “High”.
ParkSense This setting will change the type of ParkSense alert when a close object is detected and
can provide both an audible chime and a visual display.
Front ParkSense Volume This setting adjusts the volume of the Front ParkSense system. The available settings are
“Low”, “Medium”, and “High”.
Rear ParkSense Volume This setting adjusts the volume of the Rear ParkSense system. The available settings are
“Low”, “Medium”, and “High”.
Rear ParkSense Braking Assist This setting will provide braking assist if the Rear ParkSense system senses a collision
with an object.
5
23_KL_OM_EN_USC_t.book Page 131
Page 134 of 276

132MULTIMEDIA
Brakes
Blind Spot Alert This setting will change the type of alert provided when an object is detected in a
vehicle’s blind spot. The “Off” setting will turn off Blind Spot Alert. The “Lights” setting will
activate the Blind Spot Alert lights on the outside mirrors. The “Lights & Chime” setting
will activate both the lights on the outside mirrors and an audible chime.
Hill Start Assist This setting will turn the Hill Start Assist system on or off.
Active ParkView Backup Camera Guidelines This setting will turn the Active ParkView Backup Camera Guidelines on or off.
ParkView Backup Camera Delay This setting will add a delay to the ParkView Backup Camera when shifting out of
REVERSE.
Fixed ParkView Backup Camera Guidelines This setting will turn the Fixed ParkView Backup Camera Guidelines on or off.
Rain Sensing Auto Wipers This setting will turn the Rain Sensing Auto Wipers on or off.
Side Distance Warning This setting will turn the Side Distance Warning on or off and set how the system will
communicate with the user. The “Off” setting will deactivate the system. The “Sound”
setting will provide an audible chime to the user. The “Sound And Display” setting will
provide both an audible chime and a visual display.
Side Distance Warning Volume This setting will adjust the warning for side distance. The available options are “Low”,
“Medium”, and “High”.
Tire Fill Assist This setting will turn the Tire Fill Assist on or off.
Setting NameDescription
When the Brakes button is pressed on the touchscreen, the system will display settings related to the vehicle’s brake system.
NOTE:Depending on the vehicle’s options, feature settings may vary.
Setting NameDescription
Auto Park Brake This setting will turn the Auto Park Brake on or off.
Brake Service This setting will allow you to set the brakes for service. When the setting is selected, a
pop-up will display with “Yes” and “No” options.
23_KL_OM_EN_USC_t.book Page 132
Page 135 of 276
MULTIMEDIA133
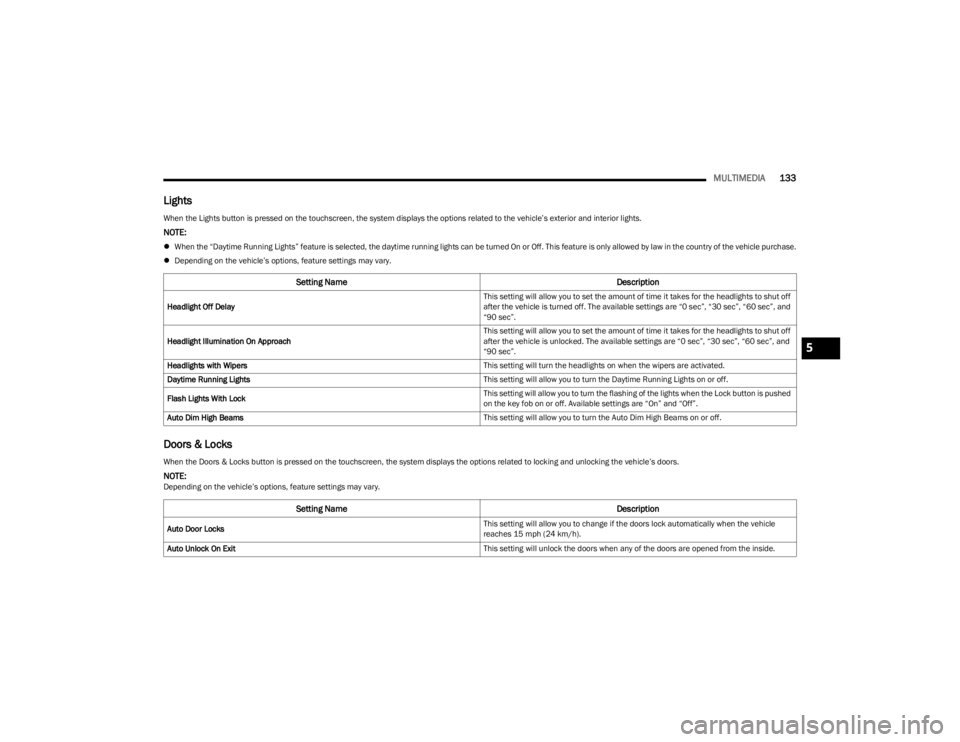
Lights
Doors & Locks
When the Lights button is pressed on the touchscreen, the system displays the options related to the vehicle’s exterior and interior lights.
NOTE:
When the “Daytime Running Lights” feature is selected, the daytime running lights can be turned On or Off. This feature is only allowed by law in the country of the vehicle purchase.
Depending on the vehicle’s options, feature settings may vary.
Setting Name Description
Headlight Off Delay This setting will allow you to set the amount of time it takes for the headlights to shut off
after the vehicle is turned off. The available settings are “0 sec”, “30 sec”, “60 sec”, and
“90 sec”.
Headlight Illumination On Approach This setting will allow you to set the amount of time it takes for the headlights to shut off
after the vehicle is unlocked. The available settings are “0 sec”, “30 sec”, “60 sec”, and
“90 sec”.
Headlights with Wipers This setting will turn the headlights on when the wipers are activated.
Daytime Running Lights This setting will allow you to turn the Daytime Running Lights on or off.
Flash Lights With Lock This setting will allow you to turn the flashing of the lights when the Lock button is pushed
on the key fob on or off. Available settings are “On” and “Off”.
Auto Dim High Beams This setting will allow you to turn the Auto Dim High Beams on or off.
When the Doors & Locks button is pressed on the touchscreen, the system displays the options related to locking and unlocking the vehicle’s doors.
NOTE:Depending on the vehicle’s options, feature settings may vary.
Setting NameDescription
Auto Door Locks This setting will allow you to change if the doors lock automatically when the vehicle
reaches 15 mph (24 km/h).
Auto Unlock On Exit This setting will unlock the doors when any of the doors are opened from the inside.
5
23_KL_OM_EN_USC_t.book Page 133
Page 136 of 276

134MULTIMEDIA
Flash Lights With Lock This setting will allow you to turn the flashing of the lights when the Lock button is pushed
on the key fob on or off. Available settings are “On” and “Off”.
Sound Horn With Lock This setting will sound the horn when the Lock button is pushed on the key fob. The “Off”
setting will not sound the horn when the Lock button is pushed. The “1st Press” setting
will sound the horn when the Lock button is pushed once. The “2nd Press” setting will
sound the horn when the Lock button is pushed twice.
Sound Horn With Remote Start This setting will sound the horn when the remote start is activated from the key fob.
Remote Door Unlock This setting will change how many pushes of the Unlock button on the key fob are needed
to unlock all the doors. The “Driver Door” setting will only unlock the driver door on the
first push on the Unlock button. The “All Doors” setting will unlock all doors on the first
push of the Unlock button.
Passive Entry This setting will allow you to turn the Passive Entry feature (Keyless Enter ‘n Go™) on or
off.
Personal Settings Linked To Key Fob This setting will recall preset radio stations and driver seat position that have been linked
to the key fob.
Power Liftgate Alert This setting will chime an audible alert when the power liftgate is raising or lowering.
Selectable options are “On” and “Off”.
Hands Free Power Liftgate This setting will use hands-free technology to automatically open or close the power
liftgate. Selectable options are “On” and “Off”.
Setting Name
Description
23_KL_OM_EN_USC_t.book Page 134