recommended oil JEEP CHEROKEE 2023 Owners Manual
[x] Cancel search | Manufacturer: JEEP, Model Year: 2023, Model line: CHEROKEE, Model: JEEP CHEROKEE 2023Pages: 276, PDF Size: 12.55 MB
Page 80 of 276
78STARTING AND OPERATING
(Continued)
IF ENGINE FAILS TO START
If the engine fails to start after you have followed the
“Normal Starting” procedure and the vehicle has not
experienced an Extended Park condition as previously
defined, it may be flooded. Push the accelerator pedal all
the way to the floor and hold it there while the engine is
cranking. This should clear any excess fuel in case the
engine is flooded. The starter motor will engage
automatically, run for 10 seconds, and then disengage.
Once this occurs, release the accelerator pedal and the
brake pedal, wait 10 to 15 seconds, then repeat the
“Normal Starting” procedure.AFTER STARTING
The idle speed is controlled automatically, and it will
decrease as the engine warms up.
ENGINE BREAK-IN RECOMMENDATIONS
A long break-in period is not required for the engine and
drivetrain (transmission and axle) in your vehicle.
Drive moderately during the first 300 miles (500 km).
After the initial 60 miles (100 km), speeds up to 50 or
55 mph (80 or 90 km/h) are desirable.
While cruising, brief full-throttle acceleration within the
limits of local traffic laws contributes to a good break-in.
Wide-open throttle acceleration in low gear can be
detrimental and should be avoided.
The engine oil installed in the engine at the factory is a
high-quality energy conserving type lubricant. Oil changes
should be consistent with anticipated climate conditions
under which vehicle operations will occur. For the
recommended viscosity and quality grades see
Úpage 256.
NOTE:A new engine may consume some oil during its first few
thousand miles (kilometers) of operation. This should be
considered a normal part of the break-in and not inter -
preted as a problem.
PARKING BRAKE
ELECTRIC PARK BRAKE (EPB)
Your vehicle is equipped with an EPB that offers simple
operation, and some additional features that make the
parking brake more convenient and useful.
The parking brake is primarily intended to prevent the
vehicle from rolling while parked. Before leaving the
vehicle, make sure that the parking brake is applied. Also,
be certain to leave the transmission in PARK (P).
You can engage the parking brake in two ways:
Manually, by applying the EPB switch.
Automatically, by enabling the Auto Park Brake feature
in the customer programmable features
Úpage 132.
The EPB switch is located in the center console, behind
the gear selector.
CAUTION!
To prevent damage to the starter, do not crank
continuously for more than 10 seconds at a time. Wait
10 to 15 seconds before trying again.
WARNING!
Never pour fuel or other flammable liquid into the
throttle body air inlet opening in an attempt to start
the vehicle. This could result in flash fire causing
serious personal injury.
Do not attempt to push or tow your vehicle to get it
started. Vehicles equipped with an automatic trans -
mission cannot be started this way. Unburned fuel
could enter the catalytic converter and once the
engine has started, ignite and damage the converter
and vehicle.
If the vehicle has a discharged battery, booster
cables may be used to obtain a start from a booster
battery or the battery in another vehicle. This type of
start can be dangerous if done improperly
Úpage 200.
WARNING!CAUTION!
Never use Non-Detergent Oil or Straight Mineral Oil in
the engine or damage may result.
23_KL_OM_EN_USC_t.book Page 78
Page 190 of 276
188SAFETY
PERIODIC SAFETY CHECKS YOU SHOULD
M
AKE OUTSIDE THE VEHICLE
Tires
Examine tires for excessive tread wear and uneven wear
patterns. Check for stones, nails, glass, or other objects
lodged in the tread or sidewall. Inspect the tread for cuts
and cracks. Inspect sidewalls for cuts, cracks, and bulges.
Check the lug nut/bolt torque for tightness. Check the
tires (including spare) for proper cold inflation pressure.
Lights
Have someone observe the operation of brake lights and
exterior lights while you work the controls. Check turn signal
and high beam indicator lights on the instrument panel.
Door Latches
Check for proper closing, latching, and locking.
Fluid Leaks
Check the area under the vehicle after overnight parking
for fuel, coolant, oil, or other fluid leaks. Also, if gasoline
fumes are detected or if fuel or brake fluid leaks are
suspected, the cause should be located and corrected
immediately.
EXHAUST GAS
The best protection against carbon monoxide entry into
the vehicle body is a properly maintained engine exhaust
system. Whenever a change is noticed in the sound of the exhaust
system, when exhaust fumes can be detected inside the
vehicle, or when the underside or rear of the vehicle is
damaged, have an authorized dealer inspect the complete
exhaust system and adjacent body areas for broken,
damaged, deteriorated, or mispositioned parts. Open
seams or loose connections could permit exhaust fumes
to seep into the passenger compartment. In addition,
inspect the exhaust system each time the vehicle is raised
for lubrication or oil change. Replace as required.
CARBON MONOXIDE WARNINGS
If the vehicle carpet has been removed and
re-installed, always properly attach carpet to the floor
and check the floor mat fasteners are secure to the
vehicle carpet. Fully depress each pedal to check for
interference with the accelerator, brake, or clutch
pedals then re-install the floor mats.
It is recommended to only use mild soap and water
to clean your floor mats. After cleaning, always check
your floor mat has been properly installed and is
secured to your vehicle using the floor mat fasteners
by lightly pulling mat.
WARNING!
WARNING!
Exhaust gases can injure or kill. They contain carbon
monoxide (CO), which is colorless and odorless.
Breathing it can make you unconscious and can
eventually poison you. To avoid breathing (CO), follow
these safety tips:
Do not run the engine in a closed garage or in
confined areas any longer than needed to move your
vehicle in or out of the area.
If you are required to drive with the trunk/liftgate/
rear doors open, make sure that all windows are
closed and the climate control BLOWER switch is set
at high speed. DO NOT use the recirculation mode.
If it is necessary to sit in a parked vehicle with the
engine running, adjust your heating or cooling
controls to force outside air into the vehicle. Set the
blower at high speed.
WARNING!
Carbon monoxide (CO) in exhaust gases is deadly.
Follow the precautions below to prevent carbon
monoxide poisoning:
Do not inhale exhaust gases. They contain carbon
monoxide, a colorless and odorless gas, which can
kill. Never run the engine in a closed area, such as a
garage, and never sit in a parked vehicle with the
engine running for an extended period. If the vehicle
is stopped in an open area with the engine running
for more than a short period, adjust the ventilation
system to force fresh, outside air into the vehicle.
Guard against carbon monoxide with proper mainte -
nance. Have the exhaust system inspected every
time the vehicle is raised. Have any abnormal condi -
tions repaired promptly. Until repaired, drive with all
side windows fully open.
23_KL_OM_EN_USC_t.book Page 188
Page 201 of 276
IN CASE OF EMERGENCY199
If the sealant (white fluid) does flow through the Sealant
Hose:
1. Continue to operate the pump until sealant is no
longer flowing through the hose (typically takes
30 - 70 seconds). As the sealant flows through the
Sealant Hose, the Pressure Gauge can read as high
as 70 psi (4.8 Bar). The Pressure Gauge will
decrease quickly from approximately 70 psi
(4.8 Bar) to the actual tire pressure when the
Sealant Bottle is empty.
2. The pump will start to inject air into the tire immediately after the Sealant Bottle is empty.
Continue to operate the pump and inflate the tire to
the pressure indicated on the tire pressure label on
the driver-side latch pillar (recommended pressure).
Check the tire pressure by looking at the Pressure
Gauge.
If the tire does not inflate to at least 26 psi (1.8 Bar)
pressure within 15 minutes:
NOTE:Never operate the compressor for longer than 20 minutes.
Risk of Overheating.
The tire is too badly damaged. Do not attempt to drive
the vehicle further. Call for assistance.
If the tire becomes overinflated, push the Deflation
Button to reduce the tire pressure to the recommended
inflation pressure before continuing. If the tire inflates to the recommended pressure or is at
least 26 psi (1.8 Bar) pressure within 15 minutes:
1. Push the Power Button to turn off the Tire Service
Kit.
2. Remove the Speed Limit sticker from the top of the Sealant Bottle and place the sticker on the
instrument panel.
3. Immediately disconnect the Sealant Hose from the valve stem, reinstall the cap on the fitting at the end
of the hose, and place the Tire Service Kit in the
vehicle storage location.
(D) Drive Vehicle:
Immediately after injecting sealant and inflating the tire,
drive the vehicle 5 miles (8 km) or 10 minutes to ensure
distribution of the Tire Service Kit Sealant within the tire.
Do not exceed 50 mph (80 km/h).
(E) After Driving:
Pull over to a safe location Úpage 198.
1. Push in the Mode Select Knob and turn to the Air Mode position.
2. Uncoil the power plug and insert the plug into the vehicle's 12 Volt power outlet.
3. Uncoil the Air Pump Hose (black in color) and screw the fitting at the end of hose onto the valve stem.
4. Check the pressure in the tire by reading the Pressure Gauge.
If tire pressure is less than 19 psi (1.3 Bar):
The tire is too badly damaged. Do not attempt to drive the
vehicle further. Call for assistance.
If the tire pressure is 19 psi (1.3 Bar) or higher:
1. Push the Power Button to turn on Tire Service Kit and inflate the tire to the pressure indicated on the
tire and loading information label on the driver-side
door opening.
CAUTION!
The metal end fitting from Power Plug may get hot
after use, so it should be handled carefully.
Failure to reinstall the cap on the fitting at the end of
the Sealant Hose can result in sealant contacting
your skin, clothing, and the vehicle’s interior. It can
also result in sealant contacting internal Tire Service
Kit components which may cause permanent
damage to the kit.
WARNING!
Tire Service Kit is not a permanent flat tire repair. Have
the tire inspected and repaired or replaced after using
Tire Service Kit. Do not exceed 50 mph (80 km/h) until
the tire is repaired or replaced. Failure to follow this
warning can result in injuries that are serious or fatal to
you, your passengers, and others around you.
7
23_KL_OM_EN_USC_t.book Page 199
Page 202 of 276
200IN CASE OF EMERGENCY
NOTE:If the tire becomes overinflated, push the Deflation Button
to reduce the tire pressure to the recommended inflation
pressure before continuing.
2. Disconnect the Tire Service Kit from the valve stem,
reinstall the cap on the valve stem and unplug from
12 Volt outlet.
3. Place the Tire Service Kit in its proper storage area in the vehicle.
4. Have the tire inspected and repaired or replaced at the earliest opportunity at an authorized dealer or tire
service center.
5. Remove the Speed Limit sticker from the instrument panel after the tire has been repaired.
6. Replace the Sealant Bottle and Sealant Hose assembly at an authorized dealer as soon as possible
Úpage 200.
NOTE:When having the tire serviced, advise the authorized
dealer or service center that the tire has been sealed
using the Tire Service Kit.
(F) Sealant Bottle And Hose Replacement:
1. Uncoil the Sealant Hose (clear in color).
2. Locate the red colored round Sealant Bottle release button at the lower right hand corner of the kit.
3. Push and hold the Sealant Bottle release button, then pull out the bottle holding the button.
4. Clean any remaining sealant from the Tire Service Kit housing. 5. Position the new Sealant Bottle in the housing so that
the Sealant Hose aligns with the hose slot in the front
of the housing. Push and hold the Sealant Bottle
release button, then push the bottle into the housing
by holding the button. An audible click will be heard
indicating the bottle is locked into place. Release the
button.
6. Verify that the cap is installed on the fitting at the end of the Sealant Hose and return the hose to its storage
area (located on top of the housing).
7. Return the Tire Service Kit to its storage location in the vehicle.
JUMP STARTING
If your vehicle has a discharged battery, it can be jump
started using a set of jumper cables and a battery in
another vehicle or by using a portable battery booster
pack. Jump starting can be dangerous if done improperly,
so please follow the procedures in this section carefully.
NOTE:When using a portable battery booster pack, follow the
manufacturer’s operating instructions and precautions.
PREPARATIONS FOR JUMP START
The battery in your vehicle is located in the front of the
engine compartment, behind the left headlight assembly.
Positive (+) Battery Post
See the following steps to prepare for jump starting:
1. Apply the parking brake, shift the automatic transmission into PARK (P) and turn the ignition OFF.
2. Turn off the heater, radio, and all electrical accessories.
3. If using another vehicle to jump start the battery, park the vehicle within the jumper cable’s reach, apply the
parking brake and make sure the ignition is OFF.WARNING!
Do not attempt jump starting if the battery is frozen. It
could rupture or explode and cause personal injury.
CAUTION!
Do not use a portable battery booster pack or any other
booster source with a system voltage greater than
12 Volts or damage to the battery, starter motor,
alternator or electrical system may occur.
23_KL_OM_EN_USC_t.book Page 200
Page 209 of 276
IN CASE OF EMERGENCY207
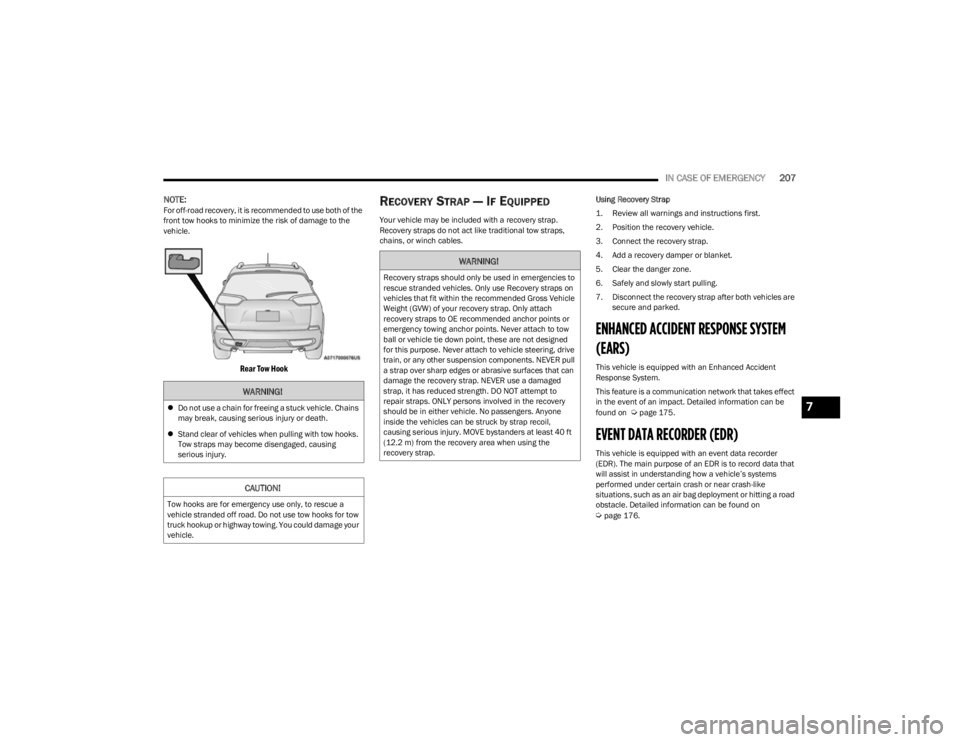
NOTE:For off-road recovery, it is recommended to use both of the
front tow hooks to minimize the risk of damage to the
vehicle.
Rear Tow Hook
RECOVERY STRAP — IF EQUIPPED
Your vehicle may be included with a recovery strap.
Recovery straps do not act like traditional tow straps,
chains, or winch cables. Using Recovery Strap
1. Review all warnings and instructions first.
2. Position the recovery vehicle.
3. Connect the recovery strap.
4. Add a recovery damper or blanket.
5. Clear the danger zone.
6. Safely and slowly start pulling.
7. Disconnect the recovery strap after both vehicles are
secure and parked.
ENHANCED ACCIDENT RESPONSE SYSTEM
(EARS)
This vehicle is equipped with an Enhanced Accident
Response System.
This feature is a communication network that takes effect
in the event of an impact. Detailed information can be
found on
Úpage 175.
EVENT DATA RECORDER (EDR)
This vehicle is equipped with an event data recorder
(EDR). The main purpose of an EDR is to record data that
will assist in understanding how a vehicle’s systems
performed under certain crash or near crash-like
situations, such as an air bag deployment or hitting a road
obstacle. Detailed information can be found on
Úpage 176.
WARNING!
Do not use a chain for freeing a stuck vehicle. Chains
may break, causing serious injury or death.
Stand clear of vehicles when pulling with tow hooks.
Tow straps may become disengaged, causing
serious injury.
CAUTION!
Tow hooks are for emergency use only, to rescue a
vehicle stranded off road. Do not use tow hooks for tow
truck hookup or highway towing. You could damage your
vehicle.
WARNING!
Recovery straps should only be used in emergencies to
rescue stranded vehicles. Only use Recovery straps on
vehicles that fit within the recommended Gross Vehicle
Weight (GVW) of your recovery strap. Only attach
recovery straps to OE recommended anchor points or
emergency towing anchor points. Never attach to tow
ball or vehicle tie down point, these are not designed
for this purpose. Never attach to vehicle steering, drive
train, or any other suspension components. NEVER pull
a strap over sharp edges or abrasive surfaces that can
damage the recovery strap. NEVER use a damaged
strap, it has reduced strength. DO NOT attempt to
repair straps. ONLY persons involved in the recovery
should be in either vehicle. No passengers. Anyone
inside the vehicles can be struck by strap recoil,
causing serious injury. MOVE bystanders at least 40 ft
(12.2 m) from the recovery area when using the
recovery strap.
7
23_KL_OM_EN_USC_t.book Page 207
Page 217 of 276
SERVICING AND MAINTENANCE215
PRESSURE WASHING
Cleaning the engine compartment with a high pressure
washer is not recommended.
VEHICLE MAINTENANCE
An authorized dealer has the qualified service personnel,
special tools, and equipment to perform all service
operations in an expert manner. Service Manuals are
available which include detailed service information for your vehicle. Refer to these Service Manuals before
attempting any procedure yourself.
NOTE:Intentional tampering with emissions control systems may
void your warranty and could result in civil penalties being
assessed against you.
ENGINE OIL
Engine Oil Selection
Use only the manufacturer's recommended fluid Úpage 256.
American Petroleum Institute (API)
Approved Engine Oil
These symbols mean that the oil has been certified by the
API. The manufacturer only recommends API trademark
oils.
The API Starburst trademark certifies 0W-20,
0W-30 and 5W-30 engine oils.
The API Donut trademark certifies 0W-40 and
5W-40 engine oil.
Synthetic Engine Oils
Your engine was designed for synthetic engine oils, only
use synthetic API approved engine oils.
Synthetic engine oils which do not have both the correct
API trademark and the correct SAE viscosity grade
numbers should not be used.
Materials Added To Engine Oil
The manufacturer strongly recommends against the
addition of any additives (other than leak detection dyes)
to the engine oil. Engine oil is an engineered product and
its performance may be impaired by supplemental
additives.
Disposing Of Used Engine Oil And Oil
Filters
Care should be taken in disposing of used engine oil and
oil filters from your vehicle. Used oil and oil filters,
indiscriminately discarded, can present a problem to the
environment. Contact an authorized dealer, service
station or governmental agency for advice on how and
where used oil and oil filters can be safely discarded in
your area.
CAUTION!
It is essential when replacing the cables on the
battery that the positive cable is attached to the posi -
tive post and the negative cable is attached to the
negative post. Battery posts are marked positive (+)
and negative (-) and are identified on the battery
case. Cable clamps should be tight on the terminal
posts and free of corrosion.
If a “fast charger” is used while the battery is in the
vehicle, disconnect both vehicle battery cables
before connecting the charger to the battery. Do not
use a “fast charger” to provide starting voltage.
CAUTION!
Precautions have been taken to safeguard all parts and
connections however, the pressures generated by these
machines is such that complete protection against
water ingress cannot be guaranteed.
WARNING!
You can be badly injured working on or around a motor
vehicle. Only do service work for which you have the
knowledge and the proper equipment. If you have any
doubt about your ability to perform a service job, take
your vehicle to a competent mechanic.
CAUTION!
Do not use chemical flushes in your engine oil as the
chemicals can damage your engine. Such damage is
not covered by the New Vehicle Limited Warranty.
8
23_KL_OM_EN_USC_t.book Page 215
Page 220 of 276
218SERVICING AND MAINTENANCE
Refrigerant Recovery And Recycling
R-134a — If Equipped
R-134a Air Conditioning Refrigerant is a Hydrofluo -
rocarbon (HFC) that is an ozone-friendly substance. It is
recommended that air conditioning service be performed
by an authorized dealer or other service facilities using
recovery and recycling equipment.
NOTE:Use only manufacturer approved A/C system PAG
compressor oil and refrigerants.
Refrigerant Recovery And Recycling
R-1234yf — If Equipped
R-1234yf Air Conditioning Refrigerant is a Hydrofluo-
roolefin (HFO) that is endorsed by the Environmental
Protection Agency and is an ozone-friendly substance with
a low global-warming potential. It is recommended that air
conditioning service be performed by an authorized dealer
using recovery and recycling equipment.
NOTE:Use only manufacturer approved A/C system PAG
compressor oil, and refrigerants.
Cabin Air Filter
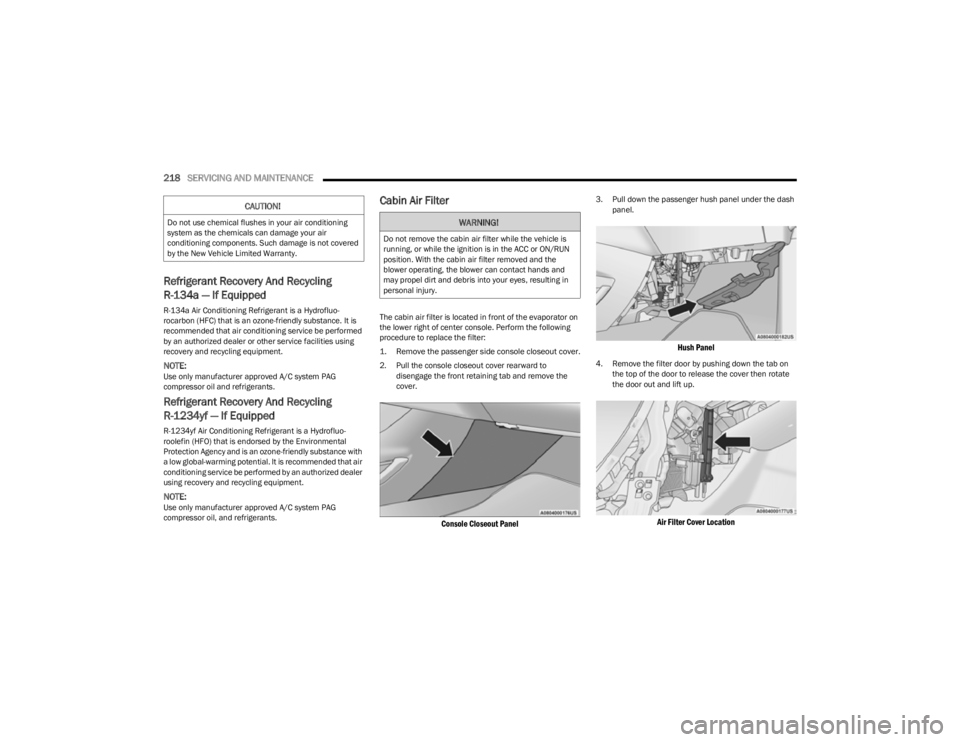
The cabin air filter is located in front of the evaporator on
the lower right of center console. Perform the following
procedure to replace the filter:
1. Remove the passenger side console closeout cover.
2. Pull the console closeout cover rearward to disengage the front retaining tab and remove the
cover.
Console Closeout Panel
3. Pull down the passenger hush panel under the dash panel.
Hush Panel
4. Remove the filter door by pushing down the tab on the top of the door to release the cover then rotate
the door out and lift up.
Air Filter Cover Location
CAUTION!
Do not use chemical flushes in your air conditioning
system as the chemicals can damage your air
conditioning components. Such damage is not covered
by the New Vehicle Limited Warranty.WARNING!
Do not remove the cabin air filter while the vehicle is
running, or while the ignition is in the ACC or ON/RUN
position. With the cabin air filter removed and the
blower operating, the blower can contact hands and
may propel dirt and debris into your eyes, resulting in
personal injury.
23_KL_OM_EN_USC_t.book Page 218
Page 226 of 276
224SERVICING AND MAINTENANCE
NOTE:
It is the owner's responsibility to maintain the proper
level of protection against freezing according to the
temperatures occurring in the area where the vehicle is
operated.
Use care when filling under hood fluids such as Engine
Oil, Windshield Washer Solvent, Antifreeze etc. to mini -
mize spillage onto top of engine. Any excess fluid that
is spilled onto the top of the engine should be removed
using compressed air or absorbent cloth.
Some vehicles require special tools to add coolant
properly. Failure to fill these systems properly could
lead to severe internal engine damage. If any coolant is
needed to be added to the system, please contact a
local authorized dealer.
Mixing engine coolant types is not recommended and
can result in cooling system damage. If HOAT and OAT
coolant are mixed in an emergency, have an authorized
dealer drain, flush, and refill with OAT coolant
(conforming to MS.90032) as soon as possible.
Cooling System Pressure Cap
The cap must be fully tightened to prevent loss of engine
coolant (antifreeze), and to ensure that engine coolant will
return to the radiator from the coolant expansion bottle/
recovery tank (if equipped).
The cap should be inspected and cleaned if there is any
accumulation of foreign material on the sealing surfaces.
Disposal Of Used Coolant
Used ethylene glycol-based coolant (antifreeze) is a
regulated substance requiring proper disposal. Check with
your local authorities to determine the disposal rules for
your community. To prevent ingestion by animals or
children, do not store ethylene glycol-based coolant in
open containers or allow it to remain in puddles on the
ground, clean up any ground spills immediately. If
ingested, seek emergency assistance immediately.
Coolant Level
The coolant bottle provides a quick visual method for
determining that the coolant level is adequate. With the
engine off and cold, the level of the engine coolant
(antifreeze) in the bottle should be between the ranges
indicated on the bottle.
The radiator normally remains completely full, so there is
no need to remove the radiator/coolant pressure cap
unless checking for engine coolant freeze point or replacing coolant. Advise your service attendant of this. As
long as the engine operating temperature is satisfactory,
the coolant only needs to be checked once a month.
When additional engine coolant is needed to maintain the
proper level, only OAT coolant that meets the
requirements of the manufacturer Material Standard
MS.90032 should be added to the coolant bottle. Do not
overfill.
Cooling System Notes
NOTE:When the vehicle is stopped after a few miles/kilometers
of operation, you may observe vapor coming from the front
of the engine compartment. This is normally a result of
moisture from rain, snow, or high humidity accumulating
on the radiator and being vaporized when the thermostat
opens, allowing hot engine coolant (antifreeze) to enter
the radiator.
If an examination of your engine compartment shows no
evidence of radiator or hose leaks, the vehicle may be
safely driven. The vapor will soon dissipate.
Do not overfill the coolant expansion bottle.
Check the coolant freeze point in the radiator and in
the coolant expansion bottle. If engine coolant needs
to be added, the contents of the coolant expansion
bottle must also be protected against freezing.
If frequent engine coolant additions are required, the
cooling system should be pressure tested for leaks.
Maintain engine coolant concentration at a minimum
of 50% OAT coolant (conforming to MS.90032) and
distilled water for proper corrosion protection of your
engine which contains aluminum components.
WARNING!
Do not open hot engine cooling system. Never add
engine coolant (antifreeze) when the engine is over -
heated. Do not loosen or remove the cap to cool an
overheated engine. Heat causes pressure to build up
in the cooling system. To prevent scalding or injury,
do not remove the pressure cap while the system is
hot or under pressure.
Do not use a pressure cap other than the one speci -
fied for your vehicle. Personal injury or engine
damage may result.
23_KL_OM_EN_USC_t.book Page 224
Page 227 of 276
SERVICING AND MAINTENANCE225
Make sure that the coolant expansion bottle overflow
hoses are not kinked or obstructed.
Keep the front of the radiator clean. If your vehicle is
equipped with air conditioning, keep the front of the
condenser clean.
Do not change the thermostat for Summer or Winter
operation. If replacement is ever necessary, install
ONLY the correct type thermostat. Other designs may
result in unsatisfactory engine cooling performance,
poor gas mileage, and increased emissions.
BRAKE SYSTEM
In order to ensure brake system performance, all brake
system components should be inspected periodically.
Refer to the Maintenance Plan for the proper
maintenance intervals
Úpage 209.
Fluid Level Check — Brake Master Cylinder
The fluid level of the brake master cylinder should be
checked whenever the vehicle is serviced, or immediately
if the Brake System Warning Light is on. If necessary, add
fluid to bring level within the designated marks on the side
of the reservoir of the brake master cylinder. Be sure to
clean the top of the master cylinder area before removing cap. With disc brakes, fluid level can be expected to fall as
the brake pads wear. Brake fluid level should be checked
when pads are replaced. If the brake fluid is abnormally
low, check the system for leaks. For further information
Úpage 256.
AUTOMATIC TRANSMISSION
Special Additives
It is strongly recommended against using any special
additives in the transmission. Automatic Transmission
Fluid (ATF) is an engineered product and its performance
may be impaired by supplemental additives. Therefore, do
not add any fluid additives to the transmission. Avoid
using transmission sealers as they may adversely affect
seals.
Fluid Level Check
The fluid level is preset at the factory and does not require
adjustment under normal operating conditions. Routine
fluid level checks are not required; therefore the
transmission has no dipstick. An authorized dealer can
check your transmission fluid level using special service
tools. If you notice fluid leakage or transmission
malfunction, visit an authorized dealer immediately to
have the transmission fluid level checked. Operating the
vehicle with an improper fluid level can cause severe
transmission damage.
WARNING!
Riding the brakes can lead to brake failure and possibly
a collision. Driving with your foot resting or riding on the
brake pedal can result in abnormally high brake
temperatures, excessive lining wear, and possible brake
damage. You would not have your full braking capacity
in an emergency.
WARNING!
Use only manufacturer's recommended brake fluid.
For further information Úpage 256. Using the wrong
type of brake fluid can severely damage your brake
system and/or impair its performance. The proper
type of brake fluid for your vehicle is also identified
on the original factory installed hydraulic master
cylinder reservoir.
To avoid contamination from foreign matter or mois -
ture, use only new brake fluid or fluid that has been
in a tightly closed container. Keep the master
cylinder reservoir cap secured at all times. Brake
fluid in a open container absorbs moisture from the
air resulting in a lower boiling point. This may cause
it to boil unexpectedly during hard or prolonged
braking, resulting in sudden brake failure. This could
result in a collision.
Overfilling the brake fluid reservoir can result in
spilling brake fluid on hot engine parts, causing the
brake fluid to catch fire. Brake fluid can also damage
painted and vinyl surfaces, care should be taken to
avoid its contact with these surfaces.
Do not allow petroleum-based fluid to contaminate
the brake fluid. Brake seal components could be
damaged, causing partial or complete brake failure.
This could result in a collision.
CAUTION!
Do not use chemical flushes in your transmission as the
chemicals can damage your transmission components.
Such damage is not covered by the New Vehicle Limited
Warranty.
8
23_KL_OM_EN_USC_t.book Page 225
Page 245 of 276
SERVICING AND MAINTENANCE243
(Continued)
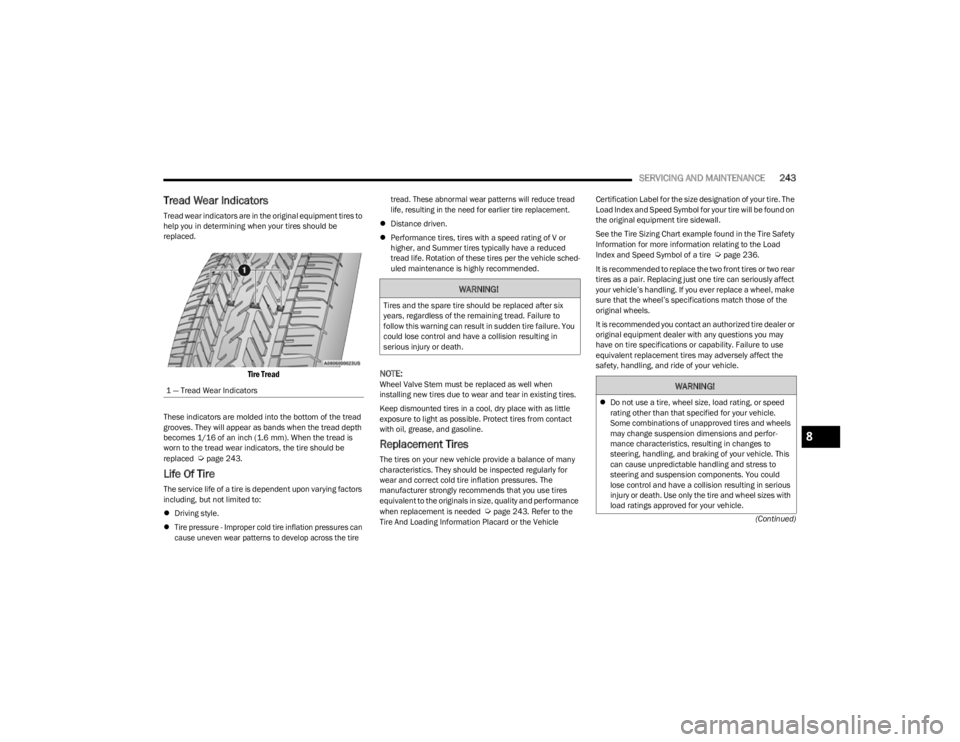
Tread Wear Indicators
Tread wear indicators are in the original equipment tires to
help you in determining when your tires should be
replaced.
Tire Tread
These indicators are molded into the bottom of the tread
grooves. They will appear as bands when the tread depth
becomes 1/16 of an inch (1.6 mm). When the tread is
worn to the tread wear indicators, the tire should be
replaced
Úpage 243.
Life Of Tire
The service life of a tire is dependent upon varying factors
including, but not limited to:
Driving style.
Tire pressure - Improper cold tire inflation pressures can
cause uneven wear patterns to develop across the tire tread. These abnormal wear patterns will reduce tread
life, resulting in the need for earlier tire replacement.
Distance driven.
Performance tires, tires with a speed rating of V or
higher, and Summer tires typically have a reduced
tread life. Rotation of these tires per the vehicle sched-
uled maintenance is highly recommended.
NOTE:Wheel Valve Stem must be replaced as well when
installing new tires due to wear and tear in existing tires.
Keep dismounted tires in a cool, dry place with as little
exposure to light as possible. Protect tires from contact
with oil, grease, and gasoline.
Replacement Tires
The tires on your new vehicle provide a balance of many
characteristics. They should be inspected regularly for
wear and correct cold tire inflation pressures. The
manufacturer strongly recommends that you use tires
equivalent to the originals in size, quality and performance
when replacement is needed
Úpage 243. Refer to the
Tire And Loading Information Placard or the Vehicle Certification Label for the size designation of your tire. The
Load Index and Speed Symbol for your tire will be found on
the original equipment tire sidewall.
See the Tire Sizing Chart example found in the Tire Safety
Information for more information relating to the Load
Index and Speed Symbol of a tire
Úpage 236.
It is recommended to replace the two front tires or two rear
tires as a pair. Replacing just one tire can seriously affect
your vehicle’s handling. If you ever replace a wheel, make
sure that the wheel’s specifications match those of the
original wheels.
It is recommended you contact an authorized tire dealer or
original equipment dealer with any questions you may
have on tire specifications or capability. Failure to use
equivalent replacement tires may adversely affect the
safety, handling, and ride of your vehicle.
1 — Tread Wear Indicators
WARNING!
Tires and the spare tire should be replaced after six
years, regardless of the remaining tread. Failure to
follow this warning can result in sudden tire failure. You
could lose control and have a collision resulting in
serious injury or death.
WARNING!
Do not use a tire, wheel size, load rating, or speed
rating other than that specified for your vehicle.
Some combinations of unapproved tires and wheels
may change suspension dimensions and perfor -
mance characteristics, resulting in changes to
steering, handling, and braking of your vehicle. This
can cause unpredictable handling and stress to
steering and suspension components. You could
lose control and have a collision resulting in serious
injury or death. Use only the tire and wheel sizes with
load ratings approved for your vehicle.
8
23_KL_OM_EN_USC_t.book Page 243