window JEEP CHEROKEE 2023 Owner's Manual
[x] Cancel search | Manufacturer: JEEP, Model Year: 2023, Model line: CHEROKEE, Model: JEEP CHEROKEE 2023Pages: 276, PDF Size: 12.55 MB
Page 159 of 276
SAFETY157
SERVICE TPMS WARNING
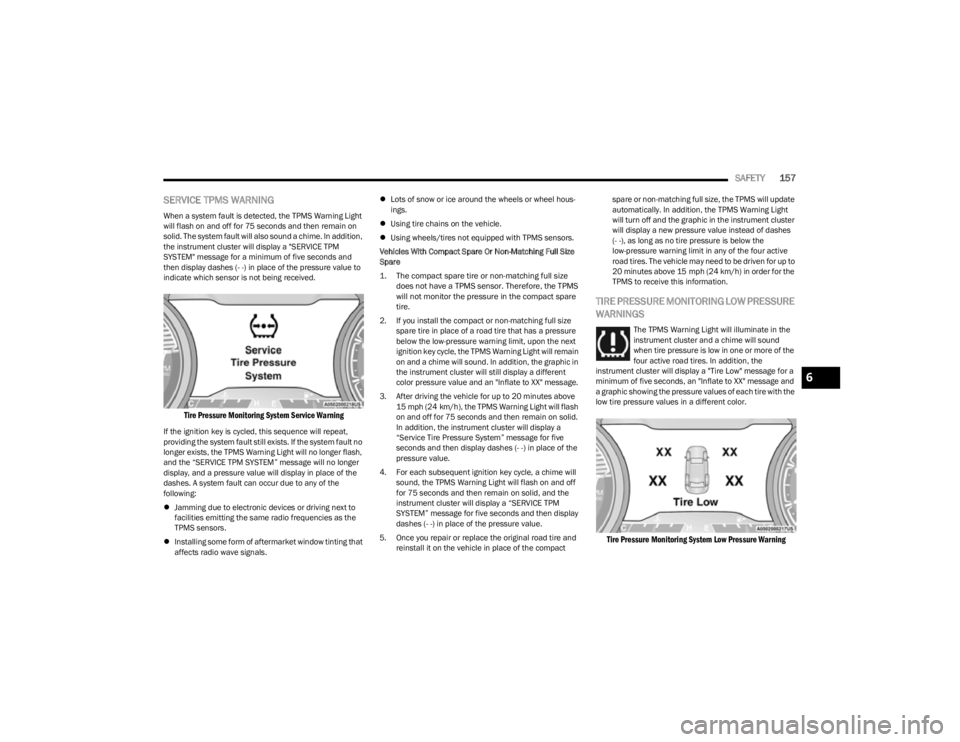
When a system fault is detected, the TPMS Warning Light
will flash on and off for 75 seconds and then remain on
solid. The system fault will also sound a chime. In addition,
the instrument cluster will display a "SERVICE TPM
SYSTEM" message for a minimum of five seconds and
then display dashes (- -) in place of the pressure value to
indicate which sensor is not being received.
Tire Pressure Monitoring System Service Warning
If the ignition key is cycled, this sequence will repeat,
providing the system fault still exists. If the system fault no
longer exists, the TPMS Warning Light will no longer flash,
and the “SERVICE TPM SYSTEM” message will no longer
display, and a pressure value will display in place of the
dashes. A system fault can occur due to any of the
following:
Jamming due to electronic devices or driving next to
facilities emitting the same radio frequencies as the
TPMS sensors.
Installing some form of aftermarket window tinting that
affects radio wave signals.
Lots of snow or ice around the wheels or wheel hous -
ings.
Using tire chains on the vehicle.
Using wheels/tires not equipped with TPMS sensors.
Vehicles With Compact Spare Or Non-Matching Full Size
Spare
1. The compact spare tire or non-matching full size does not have a TPMS sensor. Therefore, the TPMS
will not monitor the pressure in the compact spare
tire.
2. If you install the compact or non-matching full size spare tire in place of a road tire that has a pressure
below the low-pressure warning limit, upon the next
ignition key cycle, the TPMS Warning Light will remain
on and a chime will sound. In addition, the graphic in
the instrument cluster will still display a different
color pressure value and an "Inflate to XX" message.
3. After driving the vehicle for up to 20 minutes above 15 mph (24 km/h), the TPMS Warning Light will flash
on and off for 75 seconds and then remain on solid.
In addition, the instrument cluster will display a
“Service Tire Pressure System” message for five
seconds and then display dashes (- -) in place of the
pressure value.
4. For each subsequent ignition key cycle, a chime will sound, the TPMS Warning Light will flash on and off
for 75 seconds and then remain on solid, and the
instrument cluster will display a “SERVICE TPM
SYSTEM” message for five seconds and then display
dashes (- -) in place of the pressure value.
5. Once you repair or replace the original road tire and reinstall it on the vehicle in place of the compact spare or non-matching full size, the TPMS will update
automatically. In addition, the TPMS Warning Light
will turn off and the graphic in the instrument cluster
will display a new pressure value instead of dashes
(- -), as long as no tire pressure is below the
low-pressure warning limit in any of the four active
road tires. The vehicle may need to be driven for up to
20 minutes above 15 mph (24 km/h) in order for the
TPMS to receive this information.
TIRE PRESSURE MONITORING LOW PRESSURE
WARNINGS
The TPMS Warning Light will illuminate in the
instrument cluster and a chime will sound
when tire pressure is low in one or more of the
four active road tires. In addition, the
instrument cluster will display a "Tire Low" message for a
minimum of five seconds, an "Inflate to XX" message and
a graphic showing the pressure values of each tire with the
low tire pressure values in a different color.
Tire Pressure Monitoring System Low Pressure Warning
6
23_KL_OM_EN_USC_t.book Page 157
Page 161 of 276
SAFETY159
(Continued)
OCCUPANT RESTRAINT SYSTEMS
Some of the most important safety features in your vehicle
are the restraint systems:
OCCUPANT RESTRAINT SYSTEMS
F
EATURES
Seat Belt Systems
Supplemental Restraint Systems (SRS) Air Bags
Child Restraints
Some of the safety features described in this section may
be standard equipment on some models, or may be
optional equipment on others. If you are not sure, ask an
authorized dealer.
IMPORTANT SAFETY PRECAUTIONS
Please pay close attention to the information in this
section. It tells you how to use your restraint system
properly, to keep you and your passengers as safe as
possible.
Here are some simple steps you can take to minimize the
risk of harm from a deploying air bag:
1. Children 12 years old and under should always ride buckled up in the rear seat of a vehicle with a rear
seat.
2. A child who is not big enough to wear the vehicle seat belt properly must be secured in the appropriate child
restraint or belt-positioning booster seat in a rear
seating position
Úpage 176. 3. If a child from 2 to 12 years old (not in a rear-facing
child restraint) must ride in the front passenger seat,
move the seat as far back as possible and use the
proper child restraint
Úpage 176.
4. Never allow children to slide the shoulder belt behind them or under their arm.
5. You should read the instructions provided with your child restraint to make sure that you are using it
properly.
6. All occupants should always wear their lap and shoulder belts properly.
7. The driver and front passenger seats should be moved back as far as practical to allow the front air
bags room to inflate.
8. Do not lean against the door or window. If your vehicle has side air bags, and deployment occurs, the side air
bags will inflate forcefully into the space between
occupants and the door and occupants could be
injured.
9. If the air bag system in this vehicle needs to be modified to accommodate a disabled person, see
Úpage 258 for customer service contact
information.
SEAT BELT SYSTEMS
Buckle up even though you are an excellent driver, even
on short trips. Someone on the road may be a poor driver
and could cause a collision that includes you. This can
happen far away from home or on your own street.
Research has shown that seat belts save lives, and they
can reduce the seriousness of injuries in a collision. Some
of the worst injuries happen when people are thrown from
the vehicle. Seat belts reduce the possibility of ejection
and the risk of injury caused by striking the inside of the
vehicle. Everyone in a motor vehicle should be belted at all
times.
Enhanced Seat Belt Use Reminder System
(BeltAlert)
Driver And Passenger BeltAlert — If Equipped
BeltAlert is a feature intended to remind the
driver and outboard front seat passenger (if
equipped with outboard front passenger seat
BeltAlert) to buckle their seat belts. The
BeltAlert feature is active whenever the ignition switch is
in the START or ON/RUN position.WARNING!
Never place a rear-facing child restraint in front of an
air bag. A deploying passenger front air bag can
cause death or serious injury to a child 12 years or
younger, including a child in a rear-facing child
restraint.
Never install a rear-facing child restraint in the front
seat of a vehicle. Only use a rear-facing child
restraint in the rear seat. If the vehicle does not have
a rear seat, do not transport a rear-facing child
restraint in that vehicle.
WARNING!
6
23_KL_OM_EN_USC_t.book Page 159
Page 175 of 276
SAFETY173
Supplemental Side Air Bag Inflatable Curtains (SABICs)
This vehicle is equipped with Supplemental Side Air Bag
Inflatable Curtains (SABICs).
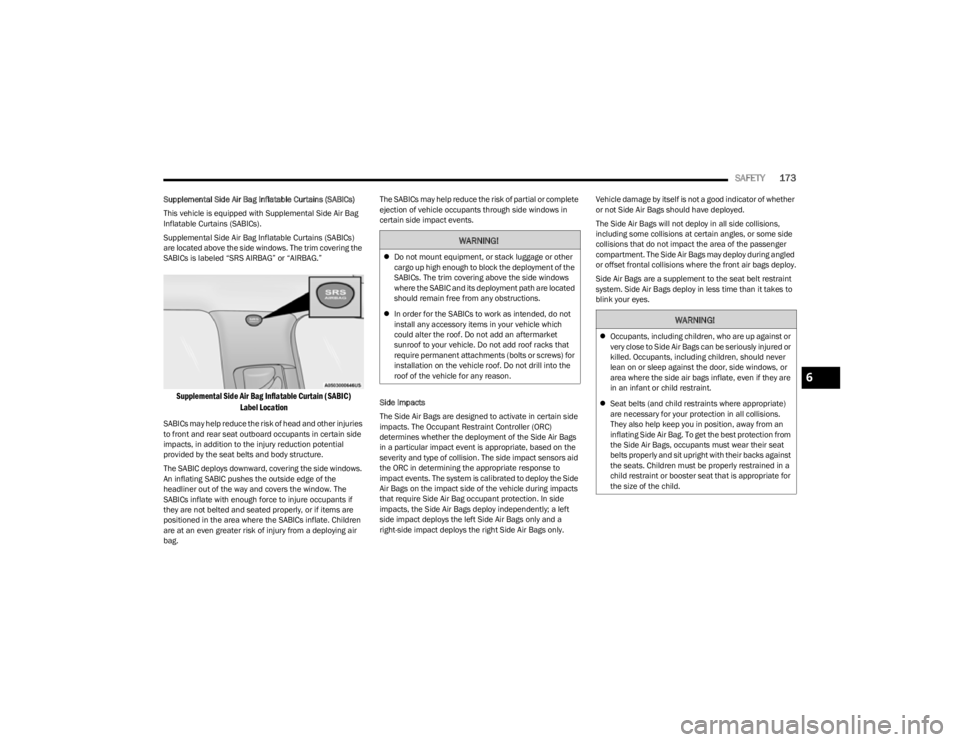
Supplemental Side Air Bag Inflatable Curtains (SABICs)
are located above the side windows. The trim covering the
SABICs is labeled “SRS AIRBAG” or “AIRBAG.”
Supplemental Side Air Bag Inflatable Curtain (SABIC)
Label Location
SABICs may help reduce the risk of head and other injuries
to front and rear seat outboard occupants in certain side
impacts, in addition to the injury reduction potential
provided by the seat belts and body structure.
The SABIC deploys downward, covering the side windows.
An inflating SABIC pushes the outside edge of the
headliner out of the way and covers the window. The
SABICs inflate with enough force to injure occupants if
they are not belted and seated properly, or if items are
positioned in the area where the SABICs inflate. Children
are at an even greater risk of injury from a deploying air
bag. The SABICs may help reduce the risk of partial or complete
ejection of vehicle occupants through side windows in
certain side impact events.
Side Impacts
The Side Air Bags are designed to activate in certain side
impacts. The Occupant Restraint Controller (ORC)
determines whether the deployment of the Side Air Bags
in a particular impact event is appropriate, based on the
severity and type of collision. The side impact sensors aid
the ORC in determining the appropriate response to
impact events. The system is calibrated to deploy the Side
Air Bags on the impact side of the vehicle during impacts
that require Side Air Bag occupant protection. In side
impacts, the Side Air Bags deploy independently; a left
side impact deploys the left Side Air Bags only and a
right-side impact deploys the right Side Air Bags only.
Vehicle damage by itself is not a good indicator of whether
or not Side Air Bags should have deployed.
The Side Air Bags will not deploy in all side collisions,
including some collisions at certain angles, or some side
collisions that do not impact the area of the passenger
compartment. The Side Air Bags may deploy during angled
or offset frontal collisions where the front air bags deploy.
Side Air Bags are a supplement to the seat belt restraint
system. Side Air Bags deploy in less time than it takes to
blink your eyes.
WARNING!
Do not mount equipment, or stack luggage or other
cargo up high enough to block the deployment of the
SABICs. The trim covering above the side windows
where the SABIC and its deployment path are located
should remain free from any obstructions.
In order for the SABICs to work as intended, do not
install any accessory items in your vehicle which
could alter the roof. Do not add an aftermarket
sunroof to your vehicle. Do not add roof racks that
require permanent attachments (bolts or screws) for
installation on the vehicle roof. Do not drill into the
roof of the vehicle for any reason.
WARNING!
Occupants, including children, who are up against or
very close to Side Air Bags can be seriously injured or
killed. Occupants, including children, should never
lean on or sleep against the door, side windows, or
area where the side air bags inflate, even if they are
in an infant or child restraint.
Seat belts (and child restraints where appropriate)
are necessary for your protection in all collisions.
They also help keep you in position, away from an
inflating Side Air Bag. To get the best protection from
the Side Air Bags, occupants must wear their seat
belts properly and sit upright with their backs against
the seats. Children must be properly restrained in a
child restraint or booster seat that is appropriate for
the size of the child.
6
23_KL_OM_EN_USC_t.book Page 173
Page 176 of 276

174SAFETY
NOTE:Air bag covers may not be obvious in the interior trim, but
they will open during air bag deployment.
Rollover Events
Side Air Bags and seat belt pretensioners are designed to
activate in certain rollover events. The Occupant Restraint
Controller (ORC) determines whether deployment in a
particular rollover event is appropriate, based on the
severity and type of collision. Vehicle damage by itself is
not a good indicator of whether or not Side Air Bags and
seat belt pretensioners should have deployed.
The Side Air Bags and seat belt pretensioners will not
deploy in all rollover events. The rollover sensing system
determines if a rollover event may be in progress and
whether deployment is appropriate. In the event the
vehicle experiences a rollover or near rollover event, and deployment is appropriate, the rollover sensing system will
deploy the side air bags and seat belt pretensioners on
both sides of the vehicle.
The SABICs may help reduce the risk of partial or complete
ejection of vehicle occupants through side windows in
certain rollover or side impact events.
Air Bag System Components
NOTE:The Occupant Restraint Controller (ORC) monitors the
internal circuits and interconnecting wiring associated
with electrical Air Bag System Components listed below:
Occupant Restraint Controller (ORC)
Air Bag Warning Light
Steering Wheel and Column
Instrument Panel
Knee Impact Bolsters
Driver and Front Passenger Air Bags
Seat Belt Buckle Switch
Supplemental Side Air Bags
Supplemental Knee Air Bags
Front and Side Impact Sensors
Seat Belt Pretensioners
Seat Track Position Sensors
Occupant Classification System
If A Deployment Occurs
The front air bags are designed to deflate immediately
after deployment.
NOTE:Front and/or side air bags will not deploy in all collisions.
This does not mean something is wrong with the air bag
system.
If you do have a collision which deploys the air bags, any
or all of the following may occur:
The air bag material may sometimes cause abrasions
and/or skin reddening to the occupants as the air bags
deploy and unfold. The abrasions are similar to friction
rope burns or those you might get sliding along a carpet
or gymnasium floor. They are not caused by contact
with chemicals. They are not permanent and normally
heal quickly. However, if you haven’t healed signifi -
cantly within a few days, or if you have any blistering,
see your doctor immediately.
As the air bags deflate, you may see some smoke-like
particles. The particles are a normal by-product of the
process that generates the non-toxic gas used for air
bag inflation. These airborne particles may irritate the
skin, eyes, nose, or throat. If you have skin or eye irrita -
tion, rinse the area with cool water. For nose or throat
irritation, move to fresh air. If the irritation continues,
see your doctor. If these particles settle on your
clothing, follow the garment manufacturer’s instruc -
tions for cleaning.
Do not drive your vehicle after the air bags have deployed.
If you are involved in another collision, the air bags will not
be in place to protect you.
WARNING!
Side Air Bags need room to inflate. Do not lean
against the door or window. Sit upright in the center
of the seat.
Being too close to the Side Air Bags during deploy -
ment could cause you to be severely injured or killed.
Relying on the Side Air Bags alone could lead to more
severe injuries in a collision. The Side Air Bags work
with your seat belt to restrain you properly. In some
collisions, Side Air Bags won’t deploy at all. Always
wear your seat belt even though you have Side Air
Bags.
23_KL_OM_EN_USC_t.book Page 174
Page 190 of 276
188SAFETY
PERIODIC SAFETY CHECKS YOU SHOULD
M
AKE OUTSIDE THE VEHICLE
Tires
Examine tires for excessive tread wear and uneven wear
patterns. Check for stones, nails, glass, or other objects
lodged in the tread or sidewall. Inspect the tread for cuts
and cracks. Inspect sidewalls for cuts, cracks, and bulges.
Check the lug nut/bolt torque for tightness. Check the
tires (including spare) for proper cold inflation pressure.
Lights
Have someone observe the operation of brake lights and
exterior lights while you work the controls. Check turn signal
and high beam indicator lights on the instrument panel.
Door Latches
Check for proper closing, latching, and locking.
Fluid Leaks
Check the area under the vehicle after overnight parking
for fuel, coolant, oil, or other fluid leaks. Also, if gasoline
fumes are detected or if fuel or brake fluid leaks are
suspected, the cause should be located and corrected
immediately.
EXHAUST GAS
The best protection against carbon monoxide entry into
the vehicle body is a properly maintained engine exhaust
system. Whenever a change is noticed in the sound of the exhaust
system, when exhaust fumes can be detected inside the
vehicle, or when the underside or rear of the vehicle is
damaged, have an authorized dealer inspect the complete
exhaust system and adjacent body areas for broken,
damaged, deteriorated, or mispositioned parts. Open
seams or loose connections could permit exhaust fumes
to seep into the passenger compartment. In addition,
inspect the exhaust system each time the vehicle is raised
for lubrication or oil change. Replace as required.
CARBON MONOXIDE WARNINGS
If the vehicle carpet has been removed and
re-installed, always properly attach carpet to the floor
and check the floor mat fasteners are secure to the
vehicle carpet. Fully depress each pedal to check for
interference with the accelerator, brake, or clutch
pedals then re-install the floor mats.
It is recommended to only use mild soap and water
to clean your floor mats. After cleaning, always check
your floor mat has been properly installed and is
secured to your vehicle using the floor mat fasteners
by lightly pulling mat.
WARNING!
WARNING!
Exhaust gases can injure or kill. They contain carbon
monoxide (CO), which is colorless and odorless.
Breathing it can make you unconscious and can
eventually poison you. To avoid breathing (CO), follow
these safety tips:
Do not run the engine in a closed garage or in
confined areas any longer than needed to move your
vehicle in or out of the area.
If you are required to drive with the trunk/liftgate/
rear doors open, make sure that all windows are
closed and the climate control BLOWER switch is set
at high speed. DO NOT use the recirculation mode.
If it is necessary to sit in a parked vehicle with the
engine running, adjust your heating or cooling
controls to force outside air into the vehicle. Set the
blower at high speed.
WARNING!
Carbon monoxide (CO) in exhaust gases is deadly.
Follow the precautions below to prevent carbon
monoxide poisoning:
Do not inhale exhaust gases. They contain carbon
monoxide, a colorless and odorless gas, which can
kill. Never run the engine in a closed area, such as a
garage, and never sit in a parked vehicle with the
engine running for an extended period. If the vehicle
is stopped in an open area with the engine running
for more than a short period, adjust the ventilation
system to force fresh, outside air into the vehicle.
Guard against carbon monoxide with proper mainte -
nance. Have the exhaust system inspected every
time the vehicle is raised. Have any abnormal condi -
tions repaired promptly. Until repaired, drive with all
side windows fully open.
23_KL_OM_EN_USC_t.book Page 188
Page 216 of 276
214SERVICING AND MAINTENANCE
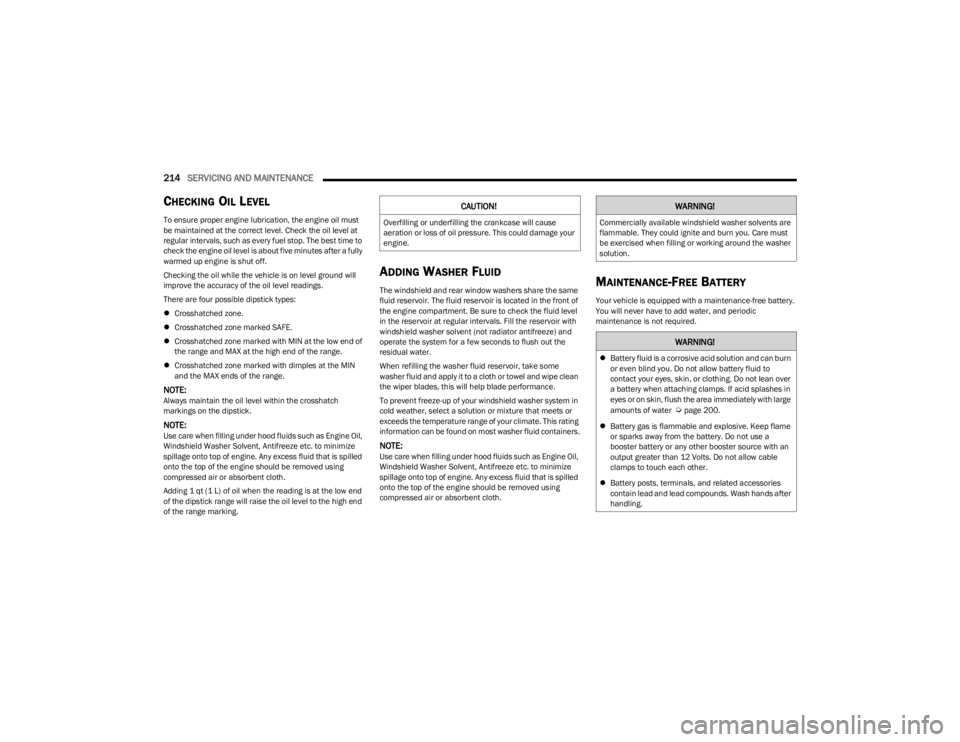
CHECKING OIL LEVEL
To ensure proper engine lubrication, the engine oil must
be maintained at the correct level. Check the oil level at
regular intervals, such as every fuel stop. The best time to
check the engine oil level is about five minutes after a fully
warmed up engine is shut off.
Checking the oil while the vehicle is on level ground will
improve the accuracy of the oil level readings.
There are four possible dipstick types:
Crosshatched zone.
Crosshatched zone marked SAFE.
Crosshatched zone marked with MIN at the low end of
the range and MAX at the high end of the range.
Crosshatched zone marked with dimples at the MIN
and the MAX ends of the range.
NOTE:Always maintain the oil level within the crosshatch
markings on the dipstick.
NOTE:Use care when filling under hood fluids such as Engine Oil,
Windshield Washer Solvent, Antifreeze etc. to minimize
spillage onto top of engine. Any excess fluid that is spilled
onto the top of the engine should be removed using
compressed air or absorbent cloth.
Adding 1 qt (1 L) of oil when the reading is at the low end
of the dipstick range will raise the oil level to the high end
of the range marking.
ADDING WASHER FLUID
The windshield and rear window washers share the same
fluid reservoir. The fluid reservoir is located in the front of
the engine compartment. Be sure to check the fluid level
in the reservoir at regular intervals. Fill the reservoir with
windshield washer solvent (not radiator antifreeze) and
operate the system for a few seconds to flush out the
residual water.
When refilling the washer fluid reservoir, take some
washer fluid and apply it to a cloth or towel and wipe clean
the wiper blades, this will help blade performance.
To prevent freeze-up of your windshield washer system in
cold weather, select a solution or mixture that meets or
exceeds the temperature range of your climate. This rating
information can be found on most washer fluid containers.
NOTE:Use care when filling under hood fluids such as Engine Oil,
Windshield Washer Solvent, Antifreeze etc. to minimize
spillage onto top of engine. Any excess fluid that is spilled
onto the top of the engine should be removed using
compressed air or absorbent cloth.
MAINTENANCE-FREE BATTERY
Your vehicle is equipped with a maintenance-free battery.
You will never have to add water, and periodic
maintenance is not required.
CAUTION!
Overfilling or underfilling the crankcase will cause
aeration or loss of oil pressure. This could damage your
engine.
WARNING!
Commercially available windshield washer solvents are
flammable. They could ignite and burn you. Care must
be exercised when filling or working around the washer
solution.
WARNING!
Battery fluid is a corrosive acid solution and can burn
or even blind you. Do not allow battery fluid to
contact your eyes, skin, or clothing. Do not lean over
a battery when attaching clamps. If acid splashes in
eyes or on skin, flush the area immediately with large
amounts of water
Úpage 200.
Battery gas is flammable and explosive. Keep flame
or sparks away from the battery. Do not use a
booster battery or any other booster source with an
output greater than 12 Volts. Do not allow cable
clamps to touch each other.
Battery posts, terminals, and related accessories
contain lead and lead compounds. Wash hands after
handling.
23_KL_OM_EN_USC_t.book Page 214
Page 234 of 276
232SERVICING AND MAINTENANCE
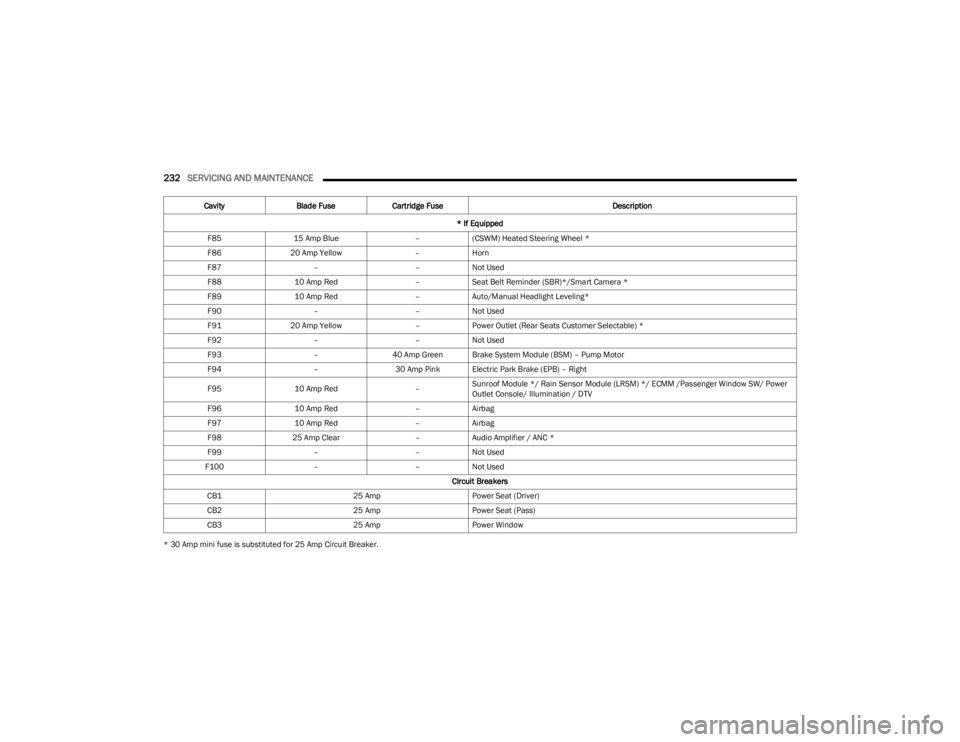
* 30 Amp mini fuse is substituted for 25 Amp Circuit Breaker.F85
15 Amp Blue –(CSWM) Heated Steering Wheel *
F86 20 Amp Yellow –Horn
F87 ––Not Used
F88 10 Amp Red –Seat Belt Reminder (SBR)*/Smart Camera *
F89 10 Amp Red –Auto/Manual Headlight Leveling*
F90 ––Not Used
F91 20 Amp Yellow –Power Outlet (Rear Seats Customer Selectable) *
F92 ––Not Used
F93 –40 Amp Green Brake System Module (BSM) – Pump Motor
F94 –30 Amp Pink Electric Park Brake (EPB) – Right
F95 10 Amp Red –Sunroof Module */ Rain Sensor Module (LRSM) */ ECMM /Passenger Window SW/ Power
Outlet Console/ Illumination / DTV
F96 10 Amp Red –Airbag
F97 10 Amp Red –Airbag
F98 25 Amp Clear –Audio Amplifier / ANC *
F99 ––Not Used
F100 ––Not Used
Circuit Breakers
CB1 25 AmpPower Seat (Driver)
CB2 25 AmpPower Seat (Pass)
CB3 25 AmpPower Window
Cavity
Blade Fuse Cartridge Fuse Description
* If Equipped
23_KL_OM_EN_USC_t.book Page 232
Page 235 of 276
SERVICING AND MAINTENANCE233
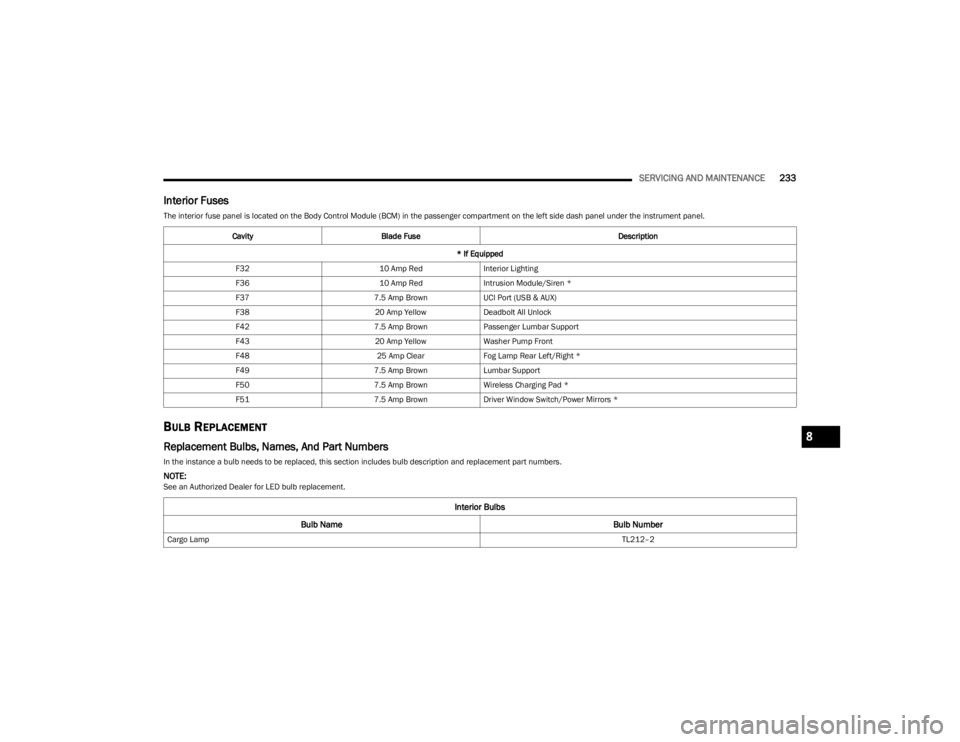
Interior Fuses
The interior fuse panel is located on the Body Control Module (BCM) in the passenger compartment on the left side dash panel under the instrument panel.
BULB REPLACEMENT
Replacement Bulbs, Names, And Part Numbers
In the instance a bulb needs to be replaced, this section includes bulb description and replacement part numbers.
NOTE:See an Authorized Dealer for LED bulb replacement.Cavity
Blade Fuse Description
* If Equipped
F32 10 Amp RedInterior Lighting
F36 10 Amp RedIntrusion Module/Siren *
F37 7.5 Amp BrownUCI Port (USB & AUX)
F38 20 Amp YellowDeadbolt All Unlock
F42 7.5 Amp BrownPassenger Lumbar Support
F43 20 Amp YellowWasher Pump Front
F48 25 Amp ClearFog Lamp Rear Left/Right *
F49 7.5 Amp BrownLumbar Support
F50 7.5 Amp BrownWireless Charging Pad *
F51 7.5 Amp BrownDriver Window Switch/Power Mirrors *
Interior Bulbs
Bulb Name Bulb Number
Cargo Lamp TL212–2
8
23_KL_OM_EN_USC_t.book Page 233
Page 254 of 276

252SERVICING AND MAINTENANCE
LEATHER SURFACES
Mopar® Total Clean is specifically recommended for
leather upholstery.
Your leather upholstery can be best preserved by regular
cleaning with a damp soft cloth. Small particles of dirt can
act as an abrasive and damage the leather upholstery and
should be removed promptly with a damp cloth. Stubborn
soils can be removed easily with a soft cloth and Mopar®
Total Clean. Care should be taken to avoid soaking your
leather upholstery with any liquid. Please do not use
polishes, oils, cleaning fluids, solvents, detergents, or
ammonia-based cleaners to clean your leather upholstery.
NOTE:If equipped with light colored leather, it tends to show any
foreign material, dirt, and fabric dye transfer more so than
darker colors. The leather is designed for easy cleaning,
and the manufacturer recommends Mopar® Total Clean
leather cleaner applied on a cloth to clean the leather
seats as needed.GLASS SURFACES
All glass surfaces should be cleaned on a regular basis
with Mopar® Glass Cleaner, or any commercial
household-type glass cleaner. Never use an abrasive type
cleaner. Use caution when cleaning the inside rear
window equipped with electric defrosters or windows
equipped with radio antennas. Do not use scrapers or
other sharp instruments that may scratch the elements.
When cleaning the rearview mirror, spray cleaner on the
towel or cloth that you are using. Do not spray cleaner
directly on the mirror.
CAUTION!
Do not use alcohol and alcohol-based and/or
ketone-based cleaning products to clean leather
upholstery, as damage to the upholstery may result.
23_KL_OM_EN_USC_t.book Page 252
Page 265 of 276

263
INDEX
AAbout Your Brakes ....................................................... 253
Adaptive Cruise Control (ACC) (Cruise Control) ...... 90, 92
Adding Engine Coolant (Antifreeze) ............................ 223
Adding Fuel................................................................... 113
Additives, Fuel .............................................................. 255
Air Bag........................................................................... 167 Air Bag Operation.................................................... 168
Air Bag Warning Light .................................... 166
, 169
Driver Knee Air Bag ................................................ 172
Enhanced Accident Response ...................... 175
, 207
Event Data Recorder (EDR).................................... 207 Front Air Bag .................................................. 167
, 169
If Deployment Occurs ............................................. 174
Knee Impact Bolsters ............................................. 172
Maintaining Your Air Bag System .......................... 175
Maintenance ........................................................... 175
Redundant Air Bag Warning Light ......................... 167
Transporting Pets.................................................... 186
Air Bag Light ................................................. 68
, 166, 187
Air Cleaner, Engine (Engine Air Cleaner Filter) ........... 216
Air Conditioner Maintenance ...................................... 217
Air Conditioner Refrigerant ................................. 217
, 218
Air Conditioner System ................................................ 217
Air Conditioning Filter ........................................... 48
, 218
Air Conditioning, Operating Tips ..................................... 48 Air Filter......................................................................... 216
Air Pressure Tires ......................................................................... 241 Alarm
Arm The System......................................................... 20
Disarm The System ................................................... 20
Security Alarm..................................................... 20
, 70
All Wheel Drive (AWD)..................................................... 85 Antifreeze (Engine Coolant) ............................... 223
, 256
Disposal ...................................................................224
Anti-Lock Brake System (ABS) ..................................... 143
Anti-Lock Warning Light.................................................. 70
Assist, Hill Start ............................................................. 148
Audio Systems (Radio) ................................................. 126
Auto Down Power Windows............................................ 53
Auto Up Power Windows ................................................ 53
Automatic Climate Controls ........................................... 45
Automatic Dimming Mirror ............................................. 34 Automatic Door Locks ............................................. 23
, 24
Automatic Headlights ..................................................... 40 Automatic High Beams ................................................... 40
Automatic Temperature Control (ATC) .......................... 48
Automatic Transaxle ....................................................... 81
Automatic Transmission ................................................. 81 Adding Fluid ............................................................. 226
Fluid And Filter Change ...........................................226
Fluid Change ............................................................226Fluid Level Check ....................................................225Fluid Type ................................................................. 226
Special Additives ..................................................... 225Torque Converter....................................................... 85
Autostick.......................................................................... 84 AUX Cord.......................................................................... 50Auxiliary (Power Outlet) .................................................. 51
BBattery.................................................................... 69, 214
Keyless Key Fob Replacement................................. 14
Battery Saver Feature .................................................... 42
Belts, Seat..................................................................... 187
Blind Spot Monitoring .................................................. 150
Body Mechanism Lubrication ...................................... 219
Bodywork ...................................................................... 250
B-Pillar Location ........................................................... 238
Brake Assist System............................................ 144
, 154
Brake Control System .................................................. 143
Brake Fluid.................................................................... 225
Brake System ......................................................225
, 253
Anti-Lock (ABS) ........................................................ 253 Fluid Check .............................................................. 225Master Cylinder ....................................................... 225Parking....................................................................... 78
Warning Light ............................................................ 68
Brake/Transmission Interlock ....................................... 81
Brightness, Interior Lights.............................................. 42
Bulb Replacement ........................................................ 233
Bulbs, Light ................................................................... 188
CCamera, Rear................................................................ 112
Capacities, Fluid ........................................................... 256
Caps, Filler Oil (Engine) ..................................................... 212
, 213
Radiator (Coolant Pressure) ................................... 224
Car Washes................................................................... 250
Carbon Monoxide Warning .......................................... 18811
23_KL_OM_EN_USC_t.book Page 263