hood open JEEP CHEROKEE 2023 Owners Manual
[x] Cancel search | Manufacturer: JEEP, Model Year: 2023, Model line: CHEROKEE, Model: JEEP CHEROKEE 2023Pages: 276, PDF Size: 12.55 MB
Page 5 of 276
3
WINDSHIELD WIPERS AND WASHERS ........................... 43Windshield Wiper Operation....................................... 44
Rain Sensing Wipers — If Equipped .......................... 44
Rear Window Wiper/Washer ..................................... 45
Windshield Wiper De-Icer — If Equipped ................... 45
CLIMATE CONTROLS ..........................................................45 Automatic Climate Control Descriptions And
Functions ..................................................................... 45
Automatic Temperature Control (ATC) —
If Equipped ................................................................. 48
Climate Voice Commands .......................................... 48
Operating Tips ............................................................ 48
INTERIOR STORAGE AND EQUIPMENT ............................49 Storage ........................................................................ 49
AUX/USB Control ........................................................ 50
Power Outlets .............................................................. 51
Power Inverter — If Equipped .................................... 52
WINDOWS ...........................................................................53 Power Window Controls .............................................. 53
Automatic Window Features ..................................... 53
Reset Auto-Up.............................................................. 53
Window Lockout Switch.............................................. 54
Wind Buffeting ............................................................ 54
POWER SUNROOF WITH POWER SHADE —
IF EQUIPPED ....................................................................... 54 Opening And Closing The Sunroof ............................. 55
Opening And Closing The Power Shade .................... 55
Pinch Protect Feature ................................................. 56
Venting Sunroof .......................................................... 56
Ignition Off Operation.................................................. 56
Sunroof Maintenance ................................................. 56
HOOD ...................................................................................56 Opening The Hood ...................................................... 56
Closing The Hood ........................................................ 57 LIFTGATE .............................................................................. 57
To Unlock/Open The Liftgate ......................................57
To Lock/Close The Liftgate ......................................... 58
Hands-Free Liftgate — If Equipped ............................ 58
Cargo Area Features ................................................... 59
ROOF LUGGAGE RACK — IF EQUIPPED .......................... 60
GETTING TO KNOW YOUR
INSTRUMENT PANEL
INSTRUMENT CLUSTER ..................................................... 61 Instrument Cluster Descriptions ................................. 63
INSTRUMENT CLUSTER DISPLAY
S
.............................. 63
Instrument Cluster Display Location And Controls.... 63
Oil Life Reset — If Equipped
S
................................. 64
Instrument Cluster Display Menu Items ................... 64
Instrument Cluster Display Selectable Items ............ 67
Battery Saver On/Battery Saver Mode Message —
Electrical Load Reduction Actions — If Equipped .....67
WARNING LIGHTS AND MESSAGES ................................ 68 Red Warning Lights ..................................................... 68
Yellow Warning Lights ................................................. 70
Yellow Indicator Lights ................................................ 73
Green Indicator Lights ................................................. 73
White Indicator Lights.................................................. 74
Blue Indicator Lights.................................................... 75
ONBOARD DIAGNOSTIC SYSTEM — OBD II ..................... 75 Onboard Diagnostic System (OBD II)
Cybersecurity ...............................................................75
EMISSIONS INSPECTION AND MAINTENANCE
PROGRAMS ........................................................................ 75
STARTING AND OPERATING
STARTING THE ENGINE ..................................................... 77 Normal Starting ........................................................... 77
Extreme Cold Weather (Below –20°F Or −29°C) .... 77
Extended Park Starting ............................................... 77
If Engine Fails To Start ............................................... 78
After Starting................................................................ 78
ENGINE BREAK-IN RECOMMENDATIONS........................ 78
PARKING BRAKE ................................................................ 78 Electric Park Brake (EPB) ........................................... 78
AUTOMATIC TRANSMISSION ............................................ 81 Key Ignition Park Interlock.......................................... 81
Brake/Transmission Shift Interlock (BTSI) System ... 81
9-Speed Automatic Transmission ............................. 81
Gear Ranges ................................................................ 82
FOUR-WHEEL DRIVE OPERATION .................................... 85 1-Speed Four-Wheel Drive (4WD) — If Equipped....... 85
2-Speed Four-Wheel Drive (4WD) — If Equipped....... 85
Shift Positions.............................................................. 86
Shifting Procedures ..................................................... 86
Rear Electronic Locker System — If Equipped........... 87
SELEC-TERRAIN .................................................................. 88 Description................................................................... 88
POWER STEERING ............................................................. 88
STOP/START SYSTEM........................................................ 89 Autostop Mode ............................................................ 89
Possible Reasons The Engine Does Not Autostop .... 89
To Start The Engine While In Autostop Mode ............ 89
To Manually Turn Off The Stop/Start System............ 90
To Manually Turn On The Stop/Start System ............ 90
System Malfunction .................................................... 90
23_KL_OM_EN_USC_t.book Page 3
Page 11 of 276
9
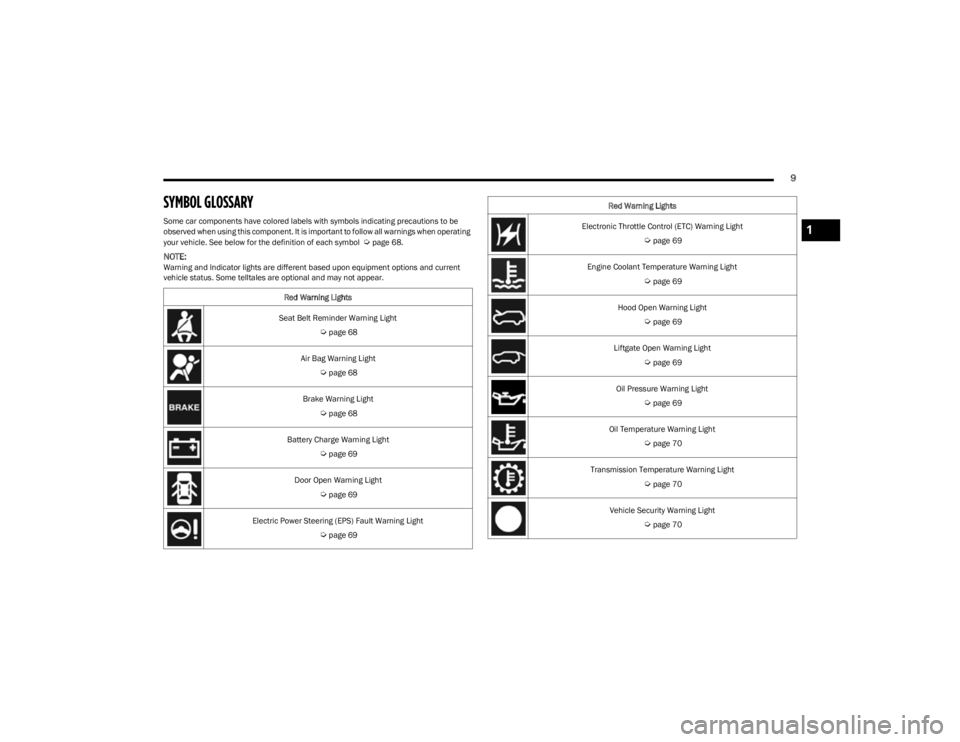
SYMBOL GLOSSARY
Some car components have colored labels with symbols indicating precautions to be
observed when using this component. It is important to follow all warnings when operating
your vehicle. See below for the definition of each symbol
Úpage 68.
NOTE:Warning and Indicator lights are different based upon equipment options and current
vehicle status. Some telltales are optional and may not appear.Red Warning Lights
Seat Belt Reminder Warning Light
Úpage 68
Air Bag Warning Light
Úpage 68
Brake Warning Light
Úpage 68
Battery Charge Warning Light
Úpage 69
Door Open Warning Light
Úpage 69
Electric Power Steering (EPS) Fault Warning Light
Úpage 69
Electronic Throttle Control (ETC) Warning Light
Úpage 69
Engine Coolant Temperature Warning Light
Úpage 69
Hood Open Warning Light
Úpage 69
Liftgate Open Warning Light
Úpage 69
Oil Pressure Warning Light
Úpage 69
Oil Temperature Warning Light
Úpage 70
Transmission Temperature Warning Light
Úpage 70
Vehicle Security Warning Light
Úpage 70
Red Warning Lights
1
23_KL_OM_EN_USC_t.book Page 9
Page 20 of 276
18GETTING TO KNOW YOUR VEHICLE
position. In addition to the chime, the message “Igni-
tion or Accessory ON” will display in the cluster.
The power window switches and power sunroof (if
equipped) will remain active for three minutes after the
ignition is placed in the OFF position. Opening either
front door will cancel this feature. The timing for this
feature is programmable.
REMOTE START — IF EQUIPPED
This system uses the key fob to start the engine
conveniently from outside the vehicle while still
maintaining security. The system has a range
of approximately 328 ft (100 m).
Remote Start is used to defrost windows in cold weather,
and to reach a comfortable climate in all ambient
conditions before the driver enters the vehicle.
NOTE:Obstructions between the vehicle and key fob may reduce
this range Úpage 262.
HOW TO USE REMOTE START
Push and release the Remote Start button on the key fob
twice within five seconds. The vehicle doors will lock, the
parking lights will flash, and the horn will chirp (if
programmed within the Uconnect system). Then, the
engine will start, and the vehicle will remain in the Remote
Start mode for a 15 minute cycle. Pushing the Remote
Start button a third time shuts the engine off.
NOTE:
With Remote Start, the engine will only run for
15 minutes.
Remote Start can only be used twice.
The ignition must be placed in the ON/RUN position
before the Remote Start sequence can be repeated for
a third cycle.
If an engine fault is present or fuel level is low, the
vehicle will start and then shut down in 10 seconds.
The parking lights will turn on and remain on during
Remote Start mode.
For security, power window and power sunroof opera -
tion (if equipped) are disabled when the vehicle is in
the Remote Start mode.
The ignition must be placed in the ON/RUN position
before the Remote Start sequence can be repeated for
a third cycle.
All of the following conditions must be met before the
engine will remote start:
Gear selector in PARK
Doors closed
Hood closed
Liftgate closed
Hazard switch off
Brake switch inactive (brake pedal not pressed)
Battery at an acceptable charge level
System not disabled from previous Remote Start event
Vehicle Security system indicator flashing
Ignition in OFF position
Fuel level meets minimum requirement
Vehicle Security system is not signaling an intrusion
Malfunction Indicator Light (MIL) is not illuminated
TO EXIT REMOTE START MODE
To drive the vehicle after starting the Remote Start
system, push and release the START/STOP ignition button
while pressing the brake pedal prior to the end of the
15 minute cycle. If the vehicle is not equipped with a
START/STOP ignition button, insert the key fob into the
ignition switch and place the ignition in the ON/RUN
position.
WARNING!
Do not start or run an engine in a closed garage or
confined area. Exhaust gas contains carbon
monoxide (CO) which is odorless and colorless.
Carbon monoxide is poisonous and can cause
serious injury or death when inhaled.
Keep key fobs away from children. Operation of the
Remote Start system, windows, door locks or other
controls could cause serious injury or death.
23_KL_OM_EN_USC_t.book Page 18
Page 21 of 276

GETTING TO KNOW YOUR VEHICLE19
The Remote Start system will turn the engine off if the
Remote Start button on the key fob is pushed again, or if
the engine is allowed to run for the entire 15 minute cycle.
Once the driver’s door is opened, or the ignition is placed
in the ON/RUN position, the climate controls will resume
previously set operations (temperature, blower control,
etc.).
NOTE:
For vehicles equipped with the Keyless Enter ‘n Go™ —
Passive Entry feature, the message “Remote Start
Active — Push Start Button” will show in the instrument
cluster display until you push the START/STOP ignition
button.
To avoid unintentional shutdowns, the system will
disable for two seconds after receiving a valid Remote
Start request.
REMOTE START FRONT DEFROST
A
CTIVATION — IF EQUIPPED
When Remote Start is active, and the outside ambient
temperature is 40°F (4.5°C) or below, the system will
automatically activate front defrost for 15 minutes or less.
The timing is dependent on the ambient temperature.
Once the timer expires, the system will automatically
adjust the settings depending on ambient conditions. See
“Remote Start Comfort Systems — If Equipped” in the next
section for detailed operation.
REMOTE START COMFORT SYSTEMS —
I
F EQUIPPED
When Remote Start is activated, the front and rear defrost
will automatically turn on in cold weather. The heated steering wheel and driver heated seat feature will turn on
if selected in the Comfort menu screen within Uconnect
Settings
Úpage 126. In warm weather, the driver vented
seat feature will automatically turn on when the Remote
Start is activated, if programmed in the Comfort menu
screen. The vehicle will adjust the climate control settings
depending on the outside ambient temperature.
Automatic Temperature Control (ATC) — If Equipped
The climate controls automatically adjust to the optimal
temperature and mode settings dependent on the outside
ambient temperature. This will occur until the driver’s door
is opened, or the ignition is placed in the ON/RUN position,
where the climate controls will resume their previous
settings.
Manual Temperature Control (MTC) — If Equipped
In ambient temperatures at 40°F (4.5°C) or below, the
climate settings will default to maximum heat, with
fresh air entering the cabin. If the front defrost timer
expires, the vehicle will enter Mix Mode.
In ambient temperatures from 40°F (4.5°C) to 78°F
(26°C), the climate settings will be based on the last
settings selected by the driver.
In ambient temperatures at 78°F (26°C) or above, the
climate settings will default to MAX A/C, Bi-Level Mode,
and Recirculation on.
For more information on ATC, MTC, and climate control
settings, see
Úpage 45.
NOTE:These features will stay on through the duration of Remote
Start until the driver’s door is opened, or until the ignition
is placed in the ON/RUN position. The climate control
settings will change if manually adjusted by the driver while the vehicle is in Remote Start mode, and exit auto
-
matic override. This includes the OFF button on the
climate controls, which will turn the system off.
REMOTE START WINDSHIELD WIPER
D
E-ICER ACTIVATION — IF EQUIPPED
When Remote Start is active and the outside ambient
temperature is less than 33°F (0.6°C), the Windshield
Wiper De-Icer will activate. Exiting Remote Start will
resume its previous operation. If the Windshield Wiper
De-Icer was active, the timer and operation will continue.
REMOTE START CANCEL MESSAGE
One of the following messages will display in the
instrument cluster display if the vehicle fails to remote
start, or exits Remote Start prematurely:
Remote Start Canceled — Door Open
Remote Start Canceled — Hood Open
Remote Start Canceled — Fuel Low
Remote Start Canceled — Liftgate Open
Remote Start Disabled — Start Vehicle To Reset
Remote Start Canceled — Too Cold
Remote Start Canceled — Time Expired
The message will stay active until the ignition is placed in
the ON/RUN position.
2
23_KL_OM_EN_USC_t.book Page 19
Page 22 of 276
20GETTING TO KNOW YOUR VEHICLE
VEHICLE SECURITY SYSTEM — IF EQUIPPED
The Vehicle Security system monitors the vehicle doors,
hood, liftgate, and the Keyless Enter ‘n Go™ Ignition for
unauthorized operation. While the Vehicle Security system
is armed, interior switches for door locks and liftgate
release are disabled. If something triggers the alarm, the
Vehicle Security system will provide the following audible
and visible signals:
The horn will pulse.
The turn signals will flash.
The Vehicle Security Light in the instrument cluster will
flash.
TO ARM THE SYSTEM
Follow these steps to arm the Vehicle Security system:
1. Make sure the vehicle’s ignition is placed in the OFF
position.
For vehicles equipped with Keyless Entry, make
sure the vehicle’s keyless ignition system is OFF.
2. Perform one of the following methods to lock the vehicle:
Push the lock button on the interior power door
lock switch with the driver and/or passenger door
open.
Push the lock button on the exterior Passive Entry
door handle with a valid key fob available in the
same exterior zone
Úpage 22.
Push the lock button on the key fob.
3. If any doors are open, close them.
TO DISARM THE SYSTEM
The Vehicle Security system can be disarmed using any of
the following methods:
Push the unlock button on the key fob.
Grab the Passive Entry door handle to unlock the door
Úpage 22.
Cycle the ignition out of the OFF position to disarm the
system.
NOTE:
The driver's door key cylinder and the liftgate button on
the key fob cannot arm or disarm the Vehicle Security
system.
The Vehicle Security system remains armed during
power liftgate entry. Pushing the liftgate button will not
disarm the Vehicle Security system. If someone enters
the vehicle through the opened liftgate, then opens any
door, the alarm will sound.
When the Vehicle Security system is armed, the interior
power door lock switches will not unlock the doors.
The Vehicle Security system is designed to protect your
vehicle. However, you can create conditions where the
system will give you a false alarm. If one of the previously
described arming sequences has occurred, the Vehicle
Security system will arm, regardless of whether you are in
the vehicle or not. If you remain in the vehicle and open a
door, the alarm will sound. If this occurs, disarm the
Vehicle Security system. If the Vehicle Security system is armed and the battery
becomes disconnected, the Vehicle Security system will
remain armed when the battery is reconnected; the
exterior lights will flash, and the horn will sound. If this
occurs, disarm the Vehicle Security system.
REARMING OF THE SYSTEM
If something triggers the alarm and no action is taken to
disarm it, the Vehicle Security system will turn the horn off
after a 29 second cycle (with five seconds between cycles
and up to eight cycles if the trigger remains active) and
then rearm itself.
SECURITY SYSTEM MANUAL OVERRIDE
The Vehicle Security system will not arm if you lock the
doors using the manual door lock.
DOORS
MANUAL DOOR LOCKS
To lock each door, rotate the door lock knob on each door
trim panel until the red area is hidden. To unlock the front
doors, pull the inside door handle to the first detent or
rotate the door lock button until the red indicator is visible.
To unlock the rear doors, rotate the door lock button until
the red indicator is visible.
If the red indicator is hidden when you shut the door, the
door is locked. Therefore, make sure the key fob is not
inside the vehicle before closing the door.
23_KL_OM_EN_USC_t.book Page 20
Page 58 of 276
56GETTING TO KNOW YOUR VEHICLE
PINCH PROTECT FEATURE
This feature will detect an obstruction in the closing of the
sunroof during the Express Close operation. If an
obstruction in the path of the sunroof is detected, the
sunroof will automatically retract. Remove the obstruction
if this occurs.
NOTE:If three consecutive sunroof close attempts result in Pinch
Protect reversals, Pinch Protect will disable and the
sunroof must be closed in Manual Mode.
VENTING SUNROOF
Push and release the Vent switch within one-half second
and the sunroof will open to the vent position. This is
called “Express Vent”, and it will occur regardless of
sunroof position. During Express Vent operation, any
movement of the switch will stop the sunroof.
IGNITION OFF OPERATION
The power sunroof switch will remain active for up to
approximately 10 minutes after the ignition switch is
placed in the OFF position. Opening either front door will
cancel this feature.
NOTE:Ignition Off timing is programmable through the Uconnect
system Úpage 126.
SUNROOF MAINTENANCE
Use only a non-abrasive cleaner and a soft cloth to clean
the glass panel. Periodically check for and clear out any
debris that may have collected in the tracks.
HOOD
OPENING THE HOOD
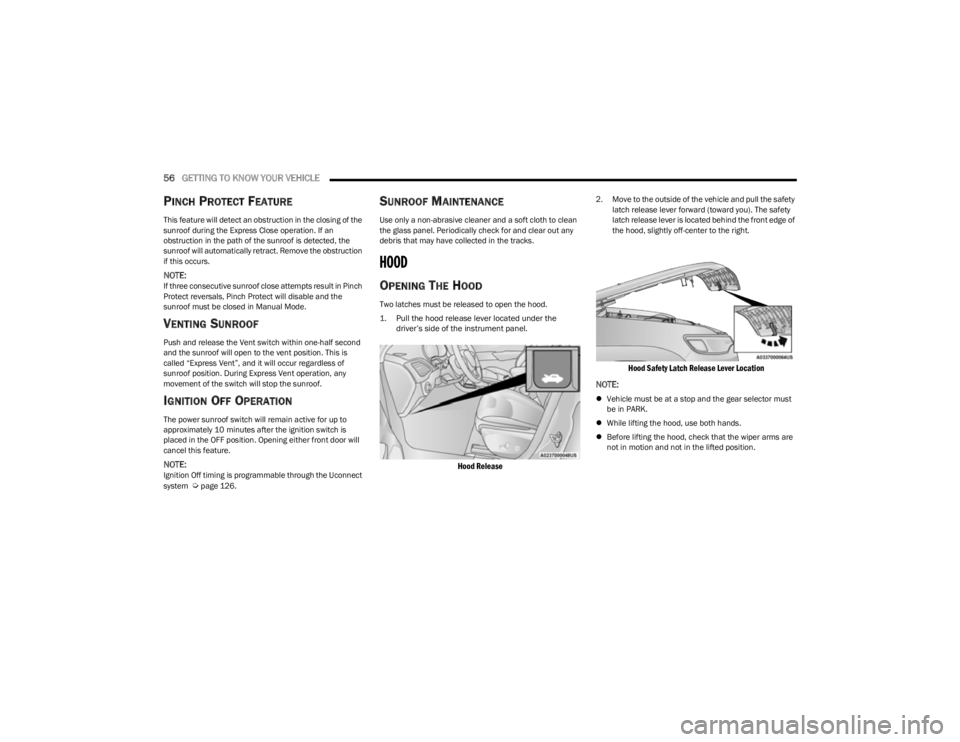
Two latches must be released to open the hood.
1. Pull the hood release lever located under the
driver’s side of the instrument panel.
Hood Release
2. Move to the outside of the vehicle and pull the safety latch release lever forward (toward you). The safety
latch release lever is located behind the front edge of
the hood, slightly off-center to the right.
Hood Safety Latch Release Lever Location
NOTE:
Vehicle must be at a stop and the gear selector must
be in PARK.
While lifting the hood, use both hands.
Before lifting the hood, check that the wiper arms are
not in motion and not in the lifted position.
23_KL_OM_EN_USC_t.book Page 56
Page 59 of 276
GETTING TO KNOW YOUR VEHICLE57
CLOSING THE HOOD
In one continuous motion, pull down on the front edge of
the hood with moderate force until the angle is below the
point where the gas props are no longer resisting. Then let
the hood continue to fall into the closed position on its
own.
LIFTGATE
TO UNLOCK/OPEN THE LIFTGATE
The power liftgate may be opened by pushing the key fob
liftgate button (if equipped) or by pushing the electronic
liftgate release handle
Úpage 22.
Push the liftgate button on the key fob twice within five
seconds to open the power liftgate. Once the liftgate is
open, pushing the button twice within five seconds a
second time will close the liftgate.
The power liftgate may also be opened or closed by
pushing the liftgate button located on the instrument
panel to right of the headlight switch. If the liftgate is fully
open, the liftgate can be closed by pushing the liftgate
button located on the left rear trim panel, near the liftgate opening. If the liftgate is in motion, pushing the liftgate
button located on the left rear trim panel will reverse the
liftgate.
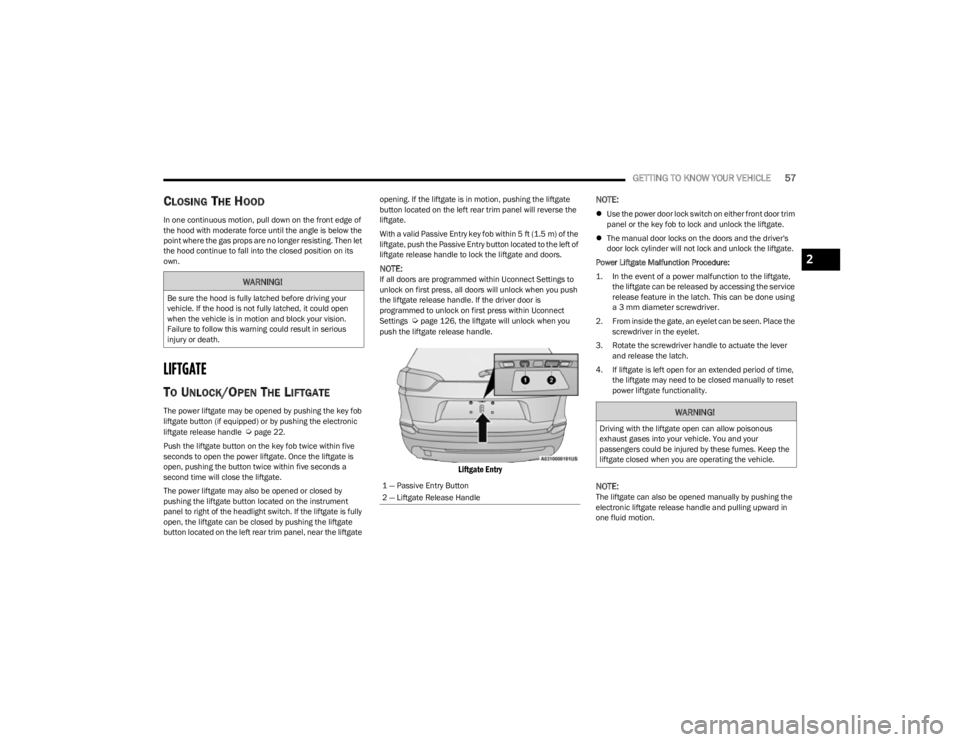
With a valid Passive Entry key fob within 5 ft (1.5 m) of the
liftgate, push the Passive Entry button located to the left of
liftgate release handle to lock the liftgate and doors.
NOTE:If all doors are programmed within Uconnect Settings to
unlock on first press, all doors will unlock when you push
the liftgate release handle. If the driver door is
programmed to unlock on first press within Uconnect
Settings
Úpage 126, the liftgate will unlock when you
push the liftgate release handle.
Liftgate Entry
NOTE:
Use the power door lock switch on either front door trim
panel or the key fob to lock and unlock the liftgate.
The manual door locks on the doors and the driver's
door lock cylinder will not lock and unlock the liftgate.
Power Liftgate Malfunction Procedure:
1. In the event of a power malfunction to the liftgate, the liftgate can be released by accessing the service
release feature in the latch. This can be done using
a 3 mm diameter screwdriver.
2. From inside the gate, an eyelet can be seen. Place the screwdriver in the eyelet.
3. Rotate the screwdriver handle to actuate the lever and release the latch.
4. If liftgate is left open for an extended period of time, the liftgate may need to be closed manually to reset
power liftgate functionality.
NOTE:The liftgate can also be opened manually by pushing the
electronic liftgate release handle and pulling upward in
one fluid motion.
WARNING!
Be sure the hood is fully latched before driving your
vehicle. If the hood is not fully latched, it could open
when the vehicle is in motion and block your vision.
Failure to follow this warning could result in serious
injury or death.
1 — Passive Entry Button
2 — Liftgate Release Handle
WARNING!
Driving with the liftgate open can allow poisonous
exhaust gases into your vehicle. You and your
passengers could be injured by these fumes. Keep the
liftgate closed when you are operating the vehicle.
2
23_KL_OM_EN_USC_t.book Page 57
Page 71 of 276
GETTING TO KNOW YOUR INSTRUMENT PANEL69
The light will also turn on when the parking brake is
applied with the ignition switch in the ON/RUN position.
NOTE:This light only shows that the parking brake is applied. It
does not show the degree of brake application.
Battery Charge Warning Light
This warning light will illuminate when the
battery is not charging properly. If it stays on
while the engine is running, there may be a
malfunction with the charging system. Contact
an authorized dealer as soon as possible.
This indicates a possible problem with the electrical
system or a related component.
This warning light will illuminate when the battery is not
charging properly. If it stays on while the engine is running,
there may be a malfunction with the charging system.
Contact an authorized dealer as soon as possible.
Door Open Warning Light
This indicator will illuminate when a door is
ajar/open and not fully closed.
NOTE:If the vehicle is moving, there will also be a single chime.
Electric Power Steering (EPS) Fault
Warning Light
This warning light will turn on when there's a
fault with the EPS system Úpage 88.
Electronic Throttle Control (ETC) Warning
Light
This warning light will illuminate to indicate a
problem with the ETC system. If a problem is
detected while the vehicle is running, the light
will either stay on or flash depending on the
nature of the problem. Cycle the ignition when the vehicle
is safely and completely stopped and the transmission is
placed in the PARK (P) position. The light should turn off.
If the light remains on with the vehicle running, your
vehicle will usually be drivable; however, see an
authorized dealer for service as soon as possible.
NOTE:This light may turn on if the accelerator and brake pedals
are pressed at the same time.
If the light continues to flash when the vehicle is running,
immediate service is required and you may experience
reduced performance, an elevated/rough idle, or engine
stall and your vehicle may require towing. The light will
come on when the ignition is placed in the ON/RUN or
ACC/ON/RUN position and remain on briefly as a bulb
check. If the light does not come on during starting, have
the system checked by an authorized dealer.
Engine Coolant Temperature Warning
Light
This light warns of an overheated engine
condition. If the engine coolant temperature is
too high, this indicator will illuminate and a
single chime will sound.
If the light turns on while driving, safely pull over and stop
the vehicle. If the Air Conditioning (A/C) system is on, turn
it off. Also, shift the transmission into NEUTRAL and idle
the vehicle. If the temperature reading does not return to
normal, turn the engine off immediately and call for
service
Úpage 203.
Hood Open Warning Light
This warning light will illuminate when the hood
is left open and not fully closed.
NOTE:If the vehicle is moving, there will also be a single chime.
Liftgate Open Warning Light
This warning light will illuminate when the
liftgate is open.
NOTE:If the vehicle is moving, there will also be a single chime.
Oil Pressure Warning Light
This warning light will illuminate to indicate low
engine oil pressure. A chime will sound when
this light turns on and a message “Oil Pressure
Low” will display in the message screen. If the
WARNING!
Continued operation with reduced assist could pose a
safety risk to yourself and others. Service should be
obtained as soon as possible.
3
23_KL_OM_EN_USC_t.book Page 69
Page 91 of 276
STARTING AND OPERATING89
NOTE:
Even if the power steering assistance is no longer oper -
ational, it is still possible to steer the vehicle. Under
these conditions there will be a substantial increase in
steering effort, especially at low speeds and during
parking maneuvers.
If the condition persists, see an authorized dealer for
service.
STOP/START SYSTEM
The Stop/Start system was designed to reduce fuel
consumption. The system will stop the engine
automatically during a vehicle stop if the required
conditions are met. Releasing the brake pedal or pressing
the accelerator pedal will automatically restart the engine.
This vehicle has been upgraded with a heavy-duty battery,
starter, as well as other engine parts, to handle the
additional engine starts.
AUTOSTOP MODE
The Stop/Start feature is enabled after every normal
customer engine start. At that time, the system will go into
STOP/START READY.
To Activate The Autostop Mode, The Following Must Occur:
The system must be in STOP/START READY state. A
“STOP/START READY” message will be displayed in the
instrument cluster display within the Stop/Start
section
Úpage 63.
The vehicle must be completely stopped.
The gear selector must be in a forward gear and the
brake pedal pressed. The engine will shut down, the tachometer will move to the
zero position, and the Stop/Start indicator light will
illuminate indicating you are in Autostop. Customer
settings will be maintained upon return to an
engine-running condition.
POSSIBLE REASONS THE ENGINE DOES
N
OT AUTOSTOP
Prior to engine shut down, the system will check many
safety and comfort conditions to see if they are fulfilled.
Detailed information about the operation of the Stop/Start
system may be viewed in the instrument cluster display
Stop/Start Screen. In the following situations, the engine
will not stop:
Driver’s seat belt is not buckled
Driver’s door is not closed
Battery temperature is too warm or cold
Battery charge is low
The vehicle is on a steep grade
Cabin heating or cooling is in process and an accept -
able cabin temperature has not been achieved
HVAC is set to full defrost mode at a high blower speed
HVAC is set to MAX A/C
Engine has not reached normal operating temperature
The transmission is not in a forward or reverse gear
Hood is open
Brake pedal is not pressed with sufficient pressure with
vehicle in DRIVE (D) position
Accelerator pedal input
Engine temperature is too high
5 mph (8 km/h) threshold has not been achieved from
previous Autostop
Steering angle is beyond threshold
It may be possible for the vehicle to be driven several
times without the Stop/Start system going into a STOP/
START READY state under more extreme conditions of the
items listed previously.TO START THE ENGINE WHILE IN
A
UTOSTOP MODE
While in a forward gear, the engine will start when the
brake pedal is released or the accelerator pedal is
pressed. The transmission will automatically re-engage
upon engine restart.
Conditions That Will Cause The Engine To Start
Automatically While In Autostop Mode:
The transmission gear selector is moved out of DRIVE,
except in the PARK position
To maintain cabin temperature comfort
HVAC is set to full defrost mode
HVAC system temperature or fan speed is manually
adjusted
Battery voltage drops too low
Stop/Start OFF switch is pushed
A Stop/Start system error occurs
Steering wheel is turned beyond threshold
4
23_KL_OM_EN_USC_t.book Page 89
Page 92 of 276
90STARTING AND OPERATING
Conditions That Force An Application Of The Electric Park
Brake While In Autostop Mode:
The driver’s door is open and brake pedal released
The driver’s door is open and the driver’s seat belt is
unbuckled
The engine hood has been opened
A Stop/Start system error occurs
If the Electric Park Brake (EPB) is applied with the engine
off, the engine may require a manual restart and the EPB
may require a manual release (press brake pedal and
push EPB switch).
TO MANUALLY TURN OFF THE STOP/
S
TART SYSTEM
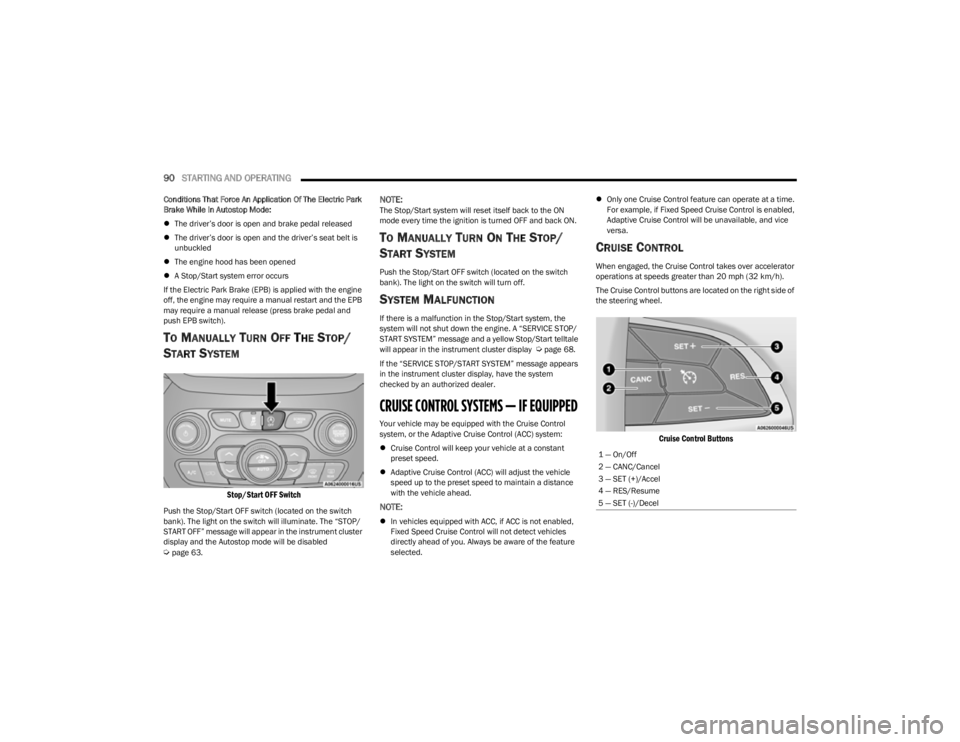
Stop/Start OFF Switch
Push the Stop/Start OFF switch (located on the switch
bank). The light on the switch will illuminate. The “STOP/
START OFF” message will appear in the instrument cluster
display and the Autostop mode will be disabled
Úpage 63.
NOTE:The Stop/Start system will reset itself back to the ON
mode every time the ignition is turned OFF and back ON.
TO MANUALLY TURN ON THE STOP/
S
TART SYSTEM
Push the Stop/Start OFF switch (located on the switch
bank). The light on the switch will turn off.
SYSTEM MALFUNCTION
If there is a malfunction in the Stop/Start system, the
system will not shut down the engine. A “SERVICE STOP/
START SYSTEM” message and a yellow Stop/Start telltale
will appear in the instrument cluster display
Úpage 68.
If the “SERVICE STOP/START SYSTEM” message appears
in the instrument cluster display, have the system
checked by an authorized dealer.
CRUISE CONTROL SYSTEMS — IF EQUIPPED
Your vehicle may be equipped with the Cruise Control
system, or the Adaptive Cruise Control (ACC) system:
Cruise Control will keep your vehicle at a constant
preset speed.
Adaptive Cruise Control (ACC) will adjust the vehicle
speed up to the preset speed to maintain a distance
with the vehicle ahead.
NOTE:
In vehicles equipped with ACC, if ACC is not enabled,
Fixed Speed Cruise Control will not detect vehicles
directly ahead of you. Always be aware of the feature
selected.
Only one Cruise Control feature can operate at a time.
For example, if Fixed Speed Cruise Control is enabled,
Adaptive Cruise Control will be unavailable, and vice
versa.
CRUISE CONTROL
When engaged, the Cruise Control takes over accelerator
operations at speeds greater than 20 mph (32 km/h).
The Cruise Control buttons are located on the right side of
the steering wheel.
Cruise Control Buttons
1 — On/Off
2 — CANC/Cancel
3 — SET (+)/Accel
4 — RES/Resume
5 — SET (-)/Decel
23_KL_OM_EN_USC_t.book Page 90