service reset JEEP CHEROKEE 2023 Owners Manual
[x] Cancel search | Manufacturer: JEEP, Model Year: 2023, Model line: CHEROKEE, Model: JEEP CHEROKEE 2023Pages: 276, PDF Size: 12.55 MB
Page 28 of 276
26GETTING TO KNOW YOUR VEHICLE
GET STARTED
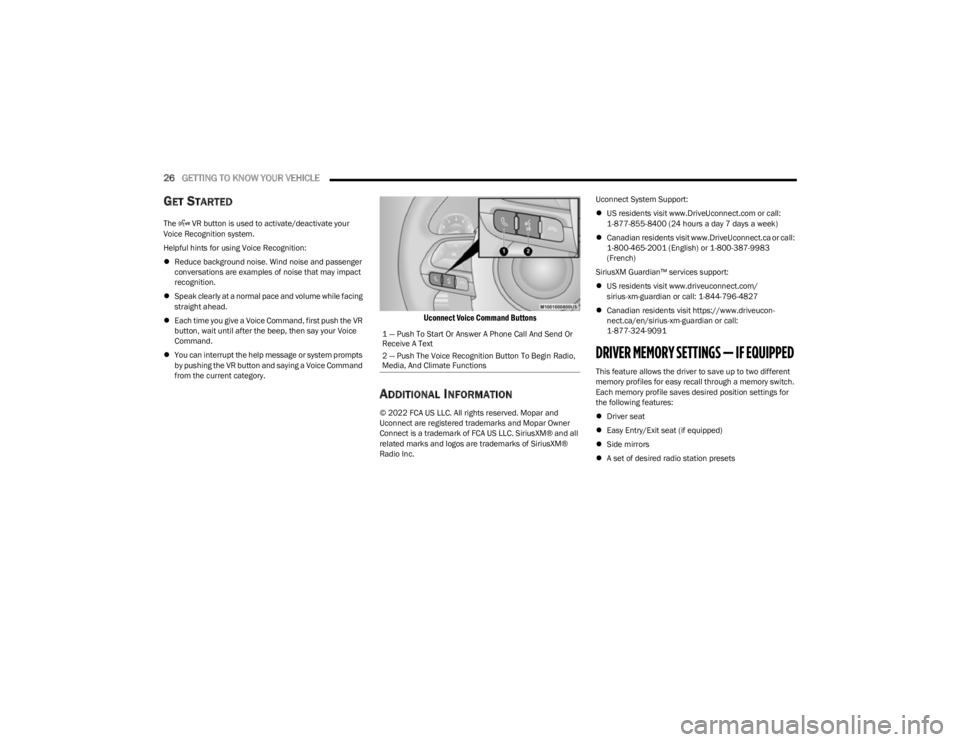
The VR button is used to activate/deactivate your
Voice Recognition system.
Helpful hints for using Voice Recognition:
Reduce background noise. Wind noise and passenger
conversations are examples of noise that may impact
recognition.
Speak clearly at a normal pace and volume while facing
straight ahead.
Each time you give a Voice Command, first push the VR
button, wait until after the beep, then say your Voice
Command.
You can interrupt the help message or system prompts
by pushing the VR button and saying a Voice Command
from the current category.
Uconnect Voice Command Buttons
ADDITIONAL INFORMATION
© 2022 FCA US LLC. All rights reserved. Mopar and
Uconnect are registered trademarks and Mopar Owner
Connect is a trademark of FCA US LLC. SiriusXM® and all
related marks and logos are trademarks of SiriusXM®
Radio Inc. Uconnect System Support:
US residents visit www.DriveUconnect.com or call:
1-877-855-8400 (24 hours a day 7 days a week)
Canadian residents visit www.DriveUconnect.ca or call:
1-800-465-2001 (English) or 1-800-387-9983
(French)
SiriusXM Guardian™ services support:
US residents visit www.driveuconnect.com/
sirius-xm-guardian or call: 1-844-796-4827
Canadian residents visit https://www.driveucon -
nect.ca/en/sirius-xm-guardian or call:
1-877-324-9091
DRIVER MEMORY SETTINGS — IF EQUIPPED
This feature allows the driver to save up to two different
memory profiles for easy recall through a memory switch.
Each memory profile saves desired position settings for
the following features:
Driver seat
Easy Entry/Exit seat (if equipped)
Side mirrors
A set of desired radio station presets
1 — Push To Start Or Answer A Phone Call And Send Or
Receive A Text
2 — Push The Voice Recognition Button To Begin Radio,
Media, And Climate Functions
23_KL_OM_EN_USC_t.book Page 26
Page 59 of 276
GETTING TO KNOW YOUR VEHICLE57
CLOSING THE HOOD
In one continuous motion, pull down on the front edge of
the hood with moderate force until the angle is below the
point where the gas props are no longer resisting. Then let
the hood continue to fall into the closed position on its
own.
LIFTGATE
TO UNLOCK/OPEN THE LIFTGATE
The power liftgate may be opened by pushing the key fob
liftgate button (if equipped) or by pushing the electronic
liftgate release handle
Úpage 22.
Push the liftgate button on the key fob twice within five
seconds to open the power liftgate. Once the liftgate is
open, pushing the button twice within five seconds a
second time will close the liftgate.
The power liftgate may also be opened or closed by
pushing the liftgate button located on the instrument
panel to right of the headlight switch. If the liftgate is fully
open, the liftgate can be closed by pushing the liftgate
button located on the left rear trim panel, near the liftgate opening. If the liftgate is in motion, pushing the liftgate
button located on the left rear trim panel will reverse the
liftgate.
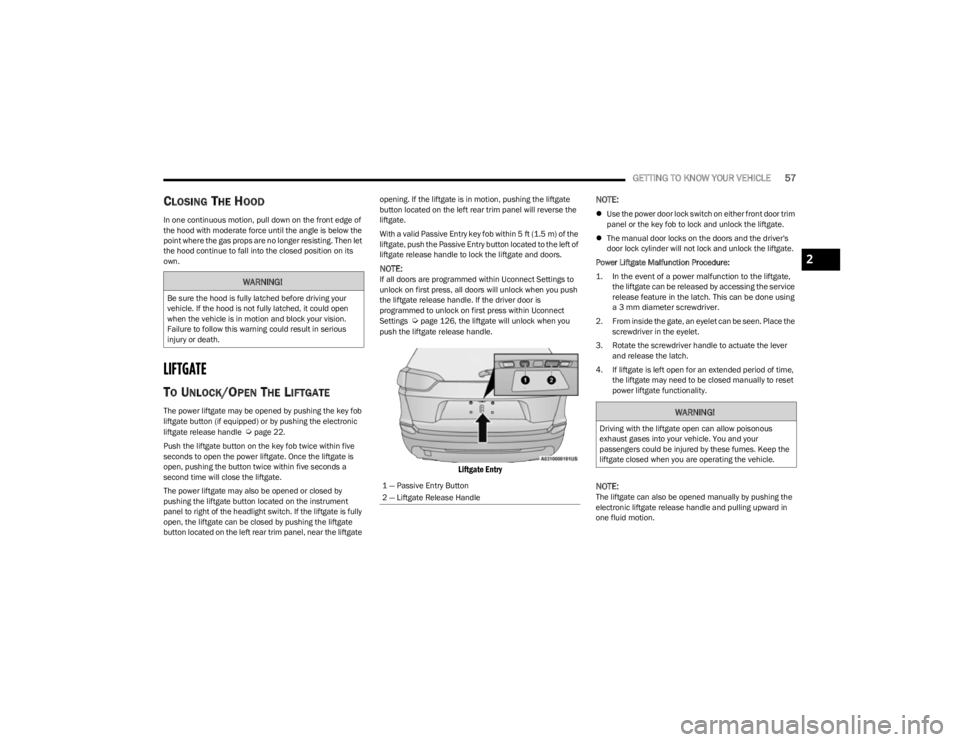
With a valid Passive Entry key fob within 5 ft (1.5 m) of the
liftgate, push the Passive Entry button located to the left of
liftgate release handle to lock the liftgate and doors.
NOTE:If all doors are programmed within Uconnect Settings to
unlock on first press, all doors will unlock when you push
the liftgate release handle. If the driver door is
programmed to unlock on first press within Uconnect
Settings
Úpage 126, the liftgate will unlock when you
push the liftgate release handle.
Liftgate Entry
NOTE:
Use the power door lock switch on either front door trim
panel or the key fob to lock and unlock the liftgate.
The manual door locks on the doors and the driver's
door lock cylinder will not lock and unlock the liftgate.
Power Liftgate Malfunction Procedure:
1. In the event of a power malfunction to the liftgate, the liftgate can be released by accessing the service
release feature in the latch. This can be done using
a 3 mm diameter screwdriver.
2. From inside the gate, an eyelet can be seen. Place the screwdriver in the eyelet.
3. Rotate the screwdriver handle to actuate the lever and release the latch.
4. If liftgate is left open for an extended period of time, the liftgate may need to be closed manually to reset
power liftgate functionality.
NOTE:The liftgate can also be opened manually by pushing the
electronic liftgate release handle and pulling upward in
one fluid motion.
WARNING!
Be sure the hood is fully latched before driving your
vehicle. If the hood is not fully latched, it could open
when the vehicle is in motion and block your vision.
Failure to follow this warning could result in serious
injury or death.
1 — Passive Entry Button
2 — Liftgate Release Handle
WARNING!
Driving with the liftgate open can allow poisonous
exhaust gases into your vehicle. You and your
passengers could be injured by these fumes. Keep the
liftgate closed when you are operating the vehicle.
2
23_KL_OM_EN_USC_t.book Page 57
Page 82 of 276
80STARTING AND OPERATING
If exceptional circumstances should make it necessary to
engage the parking brake while the vehicle is in motion,
maintain upward pressure on the EPB switch for as long as
engagement is desired. The Brake Warning Light will
illuminate, and a continuous chime will sound. The rear
stop lamps will also be illuminated automatically while the
vehicle remains in motion.
To disengage the parking brake while the vehicle is in
motion, release the EPB switch. If the vehicle is brought to
a complete stop using the parking brake, when the vehicle
reaches approximately 3 mph (5 km/h) the parking brake
will remain engaged.
In the unlikely event of a malfunction of the EPB system, a
yellow EPB Warning Light will illuminate. This may be
accompanied by the Brake Warning Light flashing. In this
event, urgent service of the EPB system is required. Do not
rely on the parking brake to hold the vehicle stationary.
Auto Park Brake
The EPB can be programmed to be applied automatically
whenever the vehicle is at a standstill and the automatic
transmission is placed in PARK, whenever the ignition is turned OFF. Auto Park Brake is enabled and disabled by
customer selection through the customer programmable
features
Úpage 132.
Any single Auto Park Brake application can be bypassed by
pushing the EPB switch to the release position while the
transmission is placed in PARK.
SafeHold
SafeHold is a safety feature of the EPB system that will
engage the parking brake automatically if the vehicle is
left unsecured while the ignition is in ON/RUN position.
The parking brake will automatically engage if all of the
following conditions are met:
The vehicle is at a standstill.
There is no attempt to press the brake pedal or accel -
erator pedal.
The driver seat belt is unbuckled.
The driver door is open.
SafeHold can be temporarily bypassed by pressing the
brake pedal and pushing the EPB Switch while the driver
door is open. Once manually bypassed, SafeHold will be
enabled again once the vehicle reaches 12 mph (20 km/h)
or the ignition is turned to the OFF position and back to ON
again.
Brake Maintenance Mode
We recommend having your brakes serviced by an
authorized dealer. You should only make repairs for which
you have the knowledge and the right equipment. You
should only enter Brake Maintenance mode during brake
service. When servicing your rear brakes, it may be necessary for
you or your technician to push the rear piston into the rear
caliper bore. With the EPB system, this can only be done
after retracting the EPB actuator. Fortunately, actuator
retraction can be done easily by entering the Brake
Maintenance mode through the Uconnect Settings in your
vehicle. This menu-based system will guide you through
the steps necessary to retract the EPB actuator in order to
perform rear brake service.
Maintenance mode has requirements that must be met in
order to be activated:
The vehicle must be at a standstill.
The parking brake must be unapplied.
The transmission must be in PARK (P) or NEUTRAL (N).
While in Maintenance Mode, the EPB Warning Light will
flash continuously while the ignition is ON.
When brake service work is complete, the following steps
must be followed to reset the parking brake system to
normal operation:
Ensure the vehicle is at a standstill.
Press the brake pedal with moderate force.
Apply the EPB Switch.
WARNING!
Driving the vehicle with the parking brake engaged, or
repeated use of the parking brake to slow the vehicle,
may cause serious damage to the brake system. Be
sure the parking brake is fully disengaged before
driving; failure to do so can lead to brake failure and a
collision.
WARNING!
You can be badly injured working on or around a motor
vehicle. Do only that service work for which you have
the knowledge and the right equipment. If you have any
doubt about your ability to perform a service job, take
your vehicle to a competent mechanic.
23_KL_OM_EN_USC_t.book Page 80
Page 86 of 276
84STARTING AND OPERATING
DRIVE (D)
This range should be used for most city and highway
driving. It provides the smoothest upshifts and downshifts,
and the best fuel economy. The transmission
automatically upshifts through all forward gears.
When frequent transmission shifting occurs (such as
when operating the vehicle under heavy loading
conditions, in hilly terrain, traveling into strong head
winds, or while towing a heavy trailer), use the AutoStick
shift control to select a lower gear
Úpage 84. Under
these conditions, using a lower gear will improve
performance and extend transmission life by reducing
excessive shifting and heat buildup.
If the transmission temperature exceeds normal operating
limits, the transmission controller may modify the
transmission shift schedule, reduce engine torque, and/or
expand the range of torque converter clutch engagement.
This is done to prevent transmission damage due to
overheating.
If the transmission becomes extremely hot, the
Transmission Temperature Warning Light may illuminate,
and the transmission may operate differently until the
transmission cools down.
During cold temperatures, transmission operation may be
modified depending on engine and transmission
temperature as well as vehicle speed. This feature
improves warm-up time of the engine and transmission to
achieve maximum efficiency. Engagement of the torque
converter clutch, and shifts into EIGHTH or NINTH gear,
are inhibited until the transmission fluid is warm
Úpage 85. Normal operation will resume once the
transmission temperature has risen to a suitable level.
SPORT — If Equipped
This mode alters the transmission's automatic shift
schedule for sportier driving. Upshift speeds are increased
to make full use of available engine power.
SPORT mode is activated using the rotary switch on the
center console
Úpage 88.
Transmission Limp Home Mode
Transmission function is monitored electronically for
abnormal conditions. If a condition is detected that could
result in transmission damage, Transmission Limp Home
mode is activated. In this mode, the transmission may
operate only in a fixed gear, or may remain in NEUTRAL.
The Malfunction Indicator Light (MIL) may be illuminated.
Limp Home mode may allow the vehicle to be driven to an
authorized dealer for service without damaging the
transmission.
In the event of a momentary problem, the transmission
can be reset to regain all forward gears by performing the
following steps:
1. Stop the vehicle.
2. Shift the transmission into PARK.
3. Turn the ignition to the OFF position.
4. Wait approximately 10 seconds.
5. Restart the engine.
6. Shift into the desired gear range. If the problem is no longer detected, the transmission will return to
normal operation.
NOTE:Even if the transmission can be reset, we recommend that
you visit an authorized dealer at your earliest possible convenience. An authorized dealer has diagnostic
equipment to assess the condition of your transmission. If
the transmission cannot be reset, authorized dealer
service is required.
AutoStick
AutoStick is a driver interactive transmission feature
providing manual shift control, giving you more control of
the vehicle. AutoStick allows you to maximize engine
braking, eliminate undesirable upshifts and downshifts,
and improve overall vehicle performance. This feature can
also provide you with more control during passing, city
driving, cold slippery conditions, mountain driving, trailer
towing and many other situations.
Operation
When the gear selector is in the AutoStick position (beside
the DRIVE position), it can be moved forward and
rearward. This allows the driver to manually select the
transmission gear being used. Moving the gear selector
forward (-) triggers a downshift, and rearward (+) an
upshift. The current gear is displayed in the instrument
cluster.
NOTE:
In AutoStick mode, the transmission will only shift up or
down when the driver moves the gear selector rearward (+)
or forward (-), except as follows:
The transmission will automatically upshift when
necessary to prevent engine overspeed.
The transmission will automatically downshift as the
vehicle slows (to prevent engine lugging) and will
display the current gear.
23_KL_OM_EN_USC_t.book Page 84
Page 92 of 276
90STARTING AND OPERATING
Conditions That Force An Application Of The Electric Park
Brake While In Autostop Mode:
The driver’s door is open and brake pedal released
The driver’s door is open and the driver’s seat belt is
unbuckled
The engine hood has been opened
A Stop/Start system error occurs
If the Electric Park Brake (EPB) is applied with the engine
off, the engine may require a manual restart and the EPB
may require a manual release (press brake pedal and
push EPB switch).
TO MANUALLY TURN OFF THE STOP/
S
TART SYSTEM
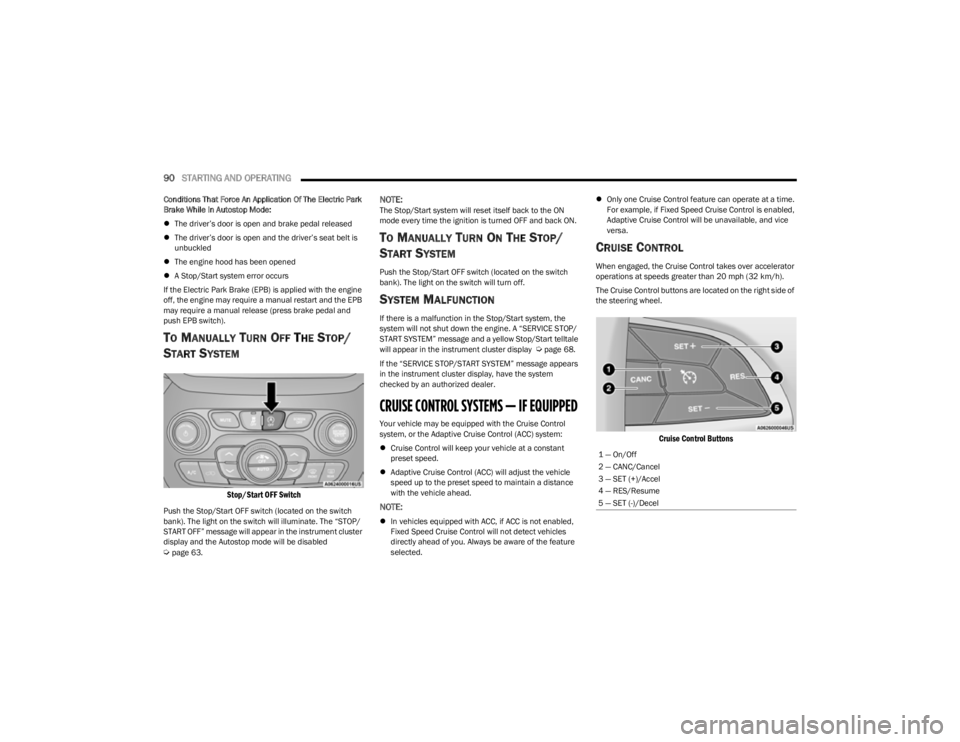
Stop/Start OFF Switch
Push the Stop/Start OFF switch (located on the switch
bank). The light on the switch will illuminate. The “STOP/
START OFF” message will appear in the instrument cluster
display and the Autostop mode will be disabled
Úpage 63.
NOTE:The Stop/Start system will reset itself back to the ON
mode every time the ignition is turned OFF and back ON.
TO MANUALLY TURN ON THE STOP/
S
TART SYSTEM
Push the Stop/Start OFF switch (located on the switch
bank). The light on the switch will turn off.
SYSTEM MALFUNCTION
If there is a malfunction in the Stop/Start system, the
system will not shut down the engine. A “SERVICE STOP/
START SYSTEM” message and a yellow Stop/Start telltale
will appear in the instrument cluster display
Úpage 68.
If the “SERVICE STOP/START SYSTEM” message appears
in the instrument cluster display, have the system
checked by an authorized dealer.
CRUISE CONTROL SYSTEMS — IF EQUIPPED
Your vehicle may be equipped with the Cruise Control
system, or the Adaptive Cruise Control (ACC) system:
Cruise Control will keep your vehicle at a constant
preset speed.
Adaptive Cruise Control (ACC) will adjust the vehicle
speed up to the preset speed to maintain a distance
with the vehicle ahead.
NOTE:
In vehicles equipped with ACC, if ACC is not enabled,
Fixed Speed Cruise Control will not detect vehicles
directly ahead of you. Always be aware of the feature
selected.
Only one Cruise Control feature can operate at a time.
For example, if Fixed Speed Cruise Control is enabled,
Adaptive Cruise Control will be unavailable, and vice
versa.
CRUISE CONTROL
When engaged, the Cruise Control takes over accelerator
operations at speeds greater than 20 mph (32 km/h).
The Cruise Control buttons are located on the right side of
the steering wheel.
Cruise Control Buttons
1 — On/Off
2 — CANC/Cancel
3 — SET (+)/Accel
4 — RES/Resume
5 — SET (-)/Decel
23_KL_OM_EN_USC_t.book Page 90
Page 177 of 276
SAFETY175
(Continued)
NOTE:
Air bag covers may not be obvious in the interior trim,
but they will open during air bag deployment.
After any collision, the vehicle should be taken to an
authorized dealer immediately.
Enhanced Accident Response System
In the event of an impact, if the communication network
remains intact, and the power remains intact, depending
on the nature of the event, the Occupant Restraint
Controller (ORC) will determine whether to have the
Enhanced Accident Response System perform the
following functions:
Cut off fuel to the engine (if equipped).
Cut off battery power to the electric motor (if equipped).
Flash hazard lights as long as the battery has power.
Turn on the interior lights, which remain on as long as
the battery has power or for 15 minutes from the inter -
vention of the Enhanced Accident Response System.
Unlock the power door locks. Your vehicle may also be designed to perform any of these
other functions in response to the Enhanced Accident
Response System:
Turn off the Fuel Filter Heater, Turn off the HVAC Blower
Motor, Close the HVAC Circulation Door
Cut off battery power to the:
Engine
Electric Motor (if equipped)
Electric power steering
Brake booster
Electric park brake
Automatic transmission gear selector
Horn
Front wiperNOTE:After an accident, remember to cycle the ignition to the
STOP (OFF/LOCK) position and remove the key from the
ignition switch to avoid draining the battery. Carefully
check the vehicle for fuel leaks in the engine compartment
and on the ground near the engine compartment and fuel
tank before resetting the system and starting the engine.
If there are no fuel leaks or damage to the vehicle elec -
trical devices (e.g. headlights) after an accident, reset the
system by following the procedure described below. If you
have any doubt, contact an authorized dealer.
Enhanced Accident Response System
Reset Procedure
In order to reset the Enhanced Accident Response System
functions after an event, the ignition switch must be
changed from ignition START or ON/RUN to ignition OFF.
Carefully check the vehicle for fuel leaks in the engine
compartment and on the ground near the engine
compartment and fuel tank before resetting the system
and starting the engine.
After an accident, if the vehicle will not start after
performing the reset procedure, the vehicle must be
towed to an authorized dealer to be inspected and to have
the Enhanced Accident Response System reset.
Maintaining Your Air Bag System
WARNING!
Deployed air bags and seat belt pretensioners cannot
protect you in another collision. Have the air bags, seat
belt pretensioners, and the seat belt retractor
assemblies replaced by an authorized dealer
immediately. Also, have the Occupant Restraint
Controller System serviced as well.
WARNING!
Modifications to any part of the air bag system could
cause it to fail when you need it. You could be injured
if the air bag system is not there to protect you. Do
not modify the components or wiring, including
adding any kind of badges or stickers to the steering
wheel hub trim cover or the upper passenger side of
the instrument panel. Do not modify the front
bumper, vehicle body structure, or add aftermarket
side steps or running boards.
It is dangerous to try to repair any part of the air bag
system yourself. Be sure to tell anyone who works on
your vehicle that it has an air bag system.6
23_KL_OM_EN_USC_t.book Page 175
Page 210 of 276
208
SERVICING AND MAINTENANCE
SCHEDULED SERVICING
Your vehicle is equipped with an automatic oil change
indicator system. The oil change indicator system will
remind you that it is time to take your vehicle in for
scheduled maintenance.
Based on engine operation conditions, the oil change
indicator message will illuminate. This means that service
is required for your vehicle. Operating conditions such as
frequent short-trips, trailer tow, or extremely hot or cold
ambient temperatures will influence when the “Oil Change
Required” message is displayed. Have your vehicle
serviced as soon as possible, within the next 500 miles
(805 km).An authorized dealer will reset the oil change indicator
message after completing the scheduled oil change. If a
scheduled oil change is performed by someone other than
an authorized dealer, the message can be reset by
referring to the steps described under Instrument Cluster
Display
Úpage 64.
NOTE:Under no circumstances should oil change intervals
exceed 10,000 miles (16,000 km), 12 months or
350 hours of engine run time, whichever comes first. The
350 hours of engine run or idle time is generally only a
concern for fleet customers.
At Every Fuel Stop:
Check engine oil level.
Check windshield washer fluid level.
Check tire pressure and look for unusual wear or
damage. Rotate tires at the first sign of irregular wear,
even if it occurs before the oil indicator system turns
on.
Check the fluid levels of the coolant reservoir and
brake master cylinder; fill as needed.
Check function of all interior and exterior lights.
23_KL_OM_EN_USC_t.book Page 208
Page 227 of 276
SERVICING AND MAINTENANCE225
Make sure that the coolant expansion bottle overflow
hoses are not kinked or obstructed.
Keep the front of the radiator clean. If your vehicle is
equipped with air conditioning, keep the front of the
condenser clean.
Do not change the thermostat for Summer or Winter
operation. If replacement is ever necessary, install
ONLY the correct type thermostat. Other designs may
result in unsatisfactory engine cooling performance,
poor gas mileage, and increased emissions.
BRAKE SYSTEM
In order to ensure brake system performance, all brake
system components should be inspected periodically.
Refer to the Maintenance Plan for the proper
maintenance intervals
Úpage 209.
Fluid Level Check — Brake Master Cylinder
The fluid level of the brake master cylinder should be
checked whenever the vehicle is serviced, or immediately
if the Brake System Warning Light is on. If necessary, add
fluid to bring level within the designated marks on the side
of the reservoir of the brake master cylinder. Be sure to
clean the top of the master cylinder area before removing cap. With disc brakes, fluid level can be expected to fall as
the brake pads wear. Brake fluid level should be checked
when pads are replaced. If the brake fluid is abnormally
low, check the system for leaks. For further information
Úpage 256.
AUTOMATIC TRANSMISSION
Special Additives
It is strongly recommended against using any special
additives in the transmission. Automatic Transmission
Fluid (ATF) is an engineered product and its performance
may be impaired by supplemental additives. Therefore, do
not add any fluid additives to the transmission. Avoid
using transmission sealers as they may adversely affect
seals.
Fluid Level Check
The fluid level is preset at the factory and does not require
adjustment under normal operating conditions. Routine
fluid level checks are not required; therefore the
transmission has no dipstick. An authorized dealer can
check your transmission fluid level using special service
tools. If you notice fluid leakage or transmission
malfunction, visit an authorized dealer immediately to
have the transmission fluid level checked. Operating the
vehicle with an improper fluid level can cause severe
transmission damage.
WARNING!
Riding the brakes can lead to brake failure and possibly
a collision. Driving with your foot resting or riding on the
brake pedal can result in abnormally high brake
temperatures, excessive lining wear, and possible brake
damage. You would not have your full braking capacity
in an emergency.
WARNING!
Use only manufacturer's recommended brake fluid.
For further information Úpage 256. Using the wrong
type of brake fluid can severely damage your brake
system and/or impair its performance. The proper
type of brake fluid for your vehicle is also identified
on the original factory installed hydraulic master
cylinder reservoir.
To avoid contamination from foreign matter or mois -
ture, use only new brake fluid or fluid that has been
in a tightly closed container. Keep the master
cylinder reservoir cap secured at all times. Brake
fluid in a open container absorbs moisture from the
air resulting in a lower boiling point. This may cause
it to boil unexpectedly during hard or prolonged
braking, resulting in sudden brake failure. This could
result in a collision.
Overfilling the brake fluid reservoir can result in
spilling brake fluid on hot engine parts, causing the
brake fluid to catch fire. Brake fluid can also damage
painted and vinyl surfaces, care should be taken to
avoid its contact with these surfaces.
Do not allow petroleum-based fluid to contaminate
the brake fluid. Brake seal components could be
damaged, causing partial or complete brake failure.
This could result in a collision.
CAUTION!
Do not use chemical flushes in your transmission as the
chemicals can damage your transmission components.
Such damage is not covered by the New Vehicle Limited
Warranty.
8
23_KL_OM_EN_USC_t.book Page 225
Page 266 of 276

264
Care And Maintenance ................................................ 250
Cargo Area Cover ............................................................59
Cargo Compartment ....................................................... 59
Cargo Load Floor ............................................................. 59
Cargo Tie-Downs ............................................................. 59
Cellular Phone .............................................................. 140
Center Seat Storage Compartment ...............................50
Certification Label ........................................................ 113
Changing A Flat Tire ..................................................... 191
Chart, Tire Sizing .......................................................... 236
Chassis Fluids And Lubricants .................................... 257
Check Engine Light (Malfunction Indicator Light) .........75
Checking Your Vehicle For Safety ............................... 186
Checks, Safety.............................................................. 186
Child Restraint.............................................................. 176
Child Restraints
Booster Seats.......................................................... 178
How To Stow An Unused ALR Seat Belt................. 183
Infant And Child Restraints .................................... 177Lower Anchors And Tethers For Children .............. 179Older Children And Child Restraints ...................... 177
Seating Positions .................................................... 178
Clean Air Gasoline........................................................ 254
Cleaning Wheels ..................................................................... 245
Climate Control ............................................................... 45
Cold Weather Operation .................................................77
Compact Spare Tire ..................................................... 245
Console Storage ....................................................................... 50
Contract, Service .......................................................... 260
Cooling Pressure Cap (Radiator Cap) ......................... 224
Cooling System............................................................. 222 Adding Coolant (Antifreeze) ................................... 223Coolant Level .......................................................... 224 Cooling Capacity ...................................................... 256
Disposal Of Used Coolant ....................................... 224
Drain, Flush, And Refill............................................223
Inspection ...................................................... 223
, 224
Points To Remember............................................... 224
Pressure Cap ...........................................................224
Radiator Cap ............................................................224 Selection Of Coolant (Antifreeze) ...........................223
Corrosion Protection ..................................................... 250
Cruise Control (Speed Control) ...................................... 90 Cruise Light .............................................................. 74
, 75
Customer Assistance ....................................................258
Cybersecurity ................................................................ 126
DDaytime Running Lights ................................................. 40
Defroster, Windshield ...................................................187
De-Icer, Remote Start ..................................................... 19 Diagnostic System, Onboard.......................................... 75
Dipsticks Oil (Engine)............................................................... 214
Disable Vehicle Towing................................................. 205
Disposal Antifreeze (Engine Coolant) ....................................224
Door Ajar.......................................................................... 69 Door Ajar Light ................................................................ 69
Door Locks Automatic ............................................................ 23
, 24
Doors ............................................................................... 20
Driver Memory Settings .................................................. 26
Driver’s Seat Back Tilt .................................................... 28 Driving ...........................................................................123
EEasy Entry Seats ............................................................. 31
Electric Brake Control System ..................................... 143 Anti-Lock Brake System .......................................... 143Electronic Roll Mitigation ...............................144
, 150
Electric Parking Brake.................................................... 78
Electrical Power Outlets ................................................. 51 Electronic Stability Control (ESC) ................................ 145
Electronic Throttle Control Warning Light ..................... 69
Emergency SOS Emergency Call................................................ 189
Emergency Gas Can Refueling .................................... 202
Emergency, In Case Of Gear Selector Override ........................................... 203
Hazard Warning Flasher ......................................... 189Jacking ..................................................................... 191Jump Starting .......................................................... 200
Tow Hooks ............................................................... 206
Emission Control System Maintenance ........................ 75
Engine ..................................................................212
, 213
Air Cleaner ............................................................... 216 Break-In Recommendations..................................... 78
Checking Oil Level ................................................... 214
Cooling ..................................................................... 222 Exhaust Gas Caution............................................... 188
Fails To Start ............................................................. 78
Flooded, Starting....................................................... 78
Fuel Requirements.................................................. 254
Jump Starting .......................................................... 200
Oil ............................................................................. 215 Oil Filler Cap ...................................................212
, 213
Oil Filter.................................................................... 216
Oil Reset .................................................................... 64
23_KL_OM_EN_USC_t.book Page 264
Page 268 of 276

266
Engine Oil Reset.........................................................64
Menu Items .........................................................64, 67
Instrument Panel Lens Cleaning ................................. 251
Interior Appearance Care ............................................ 251
Interior Lights ..................................................................42
Inverter Power ..........................................................................52
JJack Location................................................................ 191
Jack Operation ............................................................. 191
Jacking And Tire Changing .......................................... 191
Jump Starting ............................................................... 200
KKey FobArm The System .........................................................20
Disarm The System....................................................20
Key Fob Battery Service (Remote Keyless Entry) .........14
Key Fob Programming (Remote Keyless Entry) ............ 15
Keyless Enter 'n Go™ ...................................................... 22 Passive Entry .............................................................. 22
Keys .................................................................................13 Replacement .............................................................. 15
LLane Change Assist ........................................................42
LaneSense.................................................................... 109
Lap/Shoulder Belts ...................................................... 160
Latches ......................................................................... 188 Hood ...........................................................................56
Leaks, Fluid .................................................................. 188
Life Of Tires .................................................................. 243 Liftgate ............................................................................ 57
Closing........................................................................ 58
Hands-Free ................................................................ 58
Opening ...................................................................... 57
Light Bulbs ....................................................................188
Lights .............................................................................188 Air Bag ..................................................... 68
, 166, 187
Automatic Headlights ................................................ 40
Automatic High Beam ............................................... 40
Brake Assist Warning .............................................. 146 Brake Warning ........................................................... 68
Bulb Replacement...................................................233
Cruise .................................................................. 74
, 75
Daytime Running ....................................................... 40
Engine Temperature Warning................................... 69
Exterior ..............................................................39
, 188
Fog....................................................................... 41, 74
High Beam ................................................... 39, 40, 75
High Beam/Low Beam Select .................................. 40
Hill Descent Control Indicator................................. 146
Illuminated Entry ....................................................... 43
Intensity Control ........................................................ 42
Interior........................................................................ 42
LaneSense .......................................................... 71
, 74
Lights On Reminder................................................... 41
Low Fuel ..................................................................... 71
Malfunction Indicator (Check Engine)...................... 71
Park ............................................................................ 74
Passing....................................................................... 40
Seat Belt Reminder ................................................... 68
Security Alarm............................................................ 70
Service .....................................................................233
Tire Pressure Monitoring (TPMS).....................72
, 155
Traction Control ....................................................... 146 Turn Signals............................................... 42
, 74, 188
Vanity Mirror .............................................................. 34
Load Shed Battery Saver Mode..................................... 67
Load Shed Battery Saver On ......................................... 67 Load Shed Electrical Load Reduction ........................... 67Load Shed Intelligent Battery Sensor ........................... 67Loading Vehicle ............................................................ 113 Tires ......................................................................... 238
Locks Automatic Door .................................................. 23
, 24
Child Protection ......................................................... 24
Power Door ................................................................ 21
Low Tire Pressure System............................................ 155
Lubrication, Body.......................................................... 219
Lug Nuts/Bolts ............................................................. 253
Luggage Carrier .............................................................. 60
MMaintenance................................................................... 56
Maintenance Free Battery ........................................... 214
Maintenance Schedule ................................................ 208
Malfunction Indicator Light (Check Engine) .......... 71
, 75
Manual Service ..................................................................... 261
Media Hub ...................................................................... 50 Memory Feature (Memory Seats).................................. 26Methanol ....................................................................... 254
Mirrors ............................................................................. 34 Heated ....................................................................... 35
Outside....................................................................... 34
Power ......................................................................... 35
Rearview ........................................................... 34
, 189
Vanity ......................................................................... 34
23_KL_OM_EN_USC_t.book Page 266