sport mode JEEP CHEROKEE 2023 Owners Manual
[x] Cancel search | Manufacturer: JEEP, Model Year: 2023, Model line: CHEROKEE, Model: JEEP CHEROKEE 2023Pages: 276, PDF Size: 12.55 MB
Page 6 of 276
4
CRUISE CONTROL SYSTEMS — IF EQUIPPED .................90
Cruise Control.............................................................. 90
Adaptive Cruise Control (ACC) ................................... 92
PARKSENSE FRONT/REAR PARK ASSIST
SYSTEM — IF EQUIPPED.....................................................99 ParkSense Sensors ................................................... 100
ParkSense Display .................................................... 100
ParkSense Warning Display ..................................... 103
Enabling And Disabling ParkSense.......................... 103Service The ParkSense Park Assist System ............ 103Cleaning The ParkSense System ............................. 103
ParkSense System Usage Precautions ................... 103Side Distance Warning System ................................ 104
PARKSENSE ACTIVE PARK ASSIST
SYSTEM — IF EQUIPPED.................................................. 106 Enabling And Disabling The ParkSense Active
Park Assist System.................................................... 106
Parallel/Perpendicular Parking Space Assistance
Operation ................................................................... 107
Exiting The Parking Space ........................................ 109
LANESENSE — IF EQUIPPED .......................................... 109 LaneSense Operation ............................................... 109Turning LaneSense On Or Off................................... 110
LaneSense Warning Message.................................. 110Changing LaneSense Settings ................................. 112
PARKVIEW REAR BACK UP CAMERA ........................... 112
REFUELING THE VEHICLE .............................................. 113
VEHICLE LOADING ........................................................... 113 Certification Label ..................................................... 113 TRAILER TOWING ............................................................ 114
Common Towing Definitions .................................... 114Trailer Hitch Classification ....................................... 116
Trailer Towing Weights (Maximum Trailer Weight
Ratings) ..................................................................... 116
Trailer And Tongue Weight ...................................... 117
Towing Requirements............................................... 117
Towing Tips ............................................................... 119
RECREATIONAL TOWING (BEHIND MOTORHOME) .... 120 Towing This Vehicle Behind Another Vehicle .......... 120
Recreational Towing — Front-Wheel Drive (FWD)
Models ....................................................................... 121Recreational Towing — 4x4 Models With 1-Speed
Power Transfer Unit .................................................. 121Recreational Towing — 4x4 Models With 2-Speed
Power Transfer Unit .................................................. 121
DRIVING TIPS ................................................................... 123 On-Road Driving Tips ................................................ 123
Off-Road Driving Tips ................................................ 123
MULTIMEDIA
UCONNECT SYSTEMS ..................................................... 126
CYBERSECURITY ............................................................. 126
UCONNECT SETTINGS ..................................................... 126 Customer Programmable Features ......................... 127
STEERING WHEEL AUDIO CONTROLS —
IF EQUIPPED ..................................................................... 140 Radio Operation ........................................................ 140Media Mode .............................................................. 140
RADIO OPERATION AND MOBILE PHONES.................. 140 Regulatory And Safety Information.......................... 140 OFF-ROAD PAGES — IF EQUIPPED .................................141
Off-Road Pages Status Bar ...................................... 141Drivetrain .................................................................. 141
Pitch & Roll ............................................................... 142
Accessory Gauges .................................................... 142
Selec-Terrain — If Equipped ..................................... 142
SAFETY
SAFETY FEATURES ...........................................................143 Anti-Lock Brake System (ABS) ................................. 143
Electronic Brake Control (EBC) System ................... 143
AUXILIARY DRIVING SYSTEMS .......................................150 Blind Spot Monitoring (BSM) — If Equipped ............ 150
Forward Collision Warning (FCW) With
Mitigation — If Equipped ........................................... 154
Tire Pressure Monitoring System (TPMS) ................ 155
OCCUPANT RESTRAINT SYSTEMS ................................159 Occupant Restraint Systems Features ................... 159
Important Safety Precautions................................... 159
Seat Belt Systems .................................................... 159
Supplemental Restraint Systems (SRS) .................. 166Child Restraints ......................................................... 176
SAFETY TIPS......................................................................186 Transporting Passengers .......................................... 186
Transporting Pets ...................................................... 186Connected Vehicles................................................... 186
Safety Checks You Should Make Inside The
Vehicle ....................................................................... 187
Periodic Safety Checks You Should Make
Outside The Vehicle .................................................. 188
Exhaust Gas ............................................................... 188
Carbon Monoxide Warnings ..................................... 188
23_KL_OM_EN_USC_t.book Page 4
Page 7 of 276
5
IN CASE OF EMERGENCY
HAZARD WARNING FLASHERS ..................................... 189
SOS AND ASSIST MIRROR ............................................. 189
JACKING AND TIRE CHANGING ..................................... 191 Preparations For Jacking .......................................... 192
Jack Location/Spare Tire Stowage .......................... 192Jacking Instructions .................................................. 193
TIRE SERVICE KIT — IF EQUIPPED ................................. 196 Tire Service Kit Storage ............................................ 196
Tire Service Kit Components And Operation ........... 196Tire Service Kit Usage Precautions ......................... 197Sealing A Tire With Tire Service Kit .......................... 198
JUMP STARTING ............................................................... 200 Preparations For Jump Start .................................... 200
Jump Starting Procedure .......................................... 201
REFUELING IN EMERGENCY – IF EQUIPPED ............... 202
IF YOUR ENGINE OVERHEATS ....................................... 203
GEAR SELECTOR OVERRIDE .......................................... 203
FREEING A STUCK VEHICLE ........................................... 204
TOWING A DISABLED VEHICLE ...................................... 205 Front-Wheel Drive (FWD) Models ............................. 206
4x4 Models With 1–Speed Power Transfer Unit..... 2064x4 Models With 2–Speed Power Transfer Unit..... 206Emergency Tow Hooks — If Equipped ..................... 206
Recovery Strap — If Equipped .................................. 207
ENHANCED ACCIDENT RESPONSE SYSTEM (EARS) .. 207
EVENT DATA RECORDER (EDR) ..................................... 207
SERVICING AND MAINTENANCE
SCHEDULED SERVICING ................................................ 208 Maintenance Plan ..................................................... 209 ENGINE COMPARTMENT ................................................ 212
2.0L Engine .............................................................. 212
2.4L Engine .............................................................. 213
Checking Oil Level .................................................... 214
Adding Washer Fluid ................................................ 214
Maintenance-Free Battery ...................................... 214
Pressure Washing ..................................................... 215
VEHICLE MAINTENANCE ................................................. 215 Engine Oil ................................................................. 215Engine Oil Filter ......................................................... 216Engine Air Cleaner Filter ........................................... 216Accessory Drive Belt Inspection............................... 217
Air Conditioner Maintenance ................................... 217Body Lubrication ....................................................... 219
Windshield Wiper Blades ........................................ 219
Exhaust System ....................................................... 222
Cooling System ......................................................... 222Brake System ........................................................... 225
Automatic Transmission........................................... 225Fuses ......................................................................... 226
Bulb Replacement ................................................... 233
TIRES ................................................................................ 235 Tire Safety Information ............................................. 235
Tires — General Information..................................... 241
Tire Types .................................................................. 244
Spare Tires — If Equipped ....................................... 244
Wheel And Wheel Trim Care .................................... 245Snow Traction Devices ............................................ 246
Tire Rotation Recommendations ............................. 248
DEPARTMENT OF TRANSPORTATION UNIFORM
TIRE QUALITY GRADES .................................................. 249 Treadwear ................................................................. 249Traction Grades ........................................................ 249Temperature Grades ................................................ 249 STORING THE VEHICLE ....................................................250
BODYWORK ......................................................................250
Protection From Atmospheric Agents ...................... 250
Body And Underbody Maintenance.......................... 250
Preserving The Bodywork ......................................... 250
INTERIORS ........................................................................ 251 Seats And Fabric Parts.............................................. 251Plastic And Coated Parts .......................................... 251
Leather Surfaces ....................................................... 252
Glass Surfaces .......................................................... 252
TECHNICAL SPECIFICATIONS
VEHICLE IDENTIFICATION NUMBER (VIN) ..................... 253
BRAKE SYSTEM ................................................................ 253
WHEEL AND TIRE TORQUE SPECIFICATIONS ...............253 Torque Specifications ............................................... 253
FUEL REQUIREMENTS......................................................254 2.0L Engine................................................................ 254
2.4L Engine................................................................ 254
Reformulated Gasoline ............................................. 254Gasoline/Oxygenate Blends ..................................... 254
Do Not Use E-85 In Non-Flex Fuel Vehicles ............. 255
CNG And LP Fuel System Modifications .................. 255Methylcyclopentadienyl Manganese Tricarbonyl
(MMT) In Gasoline ..................................................... 255Materials Added To Fuel ........................................... 255
Fuel System Cautions ............................................... 255
FLUID CAPACITIES............................................................256
ENGINE FLUIDS AND LUBRICANTS ................................256
CHASSIS FLUIDS AND LUBRICANTS ..............................257
23_KL_OM_EN_USC_t.book Page 5
Page 86 of 276
84STARTING AND OPERATING
DRIVE (D)
This range should be used for most city and highway
driving. It provides the smoothest upshifts and downshifts,
and the best fuel economy. The transmission
automatically upshifts through all forward gears.
When frequent transmission shifting occurs (such as
when operating the vehicle under heavy loading
conditions, in hilly terrain, traveling into strong head
winds, or while towing a heavy trailer), use the AutoStick
shift control to select a lower gear
Úpage 84. Under
these conditions, using a lower gear will improve
performance and extend transmission life by reducing
excessive shifting and heat buildup.
If the transmission temperature exceeds normal operating
limits, the transmission controller may modify the
transmission shift schedule, reduce engine torque, and/or
expand the range of torque converter clutch engagement.
This is done to prevent transmission damage due to
overheating.
If the transmission becomes extremely hot, the
Transmission Temperature Warning Light may illuminate,
and the transmission may operate differently until the
transmission cools down.
During cold temperatures, transmission operation may be
modified depending on engine and transmission
temperature as well as vehicle speed. This feature
improves warm-up time of the engine and transmission to
achieve maximum efficiency. Engagement of the torque
converter clutch, and shifts into EIGHTH or NINTH gear,
are inhibited until the transmission fluid is warm
Úpage 85. Normal operation will resume once the
transmission temperature has risen to a suitable level.
SPORT — If Equipped
This mode alters the transmission's automatic shift
schedule for sportier driving. Upshift speeds are increased
to make full use of available engine power.
SPORT mode is activated using the rotary switch on the
center console
Úpage 88.
Transmission Limp Home Mode
Transmission function is monitored electronically for
abnormal conditions. If a condition is detected that could
result in transmission damage, Transmission Limp Home
mode is activated. In this mode, the transmission may
operate only in a fixed gear, or may remain in NEUTRAL.
The Malfunction Indicator Light (MIL) may be illuminated.
Limp Home mode may allow the vehicle to be driven to an
authorized dealer for service without damaging the
transmission.
In the event of a momentary problem, the transmission
can be reset to regain all forward gears by performing the
following steps:
1. Stop the vehicle.
2. Shift the transmission into PARK.
3. Turn the ignition to the OFF position.
4. Wait approximately 10 seconds.
5. Restart the engine.
6. Shift into the desired gear range. If the problem is no longer detected, the transmission will return to
normal operation.
NOTE:Even if the transmission can be reset, we recommend that
you visit an authorized dealer at your earliest possible convenience. An authorized dealer has diagnostic
equipment to assess the condition of your transmission. If
the transmission cannot be reset, authorized dealer
service is required.
AutoStick
AutoStick is a driver interactive transmission feature
providing manual shift control, giving you more control of
the vehicle. AutoStick allows you to maximize engine
braking, eliminate undesirable upshifts and downshifts,
and improve overall vehicle performance. This feature can
also provide you with more control during passing, city
driving, cold slippery conditions, mountain driving, trailer
towing and many other situations.
Operation
When the gear selector is in the AutoStick position (beside
the DRIVE position), it can be moved forward and
rearward. This allows the driver to manually select the
transmission gear being used. Moving the gear selector
forward (-) triggers a downshift, and rearward (+) an
upshift. The current gear is displayed in the instrument
cluster.
NOTE:
In AutoStick mode, the transmission will only shift up or
down when the driver moves the gear selector rearward (+)
or forward (-), except as follows:
The transmission will automatically upshift when
necessary to prevent engine overspeed.
The transmission will automatically downshift as the
vehicle slows (to prevent engine lugging) and will
display the current gear.
23_KL_OM_EN_USC_t.book Page 84
Page 90 of 276
88STARTING AND OPERATING
SELEC-TERRAIN
DESCRIPTION
Selec-Terrain allows the driver to specify the driving
surface to allow the vehicle systems to provide the best
performance possible across a wide range of conditions.
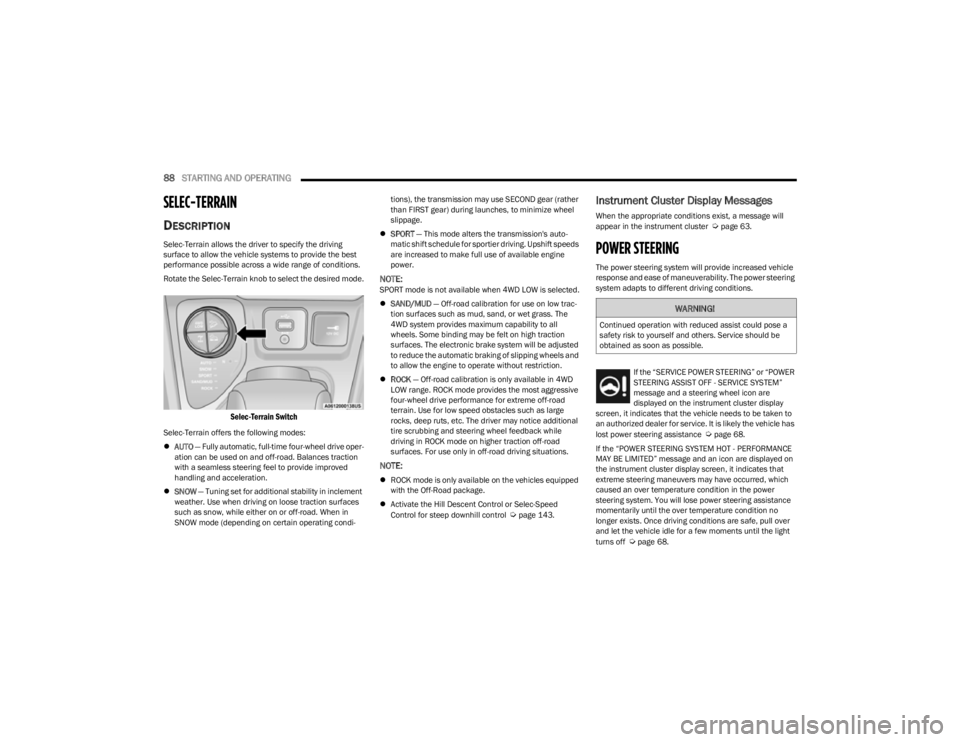
Rotate the Selec-Terrain knob to select the desired mode.
Selec-Terrain Switch
Selec-Terrain offers the following modes:
AUTO — Fully automatic, full-time four-wheel drive oper -
ation can be used on and off-road. Balances traction
with a seamless steering feel to provide improved
handling and acceleration.
SNOW — Tuning set for additional stability in inclement
weather. Use when driving on loose traction surfaces
such as snow, while either on or off-road. When in
SNOW mode (depending on certain operating condi -tions), the transmission may use SECOND gear (rather
than FIRST gear) during launches, to minimize wheel
slippage.
SPORT — This mode alters the transmission's auto -
matic shift schedule for sportier driving. Upshift speeds
are increased to make full use of available engine
power.
NOTE:SPORT mode is not available when 4WD LOW is selected.
SAND/MUD — Off-road calibration for use on low trac -
tion surfaces such as mud, sand, or wet grass. The
4WD system provides maximum capability to all
wheels. Some binding may be felt on high traction
surfaces. The electronic brake system will be adjusted
to reduce the automatic braking of slipping wheels and
to allow the engine to operate without restriction.
ROCK — Off-road calibration is only available in 4WD
LOW range. ROCK mode provides the most aggressive
four-wheel drive performance for extreme off-road
terrain. Use for low speed obstacles such as large
rocks, deep ruts, etc. The driver may notice additional
tire scrubbing and steering wheel feedback while
driving in ROCK mode on higher traction off-road
surfaces. For use only in off-road driving situations.
NOTE:
ROCK mode is only available on the vehicles equipped
with the Off-Road package.
Activate the Hill Descent Control or Selec-Speed
Control for steep downhill control
Úpage 143.
Instrument Cluster Display Messages
When the appropriate conditions exist, a message will
appear in the instrument cluster Úpage 63.
POWER STEERING
The power steering system will provide increased vehicle
response and ease of maneuverability. The power steering
system adapts to different driving conditions.
If the “SERVICE POWER STEERING” or “POWER
STEERING ASSIST OFF - SERVICE SYSTEM”
message and a steering wheel icon are
displayed on the instrument cluster display
screen, it indicates that the vehicle needs to be taken to
an authorized dealer for service. It is likely the vehicle has
lost power steering assistance
Úpage 68.
If the “POWER STEERING SYSTEM HOT - PERFORMANCE
MAY BE LIMITED” message and an icon are displayed on
the instrument cluster display screen, it indicates that
extreme steering maneuvers may have occurred, which
caused an over temperature condition in the power
steering system. You will lose power steering assistance
momentarily until the over temperature condition no
longer exists. Once driving conditions are safe, pull over
and let the vehicle idle for a few moments until the light
turns off
Úpage 68.
WARNING!
Continued operation with reduced assist could pose a
safety risk to yourself and others. Service should be
obtained as soon as possible.
23_KL_OM_EN_USC_t.book Page 88
Page 153 of 276
SAFETY151
When the vehicle is started, the BSM Warning Light will
momentarily illuminate in both outside rearview mirrors to
let the driver know that the system is operational. The
BSM system sensors operate when the vehicle is in any
forward gear and enters standby mode when the vehicle is
in PARK (P).
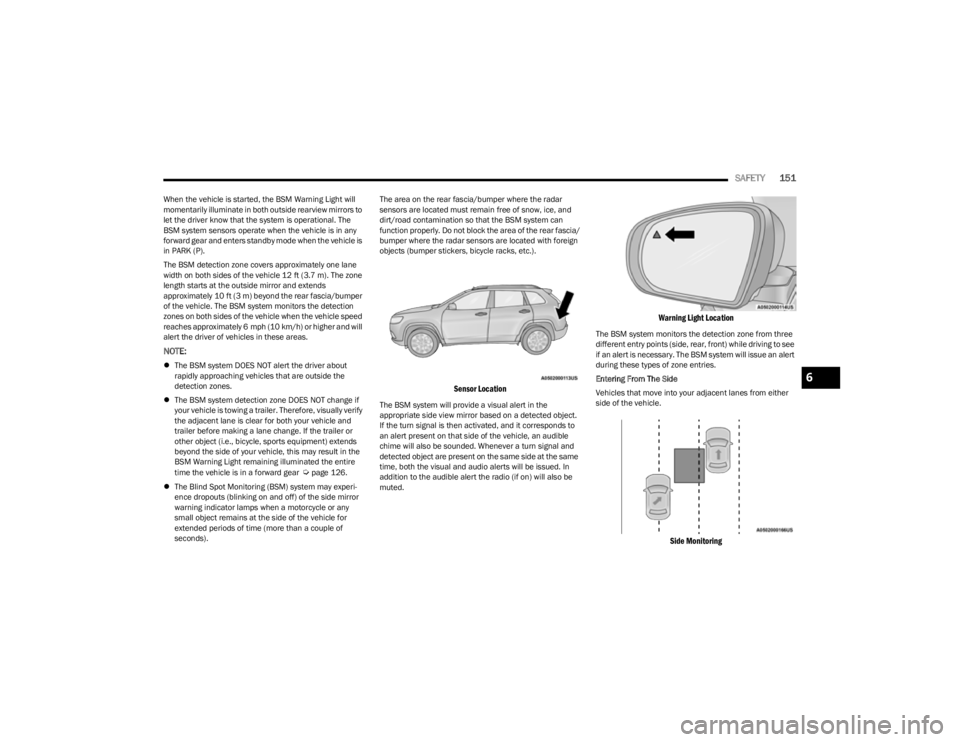
The BSM detection zone covers approximately one lane
width on both sides of the vehicle 12 ft (3.7 m). The zone
length starts at the outside mirror and extends
approximately 10 ft (3 m) beyond the rear fascia/bumper
of the vehicle. The BSM system monitors the detection
zones on both sides of the vehicle when the vehicle speed
reaches approximately 6 mph (10 km/h) or higher and will
alert the driver of vehicles in these areas.
NOTE:
The BSM system DOES NOT alert the driver about
rapidly approaching vehicles that are outside the
detection zones.
The BSM system detection zone DOES NOT change if
your vehicle is towing a trailer. Therefore, visually verify
the adjacent lane is clear for both your vehicle and
trailer before making a lane change. If the trailer or
other object (i.e., bicycle, sports equipment) extends
beyond the side of your vehicle, this may result in the
BSM Warning Light remaining illuminated the entire
time the vehicle is in a forward gear
Úpage 126.
The Blind Spot Monitoring (BSM) system may experi -
ence dropouts (blinking on and off) of the side mirror
warning indicator lamps when a motorcycle or any
small object remains at the side of the vehicle for
extended periods of time (more than a couple of
seconds). The area on the rear fascia/bumper where the radar
sensors are located must remain free of snow, ice, and
dirt/road contamination so that the BSM system can
function properly. Do not block the area of the rear fascia/
bumper where the radar sensors are located with foreign
objects (bumper stickers, bicycle racks, etc.).
Sensor Location
The BSM system will provide a visual alert in the
appropriate side view mirror based on a detected object.
If the turn signal is then activated, and it corresponds to
an alert present on that side of the vehicle, an audible
chime will also be sounded. Whenever a turn signal and
detected object are present on the same side at the same
time, both the visual and audio alerts will be issued. In
addition to the audible alert the radio (if on) will also be
muted.
Warning Light Location
The BSM system monitors the detection zone from three
different entry points (side, rear, front) while driving to see
if an alert is necessary. The BSM system will issue an alert
during these types of zone entries.
Entering From The Side
Vehicles that move into your adjacent lanes from either
side of the vehicle.
Side Monitoring
6
23_KL_OM_EN_USC_t.book Page 151
Page 161 of 276
SAFETY159
(Continued)
OCCUPANT RESTRAINT SYSTEMS
Some of the most important safety features in your vehicle
are the restraint systems:
OCCUPANT RESTRAINT SYSTEMS
F
EATURES
Seat Belt Systems
Supplemental Restraint Systems (SRS) Air Bags
Child Restraints
Some of the safety features described in this section may
be standard equipment on some models, or may be
optional equipment on others. If you are not sure, ask an
authorized dealer.
IMPORTANT SAFETY PRECAUTIONS
Please pay close attention to the information in this
section. It tells you how to use your restraint system
properly, to keep you and your passengers as safe as
possible.
Here are some simple steps you can take to minimize the
risk of harm from a deploying air bag:
1. Children 12 years old and under should always ride buckled up in the rear seat of a vehicle with a rear
seat.
2. A child who is not big enough to wear the vehicle seat belt properly must be secured in the appropriate child
restraint or belt-positioning booster seat in a rear
seating position
Úpage 176. 3. If a child from 2 to 12 years old (not in a rear-facing
child restraint) must ride in the front passenger seat,
move the seat as far back as possible and use the
proper child restraint
Úpage 176.
4. Never allow children to slide the shoulder belt behind them or under their arm.
5. You should read the instructions provided with your child restraint to make sure that you are using it
properly.
6. All occupants should always wear their lap and shoulder belts properly.
7. The driver and front passenger seats should be moved back as far as practical to allow the front air
bags room to inflate.
8. Do not lean against the door or window. If your vehicle has side air bags, and deployment occurs, the side air
bags will inflate forcefully into the space between
occupants and the door and occupants could be
injured.
9. If the air bag system in this vehicle needs to be modified to accommodate a disabled person, see
Úpage 258 for customer service contact
information.
SEAT BELT SYSTEMS
Buckle up even though you are an excellent driver, even
on short trips. Someone on the road may be a poor driver
and could cause a collision that includes you. This can
happen far away from home or on your own street.
Research has shown that seat belts save lives, and they
can reduce the seriousness of injuries in a collision. Some
of the worst injuries happen when people are thrown from
the vehicle. Seat belts reduce the possibility of ejection
and the risk of injury caused by striking the inside of the
vehicle. Everyone in a motor vehicle should be belted at all
times.
Enhanced Seat Belt Use Reminder System
(BeltAlert)
Driver And Passenger BeltAlert — If Equipped
BeltAlert is a feature intended to remind the
driver and outboard front seat passenger (if
equipped with outboard front passenger seat
BeltAlert) to buckle their seat belts. The
BeltAlert feature is active whenever the ignition switch is
in the START or ON/RUN position.WARNING!
Never place a rear-facing child restraint in front of an
air bag. A deploying passenger front air bag can
cause death or serious injury to a child 12 years or
younger, including a child in a rear-facing child
restraint.
Never install a rear-facing child restraint in the front
seat of a vehicle. Only use a rear-facing child
restraint in the rear seat. If the vehicle does not have
a rear seat, do not transport a rear-facing child
restraint in that vehicle.
WARNING!
6
23_KL_OM_EN_USC_t.book Page 159
Page 168 of 276
166SAFETY
webbing necessary to comfortably wrap around the
occupant’s mid-section. Slide the latch plate into the
buckle until you hear a "click."
In Automatic Locking Mode, the shoulder belt is
automatically pre-locked. The seat belt will still retract to
remove any slack in the shoulder belt. Use the Automatic
Locking Mode anytime a child restraint is installed in a
seating position that has a seat belt with this feature.
Children 12 years old and under should always be properly
restrained in the rear seat of a vehicle with a rear seat.
How To Engage The Automatic Locking Mode
1. Buckle the combination lap and shoulder belt.
2. Grab the shoulder portion and pull downward until
the entire seat belt is extracted.
3. Allow the seat belt to retract. As the seat belt retracts, you will hear a clicking sound. This indicates the seat
belt is now in the Automatic Locking Mode. How To Disengage The Automatic Locking Mode
Unbuckle the combination lap/shoulder belt and allow it
to retract completely to disengage the Automatic Locking
Mode and activate the vehicle sensitive (emergency)
locking mode.
SUPPLEMENTAL RESTRAINT SYSTEMS
(SRS)
Some of the safety features described in this section may
be standard equipment on some models, or may be
optional equipment on others. If you are not sure, ask an
authorized dealer. The air bag system must be ready to protect you in a
collision. The Occupant Restraint Controller (ORC)
monitors the internal circuits and interconnecting wiring
associated with the electrical Air Bag System
Components. Your vehicle may be equipped with the
following Air Bag System Components:
Air Bag System Components
Occupant Restraint Controller (ORC)
Air Bag Warning Light
Steering Wheel and Column
Instrument Panel
Knee Impact Bolsters
Driver and Front Passenger Air Bags
Seat Belt Buckle Switch
Supplemental Side Air Bags
Supplemental Knee Air Bags
Front and Side Impact Sensors
Seat Belt Pretensioners
Seat Track Position Sensors
Occupant Classification System
Air Bag Warning Light
The Occupant Restraint Controller (ORC)
monitors the readiness of the electronic parts
of the air bag system whenever the ignition
switch is in the START or ON/RUN position. If
the ignition switch is in the OFF position or in the ACC
position, the air bag system is not on and the air bags will
not inflate.
WARNING!
Never place a rear-facing child restraint in front of an
air bag. A deploying passenger front air bag can
cause death or serious injury to a child 12 years or
younger, including a child in a rear-facing child
restraint.
Never install a rear-facing child restraint in the front
seat of a vehicle. Only use a rear-facing child
restraint in the rear seat. If the vehicle does not have
a rear seat, do not transport a rear-facing child
restraint in that vehicle.
WARNING!
The seat belt assembly must be replaced if the
switchable Automatic Locking Retractor (ALR)
feature or any other seat belt function is not working
properly when checked according to the procedures
in the Service Manual.
Failure to replace the seat belt assembly could
increase the risk of injury in collisions.
Do not use the Automatic Locking Mode to restrain
occupants who are wearing the seat belt or children
who are using booster seats. The locked mode is only
used to install rear-facing or forward-facing child
restraints that have a harness for restraining the
child.
23_KL_OM_EN_USC_t.book Page 166
Page 199 of 276
IN CASE OF EMERGENCY197
(Continued)
Using The Mode Select Knob And Hoses
Your Tire Service Kit is equipped with the following
symbols to indicate the air or sealant mode.
Selecting Air Mode
Push in the Mode Select Knob and turn to this
position for air pump operation only. Use the
Black Air Pump Hose when selecting this mode.
Selecting Sealant Mode
Push in the Mode Select Knob and turn to this
position to inject the Tire Service Kit Sealant
and to inflate the tire. Use the Sealant Hose
(clear hose) when selecting this mode.
Using The Power Button
Push and release the Power Button once to
turn on the Tire Service Kit. Push and release
the Power Button again to turn Off the Tire
Service Kit.
Using The Deflation Button
Push the Deflation Button to reduce the air
pressure in the tire if it becomes overinflated.
TIRE SERVICE KIT USAGE PRECAUTIONS
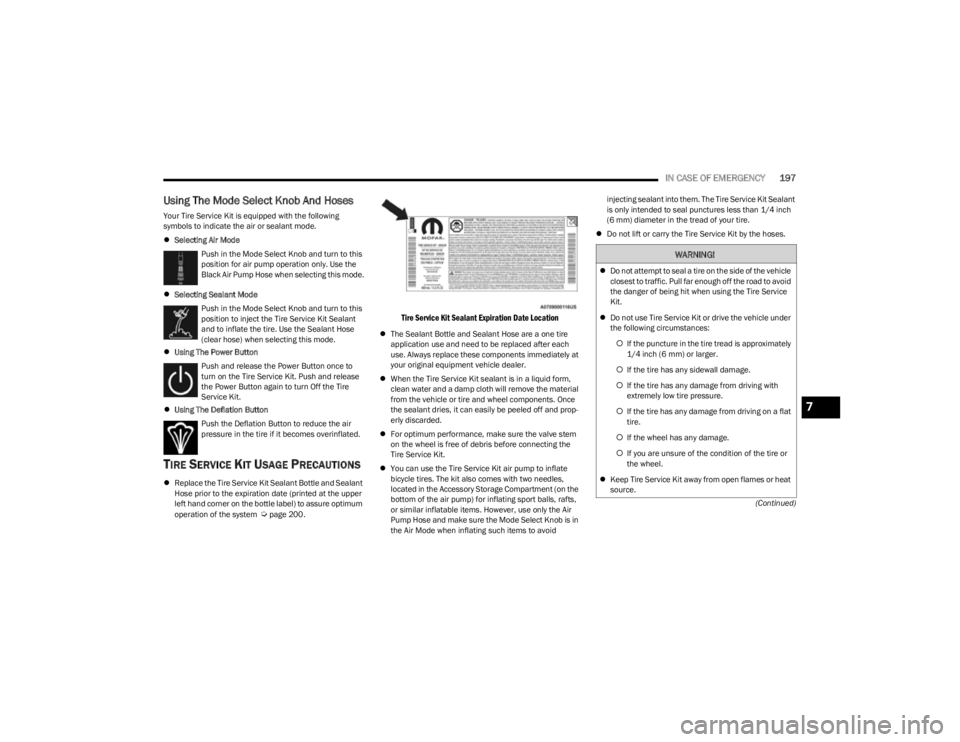
Replace the Tire Service Kit Sealant Bottle and Sealant
Hose prior to the expiration date (printed at the upper
left hand corner on the bottle label) to assure optimum
operation of the system
Úpage 200.
Tire Service Kit Sealant Expiration Date Location
The Sealant Bottle and Sealant Hose are a one tire
application use and need to be replaced after each
use. Always replace these components immediately at
your original equipment vehicle dealer.
When the Tire Service Kit sealant is in a liquid form,
clean water and a damp cloth will remove the material
from the vehicle or tire and wheel components. Once
the sealant dries, it can easily be peeled off and prop -
erly discarded.
For optimum performance, make sure the valve stem
on the wheel is free of debris before connecting the
Tire Service Kit.
You can use the Tire Service Kit air pump to inflate
bicycle tires. The kit also comes with two needles,
located in the Accessory Storage Compartment (on the
bottom of the air pump) for inflating sport balls, rafts,
or similar inflatable items. However, use only the Air
Pump Hose and make sure the Mode Select Knob is in
the Air Mode when inflating such items to avoid injecting sealant into them. The Tire Service Kit Sealant
is only intended to seal punctures less than 1/4 inch
(6 mm) diameter in the tread of your tire.
Do not lift or carry the Tire Service Kit by the hoses.
WARNING!
Do not attempt to seal a tire on the side of the vehicle
closest to traffic. Pull far enough off the road to avoid
the danger of being hit when using the Tire Service
Kit.
Do not use Tire Service Kit or drive the vehicle under
the following circumstances:
If the puncture in the tire tread is approximately
1/4 inch (6 mm) or larger.
If the tire has any sidewall damage.
If the tire has any damage from driving with
extremely low tire pressure.
If the tire has any damage from driving on a flat
tire.
If the wheel has any damage.
If you are unsure of the condition of the tire or
the wheel.
Keep Tire Service Kit away from open flames or heat
source.
7
23_KL_OM_EN_USC_t.book Page 197