compression ratio JEEP CJ 1953 User Guide
[x] Cancel search | Manufacturer: JEEP, Model Year: 1953, Model line: CJ, Model: JEEP CJ 1953Pages: 376, PDF Size: 19.96 MB
Page 88 of 376
Pi
DAUNTLESS
¥-6
ENGINE
which
would cause rings to seat improperly or have
excessive clearance in
ring
grooves. Damaged or
faulty
pistons should be replaced,
c.
Inspect bearing surfaces of piston pins and check
for
wear by measuring worn and unworn surfaces
with
a micrometer. Rough or worn pins should be
replaced.
Test fit the piston pins in piston
bosses.
Occasionally,
a pin
will
be tight due to gum or
varnish
deposits.
This
may be corrected by remov
ing
the deposit with a suitable solvent. If piston
bosses
are worn out-of-round or oversize, the piston
and
pin assembly must be replaced. Oversize pins
are
not
practical,
since the pin must be a press fit
in
the connecting rod bore. Piston pins must fit the
piston with an easy finger push at
70°F.
[21°C.].
They
should have .0004" to .0007"
[0,0178
a
0,0102
mm.] clearance.
Dl-46.
Piston Fitting
If
cylinder bores are rebored or heavily honed,
new and possibly oversize diameter pistons must be
installed.
A new piston must be fitted to its cylinder
bore.
A satisfactory method of fitting pistons is as
follows.
a.
Expand
a
telescope
gauge
to fit the cylinder bore at right angles to the piston pin and
between
1
Vi"
to 2" [3,7 a 5,1 cm.] from the top.
b.
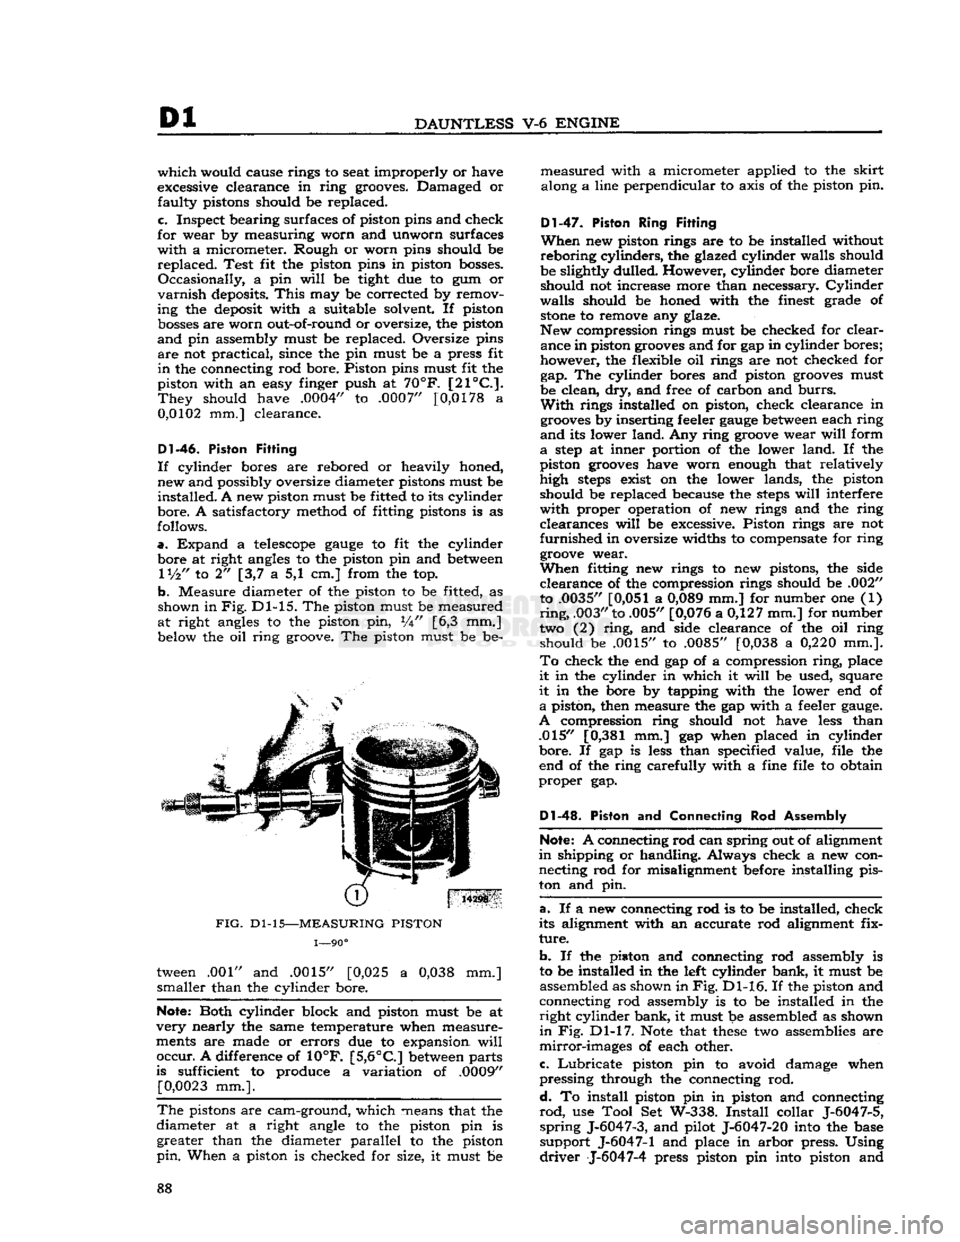
Measure diameter of the piston to be fitted, as
shown in
Fig.
Dl-15. The piston must be measured
at
right angles to the piston pin, W [6,3 mm.] below the oil
ring
groove. The piston must be be-
FIG.
Dl-15—MEASURING
PISTON
1—90°
tween .001" and .0015" [0,025 a
0,038
mm.]
smaller
than the cylinder bore.
Note:
Both cylinder block and piston must be at
very
nearly the same temperature when measure
ments are made or
errors
due to expansion
will
occur.
A difference of 10°F.
[5,6°C]
between
parts
is sufficient to produce a variation of .0009"
[0,0023
mm.].
The
pistons are cam-ground, which means that the
diameter at a right angle to the piston pin is
greater
than the diameter
parallel
to the piston
pin.
When a piston is checked for size, it must be
measured
with a micrometer applied to the
skirt
along a line
perpendicular
to axis of the piston pin.
Dl-47.
Piston Ring Fitting
When
new piston rings are to be installed without
reboring
cylinders,
the glazed cylinder walls should
be slightly dulled. However, cylinder bore diameter
should
not increase more than necessary.
Cylinder
walls
should be honed with the finest grade of
stone
to remove any glaze.
New compression rings must be checked for clear ance in piston
grooves
and for gap in cylinder bores;
however, the flexible oil rings are not checked for gap. The cylinder bores and piston
grooves
must
be clean, dry, and free of carbon and
burrs.
With
rings installed on piston, check clearance in
grooves
by inserting feeler
gauge
between
each
ring
and
its lower
land.
Any
ring
groove
wear
will
form
a
step
at inner portion of the lower
land.
If the
piston
grooves
have worn enough that relatively
high
steps
exist on the lower lands, the piston
should
be replaced because the
steps
will
interfere
with
proper operation of new rings and the
ring
clearances
will
be excessive. Piston rings are not
furnished
in oversize widths to compensate for
ring
groove
wear.
When
fitting new rings to new pistons, the side
clearance
of the compression rings should be .002" to .0035"
[0,051
a
0,089
mm.] for number one (1)
ring,
.003" to .005" [0,076 a 0,127 mm.] for number
two (2)
ring,
and side clearance of the oil
ring
should
be .0015" to .0085" [0,038 a
0,220
mm.].
To
check the end gap of a compression
ring,
place
it
in the cylinder in which it
will
be used, square
it
in the bore by tapping with the lower end of
a
piston, then measure the gap with a feeler
gauge.
A
compression
ring
should not have
less
than .015"
[0,381
mm.] gap when placed in cylinder
bore.
If gap is
less
than specified value, file the
end of the
ring
carefully with a fine file to obtain
proper
gap.
Dl-48.
Piston and Connecting Rod Assembly
Note:
A connecting rod can spring out of alignment
in
shipping or handling. Always check a new con
necting rod for misalignment before installing pis
ton and pin.
a.
If a new connecting rod is to be installed, check
its alignment with an accurate rod alignment fix
ture.
b.
If the piston and connecting rod assembly is
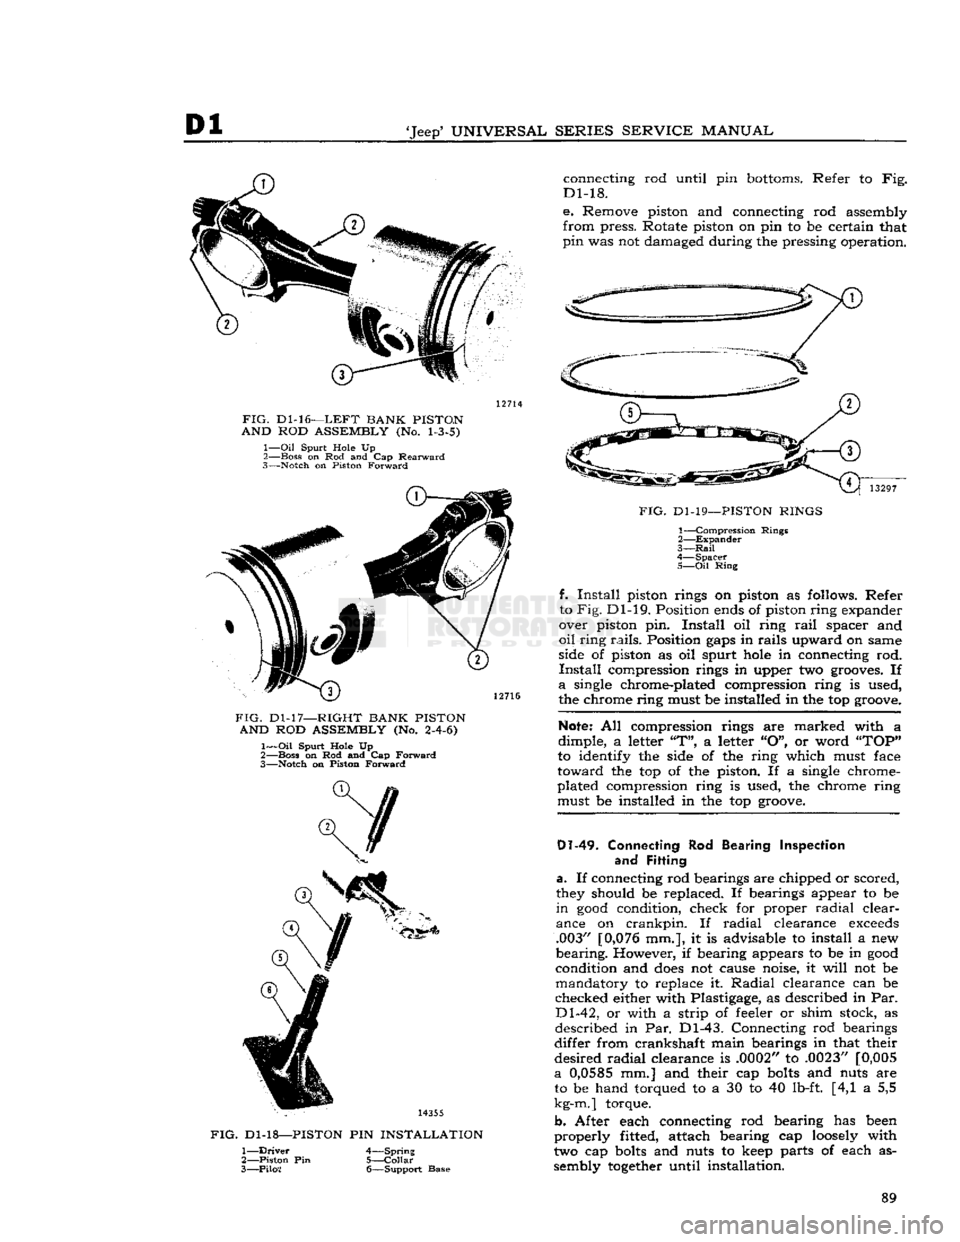
to be installed in the left cylinder bank, it must be assembled as shown in
Fig.
Dl-16. If the piston and
connecting rod assembly is to be installed in the
right
cylinder bank, it must be assembled as shown
in
Fig. Dl-17.
Note
that
these
two assemblies are
mirror-images
of each other.
c.
Lubricate
piston pin to avoid damage when
pressing
through the connecting rod.
d.
To install piston pin in piston and connecting
rod,
use
Tool
Set W-338.
Install
collar J-6047-5,
spring
J-6047-3, and pilot J-6047-20 into the base
support
J-6047-1 and place in
arbor
press. Using
driver
J-6047-4 press piston pin into piston and 88
Page 89 of 376
Dl
'Jeep5
UNIVERSAL
SERIES
SERVICE
MANUAL
FIG.
Dl-16—LEFT
BANK
PISTON
AND
ROD
ASSEMBLY
(No.
1-3-5)
1—
Oil
Spurt Hole Up
2— Boss on Rod and Cap
Rearward
3—
Notch on Piston
Forward
12716
FIG.
Dl-17—RIGHT
BANK
PISTON
AND
ROD
ASSEMBLY
(No. 2-4-6)
1—
Oil
Spurt Hole Up
2— Boss on Rod and Cap
Forward
3—
Notch on Piston
Forward
14355
FIG.
Dl-18—-PISTON
PIN
INSTALLATION
connecting rod until pin
bottoms.
Refer to Fig.
Dl-18.
e.
Remove piston and connecting rod assembly
from
press. Rotate piston on pin to be certain that
pin
was not damaged during the pressing operation. 13297
1—
Driver
2— Piston Pin
3—
Piloi
4—
Spring
5—
Collar
6—
Support
Base
FIG.
Dl-19—PISTON
RINGS
1—
Compression
Rings
2—
Expander
3—
Rail
4—
Spacer
5—
Oil
Ring
f.
Install
piston rings on piston as follows. Refer
to Fig. Dl-19. Position ends of piston ring expander
over piston pin.
Install
oil ring
rail
spacer and
oil
ring
rails.
Position
gaps
in rails upward on same
side of piston as oil spurt
hole
in connecting rod.
Install
compression rings in upper two grooves. If
a
single chrome-plated compression ring is used,
the chrome ring must be installed in the top groove.
Note:
All compression rings are marked with a
dimple, a letter
"T",
a letter
"O",
or word
"TOP"
to identify the side of the ring which must face
toward
the top of the piston. If a single chrome-
plated compression ring is used, the chrome ring must be installed in the top groove.
Dl-49.
Connecting
Rod
Bearing Inspection and Fitting
a.
If connecting rod bearings are chipped or scored,
they should be replaced. If bearings appear to be
in
good
condition, check for proper
radial
clear
ance on crankpin. If
radial
clearance
exceeds
.003" [0,076 mm.], it is advisable to install a new
bearing.
However, if bearing appears to be in
good
condition and
does
not cause noise, it
will
not be mandatory to replace it.
Radial
clearance can be
checked either with Plastigage, as described in Par.
Dl-42,
or with a strip of feeler or shim stock, as
described in Par. Dl-43. Connecting rod bearings
differ from crankshaft main bearings in that their
desired
radial
clearance is .0002" to .0023" [0,005
a
0,0585
mm.] and their cap
bolts
and nuts are to be hand torqued to a 30 to 40 lb-ft. [4,1 a 5,5
kg-m.] torque.
b. After each connecting rod bearing has been
properly
fitted, attach bearing cap
loosely
with
two cap
bolts
and nuts to keep parts of each as
sembly
together
until installation. 89
Page 106 of 376
Dl
DAUNTLESS
V-6
ENGINE
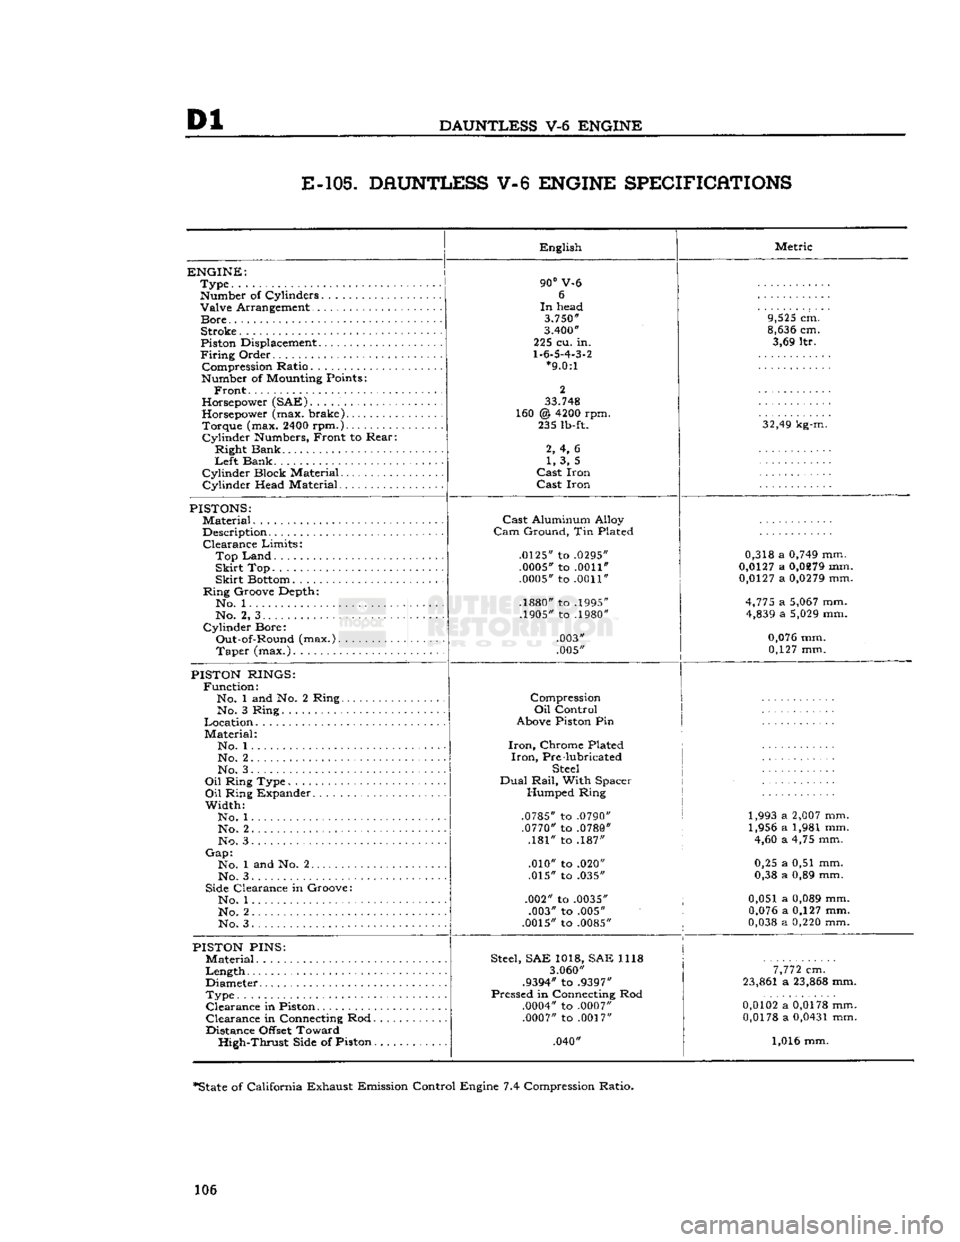
E-105.
DAUNTLESS V-6 ENGINE SPECIFICATIONS
ENGINE:
Type
Number
of Cylinders Valve Arrangement
Bore
Stroke
Piston
Displacement
Firing
Order Compression Ratio
Number
of
Mounting
Points:
Front.
Horsepower
(SAE)
Horsepower
(max. brake) Torque (max.
2400
rpm.)
Cylinder
Numbers,
Front to Rear:
Right Bank
Left
Bank
Cylinder Block Material
Cylinder Head Material English
90°
V-6 6
In
head
3.750"
3.400"
225 cu. in.
1.6.5.4.3.2
*9.0:1
2
33.748
160 @
4200
rpm. 235
lb-ft.
2, 4, 6 1, 3, 5
Cast
Iron
Cast
Iron Metric
9,525
cm.
8,636
cm. 3,69 ltr.
32,49
kg-m.
PISTONS:
Material
Description Clearance Limits:
Top
Land
Skirt
Top
Skirt
Bottom
Ring Groove Depth*. No. 1
No. 2, 3
Cylinder Bore: Out-of-Round (max.). Taper (max.)
Cast
Aluminum Alloy
Cam
Ground, Tin Plated
.0125"
to
.0295" .0005"
to
.0011"
.0005"
to
.0011"
.1880"
to
.1995"
.1905"
to
.1980"
.003"
.005" 0,318 a
0,749
mm.
0,0127
a
0,0279
mm.
0,0127
a
0,0279
mm.
4,775
a
5,067
mm.
4,839
a
5,029
mm.
0,076
mm. 0,127 mm.
PISTON
RINGS:
Function: No. 1 and No. 2 Ring.. No. 3 Ring
Location
Material: No. 1...
No. 2 No. 3.
Oil
Ring Type
Oil
Ring Expander
Width: No. 1
No. 2. .
No. 3
Gap:
No. 1 and No. 2
No. 3
Side
Clearance in Groove: No. 1
No. 2
No. 3 Compression
Oil
Control
Above
Piston
Pin
Iron,
Chrome Plated
Iron,
Pre lubricated
Steel
Dual
Rail,
With Spacer Humped Ring
.0785"
to
.0790" .0770"
to
.0780"
.181" to .187"
.010" to .020"
.015" to .035"
.002" to
.0035"
.003" to .005"
.0015"
to
.0085"
1,993 a
2,007
mm.
1,956 a 1,981 mm. 4,60 a 4,75 mm.
0,25 a 0,51 mm.
0,38 a 0,89 mm.
0,051 a
0,089
mm.
0,076
a 0,127 mm.
0,038
a
0,220
mm.
PISTON
PINS:
Material
Length
Diameter
Type Clearance in
Piston
Clearance in
Connecting
Rod.
Distance
Offset
Toward High-Thrust
Side
of Piston.
Steel,
SAE 1018, SAE 1118
3.060"
.9394"
to
.9397"
Pressed in
Connecting
Rod
.0004"
to
.0007" .0007"
to
.0017"
.040"
7,772
cm.
23,861
a
23,868
mm.
0,0102
a
0,0178
mm.
0,0178
a
0,0431
mm.
1,016 mm.
*State
of California Exhaust Emission Control Engine 7.4 Compression Ratio.
106
Page 114 of 376
FUEL
SYSTEM
14261
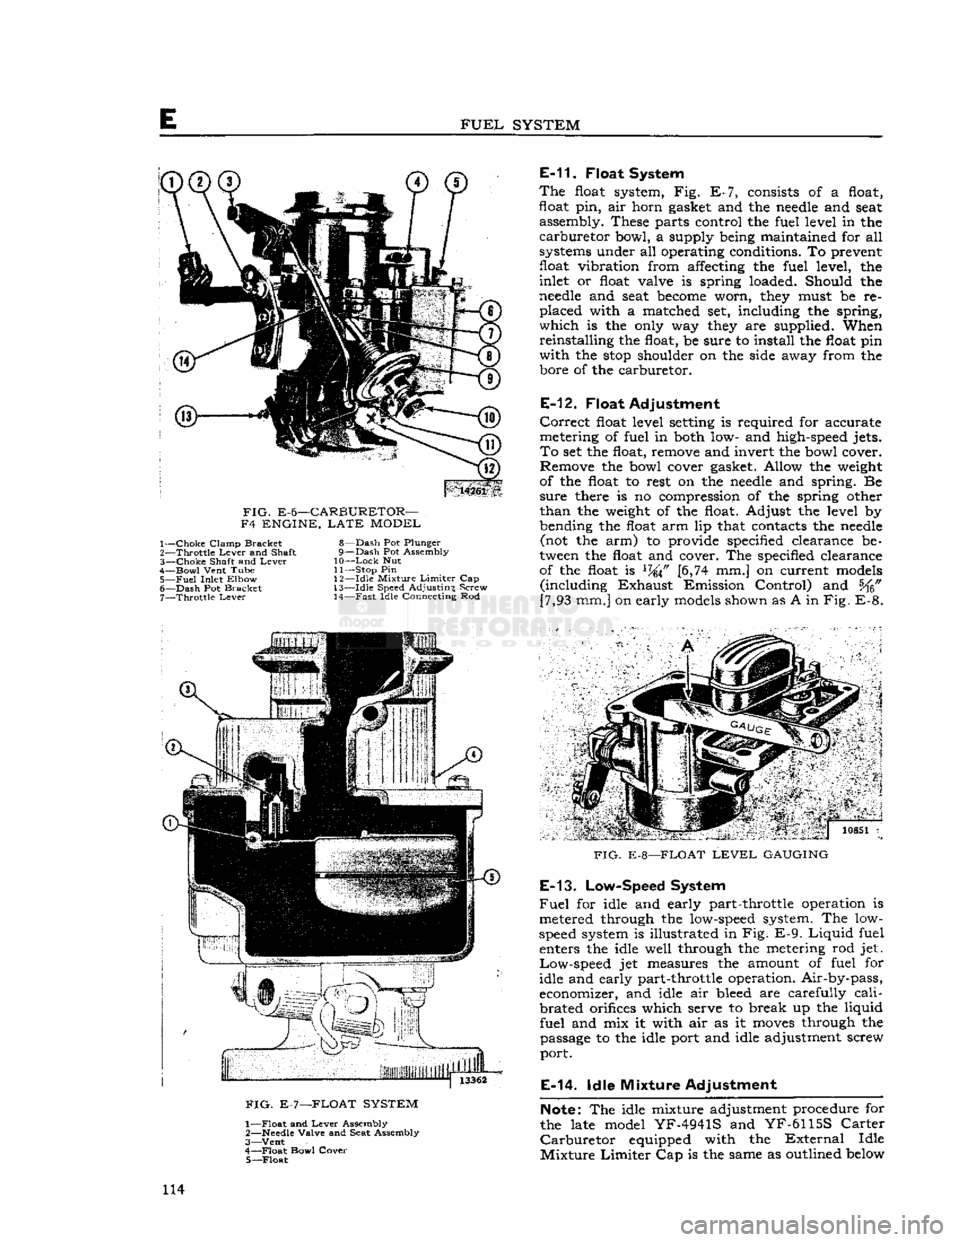
FIG.
E-6—CARBURETOR—
F4 ENGINE,
LATE
MODEL 1—
Choke
Clamp Bracket
2—
Throttle
Lever
and Shaft
3—
Choke
Shaft and
Lever
4—
Bowl
Vent Tube
5—
Fuel
Inlet Elbow
6—
Dash
Pot Bracket 7—
Throttle
Lever
8—
Dash
Pot Plunger
9—
Dash
Pot Assembly
10—
Lock
Nut
11— Stop Pin
1
2—Idle Mixture
Limiter
Cap
13—
Idle
Speed Adjusting Screw 14—
Fast
Idle Connecting Rod
E-11.
Float System
The
float system, Fig. E-7, consists of a float,
float
pin,
air horn gasket and the
needle
and seat assembly. These parts control the fuel level in the
carburetor
bowl, a supply being maintained for all
systems under all operating conditions. To prevent
float
vibration
from affecting the fuel level, the
inlet or float valve is spring loaded. Should the
needle
and seat
become
worn, they must be re
placed
with a matched set, including the spring,
which
is the only way they are supplied. When
reinstalling
the float, be sure to install the float pin
with
the
stop
shoulder on the side away from the bore of the carburetor.
E-12.
Float Adjustment
Correct
float level setting is required for accurate
metering of fuel in both low- and high-speed jets.
To
set the float, remove and invert the bowl cover. Remove the bowl cover gasket. Allow the weight
of the float to rest on the
needle
and spring. Be
sure
there is no compression of the spring other
than
the weight of the float. Adjust the level by
bending the float arm lip that contacts the
needle
(not the arm) to provide specified clearance be
tween the float and cover. The specified clearance of the float is
L74\F
[6,74 mm.] on current models
(including
Exhaust
Emission Control) and [7,93 mm.] on early models shown as A in
Fig.
E-8.
FIG.
E-7—FLOAT SYSTEM
1—
Float
and
Lever
Assembly
2—
Needle
Valve and Seat Assembly
3—
Vent
4—
Float
Bowl Cover 5—
Float
7 '.. j
io8Si
i
FIG.
E-8—FLOAT
LEVEL
GAUGING
E-13.
Low-Speed System
Fuel
for idle and early part-throttle operation is
metered through the low-speed system. The low-
speed system is illustrated in Fig.
E-9.
Liquid
fuel enters the idle well through the metering rod jet.
Low-speed
jet measures the amount of fuel for
idle and early part-throttle operation. Air-by-pass,
economizer, and idle air bleed are carefully
cali
brated
orifices which serve to break up the liquid
fuel
and mix it with air as it
moves
through the passage to the idle port and idle adjustment screw
port.
E-14.
Idle Mixture Adjustment
Note:
The idle mixture adjustment procedure for
the late model
YF-4941S
and
YF-6115S
Carter
Carburetor
equipped with the
External
Idle
Mixture
Limiter
Cap is the same as outlined below 114
Page 118 of 376
E
FUEL
SYSTEM
Note:
Do not remove pressed-in parts such as
nozzle, pump jet, or antipercolator air bleed.
j.
Remove body flange attaching screws, body flange assembly, and gasket.
k.
Remove idle-adjustment screw, spring, idle
port
rivet, throttle lever assembly, washer, fast
idle arm, throttle plate screws, throttle plate, and throttle shaft.
1. Remove throttle shaft seal by prying out seal
retainer.
Note:
Do not remove pressed-in vacuum passage
orifice.
m.
Remove choke valve screws and choke valve.
Unhook
choke spring and slide shaft from housing,
n.
Wash all parts in carburetor cleaning solution
and
blow out passages with compressed air. Do not immerse diaphragm or seals in cleaning solution.
Inspect
all parts for wear or damage. Always use
new gaskets when reassembling.
E-22.
Carburetor
Reassembly
•
Refer to Fig. E-13.
To
expedite
reassembly, it is advisable to group all
related
parts by the circuit to which they belong.
a.
Install
throttle shaft seal and retainer in flange casting.
b.
Install
fast-idle
arm,
washer, and lever assembly
on throttle shaft. Slide shaft into place and install throttle valve.
c.
Install
idle port rivet plug and idle adjusting
screw
and spring.
d.
Attach flange assembly to body casting. Use new gasket.
e.
Install
low-speed jet assembly.
f.
Early
production models install pump intake
strainer
in pump diaphragm housing and carefully
press into recess.
Note:
If strainer is even slightly damaged, a new
one must be installed.
g.
Install
pump diaphragm assembly in diaphragm housing.
Then,
install pump diaphragm spring
(lower)
and retainer.
h.
Install
pump lifter
link,
metering rod
arm,
upper
pump spring, and retainer.
I.
Install
metering rod jet.
Note:
No gasket is used with this jet.
j.
Install
diaphragm housing attaching screws in
the diaphragm housing, making sure that the
edges
of the diaphragm are not wrinkled.
Lower
into place and tighten screws evenly and securely,
k.
Install
throttle shaft seal, dust seal washer, and
shaft seal spring.
I.
Install
pump connector
link
in the throttle arm
assembly.
Install
throttle shaft arm assembly on
throttle shaft guiding connector
link
in pump lifter
link
hole.
CAUTION:
Linkage
must not bind in any throttle
position. If binding occurs,
loosen
clamp screw in
throttle arm, adjust slightly, then retighten screw.
m.
Install
pump check disc, disc retainer, and lock
ring.
n.
Install
metering rod and pin spring. Connect
metering rod spring.
o.
Check
and if necessary correct meter ing rod adjustment. Follow procedure of
Par.
E-16.
p.
Install
needle
seat and gasket assembly, needle,
float
and
float pin. The
stop
shoulder on the float
pin
must be on the side away from the bore of
the carburetor.
q.
Set float level to specifications. Follow pro cedure of
Par.
E-12.
r.
Install
air horn gasket and air horn assembly.
Install
attaching screws, lock washers, and choke
tube clamp assembly. Tighten center screws first,
s. Slide choke shaft and lever assembly into place
and
connect choke lever
spring.
Install
choke valve.
Center
the valve by tapping lightly, then hold in
place with fingers when tightening screws,
t.
Install
fast-idle connector rod with
offset
portion
of rod on top and pin spring on outside.
Install
fast-idle connecting rod spring.
E-23.
Correcting Acceleration
Flat
Spot
Early
production
Carburetor
Models 938-S, 938-
SA,
938-SC
Inasmuch
as a flat
spot
on acceleration or low speed
stumble can
come
from causes other than
car
buretor
malfunction, it is recommended that
engine
tuning be thoroughly checked before attempting
any
actual carburetor work. Make sure that
ignition, compression, and timing are correct and
that fuel pump is supplying enough gas. Also, the F-head
engine
employs a water-heated intake
manifold.
Proper vaporization of the fuel depends
on correct intake manifold temperature. Since this
temperature is controlled by the cooling system
thermostat, include an operational check of the
thermostat when diagnosing the stumble. Operating
temperatures consistently below
155°F.
can cause stumble.
If
the stumble persists, a
YF-938-S,
YF-938-SA,
or
YF-938-SC
carburetor can be converted to a
YF-938-SD
carburetor by installing Special Kit
924161, consisting of a pump discharge check
needle, a metering rod, and a metering rod jet. If this kit is installed, the pump discharge check
needle
replaces the original
ball,
weight, and re
tainer
and the small wire-type retainer used with
the
ball
check assembly must not be reinstalled.
When
installing the kit, check the size of the pump discharge jet, No. 2, Fig. E-14.
Early
production
YF-938S
and
YF-938SA
carburetors have a .025" [0,635 mm.] jet installed. If the carburetor being
converted has a .025" jet it must be opened up to .031" [0,787 mm.] by running a No. 68
drill
through
the jet as shown in
Fig.
E-14.
The jet must be drilled
as it is a pressed in part and cannot be replaced.
Upon
completing the installation of the conversion
kit,
mark
or tag the carburetor to indicate that it
is a
YF-938SD.
118
Page 134 of 376
E
FUEL
SYSTEM
E-78. SERVICE DIHGNOSIS
Symptoms Probable Remedy
Excessive
Fuel
Consumption:
Tires
improperly inflated Inflate
Brakes
drag Adjust
Engine
operates too cold Check thermostat
Heat control valve inoperative Check thermostatic spring
Leak
in fuel line Check all connections
Carburetor
float level high. See
"Carburetor"
section
Accelerator pump not properly adjusted Adjust
Leaky
fuel pump diaphragm Replace
Loose
engine
mountings causing high carburetor fuel level Tighten Ignition timing slow or spark advance stuck See "Distributor" section
Low
compression. Check valve tappet clearance
Air
cleaner dirty
.
Remove and clean
Engine
Hesitates on Acceleration: Accelerator pump
does
not function perfectly.
...................
.Replace piston and rod or adjust
Carburetor
float level. ... .Adjust
Spark
plugs Replace or clean and adjust
Low
compression Check valves
Distributor
points—dirty or pitted Replace
Weak
condenser or coil Replace
Carburetor
jets restricted Remove and clean
Excessive
engine
heat See "Engine" section
Engine
Stalls—Won't Idle:
Improper
condition of carburetor See
"Carburetor"
section
Low
speed
jet restricted Remove and clean
Dirty
fuel sediment bowl screen Remove and clean
Air
cleaner dirty Remove and clean
Leaky
manifold or gasket Replace
Fuel
pump diaphragm porous. Replace
Loose carburetor. Tighten
flange
nuts
Water
in fuel
Drain
and clean system
Improper
ignition. .See "Distributor" section
Spark
plugs Clean and adjust
Valves
sticking.
Grind
valves 134
Page 146 of 376
Fl
EXHAUST
EMISSION CONTROL SYSTEMS The
air distribution manifold should be installed
after the exhaust manifold assembly is torqued
to the cylinder head. The recommended procedure
for exhaust manifold assembly installation is as follows:
Clean
the mating surface of both the
manifold and cylinder head.
Install
the exhaust manifold to the cylinder head using a new gasket.
Tighten
the manifold to cylinder head, attaching
bolts
down evenly.
Finish
torque tightening to 29
to 35 ft. lbs. [3,4 a 4,8 kg-m.].
Fl-23.
REQUIRED
EQUIPMENT
Each
station licensed to perform repair and main
tenance on the Exhaust Emission Control System
must be equipped with that equipment necessary
for major
engine
tune-up analysis which shall in clude at least the following or equivalent.
Ignition Analyzer Oscilloscope
Ammeter
Ohmmeter
Voltmeter Tachometer
2 Vacuum Gages
Pressure
Gage (0-10 psi.)
Cam
Angle Dwell Meter Ignition Timing
Light
Engine
Exhaust Combustion Analyzer Compression Tester
Fl-24.
REPLACEMENT
PARTS
Parts
necessary to repair and/or maintain the
Exhaust
Emission Control System are available through any Jeep
SALES CORPORATION
ware
house.
Fl-25.
WARRANTY
All
parts of the Exhaust Emission Control System
are
covered by the Manufacturer's Warranty as stated in the Warranty Service and 'Jeep' Quality
Maintenance Plan booklet.
Fl-26.
EXHAUST EMISSION CONTROL
SYSTEM
DIAGNOSIS GUIDE
Pump Noisy
Hoses Touching Other Parts of Engine or Body (Hood).
Note:
The air pump is not completely noiseless.
Under
normal conditions, pump
noise
rises in pitch as
engine
speed
increases. It is also desirable to
allow for normal break-in wear of the pump prior
to replacement for excessive noise.
Pump Seized
Replace
pump.
Leak
In
Hose
Check
for leaks; using
soap
and water — tighten
clamps or replace
hoses.
Pump
Inoperative
Loose Belt — tighten belt — do not pry on housing.
Filter
Plugged — replace.
Exhaust Backfire
Check
for vacuum leaks — correct as necessary.
Check
air filter for excessive
restriction
— replace as necessary.
Check
anti-backfire valve — replace as necessary.
Induction System Backfire
Verify
engine
timing and distributor dwell.
Verify
accelerator pump charge. 146
Page 157 of 376
'Jeep'
UNIVERSAL
SERIES SERVICE
MANUAL
F2
F2-26.
Anti-Backfire
Valve
The
anti-backfire valve removal requires discon necting the
hoses
and bracket to
engine
attaching
screws.
F2-27.
Air Distribution Manifold and
Injection
Tubes
The
air distribution manifolds can be removed
from the cylinder heads without removing the
cylinder
head assemblies. Disconnect the air delivery
hose
from the pump at
the distribution manifold inlet (check valve).
Loosen the distribution manifold
tube
attaching nuts from the cylinder head and carefully work the
distribution manifold away from the cylinder head.
The
air injection
tubes
can be removed from the
cylinder
head with head on the
engine.
Insert
an easy-out through the
boss
opening on the
cylinder
head
into
the injection
tube
and twist
the
tube
out gradually. Some interference to re moval may be encountered due to normal carbon
build-up on the tubes. Injection
tubes
removed in
this manner should be replaced.
The
injection
tubes
used are all of the same diam
eter and length.
F2-28.
REQUIRED EQUIPMENT
Each
station licensed to perform repair and main tenance on the Exhaust Emission Control System
must be equipped with that equipment necessary
for major
engine
tune-up analysis which shall in clude at least the following or equivalent:
Ignition Analyzer Oscilloscope
Ammeter
Ohmmeter
Voltmeter
Tachometer 2 Vacuum Gauges
Pressure
Gauge (0-10 psi.)
Cam
Angle Dwell Meter
Ignition Timing
Light
Engine
Exhaust Combustion Analyzer Compression Tester
F2-29.
REPLACEMENT PARTS
Parts
necessary to repair and/or maintain the Ex
haust Emission Control System are available through any Jeep
SALES
CORPORATION
ware
house.
F2-30.
WARRANTY
All
parts of the Exhaust Emission Control System
are
covered by the Manufacturer's
Warranty
as stated in the
Warranty
Service and 'Jeep' Quality
Maintenance Plan booklet. 157