heating JEEP CJ 1953 User Guide
[x] Cancel search | Manufacturer: JEEP, Model Year: 1953, Model line: CJ, Model: JEEP CJ 1953Pages: 376, PDF Size: 19.96 MB
Page 290 of 376

N
REAR
AXLE
14153
FIG.
N-8—REMOVING FLANGED
AXLE
SHAFT
1—
Flange
Adapter Tool W-343
2—
Tool
C-637
3—
Axle
Flange nuts attaching backing plate and retainer to axle
tube flange.
e. Attach axle shaft adapter tool W-343 and slide
hammer
handle C-637 to axle shaft flange and re
move
axle shaft, as shown in Fig. N-8.
Caution:
Should a bearing disintegrate on the
axle shaft because of inadequate lubrication, the axle shaft and housing assembly must be carefully inspected for possible damage before new parts are
installed.
If
the bearing
cone
(inner race) is seized (cold
welded)
onto
the axle shaft due to excessive over heating, the axle shaft must be discarded and a new
axle shaft and bearing assembly installed.
Note:
Make certain the bearing cup has been
removed from the axle housing.
f. Remove axle shaft oil seal from axle housing tube using tool C-637.
g. Wipe axle housing tube seal bore clean and in
stall
a new oil seal using driver tool W-186, as shown in Fig. N-l7.
N-4.
UNIT BEARING
Basically,
there are five parts to a Unit Bearing assembly: the cup, or outer race, the cup
ring,
the cone, or inner race, the tapered rollers which
roll
freely
between
the cup and cone, and the
cage
which
serves as a retainer to maintain the proper spacing
between
the tapered rollers grouped around
the cone.
When
the bearing is manufactured, the cup and
rib
ring are bonded
together
with an adhesive to
facilitate bearing handling and installation. Since the cup and rib ring are clamped
together
in the axle housing, there is no need for a permanent
bond. When the bearing is serviced the cup
will
usually
be separated from the rib
ring.
The
bearing is held on the shaft by the press fit of the
cone
plus the press fit of the retainer
ring.
The
cup and rib ring are clamped
together
in the axle housing through the outboard seal by the re
tainer
plate. The outboard seal wipes on the rotat ing axle shaft and at the same time functions as a
static seal to prevent lubricant from escaping be
tween the housing and the seal outside diameter.
It's
important to
note
that the seal serves also as
a
"spacer" or "filler" in the clamp-up of the bearing
in
the axle housing.
Note:
All Unit Bearings are manufactured with
built-in
adjustment for axle shaft end play. No adjustment shims are necessary when installing a
flange type axle shaft.
N-5.
Servicing Unit Bearing
The
Unit
Bearing
assembly should be serviced each
12,000
miles [
19,200
km.] with bearing cleaning,
inspection and relubrication. The Unit Bearing re
quires
little attention while in service if the bear
ings have been properly installed and are ade
quately lubricated.
•
Cleaning and Inspection
a.
The Unit Bearing assembly should not be re moved from the axle shaft unless the outer seal is defective, the retainer plate is distorted or damaged,
or
the Unit Bearing is defective.
Should
it be necessary to remove the Unit Bearing
from
the axle shaft for any of
these
reasons, refer
to Par. N-7 for proper Unit Bearing removal.
b.
Clean
bearing cup with solvent and inspect cup
for any possible wear, nicks or damage.
c.
The bearing assembly can be cleaned in place
on the axle shaft. Use cleaning solvent and a stiff
bristle
brush to
loosen
the old grease. To assure
removal
of old grease and any contamination that
might be present, use compressed air. Air should be directed at the bearing assembly so that it
goes
through the bearing from one end of the rollers to the other. It is important not to "spin dry" the
bearing
with compressed
air.
Spinning the dry bearing may score the raceways and rollers due to
lack
of lubricant.
d.
Use cleaning solvent to clean out the bearing
and
oil seal bore in the housing. Wipe the area
clean
making sure it is free from old grease or other
contamination that might be present.
FIG.
N-9—LUBRICATING BEARING
290
Page 316 of 376

o
STEERING SYSTEM
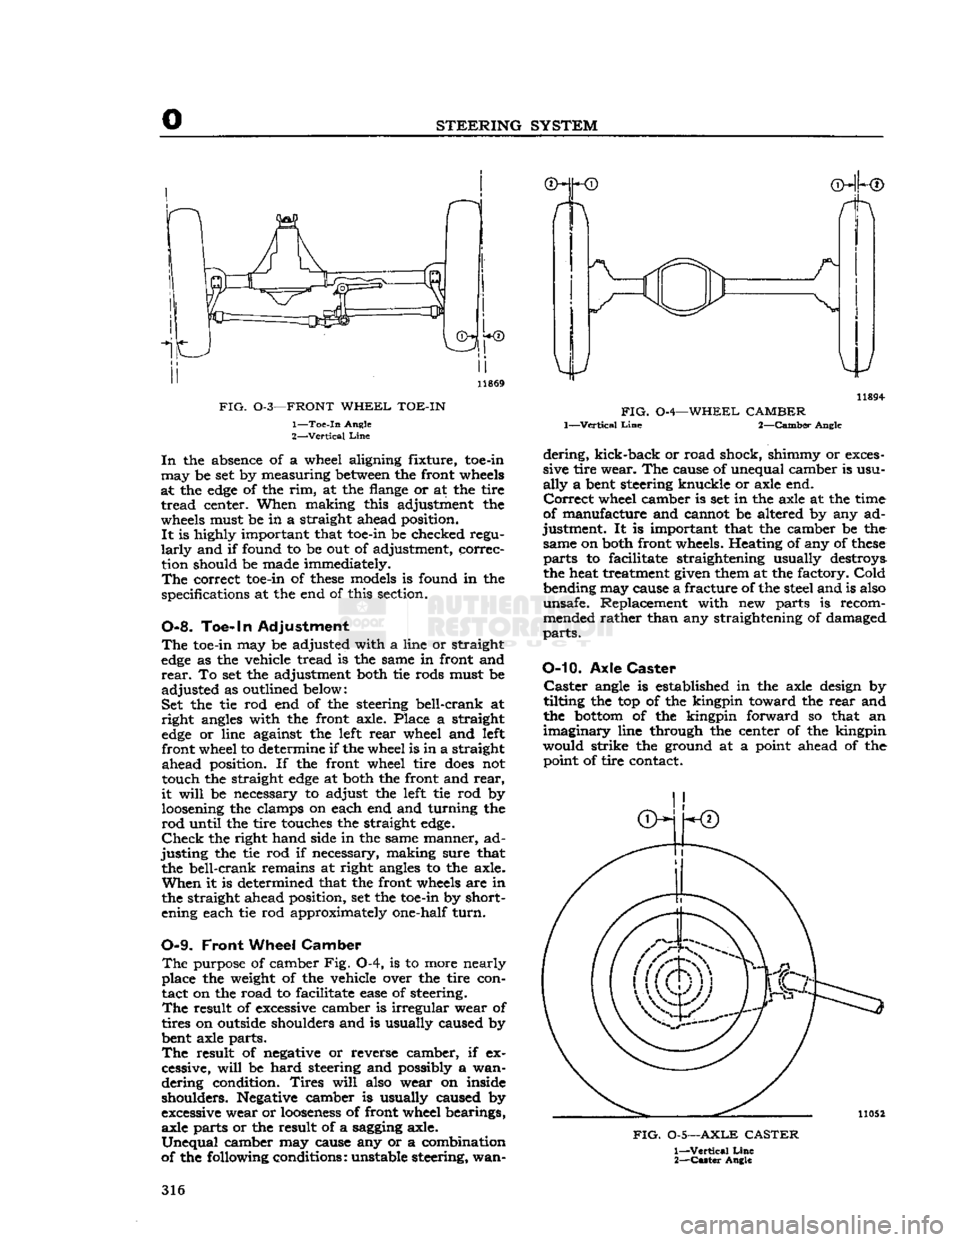
FIG.
0-3—FRONT
WHEEL
TOE-IN
1—
Toe-in
Angle
2—
Vertical
Line
In
the absence of a wheel aligning fixture, toe-in
may
be set by measuring
between
the front wheels
at the
edge
of the rim, at the flange or at the tire
tread
center. When making this adjustment the
wheels must be in a straight ahead position.
It
is highly important that toe-in be checked regu
larly
and if found to be out of adjustment, correc tion should be made immediately.
The
correct toe-in of
these
models is found in the
specifications at the end of this section.
0-8. Toe-in Adjustment
The
toe-in may be adjusted with a line or straight
edge
as the vehicle tread is the same in front and
rear.
To set the adjustment both tie rods must be
adjusted
as outlined below:
Set the tie rod end of the steering bell-crank at
right
angles with the front axle. Place a straight
edge
or line against the left
rear
wheel and left front wheel to determine if the wheel is in a straight
ahead
position. If the front wheel tire
does
not touch the straight
edge
at both the front and
rear,
it
will
be necessary to adjust the left tie rod by loosening the clamps on each end and turning the
rod
until the tire touches the straight
edge.
Check
the right hand side in the same manner, ad
justing
the tie rod if necessary, making sure that the bell-crank remains at right angles to the axle.
When
it is determined that the front wheels are in the straight ahead position, set the toe-in by short
ening each tie rod approximately one-half
turn.
0-9.
Front
Wheel
Camber
The
purpose of camber Fig. 0-4, is to more nearly
place the weight of the vehicle over the tire con tact on the road to facilitate
ease
of steering.
The
result of excessive camber is irregular wear of
tires on outside shoulders and is usually caused by
bent axle parts.
The
result of negative or reverse camber, if ex
cessive,
will
be
hard
steering and possibly a wan
dering
condition.
Tires
will
also wear on inside shoulders. Negative camber is usually caused by
excessive wear or
looseness
of front wheel bearings, axle parts or the result of a sagging axle.
Unequal
camber may cause any or a combination
of the following conditions: unstable steering, wan- 11894-
FIG.
0-4—WHEEL CAMBER
1—Vertical
Line
2—Camber Angle
dering,
kick-back or road shock, shimmy or exces
sive tire wear. The cause of unequal camber is usu
ally
a bent steering knuckle or axle end.
Correct
wheel camber is set in the axle at the time
of manufacture and cannot be altered by any ad
justment. It is important that the camber be the same on both front wheels. Heating of any of
these
parts
to facilitate straightening usually destroys
the heat treatment given them at the factory.
Cold
bending may cause a fracture of the steel and is also
unsafe. Replacement with new parts is recom mended rather than any straightening of damaged
parts.
O-10.
Axle
Caster Caster
angle is established in the axle design by
tilting the top of the kingpin toward the
rear
and
the
bottom
of the kingpin forward so that an
imaginary
line through the center of the kingpin
would strike the ground at a point ahead of the point of tire contact.
FIG.
0-5—AXLE
CASTER
1—
Vertical
Line
2—
Caster
Angle
316
Page 371 of 376

'Jeep'
UNIVERSAL
SERIES SERVICE
MANUAL
ALPHABETICAL INDEX
SUBJECT PAR.
SUBJECT
PAR.
Abbreviations,
List
U-17 Accelerator Linkage E-70
Air
Cleaner B-25, B-26, B-82, C-21, E-69
Air
Delivery Manifold Fl-4, F2-12
Air
Filter, Pump • F2-3, F2-11
Air
Injection Tubes Fl-5, F2-13
Air
Pump Fl-2, F2-10
Alternator Bearings B-76, H-80
Alternator Brushes H-74, H-75
Alternator Charging System •
•
H-63
Alternator
Diodes
H-69, H-85
Alternator Precautions H-64 Alternator Rotor H-76, H-79
Alternator Tests H-67, H-77 Alternator Specifications H-l 52
Alternator Stator H-84
Anti-Backfire
Valve Fl-6, F2-14
Antifreeze
Chart
• G-22 Antifreeze
Solutions
- G-16
Axle Camber O-l
Axle Caster 0-8
Back-Up
Lights H-135
Ballast
Resistor. H-32 Battery C-3, H-2 Bendix Folo-Thru Drive H-105, H-106
Bleeding Brakes P-7
Body T-l Body Lubrication. B-65 Body Name Plates ' A-7
Brake
Adjustment P-14
Brake
Drums. • .P-17
Brake
Hoses
P-8
Brake
Maintenance . P-5
Brake
Master Cylinder B-40, P-2, P-20
Brake
Service P-6
Brake
Wheel Cylinder • P-21
Camber
Adjustment 0-7
Camshaft D-6, D-51, D-52, D-53, D-81, Dl-26, Dl-33, Dl-55, Dl-80
Carburetor
E-10, E-25
Carburetor
Adjustment C-25, E-14, E-40,
Fl-13,
F2-16
Carburetor
Specifications .Fl-38, F2-34, E-79
Caster
Adjustment 0-8
Charging
System Service. .H-34, H-63
Chassis
Lubrication B-7, B-83
Chassis
Torque Specifications U-14
Clutch
1-4, MO
Clutch
Adjustment 1-3
Clutch
Linkage B-44, 1-3
Clutch
Maintenance .. 1-2
Clutch
Release Bearing B-74, 1-25
Coil
C-20, H-19, H-31 Connecting Rod Bearings D-47, D-48, D-49, Dl-49 Connecting Rod
Crank
Pins D-42
Connecting Rods... .D-20, D-50, D-95, Dl-31, Dl-45, Dl-75
Controls B-59, B-62
Cooling System B-28, G-l Cooling System Filling G-2
Core
Hole Expansion Plugs D-72
Crankcase
Ventilating System B-13, C-6, D-110
Crankshaft
D-26, D-38, D-39, Dl-38, Dl-73
Crankshaft
End Play. D-83, Dl-74
Crankshaft
Main Bearing D-43, D-44, Dl-32, Dl-40, Dl-73
Crankshaft
Oil Seal, Front Dl-21, Dl-85
Crankshaft
Oil Seal, Rear D-63, D-85, Dl-72
Cylinder
Block D-32, Dl-34
Cylinder
Bores D-35, Dl-36
Cylinder
Head D-17, D-73, D-98, Dl-24, Dl-63, Dl-82
Cylinder
Head Torque. C-5
Dash Pot Adjustment C-26, E-44
Differential B-51 thru B-53, N-9 Differential Adjustments N-16, N-18
Differential, Powr-Lok N-20
Differential,
Trac-Lok
N-24
Directional Signal Lights. . H-138
Distributor B-14, B-15, C-10, D-13, Dl-9, H-9, H-20 Distributor Check H-l7, H-28
Distributor Point Dwell C-17 Distributor Resistance Test C-16
Drawbar
.R-6, U-16
Dual
Brake System P-l thru P-26
Electrical
Instruments H-l22
Electrical
Specifications .H-l52
Electrical
System H-l Engine .
..D-l,
Dl-1
Engine Code Number A-6
Engine Compression .
.
C-9 Engine Disassembly . • .D-6, Dl-5 Engine Installation D-105, Dl-102
Engine Lubrication System B-4, B-6 Engine Mountings D-3, Dl-3
Engine Oil B-9
Engine Oil Filter B-10, B-ll,
D-lll,
Dl-13, Dl-93
Engine Oil Pan D-l9, D-66, D-97, Dl-29, Dl-51, Dl-77 Engine Oil Pump. . .D-14, D-65, D-93, Dl-19, Dl-50, Dl-87
Engine Overheating. G-l9 Engine Removal D-5, Dl-4.
Exhaust
Emission Control — F4 Fl-1 thru Fl-30
Exhaust
Emission Control — V6 F2-1 thru F2-36
Exhaust
Manifold, Install F-6
Exhaust
Pipe -
•
F-8
Exhaust
System F-2, F-3
Exhaust
System Maintenance F-4
Fan
Belt C-27, Dl-11, Dl-96, G-18
Floating Oil Intake. D-64, Dl-30, Dl-50, Dl-76 Flywheel D-25, D-67, D-87, Dl-28, Dl-52, Dl-78
Flywheel Housing. D-71, D-88, Dl-27, Dl-54, Dl-79
Flywheel Pilot Bushing D-70, 1-8
Frame
R-l
Frame
Alignment. R-2
Frame
Dimensions R-3
Frame
Straightening R-4
Front
Bumper Weight. • U-9
Front
Axle B-50, M-2
Front
Axle Alignment R-5
Front
Axle Installation • M-12
Front
Axle Maintenance M-3
Front
Axle Shaft Removal M-5
Front
Axle U-Joint B-54, B-55, M-7
Front
Axle Steering Knuckle M-&
Front
Wheel Alignment 0-4
Front
Wheel Bearings B-56, B-57, Q-4
Front
Wheel Toe-in 0-5, 0-6
Front
Wheel Turning Angle 0-9
Fuel
Gauge Float Unit F-76
Fuel
Lines - E-77
Fuel
Pump E-45, E-54, E-60, E-67
Fuel
Pump Check C-23
Fuel
Tank
E-72
G
Gauges, Testing H-l24
General
Specifications A-8
Generator B-16, H-34 thru H-40
Glass
Replacement • T-4
Governor. . .
•.
• U-3
Guides, Valve D"61
H
Hazard
Warning Lights H-139
Head Lamp Aiming H-131, H-132 Head Lamp Replacement H-130
Headlight Dimmer Switch H-l
2
7
Heat Control Valve C-7, F-7 Heated Air System • •
•
F2-2
Heater U-10
Horns.....
....H-137 371