seats JEEP CJ 1953 User Guide
[x] Cancel search | Manufacturer: JEEP, Model Year: 1953, Model line: CJ, Model: JEEP CJ 1953Pages: 376, PDF Size: 19.96 MB
Page 105 of 376
'Jeep'
UNIVERSAL
SERIES SERVICE
MANUAL
Dl
Dl-104.
SERVICE
DIAGNOSIS
Poor Fuel Economy
Ignition Timing Late or Spark Advance Inoperative
Carburetor
Float Setting Too High
Accelerator Pump Improperly Adjusted
Fuel
Pump Pressure High
Fuel
Line
Leakage
Fuel
Pump Diaphragm Leakage
Cylinder
Compression Low
Valves Do Not Seat Properly
Spark
Plugs
Defective
Spark
Plug Cables
Defective
Ignition
Coil
or Capacitor
Defective
Carburetor
Air Cleaner Dirty
Brakes
Drag
Wheel Alignment Incorrect
Tire
Pressure Incorrect Odometer Inaccurate
Fuel
Tank
Cap Clogged or
Defective
Muffler or Exhaust Pipe Clogged or Bent
Lack
of
Power
Cylinder
Compression Low
Ingitdon Timing Late
Carburetor
or
Fuel
Pump Clogged or
Defective
Fuel
Lines Clogged
Air
Cleaner Restricted
Engine Temperature High Valves Do Not Seat Property
Valve
Timing Late Intake Manifold or Cylinder Head
Gasket Leaks
Muffler or Exhaust Pipe Clogged or Bent
Spark
Plugs Dirty or
Defective
Breaker
Point Gap Incorrect
Breaker
Points
Defective
Ignition
Coil
or Capacitor
Defective
Electrical
Connection Loose
Broken
Valve Spring
Broken
Piston Ring or Piston
Cylinder
Head Gasket
Defective
Distributor Cap Cracked
Low
Compression
Valves Not Seating Properly Piston Rings Seal Poorly
Valve
Spring Weak or Broken
Cylinder
Scored or Worn
Piston Clearance Too Great
Cylinder
Head Gasket Leaks
Burned
Valves and
Seats
Valves Stick or Are Too Loose in Guides
Valve
Timing Incorrect
Valve
Head and Seat Have Excessive Carbon
Engine Overheats
Valve
Spring Weak or Broken
Valve
Lifter Seized or Collapsed
Exhaust
System Clogged
Valves Sticking
Valve
Stem Warped
Valve
Stem Carbonized or Scored
Valve
Stem Clearance Insufficient in Guide
Valve
Spring Weak or Broken
Valve
Spring Distorted
Oil
Contaminated
Overheating
Cooling System Inoperative
Thermostat Inoperative Ignition Timing Incorrect
Valve
Timing Incorrect
Carbon
Accumulation Excessive
Fan
Belt Loose
Muffler or Exhaust Pipe Clogged or Bent
Oil
System Failure
Piston Rings Worn or Scored
Popping,
Spitting,
Detonation
Ignition Timing Incorrect
Carburetion
Improper
Carbon
Deposit
in Combustion
Chambers Excessive
Valves Not Seating Properly
Valve
Spring Broken
Spark
Plug Electrodes Burned
Water or Dirt in
Fuel
Fuel
Line
Clogged
Valve
Timing Incorrect
Excessive
Oil
Consumption
Piston Rings Stuck in Grooves, Weak,
Worn,
Broken, or Incorrectly Fitted
Crankshaft
Main Bearings or
Connecting Rod Bearings Have
Excessive Clearance
Gaskets or Oil Seals
Leak
Cylinder
Bores Worn, Scored,
Out-of-Round or Tapered
Pistons Have Too Great Clearance to Cylinder Bores
Connecting Rods Misaligned High Road Speed
High Temperature
Crankcase
Ventilation System Inoperative
Bearing Failure
Crankshaft
Bearing Journal Rough or Out-of-Round
Oil
Level Low
Oil
Leakage
Oil
Dirty
Oil
Pressure Low or Lacking
(Oil
Pump Failure)
Drilled
Passages
in Crankshaft or
Crankcase
Clogged
Oil
Screen Dirty
Connecting Rod Bent 105
Page 116 of 376
E
FUEL
SYSTEM
pressing downward on metering rod) or
seats
be
fore the metering rod arm makes flat contact with the pump lifter link, make adjustment by bending
the lip on the metering rod arm.
E-17.
Choke System
The
choke system consists of a manually-operated
choke valve, a fast-idle connecting rod, and a fast-
idle arm. The choke valve is offset-spring loaded to prevent over-choking during the starting warm-
up period. When the choke valve is moved to a closed position for starting, the fast idle connector
rod
in Fig. E-ll revolves the fast idle link.
This
action increases the
engine
idle speed to prevent stalling during the warm-up period. A fast-idle
connector rod return spring prevents partial closing
of the choke valve. pump lifter which is connected to the throttle.
This
movement forces fuel from the chamber
above the diaphragm through discharge pump check valve and discharge pump jet.
This
auxiliary discharge of fuel supplies
engine
requirements for
quick
acceleration and heavy loads. When the
throttle is closed, the diaphragm is again pulled
down by high vacuum and another measured
charge of fuel enters the chamber above the
diaphragm
through the intake passage to be
available for the next cycle of operation.
Note:
The pump jet (see insert drawing in Fig.
E-12)
projecting into the air stream is permanently pressed into the carburetor body and should not
be removed. Also, carburetor design makes it im possible to adjust the pump stroke.
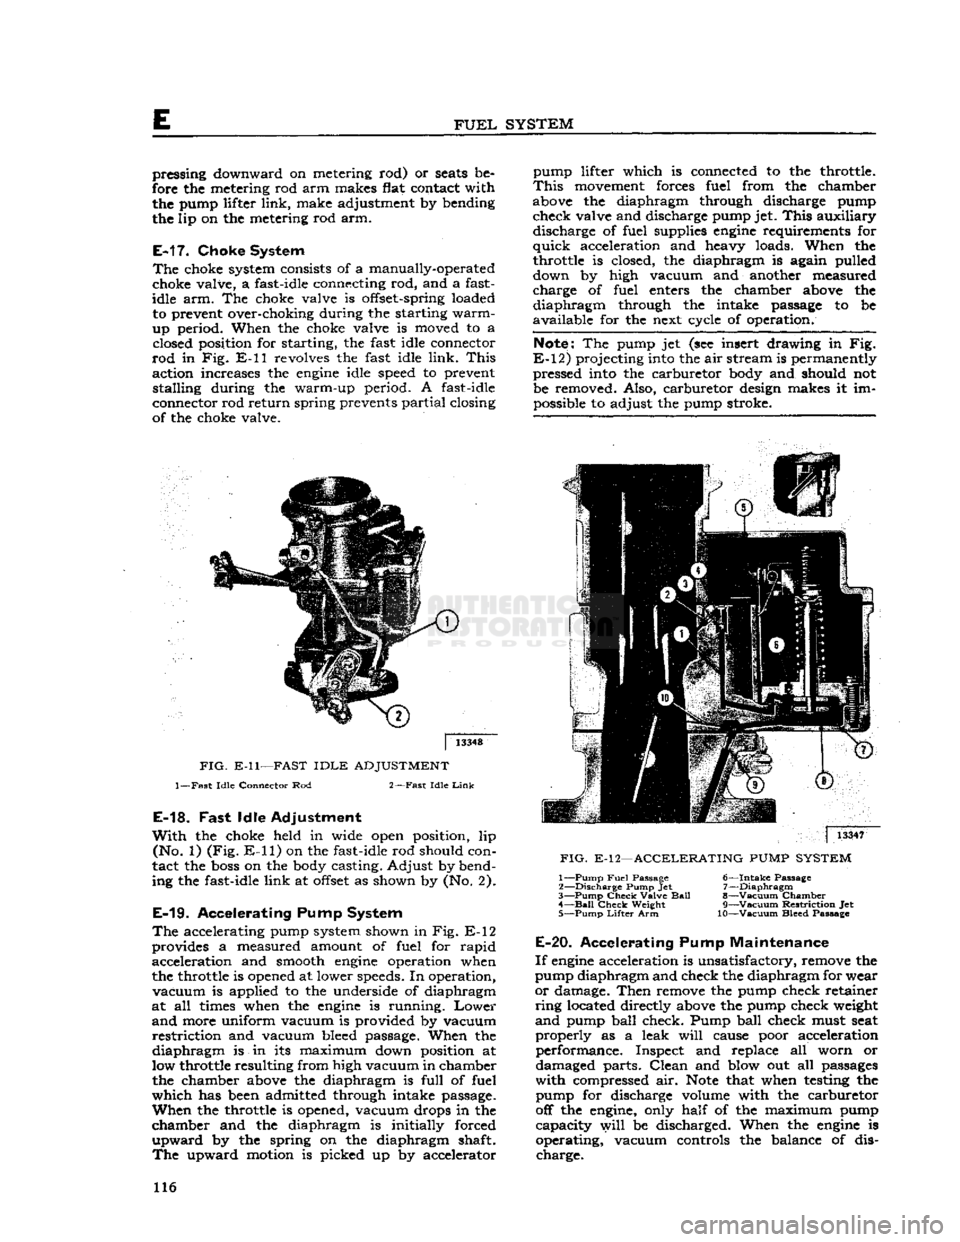
FIG.
E-ll—FAST
IDLE
ADJUSTMENT
1—Fast
Idle
Connector Rod
2—Fast
Idle
Link
E-18.
Fast
Idle Adjustment
With
the choke held in wide open position, lip (No. 1) (Fig.
E-ll)
on the fast-idle rod should con
tact the
boss
on the body casting. Adjust by bend
ing the fast-idle link at
offset
as shown by (No. 2).
E-19.
Accelerating Pump System
The
accelerating pump system shown in Fig. E-12
provides a measured amount of fuel for rapid acceleration and smooth
engine
operation when
the throttle is opened at lower speeds. In operation,
vacuum
is applied to the underside of diaphragm
at all times when the
engine
is running.
Lower
and
more uniform vacuum is provided by vacuum
restriction
and vacuum bleed passage. When the
diaphragm
is in its maximum down position at
low throttle resulting from high vacuum in chamber the chamber above the diaphragm is full of fuel
which
has been admitted through intake passage.
When
the throttle is opened, vacuum drops in the
chamber and the diaphragm is initially forced
upward
by the spring on the diaphragm shaft.
The
upward motion is picked up by accelerator
|
13347
FIG.
E-12—ACCELERATING
PUMP
SYSTEM
1—
Pump
Fuel
Passage
6—Intake
Passage
2—
Discharge
Pump Jet 7—Diaphragm
3—
Pump
Check
Valve
Ball
8—Vacuum Chamber 4—
Bail
Check
Weight
9—Vacuum
Restriction
Jet
5—
Pump
Lifter
Arm 10—Vacuum Bleed Passage
E-20.
Accelerating Pump Maintenance
If
engine
acceleration is unsatisfactory, remove the
pump diaphragm and check the diaphragm for wear
or
damage. Then remove the pump check retainer
ring
located directly above the pump check weight
and
pump ball check. Pump ball check must seat
properly
as a leak
will
cause poor acceleration performance. Inspect and replace all worn or
damaged parts.
Clean
and blow out all passages
with
compressed air.
Note
that when testing the pump for discharge volume with the carburetor
off the engine, only half of the maximum pump capacity
will
be discharged. When the
engine
is
operating, vacuum controls the balance of dis charge. 116
Page 121 of 376
'Jeep'
UNIVERSAL SERIES SERVICE
MANUAL
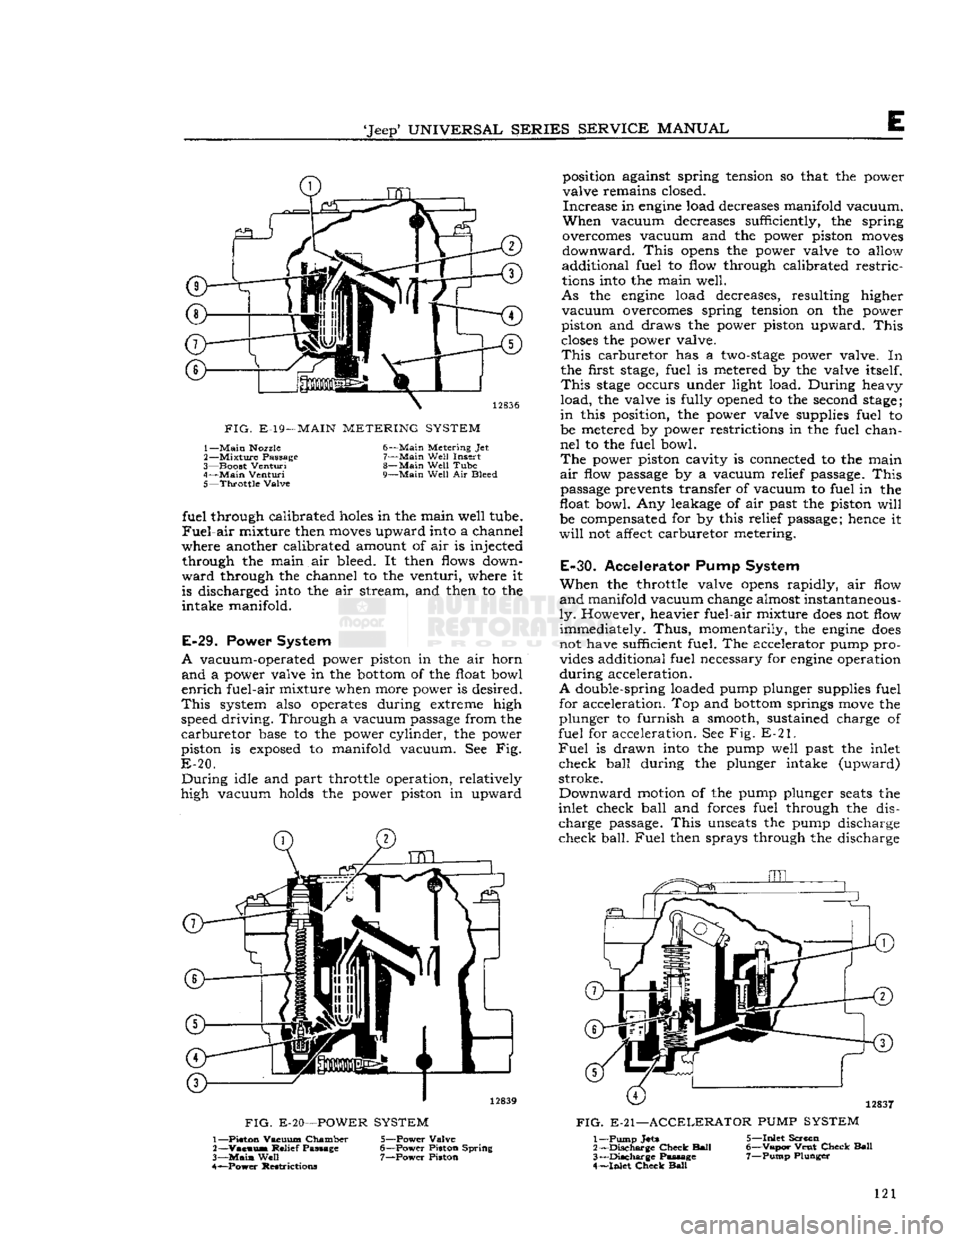
FIG.
E-19—
MAIN
METERING SYSTEM
1—
Main
Nozzle
2—
Mixture
Passage
3—
Boost
Venturi
4—
Main
Venturi
5—
Throttle
Valve 6—
Main
Metering Jet
7—
Main
Well
Insert
8—
Main
Well
Tube
9—
Main
Well
Air Bleed fuel through calibrated
holes
in the main well tube.
Fuel-air
mixture then
moves
upward into a channel
where another calibrated amount of air is injected through the main air bleed. It then flows down
ward
through the channel to the venturi, where it is discharged into the air stream, and then to the
intake manifold.
E-29.
Power System
A
vacuum-operated power piston in the air horn
and
a power valve in the
bottom
of the float bowl
enrich
fuel-air mixture when more power is desired.
This
system also operates during extreme high
speed driving. Through a vacuum passage from the
carburetor
base to the power cylinder, the power
piston is
exposed
to manifold vacuum. See Fig.
E-20.
During
idle and part throttle operation, relatively
high vacuum holds the power piston in upward
FIG.
E-20—POWER
SYSTEM
position against spring tension so that the power
valve remains closed.
Increase
in
engine
load decreases manifold vacuum.
When
vacuum decreases sufficiently, the spring
overcomes vacuum and the power piston
moves
downward.
This
opens
the power valve to allow
additional fuel to flow through calibrated restric
tions into the main well.
As
the
engine
load decreases, resulting higher
vacuum
overcomes spring tension on the power
piston and draws the power piston upward.
This
closes
the power valve.
This
carburetor has a
two-stage
power valve. In
the first
stage,
fuel is metered by the valve itself.
This
stage
occurs under light load. During heavy
load,
the valve is fully opened to the second
stage;
in
this position, the power valve supplies fuel to
be metered by power restrictions in the fuel chan
nel
to the fuel bowl.
The
power piston cavity is connected to the main
air
flow passage by a vacuum relief passage.
This
passage prevents transfer of vacuum to fuel in the
float bowl. Any leakage of air past the piston
will
be compensated for by this relief passage; hence it
will
not affect carburetor metering.
E-30.
Accelerator Pump System
When
the throttle valve
opens
rapidly, air flow
and
manifold vacuum change almost instantaneous
ly.
However, heavier fuel-air mixture
does
not flow immediately.
Thus,
momentarily, the
engine
does
not have sufficient fuel. The accelerator pump pro vides additional fuel necessary for
engine
operation
during
acceleration.
A
double-spring loaded pump plunger supplies fuel for acceleration. Top and
bottom
springs
move
the
plunger to furnish a smooth, sustained charge of
fuel for acceleration. See Fig. E-21.
Fuel
is drawn into the pump well past the inlet
check ball during the plunger intake (upward)
stroke.
Downward
motion of the pump plunger
seats
the
inlet check ball and forces fuel through the dis charge
passage.
This
unseats
the pump discharge
check
ball.
Fuel
then sprays through the discharge
12837
FIG.
E-21—ACCELERATOR
PUMP
SYSTEM
1— Piston Vacuum Chamber
2—
Vacuus*
Relief Passage
3—
Main
Well
4— ^Power Restrictions 5— Power Valve
6— Power Piston Spring 7— Power Piston 1— Pump
Jets
2—
Discharge
Check
Ball
3—
Discharge
Passage
4—
Inlet
Check
Ball
5—
Inlet
Screen
6—
Vapor
Vent
Check
Ball
7—
Pump
Plunger
121
Page 123 of 376
'Jeep9
UNIVERSAL
SERIES
SERVICE
MANUAL
E
exterior moving parts of a carburetor are
often
responsible for unsatisfactory performance.
For
this
reason,
efficient carburetion depends upon careful cleaning and inspection while servicing.
a.
Thoroughly clean carburetor castings and metal
parts
in carburetor cleaning solvent.
Caution:
Accelerator pump plunger and any fiber
or
rubber parts should never be immersed in
car
buretor
cleaner. Wash pump plunger in cleaning
solvent.
b.
Blow out all passages in the castings with com
pressed air. Dry all parts with compressed air.
Make
sure all jets and passages are clean. Do
not use wire to clean fuel passages or air bleeds.
c.
Check
inlet valve
needle
and seat for wear. If
wear
is noted, the assembly must be replaced.
d.
Check
float hinge pin for wear and check float
for damage.
e.
Check
throttle and choke shaft bores for wear
and
out-of-round.
f. Inspect idle mixture adjustment
needles
for
burrs
or
grooves; replace if damaged.
g. Inspect cup of accelerator pump plunger; re
place if damaged, worn, or hardened. Inspect pump
well
in bowl for wear or scoring.
h.
Check
filter screens for
dirt
or lint.
Clean,
and
if
they remain
clogged,
replace.
i.
If for any reason parts have
become
loose
or
damaged in the cluster assembly, the assembly
must be replaced.
Note:
Use ijew gaskets whenever the carburetor
is disassembled.
E-37.
Throttle Body Assembly
a.
Install
idle mixture adjustment
needles
and
springs in throttle body. Tighten finger-tight, then
unthread
one
turn
as a preliminary adjustment
setting.
Caution:
Do not force idle mixture adjustment
needles
against
seats
or damage may result.
b.
Invert
fuel bowl body and place new throttle
body gasket on bowl. Fasten throttle body to bowl
body with three screws and lockwashers; tighten
securely.
E-38.
Fuel
Bowl Body Assembly
a.
Drop steel discharge check
tall
of accelerator
pump into discharge hole.
Install
pump discharge
spring
and T-shaped retainer. Stake retainer in
place.
Note:
Top of retainer must be flush with flat
surface
of fuel bowl body.
b.
Install
two inserts in main well. Align surface
on lip of insert with flat surface in recess on top
of main well.
Install
venturi cluster with gasket,
and
tighten mounting screws evenly and securely.
Be
certain that center screw is fitted with fiber gasket, and that a special smooth shank screw is
used.
c.
Install
two main metering jets, power valve
gasket and power valve.
d.
Install
small aluminum inlet check
ball
in ac
celerator
pump inlet at
bottom
of pump well. In
sert
pump return spring into well, and center by
pressing spring downward with finger.
e.
Install
pump inlet screen in
bottom
of fuel
bowl.
E-39.
Air
Horn Body
Assembly
a.
Install
choke lever and collar on choke shaft.
Prong
on choke lever must face away from air
horn
body and be on top of choke trip lever.
b.
Install
choke shaft and lever assembly into the
air
horn. Choke rod
hole
in the choke lever must
face fuel inlet side of carburetor.
c.
Install
choke valve plate in choke shaft so that
letters RP
will
face upward in finished carburetor.
Install
two new valve plate attaching screws, but
do not tighten securely until valve plate is centered.
To
center choke valve plate on choke shaft, hold
choke valve tightly closed, then slide choke shaft
inward
to obtain approximately .020" [0,508 mm.]
clearance
between
choke trip lever and choke lever
and
collar assembly. Tighten choke valve screws
securely,
and stake lightly in place. Choke valve
will
be perfectly free in all positions when installed
correctly.
d.
Insert
outer accelerator pump lever and shaft as sembly into air horn body, with lever pointing to
ward
choke shaft.
Install
inner pump arm, with plunger
hole
inward,
and tighten set screw securely.
Position pump plunger assembly on inner pump
arm,
with pump shaft pointing
inward,
and install
retainer.
e.
Install
needle
seat screen on inlet valve seat. In
stall
seat and gasket in air horn body. Tighten seat
securely with a wide-blade screwdriver.
f.
Install
power piston into vacuum cavity.
Lightly
stake piston retainer washer in place. Piston should
travel
freely in cavity.
g.
Install
air horn gasket on air horn body, fitting
gasket over guide pin.
h.
Attach inlet valve
needle
to float.
Carefully
position float and insert float hinge pin. Drop tang
at
rear
of float arm downward toward air horn.
i.
Install
fuel inlet fitting, if removed.
j.
With
air horn assembly inverted, measure the distance from the air horn gasket to top of float
at toe \%£f [27,78 mm.] for standard carburetors
and
\%i [29,36 mm.] for exhaust emission control
equipped carburetors, as shown in Fig. E-23. Use
float level
gauge
J-5127-2. Bend float arm as re
quired
to adjust float level.
k.
With
air horn body held upright, measure dis
tance from gasket to
bottom
of float
pontoon
at outer end. Use a l7/s" [47,625 mm.] float drop
gauge.
Bend float tang, as required, to adjust float
drop.
See Fig. E-24.
I.
Carefully
place air horn body on fuel bowl
body, making certain that the accelerator pump
plunger is properly positioned in the pump well.
Lower
the cover gently, straight down; install air 123
Page 161 of 376
'Jeep*
UNIVERSAL
SERIES
SERVICE
MANUAL
COOLING
SYSTEM
Contents
SUBJECT
PAR.
GENERAL
.G-l Antifreeze Solutions. .G-l6
Cylinder
Block.
..................
.G-8
Draining
Cooling System............... G-3
Engine
Overheating..
.................
.G-19
Fan
Belt.
......... .........
.G-18
Filling
Cooling System.................
G-2
Inhibited
Coolant Solution .G-l7
Temperature
Sending Unit.
...........
.G-l0
Thermostat
.........................
G-9
RADIATOR
.G-5
Radiator
and Heater Hoses.............
G-7
SUBJECT
PAR.
Radiator
Pressure
Cap.................
G-4
Radiator
Removal and Replacement..... G-6
WATER
PUMP.
. . .G-ll
Water
Pump Disassembly. .............G-13
Water
Pump Inspection.
..............
.G-12
Water
Pump Reassembly.
.............
.G-14
Water
Pump Removal and Replacement. .G-l5
SERVICE
DIAGNOSIS.
.G-20
SPECIFICATIONS
. .G-21
ANTIFREEZE
CHART.
..... ... .G-22
G-l. GENERAL
a.
The satisfactory performance of the Hurricane
F4
engine
is controlled to a great
extent
by the proper operation of the cooling system. The
engine
block is full length water jacketed which prevents
distortion of the cylinder walls. Directed cooling
and
large water holes, properly placed in the cylin
der head gasket cause more water to flow past the
valve
seats
(which are the
hottest
parts of the
block)
and
carry
the heat away from the valves, giving positive cooling of valves and seats.
Minimum
temperature of the coolant is controlled by a thermostat mounted in the
outlet
passage of
the engine. When the coolant temperature is below
thermostat-rated temperature, the thermostat re mains closed and the coolant is directed through
the radiator-bypass
hose
to the water pump. When the thermostat opens, coolant flow is directed to
the top of the radiator. The radiator dissipates the
excess
engine
heat before the coolant is recirculated
through the engine.
The
cooling system is pressurized. Operating pres
sure
is regulated by the rating of the radiator cap
which
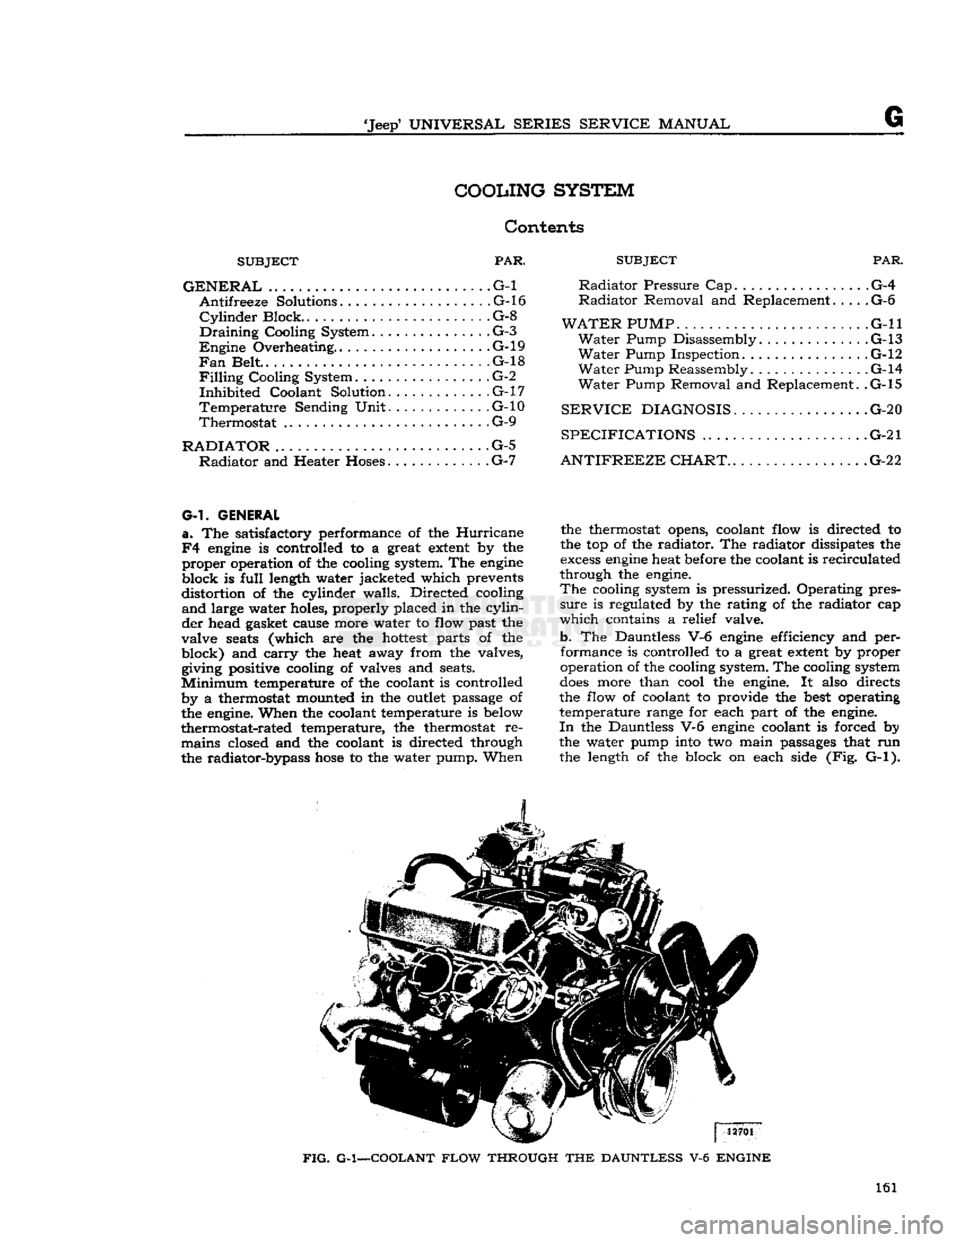
contains a relief valve, b. The Dauntless V-6
engine
efficiency and performance is controlled to a great
extent
by proper
operation of the cooling system. The cooling system
does
more than cool the engine. It also directs
the flow of coolant to provide the
best
operating
temperature range for each part of the engine.
In
the Dauntless V-6
engine
coolant is forced by
the water pump into two main passages that run the length of the block on each side (Fig. G-l).
FIG.
G-1—COOLANT
FLOW
THROUGH
THE
DAUNTLESS
V-6
ENGINE
161
Page 205 of 376
SERIES
SERVICE
MANUAL
H
t
^
12956
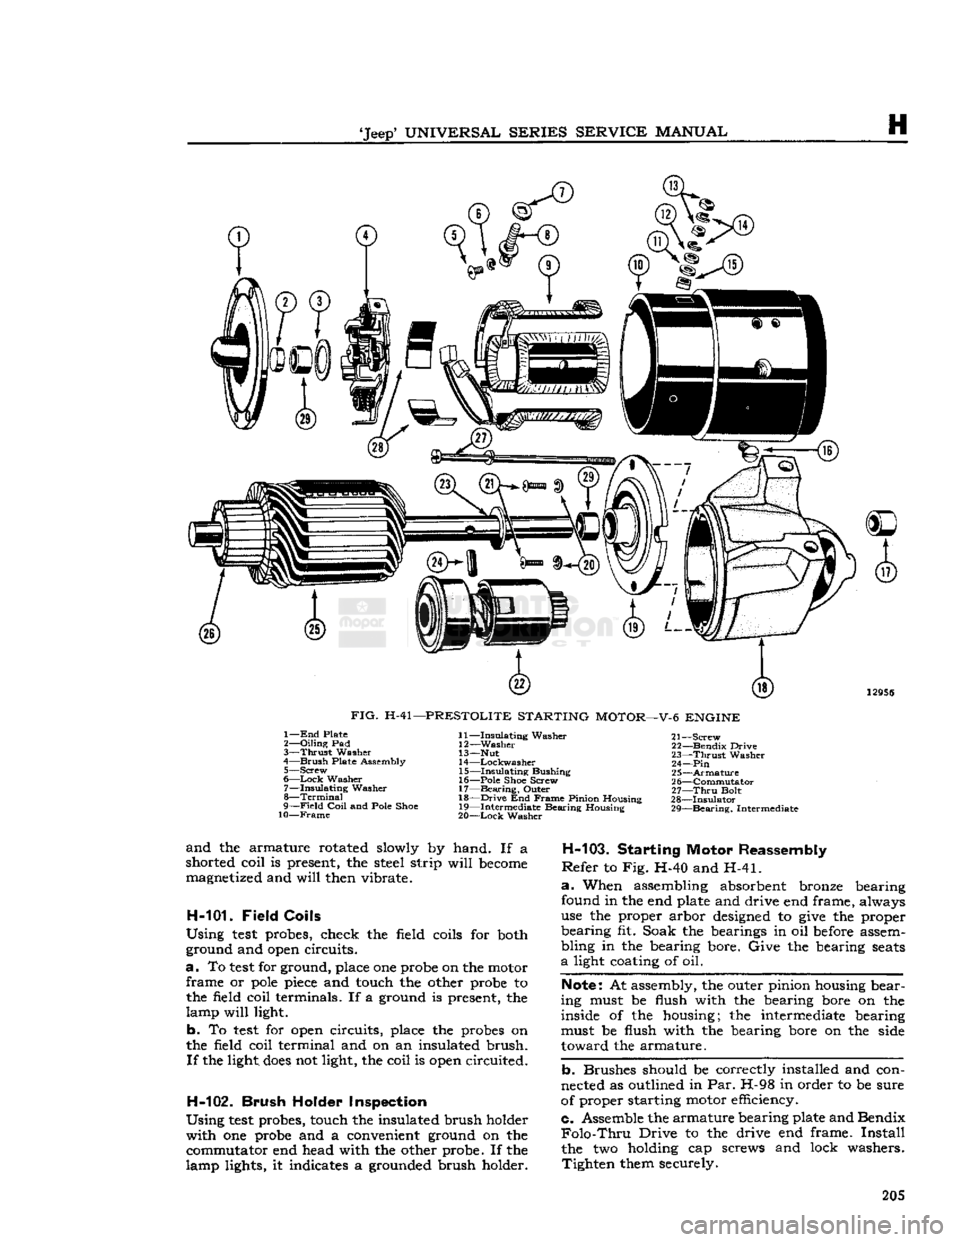
FIG.
H-41—PRESTOLITE
STARTING
MOTOR—V-6
ENGINE
1—
End
Plate
2—
Oiling
Pad
3—
Thrust
Washer
4—
Brush
Plate Assembly 5—
Screw
6—
Lock
Washer 7—
Insulating
Washer
8—
Terminal
9—
Field
Coil
and Pole Shoe
10—Frame
11—
Insulating
Washer
12—
Washer
13— Nut
14
—Lockwasher
15—
Insulating
Bushing
16— Pole Shoe Screw
17—
Bearing,
Outer
18—
Drive
End
Frame
Pinion Housing
19— Intermediate Bearing Housing
20—
Lock
Washer 21—
Screw
22— Bendix Drive
23—
Thrust
Washer
24—Pin
25—
Armature
2 6—Commutator
27—
Thru
Bolt
28—
Insulator
29—
Bearing,
Intermediate
and
the armature rotated slowly by hand. If a
shorted coil is present, the steel strip
will
become
magnetized and
will
then vibrate.
H-101-
Field
Coils
Using
test
probes, check the field coils for both
ground and
open
circuits.
a.
To
test
for ground, place one probe on the motor frame or
pole
piece
and touch the other probe to the field coil terminals. If a ground is present, the
lamp
will
light.
b.
To
test
for
open
circuits, place the probes on
the field coil terminal and on an insulated brush.
If
the light,
does
not light, the coil is
open
circuited.
H-102.
Brush
Holder Inspection
Using
test
probes, touch the insulated brush holder with one probe and a convenient ground on the commutator end head with the other probe. If the
lamp lights, it indicates a grounded brush holder.
H-103.
Starting Motor Reassembly
Refer
to Fig. H-40 and H-41.
a.
When assembling absorbent bronze bearing
found in the end plate and drive end frame, always
use the proper arbor
designed
to
give
the proper
bearing fit. Soak the bearings in oil
before
assem
bling in the bearing bore. Give the bearing
seats
a
light coating of oil.
Note:
At assembly, the outer pinion housing bear
ing must be flush with the bearing bore on the inside of the housing; the intermediate bearing
must be flush with the bearing bore on the side
toward the armature.
b.
Brushes should be correctly installed and con
nected as outlined in Par. H-98 in order to be sure
of proper starting motor efficiency.
c. Assemble the armature bearing plate and Bendix
Folo-Thru
Drive to the drive end frame.
Install
the two holding cap screws and lock washers. Tighten them securely. 205
Page 278 of 376
M
FRONT
AXLE
1— Nut
2—
Lock
Washer
3—
Bearing
Lock
Washer
4—
Wheel
Bearing Cup 5—
Cone
and Rollers
6—
Oil
Seal 7— Spindle
8— Spindle Bushing
9—
Filler
Plug
10—
Right
Knuckle and Arm
11— Shims
12— Pivot Pin
13—
Lock
Washer
14—
Cap
Screw
15— Nut
16—
Washer
17—
Universal
Joint Yoke
18—
Oil
Seal
19—
Oil
Slinger
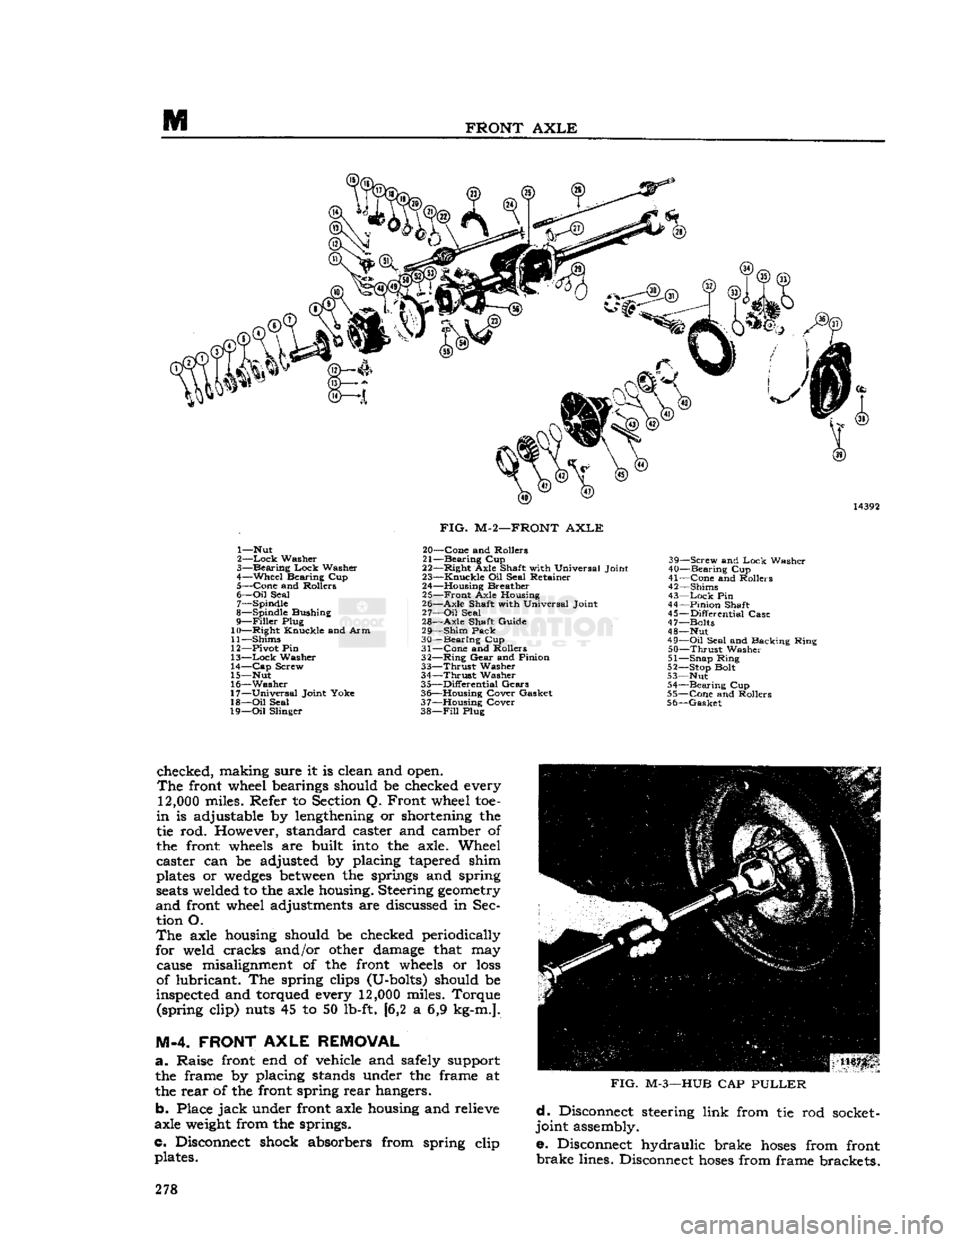
FIG.
M-2—FRONT
AXLE
20—
Cone
and Rollers
21—
Bearing
Cup
22—
Right
Axle Shaft with Universal Joint
23—
Knuckle
Oil Seal Retainer
24— Housing Breather 25—
Front
Axle Housing
26—
Axle
Shaft with Universal Joint
27—
Oil
Seal
28—
Axle
Shaft Guide
29—
Shim
Pack
30—
Bearing
Cup
31—
Cone
and Rollers
32—
Ring
Gear
and Pinion
33—
Thrust
Washer
34—
Thrust
Washer
35—
Differential
Gears
36— Housing Cover Gasket
37— Housing Cover
38—
Fill
Plug 39—
Screw
and
Lock
Washer
40—
Bearing
Cup
41—
Cone
and Rollers
42— Shims
43—
Lock
Pin
44—
Pinion
Shaft
45—
Differential
Case
47— Bolts
48— Nut
49—
Oil
Seal and Backing Ring
50—
Thrust
Washer
51— Snap Ring
52— Stop Bolt
53— Nut 54—
Bearing
Cup
55—
Cone
and Rollers
56—
Gasket
checked, making sure it is clean and open.
The
front wheel bearings should be checked every
12,000
miles. Refer to Section Q. Front wheel toe-
in
is adjustable by lengthening or shortening the
tie rod. However, standard caster and camber of
the front
wheels
are built
into
the axle. Wheel
caster can be adjusted by placing tapered shim
plates or
wedges
between
the springs and spring
seats
welded to the axle housing. Steering
geometry
and
front wheel adjustments are discussed in Sec tion O.
The
axle housing should be checked periodically
for weld cracks and/or other damage that may cause misalignment of the front
wheels
or
loss
of lubricant. The spring clips (U-bolts) should be
inspected and torqued every
12,000
miles. Torque (spring clip) nuts 45 to 50 lb-ft. [6,2 a 6,9 kg-m.].
M-4. FRONT
AXLE
REMOVAL
a.
Raise front end of vehicle
arid
safely support the frame by placing stands under the frame at
the rear of the front spring rear hangers.
b. Place
jack
under front axle housing and relieve
axle
weight
from the springs.
c. Disconnect shock absorbers from spring clip plates.
FIG.
M-3—HUB
CAP
PULLER
d.
Disconnect steering link from tie rod socket-
joint assembly.
e. Disconnect hydraulic brake
hoses
from front
brake
lines. Disconnect
hoses
from frame brackets. 278
Page 282 of 376
FRONT
AXLE
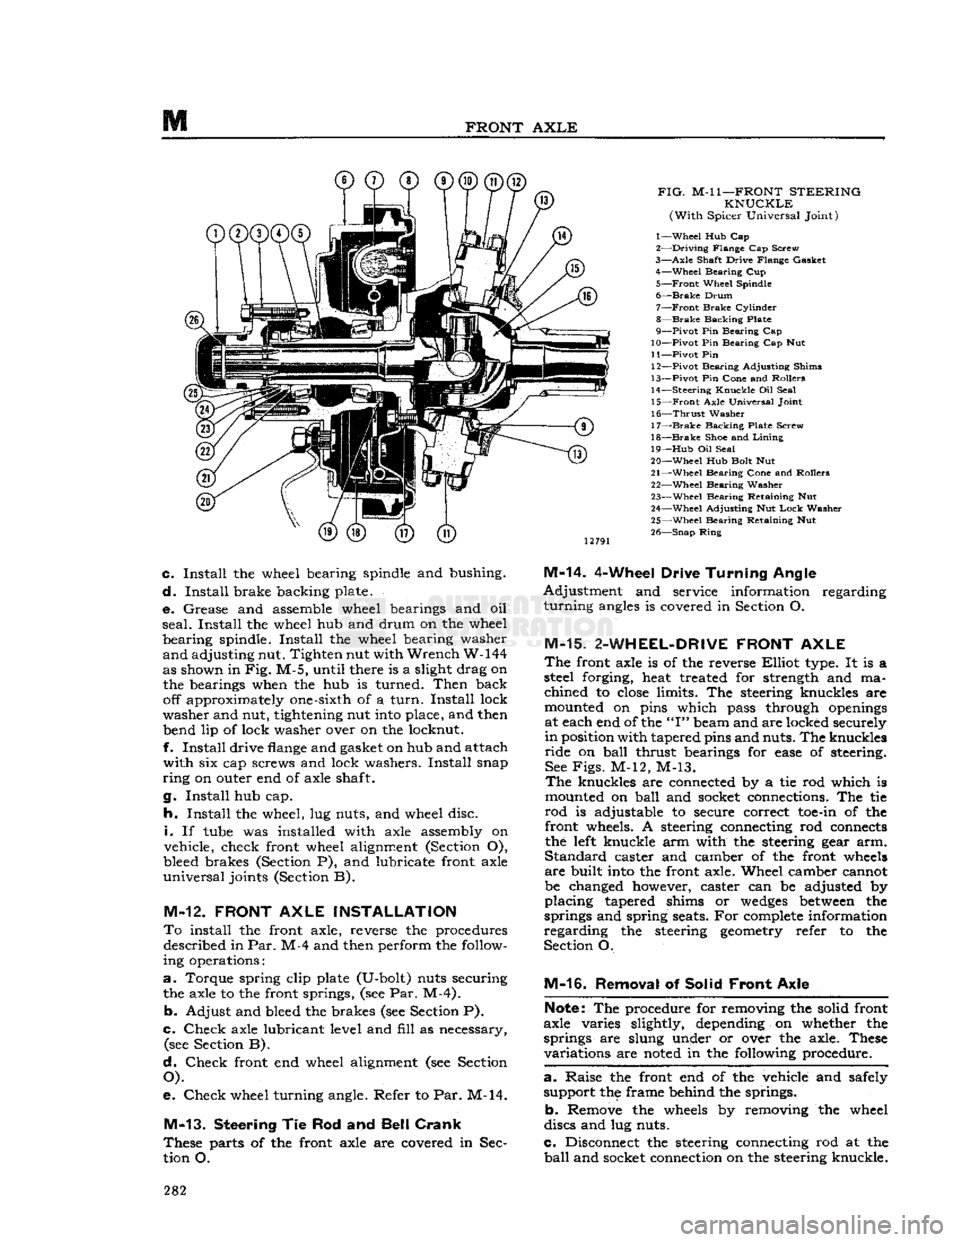
FIG.
M-l
1—FRONT
STEERING
KNUCKLE
(With
Spicer Universal Joint)
1—
Wheel
Hub Cap
2—
Driving
Flange Cap Screw
3—
Axle
Shaft Drive Flange Gasket 4—
Wheel
Bearing Cup
5—
Front
Wheel Spindle
6—
Brake
Drum
7—
Front
Brake
Cylinder
8—
Brake
Backing Plate
9—
Pivot
Pin Bearing Cap
10—
Pivot
Pin Bearing Cap Nut
11—
Pivot
Pin 12—
Pivot
Bearing Adjusting Shims
13—
Pivot
Pin Cone and Rollers
14—
Steering
Knuckle
Oil Seal 15—
Front
Axle Universal Joint
16—
Thrust
Washer
17—
Brake
Backing Plate Screw
18—
Brake
Shoe and
Lining
19—
Hub
Oil Seal
20—
Wheel
Hub Bolt Nut
21—
Wheel
Bearing Cone and Rollers 22—
Wheel
Bearing Washer
23—
Wheel
Bearing Retaining Nut
24—
Wheel
Adjusting Nut
Lock
Washer
25—
Wheel
Bearing Retaining Nut
26—
Snap
Ring
c.
Install
the wheel bearing spindle and bushing.
d.
Install
brake backing plate.
e.
Grease and assemble wheel bearings and oil
seal.
Install
the wheel hub and drum on the wheel
bearing
spindle.
Install
the wheel bearing washer
and
adjusting nut. Tighten nut with
Wrench
W-144
as shown in
Fig.
M-5, until there is a slight drag on the bearings when the hub is turned.
Then
back off approximately one-sixth of a
turn.
Install
lock
washer
and nut, tightening nut
into
place, and then bend lip of lock washer over on the locknut.
f.
Install
drive
flange
and gasket on hub and attach
with
six cap screws and lock washers.
Install
snap
ring
on outer end of axle shaft.
g.
Install
hub cap.
h.
Install
the wheel, lug nuts, and wheel disc.
i.
If
tube
was installed with axle assembly on
vehicle, check front wheel alignment (Section O),
bleed brakes (Section P), and lubricate front axle
universal
joints (Section B).
M-12.
FRONT
AXLE
INSTALLATION
To
install the front axle, reverse the procedures described in
Par.
M-4 and then perform the follow
ing operations:
a.
Torque spring clip plate (U-bolt) nuts securing the axle to the front springs, (see Par. M-4).
b.
Adjust and bleed the brakes (see Section P).
c.
Check
axle lubricant level and
fill
as necessary, (see Section B).
d.
Check
front end wheel alignment (see Section
O).
e.
Check
wheel turning angle. Refer to Par. M-14.
M-13.
Steering
Tie Rod and
Bell Crank
These
parts of the front axle are covered in Sec
tion O.
M-14.
4-Wheel Drive
Turning
Angle
Adjustment
and service information regarding
turning
angles
is covered in Section O.
M-15.
2-WHEEL-DRIVE
FRONT
AXLE
The
front axle is of the reverse
Elliot
type. It is a
steel forging, heat treated for strength and ma
chined
to
close
limits. The steering knuckles are
mounted on pins which pass through
openings
at each end of the
"I"
beam and are locked securely
in
position with tapered pins and nuts. The knuckles
ride
on
ball
thrust bearings for
ease
of steering. See
Figs.
M-12, M-13.
The
knuckles are connected by a tie rod which is
mounted on
ball
and socket connections. The tie
rod
is adjustable to secure correct
toe-in
of the front wheels. A steering connecting rod
connects
the
left
knuckle arm with the steering gear arm.
Standard
caster and camber of the front
wheels
are
built
into
the front axle. Wheel camber cannot
be changed however, caster can be adjusted by
placing
tapered shims or
wedges
between
the
springs and spring seats. For
complete
information
regarding
the steering
geometry
refer to the
Section O.
M-16.
Removal of Solid
Front
Axle
Note:
The procedure for removing the solid front
axle varies slightly, depending on whether the
springs are slung under or over the axle. These
variations
are
noted
in the following procedure.
a. -
Raise the front end of the vehicle and safely support the frame behind the springs.
b.
Remove the
wheels
by removing the wheel
discs and lug nuts.
c.
Disconnect the steering connecting rod at the
ball
and socket connection on the steering knuckle. 282
Page 318 of 376
o
STEERING
SYSTEM
10
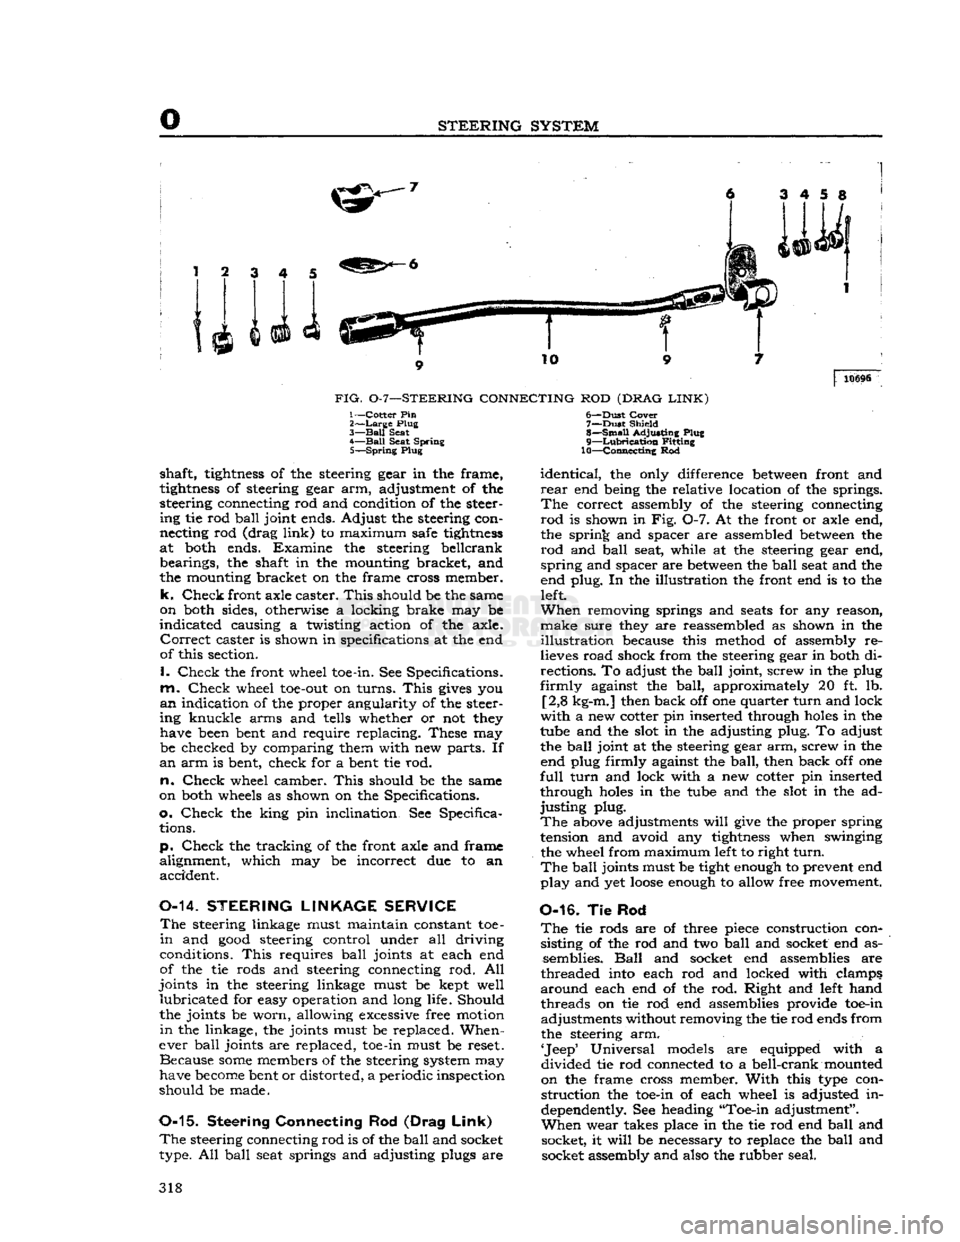
FIG.
0-7—STEERING
CONNECTING
ROD
(DRAG
LINK)
10696
1—Cotter Pin
2>—Large
Plug
3—
Ball
Seat
4—
Ball
Seat Spring 5—
Spring
Plug
shaft,
tightness
of the steering gear in the frame,
tightness
of steering gear arm, adjustment of the
steering connecting rod and condition of the steer ing tie rod
ball
joint ends. Adjust the steering con
necting rod (drag
link)
to maximum safe
tightness
at both ends. Examine the steering beilcrank bearings, the shaft in the mounting bracket, and
the mounting bracket on the frame cross member,
k.
Check
front axle caster.
This
should be the same
on both sides, otherwise a locking brake may be
indicated
causing a twisting action of the axle.
Correct
caster is shown in specifications at the end
of this section.
I.
Check
the front wheel toe-in. See Specifications,
m.
Check
wheel
toe-out
on turns.
This
gives
you
an
indication of the proper angularity of the steer
ing knuckle arms and tells whether or not they have been bent and require replacing. These may be checked by comparing them with new parts. If
an
arm is bent, check for a bent tie rod.
n.
Check
wheel camber.
This
should be the same
on both wheels as shown on the Specifications,
o.
Check
the king pin inclination. See Specifica tions.
p.
Check
the tracking of the front axle and frame
alignment, which may be incorrect due to an accident.
0-14.
STEERING
LINKAGE
SERVICE
The
steering linkage must maintain constant toe-
in
and
good
steering control under all driving
conditions.
This
requires
ball
joints at each end
of the tie rods and steering connecting rod. All
joints in the steering linkage must be kept well
lubricated
for easy operation and long life. Should
the joints be worn, allowing excessive free motion
in
the linkage, the joints must be replaced. When
ever
ball
joints are replaced, toe-in must be reset. Because
some
members of the steering system may
have
become
bent or distorted, a periodic inspection
should be made.
0-15.
Steering Connecting
Rod
(Drag
Link)
The
steering connecting rod is of the
ball
and socket
type. All
ball
seat springs and adjusting plugs are 6—
-Dust
Cover
7—
Dust
Shield
8—
Small
Adjusting Plug
9—
Lubrication
Fitting
10—Connecting Rod
identical,
the only difference
between
front and
rear
end being the relative location of the springs.
The
correct assembly of the steering connecting
rod
is shown in Fig. 0-7. At the front or axle end,
the spring and spacer are assembled
between
the
rod
and
ball
seat, while at the steering gear end,
spring
and spacer are
between
the
ball
seat and the
end plug. In the illustration the front end is to the left.
When
removing springs and
seats
for any reason,
make
sure they are reassembled as shown in the
illustration
because this method of assembly re
lieves road shock from the steering gear in both di
rections. To adjust the
ball
joint, screw in the plug
firmly
against the
ball,
approximately 20 ft. lb. [2,8 kg-m.] then back off one quarter
turn
and lock
with
a new cotter pin inserted through
holes
in the
tube and the slot in the adjusting plug. To adjust the
ball
joint at the steering gear arm, screw in the end plug firmly against the
ball,
then back off one
full
turn
and lock with a new cotter pin inserted
through
holes
in the tube and the slot in the ad
justing
plug.
The
above adjustments
will
give
the proper spring
tension and avoid any
tightness
when swinging
the wheel from maximum left to right
turn.
The
ball
joints must be tight enough to prevent end
play
and yet
loose
enough to allow free movement.
0-16. Tie Rod
The
tie rods are of three piece construction consisting of the rod and two
ball
and socket end as semblies.
Ball
and socket end assemblies are
threaded into each rod and locked with clamps,
around
each end of the rod. Right and left hand threads on tie rod end assemblies provide toe-in adjustments without removing the tie rod ends from
the steering arm.
'Jeep'
Universal models are equipped with a
divided
tie rod connected to a bell-crank mounted
on the frame cross member.
With
this type con
struction
the toe-in of each wheel is adjusted in
dependently. See heading "Toe-in adjustment".
When
wear takes place in the tie rod end
ball
and socket, it
will
be necessary to replace the
ball
and socket assembly and also the rubber seal. 318
Page 331 of 376
'Jeep*
UNIVERSAL SERIES SERVICE
MANUAL
P
f. On vehicles without a transmission brake hold
the brake
shoes
in their relative position and
engage
the parking brake cable
into
the parking
brake
lever.
g. On vehicles without a transmission brake in
stall
the parking brake strut and spring
between
the parking brake lever and the primary
shoe.
h.
Place the brake
shoes
on the backing plate and
install
the retainer pins, springs and retainers.
i.
Install the anchor pin plate.
j.
Install the lever and
sleeve
on the primary
shoe
then install the secondary return spring, then the
primary
return spring.
Important:
A
"L"
or "R" is located on the hex
agon
side of the lever crank for identification. The
lever crank marked "R" applies to the primary
shoe
on the
left
rear brake assembly. The lever
crank
marked
"L"
applies to the primary
shoe
on
the right rear brake assembly.
k. Place the upper linkage rod in the
groove
of the
anchor pin and
engage
the hook of the link rod
into
the adjusting lever.
I.
Install the brake drum. Install the wheel and
tire
assembly.
m. Adjust the brakes as described
below.
P-19.
Brake
Shoe
Initial
Adjustment —
a.
Should wheel brake units have
been
disassem bled for any reason, an initial adjustment
MUST
be made
before
drum installation.
b.
When the brake parts have
been
installed in
their correct position, initially adjust the adjusting
screw assemblies to a point where approximately Y% [9,53 mm.] of threads are
exposed
between
the
star
wheel and star wheel nut.
Note:
Following the initial adjustment and final
assembly, check brake pedal height to ensure
brake
operation. Then drive the car in reverse and
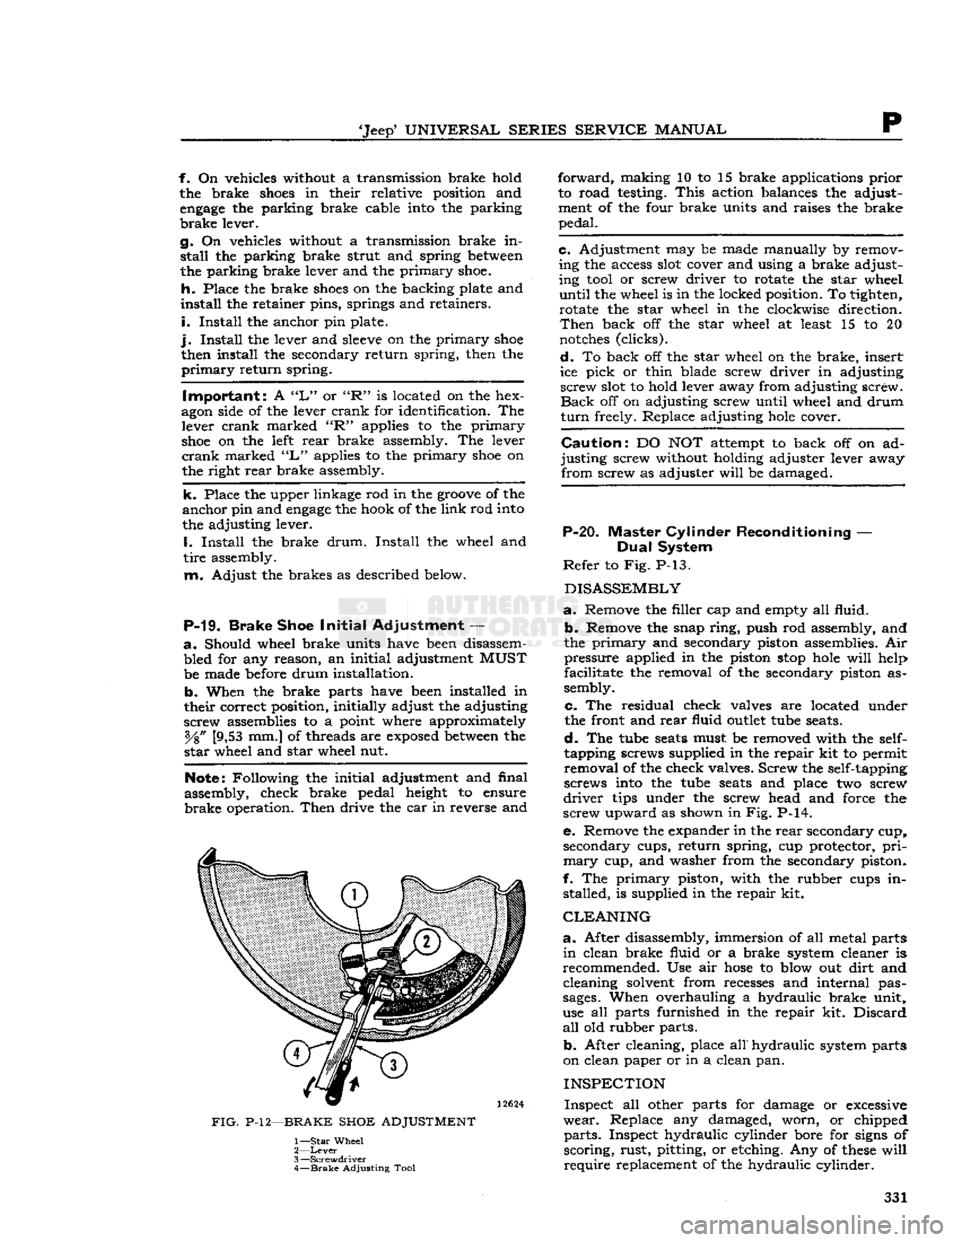
FIG.
P-12—BRAKE SHOE ADJUSTMENT
1—
Star
Wheel
2—
Lever
3—
Screwdriver
4—
Brake
Adjusting Tool
forward,
making 10 to 15 brake applications prior
to road testing.
This
action balances the adjust
ment of the four brake units and raises the brake
pedal.
c. Adjustment may be made manually by removing the access
slot
cover and using a brake adjust
ing
tool
or screw driver to rotate the star wheel
until
the wheel is in the locked position. To tighten, rotate the star wheel in the clockwise direction.
Then
back off the star wheel at least 15 to 20
notches
(clicks).
d.
To back off the star wheel on the brake, insert
ice pick or thin blade screw driver in adjusting screw
slot
to hold lever away from adjusting screw.
Back
off on adjusting screw until wheel and drum
turn
freely. Replace adjusting
hole
cover.
Caution:
DO NOT attempt to back off on ad
justing screw without holding adjuster lever away from screw as adjuster
will
be damaged.
P-20. Master Cylinder Reconditioning —
Dual
System
Refer
to Fig. P-13.
DISASSEMBLY
a.
Remove the filler cap and empty all fluid.
b.
Remove the snap ring, push rod assembly, and
the primary and secondary piston assemblies. Air pressure applied in the piston
stop
hole
will
help
facilitate the removal of the secondary piston as
sembly.
c. The residual check valves are located under
the front and rear fluid
outlet
tube
seats.
d.
The
tube
seats
must be removed with the
self-
tapping screws supplied in the repair kit to permit removal of the check valves. Screw the self-tapping
screws
into
the
tube
seats
and place two screw
driver
tips under the screw head and force the
screw upward as shown in Fig. P-14.
e. Remove the expander in the rear secondary cup, secondary cups, return spring, cup protector,
pri
mary
cup, and washer from the secondary piston.
f. The primary piston, with the rubber cups in stalled, is supplied in the repair kit.
CLEANING
a.
After disassembly, immersion of all metal parts
in
clean brake fluid or a brake system cleaner is
recommended. Use air
hose
to blow out dirt and cleaning solvent from recesses and internal pas
sages.
When overhauling a hydraulic brake unit,
use all parts furnished in the repair kit. Discard
all
old rubber parts.
b.
After cleaning, place
all"
hydraulic
system parts
on clean paper or in a clean pan.
INSPECTION
Inspect all other parts for damage or
excessive
wear.
Replace any damaged, worn, or chipped
parts.
Inspect hydraulic cylinder bore for
signs
of
scoring, rust, pitting, or etching. Any of
these
will
require
replacement of the hydraulic cylinder. 331