wheel size JEEP COMMANDER 2007 1.G Owners Manual
[x] Cancel search | Manufacturer: JEEP, Model Year: 2007, Model line: COMMANDER, Model: JEEP COMMANDER 2007 1.GPages: 456, PDF Size: 6.85 MB
Page 46 of 456
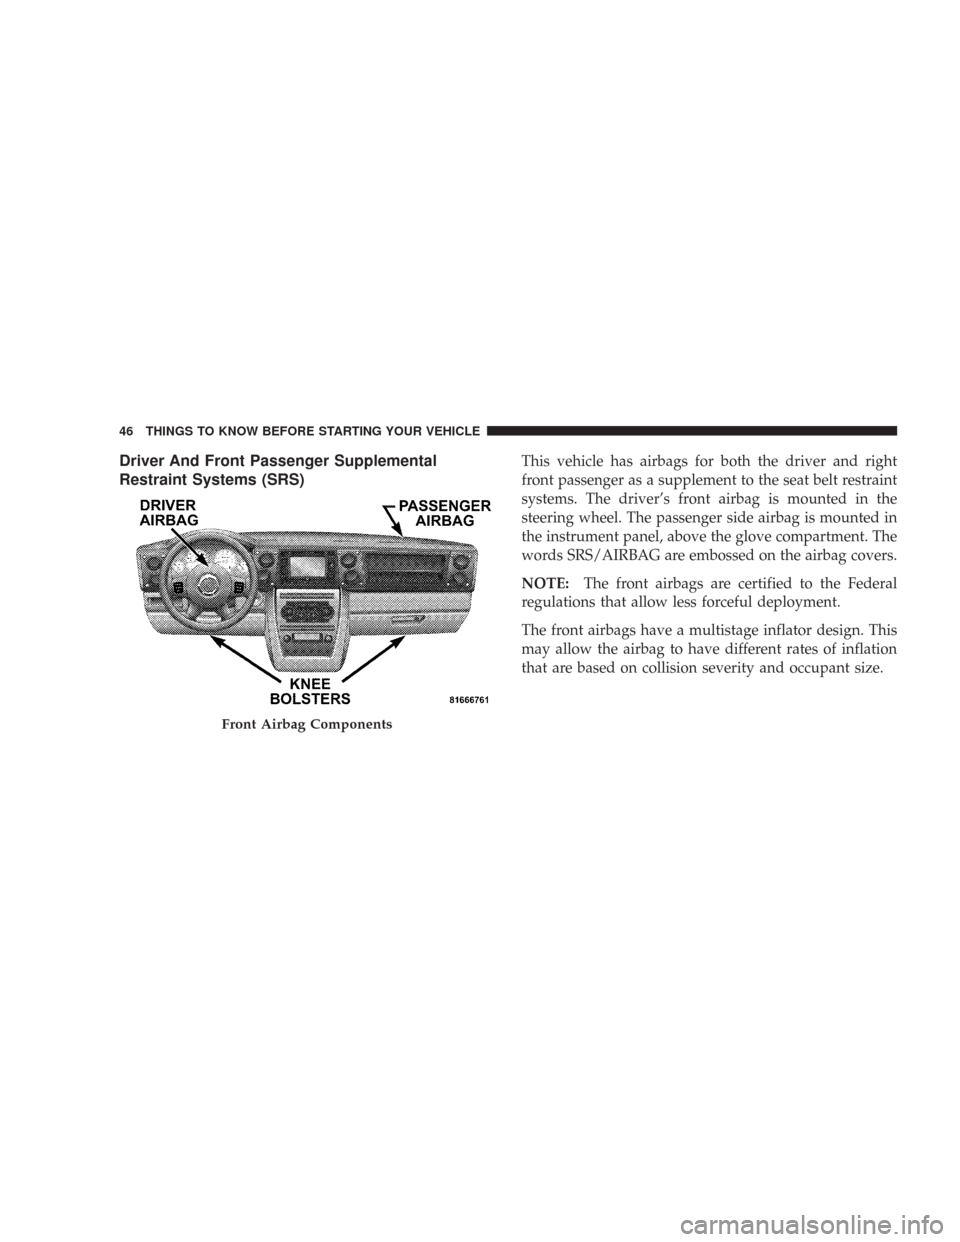
Driver And Front Passenger Supplemental
Restraint Systems (SRS)This vehicle has airbags for both the driver and right
front passenger as a supplement to the seat belt restraint
systems. The driver’s front airbag is mounted in the
steering wheel. The passenger side airbag is mounted in
the instrument panel, above the glove compartment. The
words SRS/AIRBAG are embossed on the airbag covers.
NOTE:The front airbags are certified to the Federal
regulations that allow less forceful deployment.
The front airbags have a multistage inflator design. This
may allow the airbag to have different rates of inflation
that are based on collision severity and occupant size.
Front Airbag Components
46 THINGS TO KNOW BEFORE STARTING YOUR VEHICLE
Page 52 of 456
•TheDriver and Passenger Airbag/Inflator Unitsare
located in the center of the steering wheel and the right
side of the instrument panel. When the ORC detects a
collision requiring the airbags, it signals the inflator
units. A large quantity of nontoxic gas is generated to
inflate the front airbags. Different airbag inflation rates
are possible, based on collision severity and occupant
size. The steering wheel hub trim cover and the upper
right side of the instrument panel separate and fold
out of the way as the bags inflate to their full size. The
bags fully inflate in about 50–70 milliseconds. This is
about half of the time it takes to blink your eyes. The
bags then quickly deflate while helping to restrain the
driver and front passenger.
The driver front airbag gas is vented through the vent
holes in the sides of the airbag. The passenger front
airbag gas is vented through the vent holes in the sides
of the airbag. In this way, the airbags do not interfere
with your control of the vehicle.•TheSide Impact SRS Side Curtain Airbagsare de-
signed to activate only in certain side or rollover
collisions. When the ORC (with side impact option)
detects a collision requiring the side curtain airbag to
inflate, it signals the inflators on the crash side of the
vehicle. A quantity of nontoxic gas is generated to
inflate the side curtain airbag. The inflating side cur-
tain airbag pushes the outside edge of the headliner
out of the way and covers the window. The airbag
inflates in about 30 milliseconds (about one quarter of
the time it takes to blink your eyes) with enough force
to injure you if you are not belted and seated properly,
or if items are positioned in the area where the side
curtain airbag inflates. This especially applies to chil-
dren. The side curtain airbag is only about 3
1�2inches
(9 cm) thick when it is inflated.
•TheKnee Impact Bolstershelp protect the knees of
the driver and the front passenger, and position every-
one for the best interaction with the front airbag.
52 THINGS TO KNOW BEFORE STARTING YOUR VEHICLE
Page 180 of 456
CAUTION!
The TPMS has been optimized for the original
equipment tires and wheels. TPMS pressures and
warning have been established for the tire size
equipped on your vehicle. Undesirable system op-
eration or sensor damage may result when using
replacement equipment that is not of the same size,
type, and/or style. After-market wheels can cause
sensor damage. Do not use tire sealant from a can, or
balance beads if your vehicle is equipped with a
TPMS, as damage to the sensors may result.
13. Temperature Gauge
The temperature gauge shows engine coolant tempera-
ture. Any reading within the normal range indicates that
the engine cooling system is operating satisfactorily.The gauge pointer will likely indicate a higher tempera-
ture when driving in hot weather, up mountain grades,
or when towing a trailer. It should not be allowed to
exceed the upper limits of the normal operating range.
CAUTION!
Driving with a hot engine cooling system could
damage your vehicle. If temperature gauge reads (H),
pull over and stop the vehicle. Idle the vehicle with
the air conditioner turned off until the pointer drops
back into the normal range. If the pointer remains on
the “H”, and you hear continuous chimes, turn the
engine off immediately, and call for service.
180 UNDERSTANDING YOUR INSTRUMENT PANEL
Page 265 of 456
road surfaces only. Driving in the 4 LOW position on dry
hard surfaced roads may cause increased tire wear and
damage to driveline components.
When operating your vehicle in 4 LOW, the engine speed
is approximately three times that of the 4 HI position at a
given road speed. Take care not to overspeed the engine
and do not exceed 25 mph (40 km/h).
Proper operation of four wheel drive vehicles depends on
tires of equal size, type, and circumference on each
wheel. Any difference will adversely affect shifting and
cause damage to the transfer case.
Because four wheel drive provides improved traction,
there is a tendency to exceed safe turning and stopping
speeds. Do not go faster than road conditions permit.WARNING!
You or others could be injured if you leave the
vehicle unattended with the transfer case in the N
(Neutral) position without first fully engaging the
parking brake. The transfer case N (Neutral) position
disengages both the front and rear driveshafts from
the powertrain and will allow the vehicle to move
regardless of the transmission position. The parking
brake should always be applied when the driver is
not in the vehicle.
Shift Positions
For additional information on the appropriate use of each
transfer case mode position, see the information below:
4HI
Four Wheel Drive High Range — All roads surfaces such
as ice, snow, gravel, sand, and dry hard pavement.
STARTING AND OPERATING 265
5
Page 275 of 456
WARNING!
•Always fully apply the parking brake when leav-
ing your vehicle, or it may roll and cause damage
or injury. Also, be certain to leave the transmis-
sion in P (Park). Failure to do so may allow the
vehicle to roll and cause damage or injury.
•Leaving children in a vehicle unattended is dan-
gerous for a number of reasons. A child or others
could be injured. Children should be warned not
to touch the parking brake or the gear selector
lever. Don’t leave the keys in the ignition. A child
could operate power windows, other controls, or
move the vehicle.
•Be sure the parking brake is fully disengaged
before driving, failure to do so can lead to brake
problems due to excessive heating of the rear
brakes.
When parking on a hill, turn the front wheels toward the
curb on a downhill grade and away from the curb on an
uphill grade.
The parking brake should always be applied whenever
the driver is not in the vehicle.
ANTI-LOCK BRAKE SYSTEM
The Anti-Lock Brake System (ABS) is designed to aid the
driver in maintaining vehicle control under adverse
braking conditions. The system operates with a separate
computer to modulate hydraulic pressure to prevent
wheel lock-up and help avoid skidding on slippery
surfaces.
All vehicle wheels and tires must be the same size and
type and tires must be properly inflated to produce
accurate signals for the computer.
STARTING AND OPERATING 275
5
Page 276 of 456
WARNING!
Significant over or under inflation of tires, or mixing
sizes of tires or wheels on the vehicle can lead to loss
of braking effectiveness.
The Anti-Lock Brake System conducts a low-speed self-
test at about 12 mph (20 km/h). If you have your foot
lightly on the brake while this test is occurring you may
feel slight pedal movement. The movement can be more
apparent on ice and snow. This is normal.
The Anti-Lock Brake System pump motor runs during
the self-test at 12 mph (20 km/h) and during an ABS stop.
The pump motor makes a low humming noise during
operation, which is normal.
WARNING!
Pumping of the Anti-Lock Brakes will diminish
their effectiveness and may lead to an accident.
Pumping makes the stopping distance longer. Just
press firmly on your brake pedal when you need to
slow down or stop.
276 STARTING AND OPERATING
Page 294 of 456
WARNING!
•Do not use a tire, wheel size or rating other than
that specified for your vehicle. Some combina-
tions of unapproved tires and wheels may change
suspension dimensions and performance charac-
teristics, resulting in changes to steering, han-
dling, and braking of your vehicle. This can cause
unpredictable handling and stress to steering and
suspension components. You could lose control
and have an accident resulting in serious injury or
death. Use only the tire and wheel sizes with load
ratings approved for your vehicle.
•Never use a tire with a smaller load index or
capacity, other than what was originally equipped
on your vehicle. Using a tire with a smaller load
index could result in tire overloading and failure.
You could lose control and have an accident.
•Failure to equip your vehicle with tires having
adequate speed capability can result in sudden
tire failure and loss of vehicle control.
CAUTION!
Replacing original tires with tires of a different size
may result in false speedometer and odometer read-
ings.
Alignment and Balance
Poor suspension alignment may result in:
•Fast tire wear.
•Uneven tire wear, such as feathering and one-sided
wear.
•Vehicle pull to right or left.
Tires may also cause the vehicle to pull left or right.
Alignment will not correct this problem. See your autho-
rized dealer for proper diagnosis.
294 STARTING AND OPERATING
Page 295 of 456
Improper alignment will not cause vehicle vibration.
Vibration may be a result of tire and wheel out-of-
balance. Proper balancing will reduce vibration and
avoid tire cupping and spotty wear.
TIRE CHAINS
Certain models have sufficient tire-to-body clearance to
allow use of tire chains.Install chains on rear tires only.
Follow these recommendations to guard against damage
and excessive tire and chain wear:
•Do not install tire chains or traction devices on ve-
hicles with larger than P235/65R17 size tires. Tires
larger than this may not provide sufficient body
clearance with chains or other traction devices.
•Use SAE class “S” tire chains or traction devices only.
•Follow tire chain manufacturer’s instructions for
mounting chains.
•Install chains snugly and tighten after 1/2 mile (1 km)
of driving.
•Do notexceed 35 mph (56 km/h), unless otherwise
specified by the chain manufacturer.
•Drive cautiously, avoiding large bumps, potholes and
extreme driving maneuvers.
STARTING AND OPERATING 295
5
Page 299 of 456
A tire pressure monitoring sensor is located in the spare
wheel if the vehicle is equipped with a matching full size
spare wheel and tire assembly. The matching full size spare
tire can be used in place of any of the four road tires.
The “Tire Pressure Monitoring Telltale Light” will
illuminate in the instrument cluster, and an au-
dible chime will be activated when one or more of
the four active road tire pressures are low. The audible
chime will sound once every ignition cycle for each
condition that it detects. Should this occur, you should
stop as soon as possible, check the inflation pressure of
each tire on your vehicle, and inflate each tire to the
vehicle’s recommended cold tire pressure. The system
will automatically update and the “Tire Pressure Moni-
toring Light” will extinguish once the updated tire pres-
sures have been received. The vehicle may need to be
driven for up to 10 minutes above 15 mph (24 km/h) to
receive this information. A low spare tire will not cause
the “Tire Pressure Monitoring Telltale Light” to illumi-
nate or the chime to sound.The “Tire Pressure Monitoring Telltale Light” will flash
on and off for 60 seconds, and an audible chime will
sound when a system fault is detected. The flash cycle
will repeat every ten minutes, without an audible chime,
until the fault condition no longer exists. If the ignition
key is cycled, this sequence will repeat, providing the
system fault still exists.
NOTE:If your vehicle is equipped with a matching full
size spare tire, it has a tire pressure monitoring sensor,
and can be monitored by the Tire Pressure Monitoring
System (TPMS). In the event that the matching full size
spare tire is swapped with a low pressure road tire, the
next ignition key cycle will still show the “Tire Pressure
Monitoring Telltale Light” to be ON, and a chime to
sound. Driving the vehicle for up to 10 minutes above 15
mph (24 km/h) will turn OFF the “Tire Pressure Moni-
toring Telltale Light” as long as the spare tire or any other
road tire(s) are not below the low pressure warning
threshold.
STARTING AND OPERATING 299
5
Page 300 of 456
NOTE:If your vehicle is equipped with a non-matching
full size spare tire, it does not have a tire pressure
monitoring sensor. Therefore, it will not be monitored by
the Tire Pressure Monitor System (TPMS). In the event
that the non-matching full size spare tire is swapped with
a low pressure road tire, each ignition key cycle will still
show the “Tire Pressure Monitoring Telltale Light” to be
ON, and a chime to sound. After the original road tire has
been properly repaired and put back onto the vehicle in
place of the non-matching full size spare tire, the TPMS
will update automatically, and the “Tire Pressure Moni-
toring Telltale Light” will be OFF as long as none of the
road tires are below the low pressure warning threshold.
The vehicle may need to be driven for up to 10 minutes
above 15 mph (24 km/h) to receive this information.CAUTION!
The TPMS has been optimized for the original
equipment tires and wheels. TPMS pressures have
been established for the tire size equipped on your
vehicle. Undesirable system operation or sensor
damage may result when using replacement equip-
ment that is not of the same size, type, and/or style.
After-market wheels can cause sensor damage. Do
not use tire sealant from a can, or balance beads if
your vehicle is equipped with a TPMS, as damage to
the sensors may result.
300 STARTING AND OPERATING