JEEP COMMANDER 2010 1.G Owners Manual
Manufacturer: JEEP, Model Year: 2010, Model line: COMMANDER, Model: JEEP COMMANDER 2010 1.GPages: 460, PDF Size: 7.11 MB
Page 221 of 460
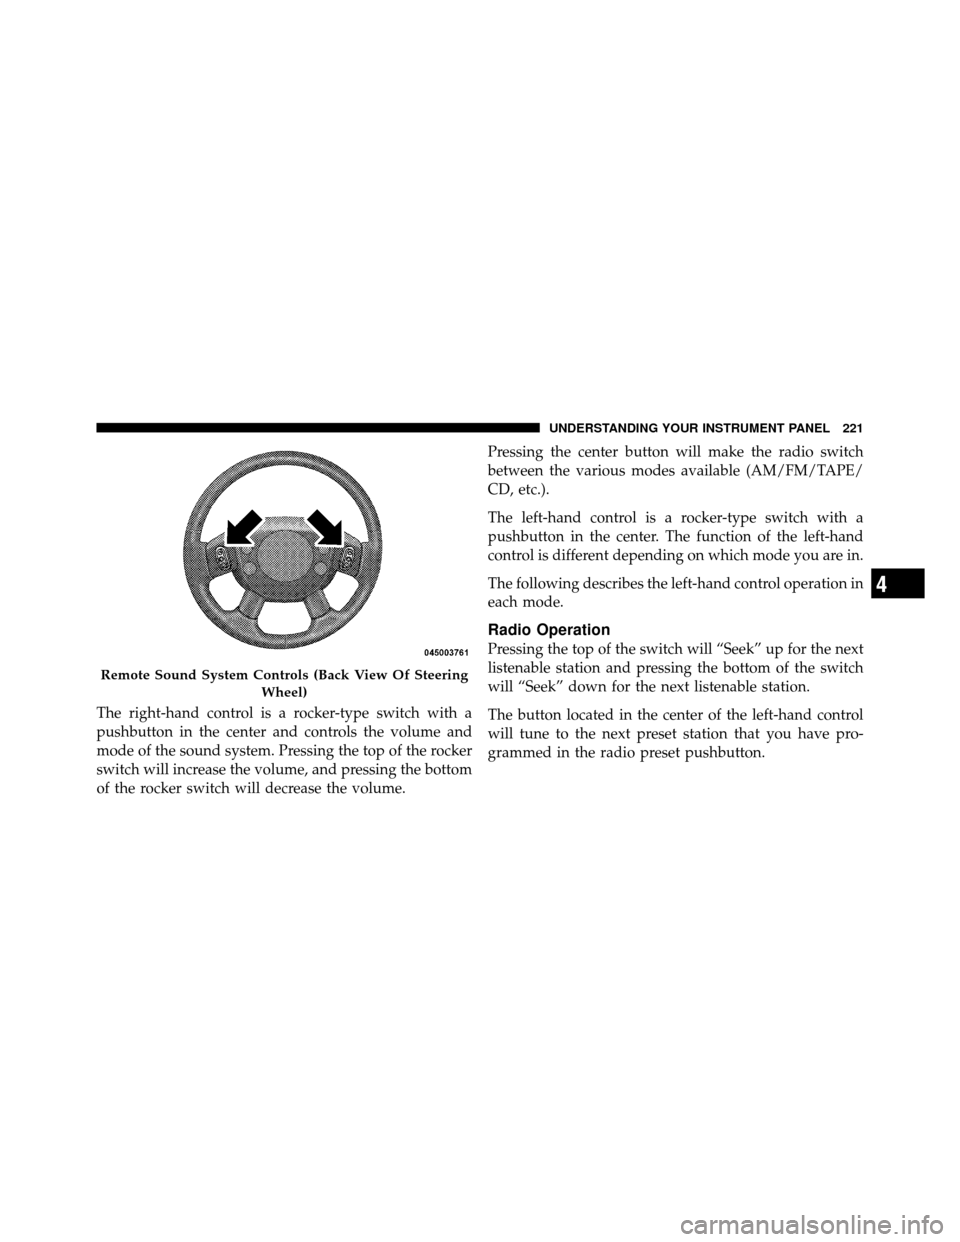
The right-hand control is a rocker-type switch with a
pushbutton in the center and controls the volume and
mode of the sound system. Pressing the top of the rocker
switch will increase the volume, and pressing the bottom
of the rocker switch will decrease the volume.Pressing the center button will make the radio switch
between the various modes available (AM/FM/TAPE/
CD, etc.).
The left-hand control is a rocker-type switch with a
pushbutton in the center. The function of the left-hand
control is different depending on which mode you are in.
The following describes the left-hand control operation in
each mode.
Radio Operation
Pressing the top of the switch will “Seek” up for the next
listenable station and pressing the bottom of the switch
will “Seek” down for the next listenable station.
The button located in the center of the left-hand control
will tune to the next preset station that you have pro-
grammed in the radio preset pushbutton.
Remote Sound System Controls (Back View Of Steering
Wheel)
4
UNDERSTANDING YOUR INSTRUMENT PANEL 221
Page 222 of 460
CD Player
Pressing the top of the switch once will go to the next
track on the CD. Pressing the bottom of the switch once
will go to the beginning of the current track, or to the
beginning of the previous track if it is within one second
after the current track begins to play.
If you press the switch up or down twice, it plays the
second track; three times, it will play the third, etc.
The center button on the left side rocker switch has no
function for a single-disc CD player. However, when a
multiple-disc CD player is equipped on the vehicle, the
center button will select the next available CD in the
player.
CD/DVD MAINTENANCE
To keep a CD/DVD in good condition, take the following
precautions:
1. Handle the disc by its edge; avoid touching the
surface.
2. If the disc is stained, clean the surface with a soft cloth,
wiping from center to edge.
3. Do not apply paper or tape to the disc; avoid scratch-
ing the disc.
4. Do not use solvents such as benzene, thinner, cleaners,
or anti-static sprays.
5. Store the disc in its case after playing.
222 UNDERSTANDING YOUR INSTRUMENT PANEL
Page 223 of 460
6. Do not expose the disc to direct sunlight.
7. Do not store the disc where temperatures may become
too high.
NOTE:If you experience difficulty in playing a particu-
lar disc, it may be damaged (i.e., scratched, reflective
coating removed, a hair, moisture or dew on the disc)
oversized, or have protection encoding. Try a known
good disc before considering disc player service.
RADIO OPERATION AND CELLULAR PHONES
Under certain conditions, the cellular phone being on in
your vehicle can cause erratic or noisy performance from
your radio. This condition may be lessened or eliminated
by relocating the cellular phone antenna. This condition
is not harmful to the radio. If your radio performance
does not satisfactorily “clear” by the repositioning of the
antenna, it is recommended that the radio volume be
turned down or off during cellular phone operation.
CLIMATE CONTROLS
Manual Heating and Air Conditioning System — If
Equipped
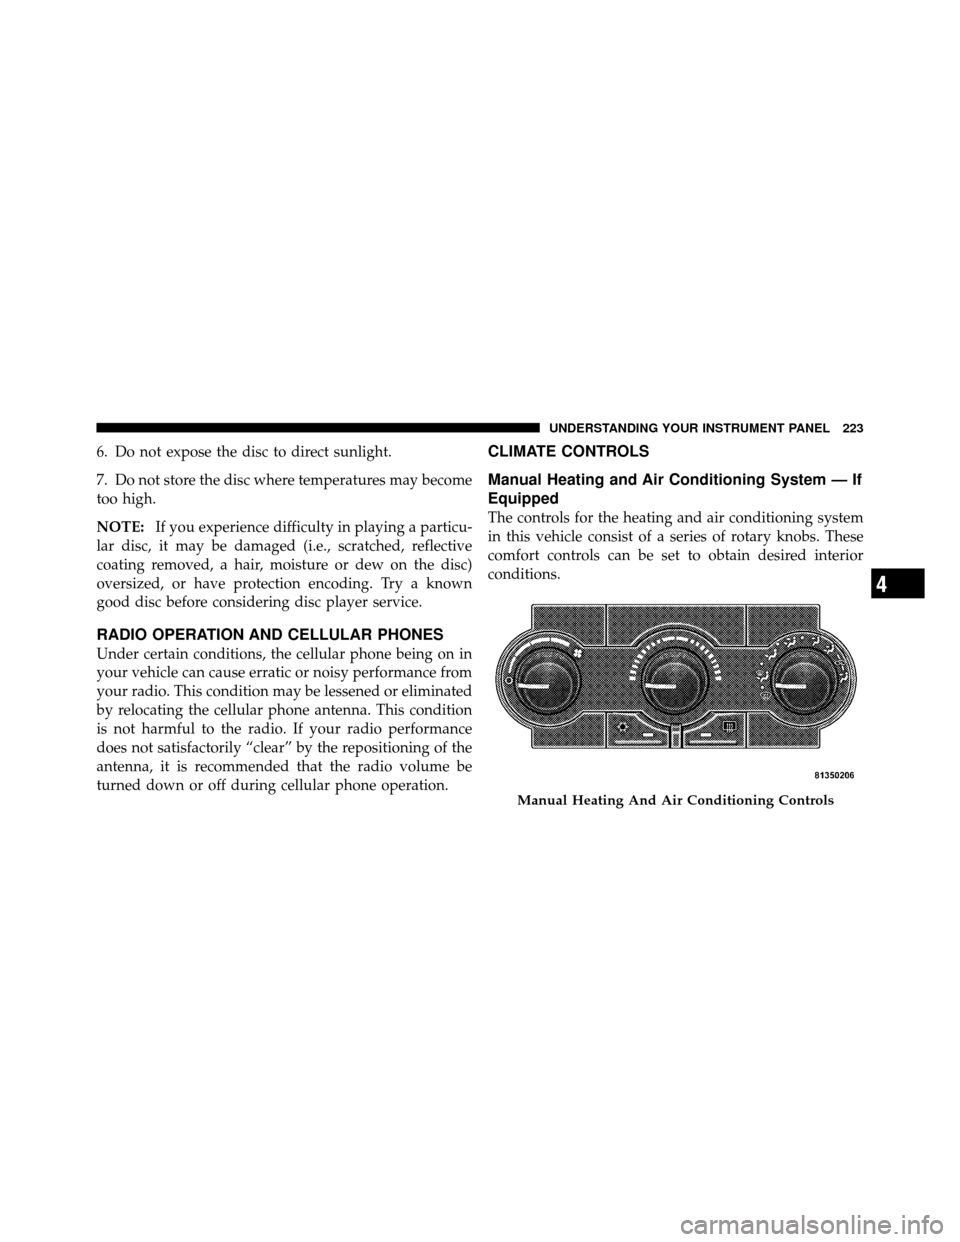
The controls for the heating and air conditioning system
in this vehicle consist of a series of rotary knobs. These
comfort controls can be set to obtain desired interior
conditions.
Manual Heating And Air Conditioning Controls
4
UNDERSTANDING YOUR INSTRUMENT PANEL 223
Page 224 of 460
The instrument panel features four dual-vane airflow
registers. Two registers are located on the outer ends of
the instrument panel and two are located in the center of
the instrument panel. These registers can be closed to
partially block airflow, and they can be adjusted to direct
airflow where the occupant desires.
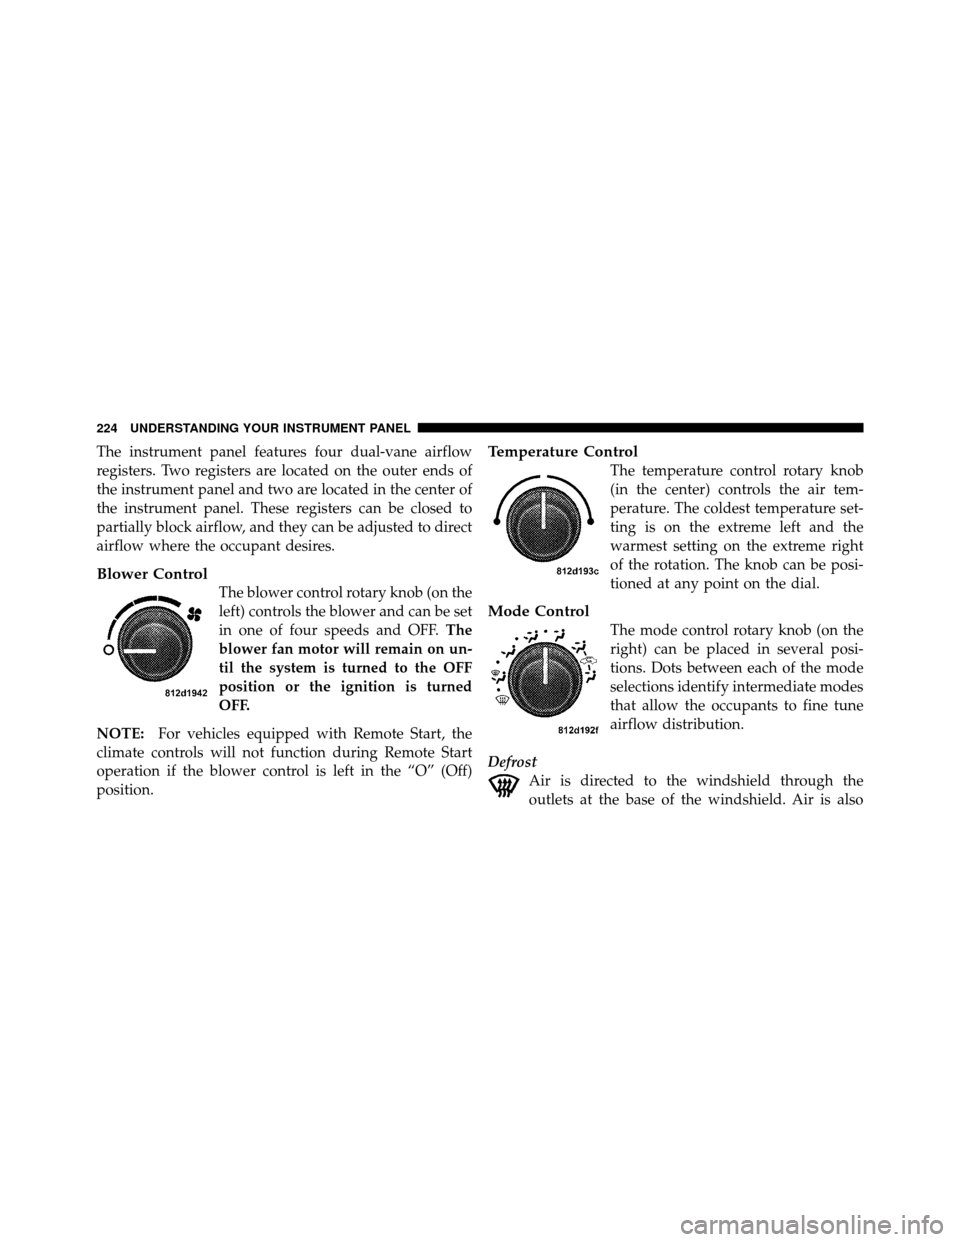
Blower Control
The blower control rotary knob (on the
left) controls the blower and can be set
in one of four speeds and OFF.The
blower fan motor will remain on un-
til the system is turned to the OFF
position or the ignition is turned
OFF.
NOTE: For vehicles equipped with Remote Start, the
climate controls will not function during Remote Start
operation if the blower control is left in the “O” (Off)
position.
Temperature Control
The temperature control rotary knob
(in the center) controls the air tem-
perature. The coldest temperature set-
ting is on the extreme left and the
warmest setting on the extreme right
of the rotation. The knob can be posi-
tioned at any point on the dial.
Mode Control
The mode control rotary knob (on the
right) can be placed in several posi-
tions. Dots between each of the mode
selections identify intermediate modes
that allow the occupants to fine tune
airflow distribution.
Defrost Air is directed to the windshield through the
outlets at the base of the windshield. Air is also
224 UNDERSTANDING YOUR INSTRUMENT PANEL
Page 225 of 460
directed to the front door windows through the side
window demister grilles. Some airflow is delivered to the
floor while in defrost so that comfort can be maintained.
Defrost/FloorAir flows through the front and rear floor outlets
and the outlets at the base of the windshield. Air is
also directed to the front door windows through the
side window demister grilles. Some airflow is delivered
to the floor while in defrost so that comfort can be
maintained.
Floor Air flows through the floor outlets located under
the instrument panel and into the rear seating area
through vents under the front seats. Some airflow is
delivered to defrost while in the floor mode so that
comfort can be maintained. Bi-Level
Air flows both through the outlets located in the
instrument panel and those located on the floor. Air
flows through the registers in the back of the center
console, and under the front seats to the rear seat
passengers. These registers can be closed to partially
block airflow. The center console outlets deliver condi-
tioned air while the floor outlets deliver heated air.
Panel Air flows through the outlets located in the instru-
ment panel. Air flows through the registers in the
back of the center console to the rear seat passengers.
These registers can be closed to block airflow.
4
UNDERSTANDING YOUR INSTRUMENT PANEL 225
Page 226 of 460
RecirculationThe recirculation feature can be selected with
the mode control knob. You may choose be-
tween Bi-Level Recirculation and Panel Recir-
culation air outlets while in this mode. Nor-
mally, air enters from outside the vehicle. However, when
in Recirculation mode air inside the vehicle is re-used.
Use this mode to rapidly cool the inside of the vehicle.
The Recirculation mode can also be used to temporarily
block out outside odors, smoke, and dust.
Air Conditioning To turn on the Air Conditioning, set the fan control
at any speed and press the snowflake button
located on the control panel. Conditioned air will
be directed through the outlets selected by the mode
control. A light in the snowflake button shows that the air
conditioning is on. Slight changes in engine speed or power may be noticed
when the air conditioning compressor is on. This is a
normal occurrence as the compressor will cycle on and
off to maintain comfort and increase fuel economy.
Automatic Temperature Control (ATC) — If
Equipped
The Automatic Temperature Control (ATC) system auto-
matically maintains the interior comfort level desired by
the driver and passenger.
226 UNDERSTANDING YOUR INSTRUMENT PANEL
Page 227 of 460
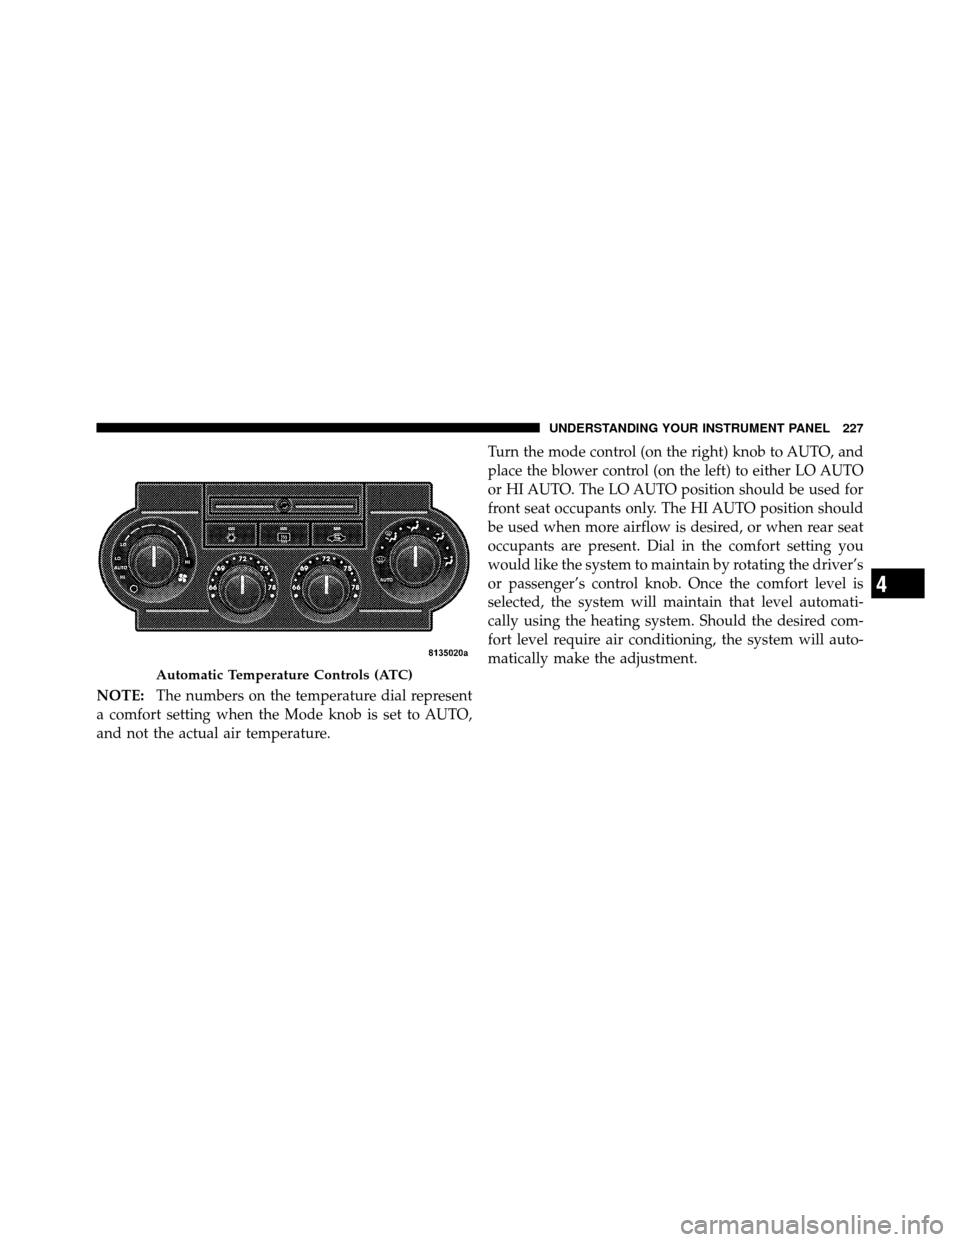
NOTE:The numbers on the temperature dial represent
a comfort setting when the Mode knob is set to AUTO,
and not the actual air temperature. Turn the mode control (on the right) knob to AUTO, and
place the blower control (on the left) to either LO AUTO
or HI AUTO. The LO AUTO position should be used for
front seat occupants only. The HI AUTO position should
be used when more airflow is desired, or when rear seat
occupants are present. Dial in the comfort setting you
would like the system to maintain by rotating the driver’s
or passenger’s control knob. Once the comfort level is
selected, the system will maintain that level automati-
cally using the heating system. Should the desired com-
fort level require air conditioning, the system will auto-
matically make the adjustment.
Automatic Temperature Controls (ATC)
4
UNDERSTANDING YOUR INSTRUMENT PANEL 227
Page 228 of 460
NOTE:The temperature setting can be adjusted at any
time without affecting automatic control operation. How-
ever, if the driver and/or passenger temperature knobs
are set to the full hot or full cold positions, the air
temperature out of the ducts will be full hot or full cold
respectively. With the temperature setting in these posi-
tions, the system does not attempt automatic comfort
control.
Air Conditioning The air conditioning in this system is automatic.
Pressing this button while in AUTO mode will
cause the LED to flash three times and remain off.
This indicates that the system is in AUTO and requesting
the air conditioning is not necessary. Recirculation
The system will automatically control recircu-
lation. However, pressing this button will tem-
porarily put the system in Recirculation mode.
This can be used when outside conditions such
as smoke, odors, dust, or high humidity are present. This
will cause the LED to illuminate.
NOTE:
•The surface of the climate control panel, and the top
center of the instrument panel should be kept free of
debris due to the climate control sensor’s location.
Mud on the windshield may also cause poor operation
of this system.
228 UNDERSTANDING YOUR INSTRUMENT PANEL
Page 229 of 460
•To provide you with maximum comfort in the auto-
matic mode, during cold start-ups the blower fan will
remain off until the engine warms up. However, the
fan will engage immediately if the defrost mode is
selected or if you manually select a blower speed.
•Under certain conditions (after the vehicle is turned
off) the climate control system may recalibrate and a
noise may be heard for 20 seconds. This is part of
normal operation.
•Most of the time, when in Automatic operation, you
can temporarily put the system into Recirculation
mode by pressing the Recirculation button. However,
under certain conditions in automatic the system is
blowing air out of the defrost vents. When these
conditions are present, and the Recirculation button is
pressed, the indicator will flash and remain off. This
tells you that you are unable to go into Recirculationmode at this time. If you would like to go to Recircu-
lation mode, you must first move your mode knob to
Panel, Panel/Floor, or Floor, then press the Recircula-
tion button. This feature will reduce the possibility of
window fogging.
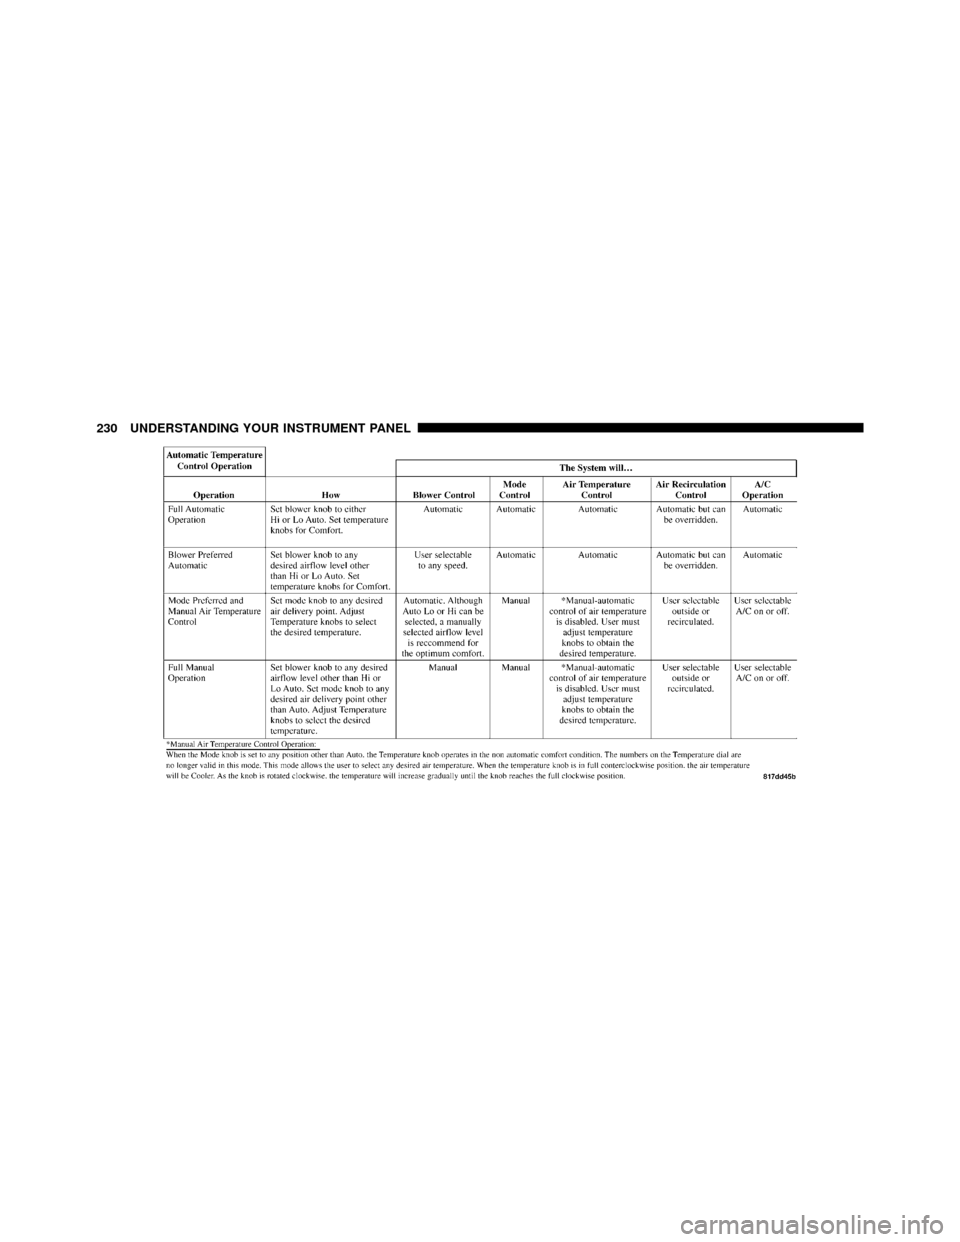
Manual Operation
This system offers a full complement of manual override
features which consist of Blower Preferred Automatic,
Mode Preferred Automatic with Manual Air Temperature
Control, and Manual. This means the customer can
override the blower, mode, and disable Automatic Tem-
perature Control completely.
NOTE:
Please read the Automatic Temperature Control
Operation Chart below for details.4
UNDERSTANDING YOUR INSTRUMENT PANEL 229
Page 230 of 460
230 UNDERSTANDING YOUR INSTRUMENT PANEL