steering JEEP COMMANDER 2010 1.G User Guide
[x] Cancel search | Manufacturer: JEEP, Model Year: 2010, Model line: COMMANDER, Model: JEEP COMMANDER 2010 1.GPages: 78, PDF Size: 7.31 MB
Page 3 of 78
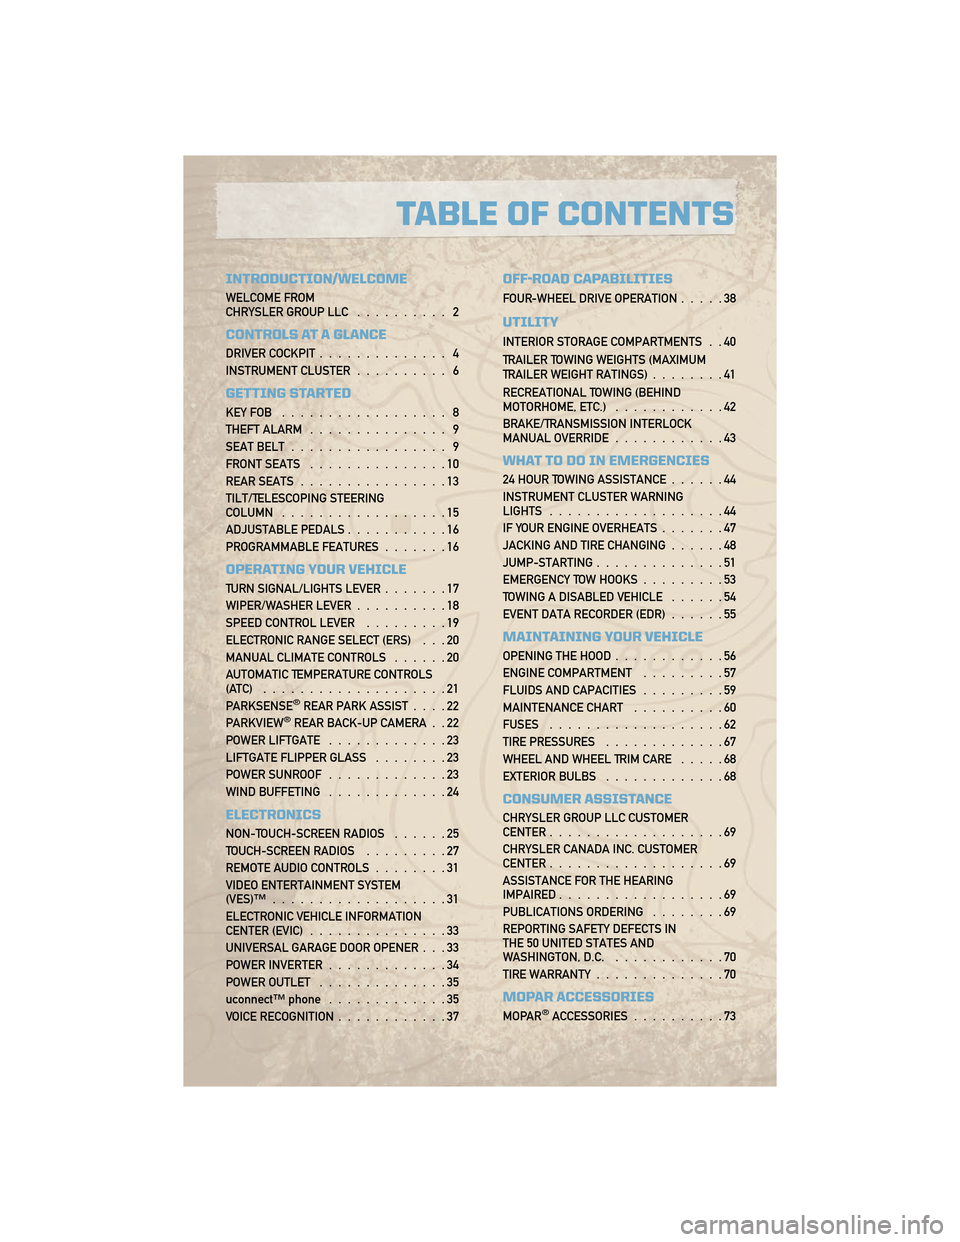
INTRODUCTION/WELCOME
WELCOME FROM
CHRYSLER GROUP LLC.......... 2
CONTROLS AT A GLANCE
DRIVER COCKPIT.............. 4
INSTRUMENT CLUSTER .......... 6
GETTING STARTED
KEYFOB .................. 8
THEFT ALARM............... 9
SEAT BELT ................. 9
FRONT SEATS ...............10
REAR SEATS ................13
TILT/TELESCOPING STEERING
COLUMN ..................15
ADJUSTABLE PEDALS ...........16
PROGRAMMABLE FEATURES .......16
OPERATING YOUR VEHICLE
TURN SIGNAL/LIGHTS LEVER .......17
WIPER/WASHER LEVER ..........18
SPEED CONTROL LEVER .........19
ELECTRONIC RANGE SELECT (ERS) . . . 20
MANUAL CLIMATE CONTROLS ......20
AUTOMATIC TEMPERATURE CONTROLS
(ATC) ....................21
PARKSENSE
®REAR PARK ASSIST ....22
PARKVIEW®REAR BACK-UP CAMERA . . 22
POWER LIFTGATE .............23
LIFTGATE FLIPPER GLASS ........23
POWER SUNROOF .............23
WIND BUFFETING .............24
ELECTRONICS
NON-TOUCH-SCREEN RADIOS ......25
TOUCH-SCREEN RADIOS .........27
REMOTE AUDIO CONTROLS ........31
VIDEO ENTERTAINMENT SYSTEM
(VES)™ ...................31
ELECTRONIC VEHICLE INFORMATION
CENTER (EVIC) ...............33
UNIVERSAL GARAGE DOOR OPENER . . . 33
POWER INVERTER .............34
POWER OUTLET ..............35
uconnect™ phone .............35
VOICE RECOGNITION ............37
OFF-ROAD CAPABILITIES
FOUR-WHEEL DRIVE OPERATION .....38
UTILITY
INTERIOR STORAGE COMPARTMENTS . . 40
TRAILER TOWING WEIGHTS (MAXIMUM
TRAILER WEIGHT RATINGS)........41
RECREATIONAL TOWING (BEHIND
MOTORHOME, ETC.) ............42
BRAKE/TRANSMISSION INTERLOCK
MANUAL OVERRIDE ............43
WHAT TO DO IN EMERGENCIES
24 HOUR TOWING ASSISTANCE ......44
INSTRUMENT CLUSTER WARNING
LIGHTS ...................44
IF YOUR ENGINE OVERHEATS .......47
JACKING AND TIRE CHANGING ......48
JUMP-STARTING ..............51
EMERGENCY TOW HOOKS .........53
TOWING A DISABLED VEHICLE ......54
EVENT DATA RECORDER (EDR) ......55
MAINTAINING YOUR VEHICLE
OPENING THE HOOD............56
ENGINE COMPARTMENT .........57
FLUIDS AND CAPACITIES .........59
MAINTENANCE CHART ..........60
FUSES ...................62
TIRE PRESSURES .............67
WHEEL AND WHEEL TRIM CARE .....68
EXTERIOR BULBS .............68
CONSUMER ASSISTANCE
CHRYSLER GROUP LLC CUSTOMER
CENTER...................69
CHRYSLER CANADA INC. CUSTOMER
CENTER ...................69
ASSISTANCE FOR THE HEARING
IMPAIRED ..................69
PUBLICATIONS ORDERING ........69
REPORTING SAFETY DEFECTS IN
THE 50 UNITED STATES AND
WASHINGTON, D.C. ............70
TIRE WARRANTY ..............70
MOPAR ACCESSORIES
MOPAR®ACCESSORIES..........73
TABLE OF CONTENTS
Page 17 of 78
WARNING!(Continued)
• Do not place anything on the seat that insulates against heat, such as a blanket orcushion. This may cause the seat heater to overheat. Sitting in a seat that has
been overheated could cause serious burns due to the increased surface
temperature of the seat.
CAUTION!
Repeated overheating of the seat could damage the heating element and/or degrade
the material of the seat.
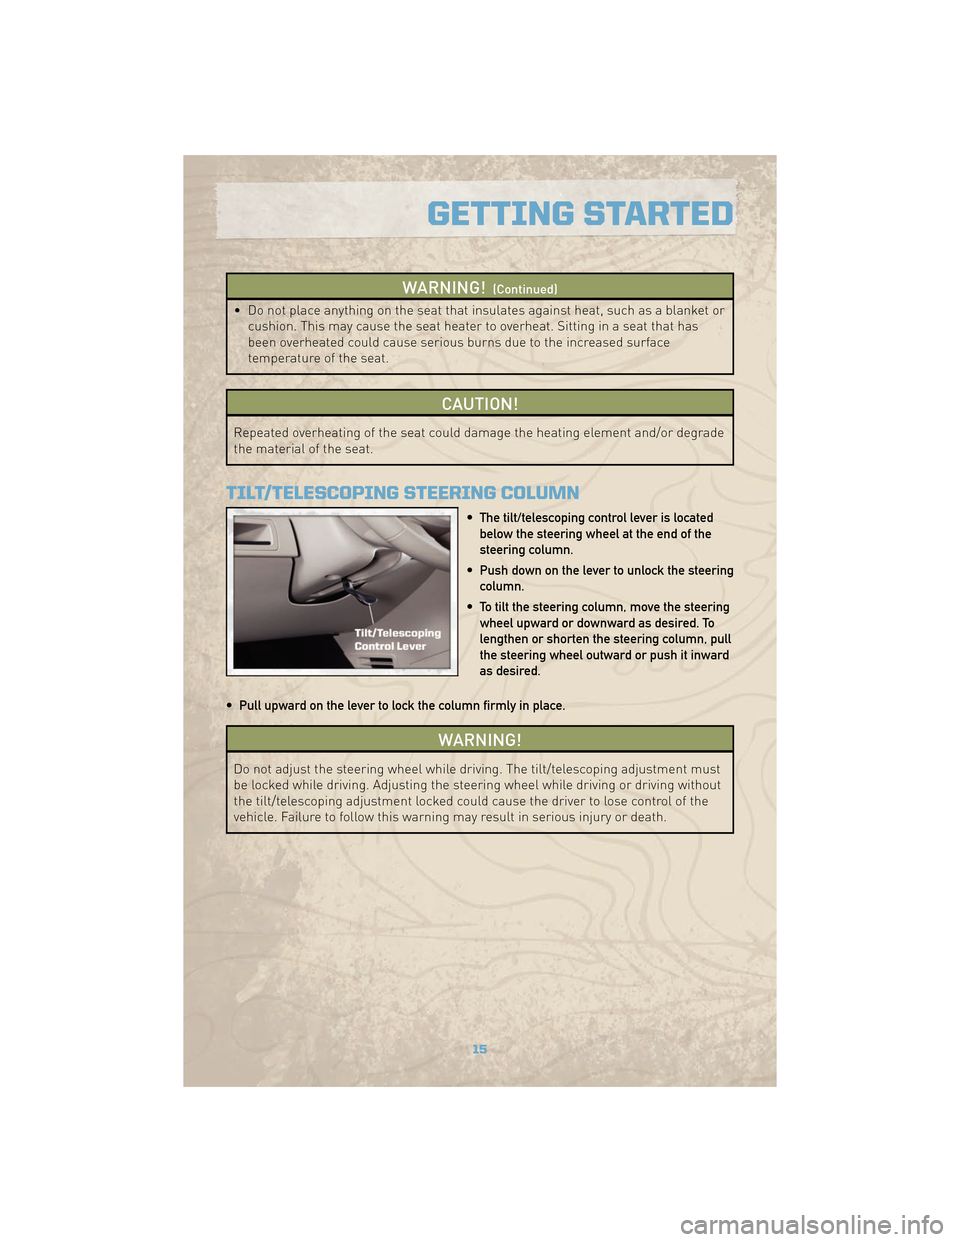
TILT/TELESCOPING STEERING COLUMN
• The tilt/telescoping control lever is locatedbelow the steering wheel at the end of the
steering column.
• Push down on the lever to unlock the steering column.
• To tilt the steering column, move the steering wheel upward or downward as desired. To
lengthen or shorten the steering column, pull
the steering wheel outward or push it inward
as desired.
• Pull upward on the lever to lock the column firmly in place.
WARNING!
Do not adjust the steering wheel while driving. The tilt/telescoping adjustment must
be locked while driving. Adjusting the steering wheel while driving or driving without
the tilt/telescoping adjustment locked could cause the driver to lose control of the
vehicle. Failure to follow this warning may result in serious injury or death.
15
GETTING STARTED
Page 33 of 78
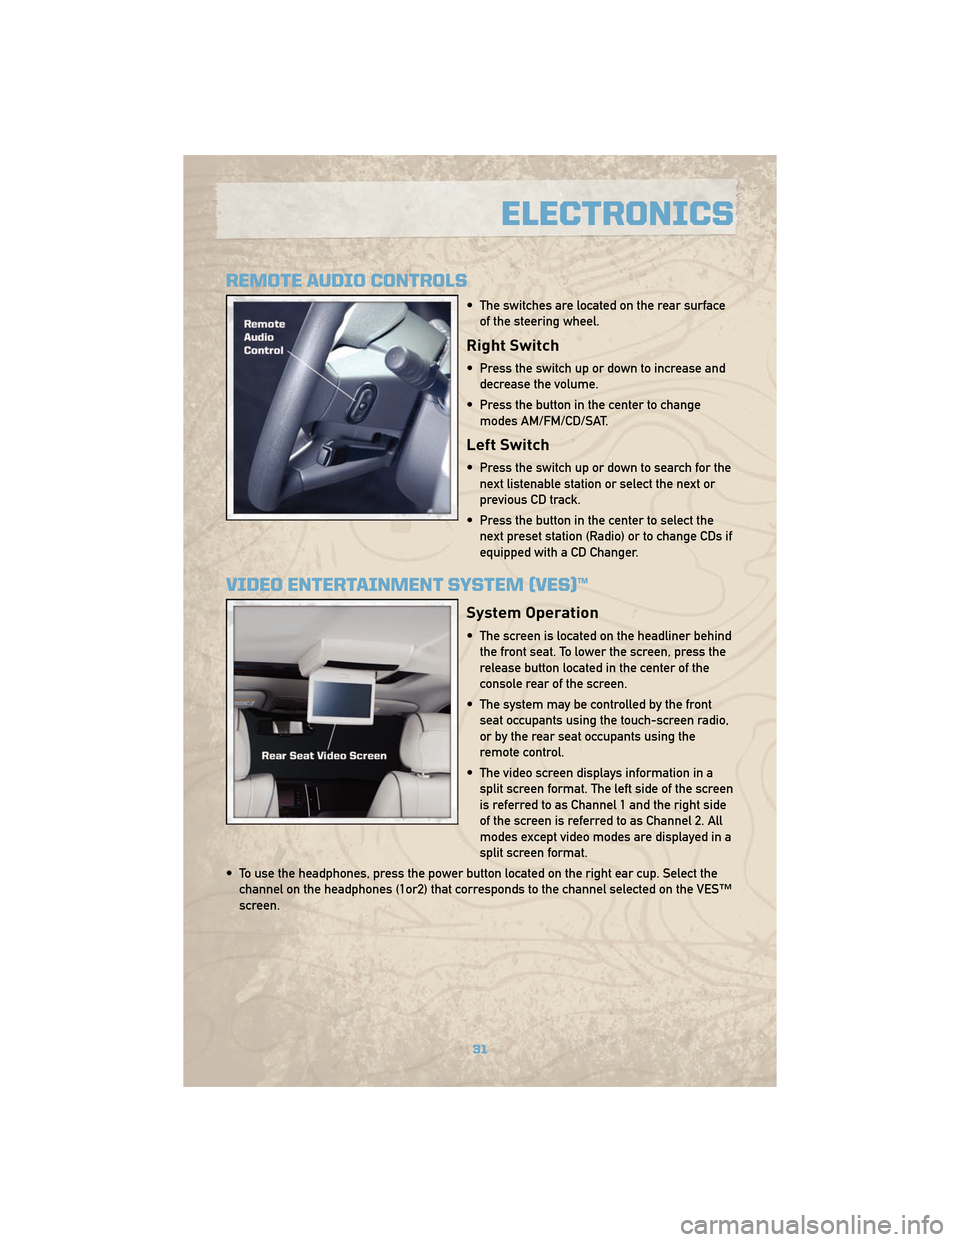
REMOTE AUDIO CONTROLS
• The switches are located on the rear surfaceof the steering wheel.
Right Switch
• Press the switch up or down to increase anddecrease the volume.
• Press the button in the center to change modes AM/FM/CD/SAT.
Left Switch
• Press the switch up or down to search for thenext listenable station or select the next or
previous CD track.
• Press the button in the center to select the next preset station (Radio) or to change CDs if
equipped with a CD Changer.
VIDEO ENTERTAINMENT SYSTEM (VES)™
System Operation
• The screen is located on the headliner behindthe front seat. To lower the screen, press the
release button located in the center of the
console rear of the screen.
• The system may be controlled by the front seat occupants using the touch-screen radio,
or by the rear seat occupants using the
remote control.
• The video screen displays information in a split screen format. The left side of the screen
is referred to as Channel 1 and the right side
of the screen is referred to as Channel 2. All
modes except video modes are displayed in a
split screen format.
• To use the headphones, press the power button located on the right ear cup. Select the channel on the headphones (1or2) that corresponds to the channel selected on the VES™
screen.
31
ELECTRONICS
Page 35 of 78
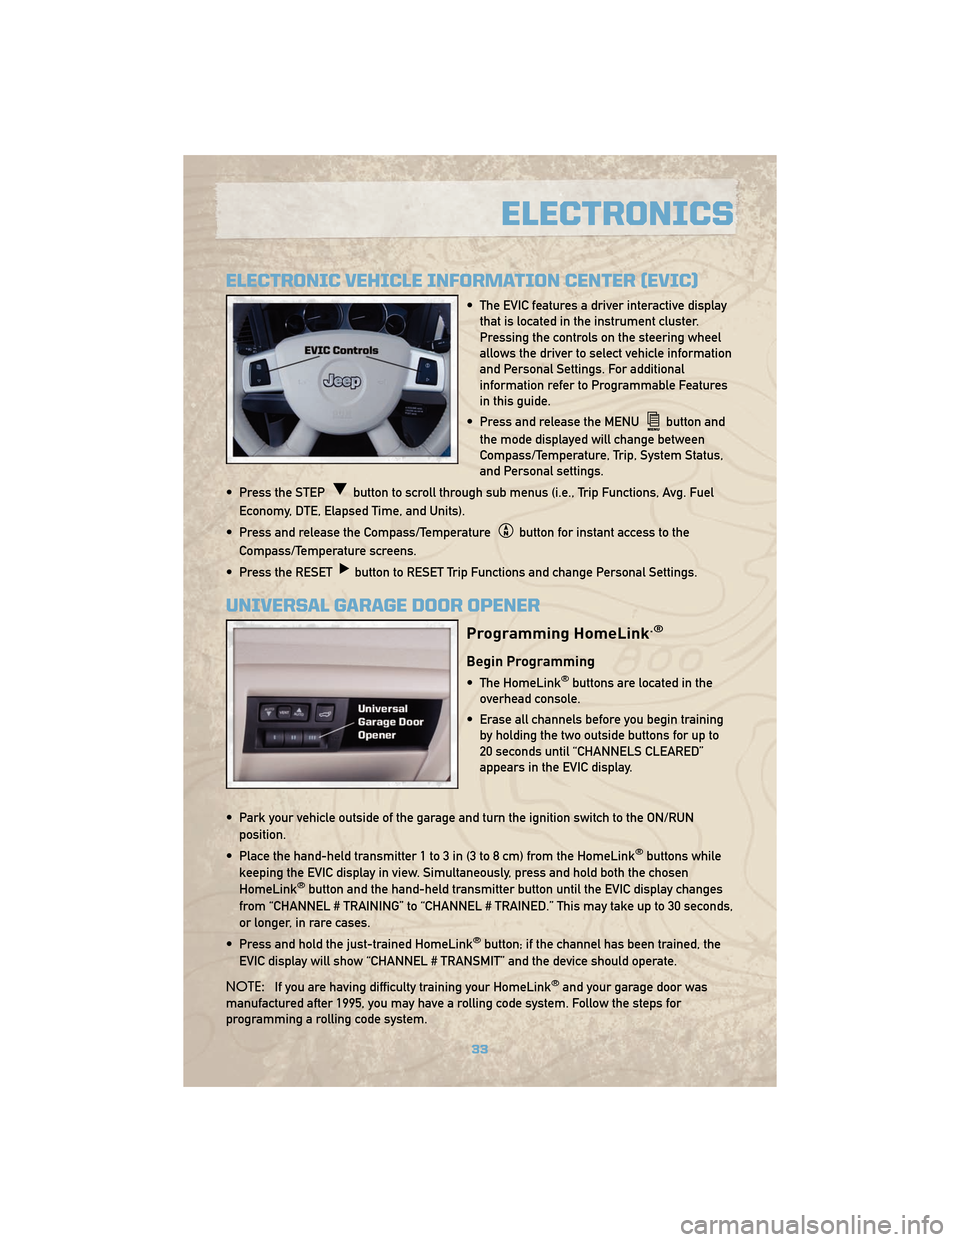
ELECTRONIC VEHICLE INFORMATION CENTER (EVIC)
• The EVIC features a driver interactive displaythat is located in the instrument cluster.
Pressing the controls on the steering wheel
allows the driver to select vehicle information
and Personal Settings. For additional
information refer to Programmable Features
in this guide.
• Press and release the MENU
button and
the mode displayed will change between
Compass/Temperature, Trip, System Status,
and Personal settings.
• Press the STEP
button to scroll through sub menus (i.e., Trip Functions, Avg. Fuel
Economy, DTE, Elapsed Time, and Units).
• Press and release the Compass/Temperature
button for instant access to the
Compass/Temperature screens.
• Press the RESET
button to RESET Trip Functions and change Personal Settings.
UNIVERSAL GARAGE DOOR OPENER
Programming HomeLink.®
Begin Programming
• The HomeLink®buttons are located in the
overhead console.
• Erase all channels before you begin training by holding the two outside buttons for up to
20 seconds until “CHANNELS CLEARED”
appears in the EVIC display.
• Park your vehicle outside of the garage and turn the ignition switch to the ON/RUN position.
• Place the hand-held transmitter 1 to 3 in (3 to 8 cm) from the HomeLink
®buttons while
keeping the EVIC display in view. Simultaneously, press and hold both the chosen
HomeLink
®button and the hand-held transmitter button until the EVIC display changes
from “CHANNEL # TRAINING” to “CHANNEL # TRAINED.” This may take up to 30 seconds,
or longer, in rare cases.
• Press and hold the just-trained HomeLink
®button; if the channel has been trained, the
EVIC display will show “CHANNEL # TRANSMIT” and the device should operate.
NOTE: If you are having difficulty training your HomeLink
®and your garage door was
manufactured after 1995, you may have a rolling code system. Follow the steps for
programming a rolling code system.
33
ELECTRONICS
Page 58 of 78
OPENING THE HOOD
• Pull the hood release lever located below the steering wheel at the base of theinstrument panel.
• Reach into the opening beneath the center of the hood and move the safety latch lever while lifting the hood at the same time.
WARNING!
Be sure the hood is fully latched before driving your vehicle. If the hood is not fully
latched, it could open when the vehicle is in motion and block your vision. Failure to
follow this warning could result in serious injury or death.
MAINTAINING YOUR VEHICLE
56
Page 61 of 78
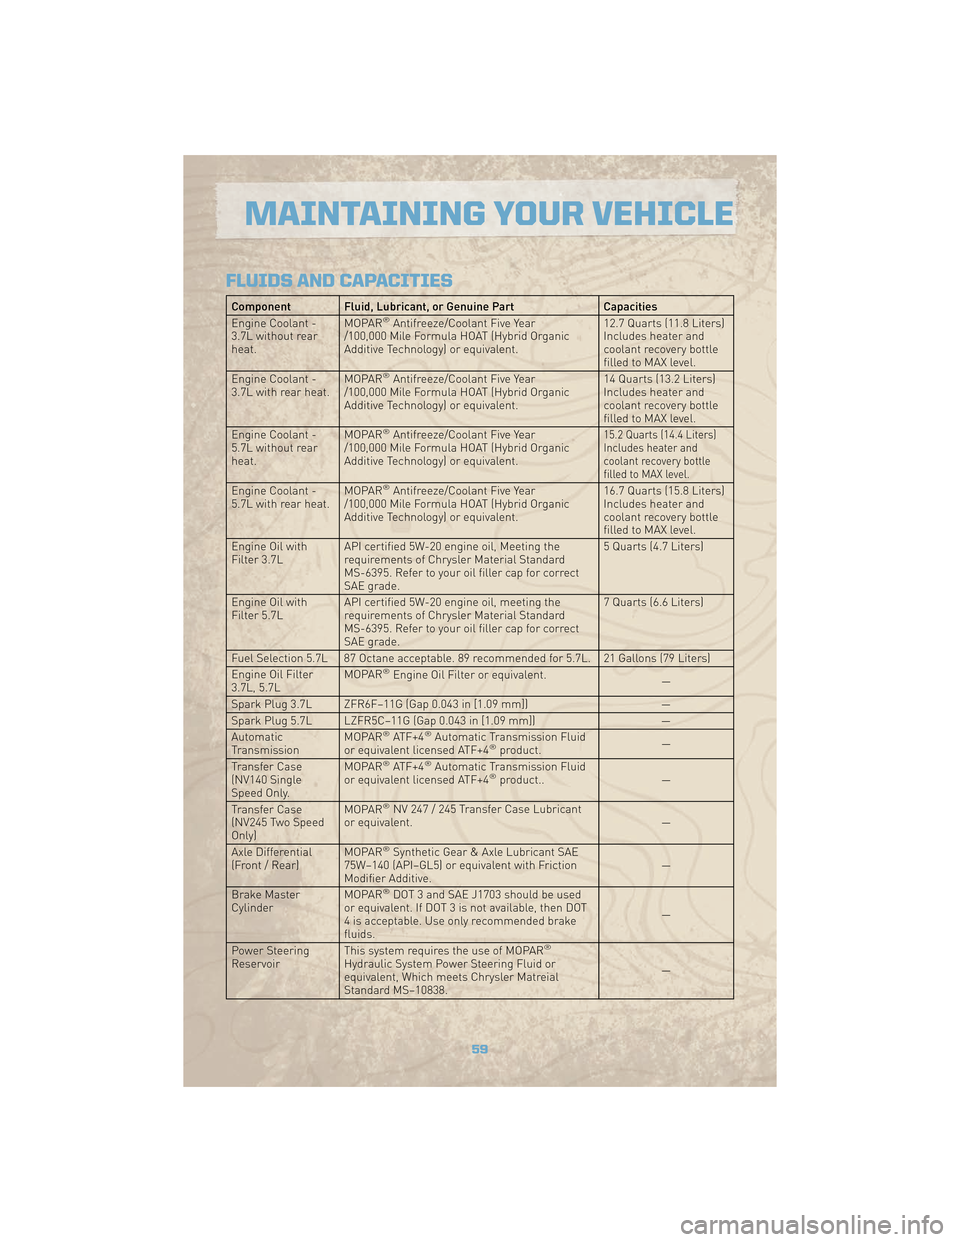
FLUIDS AND CAPACITIES
Component Fluid, Lubricant, or Genuine PartCapacities
Engine Coolant -
3.7L without rear
heat. MOPAR®Antifreeze/Coolant Five Year
/100,000 Mile Formula HOAT (Hybrid Organic
Additive Technology) or equivalent. 12.7 Quarts (11.8 Liters)
Includes heater and
coolant recovery bottle
filled to MAX level.
Engine Coolant -
3.7L with rear heat. MOPAR
®Antifreeze/Coolant Five Year
/100,000 Mile Formula HOAT (Hybrid Organic
Additive Technology) or equivalent. 14 Quarts (13.2 Liters)
Includes heater and
coolant recovery bottle
filled to MAX level.
Engine Coolant -
5.7L without rear
heat. MOPAR
®Antifreeze/Coolant Five Year
/100,000 Mile Formula HOAT (Hybrid Organic
Additive Technology) or equivalent.15.2 Quarts (14.4 Liters)
Includes heater and
coolant recovery bottle
filled to MAX level.
Engine Coolant -
5.7L with rear heat. MOPAR®Antifreeze/Coolant Five Year
/100,000 Mile Formula HOAT (Hybrid Organic
Additive Technology) or equivalent. 16.7 Quarts (15.8 Liters)
Includes heater and
coolant recovery bottle
filled to MAX level.
Engine Oil with
Filter 3.7L API certified 5W-20 engine oil, Meeting the
requirements of Chrysler Material Standard
MS-6395. Refer to your oil filler cap for correct
SAE grade. 5 Quarts (4.7 Liters)
Engine Oil with
Filter 5.7L API certified 5W-20 engine oil, meeting the
requirements of Chrysler Material Standard
MS-6395. Refer to your oil filler cap for correct
SAE grade. 7 Quarts (6.6 Liters)
Fuel Selection 5.7L 87 Octane acceptable. 89 recommended for 5.7L. 21 Gallons (79 Liters)
Engine Oil Filter
3.7L, 5.7L MOPAR
®Engine Oil Filter or equivalent.
—
Spark Plug 3.7L ZFR6F–11G (Gap 0.043 in [1.09 mm]) —
Spark Plug 5.7L LZFR5C–11G (Gap 0.043 in [1.09 mm]) —
Automatic
Transmission MOPAR
®ATF+4®Automatic Transmission Fluid
or equivalent licensed ATF+4®product. —
Transfer Case
(NV140 Single
Speed Only. MOPAR®ATF+4®Automatic Transmission Fluid
or equivalent licensed ATF+4®product.. —
Transfer Case
(NV245 Two Speed
Only) MOPAR
®NV 247 / 245 Transfer Case Lubricant
or equivalent. —
Axle Differential
(Front / Rear) MOPAR
®Synthetic Gear & Axle Lubricant SAE
75W–140 (API–GL5) or equivalent with Friction
Modifier Additive. —
Brake Master
Cylinder MOPAR
®DOT 3 and SAE J1703 should be used
or equivalent. If DOT 3 is not available, then DOT
4 is acceptable. Use only recommended brake
fluids. —
Power Steering
Reservoir This system requires the use of MOPAR
®
Hydraulic System Power Steering Fluid or
equivalent, Which meets Chrysler Matreial
Standard MS–10838. —
59
MAINTAINING YOUR VEHICLE
Page 65 of 78
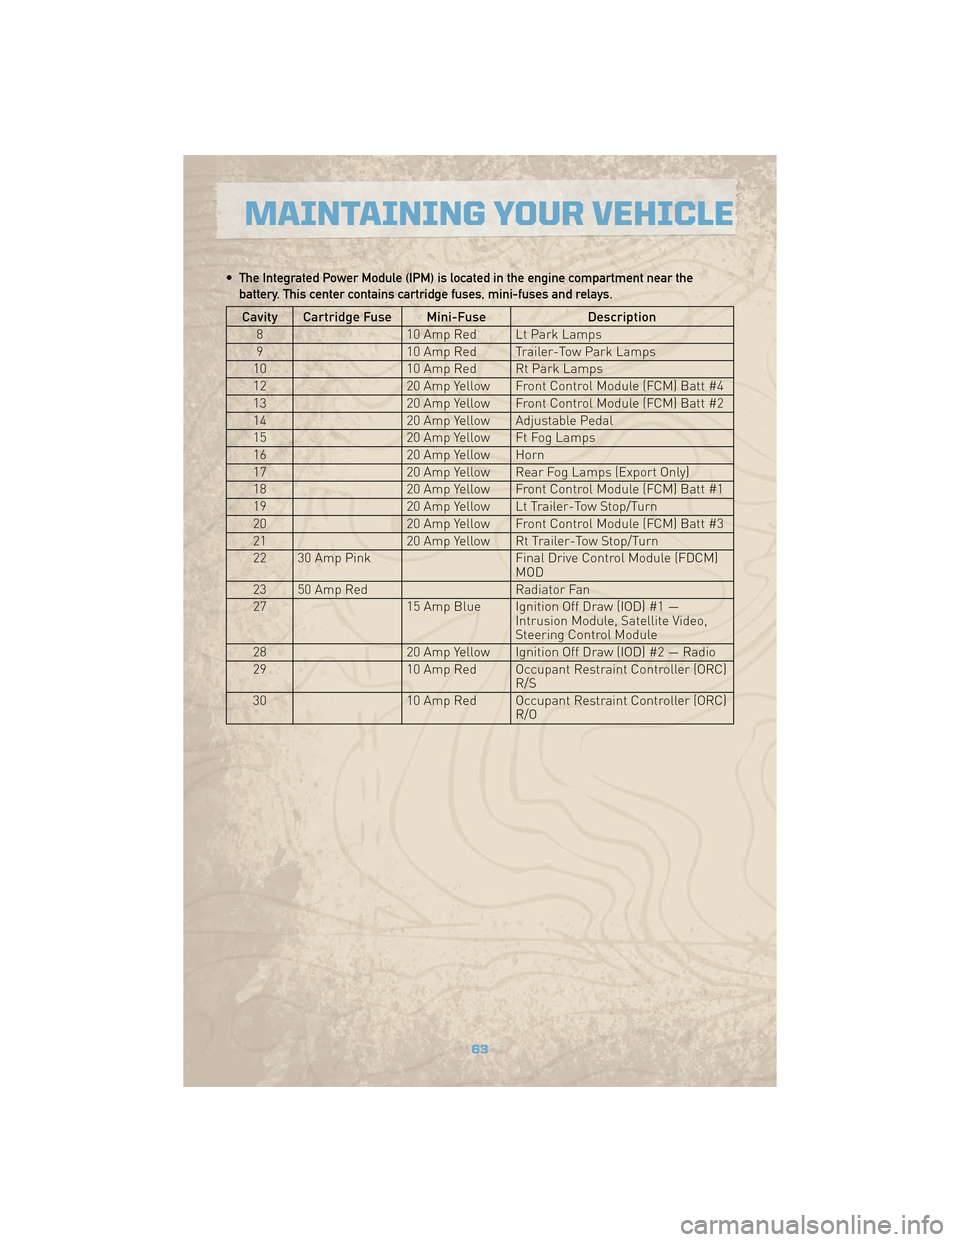
• The Integrated Power Module (IPM) is located in the engine compartment near thebattery. This center contains cartridge fuses, mini-fuses and relays.
Cavity Cartridge Fuse Mini-Fuse Description
8 10 Amp Red Lt Park Lamps
9 10 Amp Red Trailer-Tow Park Lamps
10 10 Amp Red Rt Park Lamps
12 20 Amp Yellow Front Control Module (FCM) Batt #4
13 20 Amp Yellow Front Control Module (FCM) Batt #2
14 20 Amp Yellow Adjustable Pedal
15 20 Amp Yellow Ft Fog Lamps
16 20 Amp Yellow Horn
17 20 Amp Yellow Rear Fog Lamps (Export Only)
18 20 Amp Yellow Front Control Module (FCM) Batt #1
19 20 Amp Yellow Lt Trailer-Tow Stop/Turn
20 20 Amp Yellow Front Control Module (FCM) Batt #3
21 20 Amp Yellow Rt Trailer-Tow Stop/Turn
22 30 Amp Pink Final Drive Control Module (FDCM)
MOD
23 50 Amp Red Radiator Fan
27 15 Amp Blue Ignition Off Draw (IOD) #1 —
Intrusion Module, Satellite Video,
Steering Control Module
28 20 Amp Yellow Ignition Off Draw (IOD) #2 — Radio
29 10 Amp Red Occupant Restraint Controller (ORC)
R/S
30 10 Amp Red Occupant Restraint Controller (ORC)
R/O
63
MAINTAINING YOUR VEHICLE
Page 68 of 78
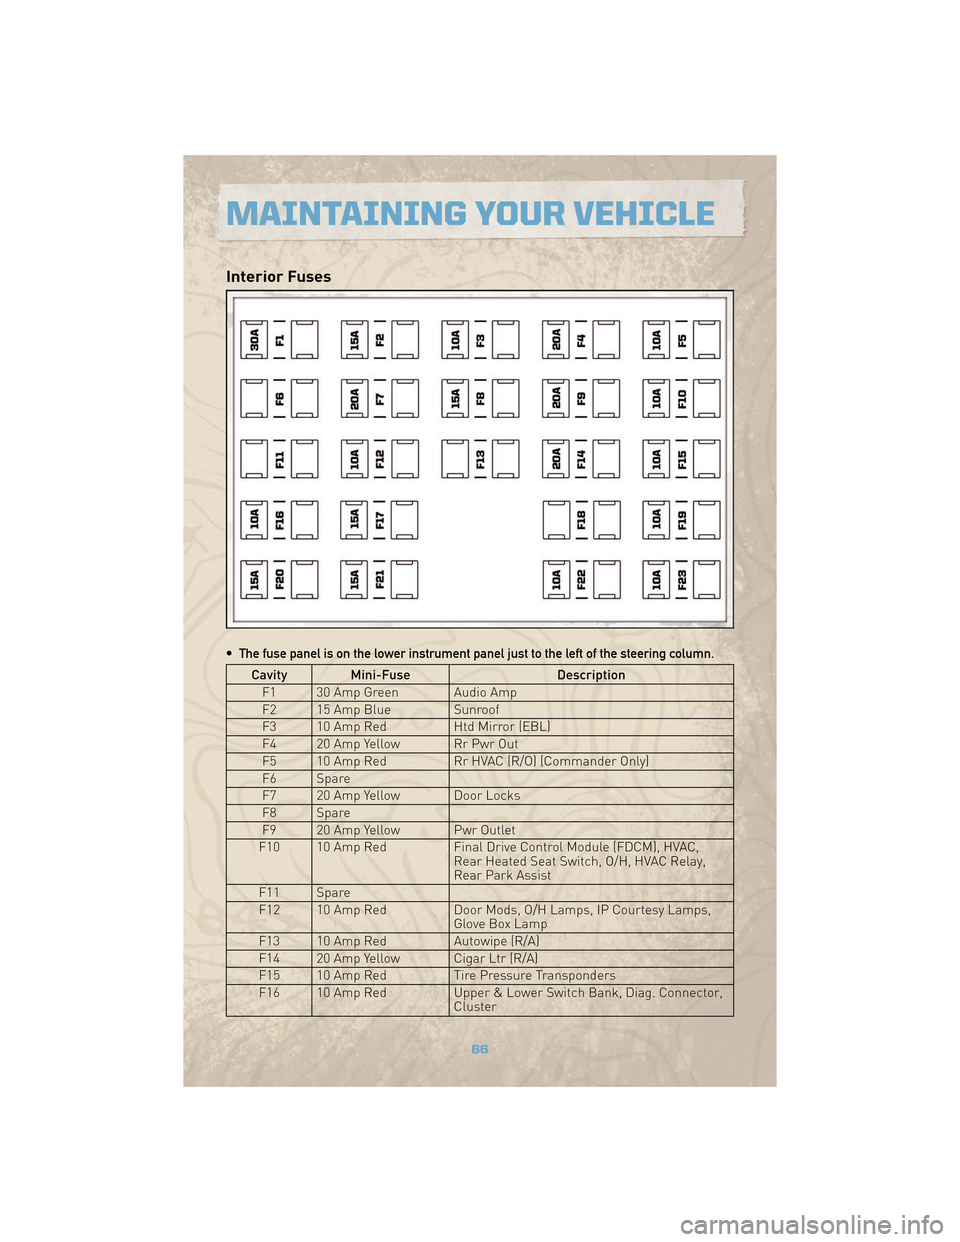
Interior Fuses
• The fuse panel is on the lower instrument panel just to the left of the steering column.
Cavity Mini-FuseDescription
F1 30 Amp Green Audio Amp
F2 15 Amp Blue Sunroof
F3 10 Amp Red Htd Mirror (EBL)
F4 20 Amp Yellow Rr Pwr Out
F5 10 Amp Red Rr HVAC (R/O) (Commander Only)
F6 Spare
F7 20 Amp Yellow Door Locks
F8 Spare
F9 20 Amp Yellow Pwr Outlet
F10 10 Amp Red Final Drive Control Module (FDCM), HVAC,
Rear Heated Seat Switch, O/H, HVAC Relay,
Rear Park Assist
F11 Spare
F12 10 Amp Red Door Mods, O/H Lamps, IP Courtesy Lamps,
Glove Box Lamp
F13 10 Amp Red Autowipe (R/A)
F14 20 Amp Yellow Cigar Ltr (R/A)
F15 10 Amp Red Tire Pressure Transponders
F16 10 Amp Red Upper & Lower Switch Bank, Diag. Connector,
Cluster
MAINTAINING YOUR VEHICLE
66
Page 69 of 78
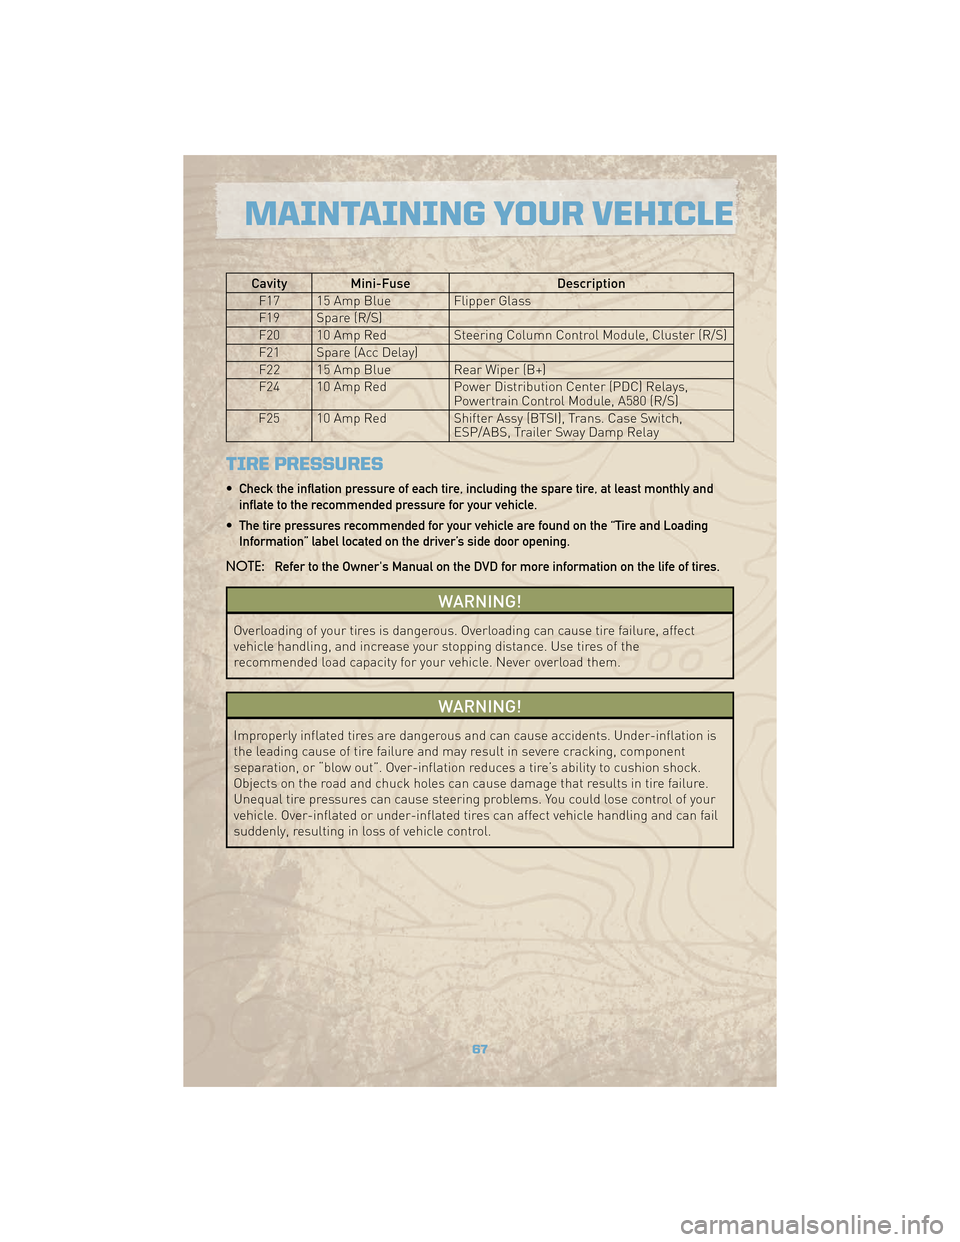
Cavity Mini-FuseDescription
F17 15 Amp Blue Flipper Glass
F19 Spare (R/S)
F20 10 Amp Red Steering Column Control Module, Cluster (R/S)
F21 Spare (Acc Delay)
F22 15 Amp Blue Rear Wiper (B+)
F24 10 Amp Red Power Distribution Center (PDC) Relays,
Powertrain Control Module, A580 (R/S)
F25 10 Amp Red Shifter Assy (BTSI), Trans. Case Switch,
ESP/ABS, Trailer Sway Damp Relay
TIRE PRESSURES
• Check the inflation pressure of each tire, including the spare tire, at least monthly and
inflate to the recommended pressure for your vehicle.
• The tire pressures recommended for your vehicle are found on the “Tire and Loading Information” label located on the driver’s side door opening.
NOTE: Refer to the Owner's Manual on the DVD for more information on the life of tires.
WARNING!
Overloading of your tires is dangerous. Overloading can cause tire failure, affect
vehicle handling, and increase your stopping distance. Use tires of the
recommended load capacity for your vehicle. Never overload them.
WARNING!
Improperly inflated tires are dangerous and can cause accidents. Under-inflation is
the leading cause of tire failure and may result in severe cracking, component
separation, or “blow out”. Over-inflation reduces a tire’s ability to cushion shock.
Objects on the road and chuck holes can cause damage that results in tire failure.
Unequal tire pressures can cause steering problems. You could lose control of your
vehicle. Over-inflated or under-inflated tires can affect vehicle handling and can fail
suddenly, resulting in loss of vehicle control.
67
MAINTAINING YOUR VEHICLE