change time JEEP COMPASS 2012 1.G User Guide
[x] Cancel search | Manufacturer: JEEP, Model Year: 2012, Model line: COMPASS, Model: JEEP COMPASS 2012 1.GPages: 108, PDF Size: 4.03 MB
Page 4 of 108
WELCOME FROM CHRYSLER GROUP LLC
Congratulations on selecting your new Chrysler Group LLC vehicle. Be
assured that it represents precision workmanship, distinctive styling, and
high quality - all essentials that are traditional to our vehicles.
Your new Chrysler Group LLC vehicle has characteristics to enhance the
driver's control under some driving conditions. These are to assist the driver
and are never a substitute for attentive driving. They can never take the
driver's place. Always drive carefully.
Your new vehicle has many features for the comfort and convenience of you
and your passengers. Some of these should not be used when driving
because they take your eyes from the road or your attention from driving.
Never text while driving or take your eyes more than momentarily off the
road.
This guide illustrates and describes the operation of features and equipment
that are either standard or optional on this vehicle. This guide may also
include a description of features and equipment that are no longer available
or were not ordered on this vehicle. Please disregard any features and
equipment described in this guide that are not available on this vehicle.
Chrysler Group LLC reserves the right to make changes in design and
specifications and/or make additions to or improvements to its products
without imposing any obligation upon itself to install them on products
previously manufactured.
This User Guide has been prepared to help you quickly become acquainted
with the important features of your vehicle. It contains most things you will
need to operate and maintain the vehicle, including emergency information.
The DVD includes a computer application containing detailed owner's
information which can be viewed on a personal computer or MAC computer.
The multimedia DVD also includes videos which can be played on any
standard DVD player (including the Media Center Touch-Screen Radios).
Additional DVD operational information is located on the back of the DVD
sleeve.
For complete owner information, refer to your Owner's Manual on the DVD
in the owner’s kit provided at the time of new vehicle purchase.For your
convenience, the information contained on the DVD may also be printed and
saved for future reference.
Chrysler Group LLC is committed to protecting our environment and natural
resources. By converting from paper to electronic delivery for the majority of
the user information for your vehicle, together we greatly reduce the
demand for tree-based products and lessen the stress on our environment.
Vehicles Sold In Canada
With respect to any vehicles sold in Canada, the name Chrysler Group LLC
shall be deemed to be deleted and the name Chrysler Canada Inc. used in
substitution therefore.
INTRODUCTION/WELCOME
2
Page 20 of 108
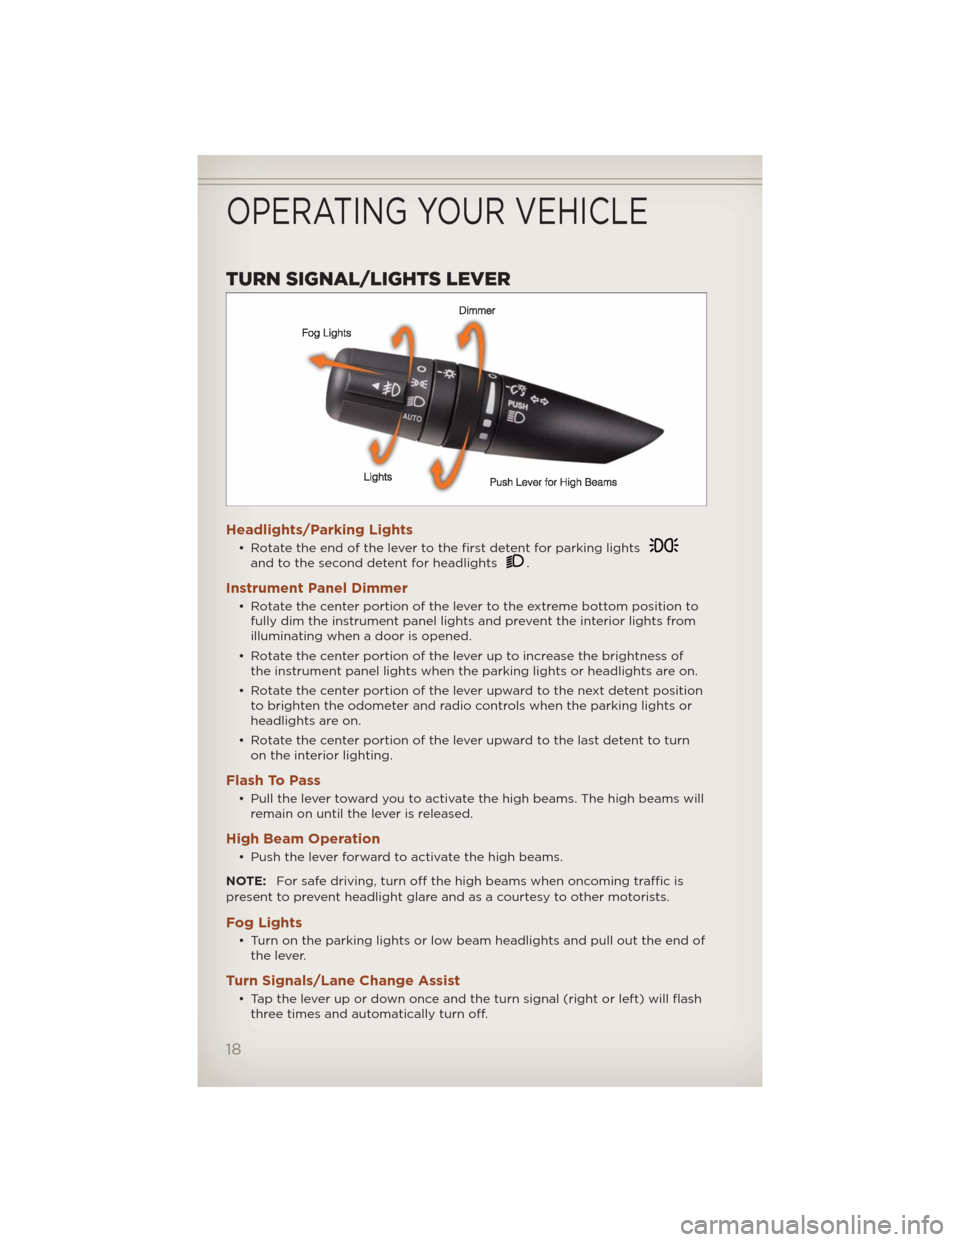
TURN SIGNAL/LIGHTS LEVER
Headlights/Parking Lights
• Rotate the end of the lever to the first detent for parking lightsand to the second detent for headlights.
Instrument Panel Dimmer
• Rotate the center portion of the lever to the extreme bottom position to
fully dim the instrument panel lights and prevent the interior lights from
illuminating when a door is opened.
• Rotate the center portion of the lever up to increase the brightness of
the instrument panel lights when the parking lights or headlights are on.
• Rotate the center portion of the lever upward to the next detent position
to brighten the odometer and radio controls when the parking lights or
headlights are on.
• Rotate the center portion of the lever upward to the last detent to turn
on the interior lighting.
Flash To Pass
• Pull the lever toward you to activate the high beams. The high beams will
remain on until the lever is released.
High Beam Operation
• Push the lever forward to activate the high beams.
NOTE:For safe driving, turn off the high beams when oncoming traffic is
present to prevent headlight glare and as a courtesy to other motorists.
Fog Lights
• Turn on the parking lights or low beam headlights and pull out the end of
the lever.
Turn Signals/Lane Change Assist
• Tap the lever up or down once and the turn signal (right or left) will flash
three times and automatically turn off.
OPERATING YOUR VEHICLE
18
Page 28 of 108
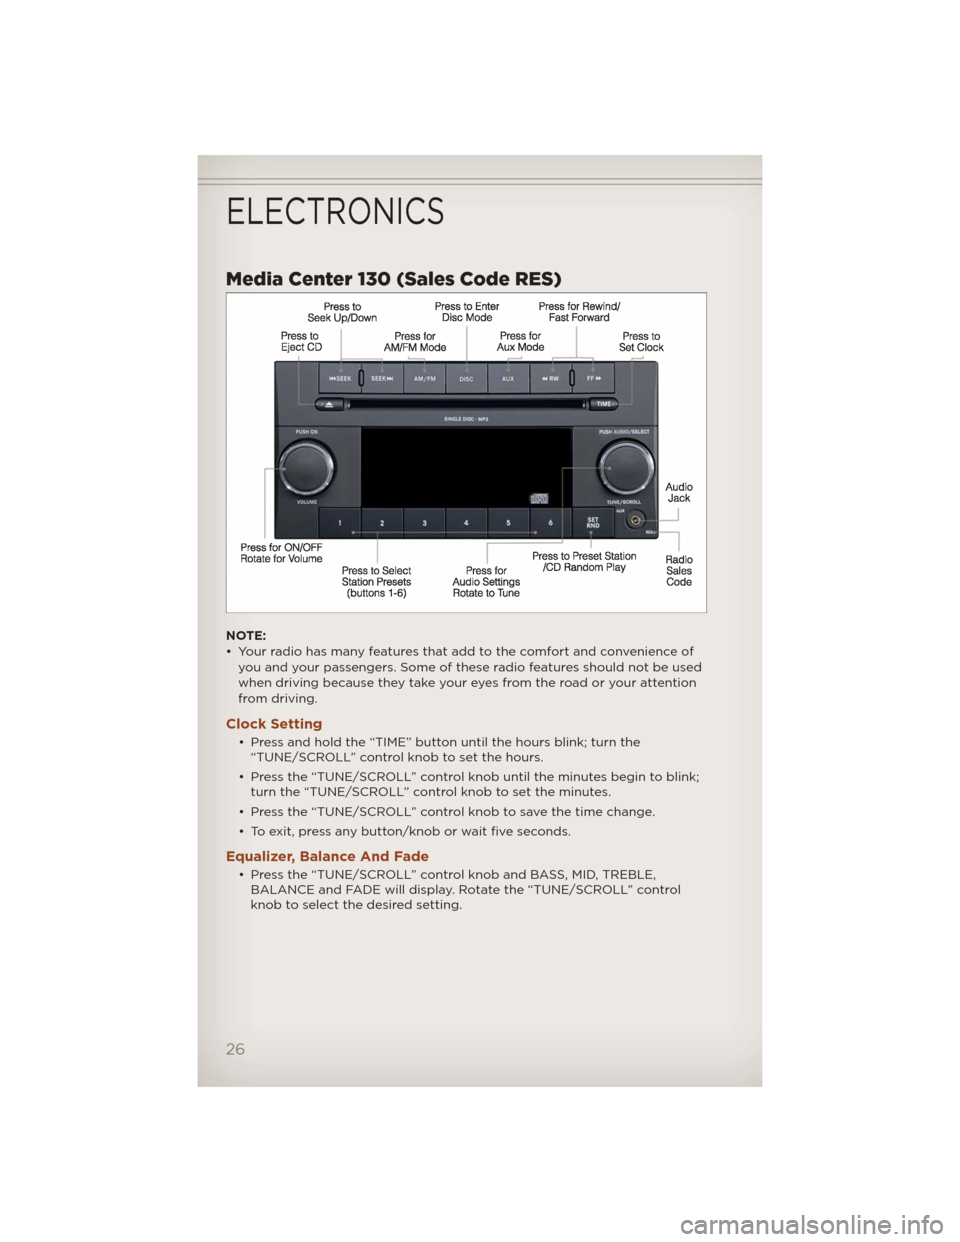
Media Center 130 (Sales Code RES)
NOTE:
• Your radio has many features that add to the comfort and convenience of
you and your passengers. Some of these radio features should not be used
when driving because they take your eyes from the road or your attention
from driving.
Clock Setting
• Press and hold the “TIME” button until the hours blink; turn the
“TUNE/SCROLL” control knob to set the hours.
• Press the “TUNE/SCROLL” control knob until the minutes begin to blink;
turn the “TUNE/SCROLL” control knob to set the minutes.
• Press the “TUNE/SCROLL” control knob to save the time change.
• To exit, press any button/knob or wait five seconds.
Equalizer, Balance And Fade
• Press the “TUNE/SCROLL” control knob and BASS, MID, TREBLE,
BALANCE and FADE will display. Rotate the “TUNE/SCROLL” control
knob to select the desired setting.
ELECTRONICS
26
Page 30 of 108
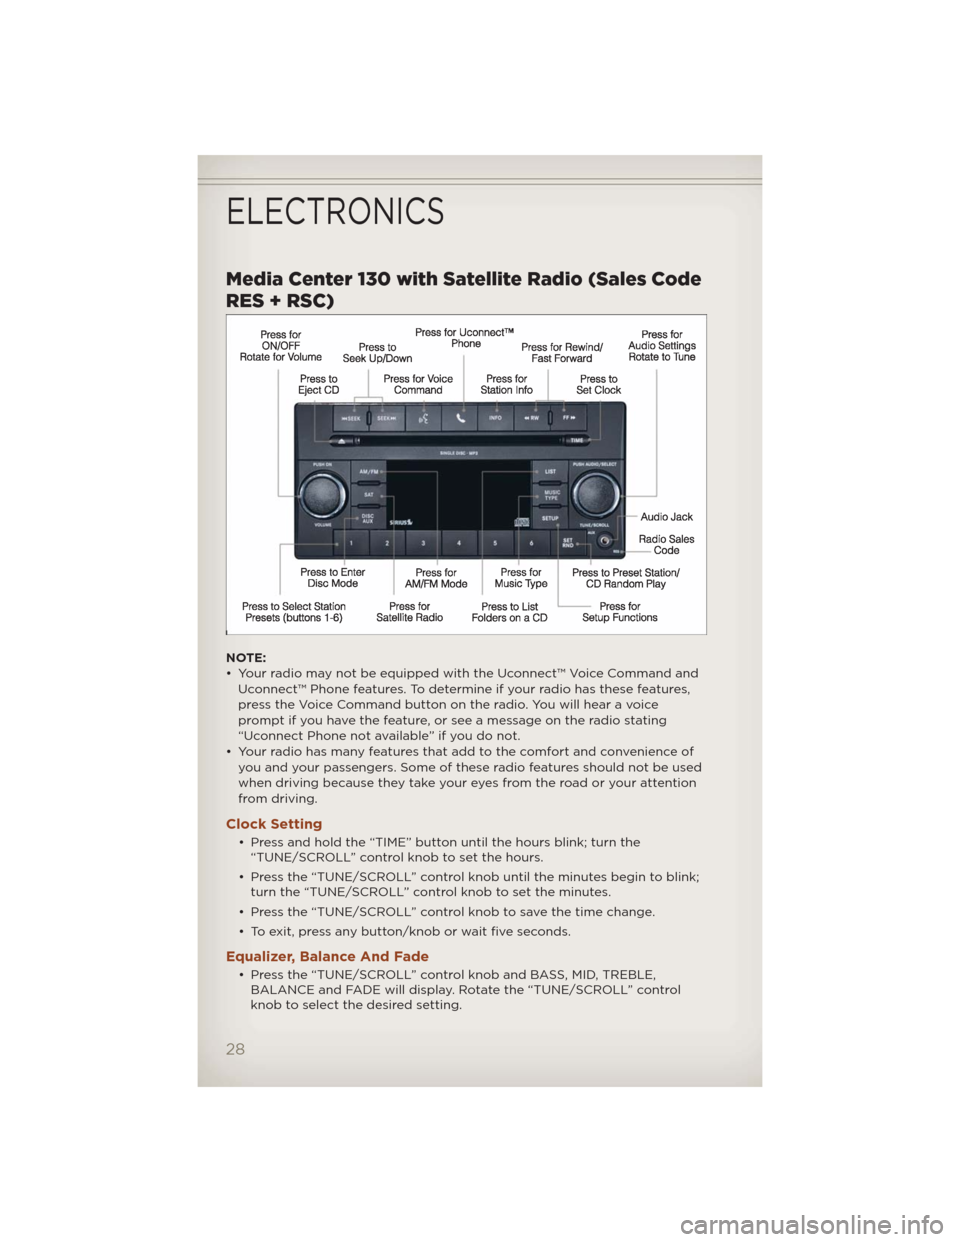
Media Center 130 with Satellite Radio (Sales Code
RES + RSC)
NOTE:
• Your radio may not be equipped with the Uconnect™ Voice Command and
Uconnect™ Phone features. To determine if your radio has these features,
press the Voice Command button on the radio. You will hear a voice
prompt if you have the feature, or see a message on the radio stating
“Uconnect Phone not available” if you do not.
• Your radio has many features that add to the comfort and convenience of
you and your passengers. Some of these radio features should not be used
when driving because they take your eyes from the road or your attention
from driving.
Clock Setting
• Press and hold the “TIME” button until the hours blink; turn the
“TUNE/SCROLL” control knob to set the hours.
• Press the “TUNE/SCROLL” control knob until the minutes begin to blink;
turn the “TUNE/SCROLL” control knob to set the minutes.
• Press the “TUNE/SCROLL” control knob to save the time change.
• To exit, press any button/knob or wait five seconds.
Equalizer, Balance And Fade
• Press the “TUNE/SCROLL” control knob and BASS, MID, TREBLE,
BALANCE and FADE will display. Rotate the “TUNE/SCROLL” control
knob to select the desired setting.
ELECTRONICS
28
Page 33 of 108
• Your radio has many features that add to the comfort and convenience of
you and your passengers. Some of these radio features should not be used
when driving because they take your eyes from the road or your attention
from driving.
Clock Setting
• Press and hold the “TIME” button until the hours blink; turn the
“TUNE/SCROLL” control knob to set the hours.
• Press the “TUNE/SCROLL” control knob until the minutes begin to blink;
turn the “TUNE/SCROLL” control knob to set the minutes.
• Press the “TUNE/SCROLL” control knob to save the time change.
• To exit, press any button/knob or wait five seconds.
Equalizer, Balance And Fade
• Press the “TUNE/SCROLL” control knob and BASS, MID, TREBLE,
BALANCE and FADE will display. Rotate the “TUNE/SCROLL” control
knob to select the desired setting.
Radio Operation
Seek Up/Down Buttons
• Press to seek through radio stations in AM, FM, or SAT bands.
• Hold either button to bypass stations without stopping.
Store Radio Presets
• Press the “SET” button once and SET 1 will show in the display. Then
select button (1–6).
• A second station may be added to each push button. Press the “SET”
button twice and SET 2 will show in the display. Then select button (1–6).
Music Type
• Press the “MUSIC TYPE” button to activate this mode. Press the “MUSIC
TYPE” button again or turn the “TUNE/SCROLL” control knob to select
the desired music type (Adult Hits, Country, Jazz, Oldies, Rock, etc.).
• Once a music type is chosen and the icon is displayed, press the SEEK
button and the radio will only search for stations with the selected music
type.
NOTE:The Music Type function only operates when in FM mode.
SETUP Button
• Pressing the “SETUP” button allows you to select between items that are
available in that particular mode.
• Turn the “TUNE/SCROLL” control knob to scroll through the entries.
Push the “AUDIO/SELECT” button to select an entry and make changes.
ELECTRONICS
31
Page 36 of 108
Menu
• Press the “MENU” hard-key to access the System Setup menu and the My
Files menu.
• Press the “MENU” hard-key in an active mode (SAT, CD, AUX, etc.) in
order to change mode specific settings.
Equalizer, Balance And Fade
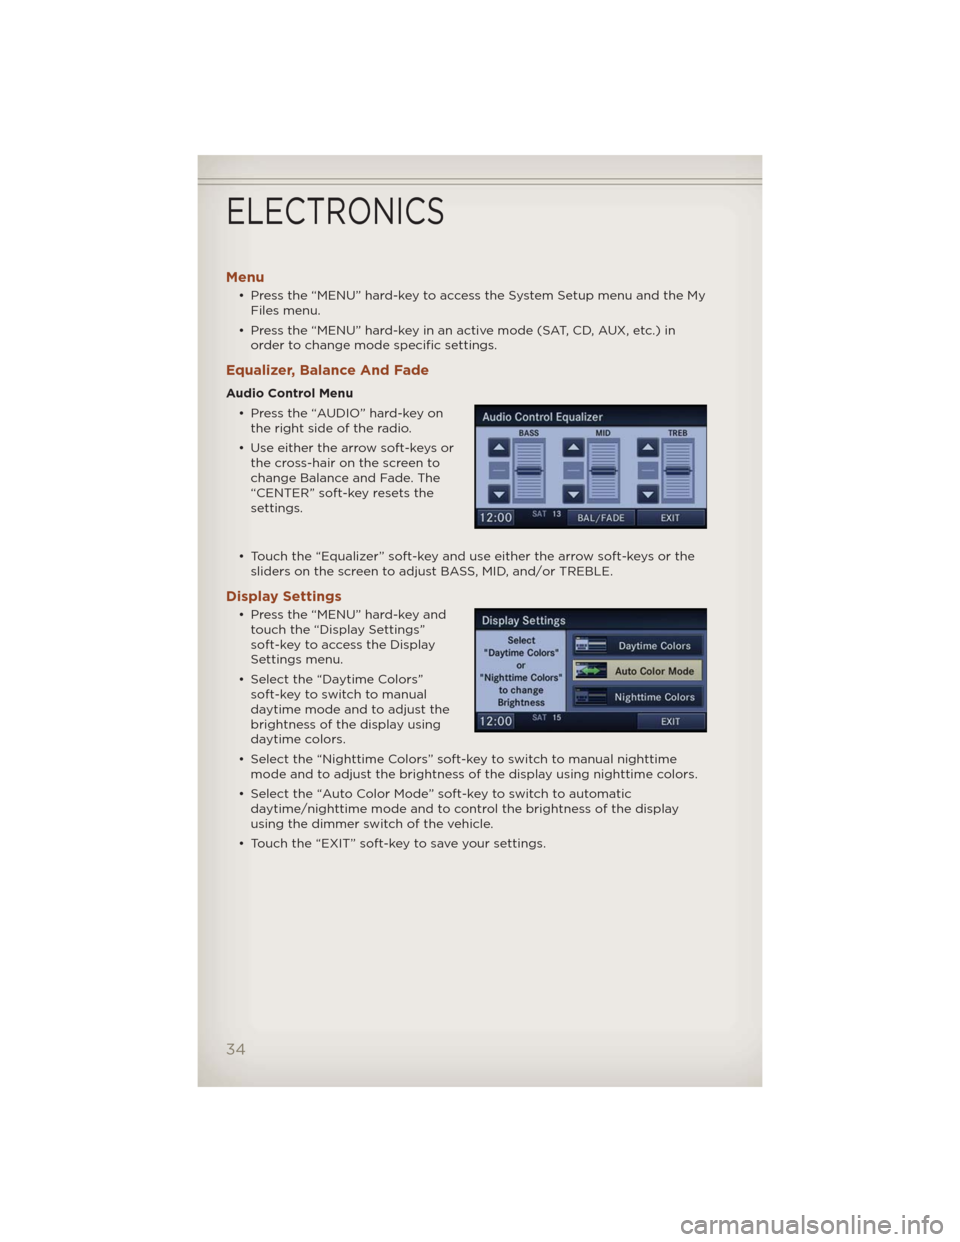
Audio Control Menu
• Press the “AUDIO” hard-key on
the right side of the radio.
• Use either the arrow soft-keys or
the cross-hair on the screen to
change Balance and Fade. The
“CENTER” soft-key resets the
settings.
• Touch the “Equalizer” soft-key and use either the arrow soft-keys or the
sliders on the screen to adjust BASS, MID, and/or TREBLE.
Display Settings
• Press the “MENU” hard-key and
touch the “Display Settings”
soft-key to access the Display
Settings menu.
• Select the “Daytime Colors”
soft-key to switch to manual
daytime mode and to adjust the
brightness of the display using
daytime colors.
• Select the “Nighttime Colors” soft-key to switch to manual nighttime
mode and to adjust the brightness of the display using nighttime colors.
• Select the “Auto Color Mode” soft-key to switch to automatic
daytime/nighttime mode and to control the brightness of the display
using the dimmer switch of the vehicle.
• Touch the “EXIT” soft-key to save your settings.
ELECTRONICS
34
Page 54 of 108
WARNING!
Any voice commanded system should be used only in safe driving
conditions following local laws and phone use. All attention should be
kept on the roadway ahead. Failure to do so may result in a collision
causing you and others to be severely injured or killed.
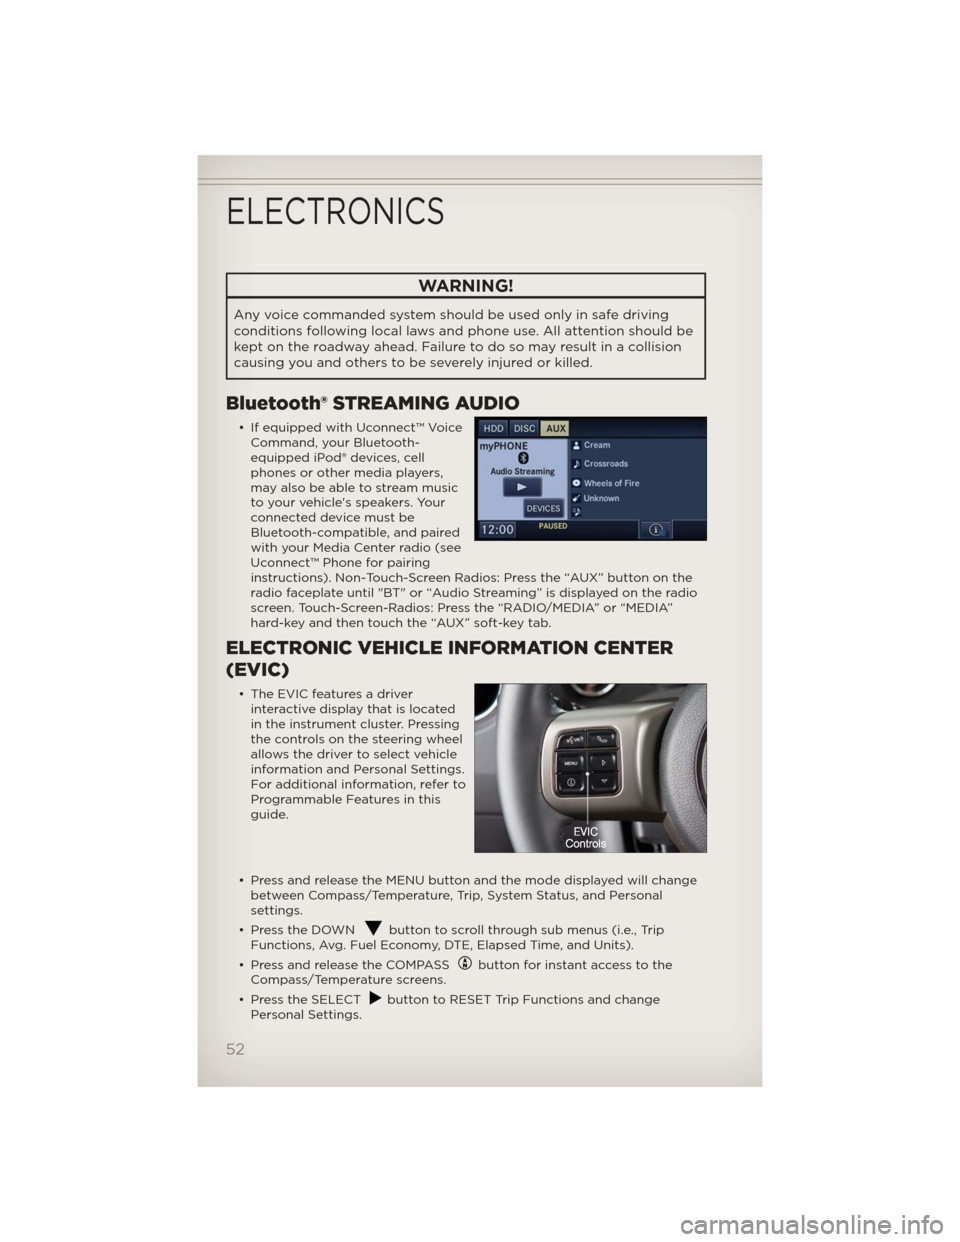
Bluetooth® STREAMING AUDIO
• If equipped with Uconnect™ Voice
Command, your Bluetooth-
equipped iPod® devices, cell
phones or other media players,
may also be able to stream music
to your vehicle's speakers. Your
connected device must be
Bluetooth-compatible, and paired
with your Media Center radio (see
Uconnect™ Phone for pairing
instructions). Non-Touch-Screen Radios: Press the “AUX” button on the
radio faceplate until "BT" or “Audio Streaming” is displayed on the radio
screen. Touch-Screen-Radios: Press the “RADIO/MEDIA” or “MEDIA”
hard-key and then touch the “AUX” soft-key tab.
ELECTRONIC VEHICLE INFORMATION CENTER
(EVIC)
• The EVIC features a driver
interactive display that is located
in the instrument cluster. Pressing
the controls on the steering wheel
allows the driver to select vehicle
information and Personal Settings.
For additional information, refer to
Programmable Features in this
guide.
• Press and release the MENU button and the mode displayed will change
between Compass/Temperature, Trip, System Status, and Personal
settings.
• Press the DOWN
button to scroll through sub menus (i.e., Trip
Functions, Avg. Fuel Economy, DTE, Elapsed Time, and Units).
• Press and release the COMPASS
button for instant access to the
Compass/Temperature screens.
• Press the SELECT
button to RESET Trip Functions and change
Personal Settings.
ELECTRONICS
52
Page 55 of 108
Compass Calibration
• This compass is self-calibrating, which eliminates the need to set the
compass manually. When the vehicle is new, the compass may appear
erratic and the EVIC will display “CAL” until the compass is calibrated.
• You may also calibrate the compass by completing one or more 360
degree turns (in an area free from large metal or metallic objects) until
the “CAL” message displayed in the EVIC turns off. The compass will now
function normally.
PROGRAMMABLE FEATURES
Electronic Vehicle Information Center (EVIC)
• The EVIC can be used to program the following Personal Settings. Press
and release the MENU button until Personal Settings displays, then press
the DOWN button
to scroll through the settings. Press the SELECT
buttonto change the setting.
• Language • Illuminated Approach
• Auto Unlock On Exit • Hill Start Assist (HSA)
• RKE Unlock Driver's Door 1st • Display Units In
• Flash Lamps With Lock • Confirmation of Voice Commands
• Sound Horn With Lock • Automatic Compass Calibration
• Headlamp Off Delay • Compass Variance
• Key Off Power Delay
Key Fob Programmable Features
• The following features may also be programmed by using the Key Fob
transmitter or the ignition switch and driver's door lock switch.
NOTE:Pressing the LOCK button while you are inside the vehicle will
activate the Vehicle Security Alarm. Opening a door with the Vehicle
Security Alarm activated will cause the alarm to sound. Press the UNLOCK
button to deactivate the Vehicle Security Alarm.
Unlock On First Press
• To unlock either the driver's side, or all doors, on the first press of the
UNLOCK button:
• Press and hold the LOCK button for at least 4 seconds, but no longer
than 10 seconds. Then, press and hold the UNLOCK button while still
holding the LOCK button.
• Release both buttons at the same time.
Auto Unlock Doors On Exit
• To have all of the vehicle doors unlock when any door is opened:
• Enter your vehicle and close all the doors.
•
Cycle the ignition switch between LOCK and ON and then back to LOCK
four times, ending up in the LOCK position (do not start the engine).
• Press the power door UNLOCK switch to unlock the doors. A single
chime will indicate that programming is complete.
ELECTRONICS
53
Page 57 of 108
• Erase all channels before you begin programming. To erase the channels,
place the ignition switch into the ON/RUN position, then press and hold
the two outside HomeLink® buttons (I and III) for up 20 seconds or until
the red indicator flashes.
NOTE:
• Erasing all channels should only be performed when programming
HomeLink® for the first time. Do not erase channels when programming
additional buttons.
• If you have any problems, or require assistance, please call toll-free
1–800–355–3515 or, on the Internet at www.HomeLink.com for information
or assistance.
Programming A Rolling Code
• For programming Garage Door Openers that were manufactured after
1995. These Garage Door Openers can be identified by the “LEARN” or
“TRAIN” button located where the hanging antenna is attached to the
Garage Door Opener. It is NOT the button that is normally used to open
and close the door. The name and color of the button may vary by
manufacturer.
• Place the ignition switch into the ON/RUN position.
• Place the hand-held transmitter 1 to 3 in (3 to 8 cm) away from the
HomeLink® button you wish to program while keeping the HomeLink®
indicator light in view.
• Simultaneously press and hold both the HomeLink® button you want to
program and the hand-held transmitter button.
• Continue to hold both buttons and observe the indicator light. The
Homelink® indicator will flash slowly and then rapidly after Homelink® has
received the frequency signal from the hand-held transmitter. Release
both buttons after the indicator light changes from slow to rapid.
• At the garage door opener motor (in the garage), locate the “LEARN” or
“TRAINING” button. This can usually be found where the hanging
antenna wire is attached to the garage door opener motor. Firmly press
and release the “LEARN” or “TRAINING” button.
NOTE:You have 30 seconds in which to initiate the next step after the
LEARN button has been pressed.
• Return to the vehicle and press the programmed HomeLink® button
twice (holding the button for two seconds each time). If the device is
plugged in and activates, programming is complete.
NOTE:If the device does not activate, press the button a third time (for two
seconds) to complete the training.
• To program the remaining two HomeLink® buttons, repeat each step for
each remaining button. DO NOT erase the channels.
ELECTRONICS
55
Page 58 of 108
Programming A Non-Rolling Code
• For programming Garage Door Openers manufactured before 1995.
• Turn the ignition switch to the ON/RUN position.
• Place the hand-held transmitter 1 to 3 in (3 to 8 cm) away from the
HomeLink® button you wish to program while keeping the HomeLink®
indicator light in view.
• Simultaneously press and hold both the HomeLink® button you want to
program and the hand-held transmitter button.
• Continue to hold both buttons and observe the indicator light. The
Homelink® indicator will flash slowly and then rapidly after Homelink® has
received the frequency signal from the hand-held transmitter. Release
both buttons after the indicator light changes from slow to rapid.
• Press and hold the programmed HomeLink® button and observe the
indicator light.
NOTE:
• If the indicator light stays on constantly, programming is complete and the
garage door (or device) should activate when the HomeLink® button is
pressed.
• To program the two remaining HomeLink® buttons, repeat each step for
each remaining button. DO NOT erase the channels.
Using HomeLink®
• To operate, press and release the programmed HomeLink® button.
Activation will now occur for the programmed device (i.e., garage door
opener, gate operator, security system, entry door lock, home/office
lighting, etc.,). The hand-held transmitter of the device may also be used
at any time.
WARNING!
• Your motorized door or gate will open and close while you are
programming the universal transceiver. Do not program the
transceiver if people or pets are in the path of the door or gate.
• Do not run your vehicle in a closed garage or confined area while
programming the transceiver. Exhaust gas from your vehicle
contains Carbon Monoxide (CO) which is odorless and colorless.
Carbon Monoxide is poisonous when inhaled and can cause you and
others to be severely injured or killed.
ELECTRONICS
56