Transmission JEEP COMPASS 2013 1.G Owner's Manual
[x] Cancel search | Manufacturer: JEEP, Model Year: 2013, Model line: COMPASS, Model: JEEP COMPASS 2013 1.GPages: 116, PDF Size: 2.71 MB
Page 77 of 116
WARNING!
You or others can be badly burned by hot engine coolant (antifreeze) or steam from
your radiator. If you see or hear steam coming from under the hood, do not open
the hood until the radiator has had time to cool. Never try to open a cooling system
pressure cap when the radiator or coolant bottle is hot.
AUTOMATIC TRANSMISSION OVERHEATING
• During sustained high speed driving or trailer towing up long grades on hot days,the automatic transmission oil may become too hot.
• When the transmission overheat warning light
turns on, you will experience
reduced performance until the automatic transmission cools down. Once the
transmission has cooled down and the light turns off, you may continue to drive
normally. If the high speed is maintained, the overheating will continue to occur.
• If the overheating continues, it may become necessary to stop the vehicle and run the engine at idle with the transmission in NEUTRAL until the light turns off.
JACKING AND TIRE CHANGING
Jack Location
• The jack and jack-handle are stowed under the load floor in the cargo area.
Spare Tire Stowage
• The compact spare tire is stowed un-der the rear load floor in the cargo area.
Spare Tire Removal
• Lift up the load floor cover and removethe hold down.
WHAT TO DO IN EMERGENCIES
75
Page 78 of 116
Preparations For Jacking
1.Park the vehicle on a firm level surface, avoiding ice or slippery areas.
2. Turn on the Hazard Warning flasher.
3. Set the parking brake.
4. Place the shift lever in PARK (automatic transmission) or REVERSE (manualtransmission).
5. Turn OFF the ignition.
Block both the front and rear of the wheel
diagonally opposite the jacking position.
For example, if changing the right front
tire, block the left rear wheel.
NOTE:
Passengers should not remain in the
vehicle while the vehicle is being jacked.
Jacking Instructions
NOTE:
Refer to “Tires — General Information” in
“Starting And Operating” in the Owner's
Manual on the DVD for further informa-
tion about the spare tire, it's use, and
operation.
1.
Remove the scissors jack and lug
wrench from the spare wheel as an as-
sembly. Turn the jack screw to the left to
loosen the lug wrench and remove the
wrench from the jack assembly.
2. Loosen, but do not remove, the wheel nuts by turning them to the left one turn while the wheel is still on the ground.
WHAT TO DO IN EMERGENCIES
76
Page 82 of 116
WARNING!
• Being under a jacked-up vehicle is dangerous. The vehicle could slip off thejack and fall on you. You could be crushed. Never put any part of your body
under a vehicle that is on a jack. If you need to get under a raised vehicle, take
it to a service center where it can be raised on a lift.
• Never start or run the engine while the vehicle is on a jack.
• The jack is designed to be used as a tool for changing tires only. The jack
should not be used to lift the vehicle for service purposes. The vehicle should
be jacked on a firm level surface only. Avoid ice or slippery areas.
• Do not attempt to change a tire on the side of the vehicle close to moving
traffic, pull far enough off the road to avoid the danger of being hit when
operating the jack or changing the wheel.
• Carefully follow these tire changing warnings to help prevent personal injury or
damage to your vehicle:
• Always park on a firm, level surface as far from the edge of the roadwayas possible before raising the vehicle.
• Turn on the Hazard Warning flasher.
• Block the wheel diagonally opposite the wheel to be raised.
• Set the parking brake firmly and set an automatic transmission in PARK;
a manual transmission in REVERSE.
• Do not let anyone sit in the vehicle when it is on a jack.
• Do not get under the vehicle when it is on a jack.
• Only use the jack in the positions indicated and for lifting this vehicle during
a tire change.
• If working on or near a roadway, be extremely careful of motor traffic.
• To assure that spare tires, flat or inflated, are securely stowed, spares must be
stowed with the valve stem facing the ground.
• Raising the vehicle higher than necessary can make the vehicle less stable.
It could slip off the jack and hurt someone near it. Raise the vehicle only
enough to remove the tire.
• To avoid possible personal injury, handle the wheel covers with care to avoid
contact with any sharp edges.
• A loose tire or jack thrown forward in a collision or hard stop could injure the
occupants in the vehicle. Have the deflated (flat) tire repaired or replaced
immediately.
• To avoid the risk of forcing the vehicle off the jack, do not tighten the lug nuts
fully until the vehicle is lowered to the ground. Failure to follow this warning
may result in personal injury.
WHAT TO DO IN EMERGENCIES
80
Page 83 of 116
JUMP-STARTING PROCEDURES
• If your vehicle has a discharged battery it can be jump-started using a set ofjumper cables and a battery in another vehicle or by using a portable battery
booster pack. Jump-starting can be dangerous if done improperly so please follow
the procedures in this section carefully.
NOTE:
When using a portable battery booster pack follow the manufacturer’s operating
instructions and precautions.
Preparations For Jump-Start
• The battery in your vehicle is located in the front of the engine compartment below the air intake duct. To access the battery remove the air intake duct by turning the
two finger screws, located on the radiator support.
1.
Set the parking brake, shift the auto-
matic transmission into PARK and turn
the ignition to LOCK.
2.Turn off the heater, radio, and all un-
necessary electrical accessories.
3.If using another vehicle to jump-start
the battery, park the vehicle within the
jumper cables reach, set the parking
brake and make sure the ignition is
OFF.
WHAT TO DO IN EMERGENCIES
81
Page 86 of 116
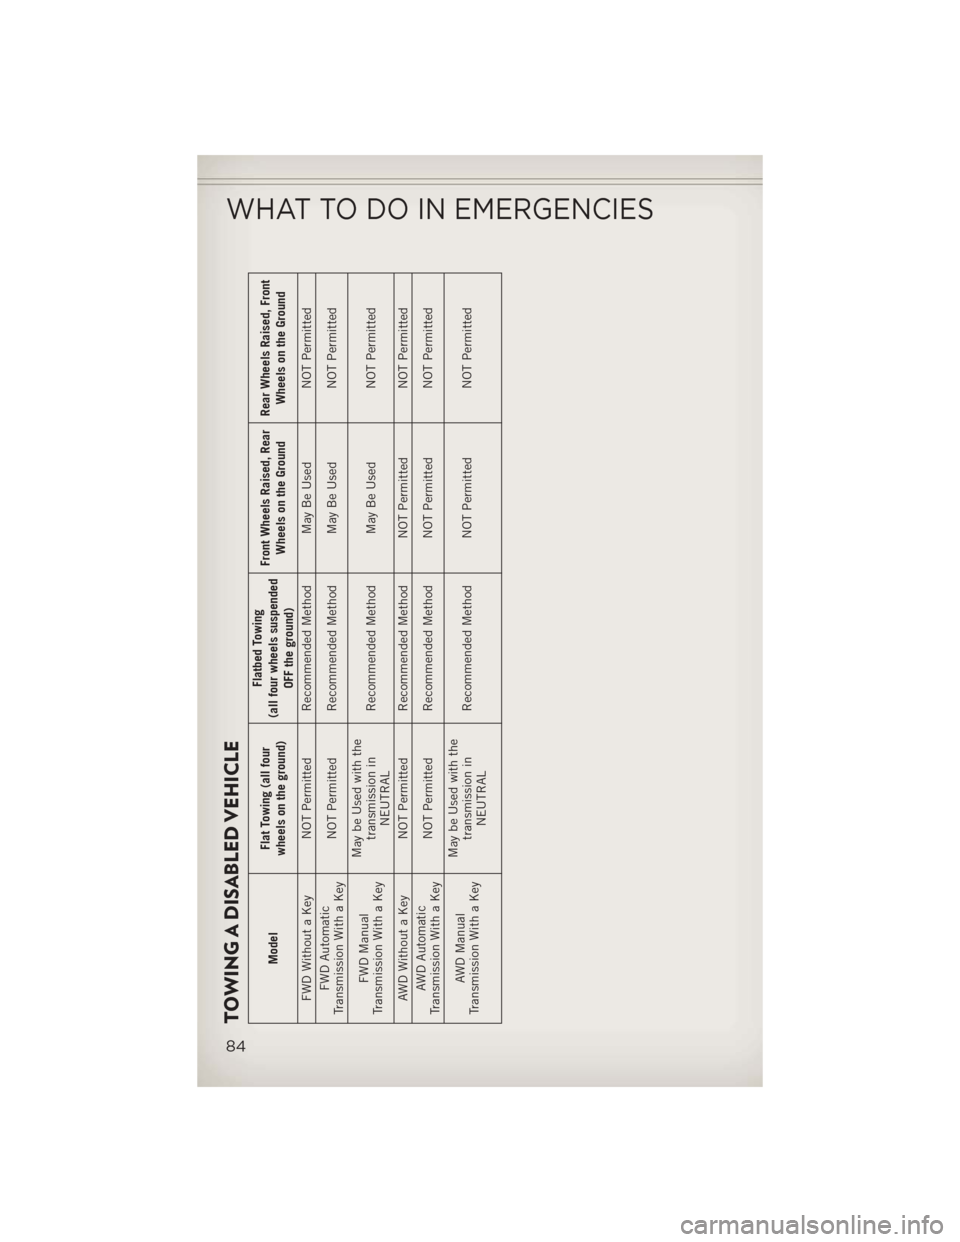
TOWING A DISABLED VEHICLE
ModelFlat Towing (all four
wheels on the ground) Flatbed Towing
(all four wheels suspended OFF the ground) Front Wheels Raised, Rear
Wheels on the Ground Rear Wheels Raised, Front
Wheels on the Ground
FWD Without a Key NOT Permitted Recommended Method May Be Used NOT Permitted FWD Automatic
Transmission With a Key NOT Permitted Recommended Method May Be Used NOT Permitted
FWD Manual
Transmission With a Key May be Used with the
transmission inNEUTRAL Recommended Method May Be Used NOT Permitted
AWD Without a Key NOT Permitted Recommended Method NOT Permitted NOT Permitted AWD Automatic
Transmission With a Key NOT Permitted Recommended Method NOT Permitted NOT Permitted
AWD Manual
Transmission With a Key May be Used with the
transmission inNEUTRAL Recommended Method NOT Permitted NOT Permitted
WHAT TO DO IN EMERGENCIES
84
Page 87 of 116
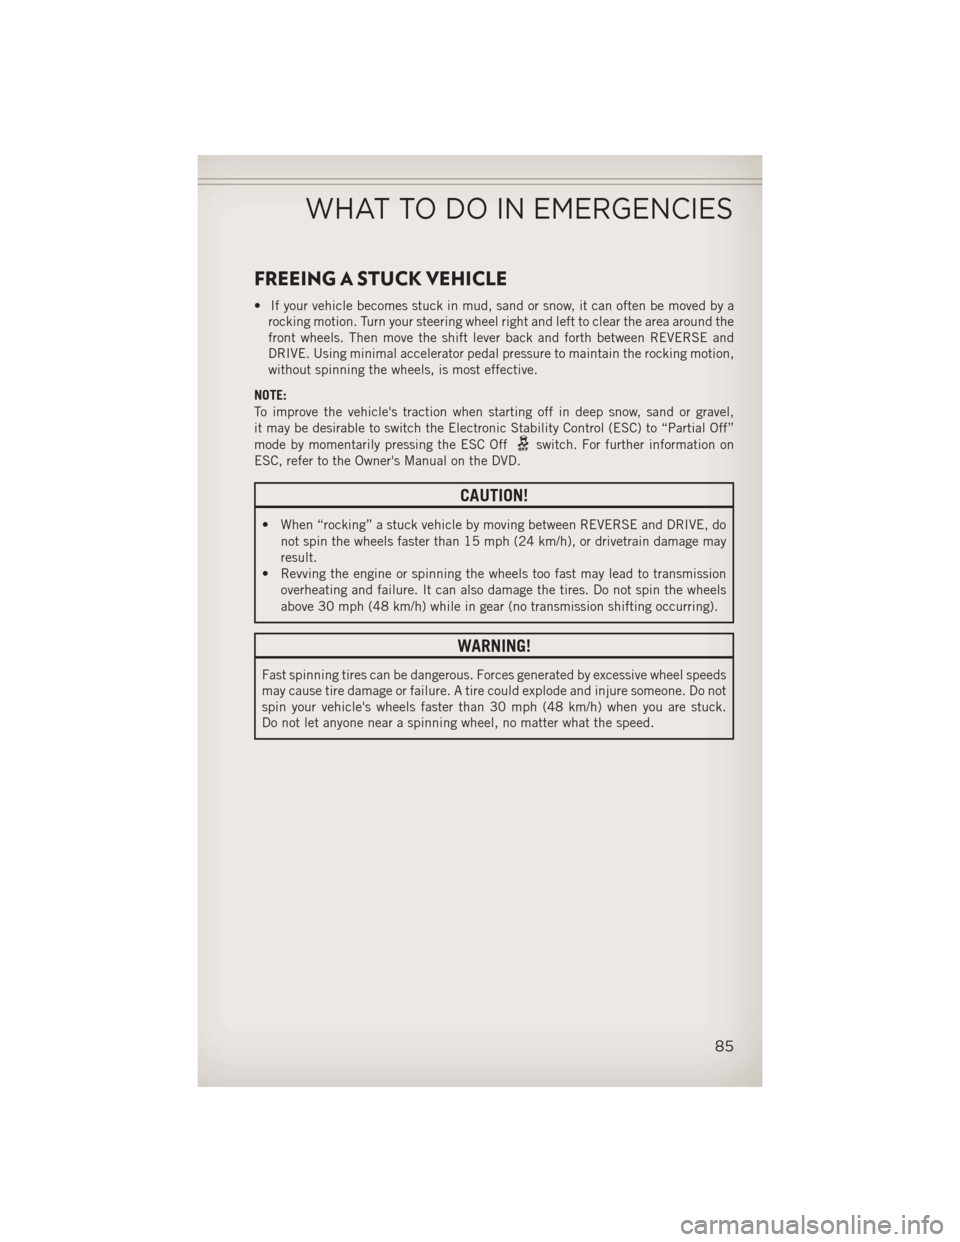
FREEING A STUCK VEHICLE
• If your vehicle becomes stuck in mud, sand or snow, it can often be moved by arocking motion. Turn your steering wheel right and left to clear the area around the
front wheels. Then move the shift lever back and forth between REVERSE and
DRIVE. Using minimal accelerator pedal pressure to maintain the rocking motion,
without spinning the wheels, is most effective.
NOTE:
To improve the vehicle's traction when starting off in deep snow, sand or gravel,
it may be desirable to switch the Electronic Stability Control (ESC) to “Partial Off”
mode by momentarily pressing the ESC Off
switch. For further information on
ESC, refer to the Owner's Manual on the DVD.
CAUTION!
• When “rocking” a stuck vehicle by moving between REVERSE and DRIVE, do not spin the wheels faster than 15 mph (24 km/h), or drivetrain damage may
result.
• Revving the engine or spinning the wheels too fast may lead to transmission
overheating and failure. It can also damage the tires. Do not spin the wheels
above 30 mph (48 km/h) while in gear (no transmission shifting occurring).
WARNING!
Fast spinning tires can be dangerous. Forces generated by excessive wheel speeds
may cause tire damage or failure. A tire could explode and injure someone. Do not
spin your vehicle's wheels faster than 30 mph (48 km/h) when you are stuck.
Do not let anyone near a spinning wheel, no matter what the speed.
WHAT TO DO IN EMERGENCIES
85
Page 92 of 116
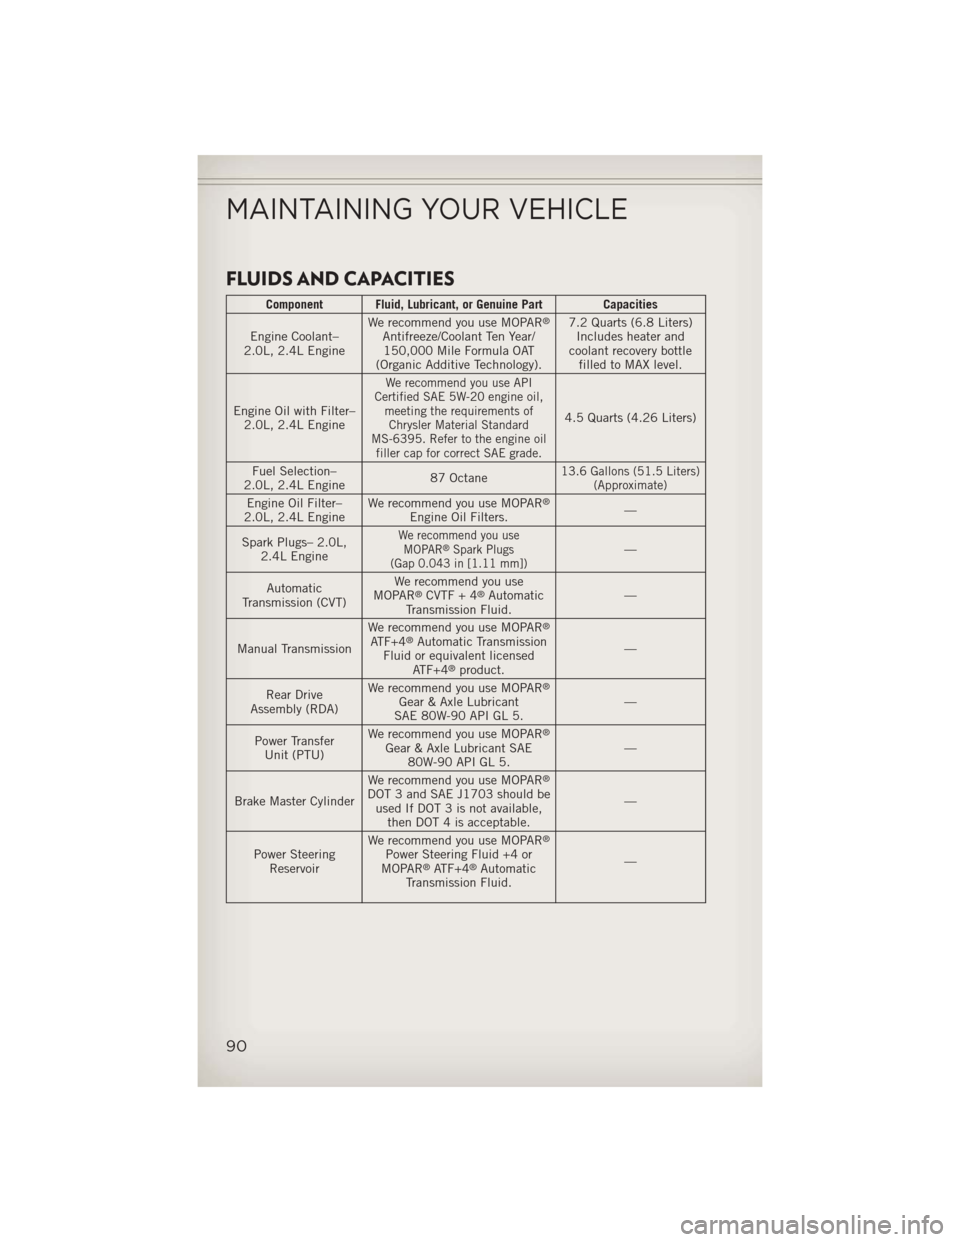
FLUIDS AND CAPACITIES
Component Fluid, Lubricant, or Genuine Part Capacities
Engine Coolant–
2.0L, 2.4L Engine We recommend you use MOPAR®
Antifreeze/Coolant Ten Year/
150,000 Mile Formula OAT
(Organic Additive Technology). 7.2 Quarts (6.8 Liters)
Includes heater and
coolant recovery bottle filled to MAX level.
Engine Oil with Filter– 2.0L, 2.4L Engine
We recommend you use API
Certified SAE 5W-20 engine oil, meeting the requirements ofChrysler Material Standard
MS-6395. Refer to the engine oil filler cap for correct SAE grade.
4.5 Quarts (4.26 Liters)
Fuel Selection–
2.0L, 2.4L Engine 87 Octane
13.6 Gallons (51.5 Liters)
(Approximate)
Engine Oil Filter–
2.0L, 2.4L Engine We recommend you use MOPAR®
Engine Oil Filters.
—
Spark Plugs– 2.0L, 2.4L Engine
We recommend you useMOPAR®Spark Plugs
(Gap 0.043 in [1.11 mm])—
Automatic
Transmission (CVT) We recommend you use
MOPAR
®CVTF + 4®Automatic
Transmission Fluid. —
Manual Transmission We recommend you use MOPAR
®
ATF+4®Automatic Transmission
Fluid or equivalent licensed ATF+4
®product. —
Rear Drive
Assembly (RDA) We recommend you use MOPAR®
Gear & Axle Lubricant
SAE 80W-90 API GL 5. —
Power Transfer Unit (PTU) We recommend you use MOPAR
®
Gear & Axle Lubricant SAE
80W-90 API GL 5. —
Brake Master Cylinder We recommend you use MOPAR
®
DOT 3 and SAE J1703 should be
used If DOT 3 is not available, then DOT 4 is acceptable. —
Power Steering Reservoir We recommend you use MOPAR
®
Power Steering Fluid +4 or
MOPAR®ATF+4®Automatic
Transmission Fluid. —
MAINTAINING YOUR VEHICLE
90
Page 95 of 116
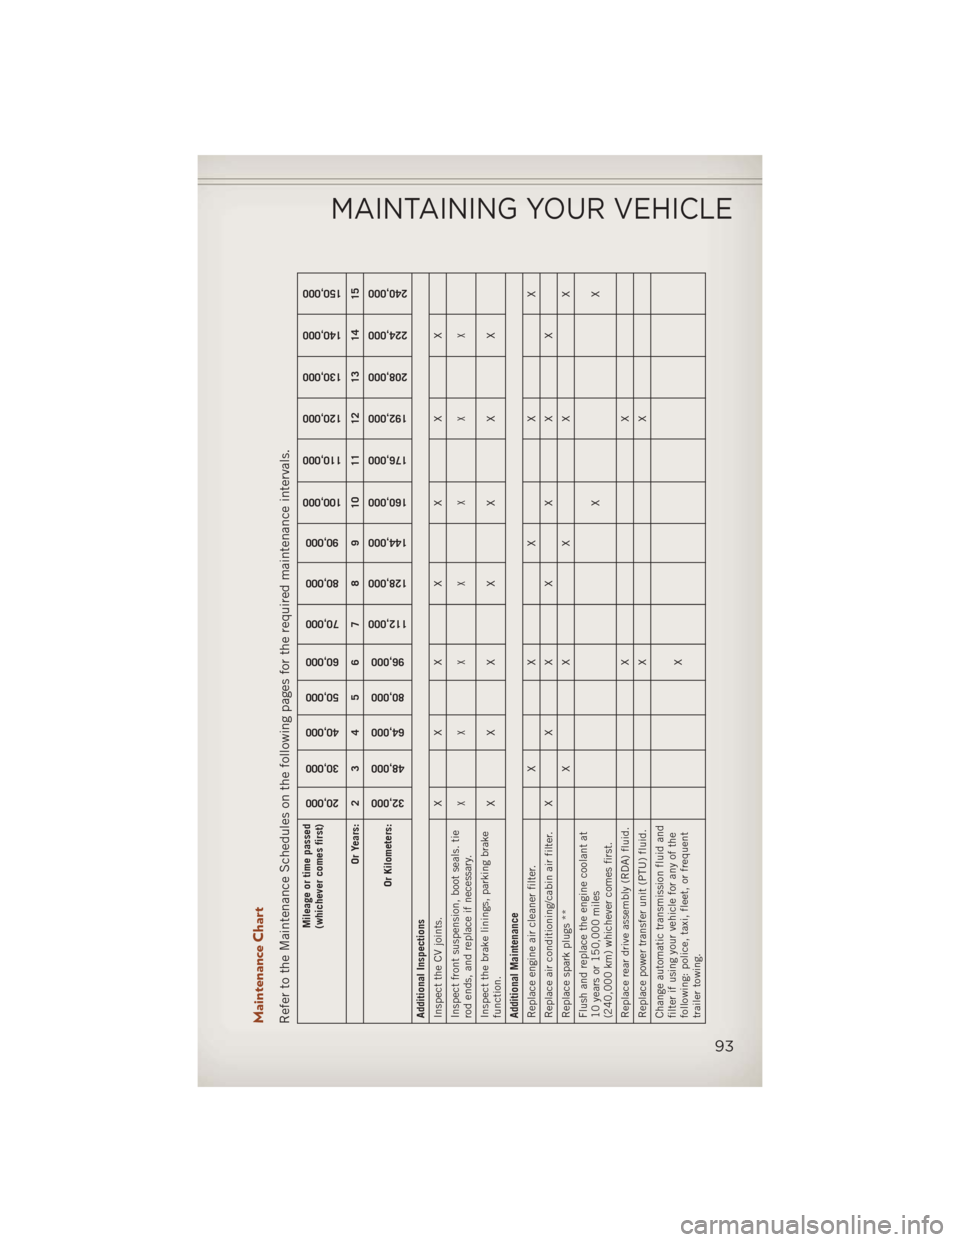
Maintenance ChartRefer to the Maintenance Schedules on the following pages for the required maintenance intervals.
Mileage or time passed
(whichever comes first)
20,000
30,000
40,000
50,000
60,000
70,000
80,000
90,000
100,000
110,000
120,000
130,000
140,000
150,000
Or Years: 2 3 4 5 6 7 8 9 10 11 12 13 14 15
Or Kilometers:
32,000
48,000
64,000
80,000
96,000
112,000
128,000
144,000
160,000
176,000
192,000
208,000
224,000
240,000
Additional Inspections
Inspect the CV joints. X X X X X X X
Inspect front suspension, boot seals. tie
rod ends, and replace if necessary.
XXX X X X X
Inspect the brake linings, parking brake
function. XXX X X X X
Additional Maintenance
Replace engine air cleaner filter. X X X X X
Replace air conditioning/cabin air filter. X X X X X X X
Replace spark plugs ** X X X X X
Flush and replace the engine coolant at
10 years or 150,000 miles
(240,000 km) whichever comes first. XX
Replace rear drive assembly (RDA) fluid. X X
Replace power transfer unit (PTU) fluid. X X
Change automatic transmission fluid and
filter if using your vehicle for any of the
following: police, taxi, fleet, or frequent
trailer towing. X
MAINTAINING YOUR VEHICLE
93
Page 96 of 116
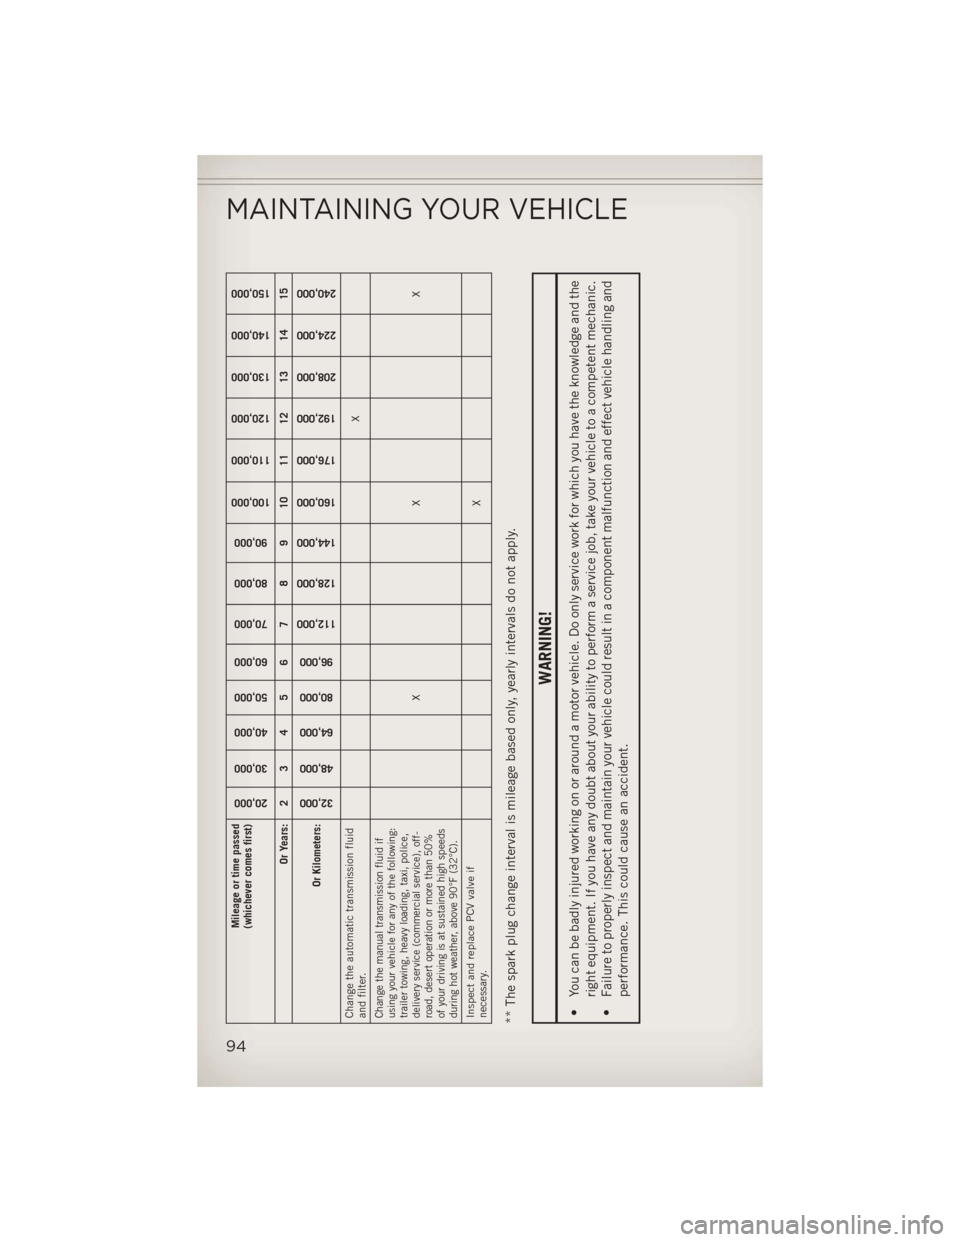
Mileage or time passed
(whichever comes first)
20,000
30,000
40,000
50,000
60,000
70,000
80,000
90,000
100,000
110,000
120,000
130,000
140,000
150,000
Or Years: 2 3 4 5 6 7 8 9 10 11 12 13 14 15
Or Kilometers:
32,000
48,000
64,000
80,000
96,000
112,000
128,000
144,000
160,000
176,000
192,000
208,000
224,000
240,000
Change the automatic transmission fluid
and filter. XChange the manual transmission fluid if
using your vehicle for any of the following:
trailer towing, heavy loading, taxi, police,
delivery service (commercial service), off-
road, desert operation or more than 50%
of your driving is at sustained high speeds
during hot weather, above 90°F (32°C).
XX X
Inspect and replace PCV valve if
necessary. X
** The spark plug change interval is mileage based only, yearly intervals do not apply.
WARNING!
• You can be badly injured working on or around a motor vehicle. Do only service work for which you have the knowledge and the
right equipment. If you have any doubt about your ability to perform a service job, take your vehicle to a competent mechanic.
• Failure to properly inspect and maintain your vehicle could result in a component malfunction and effect vehicle handling and
performance. This could cause an accident.
MAINTAINING YOUR VEHICLE
94
Page 104 of 116
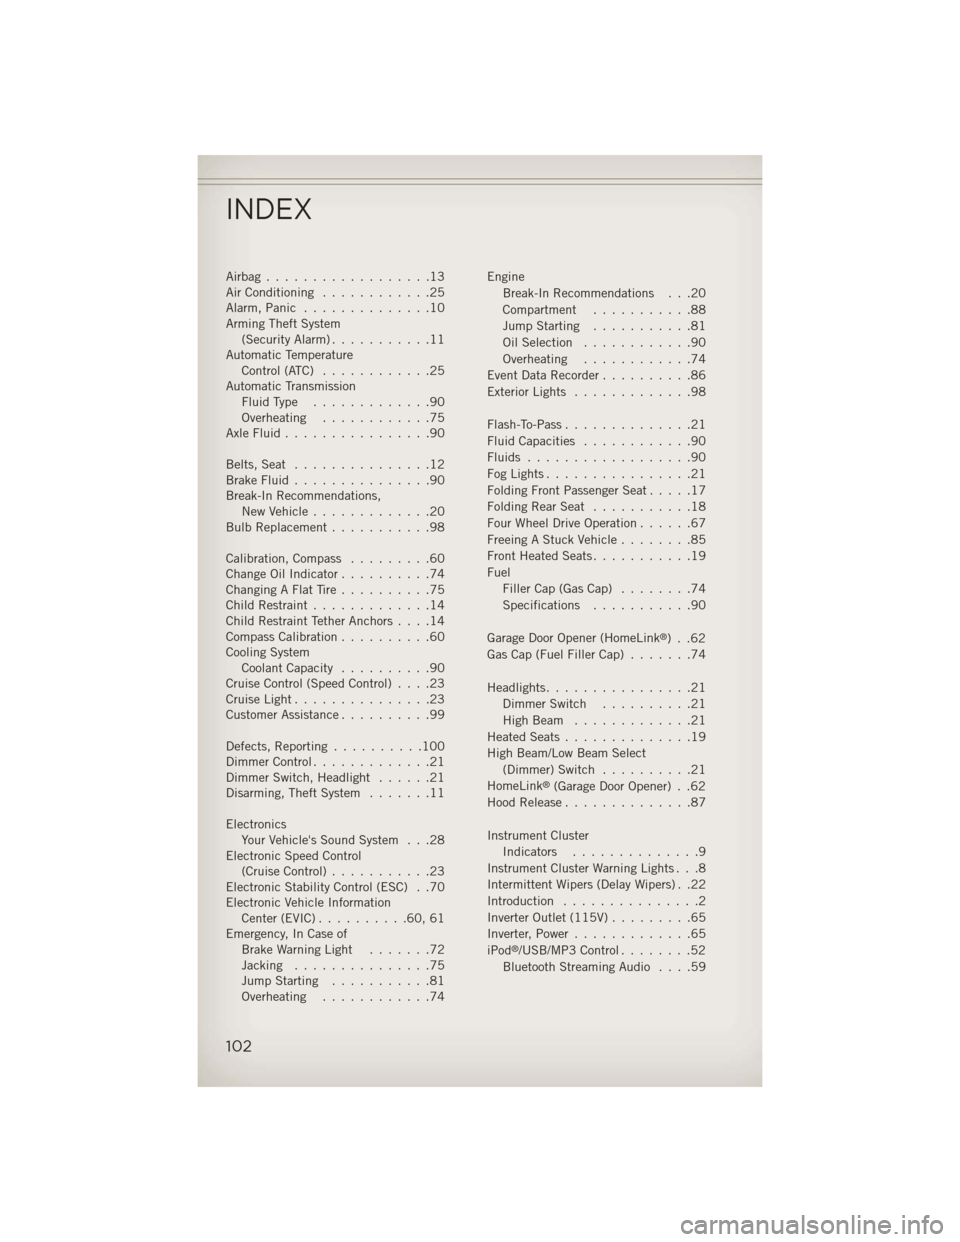
Airbag..................13
Air Conditioning............25
Alarm, Panic ..............10
Arming Theft System (Security Alarm) ...........11
Automatic Temperature Control (ATC) ............25
Automatic Transmission FluidType .............90
Overheating ............75
AxleFluid................90
Belts, Seat ...............12
BrakeFluid...............90
Break-In Recommendations, New Vehicle .............20
Bulb Replacement ...........98
Calibration, Compass .........60
Change Oil Indicator ..........74
Changing A Flat Tire ..........75
Child Restraint .............14
Child Restraint Tether Anchors ....14
Compass Calibration ..........60
Cooling System Coolant Capacity ..........90
Cruise Control (Speed Control) ....23
CruiseLight...............23
Customer Assistance ..........99
Defects, Reporting ..........100
Dimmer Control .............21
Dimmer Switch, Headlight ......21
Disarming, Theft System .......11
Electronics Your Vehicle's Sound System . . .28
Electronic Speed Control (Cruise Control) ...........23
Electronic Stability Control (ESC) . .70
Electronic Vehicle Information Center(EVIC)..........60,61
Emergency, In Case of Brake Warning Light .......72
Jacking ...............75
Jump Starting ...........81
Overheating ............74 Engine
Break-In Recommendations . . .20
Compartment ...........88
Jump Starting ...........81
Oil Selection ............90
Overheating ............74
Event Data Recorder ..........86
Exterior Lights .............98
Flash-To-Pass ..............21
Fluid Capacities ............90
Fluids ..................90
FogLights................21
FoldingFrontPassengerSeat.....17
FoldingRearSeat ...........18
Four Wheel Drive Operation ......67
Freeing A Stuck Vehicle ........85
Front Heated Seats ...........19
Fuel Filler Cap (Gas Cap) ........74
Specifications ...........90
Garage Door Opener (HomeLink
®) . .62
Gas Cap (Fuel Filler Cap) .......74
Headlights ................21
Dimmer Switch ..........21
HighBeam .............21
Heated Seats ..............19
High Beam/Low Beam Select (Dimmer) Switch ..........21
HomeLink
®(Garage Door Opener) . .62
Hood Release ..............87
Instrument Cluster Indicators ..............9
Instrument Cluster Warning Lights . . .8
Intermittent Wipers (Delay Wipers) . .22
Introduction ...............2
Inverter Outlet (115V) .........65
Inverter, Power .............65
iPod
®/USB/MP3 Control ........52
Bluetooth Streaming Audio ....59
INDEX
102