JEEP COMPASS 2014 1.G Owners Manual
COMPASS 2014 1.G
JEEP
JEEP
https://www.carmanualsonline.info/img/16/7078/w960_7078-0.png
JEEP COMPASS 2014 1.G Owners Manual
Trending: sport mode, phone, high beam, oil capacity, keyless, dimensions, lock
Page 521 of 572
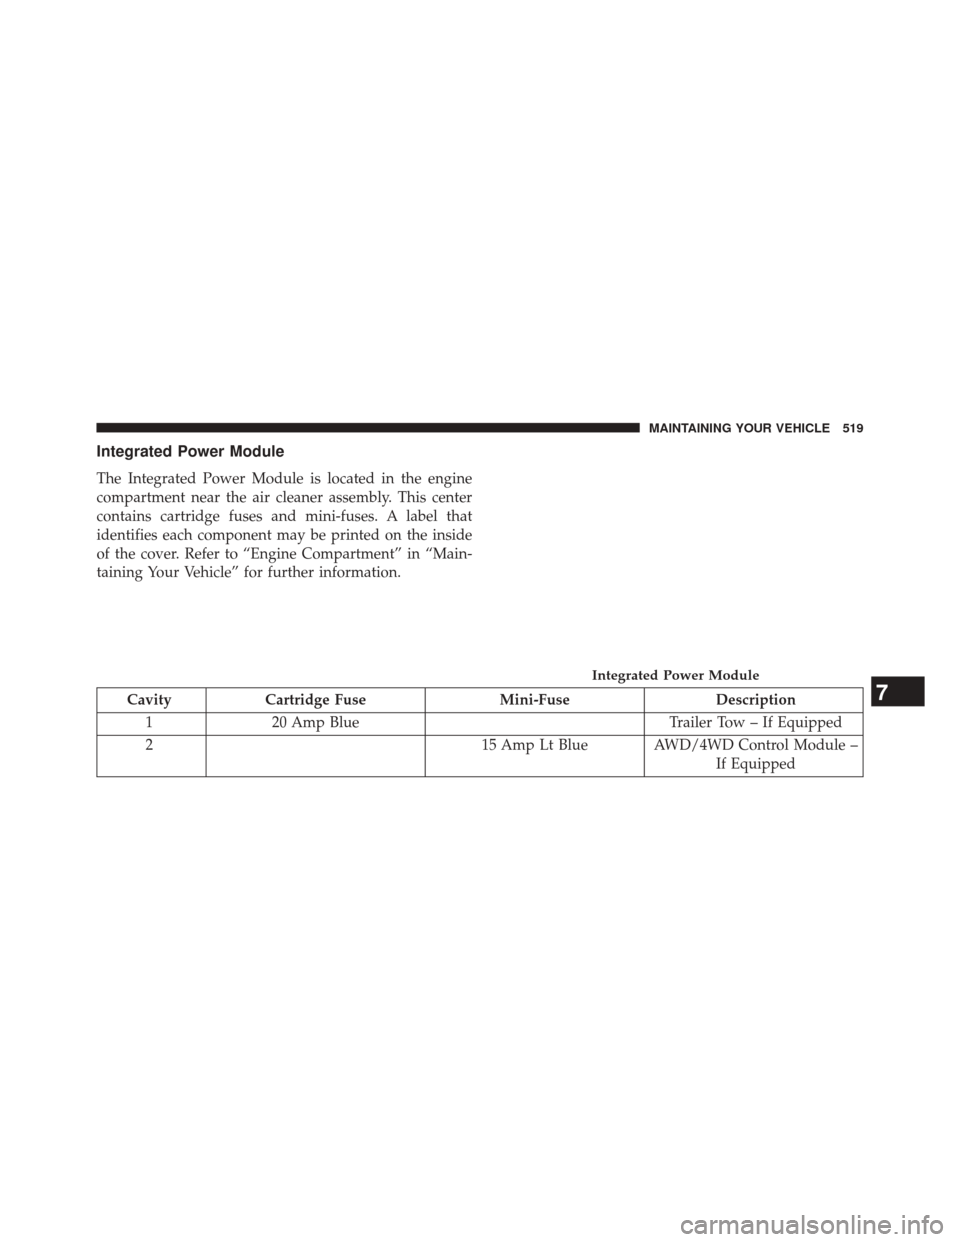
Integrated Power Module
The Integrated Power Module is located in the engine
compartment near the air cleaner assembly. This center
contains cartridge fuses and mini-fuses. A label that
identifies each component may be printed on the inside
of the cover. Refer to “Engine Compartment” in “Main-
taining Your Vehicle” for further information.
CavityCartridge Fuse Mini-FuseDescription
1 20 Amp Blue Trailer Tow – If Equipped
2 15 Amp Lt Blue AWD/4WD Control Module –
If Equipped
Integrated Power Module
7
MAINTAINING YOUR VEHICLE 519
Page 522 of 572
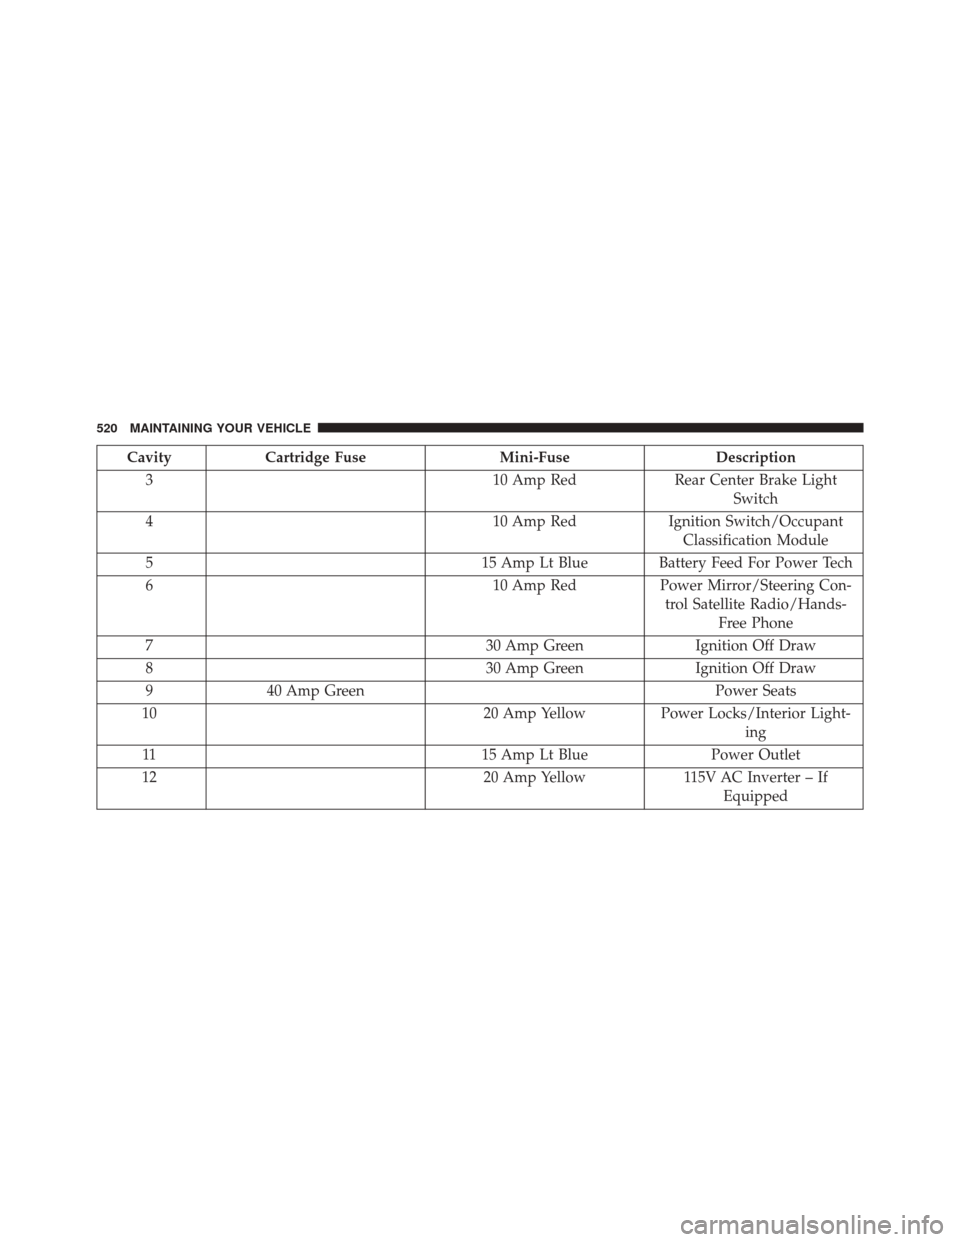
CavityCartridge Fuse Mini-FuseDescription
3 10 Amp RedRear Center Brake Light
Switch
4 10 Amp RedIgnition Switch/Occupant
Classification Module
5 15 Amp Lt Blue Battery Feed For Power Tech
6 10 Amp RedPower Mirror/Steering Con-
trol Satellite Radio/Hands- Free Phone
7 30 Amp GreenIgnition Off Draw
8 30 Amp GreenIgnition Off Draw
9 40 Amp Green Power Seats
10 20 Amp YellowPower Locks/Interior Light-
ing
11 15 Amp Lt BluePower Outlet
12 20 Amp Yellow115V AC Inverter – If
Equipped
520 MAINTAINING YOUR VEHICLE
Page 523 of 572
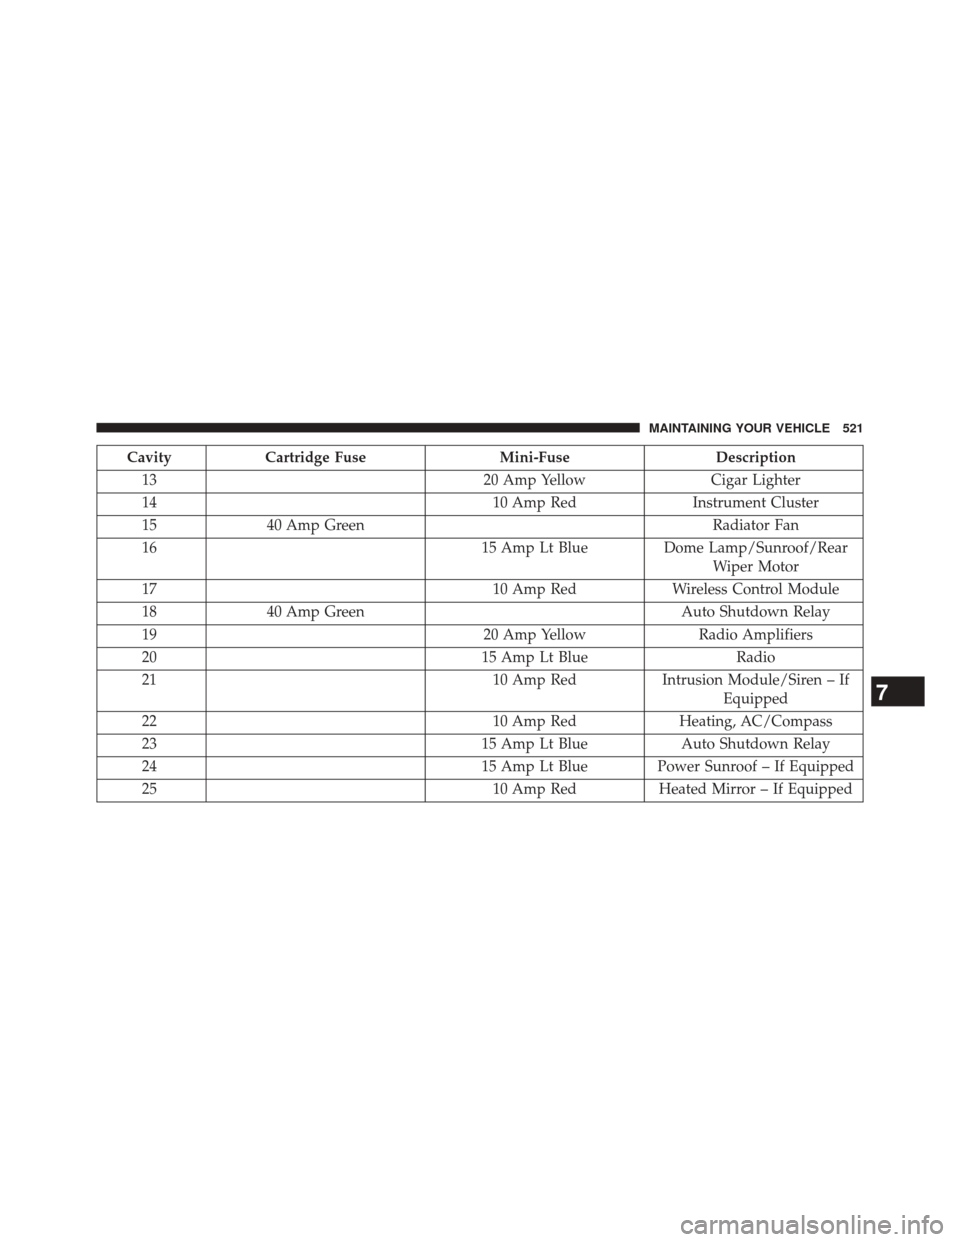
CavityCartridge Fuse Mini-FuseDescription
13 20 Amp YellowCigar Lighter
14 10 Amp RedInstrument Cluster
15 40 Amp Green Radiator Fan
16 15 Amp Lt BlueDome Lamp/Sunroof/Rear
Wiper Motor
17 10 Amp RedWireless Control Module
18 40 Amp Green Auto Shutdown Relay
19 20 Amp YellowRadio Amplifiers
20 15 Amp Lt BlueRadio
21 10 Amp RedIntrusion Module/Siren – If
Equipped
22 10 Amp RedHeating, AC/Compass
23 15 Amp Lt BlueAuto Shutdown Relay
24 15 Amp Lt Blue Power Sunroof – If Equipped
25 10 Amp RedHeated Mirror – If Equipped
7
MAINTAINING YOUR VEHICLE 521
Page 524 of 572
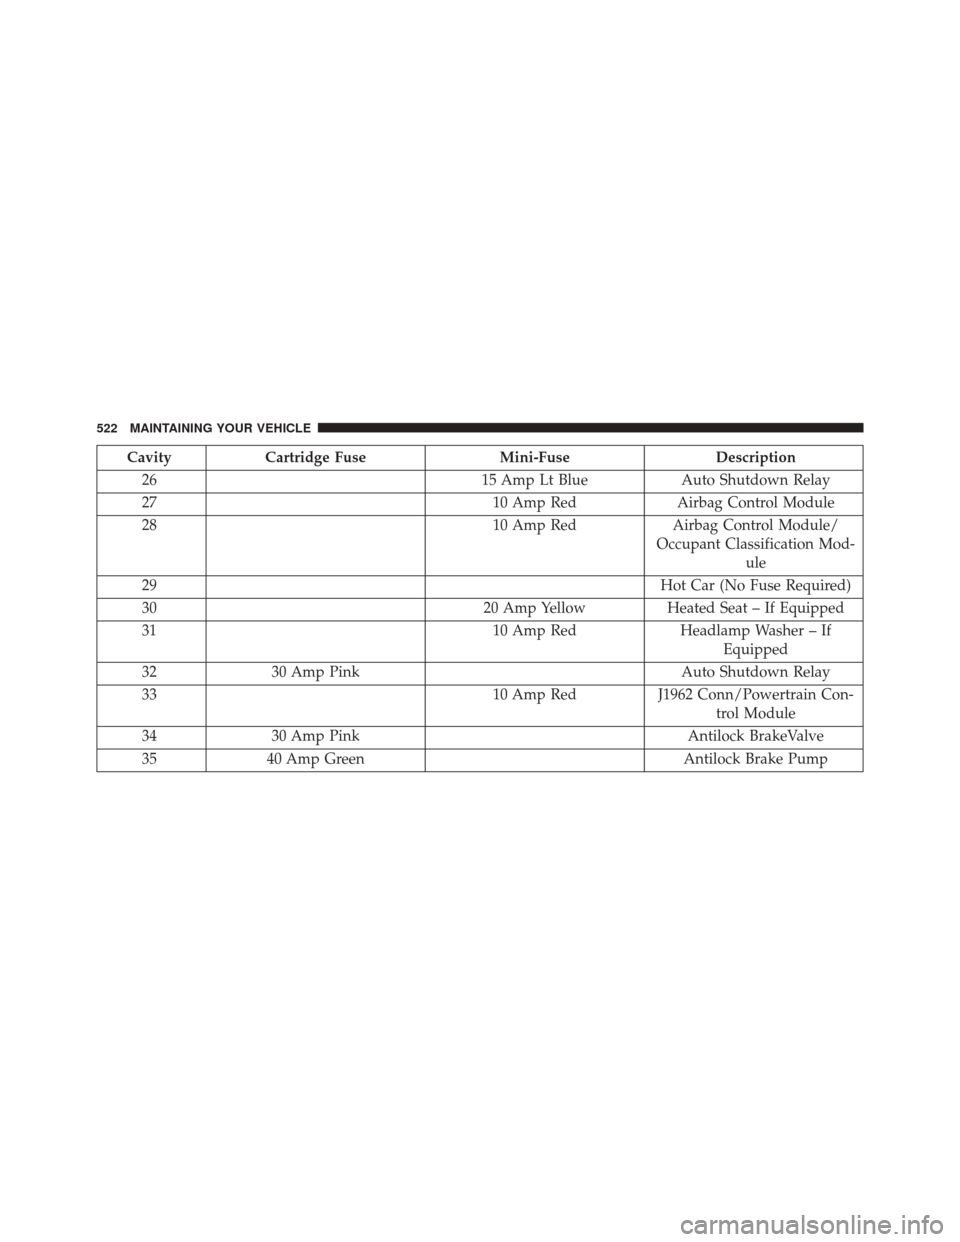
CavityCartridge Fuse Mini-FuseDescription
26 15 Amp Lt BlueAuto Shutdown Relay
27 10 Amp RedAirbag Control Module
28 10 Amp RedAirbag Control Module/
Occupant Classification Mod- ule
29 Hot Car (No Fuse Required)
30 20 Amp YellowHeated Seat – If Equipped
31 10 Amp RedHeadlamp Washer – If
Equipped
32 30 Amp Pink Auto Shutdown Relay
33 10 Amp RedJ1962 Conn/Powertrain Con-
trol Module
34 30 Amp Pink Antilock BrakeValve
35 40 Amp Green Antilock Brake Pump
522 MAINTAINING YOUR VEHICLE
Page 525 of 572
CavityCartridge Fuse Mini-FuseDescription
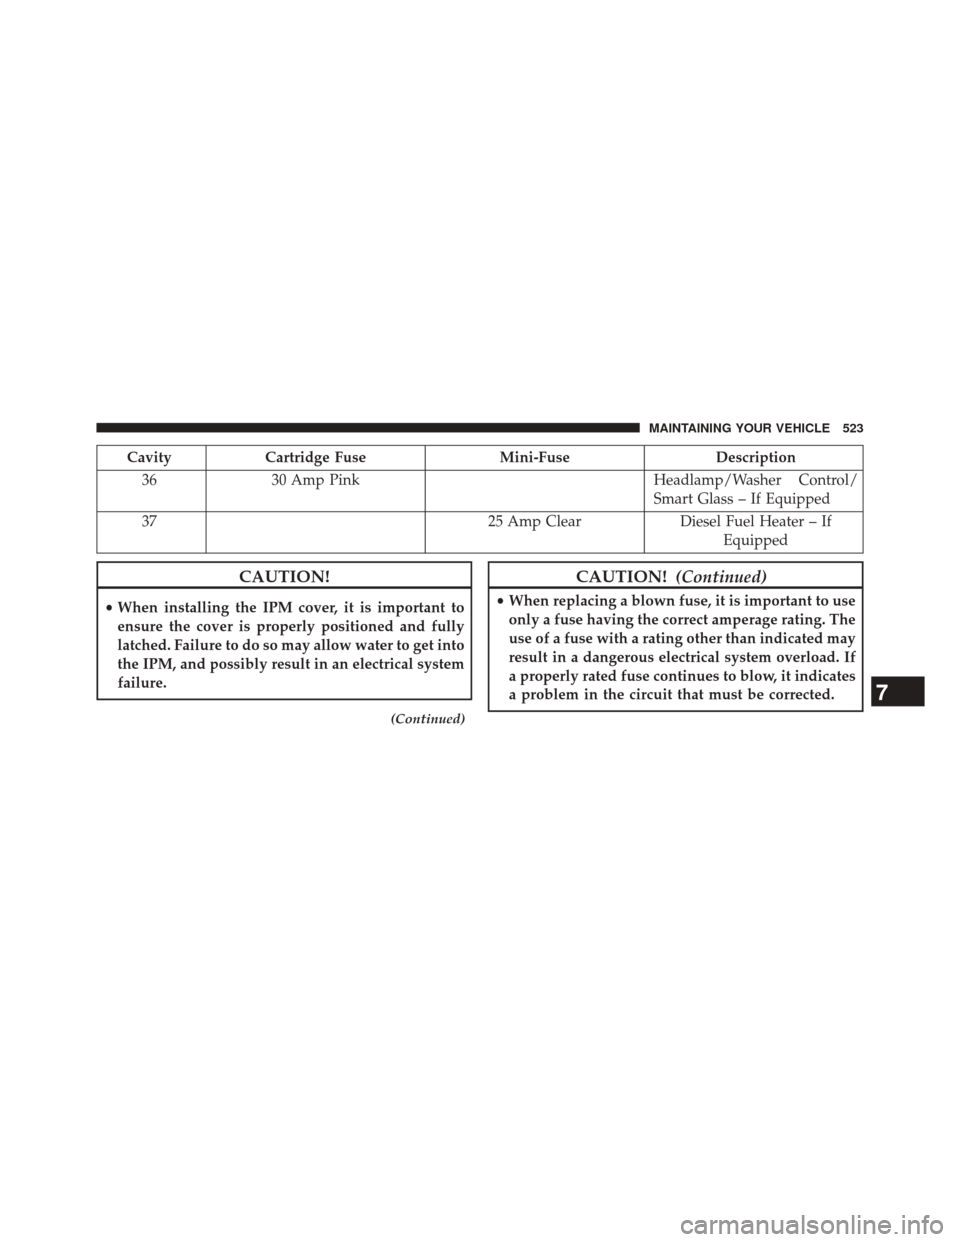
36 30 Amp Pink Headlamp/Washer Control/
Smart Glass – If Equipped
37 25 Amp ClearDiesel Fuel Heater – If
Equipped
CAUTION!
•When installing the IPM cover, it is important to
ensure the cover is properly positioned and fully
latched. Failure to do so may allow water to get into
the IPM, and possibly result in an electrical system
failure.
(Continued)
CAUTION! (Continued)
•When replacing a blown fuse, it is important to use
only a fuse having the correct amperage rating. The
use of a fuse with a rating other than indicated may
result in a dangerous electrical system overload. If
a properly rated fuse continues to blow, it indicates
a problem in the circuit that must be corrected.
7
MAINTAINING YOUR VEHICLE 523
Page 526 of 572
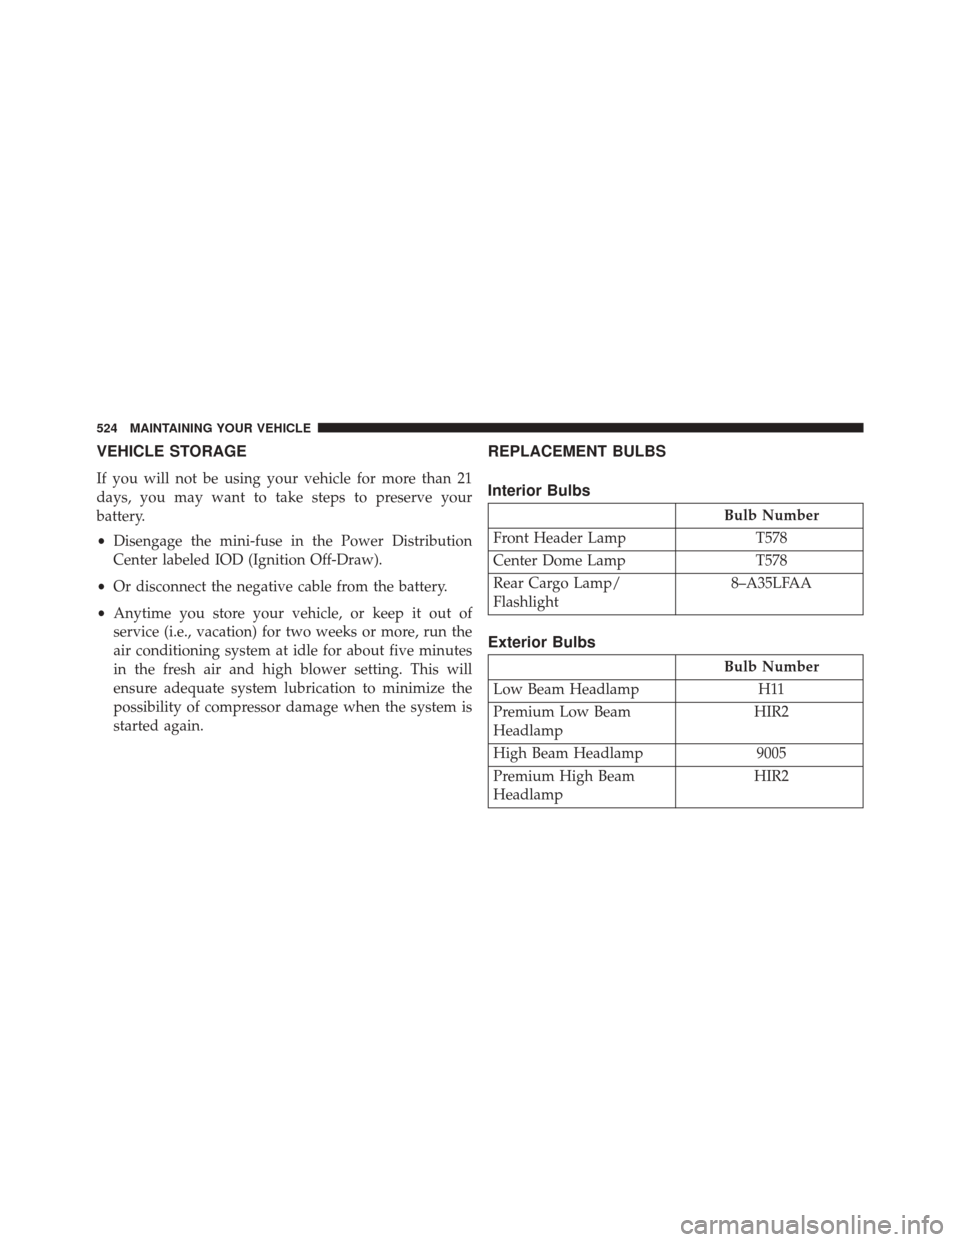
VEHICLE STORAGE
If you will not be using your vehicle for more than 21
days, you may want to take steps to preserve your
battery.
•Disengage the mini-fuse in the Power Distribution
Center labeled IOD (Ignition Off-Draw).
• Or disconnect the negative cable from the battery.
• Anytime you store your vehicle, or keep it out of
service (i.e., vacation) for two weeks or more, run the
air conditioning system at idle for about five minutes
in the fresh air and high blower setting. This will
ensure adequate system lubrication to minimize the
possibility of compressor damage when the system is
started again.
REPLACEMENT BULBS
Interior Bulbs
Bulb Number
Front Header Lamp T578
Center Dome Lamp T578
Rear Cargo Lamp/
Flashlight 8–A35LFAA
Exterior Bulbs
Bulb Number
Low Beam Headlamp H11
Premium Low Beam
Headlamp HIR2
High Beam Headlamp 9005
Premium High Beam
Headlamp HIR2
524 MAINTAINING YOUR VEHICLE
Page 527 of 572
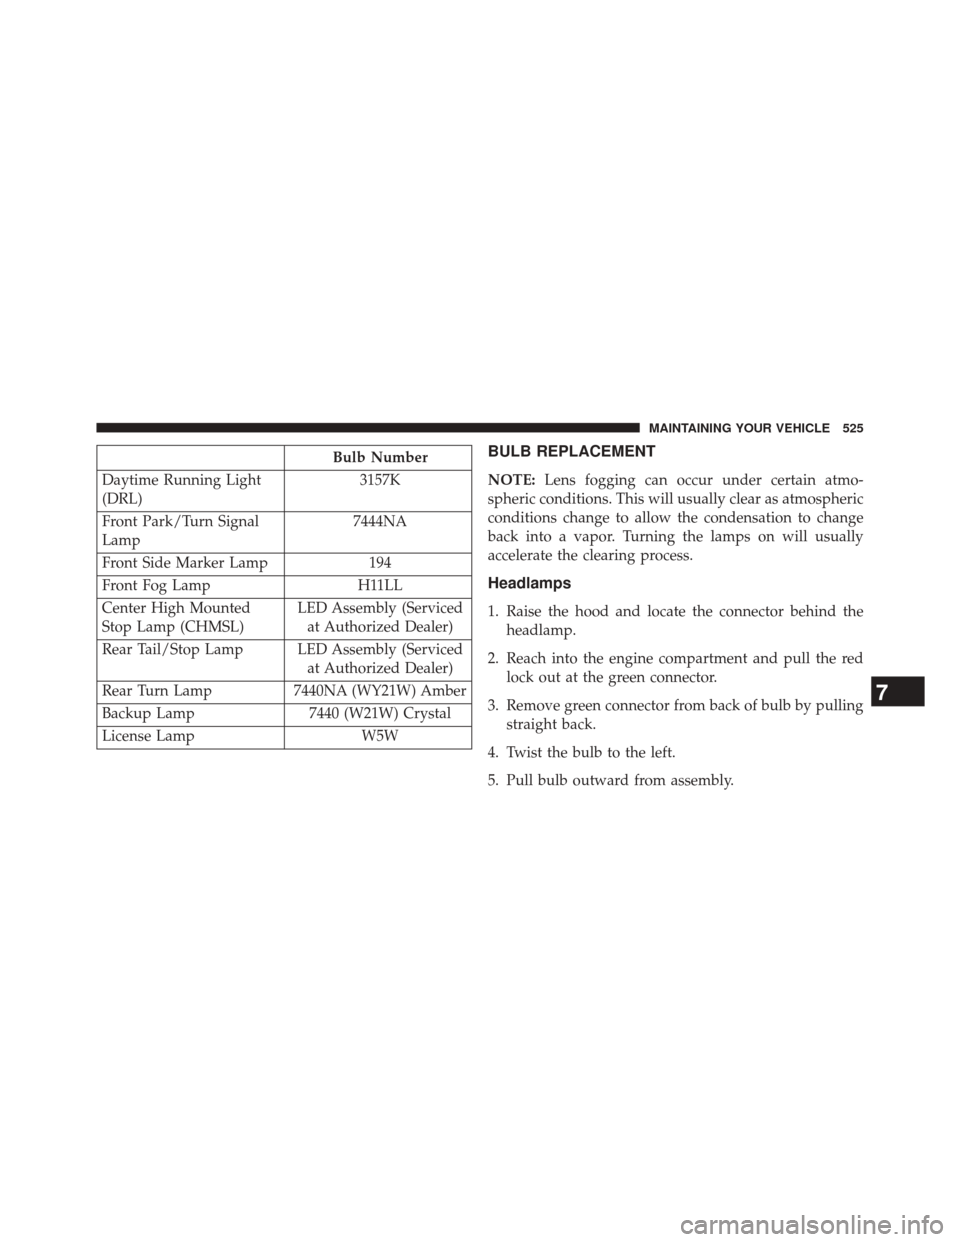
Bulb Number
Daytime Running Light
(DRL) 3157K
Front Park/Turn Signal
Lamp 7444NA
Front Side Marker Lamp 194
Front Fog Lamp H11LL
Center High Mounted
Stop Lamp (CHMSL) LED Assembly (Serviced
at Authorized Dealer)
Rear Tail/Stop Lamp LED Assembly (Serviced at Authorized Dealer)
Rear Turn Lamp 7440NA (WY21W) Amber
Backup Lamp 7440 (W21W) Crystal
License Lamp W5WBULB REPLACEMENT
NOTE:Lens fogging can occur under certain atmo-
spheric conditions. This will usually clear as atmospheric
conditions change to allow the condensation to change
back into a vapor. Turning the lamps on will usually
accelerate the clearing process.
Headlamps
1. Raise the hood and locate the connector behind the headlamp.
2. Reach into the engine compartment and pull the red lock out at the green connector.
3. Remove green connector from back of bulb by pulling straight back.
4. Twist the bulb to the left.
5. Pull bulb outward from assembly.
7
MAINTAINING YOUR VEHICLE 525
Page 528 of 572
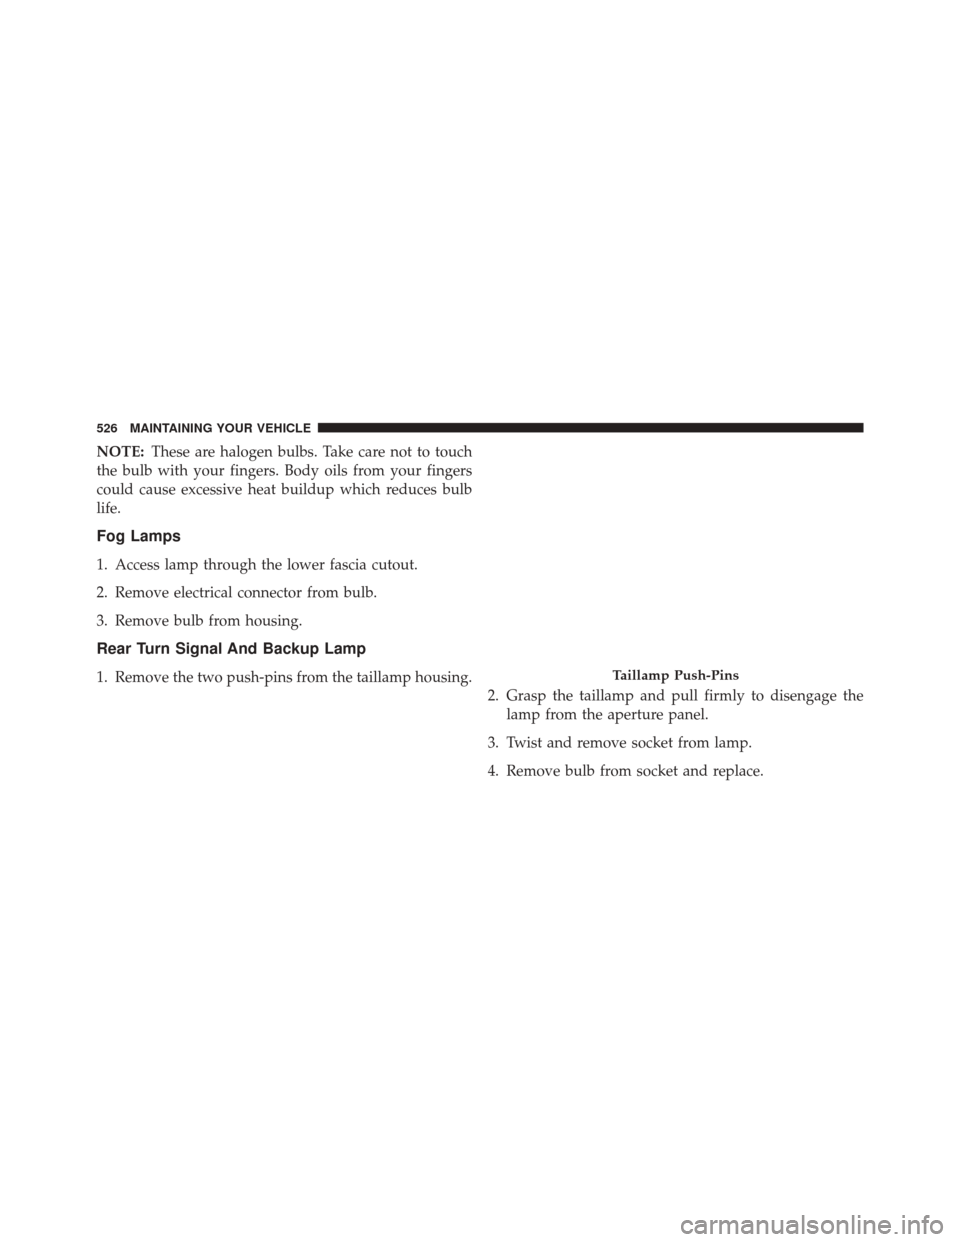
NOTE:These are halogen bulbs. Take care not to touch
the bulb with your fingers. Body oils from your fingers
could cause excessive heat buildup which reduces bulb
life.
Fog Lamps
1. Access lamp through the lower fascia cutout.
2. Remove electrical connector from bulb.
3. Remove bulb from housing.
Rear Turn Signal And Backup Lamp
1. Remove the two push-pins from the taillamp housing. 2. Grasp the taillamp and pull firmly to disengage the
lamp from the aperture panel.
3. Twist and remove socket from lamp.
4. Remove bulb from socket and replace.Taillamp Push-Pins
526 MAINTAINING YOUR VEHICLE
Page 529 of 572
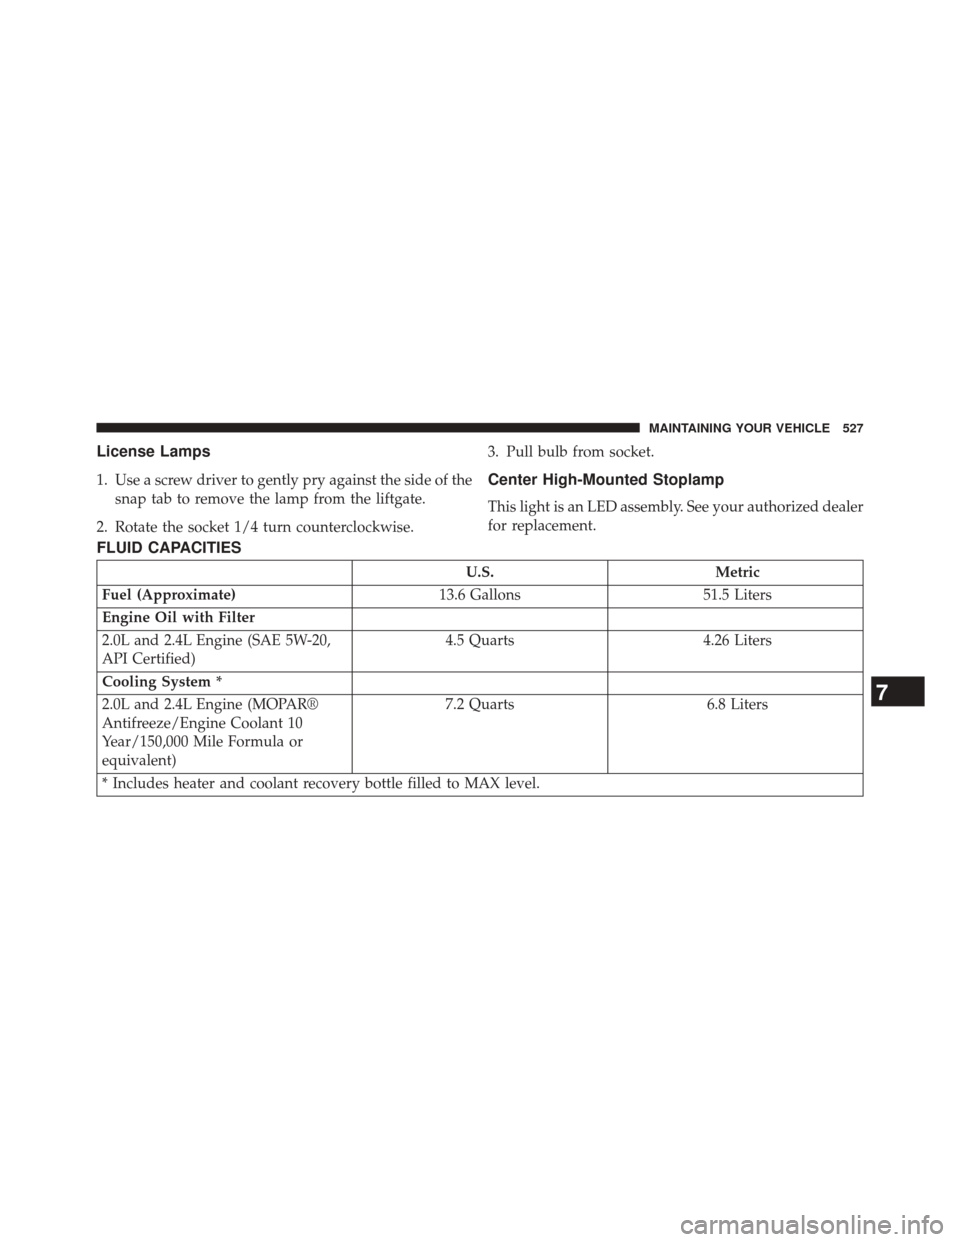
License Lamps
1. Use a screw driver to gently pry against the side of thesnap tab to remove the lamp from the liftgate.
2. Rotate the socket 1/4 turn counterclockwise. 3. Pull bulb from socket.Center High-Mounted Stoplamp
This light is an LED assembly. See your authorized dealer
for replacement.
FLUID CAPACITIES
U.S.
Metric
Fuel (Approximate) 13.6 Gallons51.5 Liters
Engine Oil with Filter
2.0L and 2.4L Engine (SAE 5W-20,
API Certified) 4.5 Quarts
4.26 Liters
Cooling System *
2.0L and 2.4L Engine (MOPAR®
Antifreeze/Engine Coolant 10
Year/150,000 Mile Formula or
equivalent) 7.2 Quarts
6.8 Liters
* Includes heater and coolant recovery bottle filled to MAX level.
7
MAINTAINING YOUR VEHICLE 527
Page 530 of 572
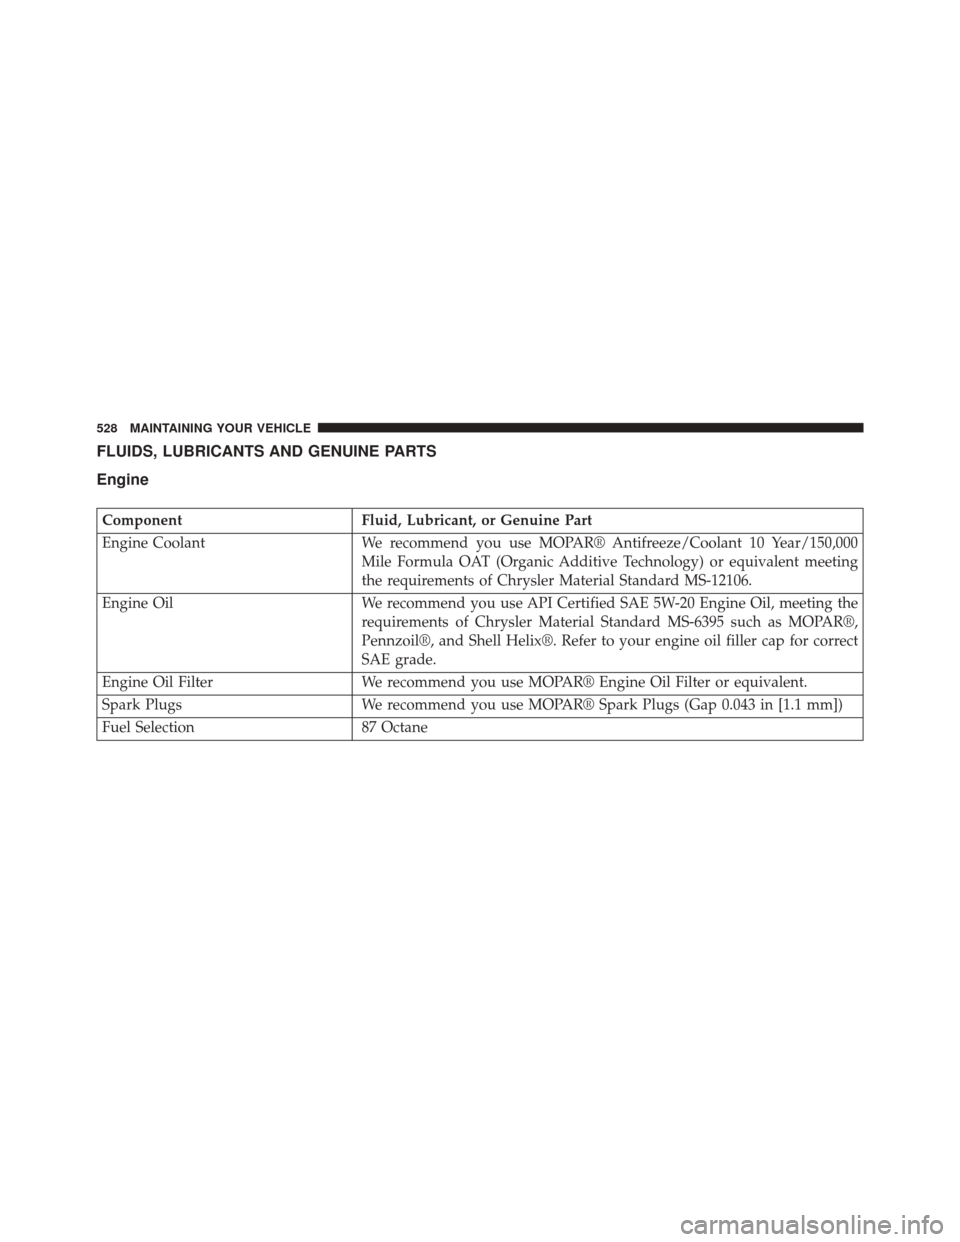
FLUIDS, LUBRICANTS AND GENUINE PARTS
Engine
ComponentFluid, Lubricant, or Genuine Part
Engine Coolant We recommend you use MOPAR® Antifreeze/Coolant 10 Year/150,000
Mile Formula OAT (Organic Additive Technology) or equivalent meeting
the requirements of Chrysler Material Standard MS-12106.
Engine Oil We recommend you use API Certified SAE 5W-20 Engine Oil, meeting the
requirements of Chrysler Material Standard MS-6395 such as MOPAR®,
Pennzoil®, and Shell Helix®. Refer to your engine oil filler cap for correct
SAE grade.
Engine Oil Filter We recommend you use MOPAR® Engine Oil Filter or equivalent.
Spark Plugs We recommend you use MOPAR® Spark Plugs (Gap 0.043 in [1.1 mm])
Fuel Selection 87 Octane
528 MAINTAINING YOUR VEHICLE
Trending: towing capacity, lug nut, ECO mode, charging, check engine light, battery replacement, fuel cap
