child lock JEEP COMPASS 2015 1.G User Guide
[x] Cancel search | Manufacturer: JEEP, Model Year: 2015, Model line: COMPASS, Model: JEEP COMPASS 2015 1.GPages: 132, PDF Size: 21.94 MB
Page 5 of 132
VEHICLES SOLD IN CANADA
With respect to any vehicles sold in Canada, the name Chrysler Group LLC shall be
deemed to be deleted and the name Chrysler Canada Inc. used in substitution.
WARNING!
• Pedals that cannot move freely can cause loss of vehicle control and increase
the risk of serious personal injury.
• Always make sure that objects cannot fall into the driver foot well while the
vehicle is moving. Objects can become trapped under the brake pedal and
accelerator pedal causing a loss of vehicle control.
• Failure to properly follow floor mat installation or mounting can cause inter-
ference with the brake pedal and accelerator pedal operation causing loss of
control of the vehicle.
• Never leave children alone in a vehicle, or with access to an unlocked vehicle.
Allowing children to be in a vehicle unattended is dangerous for a number of
reasons. A child or others could be seriously or fatally injured. Children should
be warned not to touch the parking brake, brake pedal or the shift lever/
transmission gear selector.
• Do not leave the key fob in or near the vehicle, or in a location accessible to
children, and do not leave the ignition of a vehicle equipped with Keyless
Enter-N-Go in the ACC or ON/RUN mode. A child could operate power
windows, other controls, or move the vehicle.
• Never use the ‘PARK’ position as a substitute for the parking brake. Always
apply the parking brake fully when parked to guard against vehicle movement
and possible injury or damage.
• Refer to your Owner's Manual on the DVD for further details.
INTRODUCTION/WELCOME
3
Page 13 of 132
WARNING!
• When leaving the vehicle, always make sure the ignition is in the OFF position,
remove the key fob from the vehicle, and lock your vehicle.
• Never leave children alone in a vehicle, or with access to an unlocked vehicle.
Allowing children to be in a vehicle unattended is dangerous for a number of
reasons. A child or others could be seriously or fatally injured. Children should
be warned not to touch the parking brake, brake pedal or the transmission gear
selector.
• Do not leave the Key Fob in or near the vehicle (or in a location accessible to
children). A child could operate power windows, other controls, or move the
vehicle.
REMOTE START
NOTE:
The vehicle must be equipped with an automatic transmission to be equipped with
Remote Start.
• Push the REMOTE START buttonx2on the Key Fob twice within five seconds.
Pushing the REMOTE START button a third time shuts the engine off.
• To drive the vehicle, push the UNLOCK button, insert the key in the ignition and
turn to the ON/RUN position.
With remote start, the engine will only run for 15 minutes (timeout) unless the
ignition key is placed in the ON/RUN position.
The vehicle must be started with the key after two consecutive timeouts.
All of the following conditions must be met before the engine will remote start:
• Gear selector in PARK
• Doors closed
• Hood closed
• Hazard switch off
• Brake switch inactive (brake pedal not pressed)
• Ignition key removed from ignition switch
• Battery at an acceptable charge level
• RKE PANIC button not pressed
• System not disabled from previous remote start event
• Vehicle theft alarm not active
GETTING STARTED
11
Page 14 of 132
WARNING!
• Do not start or run an engine in a closed garage or confined area. Exhaust gas
contains Carbon Monoxide (CO) which is odorless and colorless. Carbon
Monoxide is poisonous and can cause serious injury or death when inhaled.
• Keep Key Fob transmitters away from children. Operation of the Remote Start
System, windows, door locks or other controls could cause serious injury or
death.
VEHICLE SECURITY ALARM
This Vehicle Security Alarm monitors the doors, liftgate, and ignition switch for
unauthorized operation.
When the alarm is activated, the interior switches for door locks are disabled. The
Vehicle Security Alarm provides both audio and visual signals repeatedly for three
minutes. If the disturbance is still present (driver's door, passenger door, other doors,
ignition) after three minutes, the parking lights and tail lights will flash for an
additional 15 minutes.
To A r m :
• Lock the door using either the power door lock switch (one door must be open) or
the LOCK button on the Remote Keyless Entry (RKE) transmitter (doors can be
open or closed), and close all doors.
The Vehicle Security Light in the instrument cluster will flash for 16 seconds. This
shows that the Vehicle Security Alarm is arming. During this period, if a door is
opened, the ignition is cycled to ON/RUN, or the power door locks are unlocked in any
manner, the Vehicle Security Alarm will automatically disarm.
NOTE:
• The Vehicle Security Alarm will not arm if you lock the doors with the manual door
lock plungers.
• Once armed, the Vehicle Security Alarm disables the unlock switch on the driver
door trim panel and passenger door trim panel.
To D i s a r m T h e S y s t e m :
• Push the Key Fob UNLOCK button or cycle the ignition to the ON/RUN position.
The Vehicle Security Alarm is designed to protect your vehicle; however, you can
create conditions where the Vehicle Security Alarm will give you a false alarm. If one
of the previously described arming sequences has occurred, the Vehicle Security
Alarm will arm regardless of whether you are in the vehicle or not. If you remain in the
vehicle and open a door, the alarm will sound. If this occurs, disarm the Vehicle
Security Alarm.
GETTING STARTED
12
Page 19 of 132
Installing The Child Restraint Using The LATCH Lower Anchors
NOTE:
Never“share” a LATCH anchorage with two or more child restraints.
1. Loosen the adjusters on the lower straps and on the tether strap of the child seat
so that you can more easily attach the hooks or connectors to the vehicle
anchorages.
2. Attach the lower hooks or connectors of the child restraint to the lower anchorages
in the selected seating position.
3. If the child restraint has a tether strap, connect it to the top tether anchorage. See
below for directions to attach a tether anchor.
4. Tighten all of the straps as you push the child restraint rearward and downward
into the seat. Remove slack in the straps according to the child restraint
manufacturer’s instructions.
5. Test that the child restraint is installed tightly by pulling back and forth on the
child seat at the belt path. It should not move more than 1 inch (25.4 mm) in any
direction.
Installing The Child Restraint Using The Vehicle Seat Belts
The seat belts in the passenger seating positions are equipped with a Switchable
Automatic Locking Retractor (ALR) that is designed to keep the lap portion of the
seat belt tight around the child restraint. Any seat belt system will loosen with time,
so check the belt occasionally, and pull it tight if necessary.
Tether Weight Limit
Always use the tether anchor when using the seat belt to install a forward facing child
restraint, up to the recommended weight limit of the child restraint.
To Install A Child Seat Using An ALR:
1. Pull enough of the seat belt webbing from the retractor to pass it through the belt
path of the child restraint. Do not twist the belt webbing in the belt path.
2. Slide the latch plate into the buckle until you hear a “click.”
3. Pull on the webbing to make the lap portion tight against the child seat.
4. To lock the seat belt, pull down on the shoulder part of the belt until you have
pulled all the seat belt webbing out of the retractor. Then, allow the webbing to
retract back into the retractor. As the webbing retracts, you will hear a clicking
sound. This means the seat belt is now in the Automatic Locking mode.
GETTING STARTED
17
Page 20 of 132
5. Try to pull the webbing out of the retractor. If it is locked, you should not be able
to pull out any webbing. If the retractor is not locked, repeat the last step.
6. Finally, pull up on any extra webbing to tighten the lap portion around the child
restraint while you push the child restraint rearward and downward into the
vehicle seat.
7. If the child restraint has a top tether strap and the seating position has a top tether
anchorage, connect the tether strap to the anchorage and tighten the tether strap.
See below for directions to attach a tether anchor.
8. Test that the child restraint is installed tightly by pulling back and forth on the
child seat at the belt path. It should not move more than 1 inch (25.4 mm) in any
direction.
Installing The Top Tether Strap (With Either Lower Anchors Or Vehicle Seat Belt):
When installing a forward-facing child restraint, always secure the top tether strap,
up to the tether anchor weight limit, whether the child restraint is installed with the
lower anchors or the vehicle seat belt.
Tether Anchorage Installation
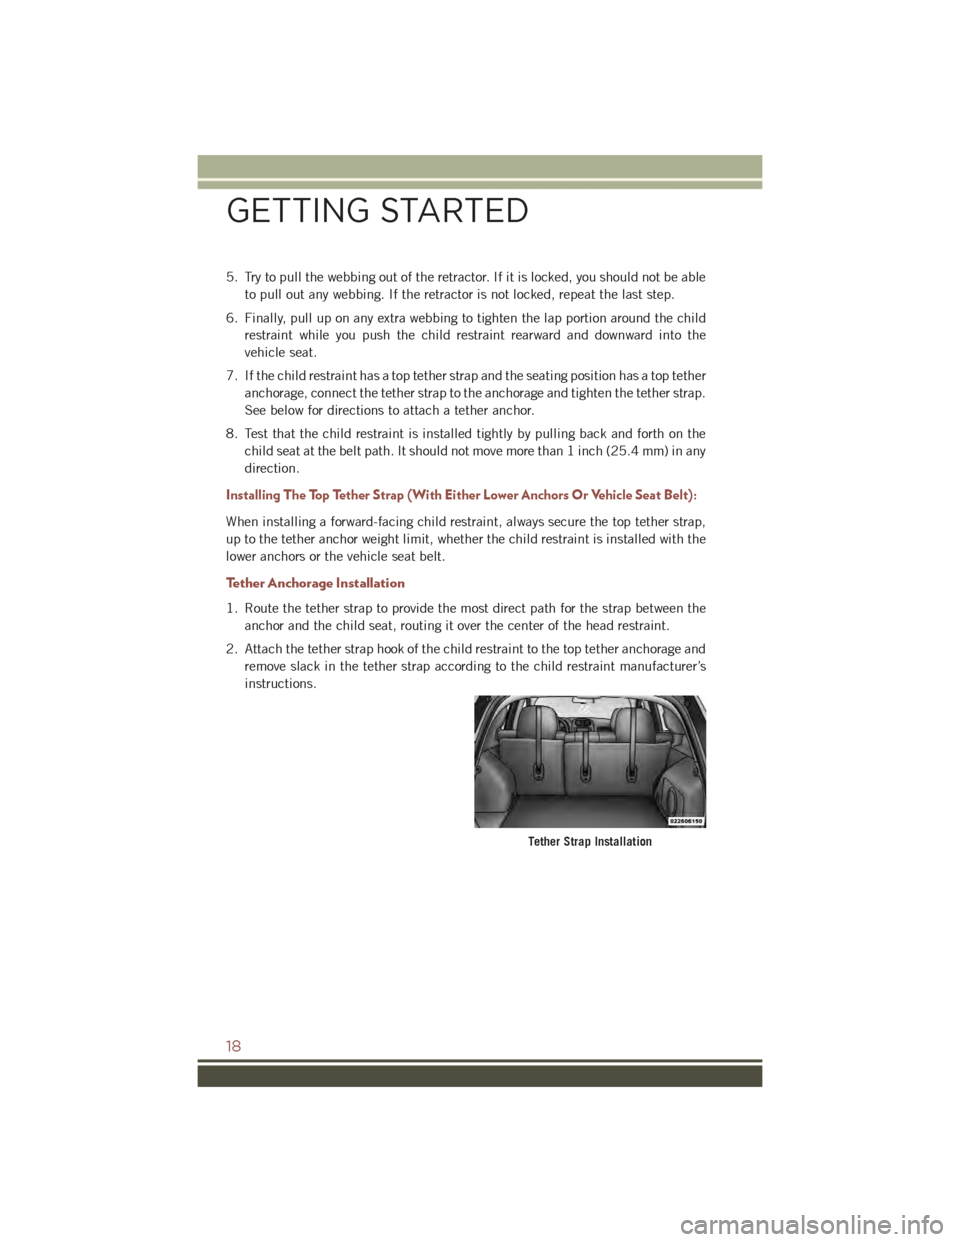
1. Route the tether strap to provide the most direct path for the strap between the
anchor and the child seat, routing it over the center of the head restraint.
2. Attach the tether strap hook of the child restraint to the top tether anchorage and
remove slack in the tether strap according to the child restraint manufacturer’s
instructions.
Tether Strap Installation
GETTING STARTED
18
Page 24 of 132
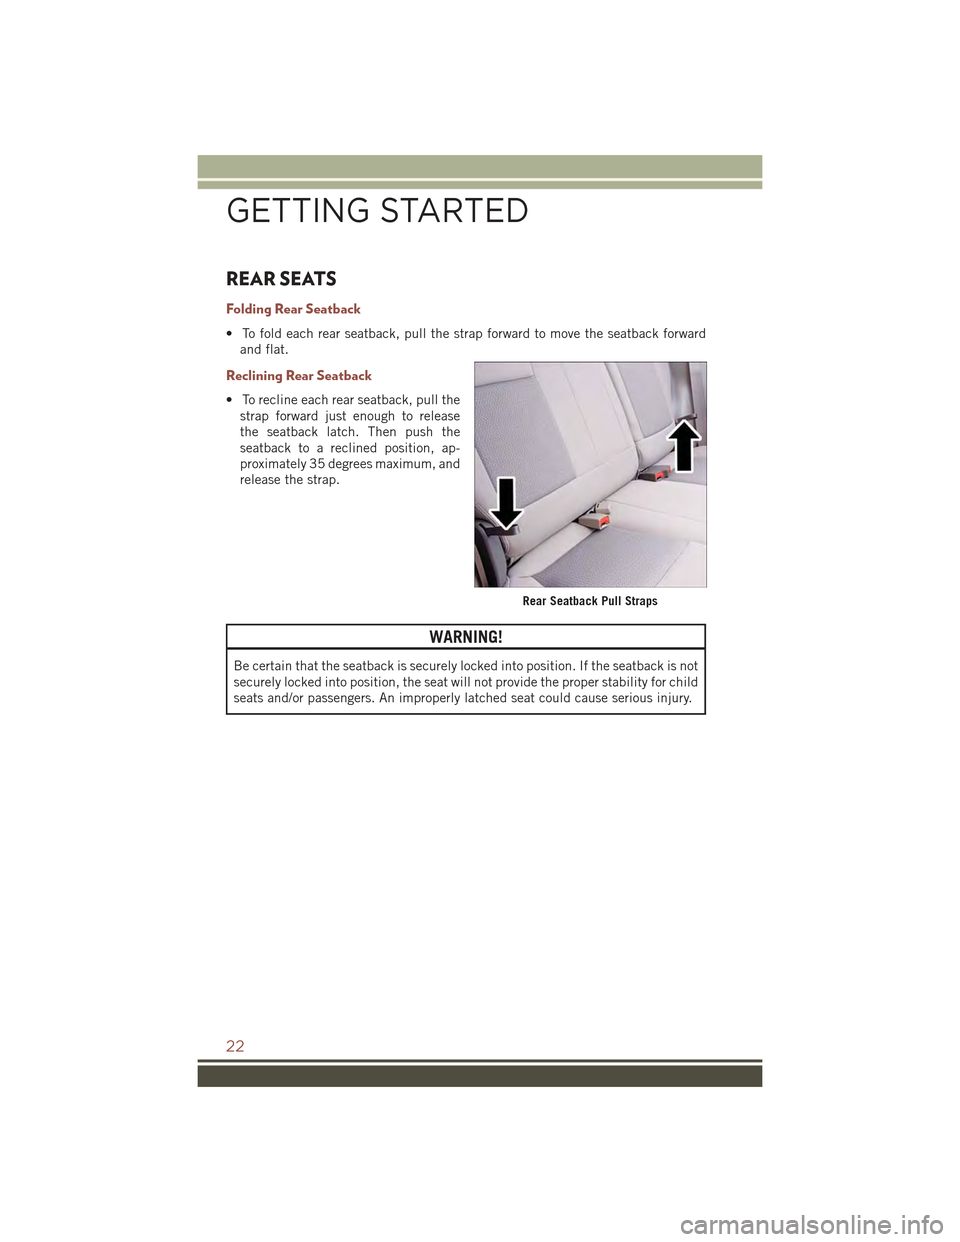
REAR SEATS
Folding Rear Seatback
• To fold each rear seatback, pull the strap forward to move the seatback forward
and flat.
Reclining Rear Seatback
• To recline each rear seatback, pull the
strap forward just enough to release
the seatback latch. Then push the
seatback to a reclined position, ap-
proximately 35 degrees maximum, and
release the strap.
WARNING!
Be certain that the seatback is securely locked into position. If the seatback is not
securely locked into position, the seat will not provide the proper stability for child
seats and/or passengers. An improperly latched seat could cause serious injury.
Rear Seatback Pull Straps
GETTING STARTED
22
Page 37 of 132
WARNING!
• Never leave children alone in a vehicle, or with access to an unlocked vehicle.
Never leave the Key Fob in or near the vehicle, or in a location accessible to
children. Occupants, particularly unattended children, can become entrapped
by the power sunroof while operating the power sunroof switch. Such entrap-
ment may result in serious injury or death.
• In a collision, there is a greater risk of being thrown from a vehicle with an open
sunroof. You could also be severely injured or killed. Always fasten your seat
belt properly and make sure all passengers are properly secured.
• Do not allow small children to operate the sunroof. Never allow your fingers,
other body parts, or any object to project through the sunroof opening. Injury
may result.
WIND BUFFETING
Wind buffeting can be described as a helicopter-type percussion sound. If buffeting
occurs with the rear windows open, adjust the front and rear windows together.
If buffeting occurs with the sunroof open, adjust the sunroof opening, or adjust any
window. This will minimize buffeting.
OPERATING YOUR VEHICLE
35
Page 124 of 132
FREQUENTLY ASKED QUESTIONS
GETTING STARTED
• How do I install my LATCH Equipped Child Seat? pg. 15
• How do my heated seats operate? pg. 23
ELECTRONICS
• Which radio is in my vehicle?
• Uconnect®130 pg. 38
• Uconnect®130 with Satellite Radio pg. 40
• Uconnect®230 pg. 43
• Uconnect®430/430N pg. 46
• How do I activate the Audio Jack?
• Uconnect®130 pg. 46
• Uconnect®130 with Satellite Radio pg. 46
• Uconnect®230 pg. 46
• Uconnect®430/430N pg. 51
• How do I set the clock on my radio?
• Uconnect®130 pg. 44
• Uconnect®130 with Satellite Radio pg. 44
• Uconnect®230 pg. 44
• Uconnect®430/430N pg. 47
• How do I use the Navigation feature? pg. 54
• How do I pair my cell phone via Bluetooth®with the Uconnect®Hands-Free Voice
Activation System? pg. 62
• How do I configure my Universal Garage Door Opener (HomeLink®)? pg. 71
UTILITY
• How do I know how much I can tow with my Jeep Compass? pg. 78
WHAT TO DO IN EMERGENCIES
• What do I do if my TPMS warning light is blinking? pg. 81
• How do I change a flat tire? pg. 87
• How do I Jump-Start my vehicle? pg. 94
MAINTAINING YOUR VEHICLE
• Where is my Fuse Block located? pg. 113
• What type of oil do I use? pg. 106
• How often should I change my engine’s oil? pg. 108
• What should my tire pressure be set at? pg. 115
FAQ (How To?)
122
Page 125 of 132
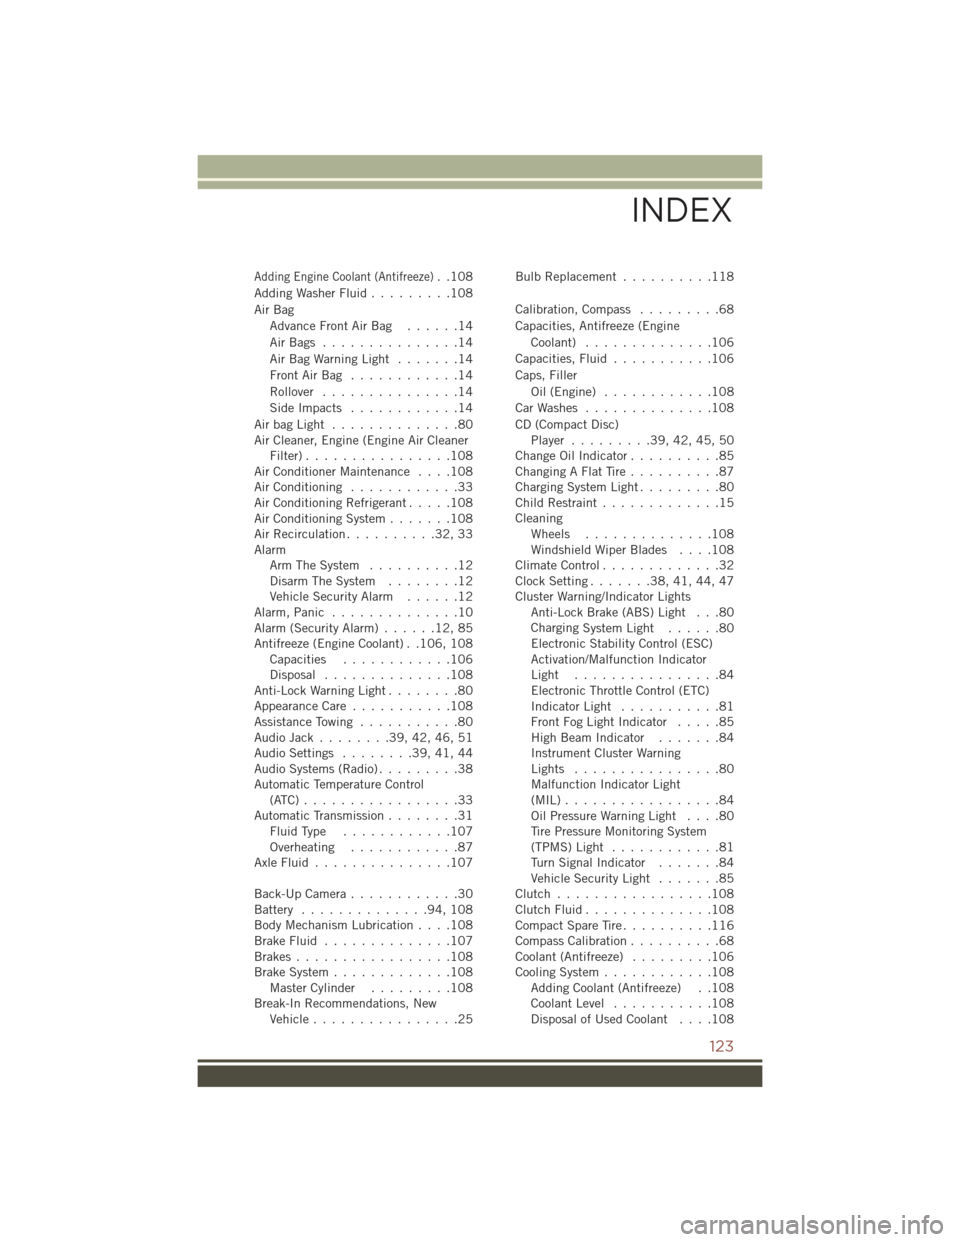
Adding Engine Coolant (Antifreeze)..108
Adding Washer Fluid.........108
Air Bag
Advance Front Air Bag . . . . . .14
Air Bags . . . . . . . . . . . . . . .14
Air Bag Warning Light . . . . . . .14
Front Air Bag . . . . . . . . . . . .14
Rollover...............14
Side Impacts . . . . . . . . . . . .14
Air bag Light . . . . . . . . . . . . . .80Air Cleaner, Engine (Engine Air CleanerFilter)................108Air Conditioner Maintenance....108Air Conditioning............33Air Conditioning Refrigerant.....108Air Conditioning System.......108Air Recirculation..........32,33AlarmArm The System..........12Disarm The System........12Vehicle Security Alarm......12Alarm, Panic . . . . . . . . . . . . . .10Alarm (Security Alarm)......12,85Antifreeze (Engine Coolant) . .106, 108Capacities............106Disposal..............108Anti-Lock Warning Light........80Appearance Care...........108Assistance Towing...........80Audio Jack........39,42,46,51Audio Settings........39,41,44Audio Systems (Radio).........38Automatic Temperature Control(ATC) . . . . . . . . . . . . . . . . .33Automatic Transmission........31Fluid Type . . . . . . . . . . . .107Overheating............87Axle Fluid . . . . . . . . . . . . . . .107
Back-Up Camera............30Battery..............94,108Body Mechanism Lubrication....108Brake Fluid..............107Brakes.................108Brake System.............108Master Cylinder.........108Break-In Recommendations, NewVehicle................25
Bulb Replacement..........118
Calibration, Compass.........68
Capacities, Antifreeze (Engine
Coolant)..............106
Capacities, Fluid...........106
Caps, Filler
Oil (Engine) . . . . . . . . . . . .108
Car Washes . . . . . . . . . . . . . .108
CD (Compact Disc)Player.........39,42,45,50Change Oil Indicator..........85Changing A Flat Tire . . . . . . . . . .87Charging System Light.........80Child Restraint.............15CleaningWheels..............108Windshield Wiper Blades....108Climate Control.............32Clock Setting.......38,41,44,47Cluster Warning/Indicator LightsAnti-Lock Brake (ABS) Light . . .80ChargingSystem Light......80Electronic Stability Control (ESC)Activation/Malfunction IndicatorLight . . . . . . . . . . . . . . . .84Electronic Throttle Control (ETC)Indicator Light...........81Front Fog Light Indicator.....85High Beam Indicator.......84Instrument Cluster WarningLights . . . . . . . . . . . . . . . .80Malfunction Indicator Light(MIL) . . . . . . . . . . . . . . . . .84Oil Pressure Warning Light....80Tire Pressure Monitoring System(TPMS) Light............81Turn Signal Indicator.......84Vehicle Security Light.......85Clutch . . . . . . . . . . . . . . . . .108Clutch Fluid . . . . . . . . . . . . . .108Compact Spare Tire . . . . . . . . . .116Compass Calibration..........68Coolant (Antifreeze).........106Cooling System............108Adding Coolant (Antifreeze) . .108Coolant Level...........108Disposal of Used Coolant....108
INDEX
123
Page 127 of 132
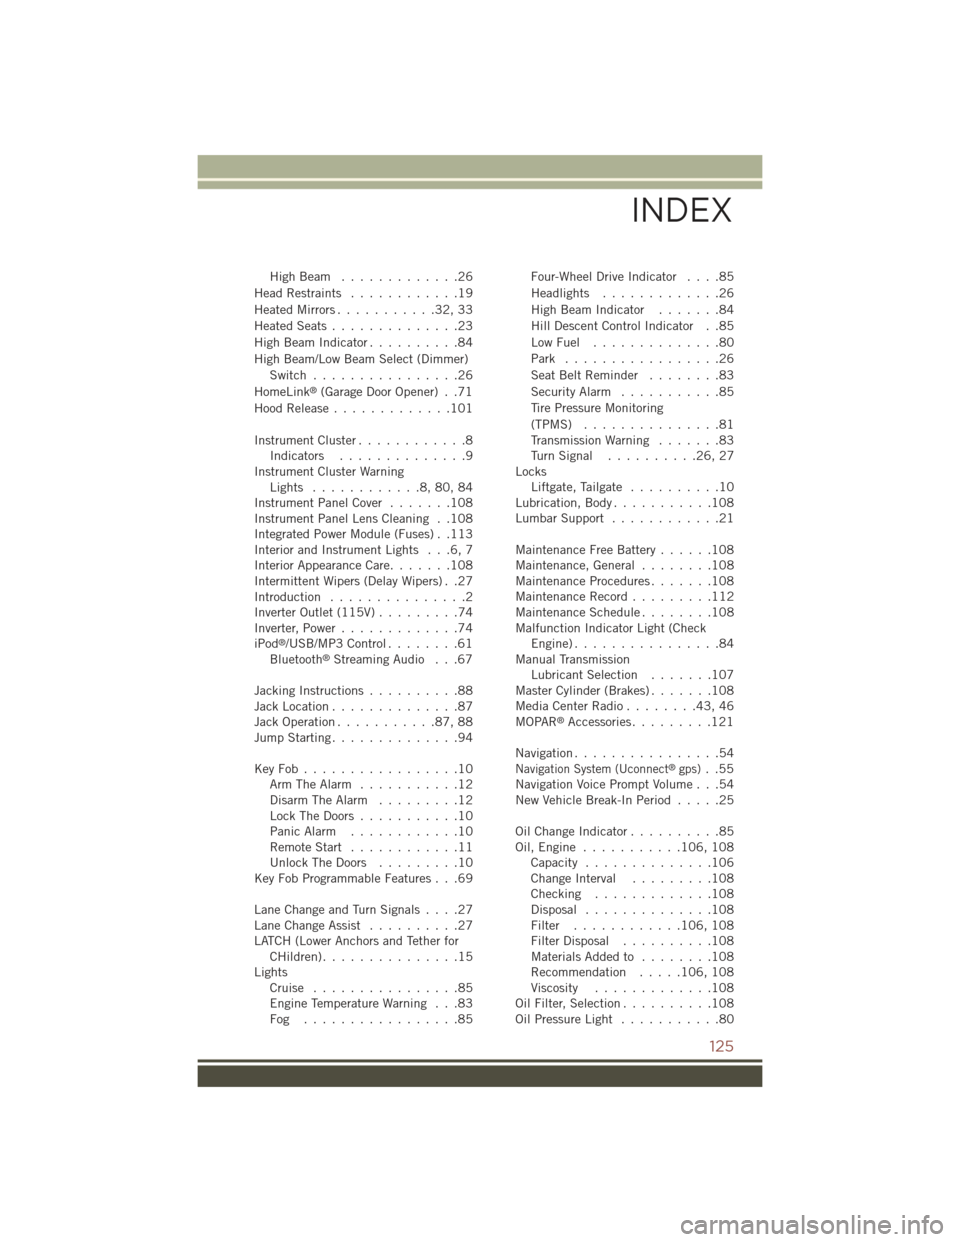
High Beam . . . . . . . . . . . . .26
Head Restraints............19
Heated Mirrors...........32,33
Heated Seats..............23
High Beam Indicator..........84
High Beam/Low Beam Select (Dimmer)
Switch................26
HomeLink®(Garage Door Opener) . .71
Hood Release.............101
Instrument Cluster............8Indicators..............9Instrument Cluster WarningLights . . . . . . . . . . . .8, 80, 84Instrument Panel Cover.......108Instrument Panel Lens Cleaning . .108Integrated Power Module (Fuses) . .113Interior and Instrument Lights . . .6, 7Interior Appearance Care.......108Intermittent Wipers (Delay Wipers) . .27Introduction...............2Inverter Outlet (115V).........74Inverter, Power.............74iPod®/USB/MP3 Control........61Bluetooth®Streaming Audio . . .67
Jacking Instructions..........88Jack Location..............87Jack Operation...........87,88Jump Starting..............94
Key Fob . . . . . . . . . . . . . . . . .10Arm The Alarm...........12Disarm The Alarm.........12Lock The Doors...........10Panic Alarm............10Remote Start . . . . . . . . . . . .11Unlock The Doors . . . . . . . . .10Key Fob Programmable Features . . .69
Lane Change and Turn Signals....27Lane Change Assist..........27LATCH (Lower Anchors and Tether forCHildren). . . . . . . . . . . . . . .15LightsCruise . . . . . . . . . . . . . . . .85Engine Temperature Warning . . .83Fog . . . . . . . . . . . . . . . . .85
Four-Wheel Drive Indicator....85
Headlights.............26
High Beam Indicator.......84
Hill Descent Control Indicator . .85
Low Fuel . . . . . . . . . . . . . .80
Park . . . . . . . . . . . . . . . . .26
Seat Belt Reminder........83
Security Alarm...........85
Tire Pressure Monitoring
(TPMS)...............81Transmission Warning.......83Tu r n S i g n a l . . . . . . . . . . 2 6 , 2 7LocksLiftgate, Tailgate..........10Lubrication, Body...........108Lumbar Support............21
Maintenance Free Battery......108Maintenance, General . . . . . . . .108Maintenance Procedures.......108Maintenance Record . . . . . . . . .112Maintenance Schedule . . . . . . . .108Malfunction Indicator Light (CheckEngine) . . . . . . . . . . . . . . . .84Manual TransmissionLubricant Selection.......107Master Cylinder (Brakes).......108Media Center Radio . . . . . . . .43, 46MOPAR®Accessories.........121
Navigation................54Navigation System (Uconnect®gps)..55Navigation Voice Prompt Volume . . .54New Vehicle Break-In Period.....25
Oil Change Indicator..........85Oil, Engine...........106, 108Capacity..............106Change Interval.........108Checking.............108Disposal..............108Filter............106, 108Filter Disposal..........108Materials Added to........108Recommendation.....106, 108Viscosity.............108Oil Filter, Selection..........108Oil Pressure Light...........80
INDEX
125