instrument cluster JEEP COMPASS 2015 1.G User Guide
[x] Cancel search | Manufacturer: JEEP, Model Year: 2015, Model line: COMPASS, Model: JEEP COMPASS 2015 1.GPages: 132, PDF Size: 21.94 MB
Page 3 of 132
INTRODUCTION/WELCOME
WELCOME FROM CHRYSLERGROUP LLC.................. 2
CONTROLS AT A GLANCE
DRIVER COCKPIT.............. 6INSTRUMENT CLUSTER.......... 8
GETTING STARTED
KEY FOB . . . . . . . . . . . . . . . . . . . 10REMOTE START............... 11VEHICLE SECURITY ALARM....... 12SEAT BELT SYSTEMS........... 13SUPPLEMENTAL RESTRAINT SYSTEM(SRS) — AIR BAGS............ 14CHILD RESTRAINTS............ 15HEAD RESTRAINTS............. 19FRONT SEATS................ 20REAR SEATS................ 22HEATED SEATS . . . . . . . . . . . . . . . 23TILT STEERING COLUMN......... 24
OPERATING YOUR VEHICLE
ENGINE BREAK-INRECOMMENDATIONS........... 25TURN SIGNAL/LIGHTS LEVER...... 26WIPER/WASHER LEVER.......... 27ELECTRONIC SPEED CONTROL..... 28PARKVIEW®REAR BACK-UP CAMERA.. 30CONTINUOUSLY VARIABLE AUTOMATICTRANSMISSION (CVT)........... 31SIX-SPEED AUTOMATICTRANSMISSION............... 31MANUAL CLIMATE CONTROLS...... 32AUTOMATIC TEMPERATURE CONTROLS(ATC) . . . . . . . . . . . . . . . . . . . . . 33POWER SUNROOF............. 34WIND BUFFETING............. 35
ELECTRONICS
YOUR VEHICLE'S SOUND SYSTEM . . . 36Uconnect®130 . . . . . . . . . . . . . . . 38Uconnect®130 WITH SiriusXM SATELLITERADIO..................... 40Uconnect®230 . . . . . . . . . . . . . . . 43Uconnect®430/430N........... 46SiriusXM SATELLITE RADIO/TRAVELLINK . . . . . . . . . . . . . . . . . . . . . . 57STEERING WHEEL AUDIO CONTROLS.. 61iPod®/USB/MP3 CONTROL........ 61Uconnect®PHONE............. 62Uconnect®VOICE COMMAND....... 65Bluetooth®STREAMING AUDIO..... 67ELECTRONIC VEHICLE INFORMATIONCENTER (EVIC)............... 68PROGRAMMABLE FEATURES....... 69UNIVERSAL GARAGE DOOR OPENER(HomeLink®).................71
POWER INVERTER............. 74POWER OUTLET.............. 75
OFF-ROAD CAPABILITIESFOUR-WHEEL DRIVE OPERATION . . . 76
UTILITYTRAILER TOWING WEIGHTS (MAXIMUMTRAILER WEIGHT RATINGS)....... 78RECREATIONAL TOWING (BEHINDMOTORHOME, ETC.)............ 79
WHAT TO DO IN EMERGENCIESROADSIDE ASSISTANCE.......... 80INSTRUMENT CLUSTER WARNINGLIGHTS.................... 80INSTRUMENT CLUSTER INDICATORLIGHTS.................... 84IF YOUR ENGINE OVERHEATS...... 86AUTOMATIC TRANSMISSIONOVERHEATING............... 87JACKING AND TIRE CHANGING..... 87JUMP-STARTING PROCEDURES..... 94SHIFT LEVER OVERRIDE......... 97TOWING A DISABLED VEHICLE..... 98FREEING A STUCK VEHICLE....... 99EVENT DATA RECORDER (EDR).... 100
MAINTAINING YOUR VEHICLEOPENING THE HOOD.......... 101ENGINE COMPARTMENT........ 102FLUID CAPACITIES............ 106FLUIDS, LUBRICANTS AND GENUINEPA RT S . . . . . . . . . . . . . . . . . . . . 1 0 6MAINTENANCE PROCEDURES..... 108MAINTENANCE SCHEDULE...... 108FUSES.................... 113TIRE PRESSURES............. 115SPARE TIRES — IF EQUIPPED..... 116WHEEL AND WHEEL TRIM CARE . . . 117EXTERIOR BULBS............ 118
CUSTOMER ASSISTANCECHRYSLER GROUP LLC CUSTOMERCENTER.................. 119CHRYSLER CANADA INC. CUSTOMERCENTER.................. 119ASSISTANCE FOR THE HEARINGIMPAIRED . . . . . . . . . . . . . . . . . 119PUBLICATIONS ORDERING....... 119REPORTING SAFETY DEFECTS IN THEUNITED STATES . . . . . . . . . . . . . . 120
MOPAR® ACCESSORIESAUTHENTIC ACCESSORIES BY MOPAR®........................ 121
FAQ ( H o w To? )
FREQUENTLY ASKED QUESTIONS . . . 122
INDEX.................. 123
TABLE OF CONTENTS
Page 8 of 132
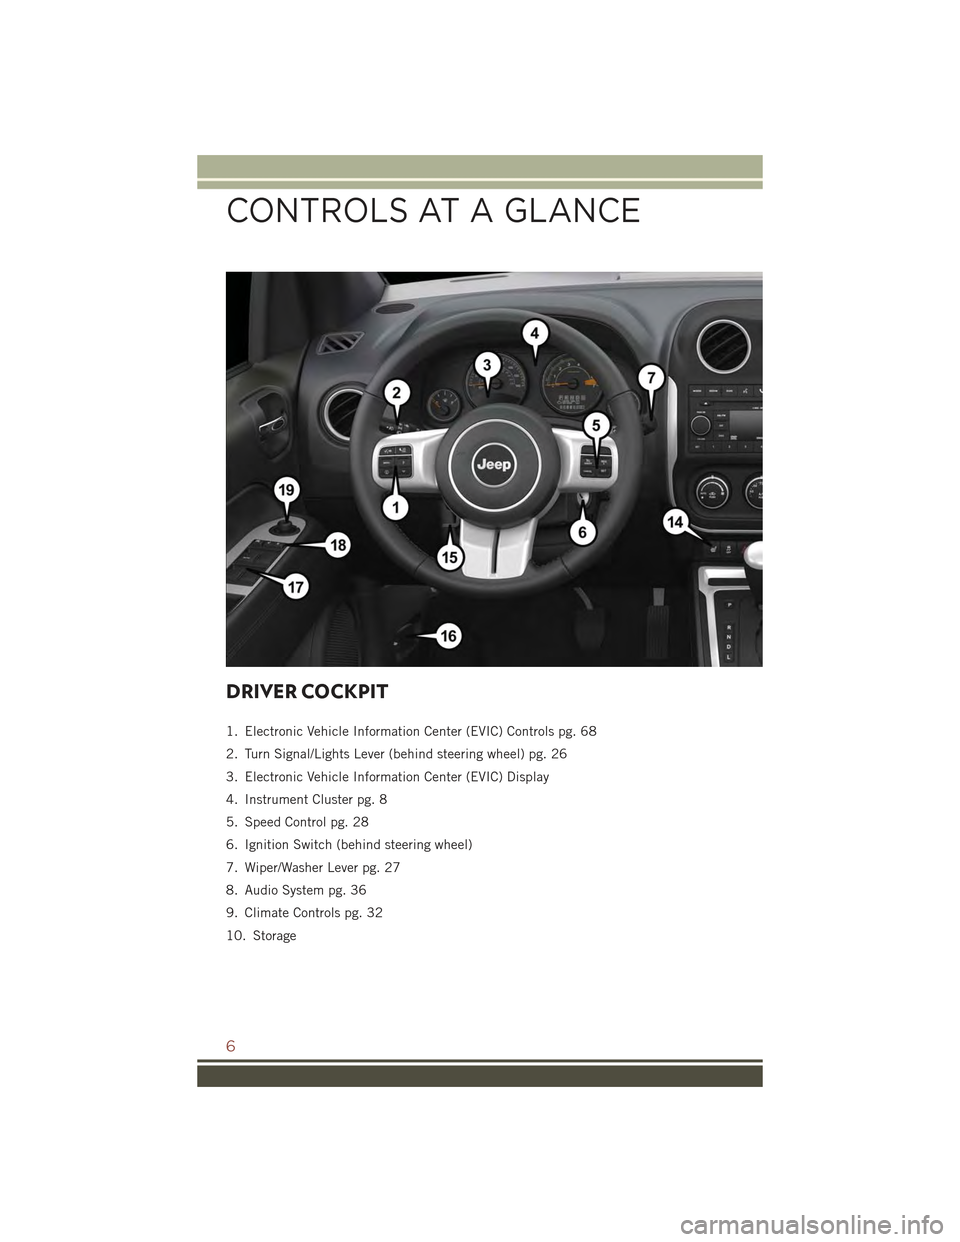
DRIVER COCKPIT
1. Electronic Vehicle Information Center (EVIC) Controls pg. 68
2. Turn Signal/Lights Lever (behind steering wheel) pg. 26
3. Electronic Vehicle Information Center (EVIC) Display
4. Instrument Cluster pg. 8
5. Speed Control pg. 28
6. Ignition Switch (behind steering wheel)
7. Wiper/Washer Lever pg. 27
8. Audio System pg. 36
9. Climate Controls pg. 32
10. Storage
CONTROLS AT A GLANCE
6
Page 10 of 132
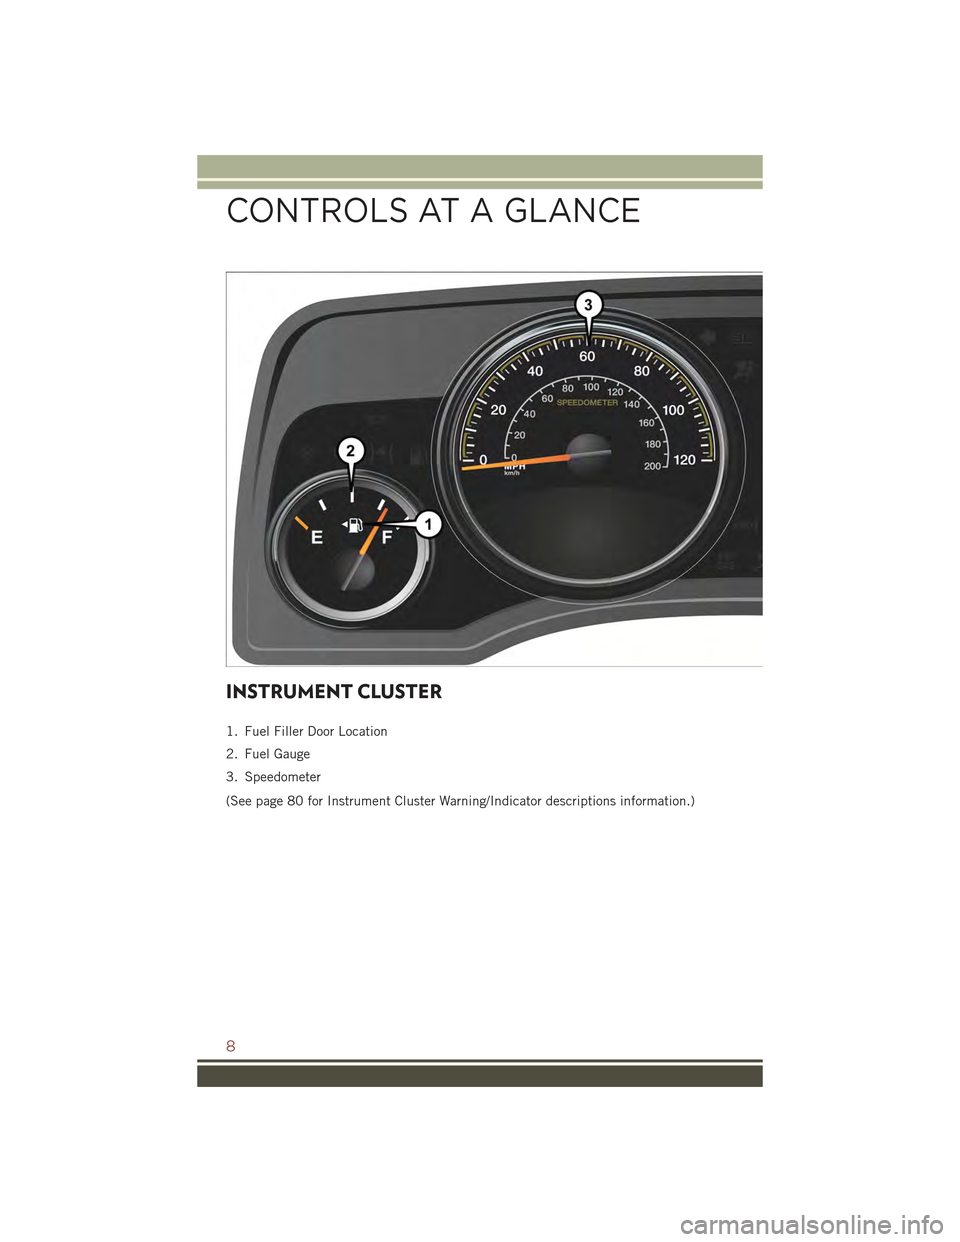
INSTRUMENT CLUSTER
1. Fuel Filler Door Location
2. Fuel Gauge
3. Speedometer
(See page 80 for Instrument Cluster Warning/Indicator descriptions information.)
CONTROLS AT A GLANCE
8
Page 11 of 132
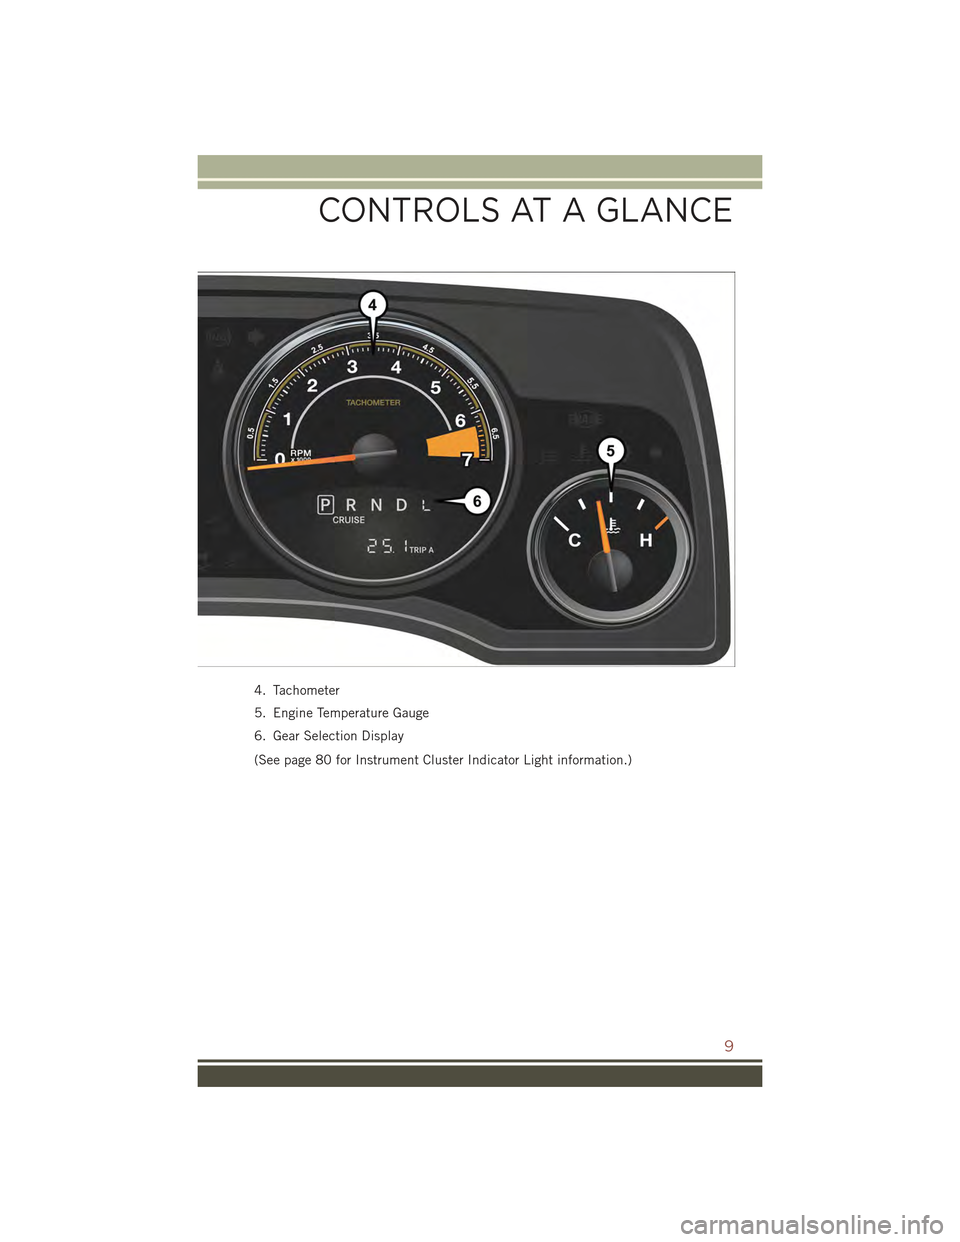
4. Tachometer
5. Engine Temperature Gauge
6. Gear Selection Display
(See page 80 for Instrument Cluster Indicator Light information.)
CONTROLS AT A GLANCE
9
Page 14 of 132
WARNING!
• Do not start or run an engine in a closed garage or confined area. Exhaust gas
contains Carbon Monoxide (CO) which is odorless and colorless. Carbon
Monoxide is poisonous and can cause serious injury or death when inhaled.
• Keep Key Fob transmitters away from children. Operation of the Remote Start
System, windows, door locks or other controls could cause serious injury or
death.
VEHICLE SECURITY ALARM
This Vehicle Security Alarm monitors the doors, liftgate, and ignition switch for
unauthorized operation.
When the alarm is activated, the interior switches for door locks are disabled. The
Vehicle Security Alarm provides both audio and visual signals repeatedly for three
minutes. If the disturbance is still present (driver's door, passenger door, other doors,
ignition) after three minutes, the parking lights and tail lights will flash for an
additional 15 minutes.
To A r m :
• Lock the door using either the power door lock switch (one door must be open) or
the LOCK button on the Remote Keyless Entry (RKE) transmitter (doors can be
open or closed), and close all doors.
The Vehicle Security Light in the instrument cluster will flash for 16 seconds. This
shows that the Vehicle Security Alarm is arming. During this period, if a door is
opened, the ignition is cycled to ON/RUN, or the power door locks are unlocked in any
manner, the Vehicle Security Alarm will automatically disarm.
NOTE:
• The Vehicle Security Alarm will not arm if you lock the doors with the manual door
lock plungers.
• Once armed, the Vehicle Security Alarm disables the unlock switch on the driver
door trim panel and passenger door trim panel.
To D i s a r m T h e S y s t e m :
• Push the Key Fob UNLOCK button or cycle the ignition to the ON/RUN position.
The Vehicle Security Alarm is designed to protect your vehicle; however, you can
create conditions where the Vehicle Security Alarm will give you a false alarm. If one
of the previously described arming sequences has occurred, the Vehicle Security
Alarm will arm regardless of whether you are in the vehicle or not. If you remain in the
vehicle and open a door, the alarm will sound. If this occurs, disarm the Vehicle
Security Alarm.
GETTING STARTED
12
Page 33 of 132
CONTINUOUSLY VARIABLE AUTOMATIC
TRANSMISSION (CVT)
While conventional automatic transmissions typically have 4, 5 or 6 speeds, the
Continuously Variable Transmission (CVT) has an infinite number of speeds. This
allows it to adjust to exactly the right ratio to optimize performance and fuel
economy.
Under hard acceleration, you may hear more engine noise than with a conventional
transmission. The CVT may also occasionally feel like it is “shifting.” These
characteristics are perfectly normal and contribute to the CVT's efficiency.
SIX-SPEED AUTOMATIC TRANSMISSION
This electronically-controlled transmission provides a precise shift schedule. The
transmission electronics are self-calibrating; therefore, the first few shifts on a new
vehicle may be somewhat abrupt. This is a normal condition, and precision shifts will
develop within a few hundred miles (kilometers).
The transmission shift lever has only PARK, REVERSE, NEUTRAL, and DRIVE shift
positions. Manual shifts can be made using the Autostick®shift control. Moving the
shift lever to the left or right (-/+) while in the DRIVE position will manually select the
transmission gear, and will display the current gear in the instrument cluster as 6, 5,
4, 3, 2, 1.
Refer to your Owner’s Manual on the DVD for further information.
OPERATING YOUR VEHICLE
31
Page 70 of 132
ELECTRONIC VEHICLE INFORMATION CENTER
(EVIC)
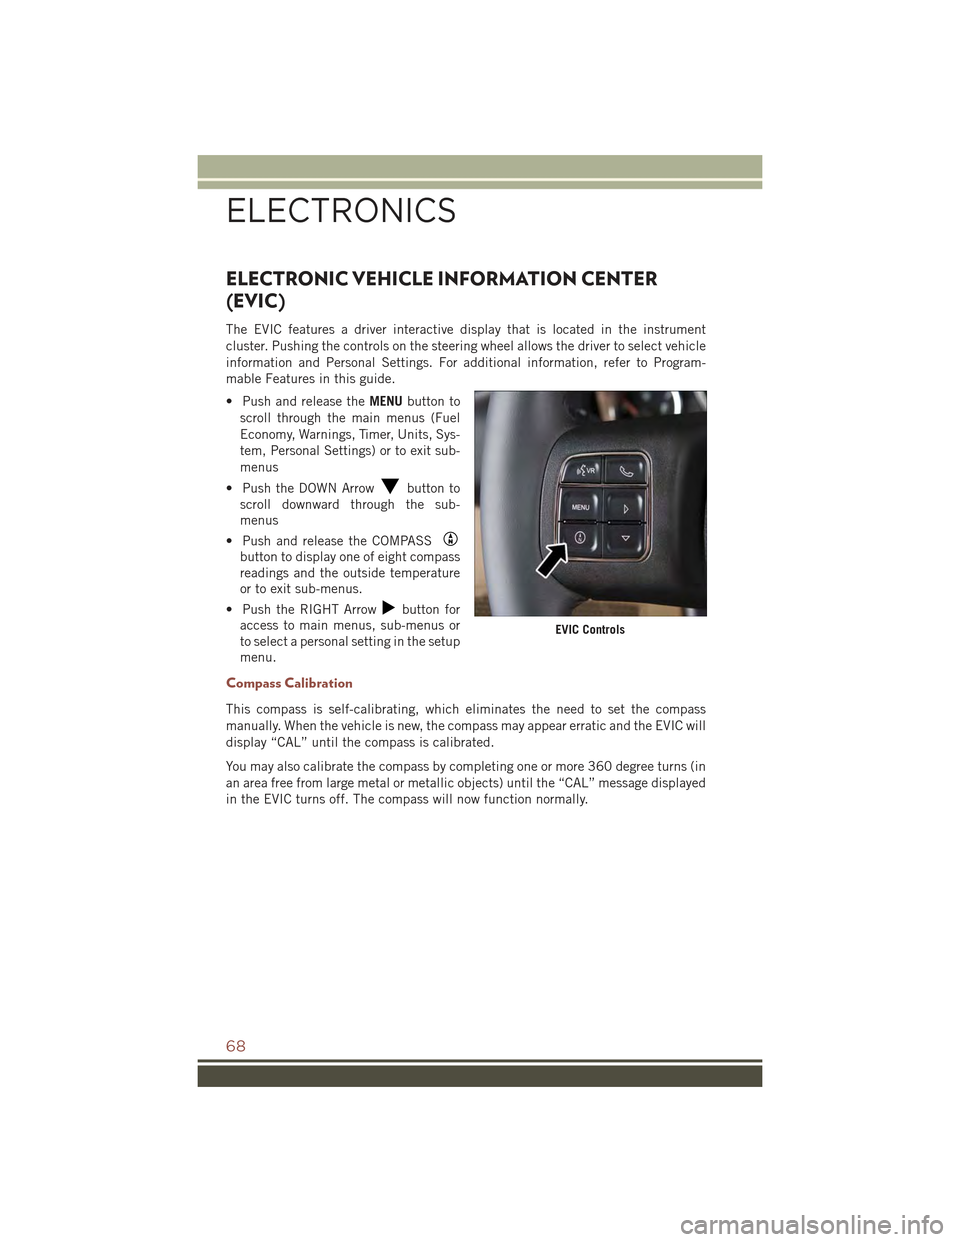
The EVIC features a driver interactive display that is located in the instrument
cluster. Pushing the controls on the steering wheel allows the driver to select vehicle
information and Personal Settings. For additional information, refer to Program-
mable Features in this guide.
• Push and release theMENUbutton to
scroll through the main menus (Fuel
Economy, Warnings, Timer, Units, Sys-
tem, Personal Settings) or to exit sub-
menus
• Push the DOWN Arrowbutton to
scroll downward through the sub-
menus
• Push and release the COMPASS
button to display one of eight compass
readings and the outside temperature
or to exit sub-menus.
• Push the RIGHT Arrowbutton for
access to main menus, sub-menus or
to select a personal setting in the setup
menu.
Compass Calibration
This compass is self-calibrating, which eliminates the need to set the compass
manually. When the vehicle is new, the compass may appear erratic and the EVIC will
display “CAL” until the compass is calibrated.
You may also calibrate the compass by completing one or more 360 degree turns (in
an area free from large metal or metallic objects) until the “CAL” message displayed
in the EVIC turns off. The compass will now function normally.
EVIC Controls
ELECTRONICS
68
Page 82 of 132
ROADSIDE ASSISTANCE
Dial toll-free 1-800-521-2779 for U.S. Residents or 1-800-363-4869 for Canadian
Residents.
• Provide your name, vehicle identification number, license plate number, and your
location, including the telephone number from which you are calling.
• Briefly describe the nature of the problem and answer a few simple questions.
• You will be given the name of the service provider and an estimated time of arrival.
If you feel you are in an “unsafe situation”, please let us know. With your consent,
we will contact local police or safety authorities.
INSTRUMENT CLUSTER WARNING LIGHTS
- Low Fuel Warning Light
This warning light indicates when the fuel level reaches approximately 2.0 gal (7.8 L),
this light will turn on and a single chime will sound.
- Oil Pressure Warning Light
This light indicates low engine oil pressure. If the light turns on while driving, stop
the vehicle and shut off the engine as soon as possible. A chime will sound when this
light turns on.
We recommend you do not operate the vehicle or engine damage will occur. Have the
vehicle serviced immediately.
- Anti-Lock Brake (ABS) Light
This light monitors the Anti-Lock Brake System (ABS).
If the light is not on during starting, stays on, or turns on while driving, we
recommend you contact the nearest authorized dealer and have the vehicle serviced
immediately.
-ChargingSystemLight
This light shows the status of the electrical charging system. If the charging system
light remains on, it means that the vehicle is experiencing a problem with the
charging system.
We recommend you do not continue driving if the charging system light is on. Have
the vehicle serviced immediately.
- Air Bag Warning Light
If the light is not on during starting, stays on, or turns on while driving, have the
vehicle serviced by an authorized dealer immediately.
WHAT TO DO IN EMERGENCIES
80
Page 86 of 132
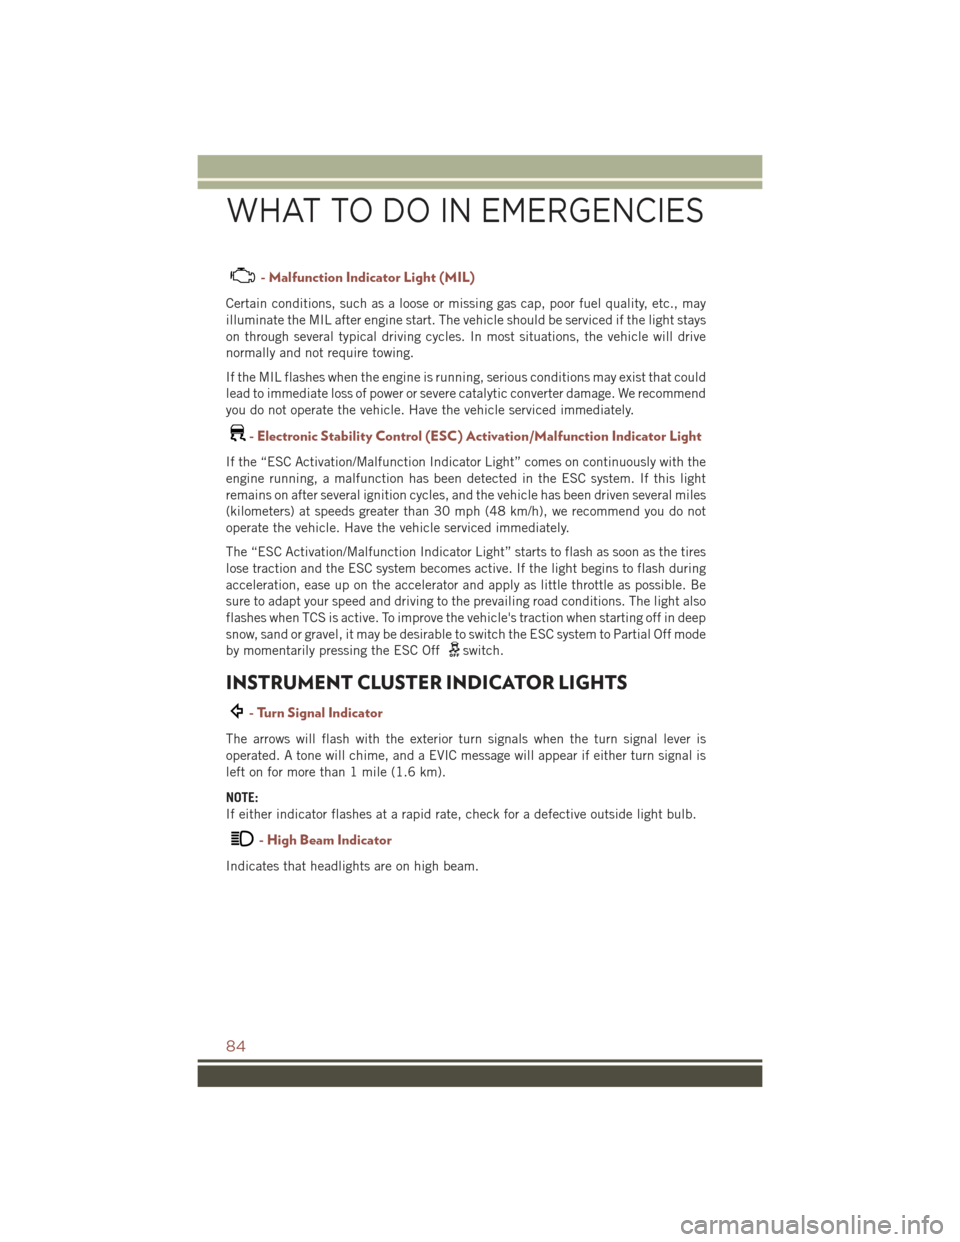
- Malfunction Indicator Light (MIL)
Certain conditions, such as a loose or missing gas cap, poor fuel quality, etc., may
illuminate the MIL after engine start. The vehicle should be serviced if the light stays
on through several typical driving cycles. In most situations, the vehicle will drive
normally and not require towing.
If the MIL flashes when the engine is running, serious conditions may exist that could
lead to immediate loss of power or severe catalytic converter damage. We recommend
you do not operate the vehicle. Have the vehicle serviced immediately.
-ElectronicStabilityControl(ESC)Activation/MalfunctionIndicatorLight
If the “ESC Activation/Malfunction Indicator Light” comes on continuously with the
engine running, a malfunction has been detected in the ESC system. If this light
remains on after several ignition cycles, and the vehicle has been driven several miles
(kilometers) at speeds greater than 30 mph (48 km/h), we recommend you do not
operate the vehicle. Have the vehicle serviced immediately.
The “ESC Activation/Malfunction Indicator Light” starts to flash as soon as the tires
lose traction and the ESC system becomes active. If the light begins to flash during
acceleration, ease up on the accelerator and apply as little throttle as possible. Be
sure to adapt your speed and driving to the prevailing road conditions. The light also
flashes when TCS is active. To improve the vehicle's traction when starting off in deep
snow, sand or gravel, it may be desirable to switch the ESC system to Partial Off mode
by momentarily pressing the ESC Offswitch.
INSTRUMENT CLUSTER INDICATOR LIGHTS
- Turn Signal Indicator
The arrows will flash with the exterior turn signals when the turn signal lever is
operated. A tone will chime, and a EVIC message will appear if either turn signal is
left on for more than 1 mile (1.6 km).
NOTE:
If either indicator flashes at a rapid rate, check for a defective outside light bulb.
- High Beam Indicator
Indicates that headlights are on high beam.
WHAT TO DO IN EMERGENCIES
84
Page 110 of 132
MAINTENANCE PROCEDURES
For information on the maintenance procedures for your vehicle, please refer to
“Maintenance Procedures” in “Maintaining Your Vehicle” in your Owner’s Manual or
applicable supplement on the DVD for further details.
MAINTENANCE SCHEDULE
Your vehicle is equipped with an automatic oil change indicator system. The oil
change indicator system will remind you that it is time to take your vehicle in for
scheduled maintenance.
Based on engine operation conditions, the oil change indicator message will
illuminate. This means that service is required for your vehicle. Operating conditions
such as frequent short-trips, trailer tow, extremely hot or cold ambient temperatures
will influence when the “Change Oil” or “Oil Change Required” message is dis-
played. Severe Operating Conditions can cause the change oil message to illuminate
as early as 3,500 miles (5,600 km) since last reset. Have your vehicle serviced as
soon as possible, within the next 500 miles (805 km).
On Electronic Vehicle Information Center (EVIC) equipped vehicles, “Oil Change
Required” will be displayed in the EVIC and a single chime will sound, indicating that
an oil change is necessary.
On Non-EVIC equipped vehicles, “Change Oil” will flash in the instrument cluster
odometer and a single chime will sound, indicating that an oil change is necessary.
Your authorized dealer will reset the oil change indicator message after completing
the scheduled oil change. If a scheduled oil change is performed by someone other
than your authorized dealer, the message can be reset by referring to the steps
described under “Instrument Cluster Warning Lights” in “What To Do In Emergen-
cies” in this guide or “Instrument Cluster Descriptions” or “Electronic Vehicle
Information Center (EVIC)” in “Understanding Your Instrument Panel” in the
Owner’s Manual on your DVD for further information.
NOTE:
Under no circumstances should oil change intervals exceed 10,000 miles
(16,000 km) or twelve months, whichever comes first.
MAINTAINING YOUR VEHICLE
108