manual radio set JEEP COMPASS 2015 1.G User Guide
[x] Cancel search | Manufacturer: JEEP, Model Year: 2015, Model line: COMPASS, Model: JEEP COMPASS 2015 1.GPages: 132, PDF Size: 21.94 MB
Page 32 of 132
Resume
• To resume a previously selected set speed in memory, push the RES + button and
release.
Cancel
• Push the CANCEL button, or apply the brakes to cancel the set speed and
maintain the set speed memory.
• Push the ON/OFF button to turn the system off and erase the set speed memory.
WARNING!
• Leaving the Electronic Speed Control system on when not in use is dangerous.
You could accidentally set the system or cause it to go faster than you want. You
could lose control and have a collision. Always leave the Electronic Speed
Control system off when you are not using it.
• Electronic Speed Control can be dangerous where the system cannot maintain
a constant speed. Your vehicle could go too fast for the conditions, and you
could lose control. A collision could be the result. Do not use Electronic Speed
Control in heavy traffic or on roads that are winding, icy, snow-covered or
slippery.
PARKVIEW® REAR BACK-UP CAMERA
You can see an on-screen image of the rear of your vehicle whenever the shift lever is
put into REVERSE. The ParkView®Rear Back-Up Camera image will be displayed on
the radio display screen, located on the center stack of the instrument panel.
If the radio display screen appears foggy, clean the camera lens located on the
liftgate.
Refer to your Owner's Manual on the DVD for further details.
WARNING!
Drivers must be careful when backing up; even when using the ParkView®Rear
Back-Up Camera. Always check carefully behind your vehicle, and be sure to
check for pedestrians, animals, other vehicles, obstructions, or blind spots before
backing up. You must continue to pay attention while backing up. Failure to do so
can result in serious injury or death.
OPERATING YOUR VEHICLE
30
Page 50 of 132
Equalizer, Balance And Fade
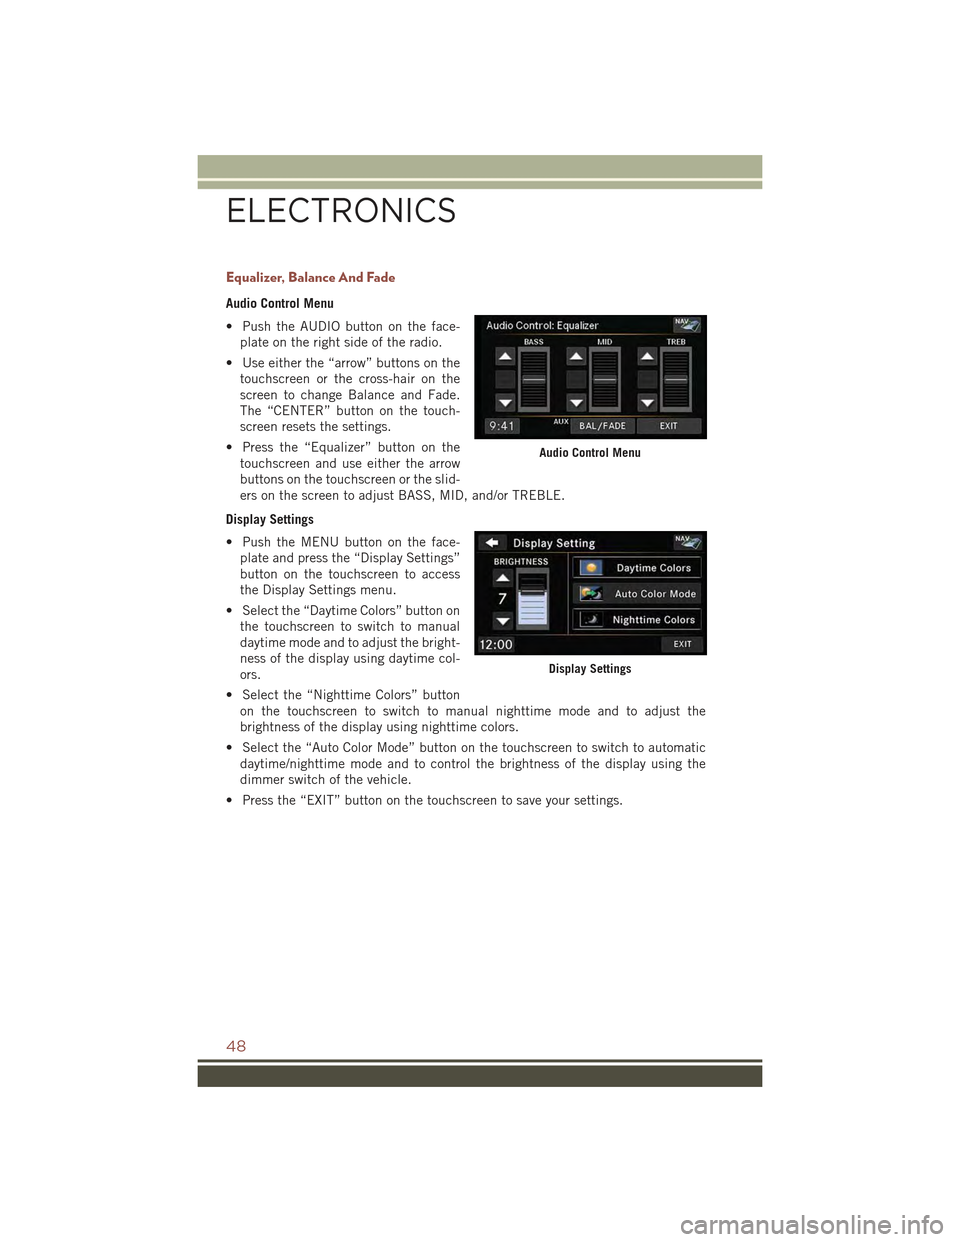
Audio Control Menu
• Push the AUDIO button on the face-
plate on the right side of the radio.
• Use either the “arrow” buttons on the
touchscreen or the cross-hair on the
screen to change Balance and Fade.
The “CENTER” button on the touch-
screen resets the settings.
• Press the “Equalizer” button on the
touchscreen and use either the arrow
buttons on the touchscreen or the slid-
ers on the screen to adjust BASS, MID, and/or TREBLE.
Display Settings
• Push the MENU button on the face-
plate and press the “Display Settings”
button on the touchscreen to access
the Display Settings menu.
• Select the “Daytime Colors” button on
the touchscreen to switch to manual
daytime mode and to adjust the bright-
ness of the display using daytime col-
ors.
• Select the “Nighttime Colors” button
on the touchscreen to switch to manual nighttime mode and to adjust the
brightness of the display using nighttime colors.
• Select the “Auto Color Mode” button on the touchscreen to switch to automatic
daytime/nighttime mode and to control the brightness of the display using the
dimmer switch of the vehicle.
• Press the “EXIT” button on the touchscreen to save your settings.
Audio Control Menu
Display Settings
ELECTRONICS
48
Page 63 of 132
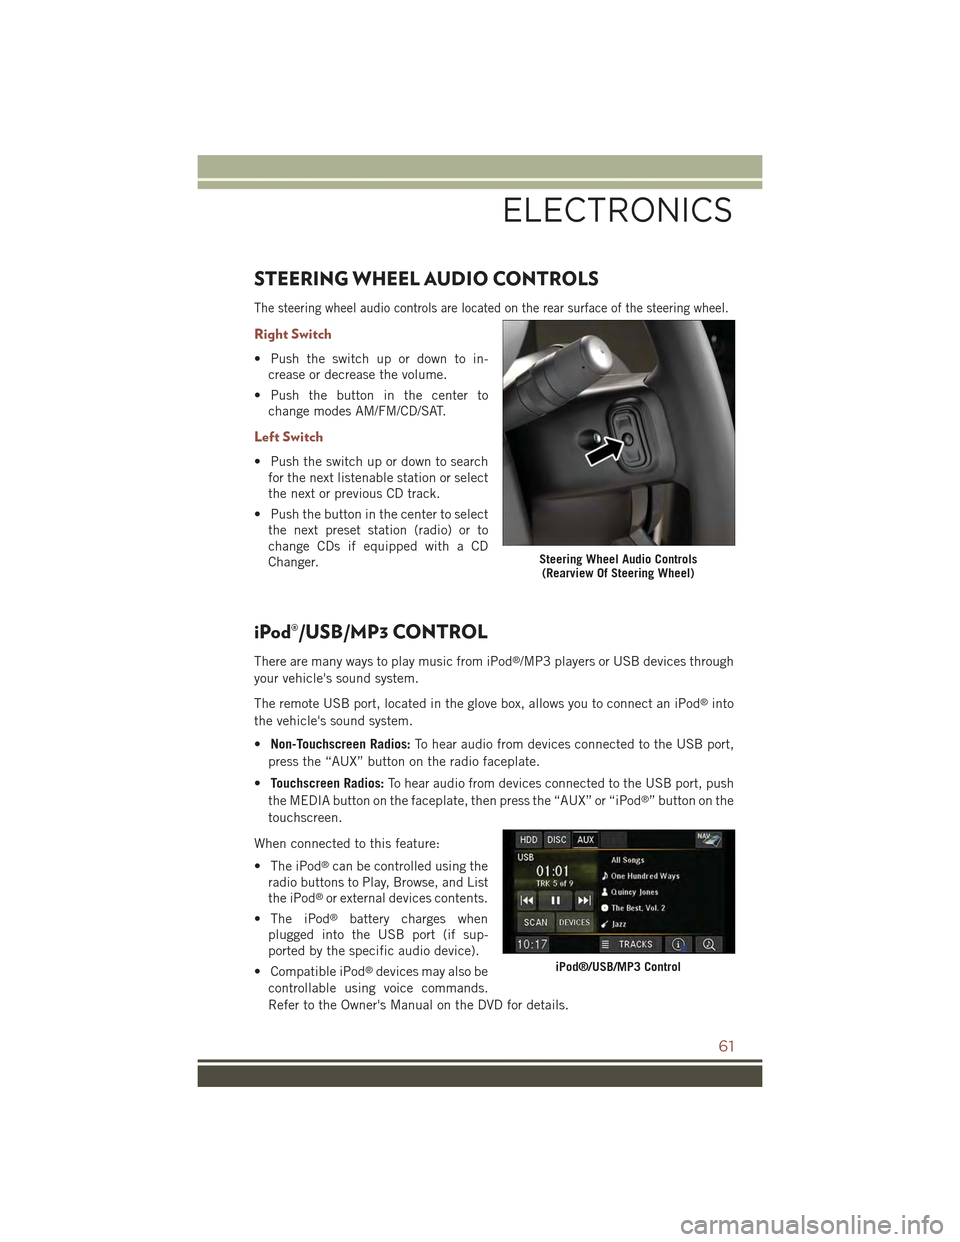
STEERING WHEEL AUDIO CONTROLS
The steering wheel audio controls are located on the rear surface of the steering wheel.
Right Switch
• Push the switch up or down to in-
crease or decrease the volume.
• Push the button in the center to
change modes AM/FM/CD/SAT.
Left Switch
• Push the switch up or down to search
for the next listenable station or select
the next or previous CD track.
• Push the button in the center to select
the next preset station (radio) or to
change CDs if equipped with a CD
Changer.
iPod®/USB/MP3 CONTROL
There are many ways to play music from iPod®/MP3 players or USB devices through
your vehicle's sound system.
The remote USB port, located in the glove box, allows you to connect an iPod®into
the vehicle's sound system.
•Non-Touchscreen Radios:To hear audio from devices connected to the USB port,
press the “AUX” button on the radio faceplate.
•Touchscreen Radios:To hear audio from devices connected to the USB port, push
the MEDIA button on the faceplate, then press the “AUX” or “iPod®” button on the
touchscreen.
When connected to this feature:
• The iPod®can be controlled using the
radio buttons to Play, Browse, and List
the iPod®or external devices contents.
• The iPod®battery charges when
plugged into the USB port (if sup-
ported by the specific audio device).
• Compatible iPod®devices may also be
controllable using voice commands.
Refer to the Owner's Manual on the DVD for details.
Steering Wheel Audio Controls(Rearview Of Steering Wheel)
iPod®/USB/MP3 Control
ELECTRONICS
61
Page 64 of 132
NOTE:
The USB port supports certain Mini, Classic, Nano, Touch, and iPhone®devices. The
USB port also supports playing music from compatible external USB Mass Storage
Class memory devices. For supported audio file formats, refer to the USB Port section
in the Owner's Manual on the DVD. Refer to UconnectPhone.com website for a list of
tested iPod®s. Some iPod®software versions may not fully support the USB port
features. Please visit Apple’s website for iPod®software updates.
WARNING!
Do not plug in or remove the iPod®or external device while driving. Failure to
follow this warning could result in a collision.
Uconnect® PHONE
• To determine if your vehicle is equipped with Uconnect®Phone, push the
Uconnect®Phone buttonlocated on the radio faceplate. If your vehicle has
this feature, you will hear a voice prompt. If not, you will see a message on the
radio stating “Uconnect phone not available.”
• The Uconnect®Phone is a voice-activated, hands-free, in-vehicle communica-
tions system with Voice Command Capability (see Voice Command section).
NOTE:
To access the tutorial, push the Uconnect®Phone buttonand after the BEEP,
say “tutorial.” Push any button on the faceplate or press any button on the
touchscreen to cancel the “tutorial.”
• The Uconnect®Phone allows you to dial a phone number with your mobile phone
using simple voice commands.
• Refer to your vehicle Owner's Manual on the DVD for further details.
NOTE:
The Uconnect®Phone requires a mobile phone equipped with the Bluetooth®
Hands-Free Profile Version 1.0 or higher. For Uconnect®Customer Support: U.S.
residents - visit UconnectPhone.com or call 1–877–855–8400. Canadian Residents
- call 1-800-465–2001 (English) or 1-800-387-9983 (French). This site will
provide specific instructions based on the type of mobile phone being paired.
Phone Pairing
NOTE:
Pairing is a one-time initial setup before using the phone. Prior to starting the pairing
procedure ensure all additional phones within the vehicle have their Bluetooth®disabled.
• Activate Bluetooth®on the phone you are pairing.
• Push the “Phone”button to begin.
• Wait for the “ready” prompt and BEEP.
• After the BEEP, say ”setup” or “Uconnect device setup.”
ELECTRONICS
62
Page 128 of 132
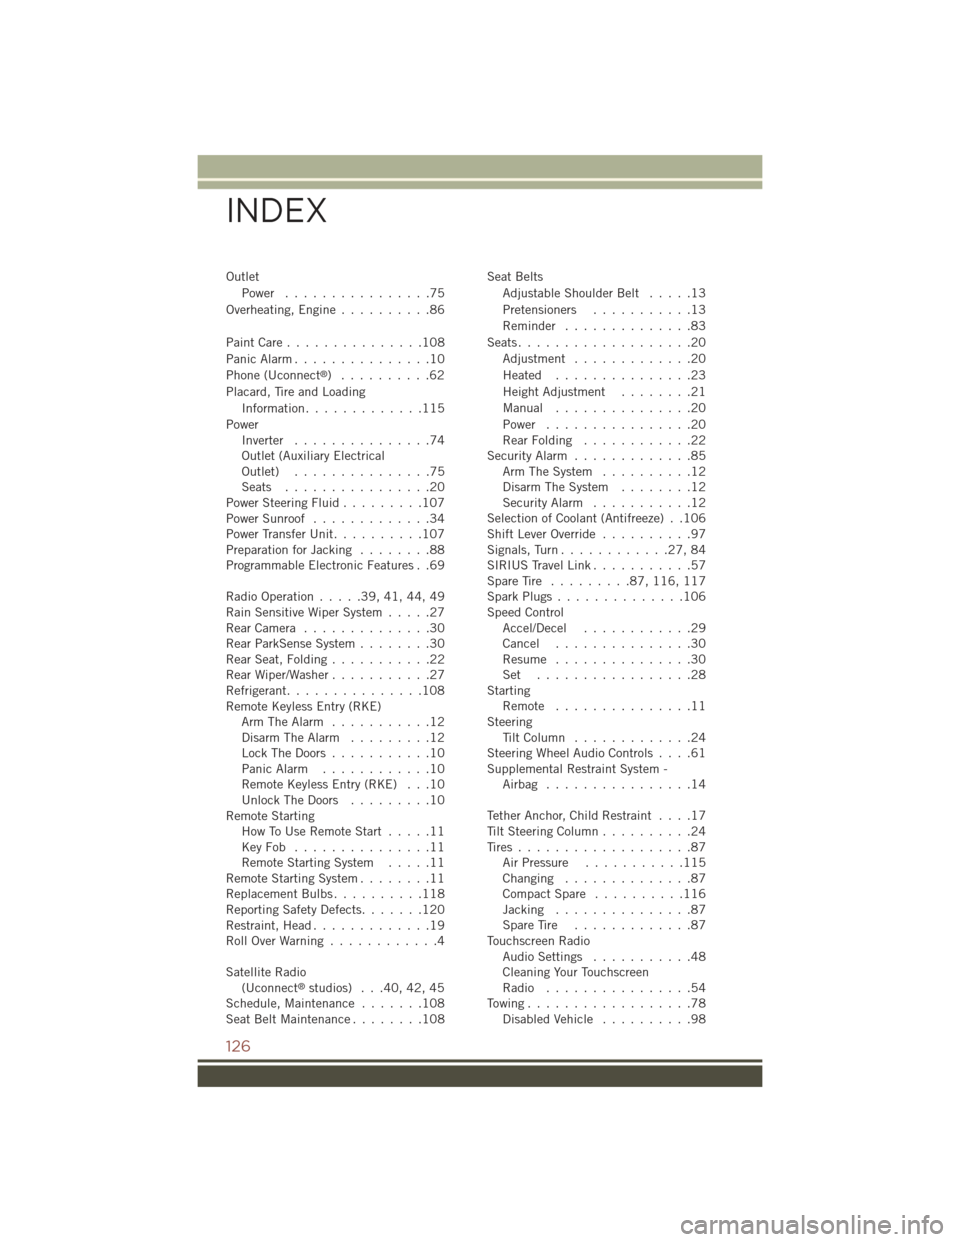
Outlet
Power . . . . . . . . . . . . . . . .75
Overheating, Engine..........86
Paint Care . . . . . . . . . . . . . . .108
Panic Alarm...............10
Phone (Uconnect®)..........62
Placard, Tire and Loading
Information.............115
PowerInverter...............74Outlet (Auxiliary ElectricalOutlet) . . . . . . . . . . . . . . .75Seats................20Power Steering Fluid.........107Power Sunroof.............34Power Transfer Unit..........107Preparation for Jacking........88Programmable Electronic Features . .69
Radio Operation.....39,41,44,49Rain Sensitive Wiper System.....27Rear Camera . . . . . . . . . . . . . .30Rear ParkSense System........30Rear Seat, Folding . . . . . . . . . . .22Rear Wiper/Washer . . . . . . . . . . .27Refrigerant...............108Remote Keyless Entry (RKE)Arm The Alarm...........12Disarm The Alarm.........12Lock The Doors...........10Panic Alarm............10Remote Keyless Entry (RKE) . . .10Unlock The Doors.........10Remote StartingHow To Use Remote Start.....11Key Fob . . . . . . . . . . . . . . .11Remote Starting System.....11Remote Starting System........11Replacement Bulbs . . . . . . . . . .118Reporting Safety Defects.......120Restraint, Head.............19Roll Over Warning . . . . . . . . . . . .4
Satellite Radio(Uconnect®studios) . . .40, 42, 45Schedule, Maintenance.......108Seat Belt Maintenance . . . . . . . .108
Seat Belts
Adjustable Shoulder Belt.....13
Pretensioners...........13
Reminder..............83
Seats...................20
Adjustment . . . . . . . . . . . . .20
Heated...............23
Height Adjustment........21
Manual . . . . . . . . . . . . . . .20
Power . . . . . . . . . . . . . . . .20Rear Folding . . . . . . . . . . . .22Security Alarm.............85Arm The System..........12Disarm The System........12Security Alarm...........12Selection of Coolant (Antifreeze) . .106Shift Lever Override..........97Signals, Turn............27,84SIRIUS Travel Link...........57Spare Tire . . . . . . . . .87,116, 117Spark Plugs . . . . . . . . . . . . . .106Speed ControlAccel/Decel............29Cancel . . . . . . . . . . . . . . .30Resume . . . . . . . . . . . . . . .30Set . . . . . . . . . . . . . . . . .28StartingRemote . . . . . . . . . . . . . . .11SteeringTi l t C o l u m n . . . . . . . . . . . . . 2 4Steering Wheel Audio Controls....61Supplemental Restraint System -Airbag . . . . . . . . . . . . . . . .14
Tether Anchor, Child Restraint....17Tilt Steering Column..........24Tires...................87Air Pressure...........115Changing..............87Compact Spare..........116Jacking...............87Spare Tire . . . . . . . . . . . . .87Touchscreen RadioAudio Settings...........48Cleaning Your TouchscreenRadio................54To w i n g . . . . . . . . . . . . . . . . . . 7 8Disabled Vehicle..........98
INDEX
126