belt JEEP COMPASS 2016 1.G Owner's Manual
[x] Cancel search | Manufacturer: JEEP, Model Year: 2016, Model line: COMPASS, Model: JEEP COMPASS 2016 1.GPages: 148, PDF Size: 8.42 MB
Page 27 of 148
Manual Front Seat Adjustment
On models equipped with manual seats, the adjusting bar is located at the front of
the seats, near the floor. While sitting in the seat, lift up on the bar and move the seat
forward or rearward. Release the bar once you have reached the desired position.
Then, using body pressure, move forward and rearward on the seat to be sure that the
seat adjusters have latched.
WARNING!
• Adjusting a seat while driving may be dangerous. Moving a seat while drivingcould result in loss of control which could cause a collision and serious injury
or death.
• Seats should be adjusted before fastening the seat belts and while the vehicle
is parked. Serious injury or death could result from a poorly adjusted seat belt.
Manual Seat Height Adjustment
The driver's seat height can be raised or lowered by using a lever, located on the
outboard side of the seat. Pull upward on the lever to raise the seat height or push
downward on the lever to lower the seat height.
Manual Seat Adjusting Bar
GETTING STARTED
25
Page 28 of 148
Manual Lumbar
The lumbar adjustment handle is located on the inboard or outboard side of the
seatback. Rotate the lever downward to increase the lumbar support or rotate the
lever upward to decrease the lumbar support.
Driver's Seatback Recline
To adjust the seatback, lift the lever lo-
cated on the outboard side of the seat,
lean back to the desired angle and re-
lease the lever. To return the seatback,
lift the lever, lean forward and release the
lever.
WARNING!
Do not ride with the seatback reclined so that the shoulder belt is no longer resting
against your chest. In a collision you could slide under the seat belt, which could
result in serious injury or death.
REAR SEATS
Folding Rear Seat
To provide additional storage area, each rear seatback can be folded forward. Pull the
strap forward to fold the rear seatback flat.
To raise the seatback, pull the strap forward and lift the seatback into its upright
position.
WARNING!
Be certain that the seatback is securely locked into position. If the seatback is not
securely locked into position the seat will not provide the proper stability for child
seats and/or passengers. An improperly latched seat could cause serious injury.
Lumbar Support Lever
GETTING STARTED
26
Page 29 of 148
Reclining Rear Seat
For additional comfort, pull the strap forward just enough to release the seatback
latch. Then push the seatback to a reclined position, approximately 35 degrees
maximum, and release the strap.
WARNING!
Do not ride with the seatback reclined so that the shoulder belt is no longer resting
against your chest. In a collision you could slide under the seat belt and be
seriously or even fatally injured. Use the recliner only when the vehicle is parked.
HEATED SEATS
Heated Seats
On some models, the front driver and passenger seats may be equipped with heaters
in both the seat cushions and seatbacks. The controls for the front heated seats are
located on the center instrument panel area.
You can choose from HI, LO or OFF heat settings. Amber indicator lights in each
switch indicate the level of heat in use. Two indicator lights will illuminate for HI, one
for LO and none for OFF.
Push the switch once to select HI-level
heating. Push the switch a second time to
select LO-level heating. Push the switch
a third time to shut the heating elements
OFF.
When the HI-level setting is selected, the
heater will provide a boosted heat level
during the initial stages of operation.
Then, the heat output will drop to the
normal HI-level. If the HI-level setting is
selected, the system will automatically
switch to LO-level after approximately 30
minutes of continuous operation. At that
time, the display will change from HI to
LO, indicating the change. When the LO-
level heating is selected, the system au-
tomatically turns the heater and the indicator light OFF after approximately 30
minutes of continuous operation.
NOTE:
Once a heat setting is selected, heat will be felt within two to five minutes.
Heated Seat Switches
GETTING STARTED
27
Page 42 of 148
POWER SUNROOF
The power sunroof switch is located on the overhead console.
WARNING!
• Never leave children alone in a vehicle, or with access to an unlocked vehicle.Never leave the Key Fob in or near the vehicle, or in a location accessible to
children. Occupants, particularly unattended children, can become entrapped
by the power sunroof while operating the power sunroof switch. Such entrap-
ment may result in serious injury or death.
• In a collision, there is a greater risk of being thrown from a vehicle with an open
sunroof. You could also be seriously injured or killed. Always fasten your seat
belt properly and make sure all passengers are properly secured.
• Do not allow small children to operate the sunroof. Never allow your fingers,
other body parts, or any object to project through the sunroof opening. Injury
may result.
Opening Sunroof — Express
Push the switch rearward and release it within one-half second. The sunroof and
sunshade will open automatically from any position. The sunroof and sunshade will
open fully and stop automatically. This is called “Express Open.” During Express
Open operation, any other actuation of the sunroof switch will stop the sunroof.
Opening Sunroof — Manual Mode
To open the sunroof, push and hold the switch rearward to full open. Any release of
the switch will stop the movement. The sunroof and sunshade will remain in a
partially opened condition until the sunroof switch is pushed again.
Closing Sunroof — Express
Push the switch forward and release it within one-half second and the sunroof will
close automatically from any position. The sunroof will close fully and stop automati-
cally. This is called “Express Close.” During Express Close operation, any other
actuation of the switch will stop the sunroof.
Closing Sunroof — Manual Mode
To close the sunroof, push and hold the switch in the forward position. Any release of
the switch will stop the movement and the sunroof will remain in a partially closed
condition until the sunroof switch is pushed again.
OPERATING YOUR VEHICLE
40
Page 79 of 148
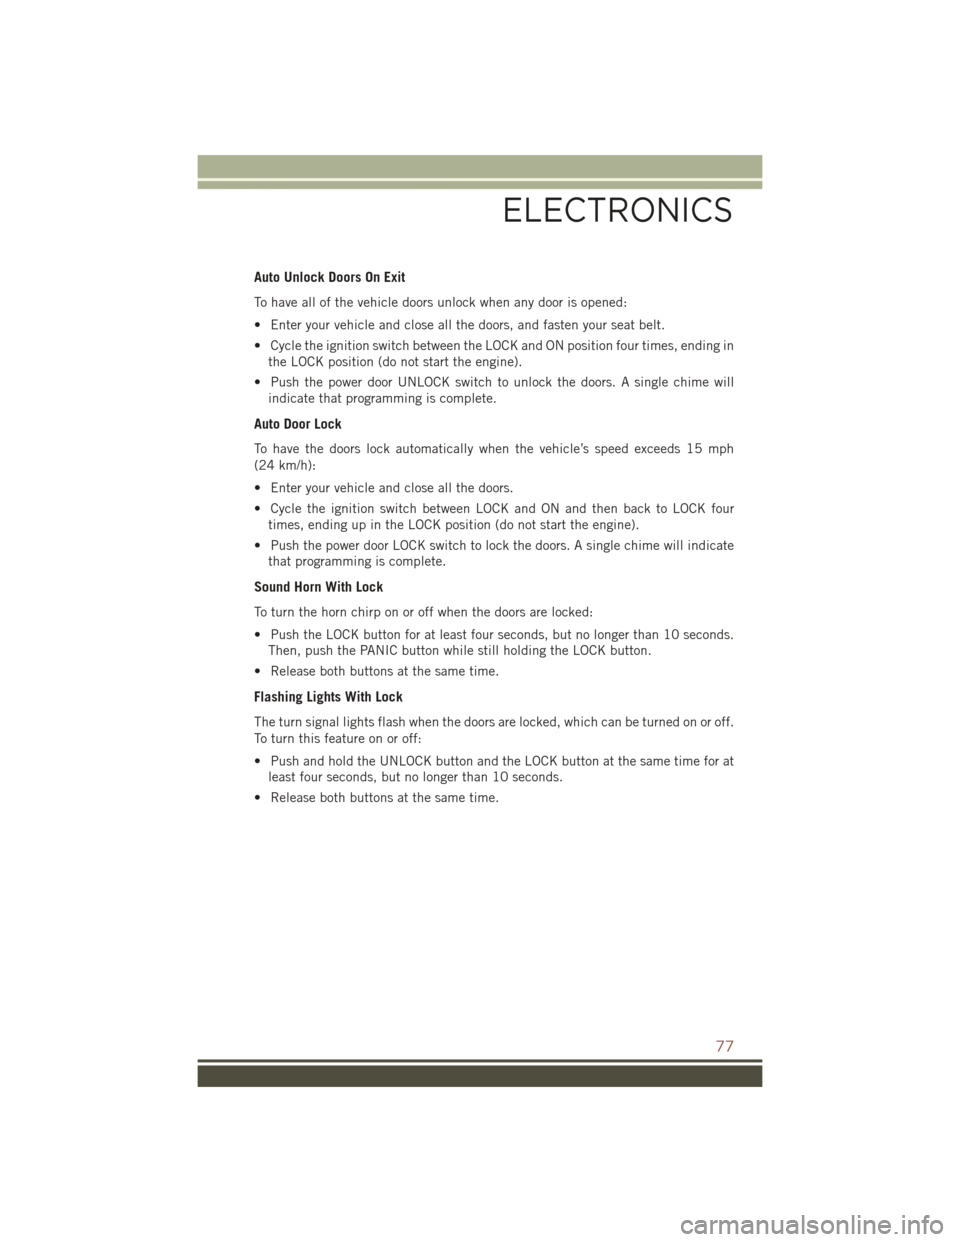
Auto Unlock Doors On Exit
To have all of the vehicle doors unlock when any door is opened:
• Enter your vehicle and close all the doors, and fasten your seat belt.
• Cycle the ignition switch between the LOCK and ON position four times, ending inthe LOCK position (do not start the engine).
• Push the power door UNLOCK switch to unlock the doors. A single chime will indicate that programming is complete.
Auto Door Lock
To have the doors lock automatically when the vehicle’s speed exceeds 15 mph
(24 km/h):
• Enter your vehicle and close all the doors.
• Cycle the ignition switch between LOCK and ON and then back to LOCK fourtimes, ending up in the LOCK position (do not start the engine).
• Push the power door LOCK switch to lock the doors. A single chime will indicate that programming is complete.
Sound Horn With Lock
To turn the horn chirp on or off when the doors are locked:
• Push the LOCK button for at least four seconds, but no longer than 10 seconds.Then, push the PANIC button while still holding the LOCK button.
• Release both buttons at the same time.
Flashing Lights With Lock
The turn signal lights flash when the doors are locked, which can be turned on or off.
To turn this feature on or off:
• Push and hold the UNLOCK button and the LOCK button at the same time for at least four seconds, but no longer than 10 seconds.
• Release both buttons at the same time.
ELECTRONICS
77
Page 93 of 148
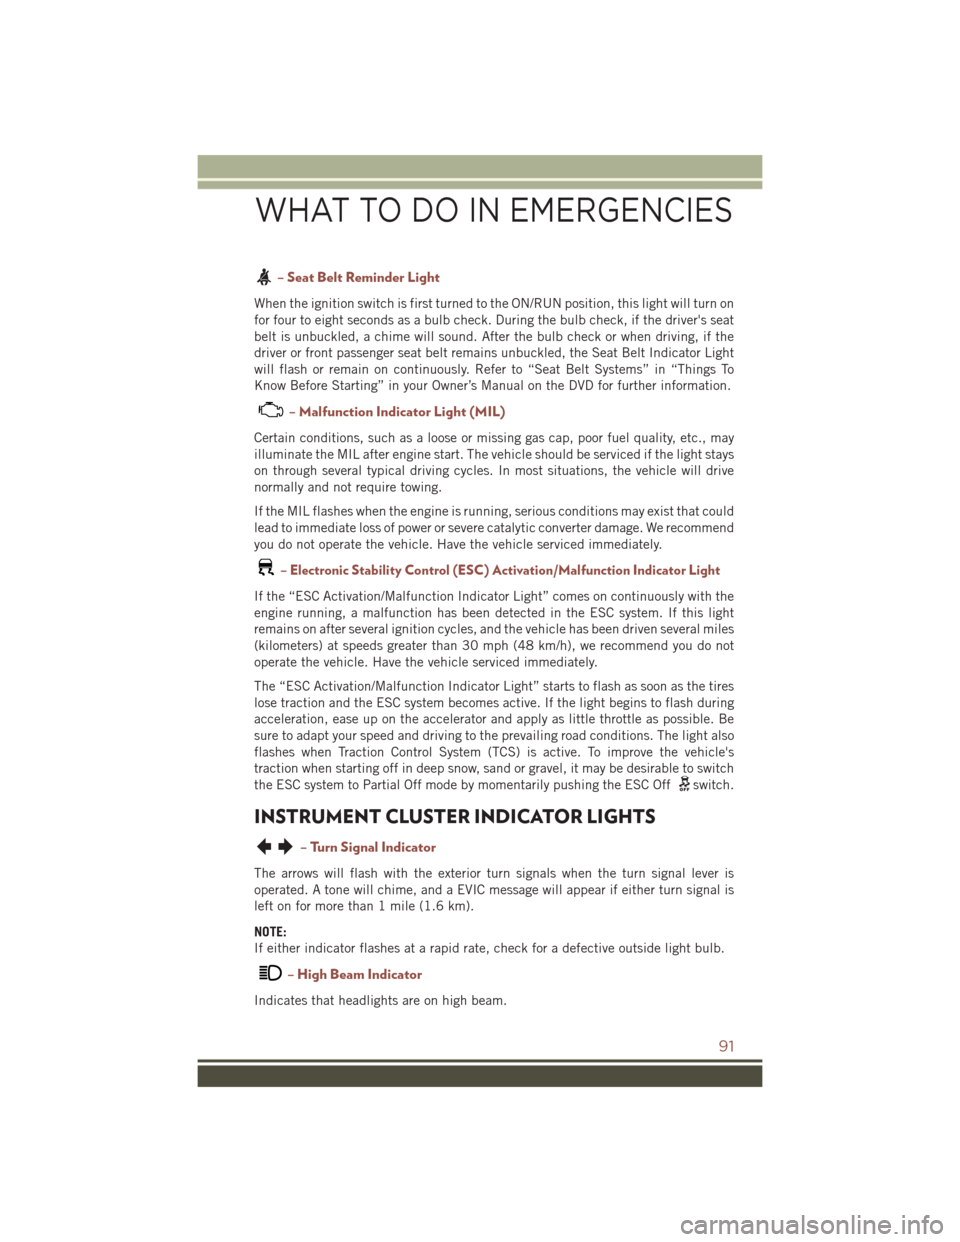
– Seat Belt Reminder Light
When the ignition switch is first turned to the ON/RUN position, this light will turn on
for four to eight seconds as a bulb check. During the bulb check, if the driver's seat
belt is unbuckled, a chime will sound. After the bulb check or when driving, if the
driver or front passenger seat belt remains unbuckled, the Seat Belt Indicator Light
will flash or remain on continuously. Refer to “Seat Belt Systems” in “Things To
Know Before Starting” in your Owner’s Manual on the DVD for further information.
– Malfunction Indicator Light (MIL)
Certain conditions, such as a loose or missing gas cap, poor fuel quality, etc., may
illuminate the MIL after engine start. The vehicle should be serviced if the light stays
on through several typical driving cycles. In most situations, the vehicle will drive
normally and not require towing.
If the MIL flashes when the engine is running, serious conditions may exist that could
lead to immediate loss of power or severe catalytic converter damage. We recommend
you do not operate the vehicle. Have the vehicle serviced immediately.
–Electronic Stability Control (ESC) Activation/Malfunction Indicator Light
If the “ESC Activation/Malfunction Indicator Light” comes on continuously with the
engine running, a malfunction has been detected in the ESC system. If this light
remains on after several ignition cycles, and the vehicle has been driven several miles
(kilometers) at speeds greater than 30 mph (48 km/h), we recommend you do not
operate the vehicle. Have the vehicle serviced immediately.
The “ESC Activation/Malfunction Indicator Light” starts to flash as soon as the tires
lose traction and the ESC system becomes active. If the light begins to flash during
acceleration, ease up on the accelerator and apply as little throttle as possible. Be
sure to adapt your speed and driving to the prevailing road conditions. The light also
flashes when Traction Control System (TCS) is active. To improve the vehicle's
traction when starting off in deep snow, sand or gravel, it may be desirable to switch
the ESC system to Partial Off mode by momentarily pushing the ESC Off
switch.
INSTRUMENT CLUSTER INDICATOR LIGHTS
– Turn Signal Indicator
The arrows will flash with the exterior turn signals when the turn signal lever is
operated. A tone will chime, and a EVIC message will appear if either turn signal is
left on for more than 1 mile (1.6 km).
NOTE:
If either indicator flashes at a rapid rate, check for a defective outside light bulb.
– High Beam Indicator
Indicates that headlights are on high beam.
WHAT TO DO IN EMERGENCIES
91
Page 136 of 148
Four Wheel Drive Operation......83
Freeing A Stuck Vehicle .......107
Fuel Capacity ..............114
Octane Rating ..........114
Tank Capacity ..........114
Fuses..................121
Garage Door Opener (HomeLink) ...........78,80
Gasoline(Fuel) ............114
Gear Select Lever Override ......105
GeneralMaintenance.........116
Glass Cleaning ............116
GPS Navigation (Uconnect GPS) . . .63
Hard Drive (HDD) ............57
Headlights Cleaning .............116
High Beam/Low Beam Select
Switch ...............31
OnWithWipers ..........33
Passing ...............31
Switch ...............30
Head Restraints ............22
Heated Mirrors ...........38,39
Heated Seats ..............27
High Beam Indicator ..........91
High Beam/Low Beam Select (Dimmer) Switch ..........31
HomeLink Operation ..............80
HomeLink (Garage Door Opener).............78,80
Hood Release .............109
Installing A Child Restraint With ALR..................20
Installing Child Restraints Using The LATCH Lower Anchorages .....20
Installing Child Restraints Using The Vehicle Seat Belt ..........20
Instrument Cluster ............8
Indicators ..............8
Instrument Cluster Warning Lights ............8,87,91
Instrument Panel Cover .......116
Instrument Panel Lens Cleaning . .116 Integrated Power Module (Fuses) . .121
Interior And Instrument Lights . . .6, 7
Interior Appearance Care
.......116
Intermittent Wipers (Delay Wipers) . .32
Introduction ...............2
Inverter Outlet (115V) .........81
Inverter, Power .............81
iPod/USB/MP3 Control ........69
Bluetooth Streaming Audio ....75
Jacking Instructions ..........96
Jack Location ..............94
Jack Operation ...........94,96
Jump Starting .............102
KeyFob.................10 Arm The Alarm ...........12
Disarm The Alarm .........12
Lock The Doors ...........10
Panic Alarm ............10
Remote Start ............11
Unlock The Doors .........10
Key Fob Programmable Features . . .76
Lane Change Assist ..........
31
Lap/Shoulder Belts ...........13
Latches Hood ...............109
LATCH (Lower Anchors And Tether For CHildren)...............18
Left Switch Steering Wheel Audio Controls . .68
Liftgate Window Wiper/Washer ....34
LightBulbs ..............126
Lights AirBag ...............17
Cruise ................92
Dimmer Switch,
Headlight ...........30,31
Engine Temperature Warning . . .90
Fog ...............31,92
Four-Wheel Drive Indicator ....92
Headlights .............30
Headlights On With Wipers ....33
Headlight Switch .........30
HighBeam .............31
High Beam Indicator .......91
High Beam/Low Beam Select . .31
INDEX
134
Page 137 of 148
Hill Descent Control Indicator . .92
InstrumentCluster ........30
LowFuel ..............87
SeatBeltReminder ........91
Security Alarm...........92
Tire Pressure Monitoring
(TPMS) ...............88
Transmission Warning .......90
TurnSignal ..........30,31
Locks Liftgate, Tailgate ..........10
Lubrication, Body ...........116
Lumbar Support ............26
Maintenance Free Battery ......116
Maintenance,General ........116
MaintenanceProcedures.......116
Maintenance Record .........120
MaintenanceSchedule........116
Malfunction Indicator Light (Check Engine)................91
Manual Transmission Lubricant Selection .......115
Master Cylinder (Brakes) .......116
MediaCenterRadio........49,52
MOPAR Accessories .........129
Multi-Function Control Lever .....30
Navigation ................61
Navigation System (Uconnect GPS) .................61
Navigation Voice Prompt Volume . . .61
New Vehicle Break-In Period .....29
OilChangeIndicator..........92
Oil,Engine ........... 114, 116
Capacity ..............114
Change Interval .........116
Checking .............116
Disposal ..............116
Filter ............ 114, 116
Filter Disposal ..........116
Materials Added To .......116
Recommendation .....114, 116
Viscosity .............116
Oil Filter, Selection ..........116
Oil Pressure Light ...........87 Outlet
Power ................82
Overheating, Engine ..........93
PaintCare...............116
Panic Alarm ...............10
Passing Light ..............31
Phone (Pairing) .............70
Phone (Uconnect) ...........70
Placard, Tire And Loading Information .............123
Power Inverter ...............81
Outlet (Auxiliary Electrical
Outlet) ...............82
Sunroof ...............40
Power Seats Down.................24
Forward ...............24
Rearward ..............24
Tilt ..................24
Up ..................24
Power Steering Fluid .........115
Power Transfer Unit ..........115
Preparation For Jacking ........95
Programmable Electronic Features . .76
Radio Presets ........45,47,50,55
RadioOperation.....45,47,50,55
R
earCamera ..............37
Rear ParkSense System ........37
Rear Seat, Folding ...........26
Rear Wiper/Washer ...........34
Refrigerant ...............116
Remote Keyless Entry (RKE) Arm The Alarm ...........12
Disarm The Alarm .........12
Lock The Doors ...........10
Panic Alarm ............10
Remote Keyless Entry (RKE) . . .10
Unlock The Doors .........10
Remote Starting How To Use Remote Start .....11
KeyFob ...............11
Remote Starting System .....11
Remote Starting System ........11
INDEX
135
Page 138 of 148
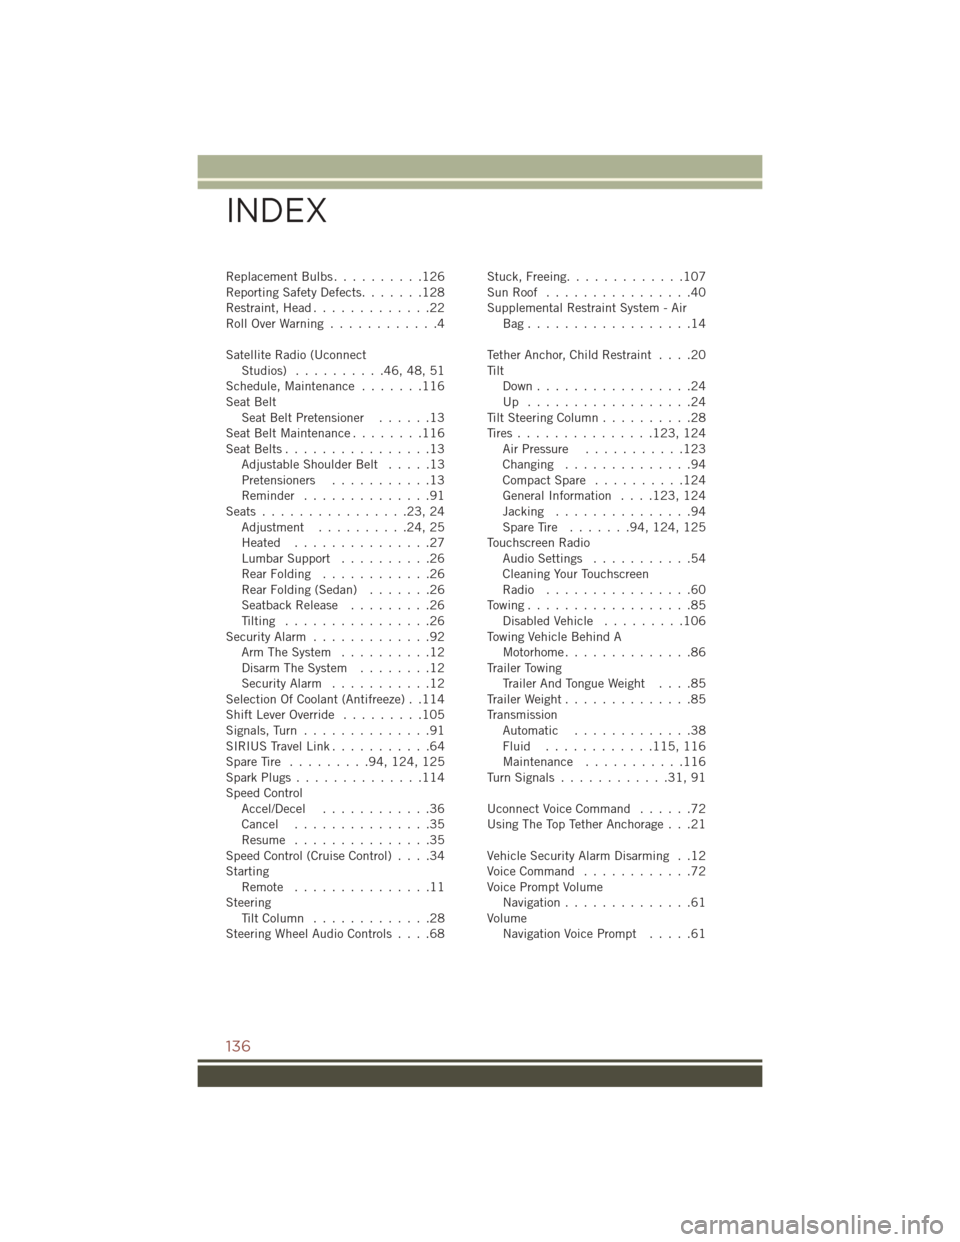
ReplacementBulbs..........126
Reporting Safety Defects.......128
Restraint, Head .............22
RollOverWarning ............4
Satellite Radio (Uconnect Studios) ..........46,48,51
Schedule, Maintenance .......116
Seat Belt Seat Belt Pretensioner ......13
SeatBeltMaintenance........116
Seat Belts ................13
AdjustableShoulderBelt .....13
Pretensioners ...........13
Reminder ..............91
Seats................23,24 Adjustment ..........24,25
Heated ...............27
Lumbar Support ..........26
RearFolding ............26
RearFolding(Sedan) .......26
Seatback Release .........26
Tilting ................26
Security Alarm .............92
Arm The System ..........12
Disarm The System ........12
Security Alarm ...........12
Selection Of Coolant (Antifreeze) . .114
Shift Lever Override .........105
Signals, Turn ..............91
SIRIUSTravelLink...........64
Spare Tire .........94, 124, 125
Spark Plugs ..............114
Speed Control Accel/Decel ............36
Cancel ...............35
Resume ...............35
Speed Control (Cruise Control) ....34
Starting Remote ...............11
Steering TiltColumn .............28
Steering Wheel Audio Controls ....68Stuck, Freeing
.............107
SunRoof ................40
Supplemental Restraint System - Air Bag..................14
Tether Anchor, Child Restraint ....20
Tilt Down .................24
Up ..................24
Tilt Steering Column ..........28
Tires ............... 123, 124
Air Pressure ...........123
Changing ..............94
Compact Spare ..........124
General Information ....123, 124
Jacking ...............94
SpareTire .......94, 124, 125
Touchscreen Radio Audio Settings ...........54
Cleaning Your Touchscreen
Radio ................60
Towing..................85 Disabled Vehicle .........106
Towing Vehicle Behind A Motorhome ..............86
Trailer Towing Trailer And Tongue Weight ....85
T
railer Weight ..............85
Transmission Automatic .............38
Fluid ............ 115, 116
Maintenance ...........116
TurnSignals............31,91
Uconnect Voice Command ......72
Using The Top Tether Anchorage . . .21
Vehicle Security Alarm Disarming . .12
Voice Command ............72
Voice Prompt Volume Navigation ..............61
Volume Navigation Voice Prompt .....61
INDEX
136