clock JEEP COMPASS 2016 1.G User Guide
[x] Cancel search | Manufacturer: JEEP, Model Year: 2016, Model line: COMPASS, Model: JEEP COMPASS 2016 1.GPages: 148, PDF Size: 8.42 MB
Page 34 of 148
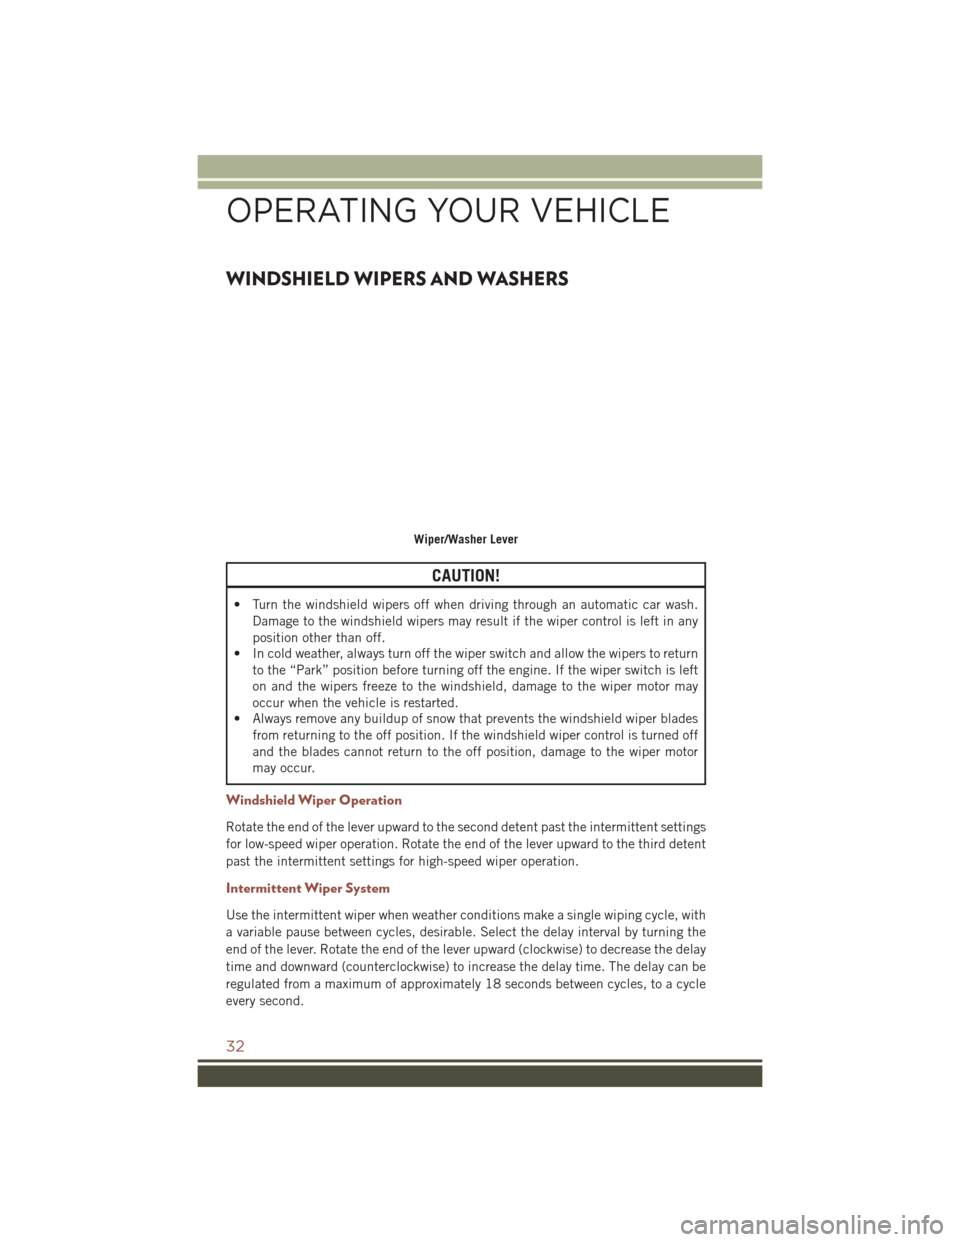
WINDSHIELD WIPERS AND WASHERS
CAUTION!
• Turn the windshield wipers off when driving through an automatic car wash.Damage to the windshield wipers may result if the wiper control is left in any
position other than off.
• In cold weather, always turn off the wiper switch and allow the wipers to return
to the “Park” position before turning off the engine. If the wiper switch is left
on and the wipers freeze to the windshield, damage to the wiper motor may
occur when the vehicle is restarted.
• Always remove any buildup of snow that prevents the windshield wiper blades
from returning to the off position. If the windshield wiper control is turned off
and the blades cannot return to the off position, damage to the wiper motor
may occur.
Windshield Wiper Operation
Rotate the end of the lever upward to the second detent past the intermittent settings
for low-speed wiper operation. Rotate the end of the lever upward to the third detent
past the intermittent settings for high-speed wiper operation.
Intermittent Wiper System
Use the intermittent wiper when weather conditions make a single wiping cycle, with
a variable pause between cycles, desirable. Select the delay interval by turning the
end of the lever. Rotate the end of the lever upward (clockwise) to decrease the delay
time and downward (counterclockwise) to increase the delay time. The delay can be
regulated from a maximum of approximately 18 seconds between cycles, to a cycle
every second.
Wiper/Washer Lever
OPERATING YOUR VEHICLE
32
Page 46 of 148
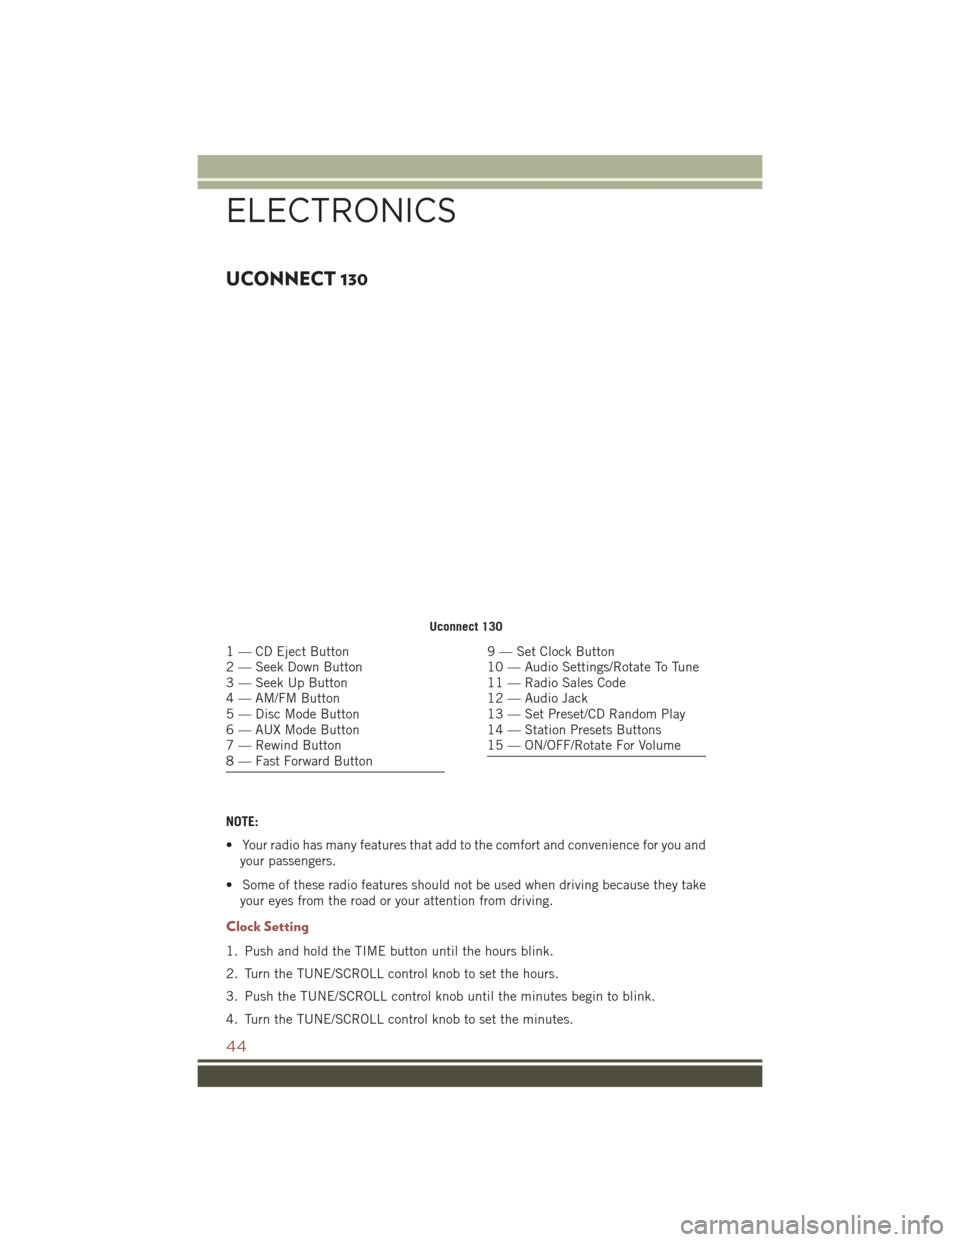
UCONNECT 130
NOTE:
• Your radio has many features that add to the comfort and convenience for you andyour passengers.
• Some of these radio features should not be used when driving because they take your eyes from the road or your attention from driving.
Clock Setting
1. Push and hold the TIME button until the hours blink.
2. Turn the TUNE/SCROLL control knob to set the hours.
3. Push the TUNE/SCROLL control knob until the minutes begin to blink.
4. Turn the TUNE/SCROLL control knob to set the minutes.
Uconnect 130
1 — CD Eject Button
2 — Seek Down Button
3 — Seek Up Button
4 — AM/FM Button
5 — Disc Mode Button
6 — AUX Mode Button
7 — Rewind Button
8 — Fast Forward Button9 — Set Clock Button
10 — Audio Settings/Rotate To Tune
11 — Radio Sales Code
12 — Audio Jack
13 — Set Preset/CD Random Play
14 — Station Presets Buttons
15 — ON/OFF/Rotate For Volume
ELECTRONICS
44
Page 48 of 148
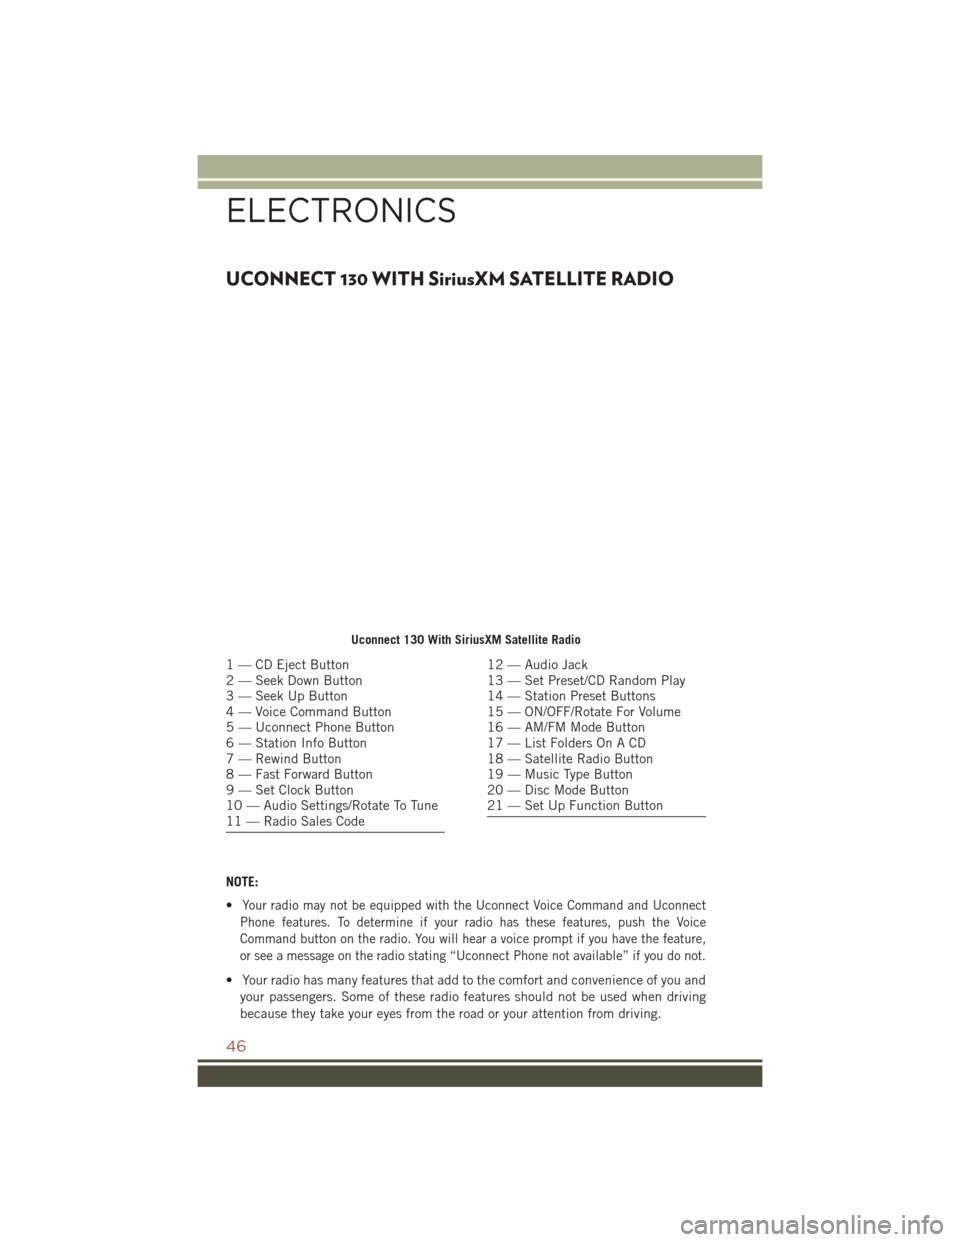
UCONNECT 130 WITH SiriusXM SATELLITE RADIO
NOTE:
•
Your radio may not be equipped with the Uconnect Voice Command and Uconnect
Phone features. To determine if your radio has these features, push the Voice
Command button on the radio. You will hear a voice prompt if you have the feature,
or see a message on the radio stating “Uconnect Phone not available” if you do not.
• Your radio has many features that add to the comfort and convenience of you and your passengers. Some of these radio features should not be used when driving
because they take your eyes from the road or your attention from driving.
Uconnect 130 With SiriusXM Satellite Radio
1 — CD Eject Button
2 — Seek Down Button
3 — Seek Up Button
4 — Voice Command Button
5 — Uconnect Phone Button
6 — Station Info Button
7 — Rewind Button
8 — Fast Forward Button
9 — Set Clock Button
10 — Audio Settings/Rotate To Tune
11 — Radio Sales Code12 — Audio Jack
13 — Set Preset/CD Random Play
14 — Station Preset Buttons
15 — ON/OFF/Rotate For Volume
16 — AM/FM Mode Button
17 — List Folders On A CD
18 — Satellite Radio Button
19 — Music Type Button
20 — Disc Mode Button
21 — Set Up Function Button
ELECTRONICS
46
Page 49 of 148
Clock Setting
1. Push and hold the TIME button until the hours blink.
2. Turn the TUNE/SCROLL control knob to set the hours.
3. Push the TUNE/SCROLL control knob until the minutes begin to blink.
4. Turn the TUNE/SCROLL control knob to set the minutes.
5. Push the TUNE/SCROLL control knob to save the changes.
6. Push any button/knob or wait five seconds to exit.
Equalizer, Balance And Fade
1. Push the TUNE/SCROLL control knob and “BASS” will display.
2. Rotate the TUNE/SCROLL control knob to select the desired setting.
3. Continue pushing the TUNE/SCROLL control knob to display and set “MIDRANGE,” “TREBLE,” “BALANCE” and “FADE.”
Radio Operation
Seek Up/Down Buttons
• Push the seek up or down button to seek through radio stations in AM, FM, or SATbands.
• Hold either button to bypass stations without stopping.
Store Radio Presets Manually
• Tune to the desired station.
• Push the SET/RND or SET (depending on the radio) button once and SET 1 will show in the display. Then select a preset button (1–6).
• A second station may be added to each push button. Push the SET/RND or SET (depending on the radio) button twice and SET 2 will show in the display. Then
select a preset button (1–6).
Music Type
NOTE:
The Music Type function only operates when in FM mode.
• Push the MUSIC TYPE button to activate this mode. Push the MUSIC TYPE button again or turn the TUNE/SCROLL control knob to select the desired music type
(Adult Hits, Country, Jazz, Oldies, Rock, etc.).
• When a music type is chosen and the Music type is displayed, Push either SEEK button and the radio will only search for stations with the selected music type.
SETUP Button
• Pushing the SETUP button allows you to select between items that are available in that particular mode.
• Turn the TUNE/SCROLL control knob to scroll through the entries. Push the AUDIO/SELECT button to select an entry and make changes.
ELECTRONICS
47
Page 51 of 148
UCONNECT 230
NOTE:
•
Your radio may not be equipped with the Uconnect Voice Command and Uconnect
Phone features. To determine if your radio has these features, push the Voice
Command button on the radio. You will hear a voice prompt if you have the feature,
or see a message on the radio stating “Uconnect Phone not available” if you do not.
• Your radio has many features that add to the comfort and convenience of you and your passengers. Some of these radio features should not be used when driving
because they take your eyes from the road or your attention from driving.
Uconnect 230
1 — CD Eject Button
2 — Seek Down Button
3 — Seek Up Button
4 — Scan Radio Stations Button
5 — Voice Command Button
6 — Uconnect Phone Button
7 — Set Clock Button
8 — Station Info Button
9 — Rewind Button
10 — Fast Forward Button
11 — Push To Load CD’s
12 — Audio Settings/Rotate To Tune13 — Audio Jack
14 — Radio Sales Code
15 — AUX Mode Button
16 — Station Preset Buttons
17 — Set Preset Button
18 — ON/OFF/Rotate For Volume
19 — AM/FM Button
20 — List Folders On CD
21 — Satellite Mode Button
22 — Music Type Button
23 — Disc Mode Button
24 — Set Up Functions Button
ELECTRONICS
49
Page 52 of 148
Clock Setting
1. Push and hold the TIME button until the hours blink.
2. Turn the TUNE/SCROLL control knob to set the hours.
3. Push the TUNE/SCROLL control knob until the minutes begin to blink.
4. Turn the TUNE/SCROLL control knob to set the minutes.
5. Push the TUNE/SCROLL control knob to save the changes.
6. Push any button/knob or wait five seconds to exit.
Equalizer, Balance And Fade
1. Push the TUNE/SCROLL control knob and “BASS” will display.
2. Rotate the TUNE/SCROLL control knob to select the desired setting.
3. Continue pushing the TUNE/SCROLL control knob to display and set “MIDRANGE,” “TREBLE,” “BALANCE” and “FADE.”
Radio Operation
Seek Up/Down Buttons
• Push the seek up or down button to seek through radio stations in AM, FM, or SATbands.
• Hold either button to bypass stations without stopping.
Store Radio Presets Manually
• Tune to the desired station
• Push the SET button once and SET 1 will show in the display. Then select button (1–6).
• A second station may be added to each push button. Push the SET button twice and SET 2 will show in the display. Then select button (1–6).
Music Type
NOTE:
The Music Type function only operates when in FM mode.
• Push the MUSIC TYPE button to activate this mode. Push the MUSIC TYPE button again or turn the TUNE/SCROLL control knob to select the desired music type
(Adult Hits, Country, Jazz, Oldies, Rock, etc.).
• Once a music type is chosen and the music type is displayed, push the SEEK button and the radio will only search for stations with the selected music type.
SETUP Button
• Pushing the SETUP button allows you to select between items that are available in that particular mode.
• Turn the TUNE/SCROLL control knob to scroll through the entries. Push the AUDIO/SELECT button to select an entry and make changes.
ELECTRONICS
50
Page 55 of 148
Clock Setting
1. Turn the radio on, then press the screen where the time is displayed.
2. Press the “User Clock” button on the touchscreen or the time display (Navigationradio only).
3. To adjust the hours, press either the “Hour Forward” or “Hour Backward” button on the touchscreen.
4. To adjust the minutes, press either the “Minute Forward” or “Minute Backward” button on the touchscreen.
5. To save the new time setting, press the screen where the word “Save” is displayed.
Menu
• Push the MENU button on the faceplate to access the System Setup menu and the My Files menu.
• Push the MENU button on the face- plate in an active mode (SAT, CD, AUX,
etc.) to change mode specific settings.
System Setup Menu
ELECTRONICS
53
Page 103 of 148
Road Tire Installation
Vehicles Equipped With Wheel Covers
1. Mount the road tire on the axle.
2. Align the valve notch in the wheel cover with the valve stem on the wheel. Installthe cover by hand. Do not use a hammer or excessive force to install the cover.
3. Install the five wheel lug nuts with the cone shaped end of the nut toward the
wheel. Lightly tighten the lug nuts.
WARNING!
To avoid the risk of forcing the vehicle off the jack, do not tighten the lug nuts fully
until the vehicle has been lowered. Failure to follow this warning may result in
serious injury.
4. Lower the vehicle to the ground by turning the jack handle counterclockwise.
5. Finish tightening the lug nuts. Push down on the wrench while at the end of the handle for increased leverage. Tighten the lug nuts in a star pattern until each nut
has been tightened twice. The correct tightness of each lug nut is 100 ft/lbs
(135 N·m). If in doubt about the correct tightness, have them checked with a
torque wrench by your authorized dealer or service station.
6. After 25 miles (40 km) check the lug nut torque with a torque wrench to ensure that all lug nuts are properly seated against the wheel.
Wheel Cover Installation
1 — Valve Stem
2 — Valve Notch
3 — Wheel Lug Nut
4 — Wheel Cover
5 — Mounting Stud
WHAT TO DO IN EMERGENCIES
101
Page 104 of 148
Vehicles Without Wheel Covers
1. Mount the road tire on the axle.
2. Install the remaining lug nuts with the cone shaped end of the nut toward thewheel. Lightly tighten the lug nuts.
WARNING!
To avoid the risk of forcing the vehicle off the jack, do not fully tighten the lug nuts
until the vehicle has been lowered. Failure to follow this warning may result in
serious injury.
3. Lower the vehicle to the ground by turning the jack handle counterclockwise.
4. Finish tightening the lug nuts. Push down on the wrench while at the end of the handle for increased leverage. Tighten the lug nuts in a star pattern until each nut
has been tightened twice. The correct tightness of each lug nut is 100 ft/lbs
(135 N·m). If in doubt about the correct tightness, have them checked with a
torque wrench by your authorized dealer or service station.
5. After 25 miles (40 km) check the lug nut torque with a torque wrench to ensure that all lug nuts are properly seated against the wheel.
JUMP-STARTING PROCEDURES
If your vehicle has a discharged battery it can be jump-started using a set of jumper
cables and a battery in another vehicle or by using a portable battery booster pack.
Jump-starting can be dangerous if done improperly so please follow the procedures
in this section carefully.
NOTE:
When using a portable battery booster pack follow the manufacturer’s operating
instructions and precautions.
CAUTION!
Do not use a portable battery booster pack or any other booster source with a
system voltage greater than 12 Volts or damage to the battery, starter motor,
alternator or electrical system may occur.
WARNING!
Do not attempt jump-starting if the battery is frozen. It could rupture or explode
and cause personal injury.
WHAT TO DO IN EMERGENCIES
102
Page 123 of 148
FUSES
WARNING!
• When replacing a blown fuse, always use an appropriate replacement fuse withthe same amp rating as the original fuse. Never replace a fuse with another
fuse of higher amp rating. Never replace a blown fuse with metal wires or any
other material. Failure to use proper fuses may result in serious personal injury,
fire and/or property damage.
• Before replacing a fuse, make sure that the ignition is off and that all the other
services are switched off and/or disengaged.
• If the replaced fuse blows again, contact an authorized dealer.
• If a general protection fuse for safety systems (air bag system, braking system),
power unit systems (engine system, gearbox system) or steering system blows,
contact an authorized dealer.
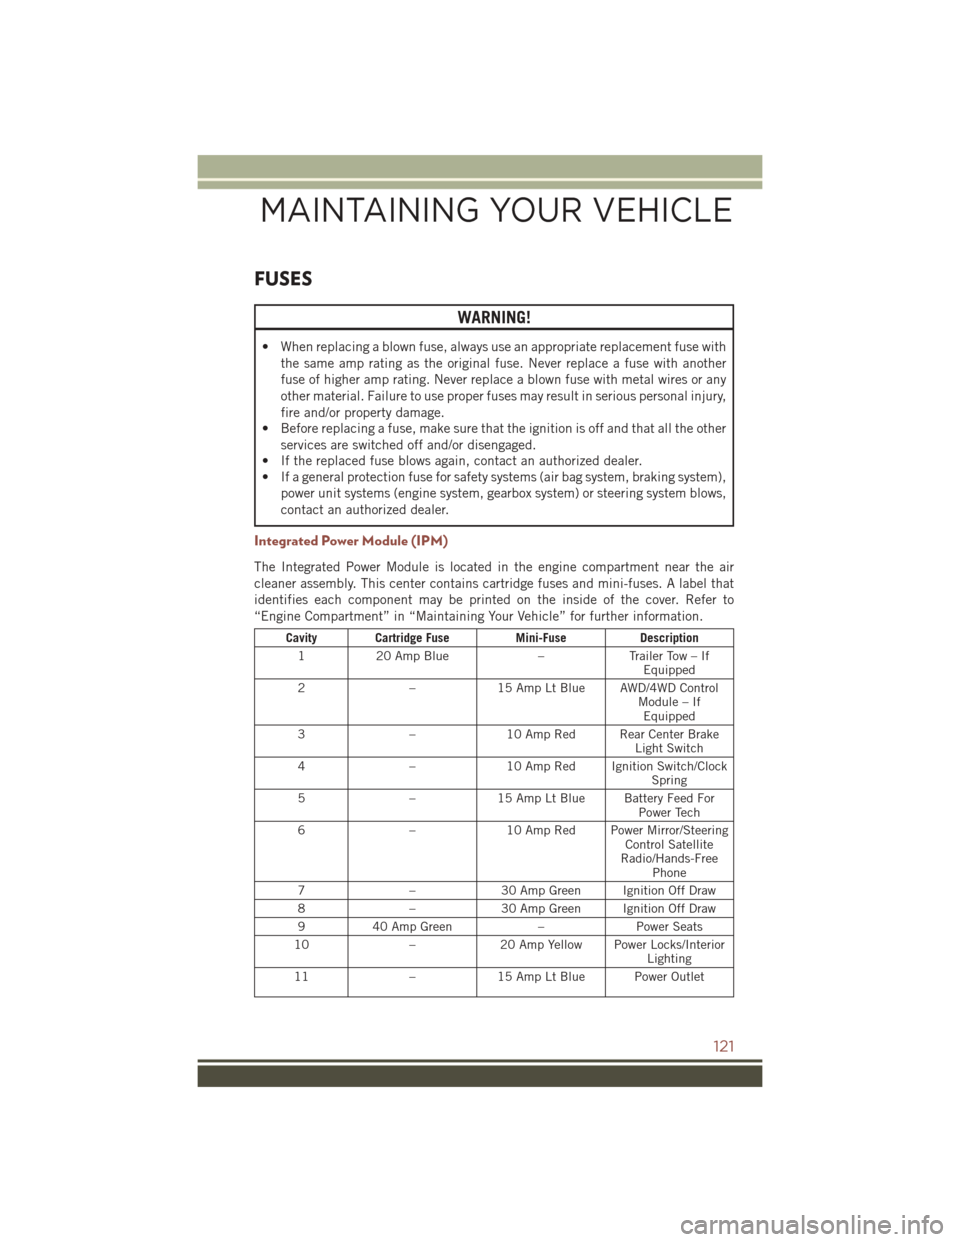
Integrated Power Module (IPM)
The Integrated Power Module is located in the engine compartment near the air
cleaner assembly. This center contains cartridge fuses and mini-fuses. A label that
identifies each component may be printed on the inside of the cover. Refer to
“Engine Compartment” in “Maintaining Your Vehicle” for further information.
Cavity Cartridge Fuse Mini-FuseDescription
1 20 Amp Blue –Trailer Tow – If
Equipped
2 –15 Amp Lt Blue AWD/4WD Control
Module – IfEquipped
3 –10 Amp Red Rear Center Brake
Light Switch
4 –10 Amp Red Ignition Switch/Clock
Spring
5 –15 Amp Lt Blue Battery Feed For
Power Tech
6 –10 Amp Red Power Mirror/Steering
Control Satellite
Radio/Hands-Free Phone
7 –30 Amp Green Ignition Off Draw
8 –30 Amp Green Ignition Off Draw
9 40 Amp Green –Power Seats
10 –20 Amp Yellow Power Locks/Interior
Lighting
11 –15 Amp Lt Blue Power Outlet
MAINTAINING YOUR VEHICLE
121