check engine JEEP COMPASS 2016 1.G User Guide
[x] Cancel search | Manufacturer: JEEP, Model Year: 2016, Model line: COMPASS, Model: JEEP COMPASS 2016 1.GPages: 148, PDF Size: 8.42 MB
Page 18 of 148
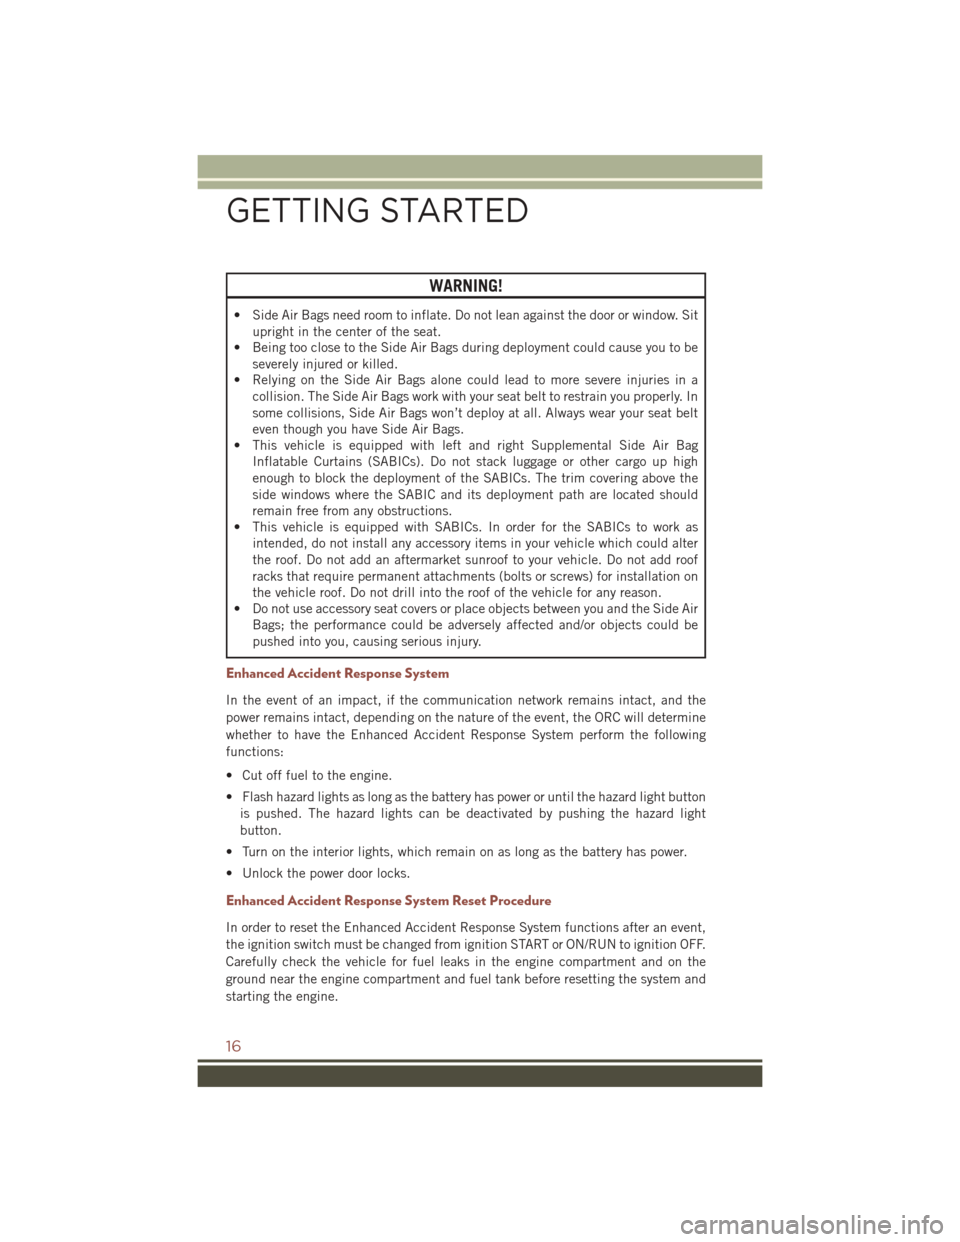
WARNING!
• Side Air Bags need room to inflate. Do not lean against the door or window. Situpright in the center of the seat.
• Being too close to the Side Air Bags during deployment could cause you to be
severely injured or killed.
• Relying on the Side Air Bags alone could lead to more severe injuries in a
collision. The Side Air Bags work with your seat belt to restrain you properly. In
some collisions, Side Air Bags won’t deploy at all. Always wear your seat belt
even though you have Side Air Bags.
• This vehicle is equipped with left and right Supplemental Side Air Bag
Inflatable Curtains (SABICs). Do not stack luggage or other cargo up high
enough to block the deployment of the SABICs. The trim covering above the
side windows where the SABIC and its deployment path are located should
remain free from any obstructions.
• This vehicle is equipped with SABICs. In order for the SABICs to work as
intended, do not install any accessory items in your vehicle which could alter
the roof. Do not add an aftermarket sunroof to your vehicle. Do not add roof
racks that require permanent attachments (bolts or screws) for installation on
the vehicle roof. Do not drill into the roof of the vehicle for any reason.
• Do not use accessory seat covers or place objects between you and the Side Air
Bags; the performance could be adversely affected and/or objects could be
pushed into you, causing serious injury.
Enhanced Accident Response System
In the event of an impact, if the communication network remains intact, and the
power remains intact, depending on the nature of the event, the ORC will determine
whether to have the Enhanced Accident Response System perform the following
functions:
• Cut off fuel to the engine.
• Flash hazard lights as long as the battery has power or until the hazard light button
is pushed. The hazard lights can be deactivated by pushing the hazard light
button.
• Turn on the interior lights, which remain on as long as the battery has power.
• Unlock the power door locks.
Enhanced Accident Response System Reset Procedure
In order to reset the Enhanced Accident Response System functions after an event,
the ignition switch must be changed from ignition START or ON/RUN to ignition OFF.
Carefully check the vehicle for fuel leaks in the engine compartment and on the
ground near the engine compartment and fuel tank before resetting the system and
starting the engine.
GETTING STARTED
16
Page 19 of 148
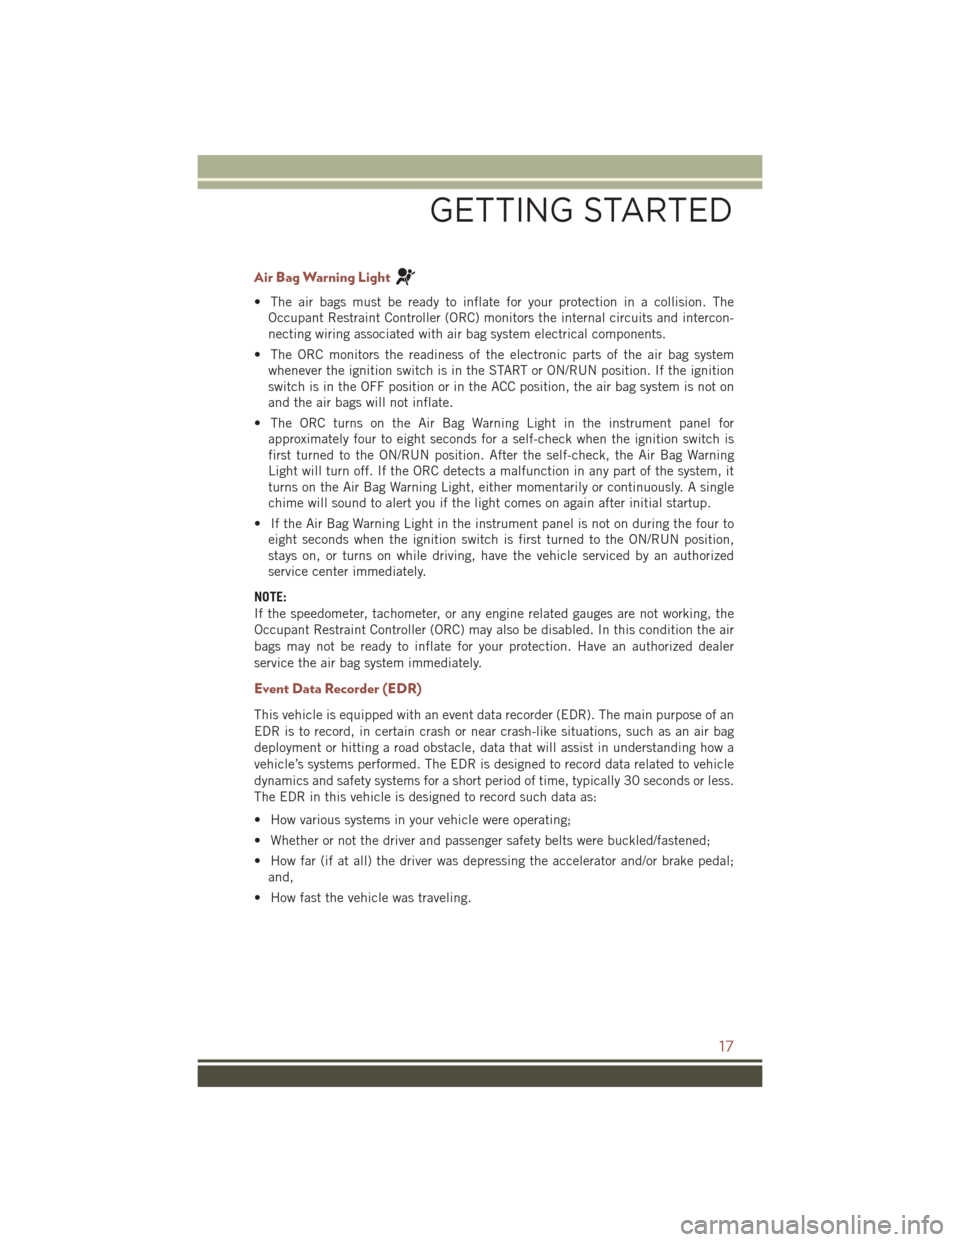
Air Bag Warning Light
• The air bags must be ready to inflate for your protection in a collision. TheOccupant Restraint Controller (ORC) monitors the internal circuits and intercon-
necting wiring associated with air bag system electrical components.
• The ORC monitors the readiness of the electronic parts of the air bag system whenever the ignition switch is in the START or ON/RUN position. If the ignition
switch is in the OFF position or in the ACC position, the air bag system is not on
and the air bags will not inflate.
• The ORC turns on the Air Bag Warning Light in the instrument panel for approximately four to eight seconds for a self-check when the ignition switch is
first turned to the ON/RUN position. After the self-check, the Air Bag Warning
Light will turn off. If the ORC detects a malfunction in any part of the system, it
turns on the Air Bag Warning Light, either momentarily or continuously. A single
chime will sound to alert you if the light comes on again after initial startup.
• If the Air Bag Warning Light in the instrument panel is not on during the four to eight seconds when the ignition switch is first turned to the ON/RUN position,
stays on, or turns on while driving, have the vehicle serviced by an authorized
service center immediately.
NOTE:
If the speedometer, tachometer, or any engine related gauges are not working, the
Occupant Restraint Controller (ORC) may also be disabled. In this condition the air
bags may not be ready to inflate for your protection. Have an authorized dealer
service the air bag system immediately.
Event Data Recorder (EDR)
This vehicle is equipped with an event data recorder (EDR). The main purpose of an
EDR is to record, in certain crash or near crash-like situations, such as an air bag
deployment or hitting a road obstacle, data that will assist in understanding how a
vehicle’s systems performed. The EDR is designed to record data related to vehicle
dynamics and safety systems for a short period of time, typically 30 seconds or less.
The EDR in this vehicle is designed to record such data as:
• How various systems in your vehicle were operating;
• Whether or not the driver and passenger safety belts were buckled/fastened;
• How far (if at all) the driver was depressing the accelerator and/or brake pedal; and,
• How fast the vehicle was traveling.
GETTING STARTED
17
Page 39 of 148
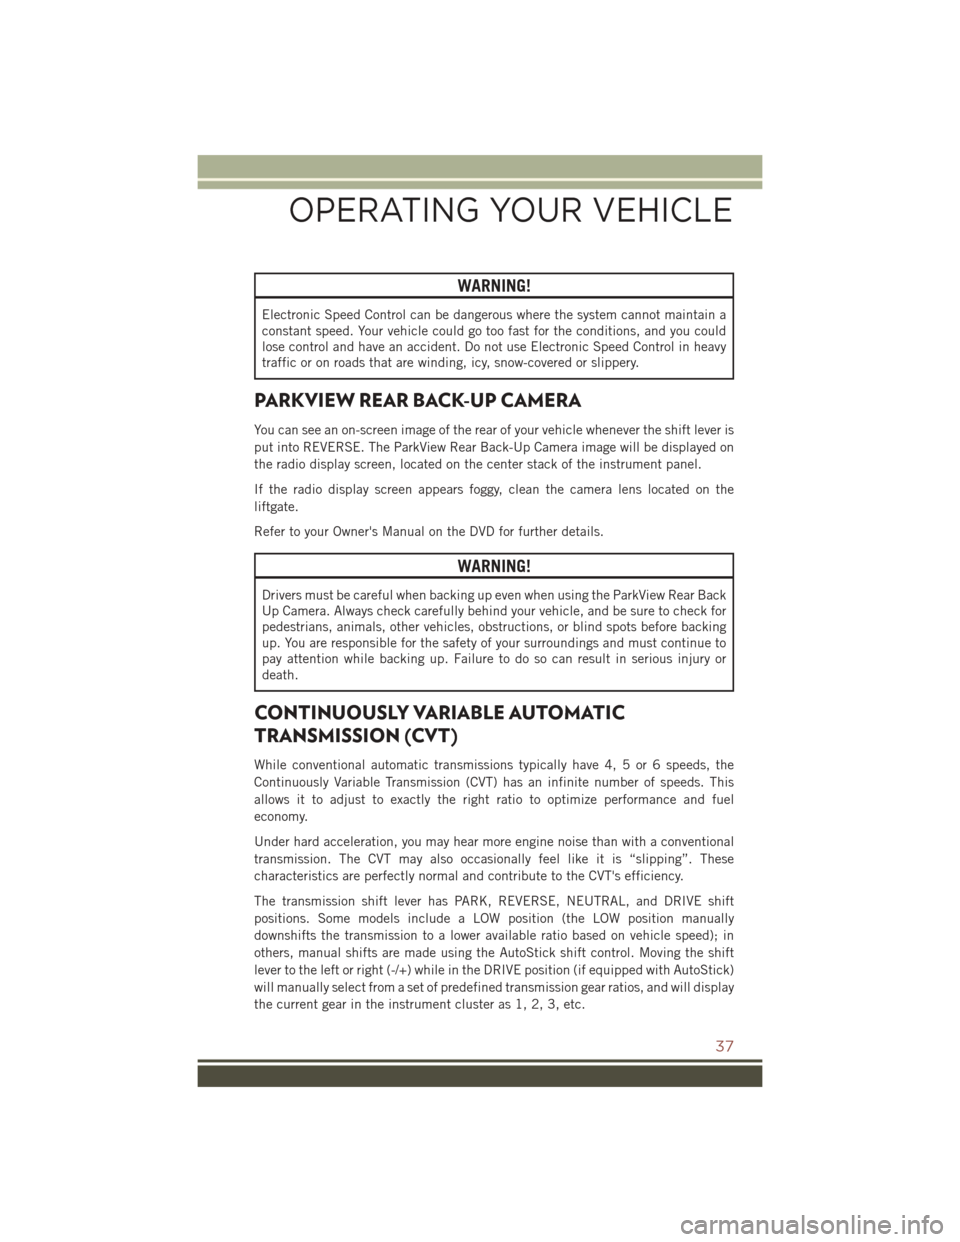
WARNING!
Electronic Speed Control can be dangerous where the system cannot maintain a
constant speed. Your vehicle could go too fast for the conditions, and you could
lose control and have an accident. Do not use Electronic Speed Control in heavy
traffic or on roads that are winding, icy, snow-covered or slippery.
PARKVIEW REAR BACK-UP CAMERA
You can see an on-screen image of the rear of your vehicle whenever the shift lever is
put into REVERSE. The ParkView Rear Back-Up Camera image will be displayed on
the radio display screen, located on the center stack of the instrument panel.
If the radio display screen appears foggy, clean the camera lens located on the
liftgate.
Refer to your Owner's Manual on the DVD for further details.
WARNING!
Drivers must be careful when backing up even when using the ParkView Rear Back
Up Camera. Always check carefully behind your vehicle, and be sure to check for
pedestrians, animals, other vehicles, obstructions, or blind spots before backing
up. You are responsible for the safety of your surroundings and must continue to
pay attention while backing up. Failure to do so can result in serious injury or
death.
CONTINUOUSLY VARIABLE AUTOMATIC
TRANSMISSION (CVT)
While conventional automatic transmissions typically have 4, 5 or 6 speeds, the
Continuously Variable Transmission (CVT) has an infinite number of speeds. This
allows it to adjust to exactly the right ratio to optimize performance and fuel
economy.
Under hard acceleration, you may hear more engine noise than with a conventional
transmission. The CVT may also occasionally feel like it is “slipping”. These
characteristics are perfectly normal and contribute to the CVT's efficiency.
The transmission shift lever has PARK, REVERSE, NEUTRAL, and DRIVE shift
positions. Some models include a LOW position (the LOW position manually
downshifts the transmission to a lower available ratio based on vehicle speed); in
others, manual shifts are made using the AutoStick shift control. Moving the shift
lever to the left or right (-/+) while in the DRIVE position (if equipped with AutoStick)
will manually select from a set of predefined transmission gear ratios, and will display
the current gear in the instrument cluster as 1, 2, 3, etc.
OPERATING YOUR VEHICLE
37
Page 90 of 148
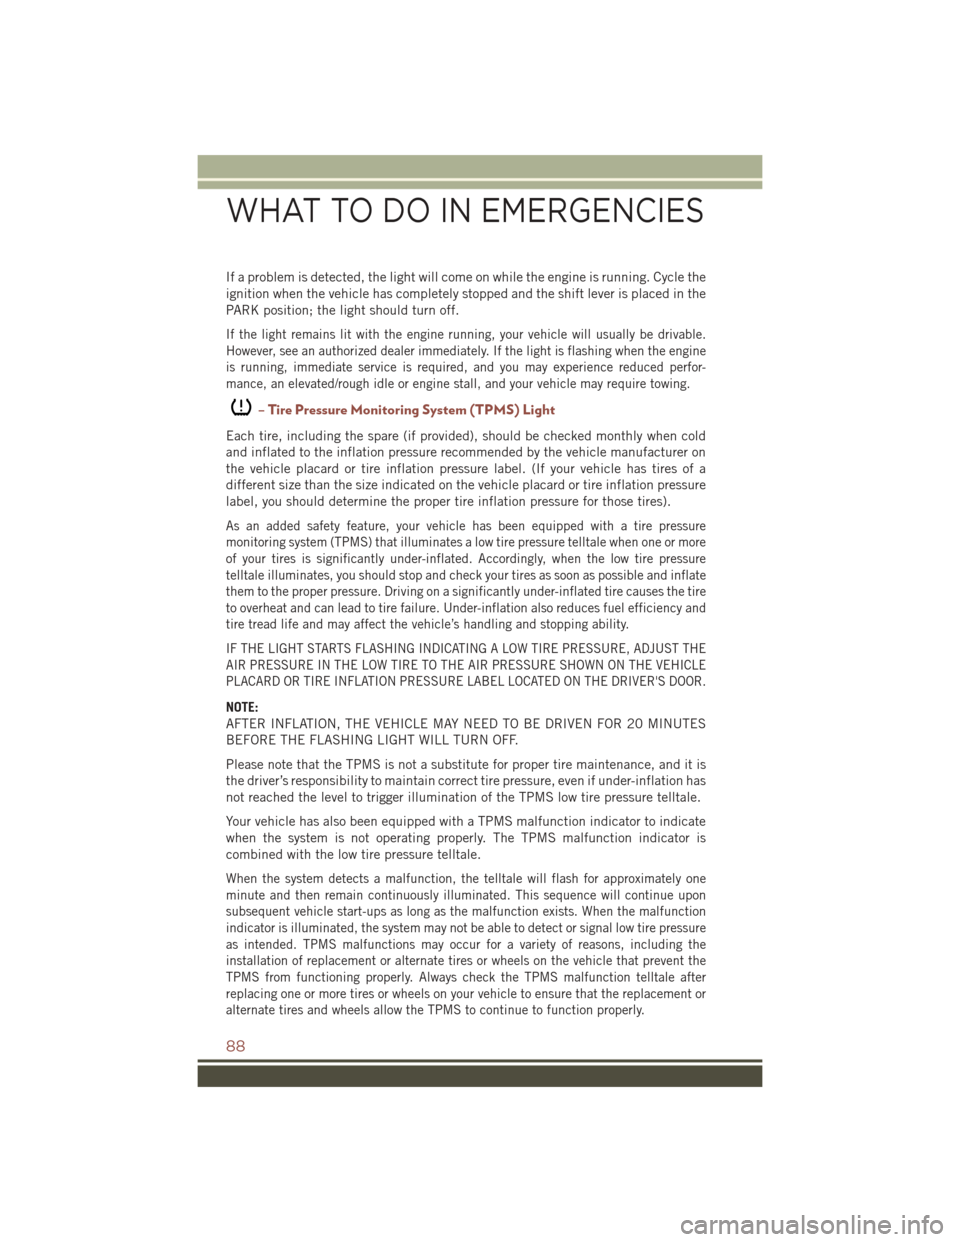
If a problem is detected, the light will come on while the engine is running. Cycle the
ignition when the vehicle has completely stopped and the shift lever is placed in the
PARK position; the light should turn off.
If the light remains lit with the engine running, your vehicle will usually be drivable.
However, see an authorized dealer immediately. If the light is flashing when the engine
is running, immediate service is required, and you may experience reduced perfor-
mance, an elevated/rough idle or engine stall, and your vehicle may require towing.
– Tire Pressure Monitoring System (TPMS) Light
Each tire, including the spare (if provided), should be checked monthly when cold
and inflated to the inflation pressure recommended by the vehicle manufacturer on
the vehicle placard or tire inflation pressure label. (If your vehicle has tires of a
different size than the size indicated on the vehicle placard or tire inflation pressure
label, you should determine the proper tire inflation pressure for those tires).
As an added safety feature, your vehicle has been equipped with a tire pressure
monitoring system (TPMS) that illuminates a low tire pressure telltale when one or more
of your tires is significantly under-inflated. Accordingly, when the low tire pressure
telltale illuminates, you should stop and check your tires as soon as possible and inflate
them to the proper pressure. Driving on a significantly under-inflated tire causes the tire
to overheat and can lead to tire failure. Under-inflation also reduces fuel efficiency and
tire tread life and may affect the vehicle’s handling and stopping ability.
IF THE LIGHT STARTS FLASHING INDICATING A LOW TIRE PRESSURE, ADJUST THE
AIR PRESSURE IN THE LOW TIRE TO THE AIR PRESSURE SHOWN ON THE VEHICLE
PLACARD OR TIRE INFLATION PRESSURE LABEL LOCATED ON THE DRIVER'S DOOR.
NOTE:
AFTER INFLATION, THE VEHICLE MAY NEED TO BE DRIVEN FOR 20 MINUTES
BEFORE THE FLASHING LIGHT WILL TURN OFF.
Please note that the TPMS is not a substitute for proper tire maintenance, and it is
the driver’s responsibility to maintain correct tire pressure, even if under-inflation has
not reached the level to trigger illumination of the TPMS low tire pressure telltale.
Your vehicle has also been equipped with a TPMS malfunction indicator to indicate
when the system is not operating properly. The TPMS malfunction indicator is
combined with the low tire pressure telltale.
When the system detects a malfunction, the telltale will flash for approximately one
minute and then remain continuously illuminated. This sequence will continue upon
subsequent vehicle start-ups as long as the malfunction exists. When the malfunction
indicator is illuminated, the system may not be able to detect or signal low tire pressure
as intended. TPMS malfunctions may occur for a variety of reasons, including the
installation of replacement or alternate tires or wheels on the vehicle that prevent the
TPMS from functioning properly. Always check the TPMS malfunction telltale after
replacing one or more tires or wheels on your vehicle to ensure that the replacement or
alternate tires and wheels allow the TPMS to continue to function properly.
WHAT TO DO IN EMERGENCIES
88
Page 92 of 148
The light also will turn on when the parking brake is applied with the ignition switch
in the ON/RUN position.
NOTE:
This light shows only that the parking brake is applied. It does not show the degree
of brake application.
WARNING!
Driving a vehicle with the red brake light on is dangerous. Part of the brake system
may have failed. It will take longer to stop the vehicle. You could have a collision.
Have the vehicle checked immediately.
– Engine Temperature Warning Light
This light warns of an overheated engine condition.
If the light turns on and a warning chime sounds while driving, safely pull over and
stop the vehicle. If the A/C system is on, turn it off. Also, shift the transmission into
NEUTRAL and idle the vehicle. If the temperature reading does not return to normal,
turn the engine off immediately.
We recommend that you do not operate the vehicle or engine damage will occur. Have
the vehicle serviced immediately.
WARNING!
A hot engine cooling system is dangerous. You or others could be badly burned by
steam or boiling coolant.
– Transmission Temperature Warning Light
This light indicates that there is excessive transmission fluid temperature that might
occur with severe usage such as trailer towing. If this light turns on, you will
experience reduced vehicle performance until the automatic transmission cools
down. If the overheating continues, stop the vehicle and run the engine at idle, with
the transmission in NEUTRAL, until the light turns off. Once the light turns off, you
may continue to drive normally.
CAUTION!
Continuous driving with the Transmission Temperature Warning Light illuminated
will eventually cause severe transmission damage or transmission failure.
WARNING!
If you continue operating the vehicle when the Transmission Temperature Warning
Light is illuminated you could cause the fluid to boil over, come in contact with hot
engine or exhaust components and cause a fire.
WHAT TO DO IN EMERGENCIES
90
Page 93 of 148
– Seat Belt Reminder Light
When the ignition switch is first turned to the ON/RUN position, this light will turn on
for four to eight seconds as a bulb check. During the bulb check, if the driver's seat
belt is unbuckled, a chime will sound. After the bulb check or when driving, if the
driver or front passenger seat belt remains unbuckled, the Seat Belt Indicator Light
will flash or remain on continuously. Refer to “Seat Belt Systems” in “Things To
Know Before Starting” in your Owner’s Manual on the DVD for further information.
– Malfunction Indicator Light (MIL)
Certain conditions, such as a loose or missing gas cap, poor fuel quality, etc., may
illuminate the MIL after engine start. The vehicle should be serviced if the light stays
on through several typical driving cycles. In most situations, the vehicle will drive
normally and not require towing.
If the MIL flashes when the engine is running, serious conditions may exist that could
lead to immediate loss of power or severe catalytic converter damage. We recommend
you do not operate the vehicle. Have the vehicle serviced immediately.
–Electronic Stability Control (ESC) Activation/Malfunction Indicator Light
If the “ESC Activation/Malfunction Indicator Light” comes on continuously with the
engine running, a malfunction has been detected in the ESC system. If this light
remains on after several ignition cycles, and the vehicle has been driven several miles
(kilometers) at speeds greater than 30 mph (48 km/h), we recommend you do not
operate the vehicle. Have the vehicle serviced immediately.
The “ESC Activation/Malfunction Indicator Light” starts to flash as soon as the tires
lose traction and the ESC system becomes active. If the light begins to flash during
acceleration, ease up on the accelerator and apply as little throttle as possible. Be
sure to adapt your speed and driving to the prevailing road conditions. The light also
flashes when Traction Control System (TCS) is active. To improve the vehicle's
traction when starting off in deep snow, sand or gravel, it may be desirable to switch
the ESC system to Partial Off mode by momentarily pushing the ESC Off
switch.
INSTRUMENT CLUSTER INDICATOR LIGHTS
– Turn Signal Indicator
The arrows will flash with the exterior turn signals when the turn signal lever is
operated. A tone will chime, and a EVIC message will appear if either turn signal is
left on for more than 1 mile (1.6 km).
NOTE:
If either indicator flashes at a rapid rate, check for a defective outside light bulb.
– High Beam Indicator
Indicates that headlights are on high beam.
WHAT TO DO IN EMERGENCIES
91
Page 119 of 148
Once A Month Or Before A Long Trip:
• Check engine oil level
• Check windshield washer fluid level
• Check the tire inflation pressures and look for unusual wear or damage
• Check the fluid levels of the coolant reservoir, brake master cylinder, powersteering and fill as needed
• Check function of all interior and exterior lights
Required Maintenance Intervals.
Refer to the maintenance schedules on the following page for the required mainte-
nance intervals.
At Every Oil Change Interval As Indicated By Oil Change Indicator System:
• Change oil and filter.
• Rotate the tires. Rotate at the first sign of irregular wear, even if it occurs before the oil
indicator system turns on.
• Inspect battery and clean and tighten terminals as required.
• Inspect brake pads, shoes, rotors, drums, hoses and park brake.
• Inspect engine cooling system protection and hoses.
• Inspect exhaust system.
• Inspect engine air cleaner if using in dusty or off-road conditions.
MAINTAINING YOUR VEHICLE
117
Page 120 of 148
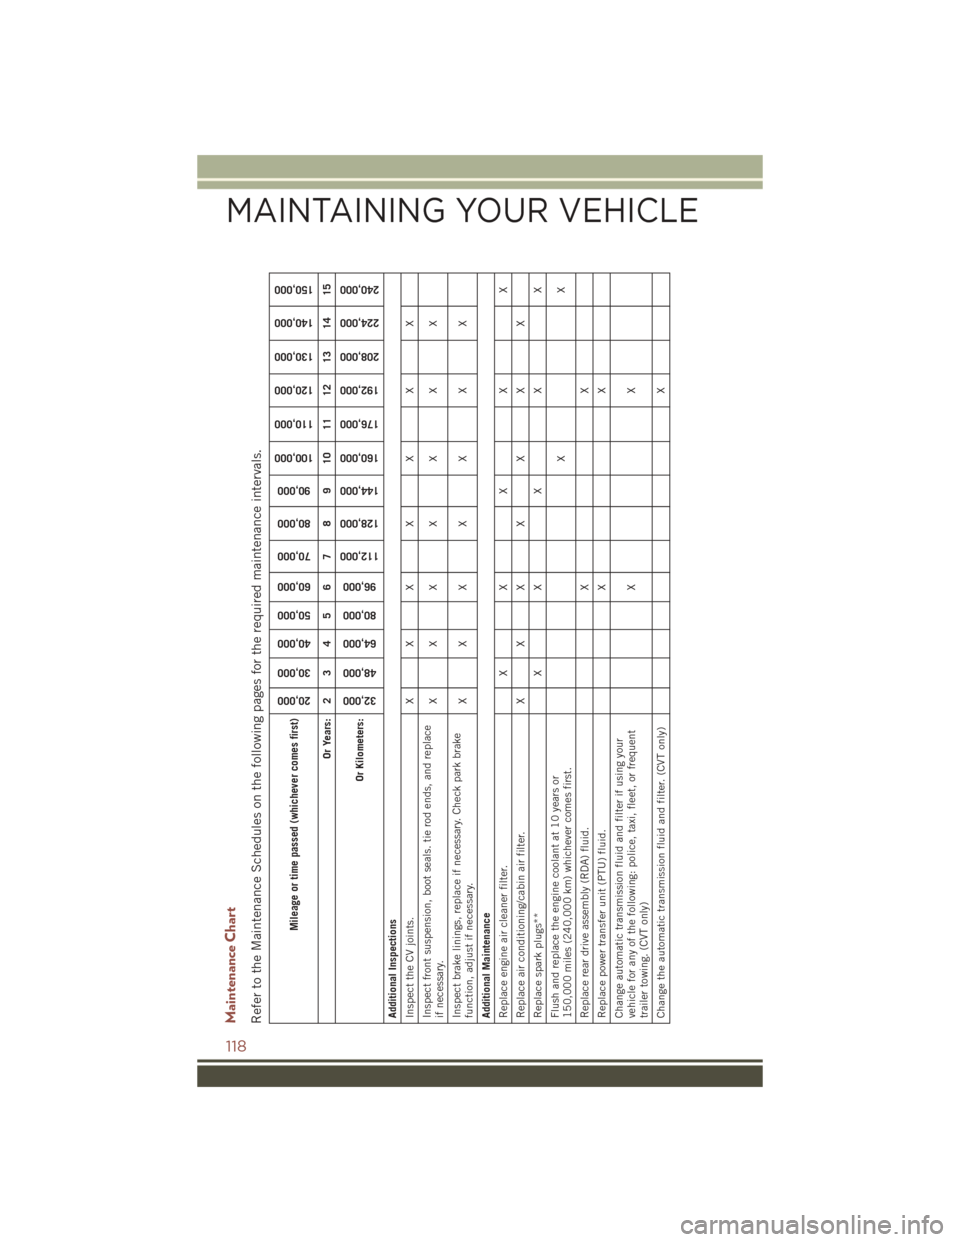
Maintenance ChartRefer to the Maintenance Schedules on the following pages for the required maintenance intervals.
Mileage or time passed (whichever comes first)
20,000
30,000
40,000
50,000
60,000
70,000
80,000
90,000
100,000
110,000
120,000
130,000
140,000
150,000
Or Years: 2 3 4 5 6 7 8 9 10 11 12 13 14 15
Or Kilometers:
32,000
48,000
64,000
80,000
96,000
112,000
128,000
144,000
160,000
176,000
192,000
208,000
224,000
240,000
Additional Inspections
Inspect the CV joints. X X X X X X X
Inspect front suspension, boot seals. tie rod ends, and replace
if necessary. XXX X X X X
Inspect brake linings, replace if necessary. Check park brake
function, adjust if necessary. XXX X X X X
Additional Maintenance
Replace engine air cleaner filter. X X X X X
Replace air conditioning/cabin air filter. X X X X X X X
Replace spark plugs** X X X X X
Flush and replace the engine coolant at 10 years or
150,000 miles (240,000 km) whichever comes first. XX
Replace rear drive assembly (RDA) fluid. X X
Replace power transfer unit (PTU) fluid. X X
Change automatic transmission fluid and filter if using your
vehicle for any of the following: police, taxi, fleet, or frequent
trailer towing. (CVT only) XX
Change the automatic transmission fluid and filter. (CVT only) X
MAINTAINING YOUR VEHICLE
118
Page 135 of 148
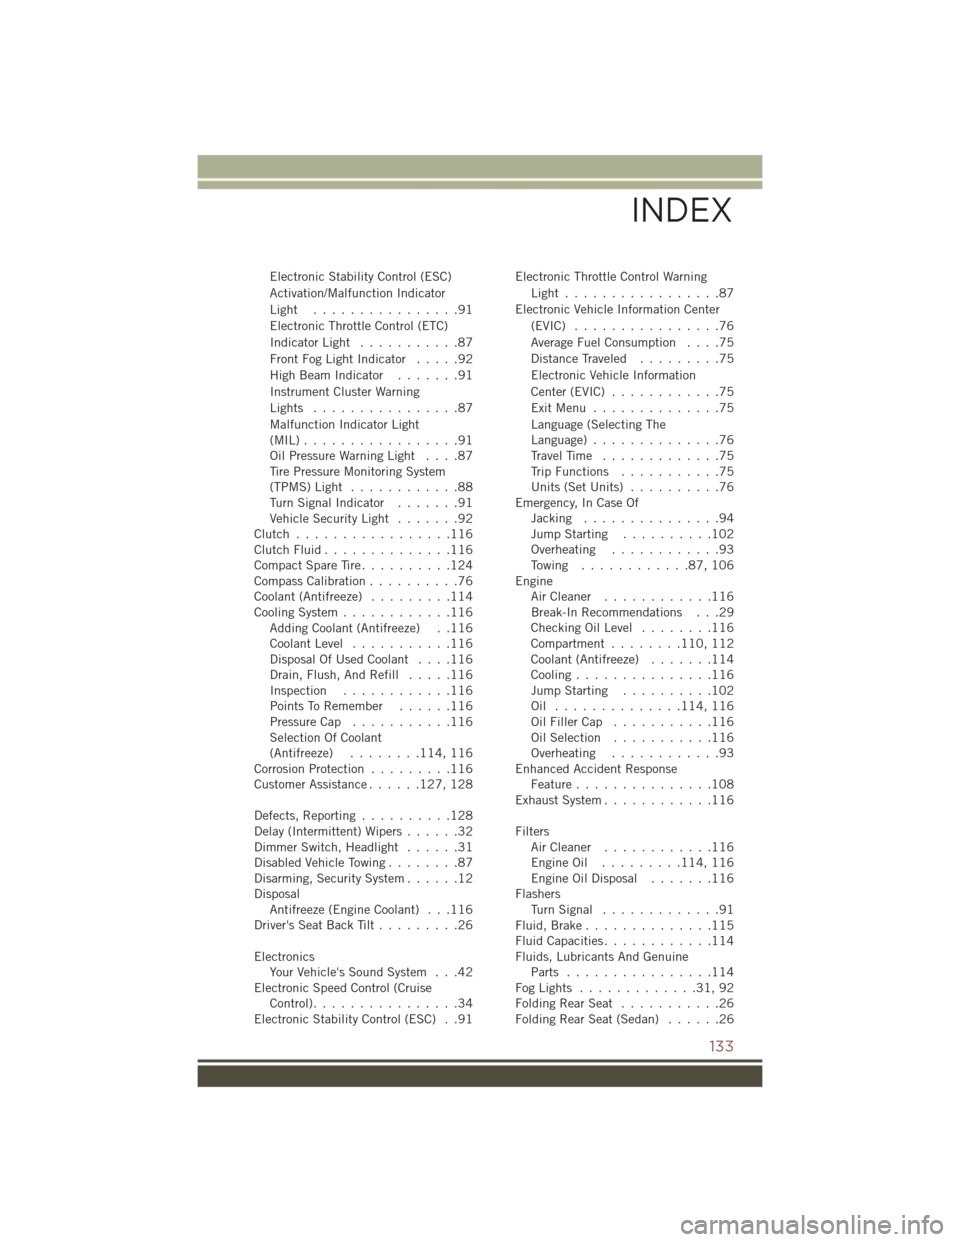
Electronic Stability Control (ESC)
Activation/Malfunction Indicator
Light ................91
Electronic Throttle Control (ETC)
Indicator Light...........87
FrontFogLightIndicator .....92
HighBeamIndicator .......91
Instrument Cluster Warning
Lights ................87
Malfunction Indicator Light
(MIL).................91
Oil Pressure Warning Light ....87
Tire Pressure Monitoring System
(TPMS) Light ............88
Turn Signal Indicator .......91
Vehicle Security Light .......92
Clutch .................116
ClutchFluid..............116
Compact Spare Tire ..........124
Compass Calibration ..........76
Coolant (Antifreeze) .........114
Cooling System ............116
Adding Coolant (Antifreeze) . .116
Coolant Level ...........116
Disposal Of Used Coolant ....116
Drain, Flush, And Refill .....116
Inspection ............116
Points To Remember ......116
Pressure Cap ...........116
Selection Of Coolant
(Antifreeze) ........114, 116
Corrosion Protection .........116
Customer Assistance ......127, 128
Defects, Reporting ..........128
Delay (Intermittent) Wipers ......32
Dimmer Switch, Headlight ......31
Disabled Vehicle Towing ........87
Disarming, Security System ......12
Disposal Antifreeze (Engine Coolant) . . .116
Driver's Seat Back Tilt .........26
Electronics Your Vehicle's Sound System . . .42
Electronic Speed Control (Cruise Control) ................34
Electronic Stability Control (ESC) . .91 Electronic Throttle Control Warning
Light.................87
Electronic Vehicle Information Center (EVIC) ................76
Average Fuel Consumption ....75
Distance Traveled .........75
Electronic Vehicle Information
Center (EVIC) ............75
ExitMenu ..............75
Language (Selecting The
Language) ..............76
Travel Time .............75
Trip Functions ...........75
Units (Set Units) ..........76
Emergency, In Case Of Jacking ...............94
Jump Starting ..........102
Overheating ............93
Towing ............87,106
Engine Air Cleaner ............116
Break-In Recommendations . . .29
Checking Oil Level ........116
Compartment ........110, 112
Coolant (Antifreeze) .......114
Cooling ...............116
Jump Starting ..........102
Oil .............. 114, 116
Oil
Filler Cap ...........116
Oil Selection ...........116
Overheating ............93
Enhanced Accident Response Feature ...............108
Exhaust System ............116
Filters Air Cleaner ............116
EngineOil ......... 114, 116
Engine Oil Disposal .......116
Flashers TurnSignal .............91
Fluid, Brake ..............115
Fluid Capacities ............114
Fluids, Lubricants And Genuine Parts ................114
FogLights .............31,92
FoldingRearSeat ...........26
FoldingRearSeat(Sedan) ......26
INDEX
133
Page 137 of 148
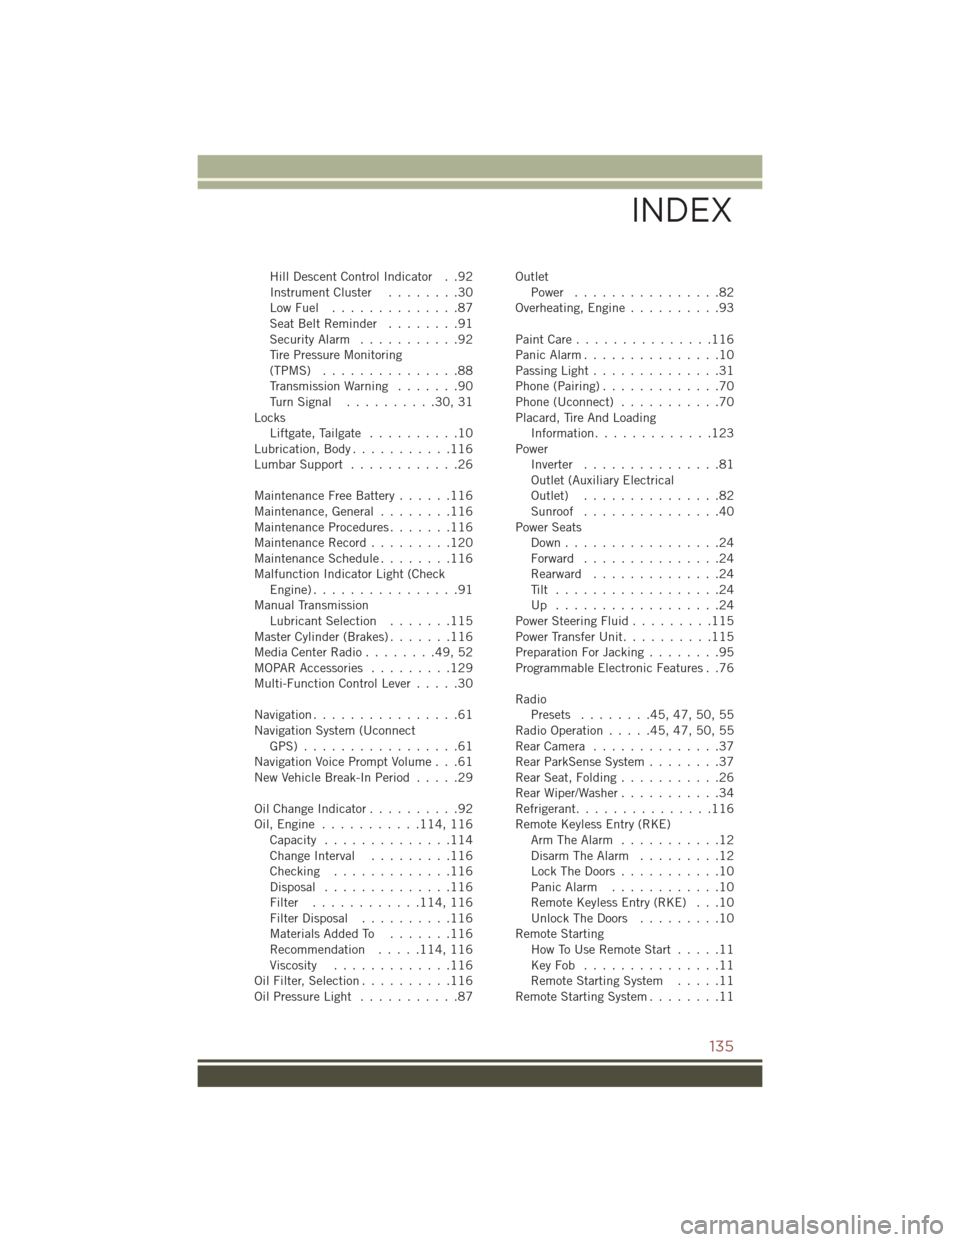
Hill Descent Control Indicator . .92
InstrumentCluster ........30
LowFuel ..............87
SeatBeltReminder ........91
Security Alarm...........92
Tire Pressure Monitoring
(TPMS) ...............88
Transmission Warning .......90
TurnSignal ..........30,31
Locks Liftgate, Tailgate ..........10
Lubrication, Body ...........116
Lumbar Support ............26
Maintenance Free Battery ......116
Maintenance,General ........116
MaintenanceProcedures.......116
Maintenance Record .........120
MaintenanceSchedule........116
Malfunction Indicator Light (Check Engine)................91
Manual Transmission Lubricant Selection .......115
Master Cylinder (Brakes) .......116
MediaCenterRadio........49,52
MOPAR Accessories .........129
Multi-Function Control Lever .....30
Navigation ................61
Navigation System (Uconnect GPS) .................61
Navigation Voice Prompt Volume . . .61
New Vehicle Break-In Period .....29
OilChangeIndicator..........92
Oil,Engine ........... 114, 116
Capacity ..............114
Change Interval .........116
Checking .............116
Disposal ..............116
Filter ............ 114, 116
Filter Disposal ..........116
Materials Added To .......116
Recommendation .....114, 116
Viscosity .............116
Oil Filter, Selection ..........116
Oil Pressure Light ...........87 Outlet
Power ................82
Overheating, Engine ..........93
PaintCare...............116
Panic Alarm ...............10
Passing Light ..............31
Phone (Pairing) .............70
Phone (Uconnect) ...........70
Placard, Tire And Loading Information .............123
Power Inverter ...............81
Outlet (Auxiliary Electrical
Outlet) ...............82
Sunroof ...............40
Power Seats Down.................24
Forward ...............24
Rearward ..............24
Tilt ..................24
Up ..................24
Power Steering Fluid .........115
Power Transfer Unit ..........115
Preparation For Jacking ........95
Programmable Electronic Features . .76
Radio Presets ........45,47,50,55
RadioOperation.....45,47,50,55
R
earCamera ..............37
Rear ParkSense System ........37
Rear Seat, Folding ...........26
Rear Wiper/Washer ...........34
Refrigerant ...............116
Remote Keyless Entry (RKE) Arm The Alarm ...........12
Disarm The Alarm .........12
Lock The Doors ...........10
Panic Alarm ............10
Remote Keyless Entry (RKE) . . .10
Unlock The Doors .........10
Remote Starting How To Use Remote Start .....11
KeyFob ...............11
Remote Starting System .....11
Remote Starting System ........11
INDEX
135