JEEP COMPASS 2018 Owner handbook (in English)
Manufacturer: JEEP, Model Year: 2018, Model line: COMPASS, Model: JEEP COMPASS 2018Pages: 348, PDF Size: 6.03 MB
Page 161 of 348
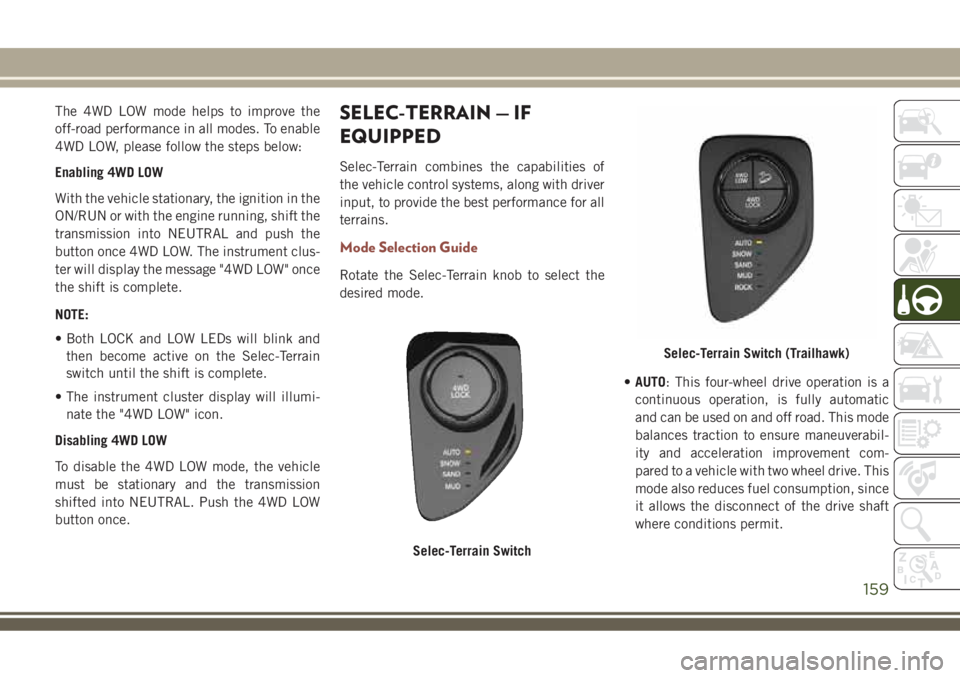
The 4WD LOW mode helps to improve the
off-road performance in all modes. To enable
4WD LOW, please follow the steps below:
Enabling 4WD LOW
With the vehicle stationary, the ignition in the
ON/RUN or with the engine running, shift the
transmission into NEUTRAL and push the
button once 4WD LOW. The instrument clus-
ter will display the message "4WD LOW" once
the shift is complete.
NOTE:
• Both LOCK and LOW LEDs will blink and
then become active on the Selec-Terrain
switch until the shift is complete.
• The instrument cluster display will illumi-
nate the "4WD LOW" icon.
Disabling 4WD LOW
To disable the 4WD LOW mode, the vehicle
must be stationary and the transmission
shifted into NEUTRAL. Push the 4WD LOW
button once.SELEC-TERRAIN — IF
EQUIPPED
Selec-Terrain combines the capabilities of
the vehicle control systems, along with driver
input, to provide the best performance for all
terrains.
Mode Selection Guide
Rotate the Selec-Terrain knob to select the
desired mode.
•AUTO: This four-wheel drive operation is a
continuous operation, is fully automatic
and can be used on and off road. This mode
balances traction to ensure maneuverabil-
ity and acceleration improvement com-
pared to a vehicle with two wheel drive. This
mode also reduces fuel consumption, since
it allows the disconnect of the drive shaft
where conditions permit.
Selec-Terrain Switch
Selec-Terrain Switch (Trailhawk)
159
Page 162 of 348
•SNOW: This mode allows you to have greater
stability under conditions of bad weather.
For use on and off road on surfaces with
poor traction, such as roads covered with
snow. When in SNOW mode (depending on
certain operating conditions), the transmis-
sion may use second gear (rather than first
gear) during launches, to minimize wheel
slippage.
•SAND: For off-road driving or use on sur-
faces with poor traction, such as dry sand.
The transmission is set to provide maxi-
mum traction.
•MUD: For off-road driving or use on surfaces
with poor traction, such as roads covered by
mud or wet grass.
•ROCK(Trailhawk only): This mode is only
available in 4WD LOW range. The device
sets the vehicle to maximize traction and
allow the highest steering capacity for off-
road surfaces. This mode gives you the
maximum performance off-road. Use for
low speed obstacles such as large rocks,
deep ruts, etc.NOTE:
• Rock mode is only available on the vehicles
equipped with the Off-Road package.
• Activate the Hill Descent Control for steep
downhill control. See “Electronic Brake
Control System” in “Safety” for further
information.
STOP/START SYSTEM — IF
EQUIPPED
The Stop/Start function is developed to re-
duce fuel consumption. The system will stop
the engine automatically during a vehicle
stop if the required conditions are met. Re-
leasing the brake pedal, clutch pedal or
pressing the accelerator pedal will automati-
cally re-start the engine.
WARNING!
Before opening the hood, make sure that
the engine is off and that the ignition is in
the OFF mode. Follow the indications on
the plate underneath the hood. We recom-
WARNING!
mend that you remove the key fob if other
people remain in the vehicle. The vehicle
should only be exited after the key fob has
been removed and the ignition is on the
OFF mode. During refueling, make sure
that the engine is off (ignition device in the
OFF mode).
CAUTION!
When replacing the battery, always con-
tact your authorized dealer. Replace the
battery with the same type (HEAVY DUTY)
and with the same specifications.
Operating Modes
Engine stopping mode
Models equipped with a manual transmis-
sion:
With the vehicle stopped, the engine stops
with transmission in neutral and clutch pedal
released.
STARTING AND OPERATING
160
Page 163 of 348
Models equipped with an automatic trans-
mission:
With vehicle at a standstill and brake pedal
pressed, the engine switches off if the gear
selector is in a position other than REVERSE.
In the event of stops uphill, the engine
switching will be disabled to activate the "Hill
Start Assist" function (works only with the
engine running).
The warning light on the instrument panel
switches on to signal that the engine was
stopped.
Engine Restarting Mode
Models equipped with manual transmission:
To restart the engine, press the clutch pedal.
If the vehicle does not start pressing the
clutch, place the gear selector in neutral and
repeat the procedure. If the problem persists,
contact your authorized dealer.
Models equipped with an automatic trans-
mission:
To restart the engine, release the brake pedal.With brake pressed, if the gear selector is in
DRIVE the engine can be restarted moving
the selector to REVERSE or NEUTRAL or
“AutoStick”.
With brake pedal pressed, if the gear selector
is in "AutoStick" mode, the engine can be
restarted moving the selector to "+" or "–", or
REVERSE or NEUTRAL.
When the engine has been stopped automati-
cally, keeping the brake pedal pressed, the
brake can be released keeping the engine off
by quickly shifting the gear selector to PARK.
To restart the engine, just move the selector
out of PARK.
Manual Activation / Deactivation
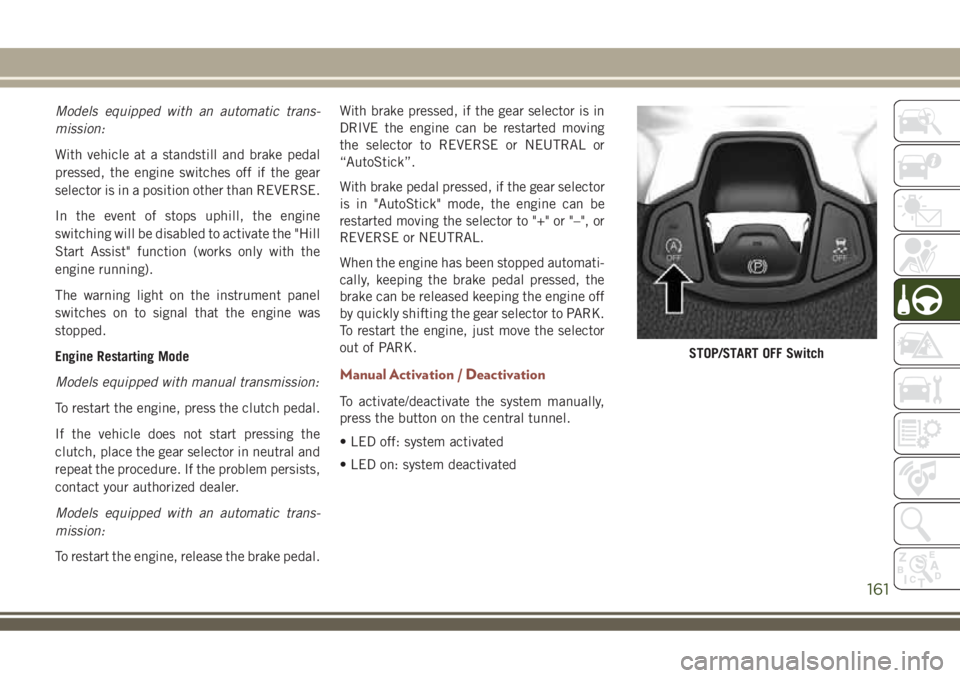
To activate/deactivate the system manually,
press the button on the central tunnel.
• LED off: system activated
• LED on: system deactivated
STOP/START OFF Switch
161
Page 164 of 348
SPEED CONTROL
When engaged, the Speed Control takes over
accelerator operations at speeds greater than
25 mph (40 km/h).
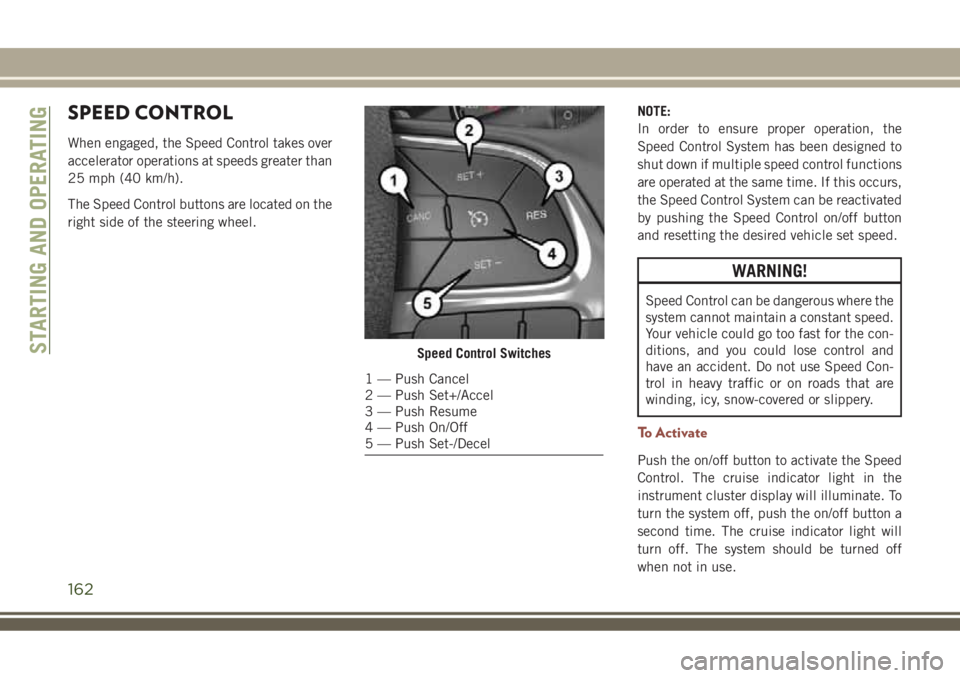
The Speed Control buttons are located on the
right side of the steering wheel.NOTE:
In order to ensure proper operation, the
Speed Control System has been designed to
shut down if multiple speed control functions
are operated at the same time. If this occurs,
the Speed Control System can be reactivated
by pushing the Speed Control on/off button
and resetting the desired vehicle set speed.
WARNING!
Speed Control can be dangerous where the
system cannot maintain a constant speed.
Your vehicle could go too fast for the con-
ditions, and you could lose control and
have an accident. Do not use Speed Con-
trol in heavy traffic or on roads that are
winding, icy, snow-covered or slippery.
To Activate
Push the on/off button to activate the Speed
Control. The cruise indicator light in the
instrument cluster display will illuminate. To
turn the system off, push the on/off button a
second time. The cruise indicator light will
turn off. The system should be turned off
when not in use.
Speed Control Switches
1 — Push Cancel
2 — Push Set+/Accel
3 — Push Resume
4 — Push On/Off
5 — Push Set-/Decel
STARTING AND OPERATING
162
Page 165 of 348
WARNING!
Leaving the Speed Control system on when
not in use is dangerous. You could acci-
dentally set the system or cause it to go
faster than you want. You could lose con-
trol and have an accident. Always leave the
system off when you are not using it.
To Set A Desired Speed
Turn the Speed Control on.
NOTE:
The vehicle should be traveling at a steady
speed and on level ground before pushing the
SET (+) or SET (-) button.
When the vehicle has reached the desired
speed, push the SET (+) or SET (-) button and
release. Release the accelerator and the ve-
hicle will operate at the selected speed.
To Vary The Speed Setting
To Increase Speed
When the Speed Control is set, you can in-
crease speed by pushing the SET(+)button.The driver’s preferred units can be selected
through the Uconnect system if equipped.
The speed increment shown is dependent on
the chosen speed unit of U.S. (mph) or Metric
(km/h):
U.S. Speed (mph)
• Pushing the SET(+)button once will result
in a 1 mph increase in set speed. Each
subsequent tap of the button results in an
increase of 1 mph.
• If the button is continually pushed, the set
speed will continue to increase until the
button is released, then the new set speed
will be established.
Metric Speed (km/h)
• Pushing the SET(+)button once will result
in a 1 km/h increase in set speed. Each
subsequent tap of the button results in an
increase of 1 km/h.
• If the button is continually pushed, the set
speed will continue to increase until the
button is released, then the new set speed
will be established.To Decrease Speed
When the Speed Control is set, you can de-
crease speed by pushing the SET(-)button.
The driver’s preferred units can be selected
through the Uconnect system if equipped. The
speed increment shown is dependent on the cho-
sen speed unit of U.S. (mph) or Metric (km/h):
U.S. Speed (mph)
• Pushing the SET(-)button once will result
in a 1 mph decrease in set speed. Each
subsequent tap of the button results in a
decrease of 1 mph.
• If the button is continually pushed, the set
speed will continue to decrease until the
button is released, then the new set speed
will be established.
Metric Speed (km/h)
• Pushing the SET(-)button once will result
in a 1 km/h decrease in set speed. Each
subsequent tap of the button results in a
decrease of 1 km/h.
• If the button is continually pushed, the set
speed will continue to decrease until the
button is released, then the new set speed
will be established.
163
Page 166 of 348
To Resume Speed
To resume a previously set speed, push the
RES button and release. Resume can be used
at any speed above 20 mph (32 km/h).
To Accelerate For Passing
Press the accelerator as you would normally.
When the pedal is released, the vehicle will
return to the set speed.
To Deactivate
A soft tap on the brake pedal, pushing the
CANC (cancel) button, or normal brake pres-
sure while slowing the vehicle will deactivate
the speed control without erasing the set
speed from memory.
Pushing the on/off button or cycling the igni-
tion to OFF, erases the set speed from
memory.
ADAPTIVE CRUISE
CONTROL (ACC)
If your vehicle is equipped with Adaptive
Cruise Control the controls operate exactly
the same as the speed control with only a
couple of differences. With this option you
can set a specified distance you would like to
maintain between you and the vehicle in
front of you.
If the ACC sensor detects a vehicle ahead,
ACC will apply limited braking or acceleration
automatically to maintain a preset following
distance, while matching the speed of the
vehicle ahead.
If the sensor does not detect a vehicle ahead
of you, ACC will maintain a fixed set speed.
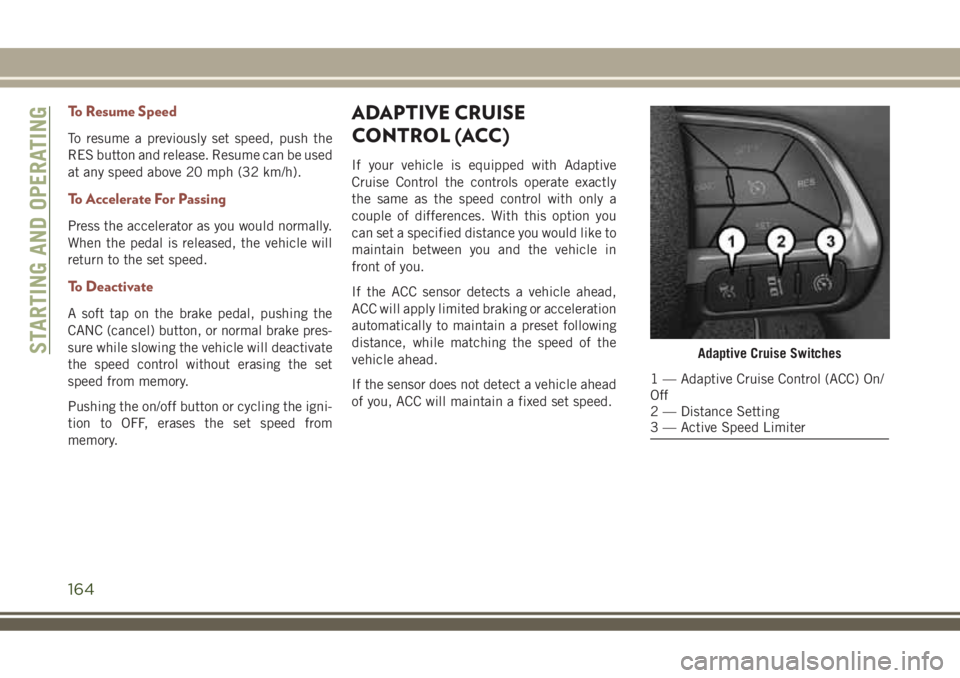
Adaptive Cruise Switches
1 — Adaptive Cruise Control (ACC) On/
Off
2 — Distance Setting
3 — Active Speed Limiter
STARTING AND OPERATING
164
Page 167 of 348
Activation
Push and release the Adaptive Cruise Control
(ACC) on/off button.
“ACC READY” will appear in the instrument
cluster display to indicate the ACC is on.
Setting A Desired Speed
When the vehicle reaches the speed desired,
push the SET(+)button or the SET(-)button
and release. The instrument cluster display
will show the set speed.
If the system is set when the vehicle speed is
below 19 mph (30 km/h), the set speed shall
be defaulted to 19 mph (30 km/h). If the
system is set when the vehicle speed is above
19 mph (30 km/h), the set speed shall be the
current speed of the vehicle.
NOTE:
ACC cannot be set if there is a stationary
vehicle in front of your vehicle in close prox-
imity.Remove your foot from the accelerator pedal.
If you do not, the vehicle may continue to
accelerate beyond the set speed. If this oc-
curs:
• The message “DRIVER OVERRIDE” will
appear in the instrument cluster display.
• The system will not be controlling the dis-
tance between your vehicle and the vehicle
ahead. The vehicle speed will only be de-
termined by the position of the accelerator
pedal.
Varying The Speed
Once the ACC has been activated, the speed
can be increased or decreased.
NOTE:
• When you override and push the SET (+)
button or SET (-) buttons, the new set
speed will be the current speed of the
vehicle.
• When you use the SET (-) button to decel-
erate, if the engine’s braking power does
not slow the vehicle sufficiently to reach
the set speed, the brake system will auto-
matically slow the vehicle.• If equipped with a automatic transmission,
The ACC system decelerates the vehicle to
a full stop when following a target vehicle.
If an ACC host vehicle follows a target
vehicle to a standstill, after two seconds the
driver will either have to push the RES
(resume) button, or apply the accelerator
pedal to reengage the ACC to the existing
set speed.
To Resume
If there is a set speed in the memory, push
the RES button and then remove your foot
from the accelerator pedal. The instrument
cluster display will show the last set speed.
WARNING!
The Resume function should only be used
if traffic and road conditions permit. Re-
suming a set speed that is too high or too
low for prevailing traffic and road condi-
tions could cause the vehicle to accelerate
or decelerate too sharply for safe opera-
tion. Failure to follow these warnings can
result in a collision and death or serious
personal injury.
165
Page 168 of 348
Deactivation
Push and release the Adaptive Cruise Control
(ACC) on/off button a second time to turn the
system off.
“Adaptive Cruise Control (ACC) Off” will ap-
pear in the instrument cluster display to
indicate the ACC is off.
WARNING!
Leaving the ACC system on when not in
use is dangerous. You could accidentally
set the system or cause it to go faster than
you want. You could lose control and have
an accident. Always leave the system OFF
when you are not using it.
Setting The Following Distance
The specified following distance for ACC can
be set by varying the distance setting be-
tween four bars (longest), three bars (long),
two bars (medium) and one bar (short). Using
this distance setting and the vehicle speed,
ACC calculates and sets the distance to the
vehicle ahead. This distance setting appears
in the instrument cluster display.To decrease the distance setting, push the
Distance Setting button and release. Each
time the button is pushed, the distance set-
ting decreases by one bar (longer). Once the
longest setting is reached, if the button is
pushed again it will be set to the shortest
setting available.
Changing Modes
If desired, the Adaptive Cruise Control mode
can be turned off and the system can be
operated as a Normal (Fixed Speed) Cruise
Control mode. When in the Normal (Fixed
Speed) Cruise Control mode the distance
setting feature will be disabled and the sys-
tem will maintain the speed you set.
• To change between the different cruise
control modes, push the Adaptive Cruise
Control (ACC) on/off button which turns the
ACC and the Normal (Fixed Speed) Cruise
Control off.
• Pushing the Normal (Fixed Speed) Cruise
Control on/off button will result in turning
on (changing to) the Normal (Fixed Speed)
Cruise Control mode.Refer to “Normal (Fixed Speed) Cruise Con-
trol Mode” in “Starting And Operating” in
your Owner's Manual for further details.
WARNING!
Adaptive Cruise Control (ACC) is a conve-
nience system. It is not a substitute for
active driving involvement. It is always the
driver’s responsibility to be attentive of
road, traffic, and weather conditions, ve-
hicle speed, distance to the vehicle ahead;
and, most importantly, brake operation to
ensure safe operation of the vehicle under
all road conditions. Your complete atten-
tion is always required while driving to
maintain safe control of your vehicle. Fail-
ure to follow these warnings can result in a
collision and death or serious personal
injury.
The ACC system:
• Does not react to pedestrians, oncoming
vehicles, and stationary objects (e.g., a
stopped vehicle in a traffic jam or a
disabled vehicle).
• Cannot take street, traffic, and weather
conditions into account, and may be
STARTING AND OPERATING
166
Page 169 of 348
WARNING!
limited upon adverse sight distance con-
ditions.
• Does not always fully recognize complex
driving conditions, which can result in
wrong or missing distance warnings.
• Will bring the vehicle to a complete stop
while following a target vehicle and hold
the vehicle for 2 seconds in the stop
position. If the target vehicle does not
start moving within two seconds the ACC
system will display a message that the
system will release the brakes and that
the brakes must be applied manually. An
audible chime will sound when the
brakes are released.
You should switch off the ACC system:
• When driving in fog, heavy rain, heavy
snow, sleet, heavy traffic, and complex
driving situations (i.e., in highway con-
struction zones).
• When entering a turn lane or highway off
ramp; when driving on roads that are
winding, icy, snow-covered, slippery, or
have steep uphill or downhill slopes.
WARNING!
• When towing a trailer up or down steep
slopes.
• When circumstances do not allow safe
driving at a constant speed.
The Cruise Control system has two control
modes:
• Adaptive Cruise Control mode for main-
taining an appropriate distance between
vehicles.
• Normal (Fixed Speed) Cruise Control
mode for cruising at a constant preset
speed. For additional information, refer
to “Normal (Fixed Speed) Cruise Control
Mode” in your Owner’s Manual for fur-
ther information.
Normal (Fixed Speed) Cruise Control will
not react to preceding vehicles. Always be
aware of the mode selected. You can
change the mode by using the Cruise Con-
trol buttons. The two control modes func-
tion differently. Always confirm which
mode is selected.
PARKSENSE REAR PARK
ASSIST — IF EQUIPPED
The ParkSense Rear Park Assist system pro-
vides visual and audible indications of the
distance between the rear fascia and a de-
tected obstacle when backing up, e.g. during
a parking maneuver. Refer to “ParkSense
System Usage Precautions” for limitations of
this system and recommendations.
ParkSense will retain the last system state
(enabled or disabled) from the last ignition
cycle when the ignition is changed to the
ON/RUN position.
ParkSense can be active only when the gear
selector is in REVERSE. The system will
remain active while in REVERSE until the
vehicle speed is increased to approximately
7 mph (11 km/h) or above. While in RE-
VERSE, and above the system's operating
speed, a warning will appear within the in-
strument cluster display indicating the ve-
hicle speed is too fast. The system will be-
come active again when the vehicle speed is
decreased to speeds less than approximately
6 mph (9 km/h).
167
Page 170 of 348
ParkSense Sensors
The four ParkSense sensors, located in the
rear fascia/bumper, monitor the area behind
the vehicle that is within the sensors’ field of
view. The sensors can detect obstacles from
approximately 12 inches (30 cm) up to
79 inches (200 cm) from the rear fascia/
bumper in the horizontal direction, depend-
ing on the location, type and orientation of
the obstacle.
Enabling And Disabling ParkSense
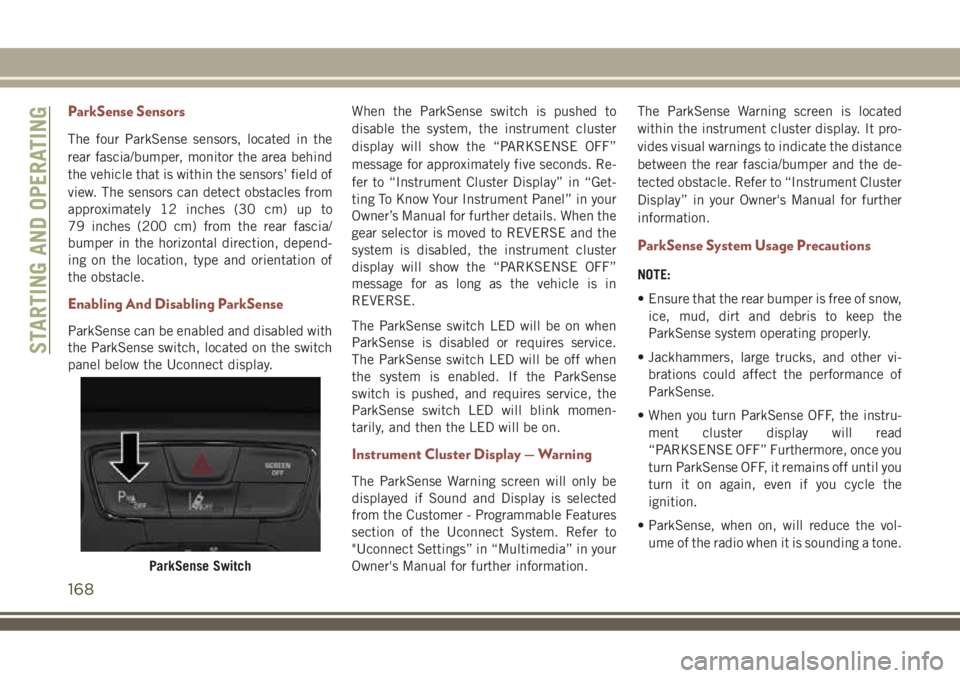
ParkSense can be enabled and disabled with
the ParkSense switch, located on the switch
panel below the Uconnect display.When the ParkSense switch is pushed to
disable the system, the instrument cluster
display will show the “PARKSENSE OFF”
message for approximately five seconds. Re-
fer to “Instrument Cluster Display” in “Get-
ting To Know Your Instrument Panel” in your
Owner’s Manual for further details. When the
gear selector is moved to REVERSE and the
system is disabled, the instrument cluster
display will show the “PARKSENSE OFF”
message for as long as the vehicle is in
REVERSE.
The ParkSense switch LED will be on when
ParkSense is disabled or requires service.
The ParkSense switch LED will be off when
the system is enabled. If the ParkSense
switch is pushed, and requires service, the
ParkSense switch LED will blink momen-
tarily, and then the LED will be on.
Instrument Cluster Display — Warning
The ParkSense Warning screen will only be
displayed if Sound and Display is selected
from the Customer - Programmable Features
section of the Uconnect System. Refer to
"Uconnect Settings” in “Multimedia” in your
Owner's Manual for further information.The ParkSense Warning screen is located
within the instrument cluster display. It pro-
vides visual warnings to indicate the distance
between the rear fascia/bumper and the de-
tected obstacle. Refer to “Instrument Cluster
Display” in your Owner's Manual for further
information.
ParkSense System Usage Precautions
NOTE:
• Ensure that the rear bumper is free of snow,
ice, mud, dirt and debris to keep the
ParkSense system operating properly.
• Jackhammers, large trucks, and other vi-
brations could affect the performance of
ParkSense.
• When you turn ParkSense OFF, the instru-
ment cluster display will read
“PARKSENSE OFF” Furthermore, once you
turn ParkSense OFF, it remains off until you
turn it on again, even if you cycle the
ignition.
• ParkSense, when on, will reduce the vol-
ume of the radio when it is sounding a tone.
ParkSense Switch
STARTING AND OPERATING
168