ESP JEEP COMPASS 2018 Owner handbook (in English)
[x] Cancel search | Manufacturer: JEEP, Model Year: 2018, Model line: COMPASS, Model: JEEP COMPASS 2018Pages: 348, PDF Size: 6.03 MB
Page 85 of 348
Activating HDC
Once HDC is enabled, it will activate auto-
matically if driven down a grade of sufficient
magnitude (greater than approximately 8%).
The set speed for HDC is selectable by the
driver and can be adjusted within the thresh-
olds by using throttle or brake application.
Driver Override:
The driver may override HDC activation speed
with throttle or brake application at anytime.
Deactivating HDC
HDC will be deactivated but remain available
if any of the following conditions occur:
• Driver overrides HDC set speed with a
speed exceeding 7.5 mph (12 km/h) but
remains below 25 mph (40 km/h).
• Vehicle is on a downhill grade of insuffi-
cient magnitude (less than approximately
8%), is on level ground, or is on an uphill
grade.
• Vehicle is shifted to PARK.Disabling HDC
HDC will be deactivated and disabled if any
of the following conditions occur:
• The driver pushes the HDC switch.
• The driveline is shifted out of 4WD Low
Range.
• Driver’s door opens.
• The vehicle is driven greater than 25 mph
(40 km/h) (HDC exits immediately.)
Feedback To The Driver:
The instrument cluster has an HDC icon and
the HDC switch has an LED which offer
feedback to the driver about the state HDC is
in.
• The cluster icon and switch lamp will illu-
minate and remain solid when HDC is en-
abled or activated. This is the normal oper-
ating condition for HDC.
• The switch lamp will flash for several sec-
onds then extinguish when the driver
pushes the HDC switch when enable con-
ditions have not been met.The Hill Descent Switch is located within the
Selec-Terrain knob in the upper right
position.
WARNING!
HDC is only intended to assist the driver in
controlling vehicle speed when descend-
ing hills. The driver must remain attentive
to the driving conditions and is responsible
for maintaining a safe vehicle speed.
Hill Start Assist (HSA)
The HSA system is designed to mitigate roll
back from a complete stop while on an in-
cline. If the driver releases the brake while
stopped on an incline, HSA will continue to
hold the brake pressure for a short period. If
the driver does not apply the throttle before
this time expires, the system will release
brake pressure and the vehicle will roll down
the hill as normal.
83
Page 86 of 348
The following conditions must be met in
order for HSA to activate:
• The feature must be enabled.
• The vehicle must be stopped.
• Park brake must be off.
• Driver door must be closed.
• The vehicle must be on a sufficient grade.
• The gear selection must match vehicle up-
hill direction (i.e., vehicle facing uphill is in
forward gear; vehicle backing uphill is in
REVERSE gear).
• HSA will work in REVERSE gear and all
forward gears. The system will not activate
if the transmission is in PARK or NEU-
TRAL. For vehicles equipped with a manual
transmission, if the clutch is pressed, HSA
will remain active.
WARNING!
There may be situations where the Hill
Start Assist (HSA) will not activate and
slight rolling may occur, such as on minor
hills or with a loaded vehicle, or while
pulling a trailer. HSA is not a substitute for
WARNING!
active driving involvement. It is always the
driver’s responsibility to be attentive to
distance to other vehicles, people, and
objects, and most importantly brake op-
eration to ensure safe operation of the
vehicle under all road conditions. Your
complete attention is always required
while driving to maintain safe control of
your vehicle. Failure to follow these warn-
ings can result in a collision or serious
personal injury.
Towing With HSA
HSA will also provide assistance to mitigate
roll back while towing a trailer.
WARNING!
• If you use a trailer brake controller with
your trailer, the trailer brakes may be
activated and deactivated with the brake
switch. If so, there may not be enough
brake pressure to hold both the vehicle
and the trailer on a hill when the brake
WARNING!
pedal is released. In order to avoid roll-
ing down an incline while resuming ac-
celeration, manually activate the trailer
brake or apply more vehicle brake pres-
sure prior to releasing the brake pedal.
• HSA is not a parking brake. Always apply
the parking brake fully when exiting your
vehicle. Also, be certain to place the
transmission in PARK.
• Failure to follow these warnings can re-
sult in a collision or serious personal
injury.
Disabling And Enabling HSA
This feature can be turned on or turned off.
To change the current setting, proceed as
follows:
• If disabling HSA using Uconnect Settings,
refer to “Uconnect Settings” in “Multime-
dia” for further information.
SAFETY
84
Page 88 of 348
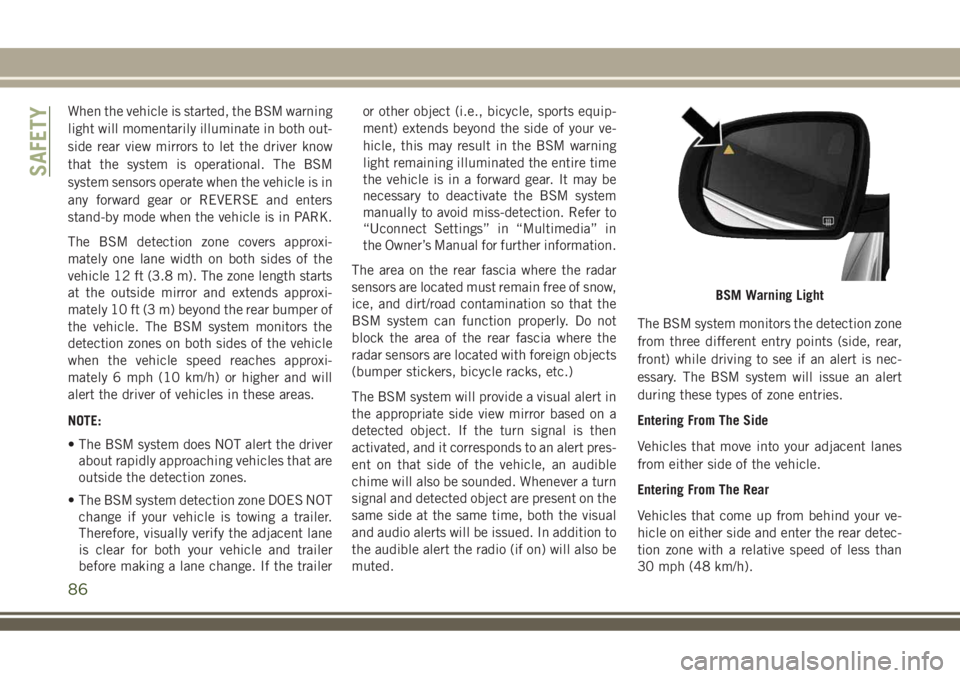
When the vehicle is started, the BSM warning
light will momentarily illuminate in both out-
side rear view mirrors to let the driver know
that the system is operational. The BSM
system sensors operate when the vehicle is in
any forward gear or REVERSE and enters
stand-by mode when the vehicle is in PARK.
The BSM detection zone covers approxi-
mately one lane width on both sides of the
vehicle 12 ft (3.8 m). The zone length starts
at the outside mirror and extends approxi-
mately 10 ft (3 m) beyond the rear bumper of
the vehicle. The BSM system monitors the
detection zones on both sides of the vehicle
when the vehicle speed reaches approxi-
mately 6 mph (10 km/h) or higher and will
alert the driver of vehicles in these areas.
NOTE:
• The BSM system does NOT alert the driver
about rapidly approaching vehicles that are
outside the detection zones.
• The BSM system detection zone DOES NOT
change if your vehicle is towing a trailer.
Therefore, visually verify the adjacent lane
is clear for both your vehicle and trailer
before making a lane change. If the traileror other object (i.e., bicycle, sports equip-
ment) extends beyond the side of your ve-
hicle, this may result in the BSM warning
light remaining illuminated the entire time
the vehicle is in a forward gear. It may be
necessary to deactivate the BSM system
manually to avoid miss-detection. Refer to
“Uconnect Settings” in “Multimedia” in
the Owner’s Manual for further information.
The area on the rear fascia where the radar
sensors are located must remain free of snow,
ice, and dirt/road contamination so that the
BSM system can function properly. Do not
block the area of the rear fascia where the
radar sensors are located with foreign objects
(bumper stickers, bicycle racks, etc.)
The BSM system will provide a visual alert in
the appropriate side view mirror based on a
detected object. If the turn signal is then
activated, and it corresponds to an alert pres-
ent on that side of the vehicle, an audible
chime will also be sounded. Whenever a turn
signal and detected object are present on the
same side at the same time, both the visual
and audio alerts will be issued. In addition to
the audible alert the radio (if on) will also be
muted.The BSM system monitors the detection zone
from three different entry points (side, rear,
front) while driving to see if an alert is nec-
essary. The BSM system will issue an alert
during these types of zone entries.
Entering From The Side
Vehicles that move into your adjacent lanes
from either side of the vehicle.
Entering From The Rear
Vehicles that come up from behind your ve-
hicle on either side and enter the rear detec-
tion zone with a relative speed of less than
30 mph (48 km/h).
BSM Warning Light
SAFETY
86
Page 90 of 348
WARNING!
Rear Cross Path Detection (RCP) is not a
back up aid system. It is intended to be
used to help a driver detect an oncoming
vehicle in a parking lot situation. Drivers
must be careful when backing up, even
when using RCP. Always check carefully
behind your vehicle, look behind you, and
be sure to check for pedestrians, animals,
other vehicles, obstructions, and blind
spots before backing up. Failure to do so
can result in serious injury or death.
Modes Of Operation
Three selectable modes of operation are
available in the Uconnect System. Refer to
“Uconnect Settings” in “Multimedia” in the
Owner’s Manual for further information.
Blind Spot Alert Lights Only (Default Setting)
When operating in Blind Spot Alert mode, the
BSM system will provide a visual alert in the
appropriate side view mirror based on a de-
tected object. However, when the system is
operating in Rear Cross Path (RCP) mode, thesystem will respond with both visual and
audible alerts when a detected object is pres-
ent. Whenever an audible alert is requested,
the radio is muted.
Blind Spot Alert Lights/Chime
When operating in Blind Spot Alert Lights/
Chime mode, the BSM system will provide a
visual alert in the appropriate side view mirror
based on a detected object. If the turn signal
is then activated, and it corresponds to an
alert present on that side of the vehicle, an
audible chime will also be sounded. When-
ever a turn signal and detected object are
present on the same side at the same time,
both the visual and audible alerts will be
issued. In addition to the audible alert the
radio (if on) will also be muted.
NOTE:
Whenever an audible alert is requested by the
BSM system, the radio is also muted.
When the system is in RCP, the system shall
respond with both visual and audible alerts
when a detected object is present. Wheneveran audible alert is requested, the radio vol-
ume is reduced. Turn/hazard signal status is
ignored; the RCP state always requests the
chime.
Blind Spot Alert Off
When the BSM system is turned off there will
be no visual or audible alerts from either the
BSM or RCP systems.
NOTE:
The BSM system will store the current oper-
ating mode when the vehicle is shut off. Each
time the vehicle is started the previously
stored mode will be recalled and used.
Blocked Sensor
If the system detects degraded performance
due to contamination or foreign objects, a
message will warn you of a blocked sensor
and the warning indicators in side view mir-
rors will be illuminated. The warning indica-
tors will remain illuminated until blockage
clearing conditions are met. First clear the
fascia area around the sensors of the block-
age. After removing the blockage, reset the
system by cycling the ignition from ON to
OFF and then back ON.
SAFETY
88
Page 91 of 348
Forward Collision Warning (FCW) With
Mitigation — If Equipped
Forward Collision Warning (FCW) With Miti-
gation Operation
The Forward Collision Warning (FCW) system
with mitigation provides the driver with au-
dible warnings, visual warnings (within the
instrument cluster display), and may apply a
brake jerk to warn the driver when it detects a
potential frontal collision. The warnings and
limited braking are intended to provide the
driver with enough time to react, avoid or
mitigate the potential collision.
NOTE:
FCW monitors the information from the for-
ward looking sensors as well as the Electronic
Brake Controller (EBC), to calculate the prob-
ability of a forward collision. When the sys-
tem determines that a forward collision is
probable, the driver will be provided with
audible and visual warnings and may provide
a brake jerk warning.
If the driver does not take action based upon
these progressive warnings, then the system
will provide a limited level of active braking tohelp slow the vehicle and mitigate the poten-
tial forward collision. If the driver reacts to
the warnings by braking and the system de-
termines that the driver intends to avoid the
collision by braking but has not applied suf-
ficient brake force, the system will compen-
sate and provide additional brake force as
required.
If a Forward Collision Warning with Mitigation
event begins at a speed below 26 mph
(42 km/h), the system may provide the maxi-
mum braking possible to mitigate the poten-
tial forward collision. If the Forward Collision
Warning with Mitigation event stops the ve-
hicle completely, the system will hold the
vehicle at standstill for two seconds and then
release the brakes.
When the system determines a collision with
the vehicle in front of you is no longer prob-
able, the warning message will be deacti-
vated.
NOTE:
• The minimum speed for FCW activation is
1 mph (2 km/h).• The FCW alerts may be triggered on objects
other than vehicles such as guard rails or
sign posts based on the course prediction.
This is expected and is a part of normal
FCW activation and functionality.
• It is unsafe to test the FCW system. To
prevent such misuse of the system, after
four Active Braking events within a key
cycle, the Active Braking portion of FCW
will be deactivated until the next key cycle.
• The FCW system is intended for on-road use
only. If the vehicle is taken off-road, the
FCW system should be deactivated to pre-
vent unnecessary warnings to the
surroundings.
WARNING!
Forward Collision Warning (FCW) is not
intended to avoid a collision on its own,
nor can FCW detect every type of potential
collision. The driver has the responsibility
to avoid a collision by controlling the ve-
hicle via braking and steering. Failure to
follow this warning could lead to serious
injury or death.
89
Page 94 of 348
For example, your vehicle may have a recom-
mended cold (parked for more than three
hours) placard pressure of 33 psi (227 kPa).
If the ambient temperature is 68°F (20°C)
and the measured tire pressure is 28 psi
(193 kPa), a temperature drop to 20°F (-7°C)
will decrease the tire pressure to approxi-
mately 24 psi (165 kPa). This tire pressure is
low enough to turn on the “Tire Pressure
Monitoring Telltale Light.” Driving the ve-
hicle may cause the tire pressure to rise to
approximately 28 psi (193 kPa), but the “Tire
Pressure Monitoring Telltale Light” will still
be on. In this situation, the “Tire Pressure
Monitoring Telltale Light” will turn off only
after the tires are inflated to the vehicle’s
recommended cold placard pressure value.
NOTE:
When filling warm tires, the tire pressure may
need to be increased up to an additional 4 psi
(30 kPa) above the recommended cold plac-
ard pressure in order to turn the Tire Pressure
Monitoring Telltale Light off.CAUTION!
• The TPMS has been optimized for the
original equipment tires and wheels.
TPMS pressures and warning have been
established for the tire size equipped on
your vehicle. Undesirable system opera-
tion or sensor damage may result when
using replacement equipment that is not
of the same size, type, and/or style. The
TPM sensor is not designed for use on
aftermarket wheels and may contribute
to a poor overall system performance or
sensor damage. Customers are encour-
aged to use OEM wheels to assure
proper TPM feature operation.
• Using aftermarket tire sealants may
cause the Tire Pressure Monitoring Sys-
tem (TPMS) sensor to become inoper-
able. After using an aftermarket tire
sealant it is recommended that you take
your vehicle to your authorized dealer to
have your sensor function checked.
• After inspecting or adjusting the tire
pressure always reinstall the valve stem
cap. This will prevent moisture and dirt
CAUTION!
from entering the valve stem, which
could damage the TPMS sensor.
NOTE:
• The TPMS is not intended to replace nor-
mal tire care and maintenance, or to pro-
vide warning of a tire failure or condition.
• The TPMS should not be used as a tire
pressure gauge while adjusting your tire
pressure.
• Driving on a significantly underinflated tire
causes the tire to overheat and can lead to
tire failure. Underinflation also reduces
fuel efficiency and tire tread life, and may
affect the vehicle’s handling and stopping
ability.
• The TPMS is not a substitute for proper tire
maintenance, and it is the driver’s respon-
sibility to maintain correct tire pressure
using an accurate tire pressure gauge, even
if underinflation has not reached the level
to trigger illumination of the “Tire Pressure
Monitoring Telltale Light”.
SAFETY
92
Page 117 of 348
The SABIC deploys downward, covering the
side windows. An inflating SABIC pushes the
outside edge of the headliner out of the way
and covers the window. The SABICs inflate
with enough force to injure occupants if they
are not belted and seated properly, or if items
are positioned in the area where the SABICs
inflate. Children are at an even greater risk of
injury from a deploying air bag.
The SABICs (if equipped with SABICs) may
help reduce the risk of partial or complete
ejection of vehicle occupants through side
windows in certain side impact events.
WARNING!
• Do not mount equipment, or stack lug-
gage or other cargo up high enough to
block the deployment of the SABICs.
The trim covering above the side win-
dows where the SABIC and its deploy-
ment path are located should remain
free from any obstructions.
• In order for the SABICs to work as in-
tended, do not install any accessory
items in your vehicle which could alter
WARNING!
the roof. Do not add an aftermarket sun-
roof to your vehicle. Do not add roof
racks that require permanent attach-
ments (bolts or screws) for installation
on the vehicle roof. Do not drill into the
roof of the vehicle for any reason.
Side Impacts
The Side Air Bags are designed to activate in
certain side impacts. The Occupant Restraint
Controller (ORC) determines whether the de-
ployment of the Side Air Bags in a particular
impact event is appropriate, based on the
severity and type of collision. The side impact
sensors aid the ORC in determining the ap-
propriate response to impact events. The sys-
tem is calibrated to deploy the Side Air Bags
on the impact side of the vehicle during
impacts that require Side Air Bag occupant
protection. In side impacts, the Side Air Bags
deploy independently; a left side impact de-
ploys the left Side Air Bags only and a right-
side impact deploys the right Side Air Bagsonly. Vehicle damage by itself is not a good
indicator of whether or not Side Air Bags
should have deployed.
The Side Air Bags will not deploy in all side
collisions, including some collisions at cer-
tain angles, or some side collisions that do
not impact the area of the passenger com-
partment. The Side Air Bags may deploy
during angled or offset frontal collisions
where the front air bags deploy.
Side Air Bags are a supplement to the seat
belt restraint system. Side Air Bags deploy in
less time than it takes to blink your eyes.
WARNING!
• Occupants, including children, who are
up against or very close to Side Air Bags
can be seriously injured or killed. Occu-
pants, including children, should never
lean on or sleep against the door, side
windows, or area where the side air bags
inflate, even if they are in an infant or
child restraint.
115
Page 119 of 348
• Seat Belt Pretensioners
• Seat Track Position Sensors
If A Deployment Occurs
The front air bags are designed to deflate
immediately after deployment.
NOTE:
Front and/or side air bags will not deploy in all
collisions. This does not mean something is
wrong with the air bag system.
If you do have a collision which deploys the
air bags, any or all of the following may occur:
• The air bag material may sometimes cause
abrasions and/or skin reddening to the oc-
cupants as the air bags deploy and unfold.
The abrasions are similar to friction rope
burns or those you might get sliding along a
carpet or gymnasium floor. They are not
caused by contact with chemicals. They are
not permanent and normally heal quickly.
However, if you haven’t healed significantly
within a few days, or if you have any blis-
tering, see your doctor immediately.
• As the air bags deflate, you may see some
smoke-like particles. The particles are a
normal by-product of the process that gen-erates the non-toxic gas used for air bag
inflation. These airborne particles may irri-
tate the skin, eyes, nose, or throat. If you
have skin or eye irritation, rinse the area
with cool water. For nose or throat irritation,
move to fresh air. If the irritation continues,
see your doctor. If these particles settle on
your clothing, follow the garment manufac-
turer’s instructions for cleaning.
Do not drive your vehicle after the air bags
have deployed. If you are involved in another
collision, the air bags will not be in place to
protect you.
WARNING!
Deployed air bags and seat belt preten-
sioners cannot protect you in another col-
lision. Have the air bags, seat belt preten-
sioners, and the seat belt retractor
assemblies replaced by an authorized
dealer immediately. Also, have the Occu-
pant Restraint Controller System serviced
as well.NOTE:
• Air bag covers may not be obvious in the
interior trim, but they will open during air
bag deployment.
• After any collision, the vehicle should be
taken to an authorized dealer immediately.
Enhanced Accident Response System
In the event of an impact, if the communica-
tion network remains intact, and the power
remains intact, depending on the nature of
the event, the ORC will determine whether to
have the Enhanced Accident Response Sys-
tem perform the following functions:
• Cut off fuel to the engine.
• Flash hazard lights as long as the battery
has power or until the hazard light button is
pressed. The hazard lights can be deacti-
vated by pressing the hazard light button.
• Turn on the interior lights, which remain on
as long as the battery has power or for 15
minutes from the intervention of the En-
hanced Accident Response System.
• Unlock the power door locks.
117
Page 120 of 348
• Turn off the Gasoline Fuel Pump Heater (if
equipped) or the Diesel Fuel Filter Heater
(if equipped).
• Turn off the HVAC Blower Motor.
• Close the HVAC Circulation Door.
Enhanced Accident Response System Reset
Procedure
After the event occurs, when the system is
active, a message regarding fuel cutoff is
displayed. Turn the ignition switch from igni-
tion AVV/START or MAR/ACC/ON/RUN to ig-
nition STOP/OFF/LOCK. Carefully check the
vehicle for fuel leaks in the engine compart-
ment and on the ground near the engine
compartment and fuel tank before resetting
the system and starting the engine.
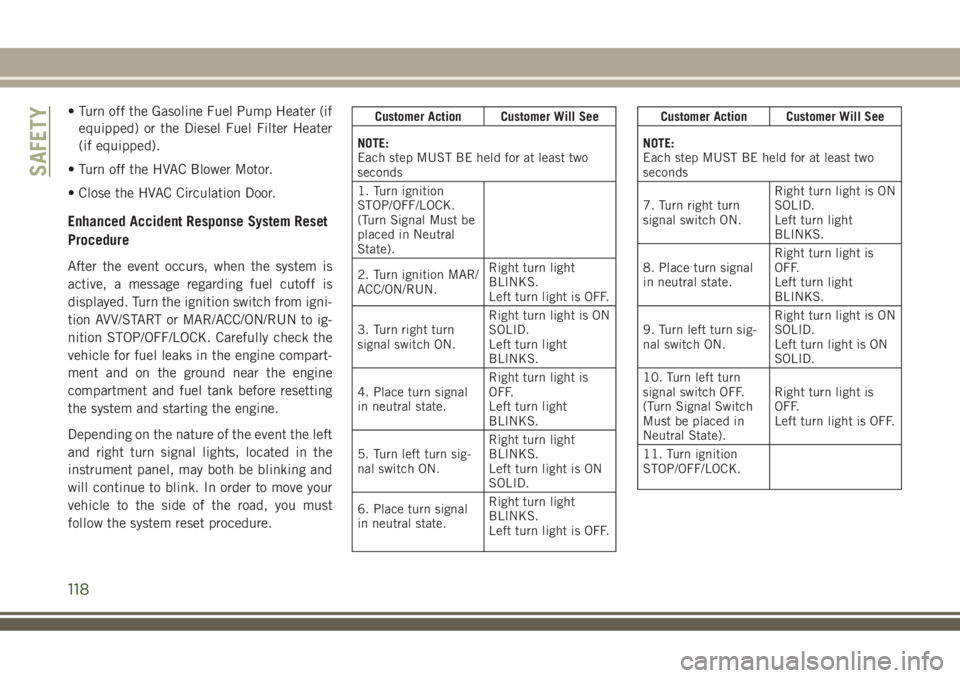
Depending on the nature of the event the left
and right turn signal lights, located in the
instrument panel, may both be blinking and
will continue to blink. In order to move your
vehicle to the side of the road, you must
follow the system reset procedure.
Customer Action Customer Will See
NOTE:
Each step MUST BE held for at least two
seconds
1. Turn ignition
STOP/OFF/LOCK.
(Turn Signal Must be
placed in Neutral
State).
2. Turn ignition MAR/
ACC/ON/RUN.Right turn light
BLINKS.
Left turn light is OFF.
3. Turn right turn
signal switch ON.Right turn light is ON
SOLID.
Left turn light
BLINKS.
4. Place turn signal
in neutral state.Right turn light is
OFF.
Left turn light
BLINKS.
5. Turn left turn sig-
nal switch ON.Right turn light
BLINKS.
Left turn light is ON
SOLID.
6. Place turn signal
in neutral state.Right turn light
BLINKS.
Left turn light is OFF.Customer Action Customer Will See
NOTE:
Each step MUST BE held for at least two
seconds
7. Turn right turn
signal switch ON.Right turn light is ON
SOLID.
Left turn light
BLINKS.
8. Place turn signal
in neutral state.Right turn light is
OFF.
Left turn light
BLINKS.
9. Turn left turn sig-
nal switch ON.Right turn light is ON
SOLID.
Left turn light is ON
SOLID.
10. Turn left turn
signal switch OFF.
(Turn Signal Switch
Must be placed in
Neutral State).Right turn light is
OFF.
Left turn light is OFF.
11. Turn ignition
STOP/OFF/LOCK.
SAFETY
118
Page 149 of 348
For automatic transmissions, the EPB will
automatically engage if all of the following
conditions are met:
• Vehicle speed is below 1.9 mph (3 km/h).
• There is no attempt to depress the brake
pedal or accelerator pedal.
• The seat belt is unbuckled.
• The driver door is open.
• The vehicle is not in the PARK position.
For manual transmissions, the EPB will auto-
matically engage if all of the following condi-
tions are met:
• Vehicle speed is below 1.9 mph (3 km/h).
• There is no attempt to depress the brake
pedal or accelerator pedal.
• The clutch pedal is not pressed.
• The seat belt is unbuckled.
• The driver door is open.
SafeHold can be temporarily bypassed by
pushing the EPB Switch while the driver door
is open and the brake pedal is pressed. Once
manually bypassed, SafeHold will be enabledagain once the vehicle reaches 12 mph
(20 km/h) or the ignition is turned to the OFF
position and back to ON/RUN again.
MANUAL TRANSMISSION —
IF EQUIPPED
WARNING!
You or others could be injured if you leave
the vehicle unattended without having the
park brake fully applied. The park brake
should always be applied when the driver
is not in the vehicle, especially on an
incline.
CAUTION!
Never drive with your foot resting on the
clutch pedal, or attempt to hold the ve-
hicle on a hill with the clutch pedal par-
tially engaged, as this will cause abnormal
wear on the clutch.NOTE:
During cold weather, you may experience
increased effort in shifting until the transmis-
sion fluid warms up. This is normal.
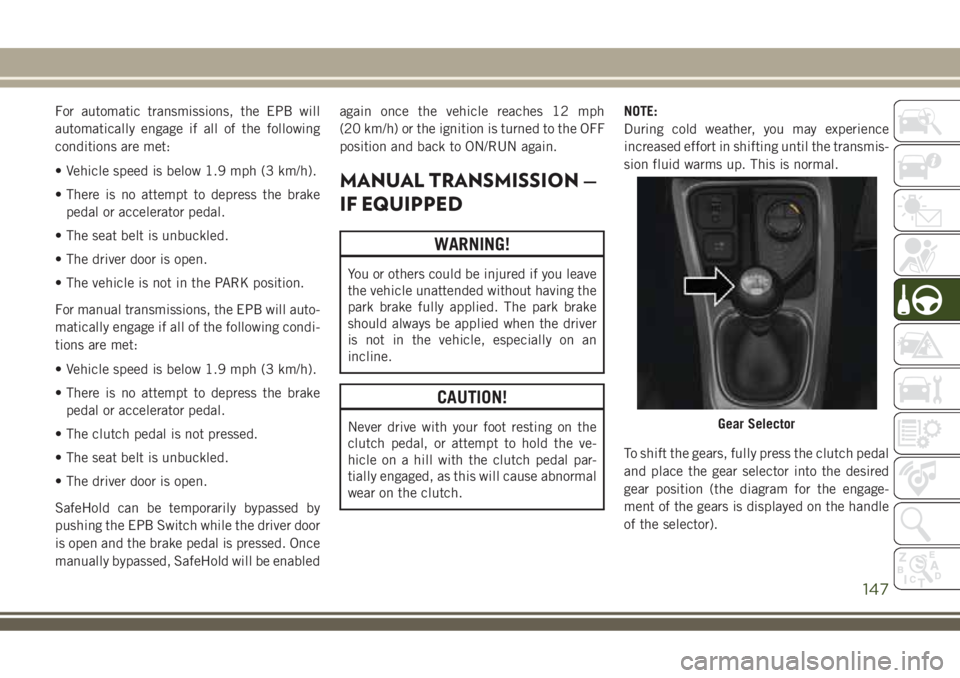
To shift the gears, fully press the clutch pedal
and place the gear selector into the desired
gear position (the diagram for the engage-
ment of the gears is displayed on the handle
of the selector).Gear Selector
147