light JEEP COMPASS 2018 Owner handbook (in English)
[x] Cancel search | Manufacturer: JEEP, Model Year: 2018, Model line: COMPASS, Model: JEEP COMPASS 2018Pages: 348, PDF Size: 6.03 MB
Page 191 of 348
NOTE:
We advise referring to an authorized dealer.
WARNING!
Carry out the operation of replacing lamps
only with the engine off. Also make sure
that the engine is cold, to avoid the danger
of burns.
Turn Signal Light/Position Lights/Daytime Run-
ning Lights
To replace the bulbs proceed as follows:
1. Turn the front wheels completely.
2. Remove the wheel liner.
3. Remove the electrical connectors.
4. For the DRL bulb, grip the bulb at the top
and bottom locking tabs and squeeze to
and remove the bulb.
5. To replace the DRL bulb gently push bulb
towards housing. Be sure to hear both the
top and bottom locking tabs “CLICK” to
ensure the bulb is properly seated.6. For the turn signal bulb, rotate in a coun-
terclockwise direction and remove the
bulb and bulb socket. Pull the bulb axially
to remove it from the socket.
7. Install the bulb and sockets and rotate
them clockwise making sure that it is
properly locked.
8. Reconnect the electrical connectors.
9. Reinstall the wheel liner.
NOTE:
We advise referring to an authorized dealer.
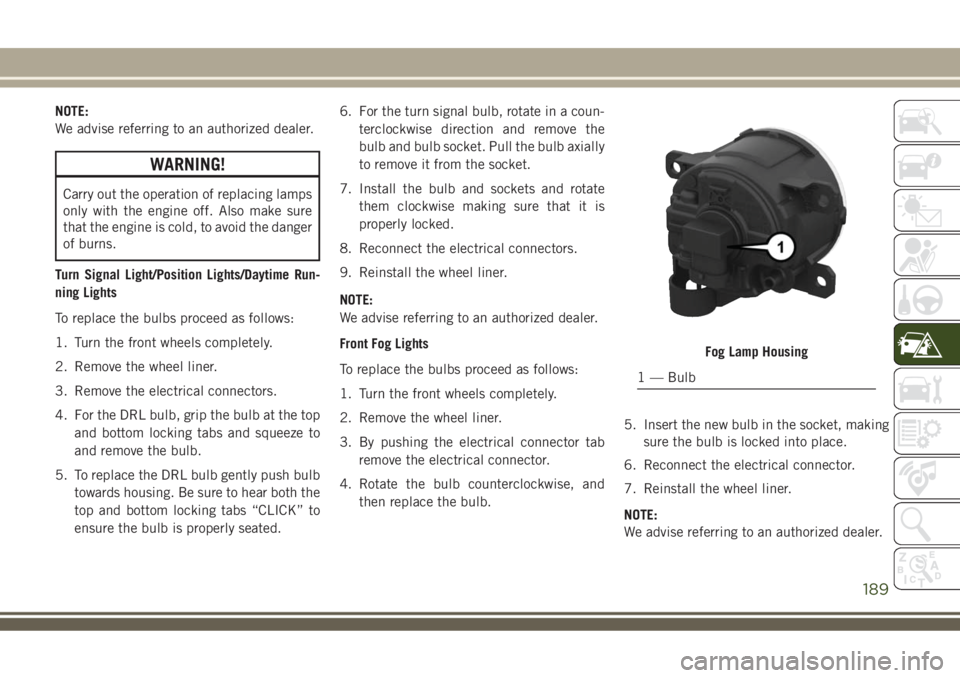
Front Fog Lights
To replace the bulbs proceed as follows:
1. Turn the front wheels completely.
2. Remove the wheel liner.
3. By pushing the electrical connector tab
remove the electrical connector.
4. Rotate the bulb counterclockwise, and
then replace the bulb.5. Insert the new bulb in the socket, making
sure the bulb is locked into place.
6. Reconnect the electrical connector.
7. Reinstall the wheel liner.
NOTE:
We advise referring to an authorized dealer.
Fog Lamp Housing
1 — Bulb
189
Page 192 of 348
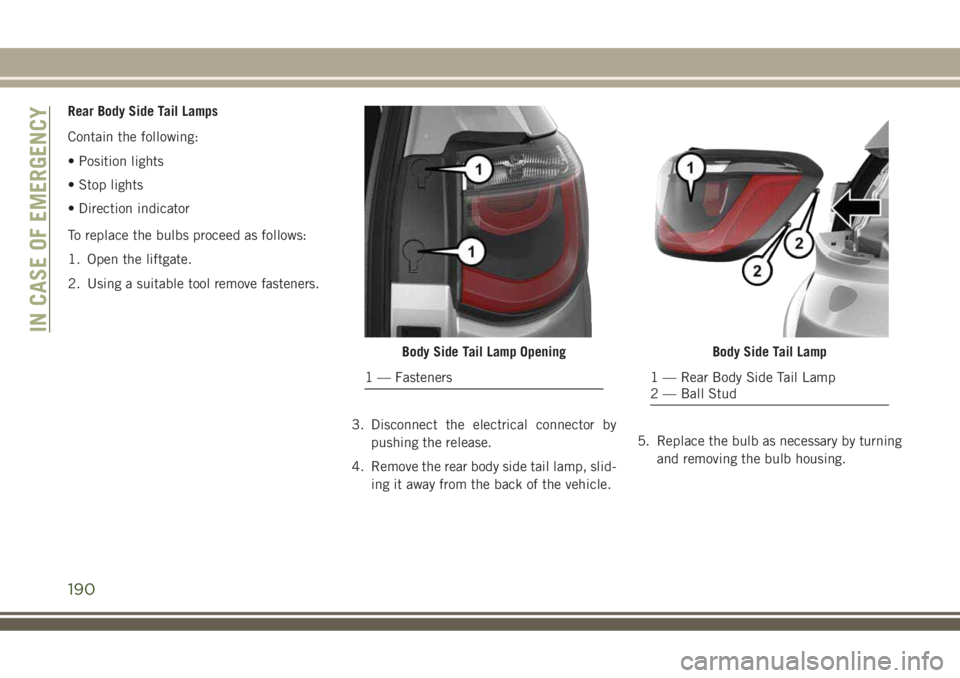
Rear Body Side Tail Lamps
Contain the following:
• Position lights
• Stop lights
• Direction indicator
To replace the bulbs proceed as follows:
1. Open the liftgate.
2. Using a suitable tool remove fasteners.
3. Disconnect the electrical connector by
pushing the release.
4. Remove the rear body side tail lamp, slid-
ing it away from the back of the vehicle.5. Replace the bulb as necessary by turning
and removing the bulb housing.
Body Side Tail Lamp Opening
1 — Fasteners
Body Side Tail Lamp
1 — Rear Body Side Tail Lamp
2 — Ball Stud
IN CASE OF EMERGENCY
190
Page 194 of 348
Reverse Lamps
1. Open the liftgate.
2. Using a suitable tool remove the access
panel for body side lamps, remove lift gate
access cover for lift gate lamps.
3. Disconnect the electrical connector by
pushing the release.
4. Remove bulb and replace making sure it
is properly locked.
5. Reconnect the electrical connector.
6. Reinstall the access panels making sure
they are locked in correctly.
7. Finally close the tailgate.
3rd Stop Lamp
The CHMSL is LED. For their replacement,
see an authorized dealer.
License Plate Lights
The license plate light is LED. For their
replacement, see an authorized dealer.FUSES
WARNING!
• When replacing a blown fuse, always use
an appropriate replacement fuse with
the same amp rating as the original fuse.
Never replace a fuse with another fuse of
higher amp rating. Never replace a
blown fuse with metal wires or any other
material. Do not place a fuse inside a
circuit breaker cavity or vice versa. Fail-
ure to use proper fuses may result in
serious personal injury, fire and/or prop-
erty damage.
• Before replacing a fuse, make sure that
the ignition is off and that all the other
services are switched off and/or disen-
gaged.
• If the replaced fuse blows again, contact
an authorized dealer.
• If a general protection fuse for safety
systems (air bag system, braking sys-
WARNING!
tem), power unit systems (engine sys-
tem, transmission system) or steering
system blows, contact an authorized
dealer.
General Information
The fuses protect electrical systems against
excessive current.
When a device does not work, you must check
the fuse element inside the blade fuse for a
break/melt.
Also, please be aware that when using power
outlets for extended periods of time with the
engine off may result in vehicle battery dis-
charge.
Fuse Location
The fuses are grouped into controllers lo-
cated in the engine compartment.
IN CASE OF EMERGENCY
192
Page 196 of 348
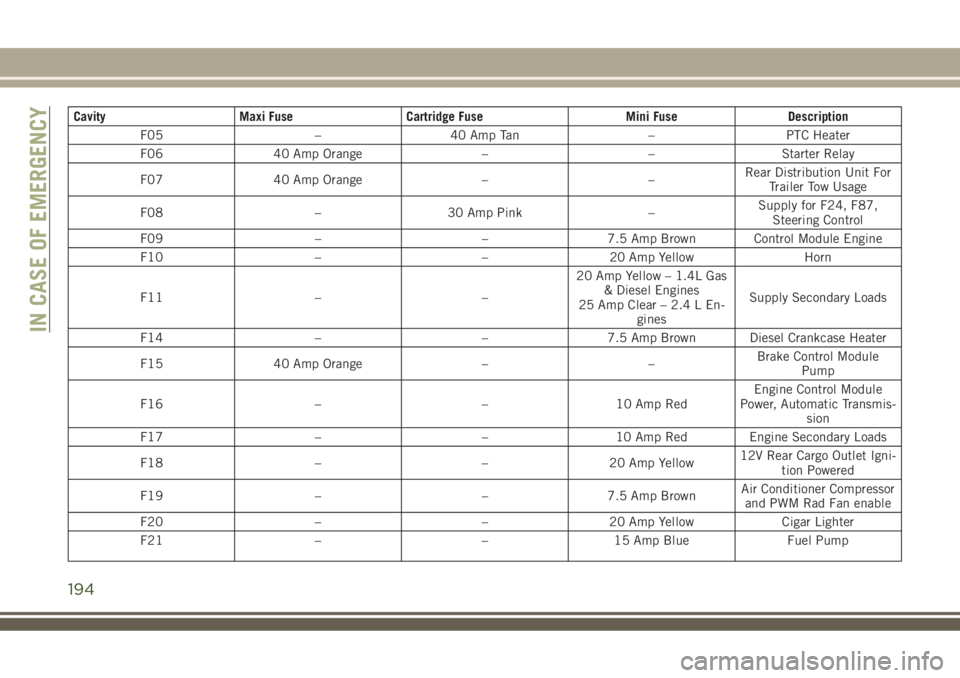
Cavity Maxi Fuse Cartridge Fuse Mini Fuse Description
F05 – 40 Amp Tan – PTC Heater
F06 40 Amp Orange – – Starter Relay
F07 40 Amp Orange – –Rear Distribution Unit For
Trailer Tow Usage
F08 – 30 Amp Pink –Supply for F24, F87,
Steering Control
F09 – – 7.5 Amp Brown Control Module Engine
F10 – – 20 Amp Yellow Horn
F11 – –20 Amp Yellow – 1.4L Gas
& Diesel Engines
25 Amp Clear – 2.4 L En-
ginesSupply Secondary Loads
F14 – – 7.5 Amp Brown Diesel Crankcase Heater
F15 40 Amp Orange – –Brake Control Module
Pump
F16 – – 10 Amp RedEngine Control Module
Power, Automatic Transmis-
sion
F17 – – 10 Amp Red Engine Secondary Loads
F18 – – 20 Amp Yellow12V Rear Cargo Outlet Igni-
tion Powered
F19 – – 7.5 Amp BrownAir Conditioner Compressor
and PWM Rad Fan enable
F20 – – 20 Amp Yellow Cigar Lighter
F21 – – 15 Amp Blue Fuel Pump
IN CASE OF EMERGENCY
194
Page 199 of 348
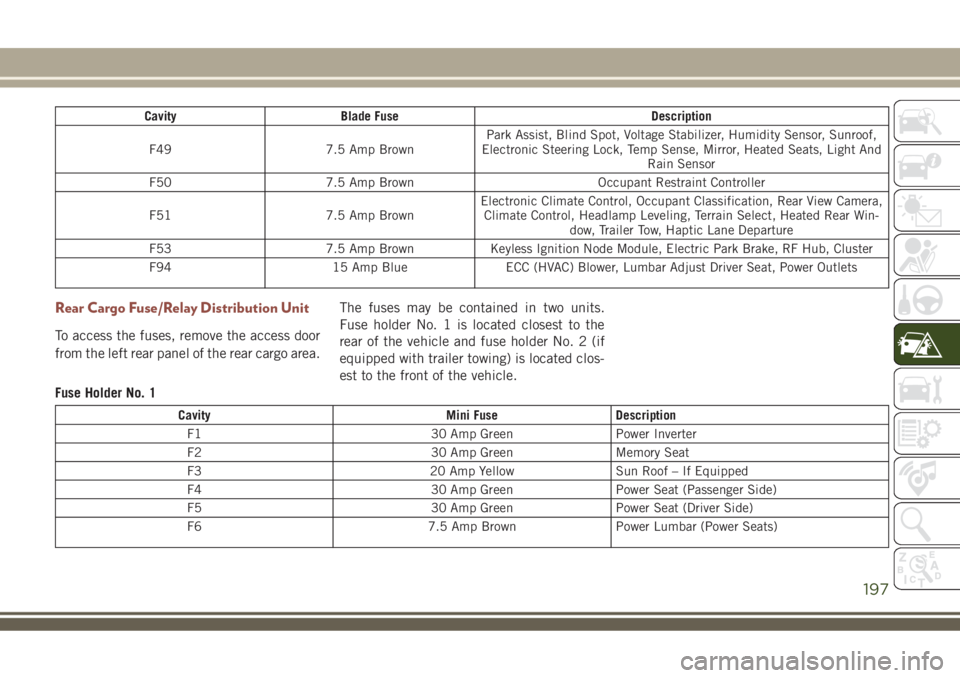
Cavity Blade Fuse Description
F49 7.5 Amp BrownPark Assist, Blind Spot, Voltage Stabilizer, Humidity Sensor, Sunroof,
Electronic Steering Lock, Temp Sense, Mirror, Heated Seats, Light And
Rain Sensor
F50 7.5 Amp Brown Occupant Restraint Controller
F51 7.5 Amp BrownElectronic Climate Control, Occupant Classification, Rear View Camera,
Climate Control, Headlamp Leveling, Terrain Select, Heated Rear Win-
dow, Trailer Tow, Haptic Lane Departure
F53 7.5 Amp Brown Keyless Ignition Node Module, Electric Park Brake, RF Hub, Cluster
F94 15 Amp Blue ECC (HVAC) Blower, Lumbar Adjust Driver Seat, Power Outlets
Rear Cargo Fuse/Relay Distribution Unit
To access the fuses, remove the access door
from the left rear panel of the rear cargo area.The fuses may be contained in two units.
Fuse holder No. 1 is located closest to the
rear of the vehicle and fuse holder No. 2 (if
equipped with trailer towing) is located clos-
est to the front of the vehicle.
Fuse Holder No. 1
Cavity Mini Fuse Description
F1 30 Amp Green Power Inverter
F2 30 Amp Green Memory Seat
F3 20 Amp Yellow Sun Roof – If Equipped
F4 30 Amp Green Power Seat (Passenger Side)
F5 30 Amp Green Power Seat (Driver Side)
F6 7.5 Amp Brown Power Lumbar (Power Seats)
197
Page 200 of 348
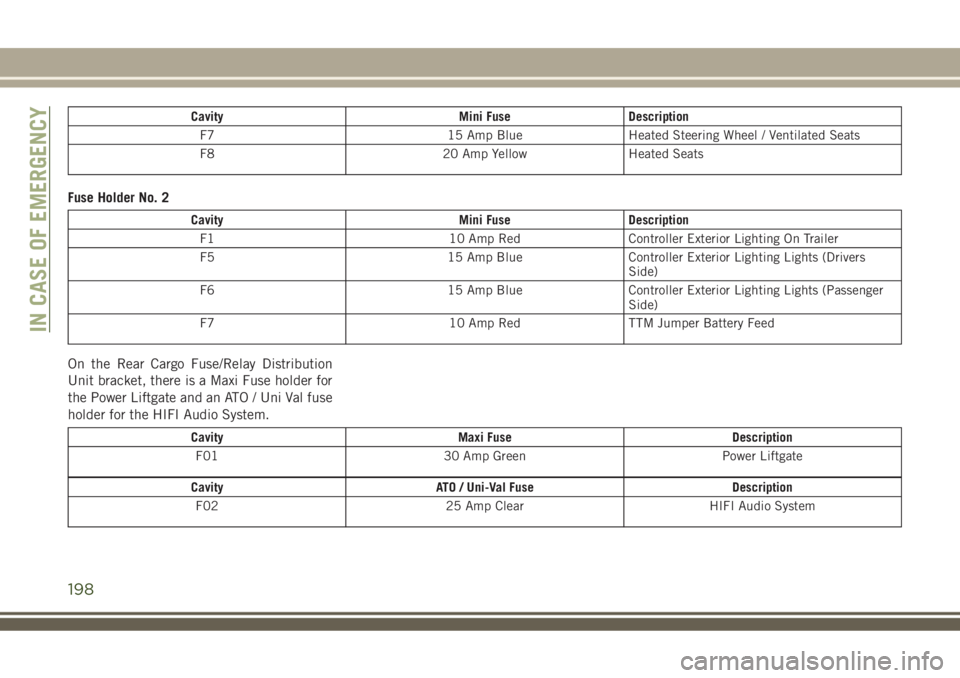
Cavity Mini Fuse Description
F7 15 Amp Blue Heated Steering Wheel / Ventilated Seats
F8 20 Amp Yellow Heated Seats
Fuse Holder No. 2
Cavity Mini Fuse Description
F1 10 Amp Red Controller Exterior Lighting On Trailer
F5 15 Amp Blue Controller Exterior Lighting Lights (Drivers
Side)
F6 15 Amp Blue Controller Exterior Lighting Lights (Passenger
Side)
F7 10 Amp Red TTM Jumper Battery Feed
On the Rear Cargo Fuse/Relay Distribution
Unit bracket, there is a Maxi Fuse holder for
the Power Liftgate and an ATO / Uni Val fuse
holder for the HIFI Audio System.
Cavity Maxi Fuse Description
F01 30 Amp Green Power Liftgate
Cavity ATO / Uni-Val Fuse Description
F02 25 Amp Clear HIFI Audio System
IN CASE OF EMERGENCY
198
Page 205 of 348
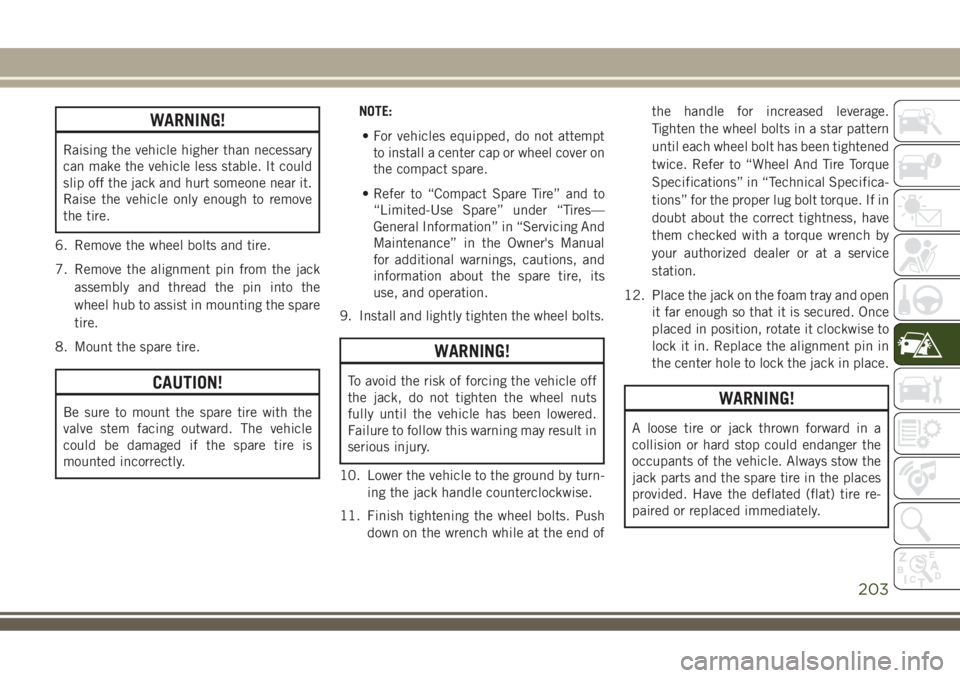
WARNING!
Raising the vehicle higher than necessary
can make the vehicle less stable. It could
slip off the jack and hurt someone near it.
Raise the vehicle only enough to remove
the tire.
6. Remove the wheel bolts and tire.
7. Remove the alignment pin from the jack
assembly and thread the pin into the
wheel hub to assist in mounting the spare
tire.
8. Mount the spare tire.
CAUTION!
Be sure to mount the spare tire with the
valve stem facing outward. The vehicle
could be damaged if the spare tire is
mounted incorrectly.NOTE:
• For vehicles equipped, do not attempt
to install a center cap or wheel cover on
the compact spare.
• Refer to “Compact Spare Tire” and to
“Limited-Use Spare” under “Tires—
General Information” in “Servicing And
Maintenance” in the Owner's Manual
for additional warnings, cautions, and
information about the spare tire, its
use, and operation.
9. Install and lightly tighten the wheel bolts.
WARNING!
To avoid the risk of forcing the vehicle off
the jack, do not tighten the wheel nuts
fully until the vehicle has been lowered.
Failure to follow this warning may result in
serious injury.
10. Lower the vehicle to the ground by turn-
ing the jack handle counterclockwise.
11. Finish tightening the wheel bolts. Push
down on the wrench while at the end ofthe handle for increased leverage.
Tighten the wheel bolts in a star pattern
until each wheel bolt has been tightened
twice. Refer to “Wheel And Tire Torque
Specifications” in “Technical Specifica-
tions” for the proper lug bolt torque. If in
doubt about the correct tightness, have
them checked with a torque wrench by
your authorized dealer or at a service
station.
12. Place the jack on the foam tray and open
it far enough so that it is secured. Once
placed in position, rotate it clockwise to
lock it in. Replace the alignment pin in
the center hole to lock the jack in place.
WARNING!
A loose tire or jack thrown forward in a
collision or hard stop could endanger the
occupants of the vehicle. Always stow the
jack parts and the spare tire in the places
provided. Have the deflated (flat) tire re-
paired or replaced immediately.
203
Page 206 of 348
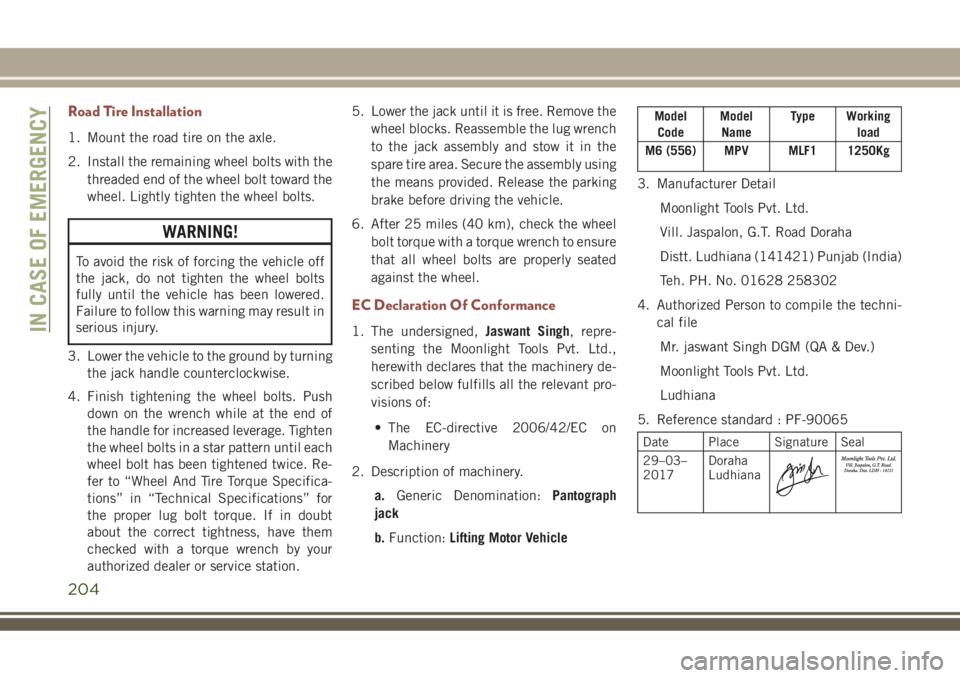
Road Tire Installation
1. Mount the road tire on the axle.
2. Install the remaining wheel bolts with the
threaded end of the wheel bolt toward the
wheel. Lightly tighten the wheel bolts.
WARNING!
To avoid the risk of forcing the vehicle off
the jack, do not tighten the wheel bolts
fully until the vehicle has been lowered.
Failure to follow this warning may result in
serious injury.
3. Lower the vehicle to the ground by turning
the jack handle counterclockwise.
4. Finish tightening the wheel bolts. Push
down on the wrench while at the end of
the handle for increased leverage. Tighten
the wheel bolts in a star pattern until each
wheel bolt has been tightened twice. Re-
fer to “Wheel And Tire Torque Specifica-
tions” in “Technical Specifications” for
the proper lug bolt torque. If in doubt
about the correct tightness, have them
checked with a torque wrench by your
authorized dealer or service station.5. Lower the jack until it is free. Remove the
wheel blocks. Reassemble the lug wrench
to the jack assembly and stow it in the
spare tire area. Secure the assembly using
the means provided. Release the parking
brake before driving the vehicle.
6. After 25 miles (40 km), check the wheel
bolt torque with a torque wrench to ensure
that all wheel bolts are properly seated
against the wheel.
EC Declaration Of Conformance
1. The undersigned,Jaswant Singh, repre-
senting the Moonlight Tools Pvt. Ltd.,
herewith declares that the machinery de-
scribed below fulfills all the relevant pro-
visions of:
• The EC-directive 2006/42/EC on
Machinery
2. Description of machinery.
a.Generic Denomination:Pantograph
jack
b.Function:Lifting Motor Vehicle
Model
CodeModel
NameType Working
load
M6 (556) MPV MLF1 1250Kg
3. Manufacturer Detail
Moonlight Tools Pvt. Ltd.
Vill. Jaspalon, G.T. Road Doraha
Distt. Ludhiana (141421) Punjab (India)
Teh. PH. No. 01628 258302
4. Authorized Person to compile the techni-
cal file
Mr. jaswant Singh DGM (QA & Dev.)
Moonlight Tools Pvt. Ltd.
Ludhiana
5. Reference standard : PF-90065
Date Place Signature Seal
29–03–
2017Doraha
Ludhiana
IN CASE OF EMERGENCY
204
Page 213 of 348
4. Have the tire inspected and repaired or
replaced at the earliest opportunity at
your authorized dealer or tire service
center.
5. Remove the Speed Limit sticker from the
steering wheel after the tire has been
repaired.
6. Replace the Sealant Bottle at your autho-
rized dealer as soon as possible. Refer to
“Sealant Bottle Replacement”.
NOTE:
When having the tire serviced, advise the
authorized dealer or service center that the
tire has been sealed using the Tire Service
Kit.
Sealant Bottle Replacement:
1. Unwrap the power cord.
2. Unwrap the hose.
3. Remove the bottle cover.
4. Rotate the bottle up beyond vertical to
release.
5. Pull the bottle away from the Compressor.NOTE:
• For sealant bottle installation, follow these
steps reverse order.
• Replacement sealant bottles are available
at authorized service centers.
JUMP STARTING
If your vehicle has a discharged battery, it can
be jump started using a set of jumper cables
and a battery in another vehicle or by using a
portable battery booster pack. Jump starting
can be dangerous if done improperly, so
please follow the procedures in this section
carefully.
NOTE:
When using a portable battery booster pack,
follow the manufacturer’s operating instruc-
tions and precautions.
WARNING!
Do not attempt jump starting if the battery
is frozen. It could rupture or explode and
cause personal injury.
CAUTION!
Do not use a portable battery booster pack
or any other booster source with a system
voltage greater than 12 Volts or damage to
the battery, starter motor, alternator or
electrical system may occur.
Preparations For Jump Start
The battery in your vehicle is located in the
front of the engine compartment, behind the
left headlight assembly.
NOTE:
The positive battery post is covered with a
protective cap. Lift up on the cap to gain
access to the post.
211
Page 224 of 348
SCHEDULED SERVICING
1.4L Gasoline Engine
The scheduled services listed in this manual
must be done at the times or mileages speci-
fied to protect your vehicle warranty and
ensure the best vehicle performance and re-
liability. More frequent maintenance may be
needed for vehicles in severe operating con-
ditions, such as dusty areas and very short
trip driving. Inspection and service should
also be done anytime a malfunction is sus-
pected.
• Change your engine oil more often if you
drive your vehicle off-road for an extended
period of time.
• Under no circumstances should oil change
intervals exceed 7,500 miles (12,000 km)
or 12 months, whichever comes first.Once A Month Or Before A Long Trip
• Check engine oil level.
• Check windshield washer fluid level.
• Check tire pressure and look for unusual
wear or damage. Rotate tires at the first
sign of irregular wear, even if it occurs
before the oil indicator system turns on.
• Check the fluid levels of the coolant reser-
voir and brake master cylinder, fill as
needed.
• Check function of all interior and exterior
lights.
At Each Oil Change
• Change oil and filter.
• Rotate the tires.Rotate at the first sign of
irregular wear, even if it occurs before the oil
indicator system turns on.
• Inspect battery and clean and tighten ter-
minals as required.• Inspect brake pads, shoes, rotors, drums,
hoses and park brake.
• Inspect engine cooling system protection
and hoses.
• Inspect exhaust system.
• Inspect engine air cleaner if using in dusty
or off-road conditions.
Refer to the “Maintenance Plan” on the fol-
lowing page for the required maintenance
intervals.
CAUTION!
Failure to perform the required mainte-
nance items may result in damage to the
vehicle.
SERVICING AND MAINTENANCE
222