headlamp JEEP COMPASS 2018 Owner handbook (in English)
[x] Cancel search | Manufacturer: JEEP, Model Year: 2018, Model line: COMPASS, Model: JEEP COMPASS 2018Pages: 348, PDF Size: 6.03 MB
Page 37 of 348

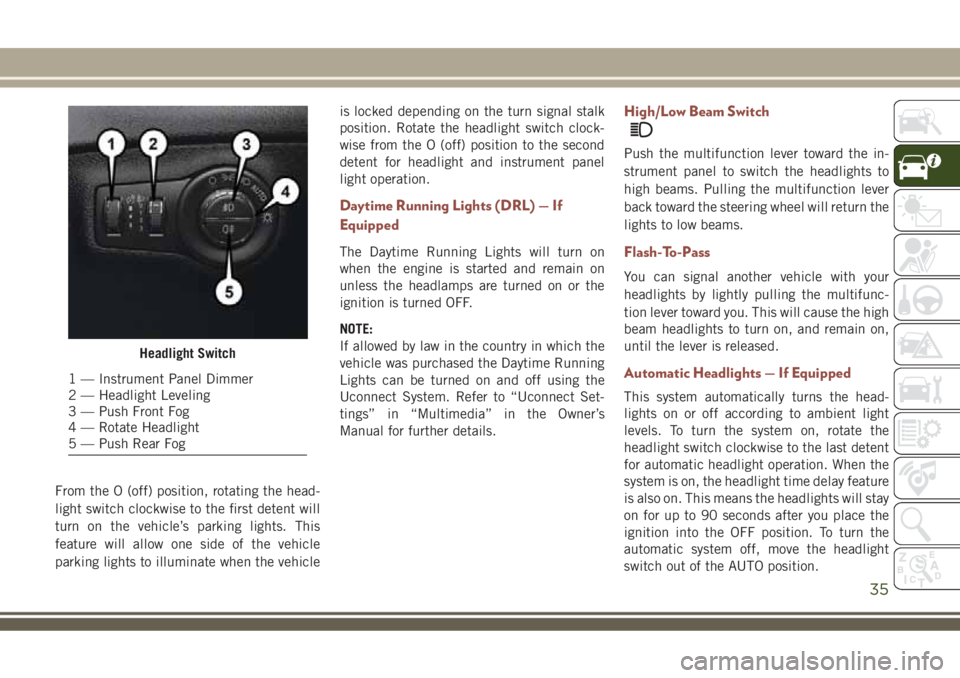
From the O (off) position, rotating the head-
light switch clockwise to the first detent will
turn on the vehicle’s parking lights. This
feature will allow one side of the vehicle
parking lights to illuminate when the vehicleis locked depending on the turn signal stalk
position. Rotate the headlight switch clock-
wise from the O (off) position to the second
detent for headlight and instrument panel
light operation.
Daytime Running Lights (DRL) — If
Equipped
The Daytime Running Lights will turn on
when the engine is started and remain on
unless the headlamps are turned on or the
ignition is turned OFF.
NOTE:
If allowed by law in the country in which the
vehicle was purchased the Daytime Running
Lights can be turned on and off using the
Uconnect System. Refer to “Uconnect Set-
tings” in “Multimedia” in the Owner’s
Manual for further details.
High/Low Beam Switch
Push the multifunction lever toward the in-
strument panel to switch the headlights to
high beams. Pulling the multifunction lever
back toward the steering wheel will return the
lights to low beams.
Flash-To-Pass
You can signal another vehicle with your
headlights by lightly pulling the multifunc-
tion lever toward you. This will cause the high
beam headlights to turn on, and remain on,
until the lever is released.
Automatic Headlights — If Equipped
This system automatically turns the head-
lights on or off according to ambient light
levels. To turn the system on, rotate the
headlight switch clockwise to the last detent
for automatic headlight operation. When the
system is on, the headlight time delay feature
is also on. This means the headlights will stay
on for up to 90 seconds after you place the
ignition into the OFF position. To turn the
automatic system off, move the headlight
switch out of the AUTO position.
Headlight Switch
1 — Instrument Panel Dimmer
2 — Headlight Leveling
3 — Push Front Fog
4 — Rotate Headlight
5 — Push Rear Fog
35
Page 189 of 348

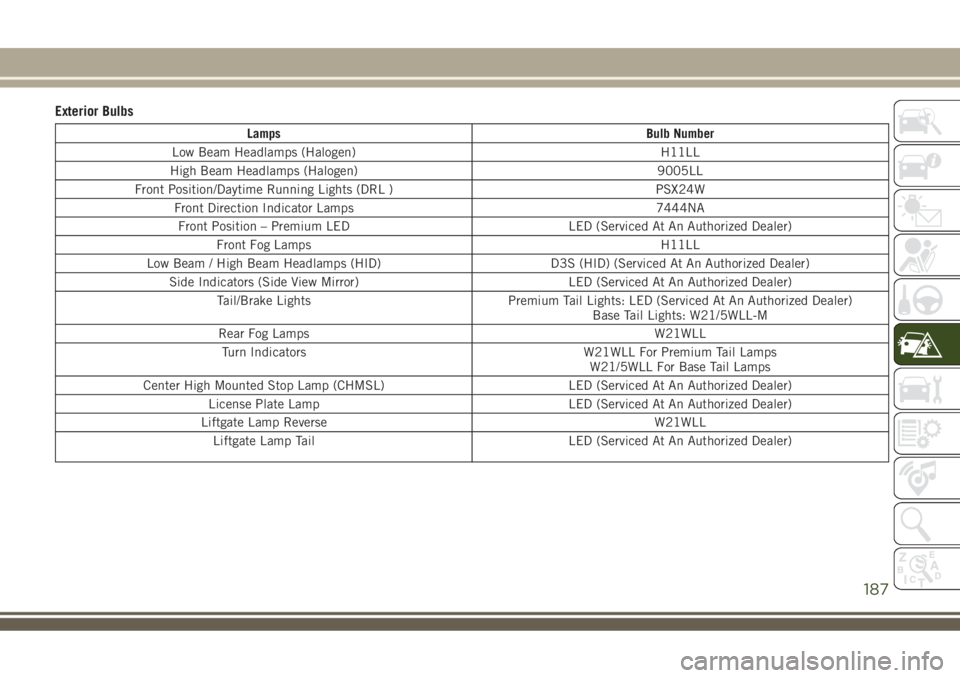
Exterior Bulbs
Lamps Bulb Number
Low Beam Headlamps (Halogen) H11LL
High Beam Headlamps (Halogen) 9005LL
Front Position/Daytime Running Lights (DRL ) PSX24W
Front Direction Indicator Lamps 7444NA
Front Position – Premium LED LED (Serviced At An Authorized Dealer)
Front Fog Lamps H11LL
Low Beam / High Beam Headlamps (HID) D3S (HID) (Serviced At An Authorized Dealer)
Side Indicators (Side View Mirror) LED (Serviced At An Authorized Dealer)
Tail/Brake Lights Premium Tail Lights: LED (Serviced At An Authorized Dealer)
Base Tail Lights: W21/5WLL-M
Rear Fog Lamps W21WLL
Turn Indicators W21WLL For Premium Tail Lamps
W21/5WLL For Base Tail Lamps
Center High Mounted Stop Lamp (CHMSL) LED (Serviced At An Authorized Dealer)
License Plate Lamp LED (Serviced At An Authorized Dealer)
Liftgate Lamp Reverse W21WLL
Liftgate Lamp Tail LED (Serviced At An Authorized Dealer)
187
Page 190 of 348

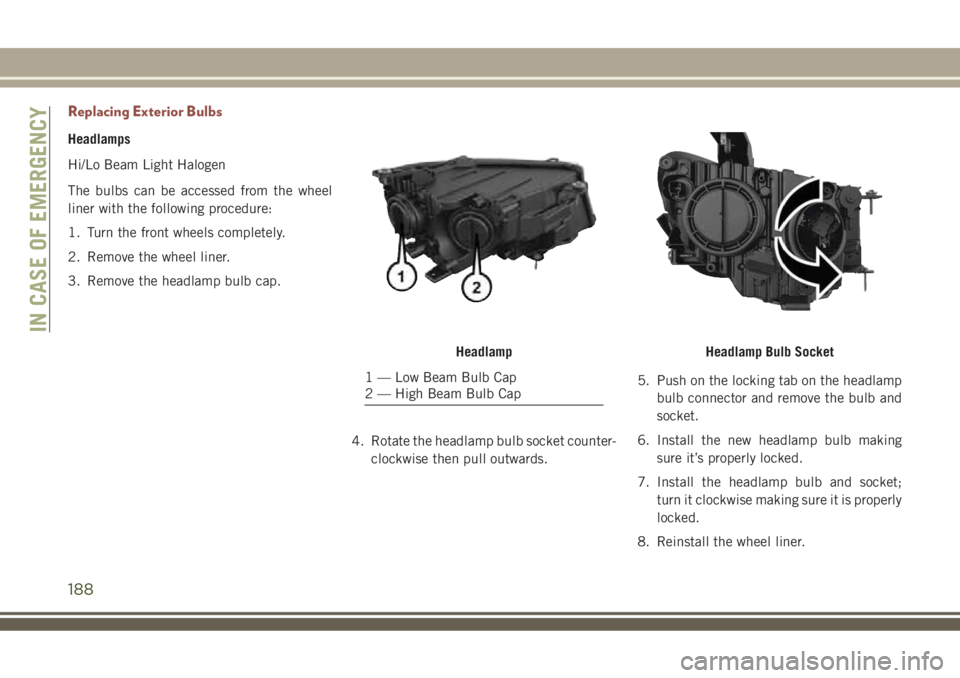
Replacing Exterior Bulbs
Headlamps
Hi/Lo Beam Light Halogen
The bulbs can be accessed from the wheel
liner with the following procedure:
1. Turn the front wheels completely.
2. Remove the wheel liner.
3. Remove the headlamp bulb cap.
4. Rotate the headlamp bulb socket counter-
clockwise then pull outwards.5. Push on the locking tab on the headlamp
bulb connector and remove the bulb and
socket.
6. Install the new headlamp bulb making
sure it’s properly locked.
7. Install the headlamp bulb and socket;
turn it clockwise making sure it is properly
locked.
8. Reinstall the wheel liner.
Headlamp
1 — Low Beam Bulb Cap
2 — High Beam Bulb Cap
Headlamp Bulb Socket
IN CASE OF EMERGENCY
188
Page 199 of 348

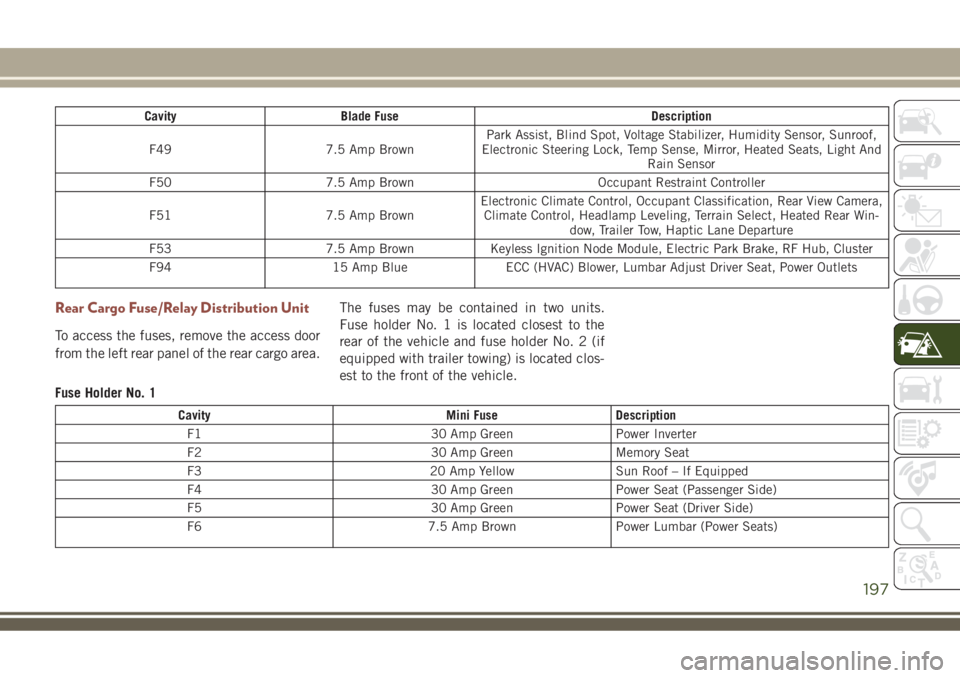
Cavity Blade Fuse Description
F49 7.5 Amp BrownPark Assist, Blind Spot, Voltage Stabilizer, Humidity Sensor, Sunroof,
Electronic Steering Lock, Temp Sense, Mirror, Heated Seats, Light And
Rain Sensor
F50 7.5 Amp Brown Occupant Restraint Controller
F51 7.5 Amp BrownElectronic Climate Control, Occupant Classification, Rear View Camera,
Climate Control, Headlamp Leveling, Terrain Select, Heated Rear Win-
dow, Trailer Tow, Haptic Lane Departure
F53 7.5 Amp Brown Keyless Ignition Node Module, Electric Park Brake, RF Hub, Cluster
F94 15 Amp Blue ECC (HVAC) Blower, Lumbar Adjust Driver Seat, Power Outlets
Rear Cargo Fuse/Relay Distribution Unit
To access the fuses, remove the access door
from the left rear panel of the rear cargo area.The fuses may be contained in two units.
Fuse holder No. 1 is located closest to the
rear of the vehicle and fuse holder No. 2 (if
equipped with trailer towing) is located clos-
est to the front of the vehicle.
Fuse Holder No. 1
Cavity Mini Fuse Description
F1 30 Amp Green Power Inverter
F2 30 Amp Green Memory Seat
F3 20 Amp Yellow Sun Roof – If Equipped
F4 30 Amp Green Power Seat (Passenger Side)
F5 30 Amp Green Power Seat (Driver Side)
F6 7.5 Amp Brown Power Lumbar (Power Seats)
197